It had never occurred to me to make my own condiments until I had a health crisis. In 2003 I got so sick that I couldn’t work. After months of tests and specialists, I was told I had chronic fatigue syndrome and fibromyalgia. Not because there are tests for those, but because they had ruled out everything else. There’s no treatment for either, so eventually I turned to an alternative healer. He took one look at me, said I was “full of inflammation” and that I had to get off sugar. And not just candy, of which I ate a lot. No, every type of granulated sugar, high-fructose corn sugar, anything with -ose at the end of it, and white distilled vinegar. (White vinegar is made from GMO corn, by the way.)
So, a month of label reading later, I was off all processed foods and had tossed or given away every condiment in my fridge. While I had made salad dressing before, making other condiments just hadn’t been on my radar. They were something you bought and stuck on the fridge door until you needed them.
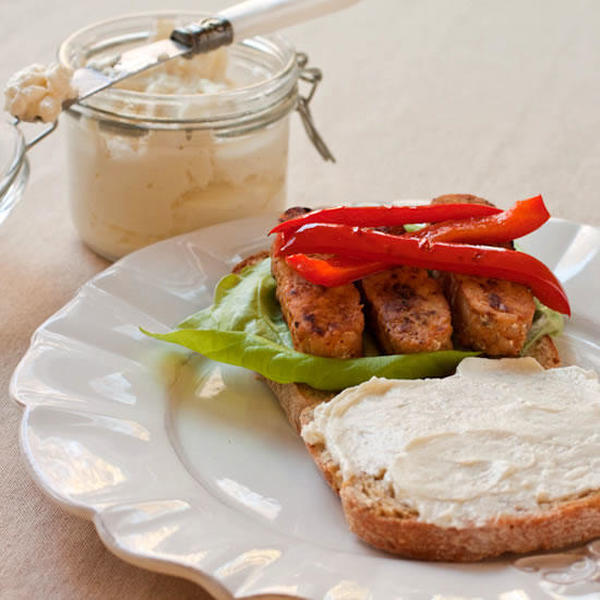
My first stop on the condiment train was barbecue sauce, which is normally loaded with HFCS. When that recipe turned out to be insanely delicious, I turned my hand to other favorites. Pickle relish? Check. Ketchup? Yum. Mayo? I had made real mayo years before, but now I was off dairy products and eggs too. Could I possibly make vegan mayo? It was pretty pricey at the store…
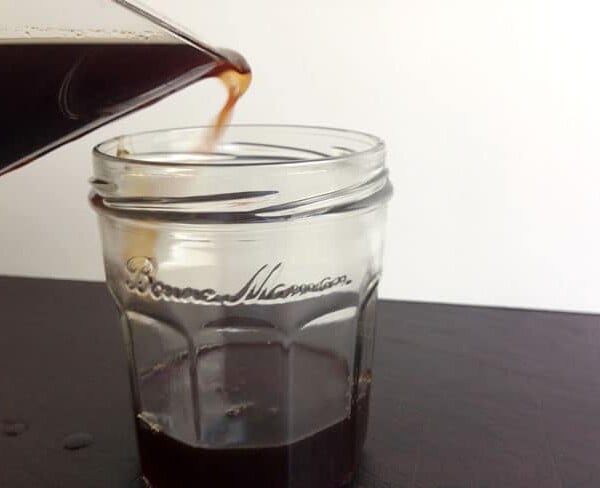
The vegan mayo was a happy accident. I was trying to make a different version of home-made margarine during October Unprocessed last year, tried agar agar instead of lecithin, and ended up with creamy, fluffy, cholesterol-free and salmonella-free mayo.
The only special ingredient you need for this recipe is agar flakes. This rich, creamy mayo rivals anything you can buy in the store, and you can make as much or as little as you need. [Andrew adds: If you can’t find agar in your local store, you can order it from amazon]
Agar, made from dried seaweed, is a thickener used in Asian desserts, molecular gastronomy, and in petri dishes at most science laboratories. It creates and holds the oil-milk emulsion. You can flavor this mayo with lemon juice, add a little sweetener, or use it as a base for dips or salad dressings. Start to finish, this recipe takes only 10 minutes.
2/3cupsoy milk*
2teaspoonapple cider vinegar
3/4teaspoonsea salt, omit for low-sodium diets
2/3cupgrapeseed oil, can also use safflower or organic canola oil
2/3cupolive oil
1teaspoonagar flakes*
2Tablespoonsfiltered water
Combine the soy milk, vinegar, and salt and let stand at least 10 minutes until it is thick and curdled.
Heat the agar in the water over medium-low heat, stirring constantly until it swells up.
Put the curdled milk, half of the oil, and the agar mixture in a blender and blend on high for one minute. Add the other half of the oil in a steady stream with the blender running until it emulsifies. If you are using a Vitamix (or other high-speed blender), start on Variable 1, and bring it up to Variable 6 while streaming in the remaining oil.
Store this in the refrigerator. It lasts about two weeks. You might see a little bit of separation, but you can stir it and it will be fine.
I have not tried this with other types of non-dairy milk, so I can’t be sure it will work. If you can’t have soy, I would try a nut milk and see if it curdles before proceeding. Soy milk curdles and gets beautifully thick. Make sure you use organic (non-GMO) soy milk, or make your own. If you can’t find agar flakes, you can use agar powder. Just use 1/2 teaspoon of powder and the same amount of water.
Stephanie Weaver is a writer and health coach with expertise in changing diets and recipes for health reasons. Her book The Migraine Relief Plan: An 8-Week Transition to Better Eating, Fewer Headaches, and Optimal Health will hit shelves Feb. 14, 2017. Find over 325 recipes coded for special diets in her Recipe Index. She does regular cooking demonstrations on Facebook Live.
You can also find her on Twitter, Facebook, and Pinterest.
Welcome to Eating Rules!
Hi! My name is Andrew Wilder, and I think healthy eating doesn’t have to suck. With just three simple eating rules, we’ll kickstart your journey into the delicious and vibrant world of unprocessed food.
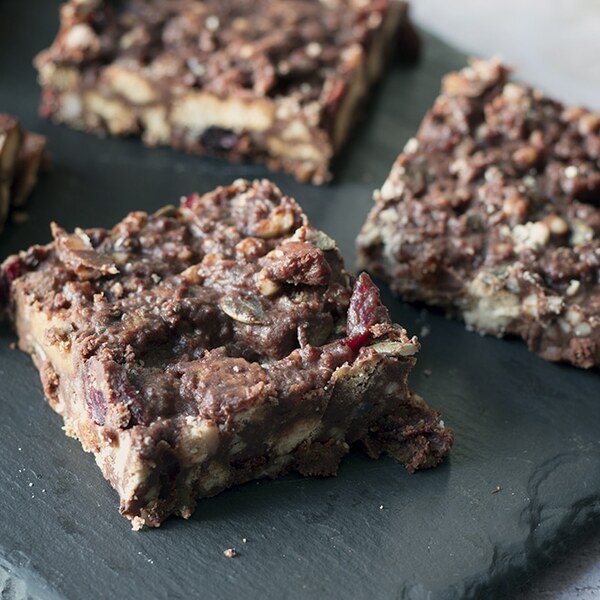
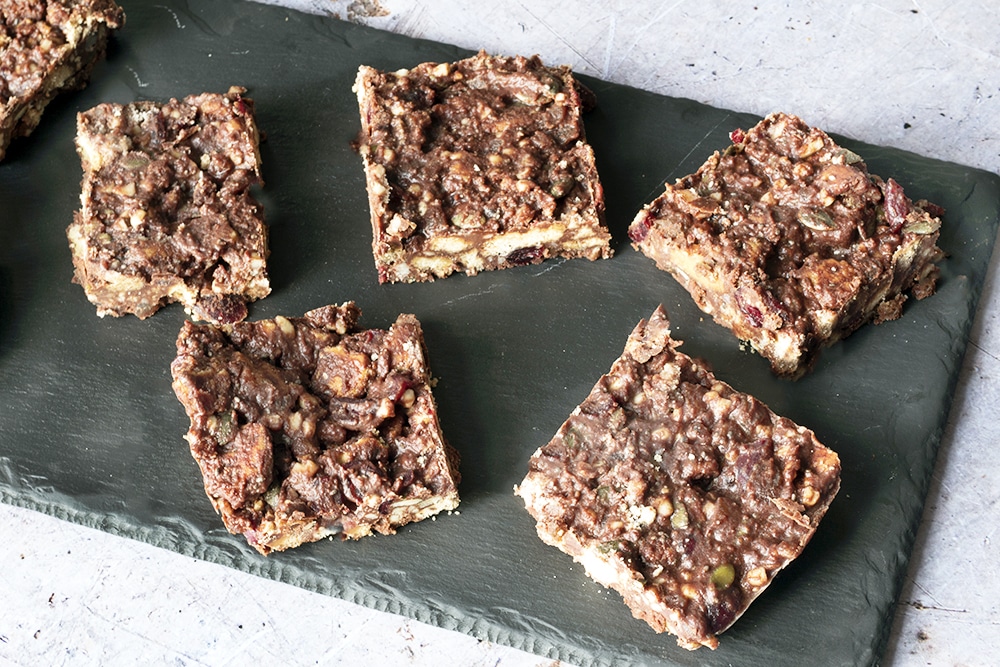
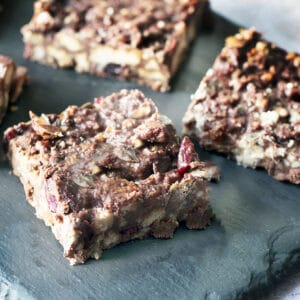
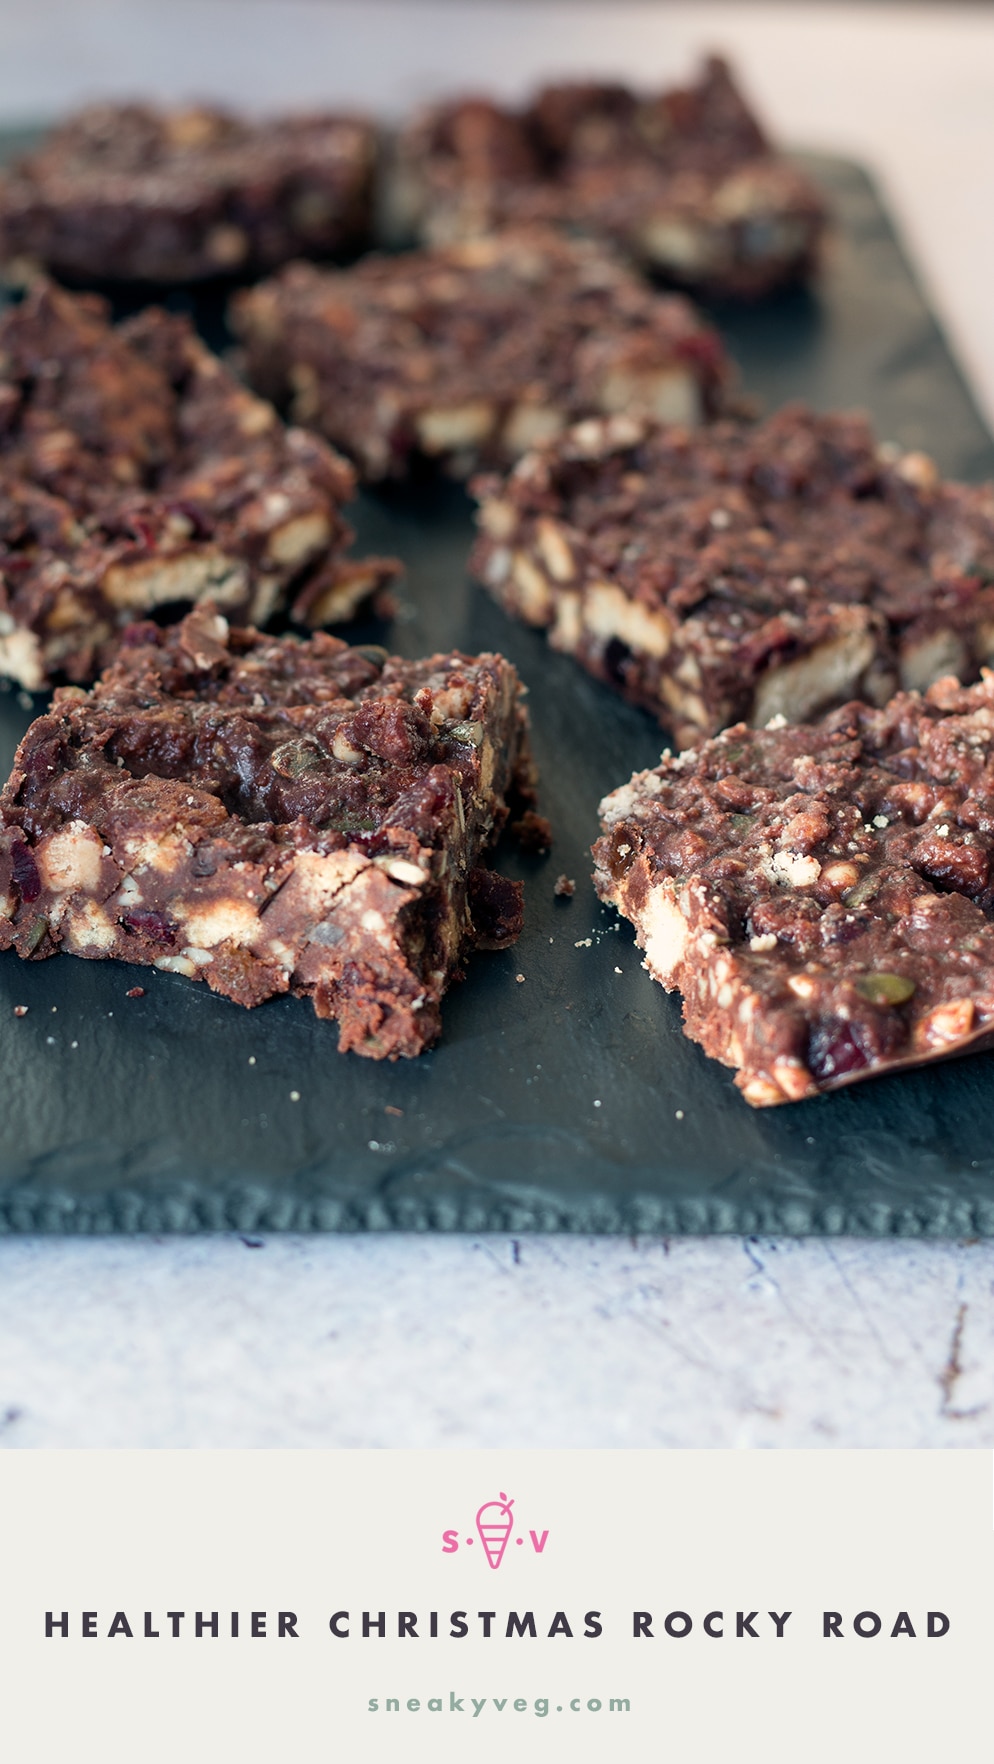
A delicious Christmas rocky road – or tiffin – recipe that’s full of festive flavour and ingredients. It’s not exactly healthy but it’s definitely healthier than your average slice of rocky road and I’ve made it with vegan ingredients as well so my whole family were very happy with this.
Sometimes Christmas, or let’s face it – the whole of December, feels like an endless procession of sweet treats.
From chocolate selection packs to mince pies and cakes to candy canes it’s hard to avoid sugary food.
And my kids sure don’t want to avoid it!
So wherever possible I try to make treats a little healthier.
This Christmas rocky road recipe uses dark chocolate, dried fruit and maple syrup. These are all healthier choices than some of the ingredients you’d normally find in rocky road.
But it still tastes amazing and to my kids this is as good a treat as any!
What’s the difference between rocky road and tiffin?
Well, it’s a matter up for debate really but I think that rocky road generally has marshmallows in it whereas tiffin does not.
So strictly speaking this is really tiffin, but I decided to call it rocky road as I’m not sure how many people know what tiffin is these days including my children!
No-one in my family noticed that this rocky road didn’t contain marshmallows. The kids who (according to them) do not like dried cranberries and pumpkin seeds didn’t comment on their inclusion either.
On the contrary it was hard keeping them from finishing off the whole batch of this healthier Christmas rocky road in one sitting.
Rocky road is very versatile
The beauty of rocky road is that you can pretty much substitute the ingredients for whatever you have available.
Don’t have any mixed peel? Stick in some extra dried fruit.
Want to add marshmallows? Go for it.
Just keep the quantities similar to those in the recipe below and it’ll turn out great.
You can also use whichever biscuits you wish – I used some vegan cinnamon biscuits that I had in the cupboard but digestives and rich tea biscuits also work well if you don’t need to make this vegan.
You need to break the biscuits up so I wouldn’t go for ones that are too crunchy as you’re only making life harder for yourself.
More Christmas inspiration
nut free coconut snowballs
healthy gingerbread blondies
apple and mincemeat pinwheels
carrot Christmas loaf cake
chocolate orange tiffin
Christmas fruit salad
How to make healthier Christmas rocky road:
If you’ve made this recipe please a leave a star rating and comment below. Thank you
Please do not reproduce this recipe without permission.
Healthier Christmas rocky road or tiffin
Mandy Mazliah
A delicious Christmas rocky road – or tiffin – recipe that’s full of festive flavour and ingredients. It’s not exactly healthy but it’s definitely healthier than your average slice of rocky road and I’ve made it with vegan ingredients as well so my whole family were very happy with this.
Prep Time 30 minutesmins
Chilling time 4 hourshrs
Total Time 4 hourshrs30 minutesmins
Course Snack
Cuisine International
Servings 16
Calories 292kcal
Ingredients
100gdark vegan chocolate
4tablespoonsmaple syrup
175gdairy free spread or butter
325gbiscuitscrushed (I used vegan cinnamon biscuits but digestives and rich tea biscuits work well if you’re not vegan)
100gmixed nuts and seedschopped (I used almonds and pumpkin seeds)
50gmixed peel
75gdried cranberries
50graisins
1teaspoonground cinnamon
1tablespoonchia seedsoptional
Instructions
Grease a 20 x 30cm dish and line with baking paper.
Melt 4 tablespoon maple syrup, 175g dairy free butter and 100g dark chocolate together. You can either do this in a tightly fitting heatproof bowl over a pan of boiling water or in the microwave. If you opt for the microwave take it out and stir every 30 seconds and be very careful of the heat.
Place 325g crushed biscuits, 100g chopped nuts or seeds, 50g mixed peel, 75g dried cranberries, 50g raisins, 1 teaspoon ground cinnamon and 1 tablespoon chia seeds (if using) into a mixing bowl and combine.
Pour the chocolate mixture over the dried goods and stir well.
Transfer to your prepared dish, allow to cool and then put in the fridge overnight to firm up. You can speed this process up by putting it in the freezer for an hour.
Once set cut into slices, place in an airtight container and store in the fridge.
Notes
Nutritional information is approximate and is intended as a guide only.
Veggies, fruit, and milk all in 1 drink! Plus it’s ‘skinny’!
Submitted by Yoly
Published on June 19, 2020
Cook Mode (Keep screen awake)
Ingredients
This recipe was developed at its original yield. Ingredient amounts are automatically adjusted, but cooking times and steps remain unchanged. Note that not all recipes scale perfectly.
Original recipe (1X) yields 2 servings
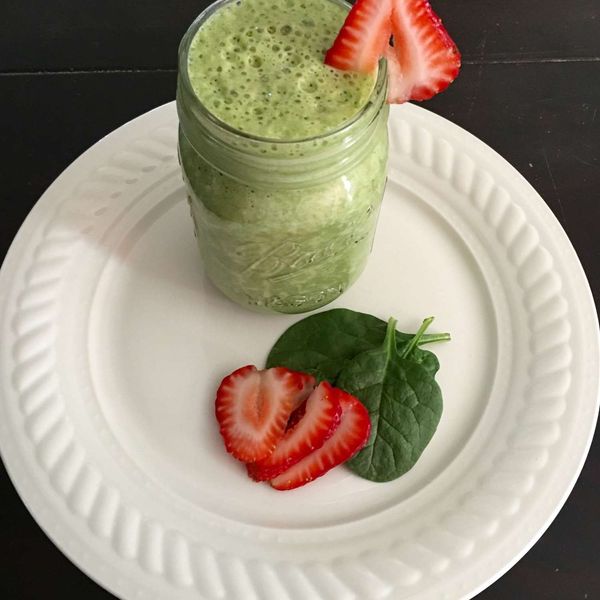
2cupsfresh spinach
2cupsfrozen strawberries
1frozen banana
1 ½cupsunsweetened almond milk
1tablespoonagave nectar (Optional)
Directions
Combine spinach, strawberries, banana, almond milk, and agave in a blender; blend until smooth.
Nutrition Facts (per serving)
190
Calories
3g
Fat
43g
Carbs
3g
Protein
Nutrition Facts
Servings Per Recipe 2
Calories 190
% Daily Value *
Total Fat
3g
3%
Saturated Fat
0g
1%
Sodium
147mg
6%
Total Carbohydrate
43g
15%
Dietary Fiber
7g
24%
Total Sugars
27g
Protein
3g
6%
Vitamin C
75mg
83%
Calcium
216mg
17%
Iron
2mg
13%
Potassium
743mg
16%
* Percent Daily Values are based on a 2,000 calorie diet. Your daily values may be higher or lower depending on your calorie needs.
** Nutrient information is not available for all ingredients. Amount is based on available nutrient data.
(-) Information is not currently available for this nutrient. If you are following a medically restrictive diet, please consult your doctor or registered dietitian before preparing this recipe for personal consumption.
Vegan chocolate cupcakes with raspberry hearts in the center, and topped with a delicious frosting infused with raspberries and chocolate. Perfect for any occasion, and especially a romantic one.
If you love these vegan chocolate cupcakes with chocolate buttercream, you will love these vegan cupcakes infused with chocolate in every bite and with a scrumptious raspberry and chocolate frosting on top.
Valentine’s Day is special to me because it’s the day I married the love of my life. So each year, when this day rolls around, I try to find ways to make it even more special than every wonderful day I spend with him. And by now I know that the easiest way to put a smile on my sweetie’s face is with something sweet, like these vegan and dairy free Chocolate Cupcakes with Raspberry Hearts.
Chocolates and raspberries are a match made in heaven: each is delicious on its own, but when paired together they enhance each other’s deliciousness.
My chocolate cupcakes are intensely chocolatey, and inside each is a little surprise: a raspberry stuffed with more chocolate. I top off all this deliciousness with a velvety frosting of buttercream flecked with more chocolate and raspberries.
But their divine taste is not the only thing that’s great about these cupcakes. These are extremely easy to make and they are really, really pretty to look at. I mean, take a look at that pink frosting flecked with red and chocolate. Even the fact that I am quite possibly the world’s worst cake decorator doesn’t take away from it, does it?
These vegan chocolate cupcakes are not cloyingly sweet. I add just a cup and a half of sugar to the frosting, which is very conservative by most frosting standards, but it’s more than enough because you want the chocolate and the raspberry flavors to shine through.
Here’s the recipe for the vegan chocolate cupcakes with raspberry frosting and I’ll let that — and Desi’s pictures– do the talking. A very happy Valentine’s Day to all of you. And tell me, how do you plan to say “I love you” to your special one?
More vegan cake recipes
Recipe card
Vegan Chocolate Cupcakes with Raspberry Hearts
Vaishali · Holy Cow Vegan
Vegan chocolate cupcakes with raspberry hearts in the center, and topped with a delicious frosting of raspberries and chocolate. Perfect for any occasion, and especially a romantic one.
Prep Time 20 minutesmins
Cook Time 22 minutesmins
Total Time 42 minutesmins
Course Dessert
Cuisine American
Servings 12cupcakes
Calories 382kcal
Instructions
In a bowl, mix the almond milk and vinegar and set aside for a few minutes until it curdles.
Add the sugar, oil, vanilla extract and whisk for a minute until the mixture is all frothy.
In another bowl, sift together the flour, baking soda, baking powder, cocoa powder and salt.
Add the cocoa-flour mixture to the wet ingredients in two batches, mixing for 20 seconds after each addition. If you need to mix the ingredients further, use a spatula and mix until just combined.
Line a 12-tin standard muffin pan with paper liners. Pour the batter into each liner, about ¾ full.
Stuff each of the raspberries with two or three chocolate chips– as many as they will hold. Place a raspberry in the center of each cupcake.
Bake the cupcakes in a preheated 350-degree oven for 20-22 minutes or until a toothpick inserted near the center of a cupcake comes out clean (make sure you insert the toothpick in the batter and not the raspberry “heart”.)
Cool on a rack for about 10 minutes. Then unmold the muffins and place them on the rack until thoroughly cooled.
To make the frosting, beat the butter and shortening in a bowl with a hand mixer or in a stand mixer until the mixture is light and fluffy, about two minutes.
Add the sugar, a half a cup at a time, and beat in thoroughly. Scrape the sides and bottom of the bowl to ensure everything’s getting mixed together thoroughly.
Add the raspberries and the chocolate that’s been broken down into tiny chips or flakes in the food processor and beat in. The frosting will turn pink from the raspberries, but you want to leave in little flecks of red.
Place the frosting in a pastry bag fitted with a round tip, or use a Ziploc bag like I did– just squeeze all the frosting to one corner of the bag and then cut off the tip and proceed.
Place a raspberry at the center of each frosted cupcake. Devour.
To print recipe card without images, uncheck “instruction images” after clicking the “print recipe” button.
Tried this recipe?Let us know in the comments below!
About Vaishali
Hi! I’m Vaishali, a journalist turned food blogger. At Holy Cow Vegan I share easy, tasty recipes made with clean, wholesome ingredients that the entire family can enjoy.
An error was encountered while processing your request. Typically this is a temporary condition. Please contact the web site owner for further assistance.
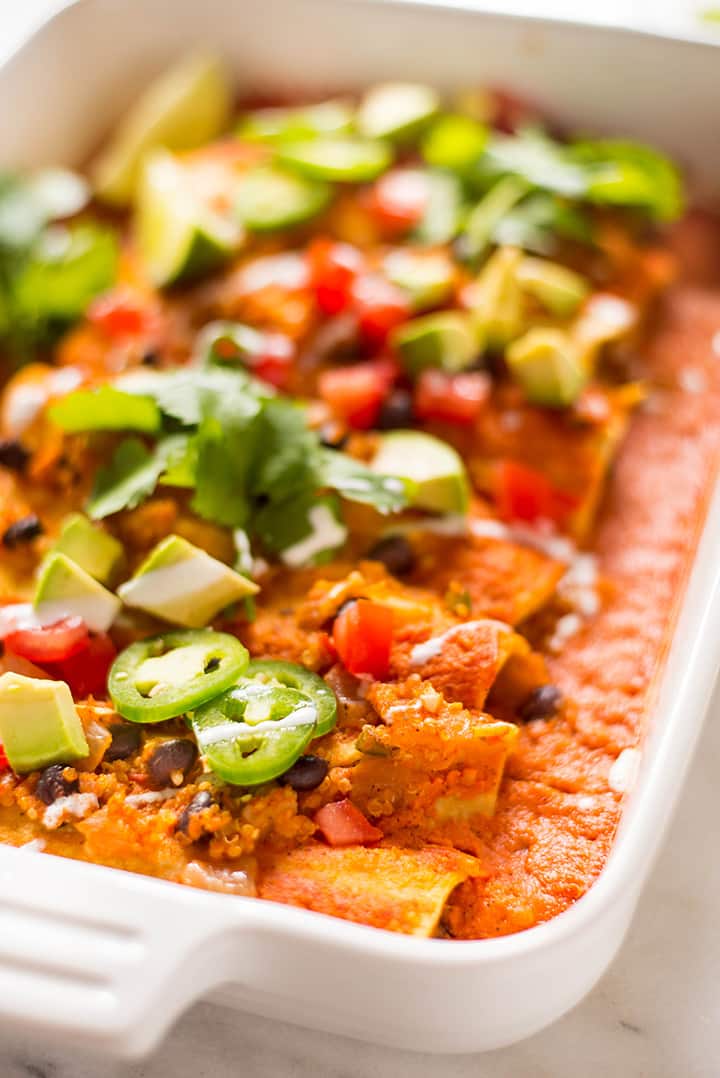
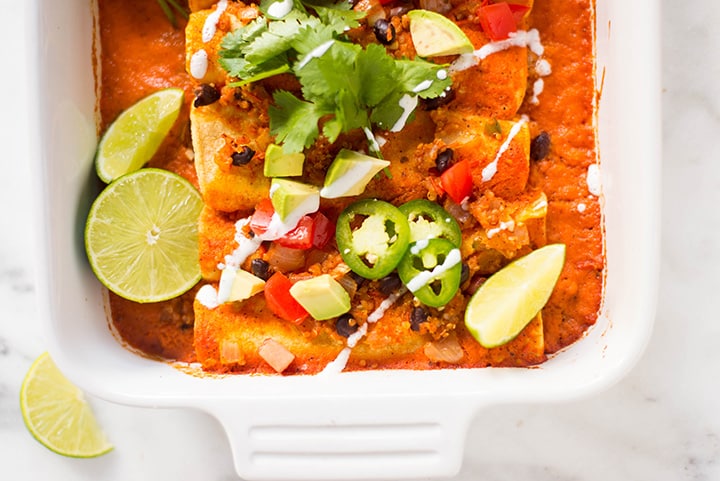
These Spicy Quinoa and Black Bean Vegan Enchiladas are the real deal. Not only are they clean-eating and nutritious, but they’ll also satisfy your enchilada craving with the first bite!
By now you must already know that I absolutely love enchiladas. What’s not to love, right? Soft homemade corn tortillas filled up with deliciousness of your choice and covered with a chili pepper sauce (or any other for that matter). And, since my Shredded chicken enchiladas recipe is one of the most popular posts on the blog, I know you love them, too!
One of my favorite things about this traditional Mexican dish is that it’s so versatile. It’s so easy to play around with flavors and textures and add something new and different every time. So far, I’ve tried pretty much everything I could think of, from these Green Chile Chicken Enchiladas with salsa verde to this rich and savory Ground Beef Enchiladas recipe.
As much as I’d maybe like to eat just enchiladas for days on end sometimes, it’s important to still eat balanced and healthy. With a little help of my crock pot, I’ve even managed to turn this beloved dish into a healthier, but nonetheless delicious Crock Pot Chicken Enchilada Soup.
This time, I’ve decided to swap the meaty filling with one of my favorite grains – quinoa!
Quinoa is not only gluten-free but also high in fiber and protein. On top of that, quinoa also happens to be very high in antioxidants which makes it a perfect choice when you’re trying to eat healthier, and when you’re trying to make a more nutritious vegetarian and vegan-friendly version of your favorite comfort food.
Follow my recipe for Spicy Quinoa & Black Bean Vegan Enchiladas With Homemade Vegan Enchilada Sauce (that’s ready in just 10 minutes!) and whip up this crowd-pleaser next time you’re having friends or family over for dinner.
Put in a tiny bit more effort and make this dish even healthier by swapping regular, store-bought tortillas for these 4 ingredient vegan Homemade Corn Tortillas.
HOW TO STORE SPICY QUINOA AND BLACK BEAN VEGAN ENCHILADAS
When I make these vegan enchiladas, I like to lots of make extras. Sometimes we eat them again the next day, or I freeze them to have on hand for the end of a busy day. If you need to store them, follow these easy tips:
In the fridge: Store in the refrigerator in an airtight container for 3 days.
In the freezer: I often make a batch of vegan enchiladas ahead of time, leaving them in a casserole dish. I cover it with foil, making sure it is well sealed. Then, I wrap it with plastic wrap and pop it in the freezer. They keep well in the freezer for up to 1 month.
HOW TO REHEAT SPICY QUINOA AND BLACK BEAN VEGAN ENCHILADAS
Reheating out of the fridge: If reheating these vegan enchiladas, I put them in a 350F degree oven for around 15 minutes.
Reheating out of the freezer: If the vegan enchiladas are frozen, I thaw them first and then reheat them the same way – 15 minutes at 350F degrees. However, when cooking from frozen, they typically take 45 minutes to an hour to heat up. I leave them covered with foil the first 30 minutes, and the remaining time, I have them uncovered.
WHAT TO SERVE WITH SPICY QUINOA AND BLACK BEAN VEGAN ENCHILADAS
Of course, these delicious enchiladas are excellent as a meal on their own, but sometimes when I am feeding a crowd, I like to make the meal a party of Mexican goodness!
Homemade Horchata
10-Minute Salsa Verde
Slow Cooker Chicken Tortilla Soup
Pico de Gallo
Quinoa Taco Stackers
The Perfect Guacamole
HEALTHY TORTILLA SUBSTITUTIONS FOR ENCHILADAS
When I make vegan enchiladas, I typically use homemade corn tortillas in the recipe. But, there are other great tortilla recipes that can work in this dish, too. Try these:
Healthy Homemade Spinach Tortillas
Cassava Flour Tortillas
Cauliflower Tortillas
Chickpea Flour Tortillas
Sweet Potato Tortillas
Spinach Tortillas
HOW TO MAKE AN ENCHILADA RECIPE VEGAN
Enchiladas are definitely one dish that can easily be turned vegetarian or vegan. The first step is swapping the meat filling with a vegan-friendly option. I decided to fill my Spicy Quinoa and Black Bean Vegan Enchiladas with quinoa and black beans. You can also easily omit the cheese and any toppings you normally use in an enchilada dish that are not vegan, such as plain Greek yogurt.
HOW TO MAKE ENCHILADAS WITHOUT CHEESE
Traditional enchilada recipes call for cheese, but if you’re making vegan enchiladas, cheese is not really an option, right? You can always use vegan cheese or nutritional yeast (it resembles parmesan and gives a nice nutty flavor), but I find topping off these spicy vegan enchiladas with some fresh cilantro, diced tomatoes and avocado, lime, and a little drizzle of non-dairy yogurt an even better option. Yum!
HOW TO MAKE VEGAN ENCHILADA SAUCE
The super-easy vegan enchilada sauce I used in this recipe is not only delicious but it will take you only 10 minutes to make it. Yes, from scratch! Not only is it healthier, but it’s also quicker to prep the sauce yourself instead of running to the store to buy some.
All you need to do is cook diced fresh tomatoes with some minced garlic until the tomatoes become softened. Then, stir in the remaining ingredients and continue to cook over medium-high heat for 5 minutes until slightly thickened. Transfer this mixture to a blender or a food processor and blend until smooth. And that’s it!
MORE HEALTHY ENCHILADA RECIPES
Vegan enchiladas are absolutely flavorsome and so are many other recipes for this zesty Mexican meal. I’ve created other enchiladas dishes for every taste. Here they are:
Green Chile Chicken Enchiladas
Ground Beef Enchiladas
Shredded Chicken Enchiladas
Crock Pot Chicken Enchilada Soup
Spicy Quinoa and Black Bean Vegan Enchiladas
Lacey Baier
These Spicy Quinoa and Black Bean Vegan Enchiladas are the real deal. Not only are they clean-eating and nutritious, but they’ll also satisfy your enchilada craving with the first bite!
Prep Time 20 minutesmins
Cook Time 15 minutesmins
Total Time 35 minutesmins
Course Dinner
Cuisine Mexican
Servings 4
Calories 445kcal
*This post may contain affiliate links for products I use often and highly recommend.
Ingredients
For The 10 Minute Vegan Red Enchilada Sauce:
2tablespoonolive oil
3largetomatoes on the vine,diced plus more for topping
3clovesgarlic,minced
1 ½cupslow sodium vegetable broth
2tablespoontomato paste
1tablespoonchili powder
1teaspoonground cumin
½teaspoongranulated onion
½teaspoondried oregano
1teaspoonsea salt
For The Vegan Enchiladas:
1tablespoonolive oil
1yellow onion,diced
1jalapeño,seeded and diced (plus more for topping)
2tablespoonfresh lime juice (approx. 1 lime),plus more for serving
½cupfresh cilantro,chopped, plus more for serving
10-12corn tortillas
avocado,for topping
dairy-free yogurt, for topping
Instructions
For The 10 Minute Vegan Red Enchilada Sauce:
In a large skillet, heat olive oil over medium-high heat.
Add in diced fresh tomatoes and minced garlic, and stir to combine. Cook for 4-6 minutes, until the tomatoes become softened.
Then, stir in the tomato paste, low sodium vegetable broth, chili powder, onion powder, cumin, oregano, sea salt, and black pepper, and continue to cook over medium-high heat for 5 minutes until slightly thickened.
Transfer this mixture to a blender and blend until smooth. So set this aside while we get our vegan enchiladas ready to go.
For The Vegan Enchiladas:
Start preheating your oven to 375 degrees F and grease a 9×13 casserole dish with olive oil.
In a large skillet, heat the olive oil over medium-high heat.
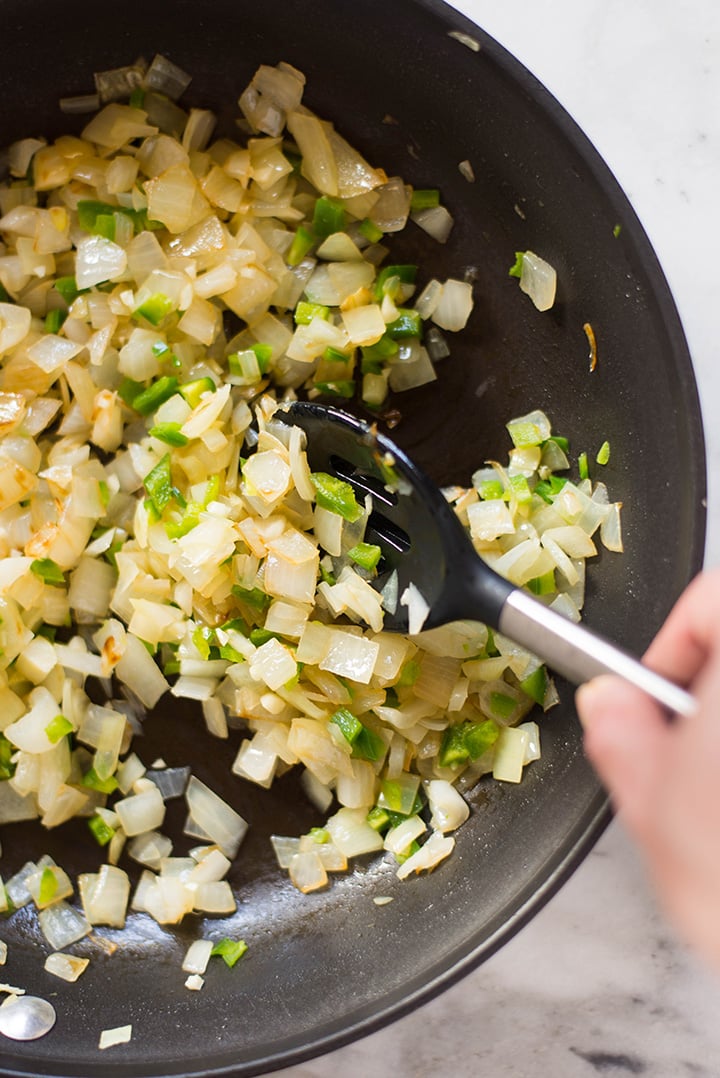
Add the onions and jalapeño, and cook until the onion is softened, about 5-6 minutes.
Add the garlic, cumin, sea salt, and cooked quinoa and stir to combine, cooking for about a minute until the garlic is fragrant.
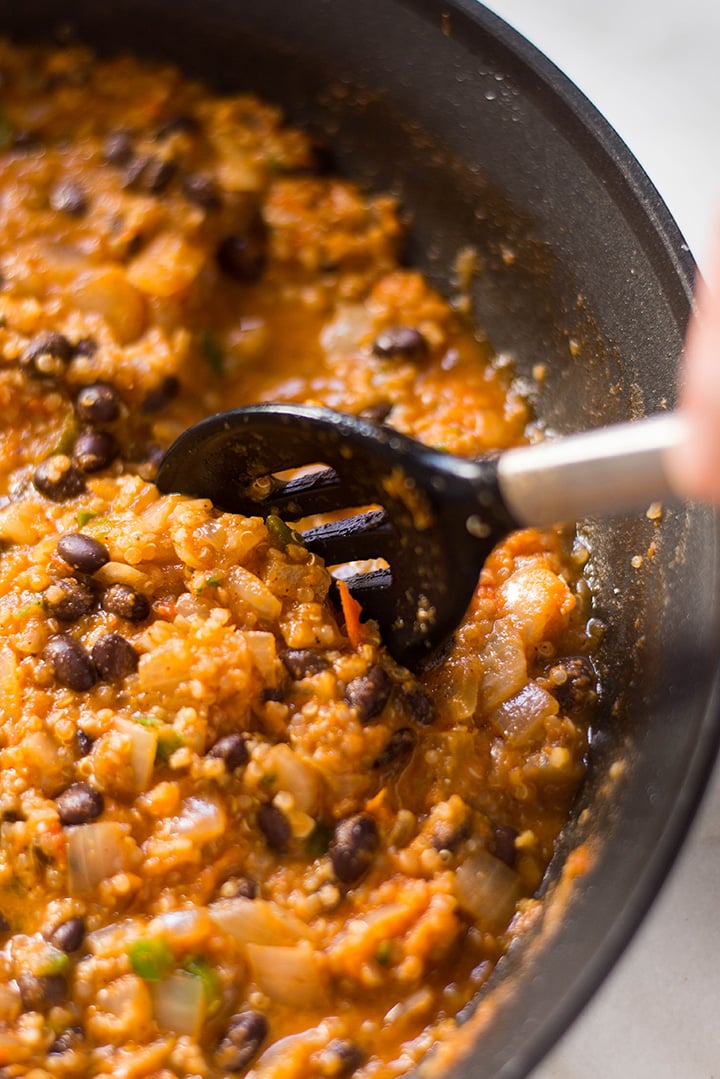
Add in half the enchilada sauce, black beans, chopped cilantro, and lime juice, and stir together.
To make sure your tortillas don’t crack, you could lightly brush the exposed tortillas with olive oil, give them a quick dip in olive oil or enchilada sauce, or heat in the microwave for about 20 seconds wrapped in a damp towel.
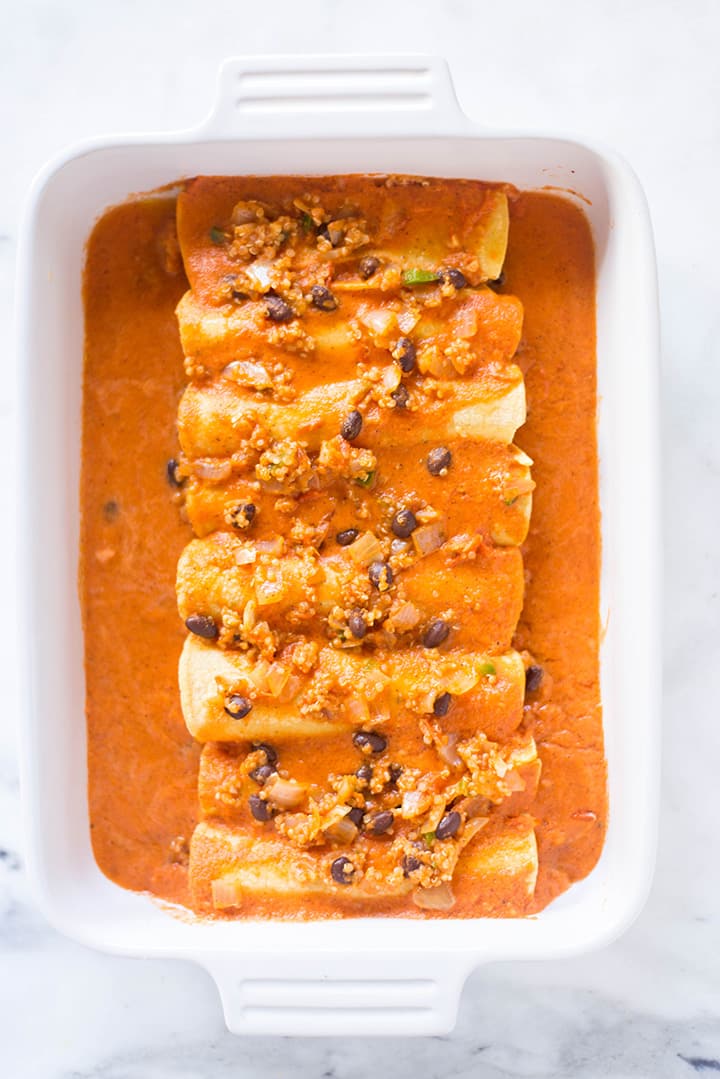
Spoon about ¼ cup of the spicy quinoa and black bean mixture along the center of a tortilla. Then, gently, but firmly, roll the tortilla around the filling and place into baking dish, seam-side down. Repeat with remaining tortillas.
Pour the enchilada sauce over and around the enchiladas, and then add a little more of the filling over the top for some added texture.
Then, place the casserole dish in the oven, uncovered, for 12-15 minutes or until the tortillas begin to turn golden and the enchilada sauce becomes a darker red.
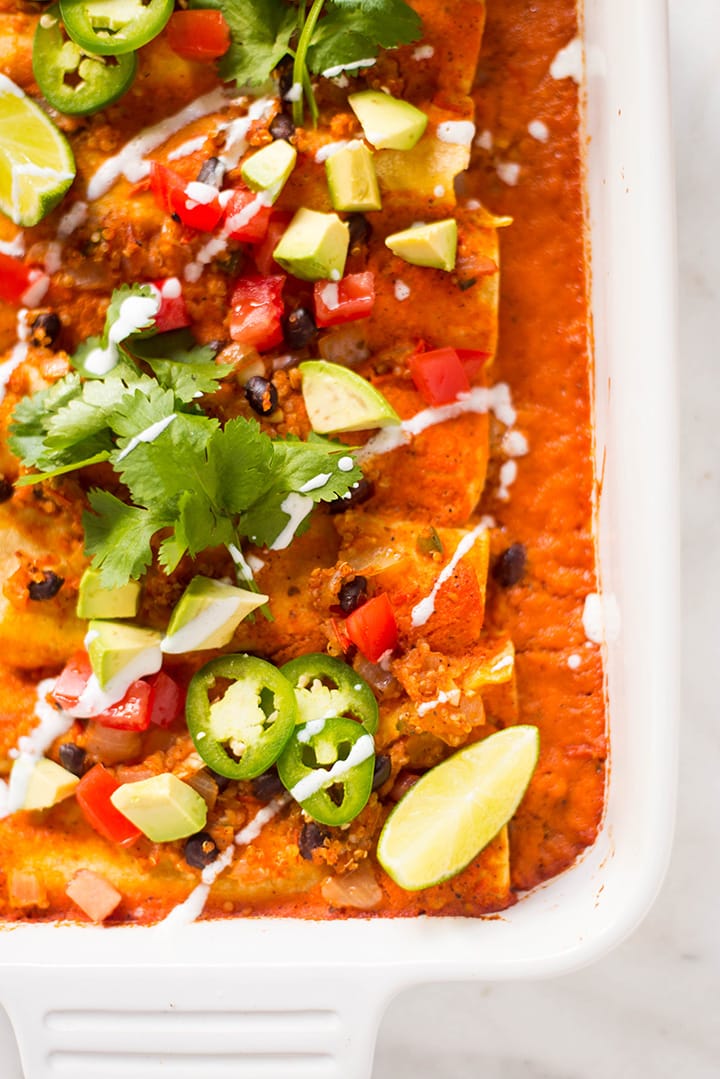
To serve, top with fresh cilantro, diced tomatoes and avocado, lime, and a little drizzle of non-dairy yogurt.
Notes
If you want to make your own corn tortillas for this enchilada recipe, check out my super easy recipe for the best 4 ingredient vegan corn tortillas here!
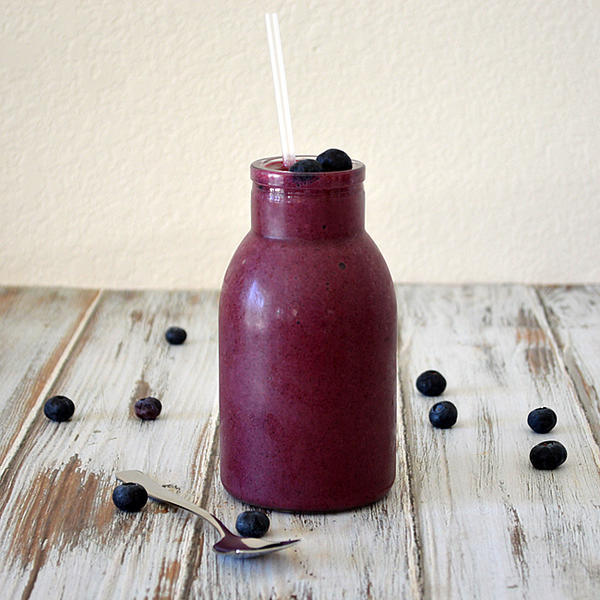
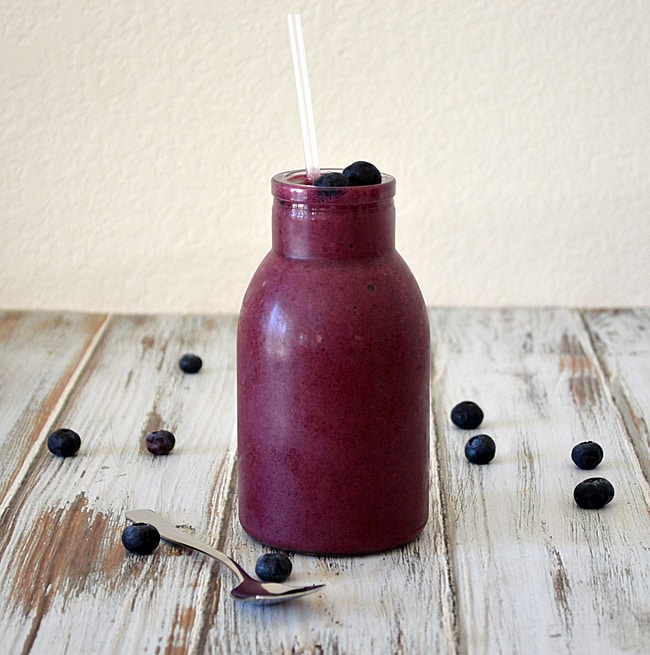
Doesn’t this look yummy? I wanted to create a deep, rich color and achieved that with the additon of blackberries. You can also freeze the banana, but I found that mine was plenty thick without it. We used this as the base for our a parfait (recipe to come). You can also add a bit of agave syrup if your berries aren’t as sweet.
Blueberry Protein Smoothie
Author Veg Life Staff
Ingredients
1Banana
1/2Cfrozen Blueberries
1/2Cfrozen Blackberries
5Ice Cubes
1/2CAlmond Milk
1serving vegan Protein Powderoptional
Instructions
Combine all ingredients in a high-powered blender, adding the ice last.
You may need a bit more of the almond milk if it’s too thick.
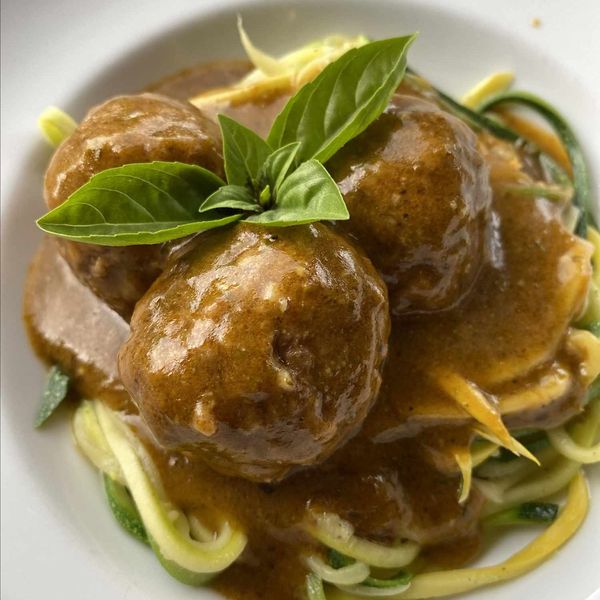
Quick, easy vegan gravy with lots of flavor from fresh herbs. Tastes great on vegan meatballs, mashed potatoes, or your favorite vegan protein or side dish.
Submitted by Brooke Ashby
Published on July 29, 2020
Cook Mode (Keep screen awake)
Ingredients
This recipe was developed at its original yield. Ingredient amounts are automatically adjusted, but cooking times and steps remain unchanged. Note that not all recipes scale perfectly.
Original recipe (1X) yields 4 servings
1 ¼cupswater
¼cupolive oil
¼cupfresh chives
4sprigsfresh thyme, stemmed
1sprigfresh rosemary, stemmed
8leavesfresh basil
8fresh parsley leaves
4fresh oregano leaves
1tablespoontomato paste
1tablespooncornstarch
⅓tablespoonvegetable base
1teaspoonminced fresh garlic
⅛teaspoonsalt
⅛teaspoonground black pepper
Directions
Combine water, olive oil, chives, thyme, rosemary, basil, parsley, oregano, tomato paste, cornstarch, vegetable base, garlic, salt, and pepper in a blender. Blend until smooth.
Pour mixture into a saucepan and bring to a rapid boil for 1 minute.
Nutrition Facts (per serving)
177
Calories
14g
Fat
13g
Carbs
3g
Protein
Nutrition Facts
Servings Per Recipe 4
Calories 177
% Daily Value *
Total Fat
14g
18%
Saturated Fat
2g
11%
Sodium
134mg
6%
Total Carbohydrate
13g
5%
Dietary Fiber
6g
20%
Total Sugars
1g
Protein
3g
6%
Vitamin C
103mg
114%
Calcium
187mg
14%
Iron
8mg
43%
Potassium
460mg
10%
* Percent Daily Values are based on a 2,000 calorie diet. Your daily values may be higher or lower depending on your calorie needs.
** Nutrient information is not available for all ingredients. Amount is based on available nutrient data.
(-) Information is not currently available for this nutrient. If you are following a medically restrictive diet, please consult your doctor or registered dietitian before preparing this recipe for personal consumption.
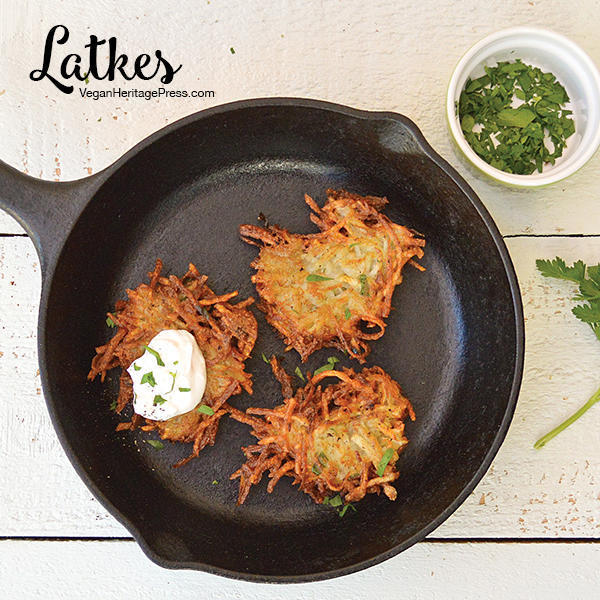
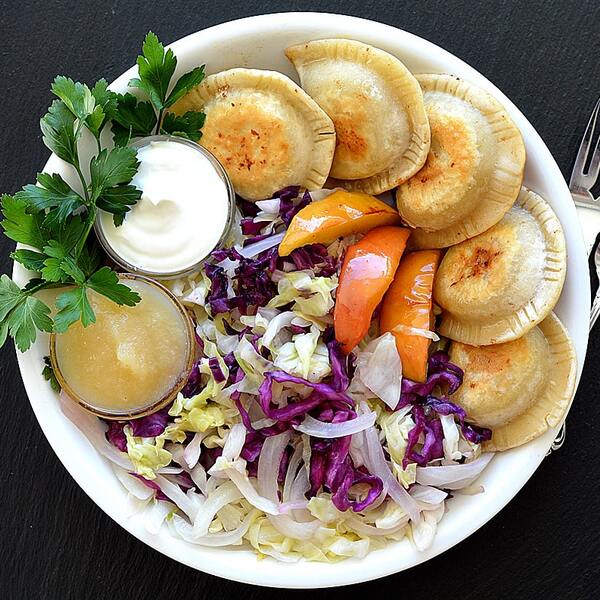
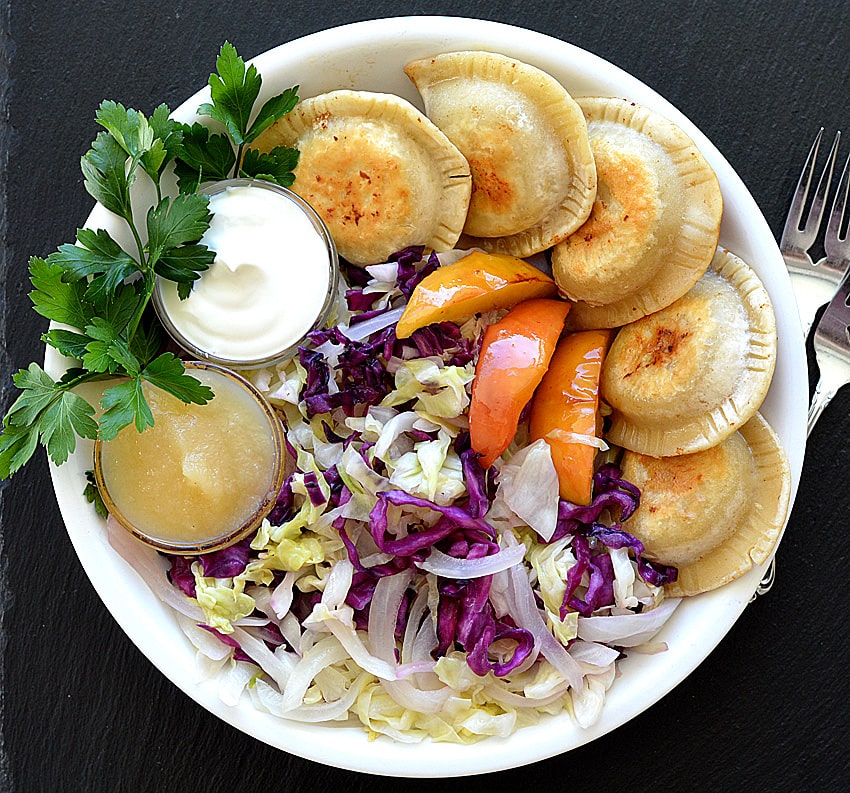
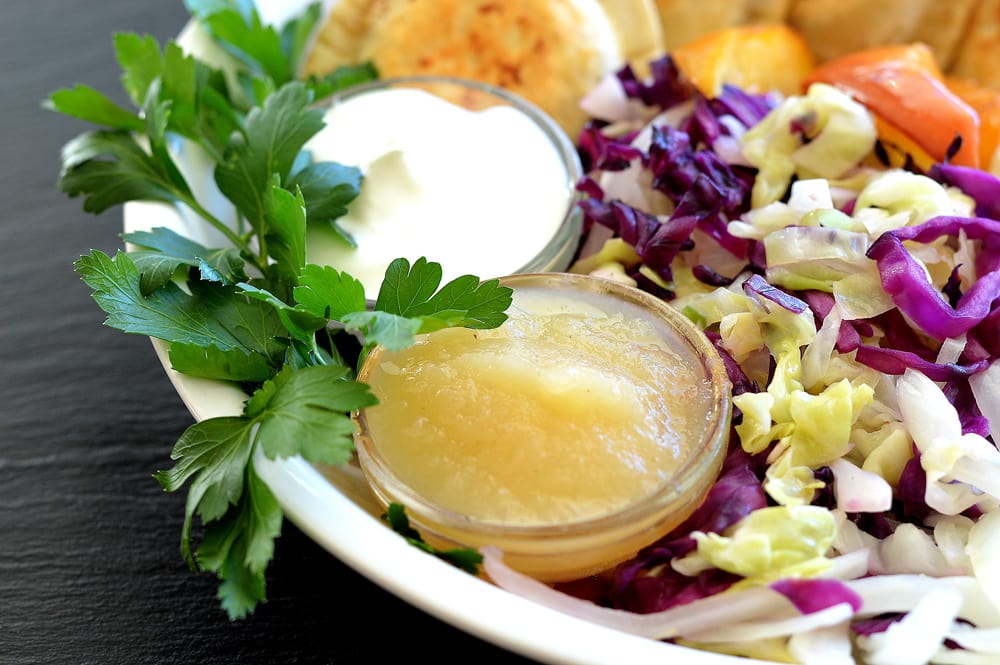
Growing up, I had never even tasted a pierogi. I know … hard to believe, right? Then, somewhere in my 20’s I was introduced to these little gems and it was love at first bite! This Potato Pierogi with Sauteed Cabbage and Apples did not disappoint.
Awhile back, I made these homemade Sweet Potato Pierogi and since I demonstrated the making of the vegan pierogi dough there, I won’t repeat myself. The filling in this version is beyond simple. Mashed potatoes, caramelized onions plus a little salt and pepper.
I like to make my mashed potatoes just as I would if I were going to eat them “as is” … and be sure to season them well with salt and pepper. As with the sweet potato pierogi, take care not to overfill or they will burst open. Trust me, learned that lesson the hard way!
You just fold over the dough and with a fork, crimp the edges to seal. This part is important or again, they will burst open when we boil them. After they are par-boiled (they float to the top when they are ready), they go into a skillet that contains a bit of oil or vegan margarine over medium heat. I actually use both, one for flavor, one for browning. I find that if I just use vegan margarine, it burns but with a touch of oil, I am able to get better color on them.
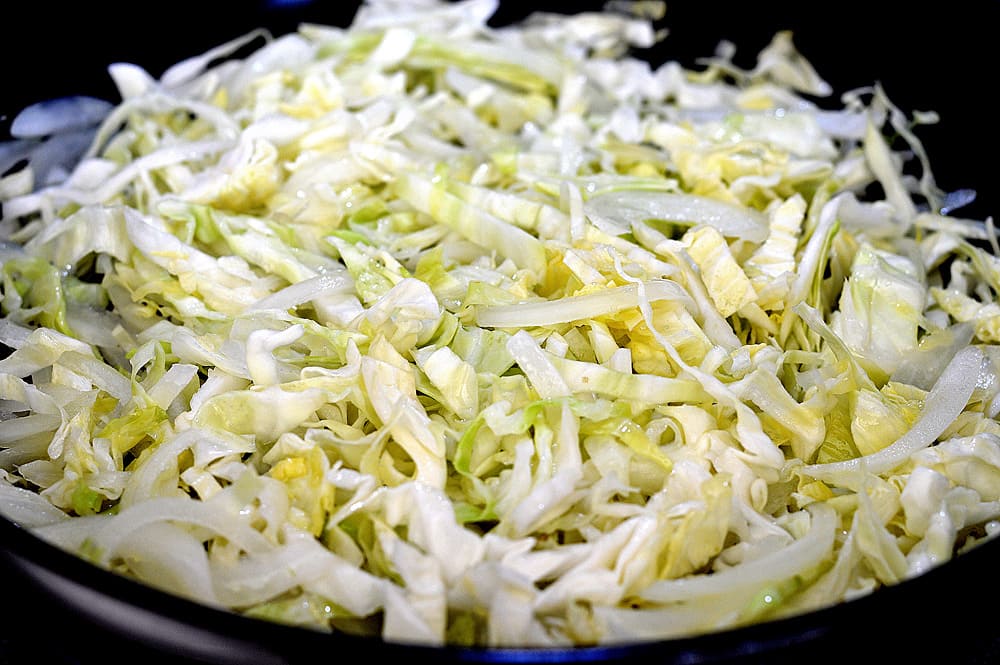
In another larger skillet over medium heat, add the onions and again, a touch of both oil and vegan margarine. Very little is required to get this going. I season with salt and pepper along with a splash of apple cider vinegar. You’ll notice I did the onions and green cabbage together, but did the red cabbage separately. If you do them together, they will taste just fine – but it will turn everything pink. Not a bad thing…if you like pink 🙂
Just before serving, I clean out one of the skillets and add a smidge (technical term) of vegan margarine and the sliced apples over medium heat. In just a few minutes they get golden and tender. Apples, onions and cabbage are a match made in Heaven.
I like to serve mine with both vegan sour cream and applesauce for dipping. Sweet + savory = my favorite kind of meal!
Did you make this recipe for Potato Pierogi with Sauteed Cabbage and Apples? Let me know in the comments section below what you thought 🙂
Servings 24pierogi
Ingredients
FOR THE PIEROGI DOUGH:
1/8capplesauce
1-1/2tbspvegan sour creamor cashew cream
1/2calmond milk
1/2cwater
1-3/4call purpose flour
1ccake flourmakes a more tender dough, but you can use all purpose flour
1/4tspsalt
FOR THE FILLING:
5mediumpotatoesmashed
1largeoniondiced
1tbspvegan margarine
1/4cupalmond milk
1/4cupnutritional yeastoptional
1tspsalt
1tspblack pepper
FOR SERVING:
1largecabbagesauteed with salt & apple cider vinegar, to taste
1largeonionsauteed in a very small amount of oil and/or vegan margarine
2largeapplessliced into wedges, sauteed in a very small amount of vegan margarine
Vegan Sour Creamor cashew cream, for dipping
Applesaucefor dipping
Instructions
In the bowl of an electric mixer, combine all of the ingredients for the dough. Wrap in plastic wrap and let rest in the refrigerator. For easier handling, as it is a sticky dough, you could also place in the freezer for 10 minutes prior to using.
Meanwhile, in a saute pan with a little bit of oil or vegan margarine (I use a very small amount of both), saute the onions. Once softened, add the cabbage, salt and apple cider vinegar.
Using a well-floured surface and rolling pin, roll dough to about 1/8 inch thick. Allow to rest for a few minutes. Using a large round cookie cutter, cut circles and place about 1 Tbl of filling in the center of each. Fold over and press to seal. Using a fork, crimp edges and use the cookie cutter if you need to trim up any excess. The most important thing is to be sure they are sealed or they will seep out during the boiling process. Place on a lined sheet pan as you make them and complete all before proceeding.
Heat a pot of salted water to boiling. Gently place a few pierogi at a time in the water. They will float to the top when they are ready. Remove to a towel-lined cookie sheet to drain.
Heat a skillet on high heat and add 1 tsp of oil. Add the drained pierogi and quickly brown on both sides.
NOTE: If you plan to freeze any, boil them first. Let them drain then place them in an airtight container with a little oil. Allow to cool completely and freeze. They’ll keep for 3 months in the freezer.
Just prior to serving, saute the apple wedges in a very small amount of vegan margarine over medium heat until golden and just slightly tender.
Serve with vegan sour cream (or cashew cream) and/or applesauce for dipping.