This is what a real treat taste like. We all need that from time to time, right? Well, if you manage to keep your hands away from a few of these babies, why not wrap it up and give it to someone special.
Ingredients
1 cup desiccated coconut
1/8 cup light brown sugar
1/8 cup golden syrup
1 tsp vanilla extract
100gr dark chocolate
2 tbsp warm vegan single cream
Method
In a small bowl mix the coconut, sugar, golden syrup and vanilla extract.
Take the mixture to the fridge and let it rest for at least two hours.
Make little balls using a tablespoon and take them to the freezer for one hour.
Melt the chocolate in the microwave and add the single cream.
Dunk the coconut balls into the chocolate and transfer it to a baking sheet.
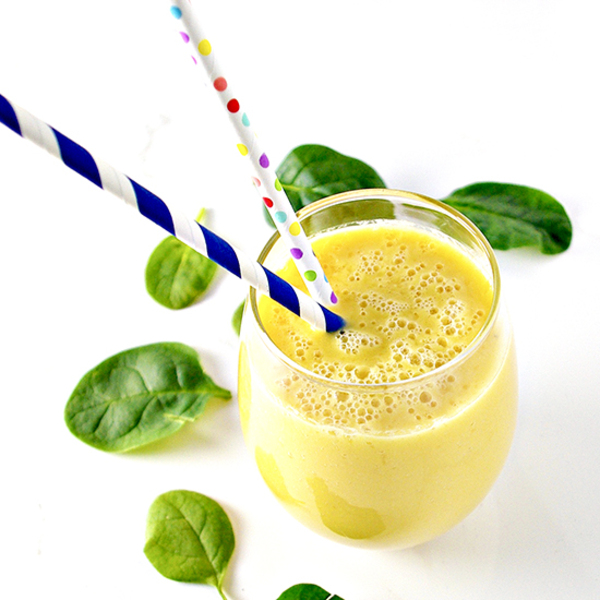
We did it, Spiriteds! We successfully introduced a new smoothie to the girls, and it isn’t even pink. Can you even believe it? I can’t. But that should tell you something about this Peach Mango Smoothie. It is rich and creamy without loads of sugar. It’s gluten-free, dairy-free, and vegan or paleo without sacrificing flavor. And, if you’re looking to shake up your smoothie game, then this is the one to nab.
Why?
Because it’s full of variations with you in the driver’s seat. Here are just a few options for your tastebuds’ consideration:
Prepare with almond milk and then top with sliced almonds or coconut milk with a few pieces of unsweetened shredded coconut
Add a splash of vanilla (we highly suggest this mix-in)
Top with frozen fruit
Throw a handful of spinach into the mix
However you choose to enjoy your Peach Mango Smoothie, you basically can’t go wrong. It just isn’t possible.
Can we also take a moment to enjoy Peach Mango Smoothie’s sunshine-y, springy color? FINALLY, we are getting weather appropriate for the month of April. And I’m all for it because we are dead with cabin fever over here. This is a completely true story. Our family has absolutely no dambs left to give snow fall, below zero temps, and icy sidewalks.
If you are in doubt of our status, then I present this next scenario as evidence. Twinkle had a 2.5-hour ophthalmology appointment this past week and flat-out looked the doctor in the face and said, “I’m so sorry, but this is just so boring, and we’re not even done. And I’m 12 today [she’s not]. And how can I even answer your alphabet questions when I can’t even see my mom? Ugh, my eyes are so blind they’re tired.” [Starts to snore in the chair]
Me: Twinkle, I’m right here, and let’s mind-
Twinkle: Oh, Mom! Where are you? [Grasps at the air]
Me: Right here, and you’re staring at me.
Twinkle: Am I though? Are we sure? Because I’m so blind I can’t even hear the doctor.
Doctor: This has been a very long long appointment. You’ve done very well.
Twinkle: Yes, because I am blind and I will be 11 tomorrow.
Spiriteds, we hadn’t even picked out the frames yet, and when we did, we ran into this gem:
Twinkle: I want rectangle glasses. I will buy those right there.
Optician: These are a sample. We’ll order a pair just for you.
Twinkle: That sounds good. Of course. Rectangles, please, because circle glasses make my eyes fall out of my face.
Me: We’ll just see ourselves out….
And there you have it, Spiriteds, an ophthalmology appointment at the end of a long winter through the, no pun intended, eyes of a four-year-old. Honestly, I LOVE THIS AGE. The sayings, I can’t write them down fast enough.
Also, apparently Twinkle doesn’t love eye appointments. I hear that, or rather, see, it.
But, fortunately, she does love Peach Mango Smoothie, and after a story like that, how does one even come back to a smoothie recipe? Bottom line, I’m taking the wins where I can get them. If the girls complain through eye appointments but will eat a non-pink Peach Mango Smoothie, then I’M TAKING IT, I’M WINNING AT SOMETHING.
Because, shocker, when we went back to pick up the new rectangular-not-circlular glasses, the staff remembered us. “Oooooh, it’s yewwww guyz!!!!” Oh, yes, we’ve arrived to pick up our rectangulars since circulars make our eyes fall out of our faces.
Print
Peach Mango Smoothie
5 Stars 4 Stars 3 Stars 2 Stars 1 Star
No reviews
Prep Time:5 mins
Cook Time:5 mins
Total Time:10 mins
Yield:3 to 4 cups 1x
2cups almond milk (or coconut milk)
2cups frozen sliced peaches
1cup frozen mango chunks
1/2 banana
2 tablespoons organic agave nectar (vegan) or 100 % pure honey (paleo), optional
Splash of vanilla, optional
Combine all ingredients and blend on high speed until smooth.
Serve immediately or let chill for 30 minutes before serving to thicken.
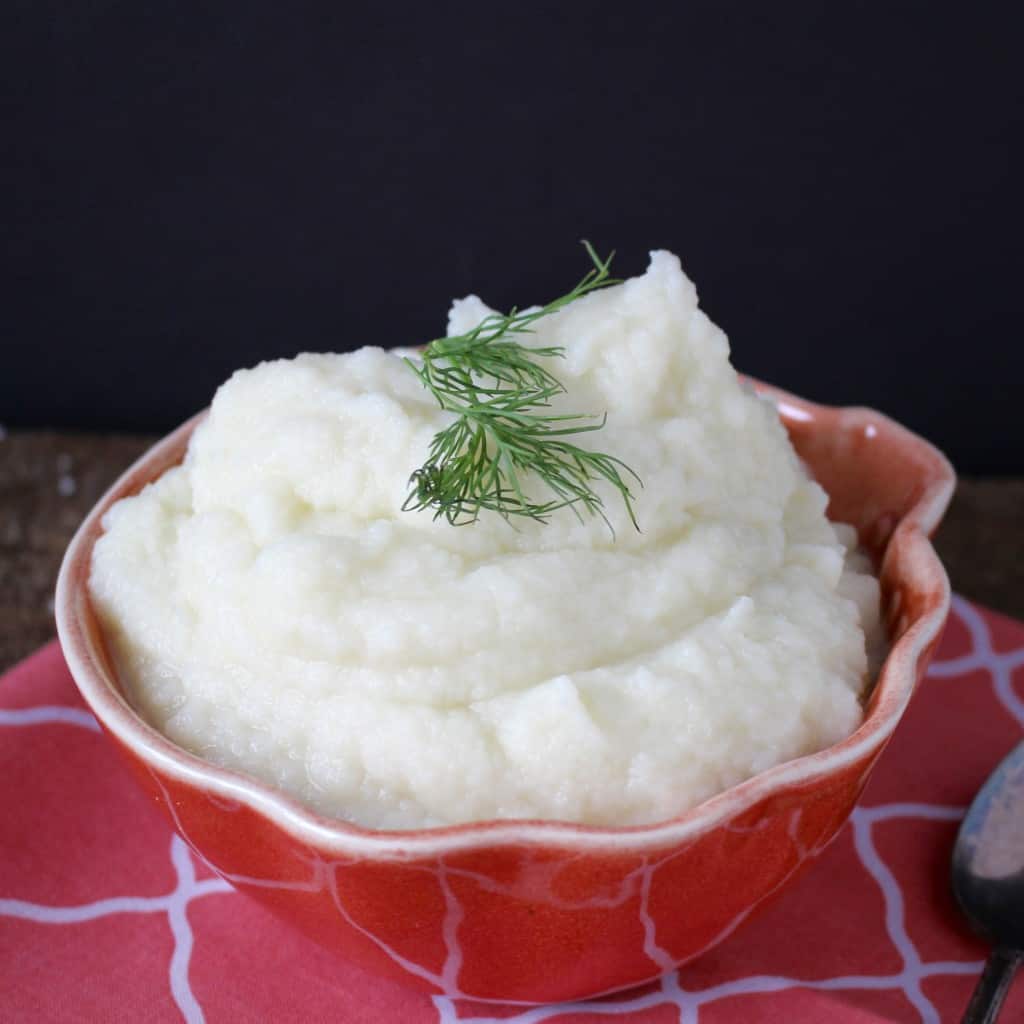
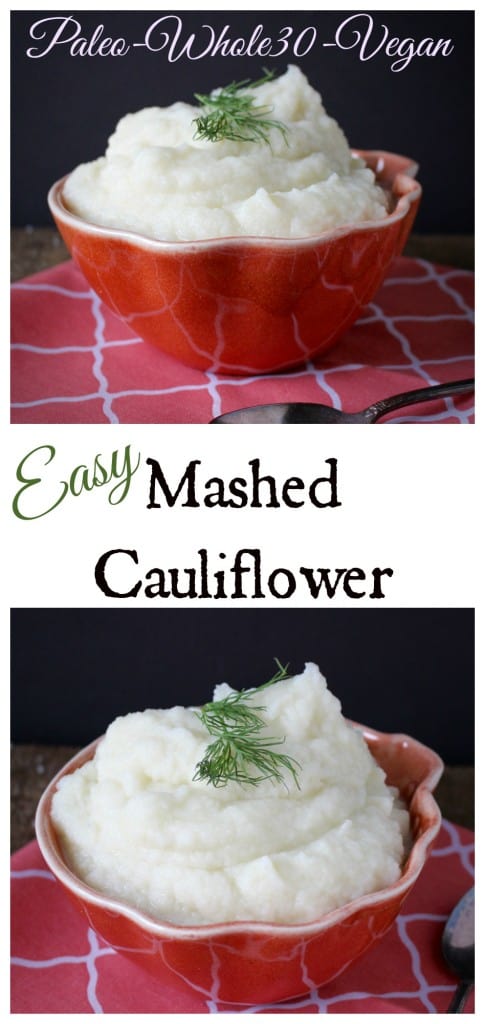
This Easy Mashed Cauliflower is so simple and a great replacement for mashed potatoes. Paleo, Whole30, gluten free, low carb, and vegan.
My husband does not particularly like cooked cauliflower. In fact, he has told me many times that he hates it. I take that as a challenge to see if I can prepare it in a way he likes, and I’ve succeeded. This does not taste exactly like mashed potatoes, cauliflower never will, but it’s a tasty side with the same consistency. I add garlic to help with the flavor and I try to get it as smooth as possible.
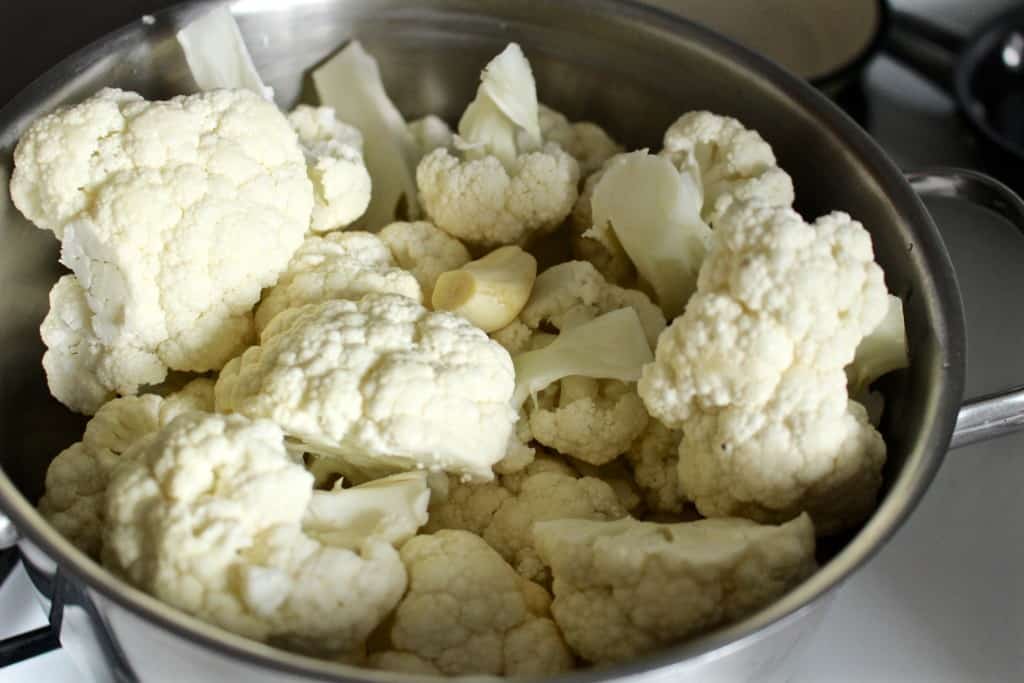
Cut the cauliflower in large chucks and place it in a saucepan with the garlic and salt. Pour the broth over it all.
Cover and cook on medium heat for about 25 minutes or until a fork can be pushed in easily.
Take the pan off the heat and, using an immersion blender, blend until there are no large chunks. Add the ghee (or coconut oil) and blend again until super smooth; 1-2 minutes.
The cauliflower flavor is very mellow and it pairs nicely with gravies, bacon and green onions, and steak- really anything that you like with mashed potatoes.
Hungry for more? Subscribe to my newsletter and follow along on Facebook, Pinterest and Instagram for all of the latest updates.
Easy Mashed Cauliflower
This Easy Mashed Cauliflower is so simple and a great replacement for mashed potatoes. Paleo, Whole30, gluten free, low carb, and vegan.
Prep Time:5 minutesminutes
Cook Time:25 minutesminutes
Servings:4servings
Ingredients
1large head of cauliflower
2garlic cloves
1 ½cupsbone brothveggie broth for vegan
2-3tablespoonsghee or coconut oil
1teaspoonsalt or to taste
Instructions
Cut the cauliflower in large chunks and place in a saucepan with the garlic, salt, and broth.
Cover and cook for 25 minutes or until a fork can be poked in to the cauliflower easily.
Remove from heat and using an immersion blender, blend until no large chunks remain.
Add in ghee/coconut oil and blend again.
Keep blending until completely smooth- 1 to 2 minutes.
* 6 medium sized russet potato, scrubbed and diced
* 2 teaspoon salt, divided
* 1 teaspoon olive oil
* 2 leek, chopped
* 4 cup kale, chopped into bite sized piece
* 4 scallion
* 1 cup non dairy milk
* 2 tablespoon olive oil
* 2 tablespoon nutritional yeast
* 1/2 teaspoon black pepper
* 1/4 cup parsley
Instructions:
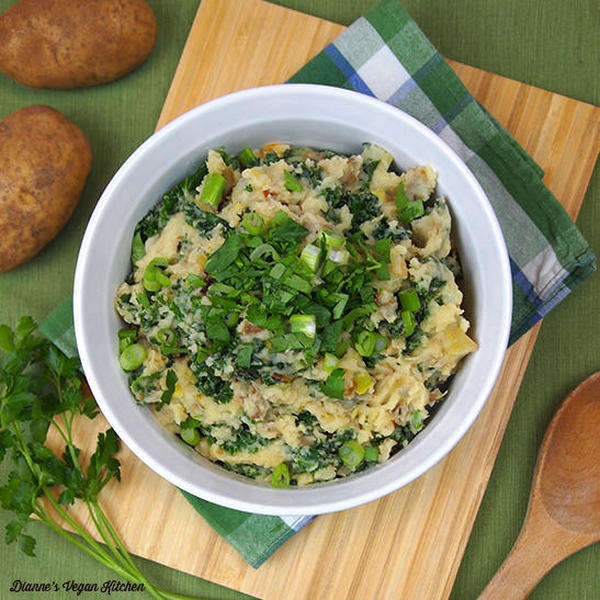
Place the potatoes in a large pot and cover with enough water to cover the pieces with an extra inch or two. Add a teaspoon of salt to the water. Bring to a boil, and then reduce heat to medium. Cook until the potatoes are fork-tender, about 15 to 20 minutes.
While the potatoes are cooking, heat the olive oil in a pan over medium-high heat and add the leeks. Sprinkle with ½ teaspoon of salt, which will help them caramelize. Cook for about 10 minutes, until the have begun to brown.
Add the kale and scallions to the pan, and cook until the kale wilts.
Drain the potatoes, and place them back in the pot along with ½ teaspoon of salt, the non-dairy milk, olive oil, nutritional yeast, and black pepper. Mash until the potatoes reach your desired mashed potato consistency.
Add the leeks, kale, and scallions to the potatoes and mix it all together.
These loaded vegan nachos with black beans, homemade guacamole, and cashew cheese will be hard to put down! Top with chopped black olives, if desired.
Submitted by Shannan Labrador
Updated on May 1, 2025
Total Time:
4 hrs 35 mins
Cook Mode (Keep screen awake)
Ingredients
This recipe was developed at its original yield. Ingredient amounts are automatically adjusted, but cooking times and steps remain unchanged. Note that not all recipes scale perfectly.
Original recipe (1X) yields 6 servings
½cupcashews
aluminum foil
1cupchunky salsa
1smallred bell pepper – cored, seeded, and chopped
2tablespoonsnutritional yeast
½teaspoonground turmeric
¼teaspoonsalt
1(13 ounce) packagetortilla chips
1(15.25 ounce) canblack bean chili (such as Amy’s®)
2ripe avocados, peeled and cubed
¼cupchopped fresh cilantro, or to taste
½lime, juiced
1pinchsalt, or to taste
1cuppico de gallo
2tablespoonschopped fresh cilantro, or to taste
Directions
Gather all ingredients.
Allrecipes / Sonia Bozzo
Place cashews in a bowl and cover with cold water. Soak for 4 hours. Drain.
Allrecipes / Sonia Bozzo
Preheat the oven to 375 degrees F (190 degrees C). Line a baking sheet with aluminum foil.
Allrecipes / Sonia Bozzo
Combine drained cashews, salsa, bell pepper, nutritional yeast, turmeric, and 1 teaspoon salt in a high-speed blender; blend until smooth and slightly warm.
Allrecipes / Sonia Bozzo
Spread tortilla chips on the prepared baking sheet. Spoon chili all over chips and spoon cashew “nacho” cheese over chili.
Allrecipes / Sonia Bozzo
Bake in the preheated oven until hot, 10 to 15 minutes.
Allrecipes / Sonia Bozzo
Meanwhile, place avocados, 1/4 cup cilantro, and lime juice in a bowl. Season with salt and mash with a fork until guacamole is mostly smooth but a little chunky.
Allrecipes / Sonia Bozzo
Top nachos with guacamole and pico de gallo, and sprinkle with cilantro. Serve hot.
Allrecipes / Sonia Bozzo
Enjoy!
Allrecipes / Sonia Bozzo
Nutrition Facts (per serving)
518
Calories
30g
Fat
57g
Carbs
10g
Protein
Nutrition Facts
Servings Per Recipe 6
Calories 518
% Daily Value *
Total Fat
30g
38%
Saturated Fat
4g
21%
Sodium
935mg
41%
Total Carbohydrate
57g
21%
Dietary Fiber
10g
36%
Total Sugars
5g
Protein
10g
21%
Vitamin C
26mg
29%
Calcium
137mg
11%
Iron
3mg
17%
Potassium
751mg
16%
* Percent Daily Values are based on a 2,000 calorie diet. Your daily values may be higher or lower depending on your calorie needs.
** Nutrient information is not available for all ingredients. Amount is based on available nutrient data.
(-) Information is not currently available for this nutrient. If you are following a medically restrictive diet, please consult your doctor or registered dietitian before preparing this recipe for personal consumption.
Photos of Loaded Vegan Nachos
Photo by
Allrecipes / Sonia Bozzo
Photo by
Sonia
Great flavors
I want to incorporate more vegan dishes in my diet and this nachos are a keeper. Love the flavors, especially of the vegan cheese sauce!
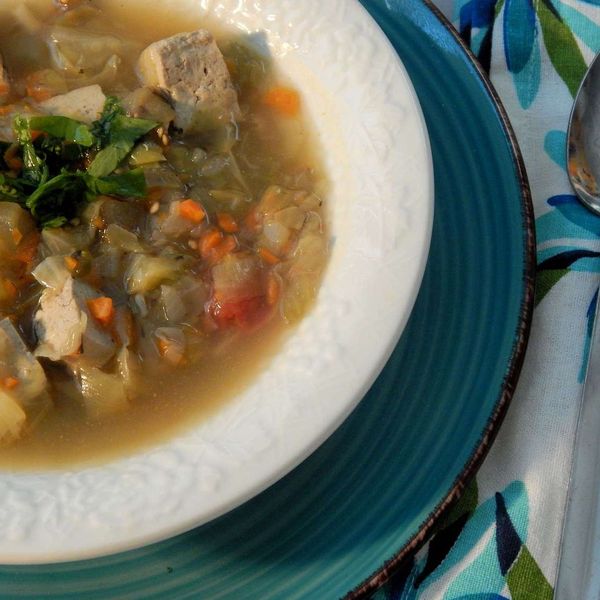
This delicious vegan vegetable soup uses lots of vegetables in a tasty, light broth, easy to adapt to your personal taste! Suggest adding cooked basmati rice when serving to make a complete meal.
This will need salt and tastes better the second day. Also, cooking and prep time may not be entirely accurate. I invented this soup at 1 am – I’m a college student – but it is delicious.
Submitted by melaelle
Updated on April 25, 2025
Cook Mode (Keep screen awake)
Ingredients
This recipe was developed at its original yield. Ingredient amounts are automatically adjusted, but cooking times and steps remain unchanged. Note that not all recipes scale perfectly.
Heat oil in a large pot over medium heat. Add leeks, celery, red onion, green onion, jalapeno, basil, and rosemary. Cook and stir until vegetables are soft, about 10 minutes. Add cabbage, eggplant, carrots, tofu, and garlic. Add water to cover. Bring soup to a boil uncovered.
Cover soup partially; reduce heat. Simmer, stirring occasionally, until vegetables are almost tender, about 20 minutes. Add tomato. Cook until vegetables are fully tender, about 10 minutes more. Season with salt.
Cook’s Note:
I do not measure precisely when I cook, generally, so this recipe is easy to play with, substitute ingredients, or add your own twist. I never measure spices or herbs, so if the amount of basil or rosemary seems too much or too little, go with what you like.
Nutrition Facts (per serving)
97
Calories
3g
Fat
15g
Carbs
4g
Protein
Nutrition Facts
Servings Per Recipe 6
Calories 97
% Daily Value *
Total Fat
3g
4%
Saturated Fat
1g
3%
Sodium
60mg
3%
Total Carbohydrate
15g
6%
Dietary Fiber
5g
16%
Total Sugars
6g
Protein
4g
7%
Vitamin C
35mg
39%
Calcium
130mg
10%
Iron
2mg
12%
Potassium
445mg
9%
* Percent Daily Values are based on a 2,000 calorie diet. Your daily values may be higher or lower depending on your calorie needs.
** Nutrient information is not available for all ingredients. Amount is based on available nutrient data.
(-) Information is not currently available for this nutrient. If you are following a medically restrictive diet, please consult your doctor or registered dietitian before preparing this recipe for personal consumption.
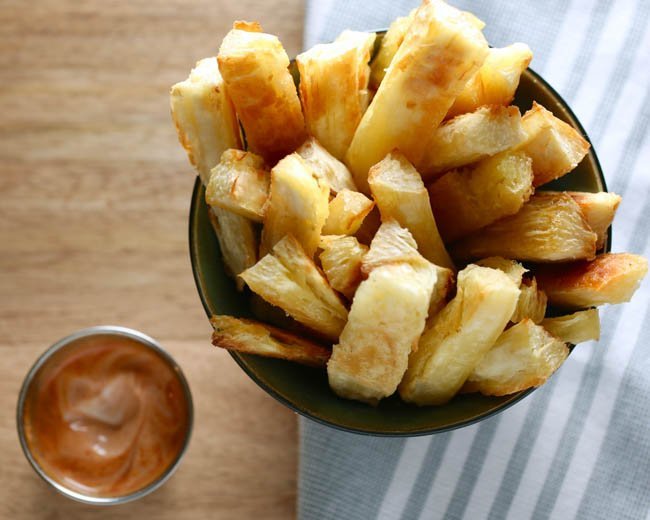
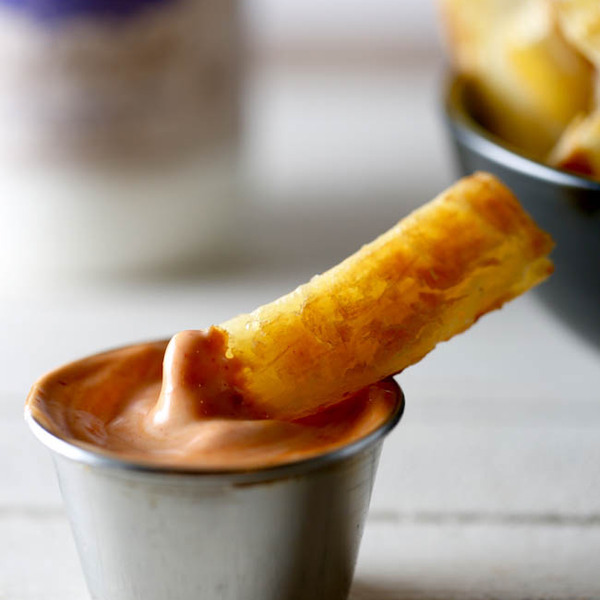
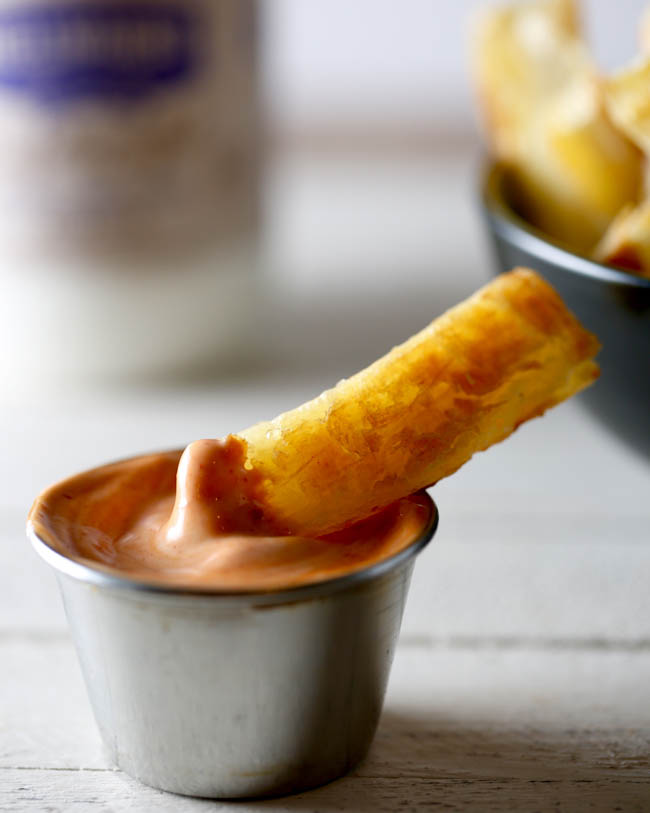
These Baked Yuca Fries with Sriracha Mayo Dip have been my highlight of the week! Growing up eating yuca, it’s so exciting to be able to play around in the kitchen with this delicious vegetable.
Yuca is a tuberous veggie just like potatoes and sweet potatoes, which makes it a great substitute.
A one cup portion provides a good source of fiber and potassium, and an excellent source of vitamin C. It is an excellent source of complex carbohydrates that will still get nice and crispy like your standard fries would.
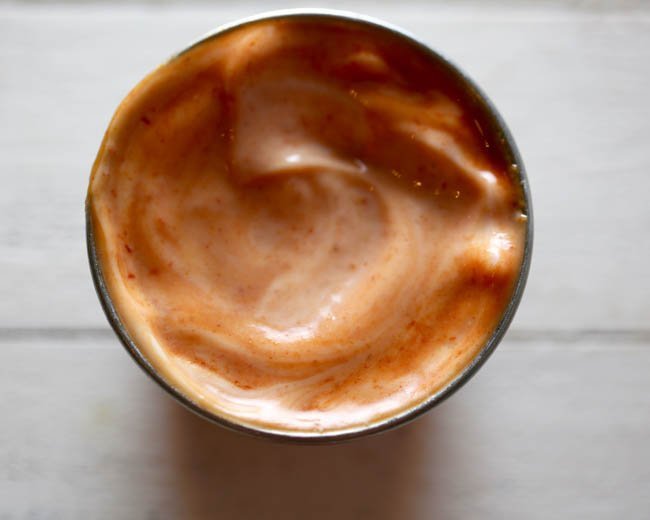
Now let’s talk about Sriracha. I could honestly put Sriracha on anything and everything, and so we did just that. The Sriracha Mayo Dip to accompany these fries is dressed to impress. Mix with Sriracha and garlic powder and we are cooking. Let’s actually get to cooking.
To begin, boil the yuca chunks for 25 minutes in a pot of water with the cover on. While that’s boiling, add the mayonnaise, Sriracha sauce and garlic powder to a small bowl or cup and mix it well with a spoon and scoop into a small bowl. Set aside the dip while we finish up with the yuca. Preheat the oven to 400F. Once the yuca is finished boiling, drain, allow to cool, and using a knife, cut each yuca chunk lengthwise into 5-6 pieces, so that they resemble thick french fries. Make sure you remove the fibrous pieces from the center while cutting. Assemble the yuca fries on a baking sheet, and drizzle olive oil over them evenly. Pop them into the oven and bake for 15 minutes. Then, open the oven and flip the yuca fries with a spatula. Bake for another 10 minutes. Once done, allow to cool and enjoy with our homemade Sriracha Mayo Dip!
Feel free to drop us a line in the comments and let us know what you think of our Baked Yuca Fries with Sriracha Mayo Dip!
Baked Yuca Fries with Sriracha Mayo Dip
Ingredients
2 pounds yuca, peeled and cut crosswise into 4″ pieces
2 tablespoons olive oil
2 tablespoons of mayonnaise
1 tablespoon Sriracha sauce
1/4 teaspoon garlic powder
Instructions
In a pot of water, boil the yuca chunks for 25 minutes, with the cover on
While that’s boiling, add the mayonnaise, Sriracha sauce and garlic powder to a small bowl or cup
Mix well with a spoon and scoop into a small bowl. Set aside
Preheat the oven to 400F
Once the yucca is finished boiling, drain, allow to cool, and using a knife, cut each yucca chunk lengthwise into 5-6 pieces, so that they resemble thick french fries
Make sure you remove the fibrous pieces from the center
Assemble the yucca fries on a baking sheet, and drizzle olive oil over them evenly
Pop into the oven and bake for 15 minutes. Open the oven, and with a spatula, flip the yucca fries. Bake for another 10 minutes
Once done, allow to cool and enjoy with our homemade Sriracha Mayo Dip!


 We did it, Spiriteds! We successfully introduced a new smoothie to the girls, and it isn’t even pink. Can you even believe it? I can’t. But that should tell you something about this Peach Mango Smoothie. It is rich and creamy without loads of sugar. It’s gluten-free, dairy-free, and vegan or paleo without sacrificing flavor. And, if you’re looking to shake up your smoothie game, then this is the one to nab.
 Why?
Why?

 Can we also take a moment to enjoy Peach Mango Smoothie’s sunshine-y, springy color? FINALLY, we are getting weather appropriate for the month of April. And I’m all for it because we are dead with cabin fever over here. This is a completely true story. Our family has absolutely no dambs left to give snow fall, below zero temps, and icy sidewalks.
 If you are in doubt of our status, then I present this next scenario as evidence. Twinkle had a 2.5-hour ophthalmology appointment this past week and flat-out looked the doctor in the face and said, “I’m so sorry, but this is just so boring, and we’re not even done. And I’m 12 today [she’s not]. And how can I even answer your alphabet questions when I can’t even see my mom? Ugh, my eyes are so blind they’re tired.” [Starts to snore in the chair]
 But, fortunately, she does love Peach Mango Smoothie, and after a story like that, how does one even come back to a smoothie recipe? Bottom line, I’m taking the wins where I can get them. If the girls complain through eye appointments but will eat a non-pink Peach Mango Smoothie, then I’M TAKING IT, I’M WINNING AT SOMETHING.


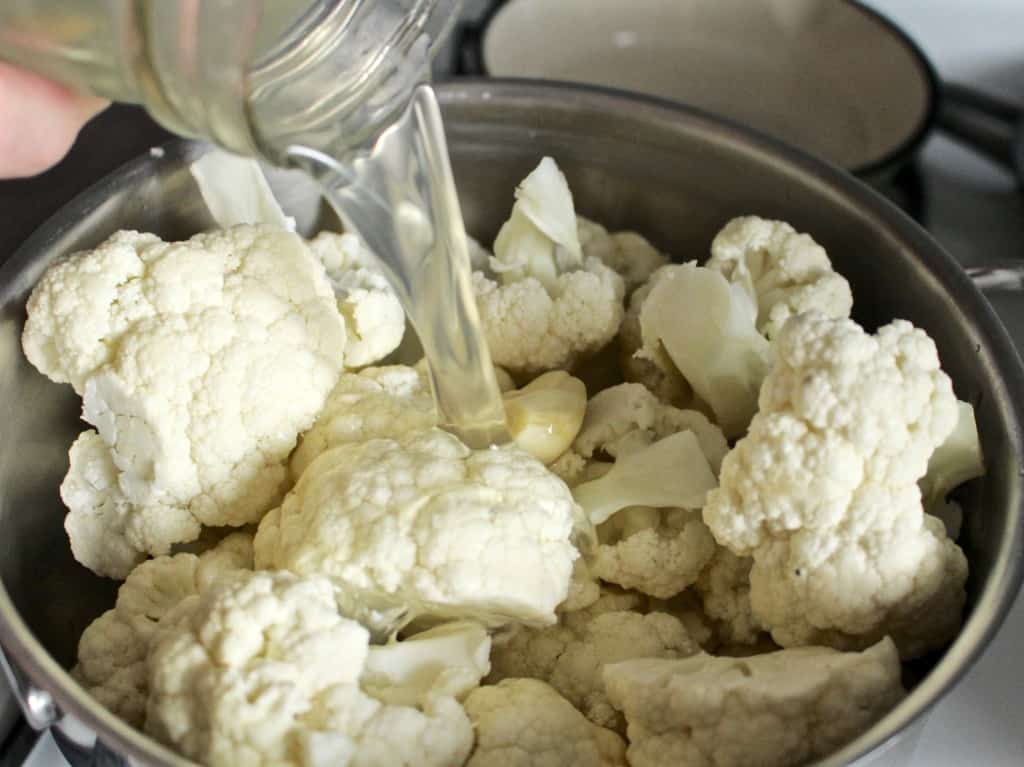 Cut the cauliflower in large chucks and place it in a saucepan with the garlic and salt. Pour the broth over it all.
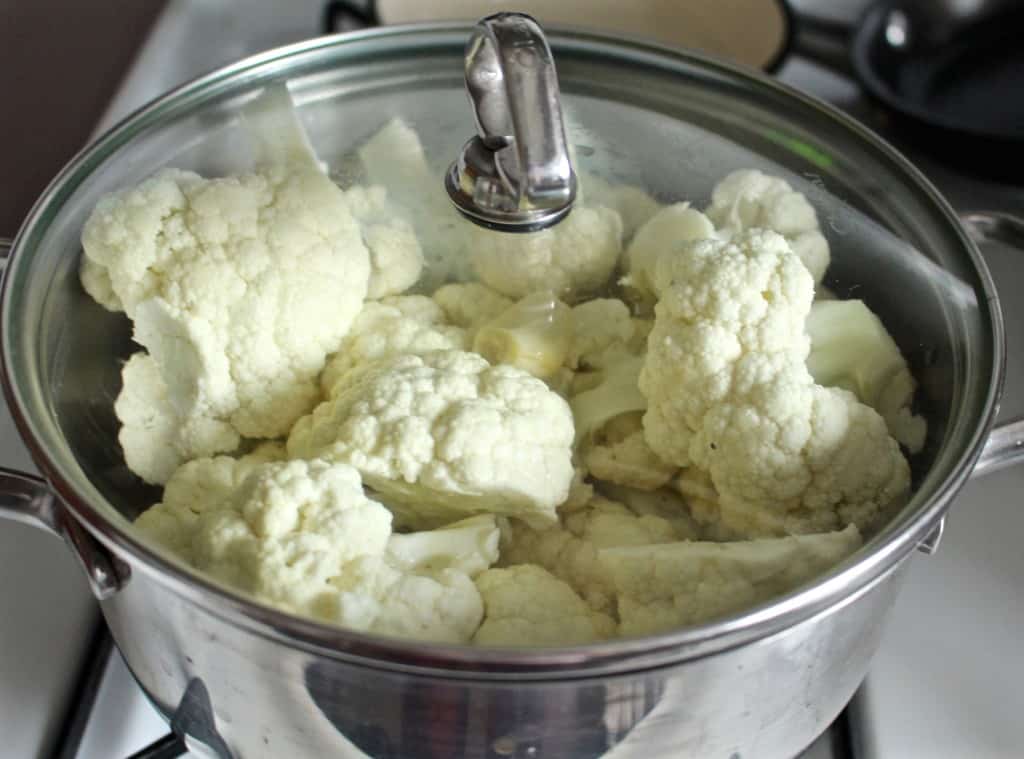
 Cover and cook on medium heat for about 25 minutes or until a fork can be pushed in easily.
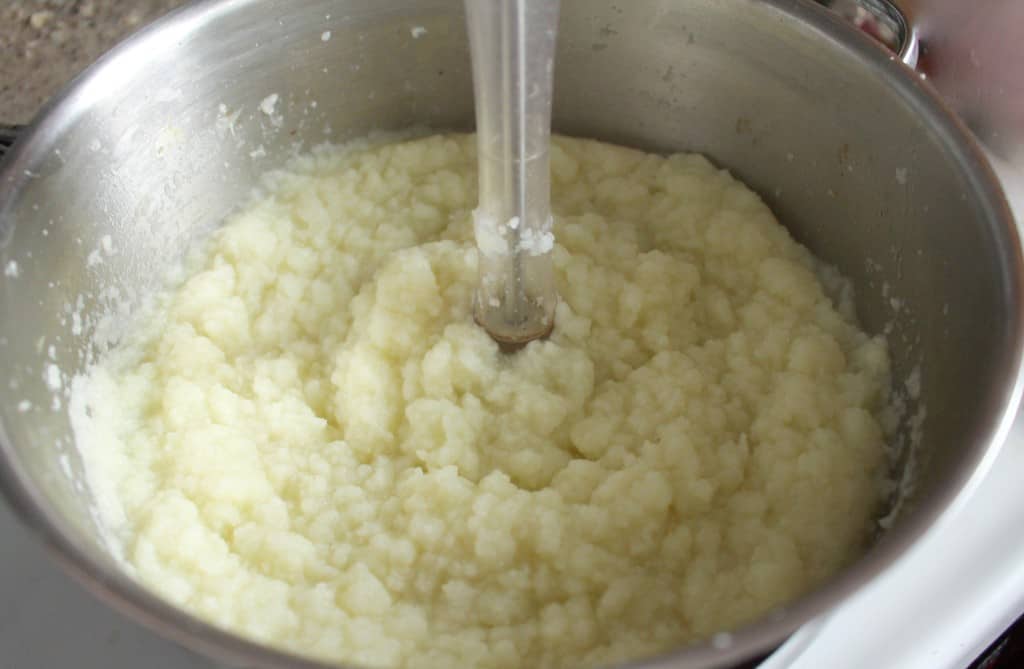
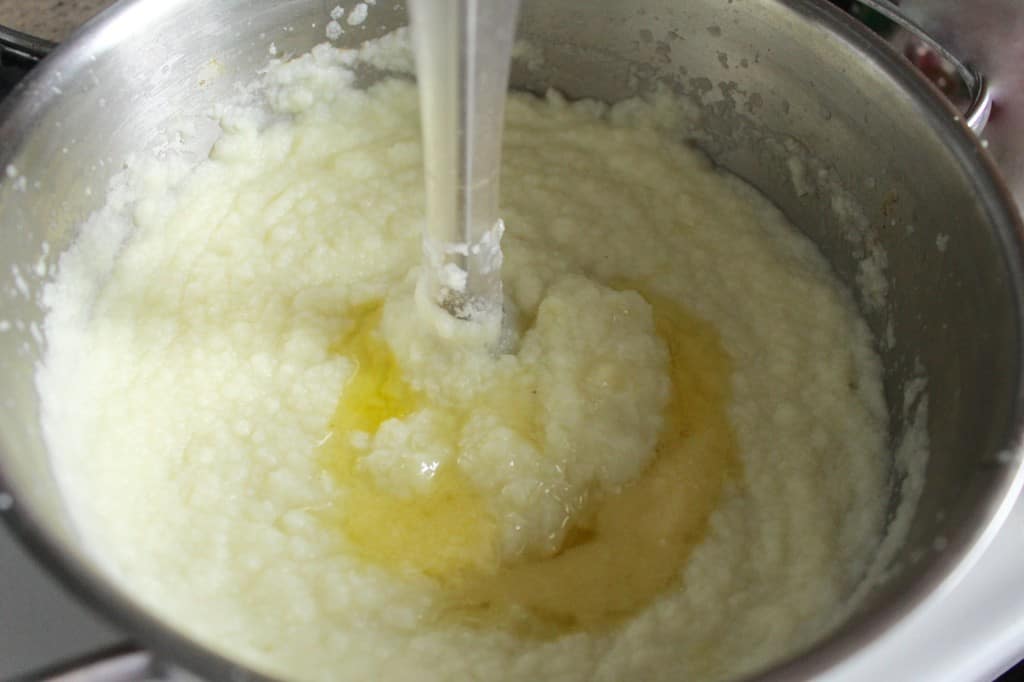 Take the pan off the heat and, using an immersion blender, blend until there are no large chunks. Add the ghee (or coconut oil) and blend again until super smooth; 1-2 minutes.
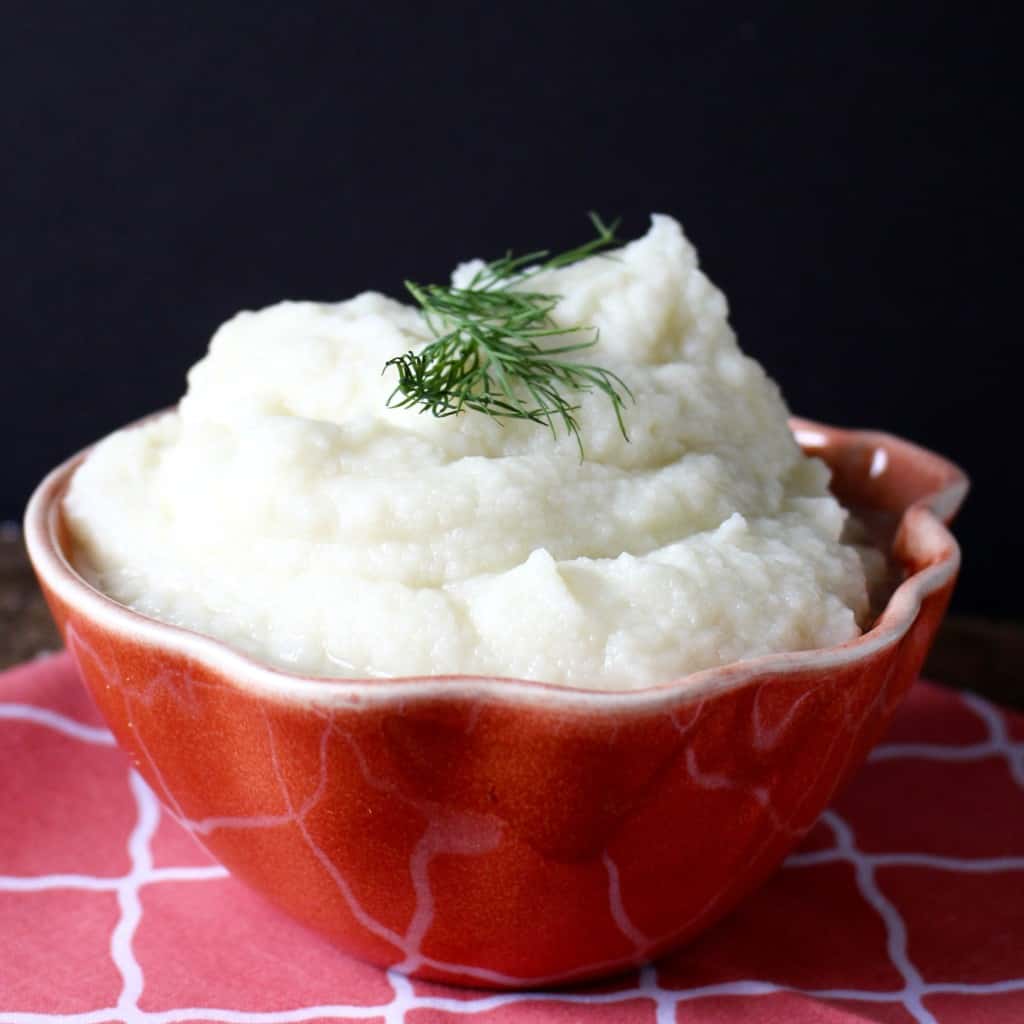


:max_bytes(150000):strip_icc()/ALR-270237-vegan-loaded-nachos-VAT-4x3-ea5b9e251033448ba9a1a1df9cbc520d.jpg)


 Yuca is a tuberous veggie just like potatoes and sweet potatoes, which makes it a great substitute.
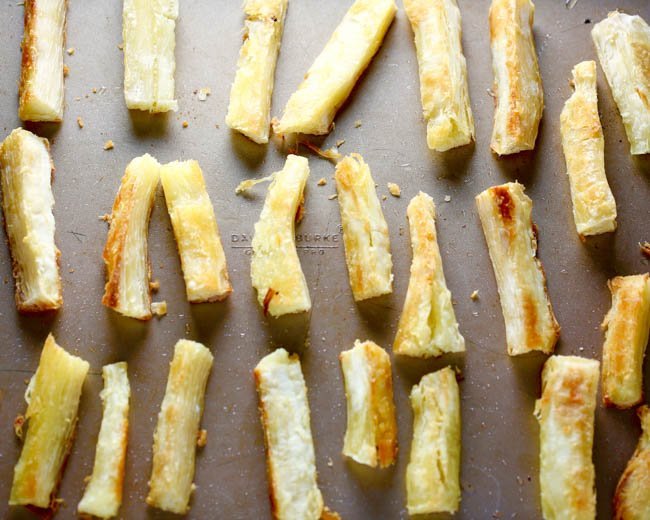 To begin, boil the yuca chunks for 25 minutes in a pot of water with the cover on. While that’s boiling, add the mayonnaise, Sriracha sauce and garlic powder to a small bowl or cup and mix it well with a spoon and scoop into a small bowl. Set aside the dip while we finish up with the yuca. Preheat the oven to 400F. Once the yuca is finished boiling, drain, allow to cool, and using a knife, cut each yuca chunk lengthwise into 5-6 pieces, so that they resemble thick french fries. Make sure you remove the fibrous pieces from the center while cutting. Assemble the yuca fries on a baking sheet, and drizzle olive oil over them evenly. Pop them into the oven and bake for 15 minutes. Then, open the oven and flip the yuca fries with a spatula. Bake for another 10 minutes. Once done, allow to cool and enjoy with our homemade Sriracha Mayo Dip!