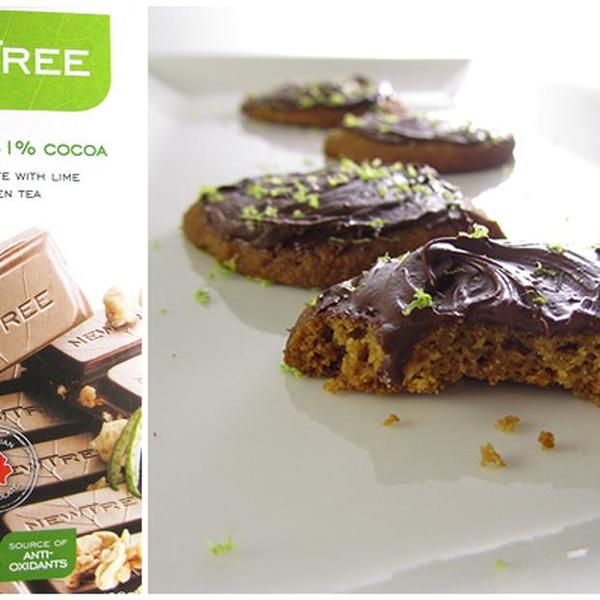
For anyone who knows me or follows this blog, it’s no secret that I love citrus. From the common most common navel orange the deceptively dressed rangpur lime to fragrant bergamot and the good-luck pommelo, I have never met a citrus fruit I did not love. So, when NewTree Chocolates sent me a little “care package” with a bunch of their chocolate bars, their lime granola milk chocolate bar was the first one I wanted to try.
When I first read that the bar was only 31% cocoa, I thought I might be disappointed, but I was far from it! It turns out, those Beligians know a thing or two about chocolate, and created a perfectly balanced bar. As for the other flavors, I also really loved their cassis with 73% cocoa, the lavender milk chocolate, and the simple plain dark chocolate. All of these have 30% less sugar than comparable brands and are packed with extra healthy ingredients. NewTree is also committed to sustainable business practices- head over to their site to learn more.
Since I’m on a vegan and gluten free cleanse until mid-march, there are no milk chocolate goodies for me. Necessity being the mother of invention, I headed into the kitchen to create a cookie based on the lime-granola bar I loved so much. These cookies are made from oat and coconut flours and surprisingly, they hold together without any xantham gum! I never would have thought to try this if it hadn’t been for my friend Kayla over at Babes in Soyland. She made this recipe for vegan thin mints from Chef Chloe, but replaced the all purpose flour with oat flour. Kayla’s cookies were so delicious, I was not afraid to lick my fingers in front of my co-workers. My cookie recipe is loosely based on Chef Chloe’s as well, but strays pretty far from the thin mint cookie, as you can see.
You can enter to win 2 NewTree Chocolate Bars of your own. Here’s how the giveaway works, you get one entry for every action you take:
Follow me on Twitter, then tweet this giveaway. You can say something like: GlutenFree Vegan Cookie w/ Chocolate Frosting + NewTree Chocolate #Giveaway @thetomatotart @newtreechocolat http://wp.me/p16qcA-ey (and leave one comment below)
Follow NewTree Chocolate on Twitter (leave 1 comment below)
Get My Rss Feed (leave 1 comment below)
If you’re doing any of these things already, you can leave a comment and let me know. As always, your tweets and facebook posts are really appreciated.
The giveaway will end at 11:59pm on March 2, 2011 and the winner will be chosen by a random number generator Ended and the winner was chosen by a random number generator. Good luck, and enjoy these tasty cookies!
Congratulations, Amanda! You’ve won by random selection with your comment about following me on Twitter!
You’ll get to choose two chocolate bars from New Tree Chocolates!
COOKIE INGREDIENTS
1 cup oat flour
¼ cup coconut flour
¾ cup muscavado sugar
¼ teaspoon salt
¼ teaspoon baking soda
¼ teaspoon baking powder
½ cup vegan margarine (I used Earth Balance buttery sticks)
¼ cup coconut oil
1 tablespoons unsweetened whole grain rice milk
¼ teaspoon lime oil
zest of one lime
CHOCOLATE FROSTING INGREDIENTS
2 cups dairy-free semi-sweet chocolate
2 tablespoons vegan margarine
1/4 teaspoon lime oil
Zest of one lime for garnish
COOKIE INSTRUCTIONS
In a food processor, pulse flour, sugar, salt, and baking powder & soda until well combined. Add margarine, rice milk, lime zest, and lime oil.
Pulse a until mixture comes together.
Transfer mixture to a large bowl and knead with your hands in the bowl for one minute.
Chill the dough in the refrigerator for at least 1 hour.
Preheat oven to 350º F and line two large baking sheets with parchment paper
Roll a rounded teaspoon of cookie dough into a ball and place onto prepared cookie sheets, making sure to leave about three inches space between balls. Evenly flatten the dough with your fingertips so that it is about ¼ inch thick and bake for 12-14 minutes. Let cool completely.
CHOCOLATE FROSTING INSTRUCTIONS
Melt chocolate chips and margarine over a double boiler. Stir in the lime oil and mix until smooth
Spread a thin layer of the chocolate on top of the cookies
Sprinkle with more lime zest (optional but pretty & delicious!)
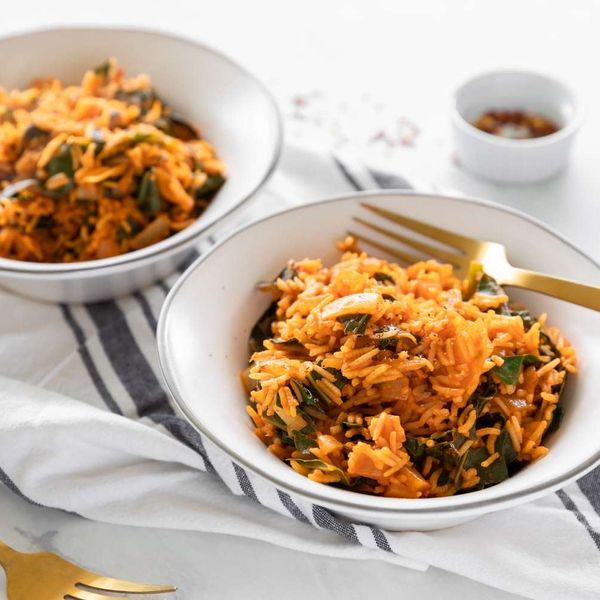
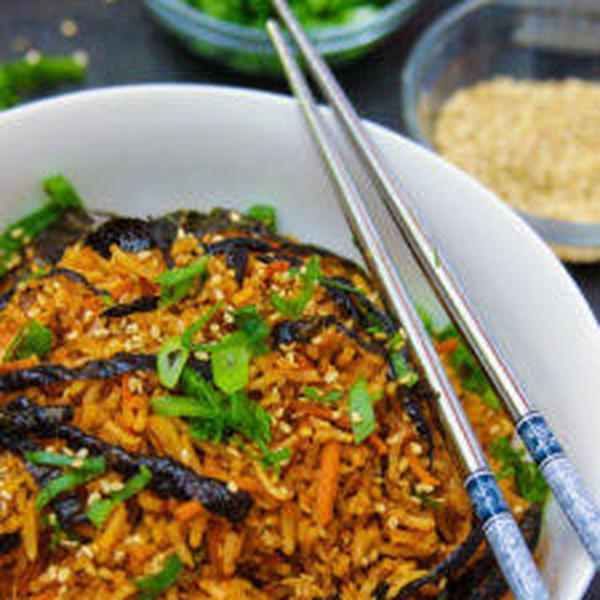
Not everyone enjoys eating leafy green vegetables (especially those who live north of the Mason-Dixon Line), but when collard greens are spiced perfectly and cooked properly, the result is simply scrumptious. This vegan rice and greens recipe gets its roots from the Deep South where collard greens were traditionally boiled in water alongside bacon or pork scraps. Here, vegetable stock is substituted for a meat-flavored broth and vegan margarine provides the medium for sautéing. The garlic, paprika, and cayenne top off the dish with a kick of spice for an updated recipe that’s perfect for a vegan weeknight meal. If you’re not eating vegan, substitute butter (in lieu of vegan margarine) for a satiating bit of fat.
Dirty rice and collard greens can be served as a vegetarian side dish paired with fried or baked tofu. And meat eaters can enjoy it with grilled white fish or chicken for a well-balanced meal. Or keep it a one-pot dish by tossing in some Italian sausage. This low-calorie meal is also a great option for anyone cooking on a budget. Rice—one of the cheapest foods you can buy—makes it a filling meal (even without the tofu) and the vitamins contained in the collards provide the fuel to get you through the day.
For a gluten-free option to this recipe, check the label on your vegetable broth. Or better yet, make your own stock from scratch so you know exactly what’s in it.
Cook Mode (Keep screen awake)
1tablespoonvegan margarine
1mediumonion, chopped
2clovesgarlic, minced
1cupbasmati rice, or another long-grain rice
2cupsvegetable broth
2tablespoonssmoked paprika
1/4teaspoonred pepper flakes
1/2teaspoonsalt
2cups chopped collard greens, rinsed
Freshly ground black pepper, to taste
1dashcayenne, optional
Gather the ingredients.
The Spruce
In a large pot or Dutch oven, melt the vegan margarine over medium heat.
The Spruce
Add the onion and garlic and sauté for 2 minutes or until the onion turns translucent.
The Spruce
Add the rice and cook for 1 minute more.
The Spruce
Add the vegetable broth, paprika, red pepper flakes, and salt. Bring to a simmer.
The Spruce
Add the collards and reduce the heat to low.
The Spruce
Simmer for 15 to18 minutes until the rice is cooked through. Add additional stock, if necessary.
The Spruce
Remove the pot from the heat, taste the dish, and add black pepper or cayenne, if desired.
Tips
Most recipes call for the rice to be cooked al dente (still firm when bitten). However, this dish tastes best when the rice is just slightly overcooked and soft.
For an even spicier dish, mix in a 1/4 to 1/2 teaspoon of cayenne pepper (or a dash of hot sauce) before serving.
This recipe tastes even better as leftovers, so make sure you make enough to pack along for a work lunch the next day.
Nutrition Facts (per serving)
138
Calories
4g
Fat
23g
Carbs
5g
Protein
×
Nutrition Facts
Servings: 4
Amount per serving
Calories
138
% Daily Value*
4g
5%
Saturated Fat 1g
4%
0mg
0%
616mg
27%
23g
8%
Dietary Fiber 6g
20%
Total Sugars 3g
5g
Vitamin C 20mg
98%
Calcium 158mg
12%
Iron 2mg
14%
Potassium 275mg
6%
*The % Daily Value (DV) tells you how much a nutrient in a food serving contributes to a daily diet. 2,000 calories a day is used for general nutrition advice.
(Nutrition information is calculated using an ingredient database and should be considered an estimate.)
Rate This Recipe
I don’t like this at all. It’s not the worst. Sure, this will do. I’m a fan—would recommend. Amazing! I love it! Thanks for your rating!
One of the biggest complaints I hear from people trying to permanently adopt a vegan diet, is that they can’t cook or bake, and there are no ready made options for them. So they fall of the wagon because they crave something and can’t make it themselves. Well, I want to change that. As well as my more advanced recipes, I really want to start working on lots of options for those who either don’t know how to cook or bake, or just don’t have the time. This is one of those recipes. I have been brainstorming about things anyone can make, even with a tiny kitchen or a college kid trying to stick to a vegan life living in a dorm room. This takes five minutes, anyone can do it, and all you need is a microwave.
Chocolate is my weakness, my kryptonite. I have to set myself up for success, and that is knowing, I need something a little sweet after dinner. That can be fruit or something really healthy, but sometimes I just need some chocolate cake. I need a quick healthy option, so I don’t have a serious craving and go really crazy and eat something that will make me feel sick and regret all of my decisions! I know myself and my body and brain, and how they work together, and sometimes the best idea for me is to have plan. A plan for the times that I really, really need chocolate!
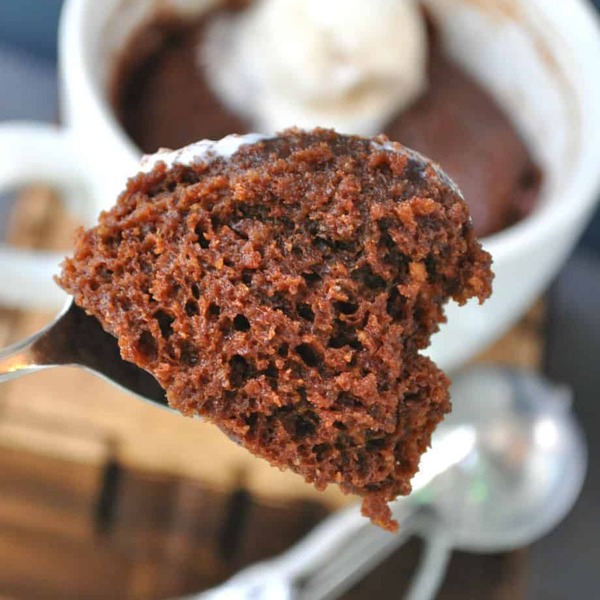
Not only is this a super moist and fluffy cake, I took it up a notch by adding some dark chocolate to the center, and when your spoon dives into the middle of this amazing cake, you get an extra special treat, with a beautiful lava flow of dark sweet goodness. I can’t tell you what a dream come true this is for me, I have been dying for a quick luscious dessert that will satisfy any craving. Plant based and refined sugar free, this is something to enjoy and not feel guilty about. I threw some vegan vanilla ice cream on top, and holy crap, your taste buds will never know this was a five minute vegan dessert! You literally mix everything in a mug, throw it into the microwave for a couple of minutes, and out pops magic, I swear, it must be magic!
I dare you to find an easier dessert! I would like to also suggest that it is one of the best chocolate cakes as well. I was just glad I decided to make this a single serving, because I would have eaten more! This also takes me back to my single days living by myself and trying to figure out how to make fantastic meals for one. Here is a good way to take care of yourself, have your cake!!! I hope you enjoy! Adapted from The Food Network.
Vegan Molten Chocolate Mug Cake
Created by Lauren Hartmann on October 21, 2016
Prep Time: 3m
Cook Time: 2m
Total Time: 5m
Serves: 1 perspn
Yield: 1 mug cake
Category: Dessert
Ingredients
2tbsp.Vegan butter( I use Earth Balance)
3tbsp.Coconut cream ( I use Trader Joe’s)
1Flax egg ( 2Tbsp. Flax meal+3 Tbsp. water=1 egg)
3tbsp.All purpose flour
4tbsp.Coconut sugar or other sweetener of choice
2tbsp.Cocoa powder
1/4tsp.Vanilla
1tsp.Salt
1ozDark chocolate
Instructions
Make your flax egg and set aside.
In a large mug, melt the vegan butter in the microwave for about 15-20 seconds. Let cool just a bit and stir in the coconut cream and flax egg. Make sure it is combined well.
Stir in the flour and sweetener. Then stir in the cocoa, salt and vanilla.
In the center of the batter, place a 1 oz. chunk of dark chocolate(or more if you want)
Microwave for 2-2 1/2 minutes. I ended up doing about 2 minutes and 15 seconds. Throw some vegan ice cream or vegan whipped cream on top and enjoy!
Published: · Modified: by Alissa Saenz · This post may contain affiliate links · 26 Comments
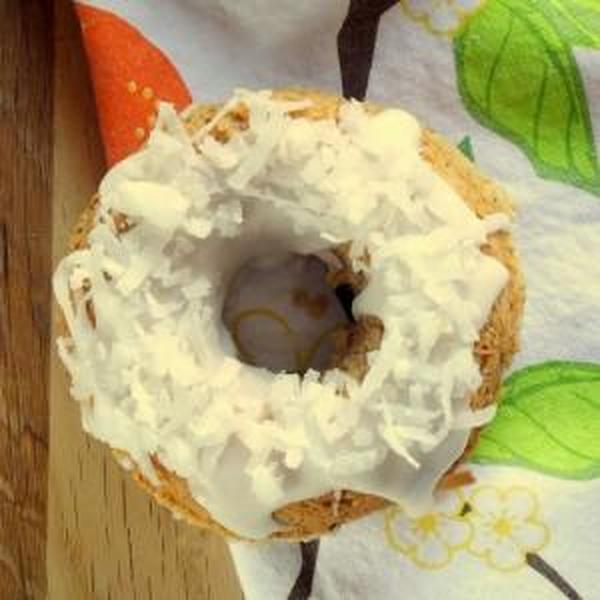
These scrumptious vegan lemon doughnuts are baked (not fried!), so they’re super easy to whip up at a moment’s notice! Sweet and tangy and drizzled in lemon glaze, they’re perfect for dessert or a sweet indulgent breakfast!
You really can’t go wrong with lemon flavored desserts. As a recipe creator I’ve been surprised to find that my lemon desserts are often more popular than chocolate ones. Whoa! My vegan lemon bars, vegan lemon bundt cake, vegan lemon cupcakes, and vegan lemon loaf are some of my readers’ favorites. Well, if you enjoyed any of those treats, I think you’ll LOVE my vegan lemon doughnuts.
Jump to:
Ingredients You’ll Need
How They’re Made
Variations
Shelf-Life & Storage
Frequently Asked Questions
More Vegan Doughnut Recipes
Vegan Lemon Doughnuts
This recipe is a great way satisfy your doughnut cravings. It’s super quick and easy. Baking the doughnuts cuts out all of the fuss with hot oil that’s normally involved in making a batch of doughnuts, but they’re every bit as delicious as my more conventional, fried vegan doughnuts.
You’ll need to get yourself a doughnut pan, but it’s totally a worthwhile investment! Check out the bottom of this post for some more delicious recipes you can make with it.
Ingredients You’ll Need
Below you’ll find a list of ingredients in this recipe, with notes and substitutions. Scroll all the way to the bottom of the post to see the full recipe, including the amount of each ingredient.
All-purpose flour. This might also be known to you as white flour or plain old wheat flour. I’ve also successfully made this recipe with whole wheat pastry flour.
Sugar. Make sure you’re using organic granulated sugar. Conventional sugar is often processed using animal bone char, so you’ll want to avoid it to keep the recipe vegan.
Baking soda.
Baking powder.
Salt.
Non-dairy milk. Use an unsweetened and unflavored variety. Pretty much anything other than canned coconut milk will work, but if you need guidance, check out my guide to non-dairy milks.
Lemon juice. Lemon is the star of this recipe, so use freshly squeezed juice. You’ll need about three lemons to give you enough juice for the doughnuts and the glaze.
Vegetable oil. Any neutral oil you normally like to bake with will work in this recipe. Melted coconut oil, canola oil, and corn oil are all fine. You could even use olive oil!
Lemon zest.
Lemon extract.
Coloring. This is totally optional, but if you’d like your doughnuts to have a nice yellow color like mine, add a couple drops of natural yellow food coloring or a pinch of turmeric.
Powdered sugar. Again, make sure this is organic.
How They’re Made
The following is a detailed photo tutorial on how to make this dish. Scroll all the way down if you’d like to skip right to the recipe!
Step 1: Start by preheating your oven to 350°F and oiling the cavities of your doughnut pan(s).
Step 2: Combine your dry ingredients. Whisk together the flour, sugar, baking powder, soda, and salt.
Step 3: Now combine your wet ingredients in a small container: milk, lemon juice, oil, lemon zest, lemon extract, and yellow food coloring or turmeric, if using.
Step 4: Pour the wet ingredients into the bowl with the dry ingredients. Stir everything together just until a batter is formed and you stop seeing flour streaks.
Step 5: Divide the batter among the cavities of your doughnut pans. You can pipe it in if you’d like, but I keep things simple and use a spoon.
Step 6: Stick the doughnut pans into the oven and bake your doughnuts until they’re fluffy and have darkened a bit around the edges.
Step 7: Place the pan on a wire rack and let the doughnuts cool completely before you remove them.
Step 8: Once your doughnuts are cool, stir some powdered sugar together with lemon juice in a small bowl.
Step 9: Dip your doughnuts in the glaze until the tops are nicely coated. Let them sit on parchment paper for a few minutes to allow the glaze to set.
Variations
Cream cheese frosting topped doughnuts. Swap the glaze out with my vegan cream cheese frosting. Just be warned that it’ll go on quite a bit thicker!
Top your doughnuts. Coat the glaze in sprinkles, decorating sugar, shredded coconut, or chopped nuts.
Powdered sugar coated doughnuts. Skip the glaze, and instead coat your doughnuts in organic powdered sugar.
Shelf-Life & Storage
Vegan lemon doughnuts will keep in an airtight container at room temperature for 2 to 3 days, in the fridge for about 1 week, or in the freezer for about 3 months.
Frequently Asked Questions
Can these doughnuts be made gluten-free?
I haven’t tested a gluten-free version of this recipe, but I think an all-purpose gluten-free flour blend would work.
My doughnuts are sticking to the pan. How can I get them out?
First, make sure they’re completely cool. Once they are, use a butter knife to gently loosen each doughnut from the pan. Keep working it around the doughnut until it comes out. It’s worth mentioning that I’ve found that older pans tend to stick more, so if you’ve been using the same pan for a while, consider replacing it.
Can I make this recipe without a doughnut pan?
You can try baking the batter in a muffin tin, or even a mini muffin tin, which will give you something like doughnut holes. Keep an eye on them while they’re in the oven, as the bake time may need to be reduced a bit.
More Vegan Doughnut Recipes
Like this recipe? If so, please stop back and leave me a review and rating below if you try it!Also be sure to follow me on Facebook, Pinterest or Instagram, or subscribe to my newsletter for more recipes like this one!
Vegan Lemon Doughnuts
These scrumptious vegan lemon doughnuts are baked (not fried!), so they’re super easy to whip up at a moment’s notice! Sweet and tangy and drizzled in lemon glaze, they’re perfect for dessert or a sweet indulgent breakfast!
Course Dessert
Cuisine American
Prep Time 10 minutesminutes
Cook Time 12 minutesminutes
Total Time 22 minutesminutes
Servings 12
Calories 227kcal
Author Alissa
Ingredients
2cupsall-purpose flour
¾cuporganic granulated sugar
1teaspoonbaking powder
¼teaspoonbaking soda
½teaspoonsalt
¾cupunflavored and unsweetened non-dairy milk
¼cupfreshly squeezed lemon juice
¼cupvegetable oil
2teaspoonslemon zest
1teaspoonlemon extract
2dropsnatural yellow food coloring(optional, you can also use a pinch of turmeric for color)
For the Glaze
1 ½cupsorganic powdered sugar
3tablespoonsfreshly squeezed lemon juice
Instructions
Make the Donuts
Preheat oven to 350°F and lightly oil an 12 cavity doughnut pan, or a couple of 6 cavity pans.
Whisk together the flour, sugar, baking powder, baking soda, and salt in a large mixing bowl.
In a small container, such as a liquid measuring cup, stir together the milk, lemon juice, oil, lemon zest, lemon extract, and yellow food coloring, if you’re using it.
Pour the milk mixture into the bowl with the dry ingredients, and stir the ingredients together just until they’re completely combined. Don’t overmix the batter.
Divide the batter among the doughnut cavities, filling each one to a level just barely below the rim. You can spoon the batter in, or pipe it using a pastry bag if you’d like.
Bake the doughnuts for 12 minutes, or until they’re puffy and ever so slightly browned around the edges.
Place the pans on a cooling rack and let the doughnuts cool completely.
Once the doughnuts are cool, stir the glaze ingredients together in a small bowl. You can add extra powdered sugar if if seems too thin, or more lemon juice or some water if if seems too thick.
Dip the top of each doughnut in the glaze, then place it on a sheet of parchment paper until the glaze has set,
Hi, I’m Alissa! I’m a former attorney turned professional food blogger. I love creating vegan recipes with bold flavors! You can read more about me here.
I’d love to connect with you on Facebook, Instagram, or Pinterest.
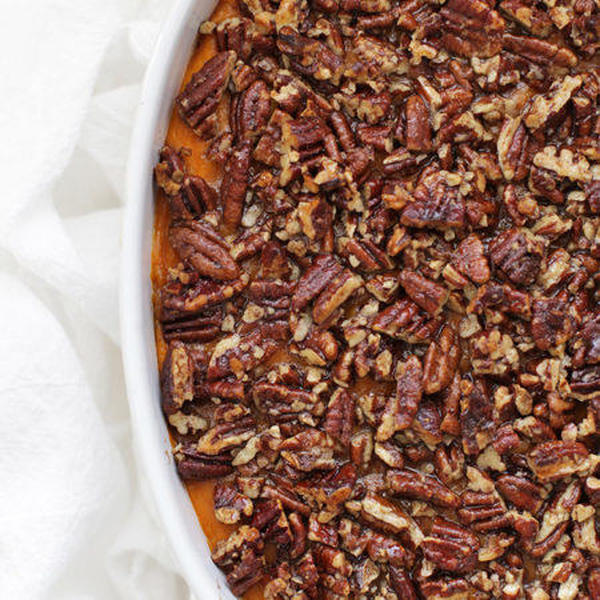
Our favorite holiday side dish is better than ever! This paleo or vegan sweet potato casserole recipe is a naturally sweetened combination of mashed sweet potato filling and a crunchy maple pecan topping your whole family will LOVE.
Since 2016, this paleo sweet potato casserole recipe has been a staple on our holiday table and hundreds of your holiday tables. It’s THE BEST!
It’s EASY to make. No fancy skills or special equipment required! You won’t need any fancy flours or hard-to-find ingredients either.
It’s DELICIOUS. Velvety smooth sweet potato puree is topped with a crunchy maple pecan topping. Every bite has a delicious combination of textures and balanced flavor.
It’s HEALTHIER than classic sweet potato casserole. This gluten-free sweet potato casserole is naturally sweetened, easily dairy-free, and paleo AND vegan friendly. It works for so many different dietary needs!
It’s a CROWD FAVORITE. This is always one of the first Thanksgiving side dishes to disappear! The creamy sweet potatoes, the perfect crunch of the pecans? ALWAYS a hit!
It’s MAKE-AHEAD FRIENDLY. Another great thing about this classic side dish is that you can absolutely make it in advance, which frees up time on Thanksgiving Day!
Here’s all you need to get started on this healthy sweet potato casserole recipe…
Simple Ingredients To Start
So, what makes this paleo/vegan sweet potato casserole different from traditional sweet potato casserole? A few simple ingredient swaps! Let’s take a look:
Fresh Sweet Potatoes. To start, you’ll need peeled, diced sweet potatoes. Look for orange-flesh sweet potatoes, rather than purple sweet potatoes or white sweet potatoes. (Some stores in the U.S. label these as yams).
Dairy-Free Milk. Next up is your favorite non-dairy milk. Use whatever you drink at home–almond milk, cashew milk, oat milk, coconut milk, and soy milk all work! (For paleo, avoid soy milk.)
A Little Fat. Next, you’ll need some melted butter, ghee, melted vegan butter (like Earth Balance), or melted coconut oil. Choose the one that fits your dietary needs best!
Pure Maple Syrup. No white sugar or brown sugar here! Maple syrup (NOT pancake syrup!) adds just the right amount of subtle sweetness to both the sweet potato filling and the crunchy pecan topping.
Salt & Vanilla. Some kosher salt and vanilla extract round out the flavors beautifully.
Eggs or An Egg Substitute. For paleo, feel free to use regular eggs. For vegan, use 2 Tablespoons powdered egg substitute (such as Ener-G egg replacer or The Neat Egg), or 1 Tablespoon cornstarch).
Raw Pecans. For the maple pecan topping, you’ll need RAW pecans. If you use toasted or roasted pecans, they’ll burn in the oven. Start with raw pecans for best results!
Cinnamon. A little bit of cinnamon adds the perfect finishing flavor!
How To Make Vegan or Paleo Sweet Potato Casserole, Step By Step
As always, you can find the full recipe with ingredient amounts, detailed instructions, and tips in the recipe card below.
First, Make The Sweet Potato Filling
Cook Sweet Potatoes. Place sweet potato cubes in a large pot and cover by at least 2-3 inches of water. Bring to a boil over medium-high heat. Boil until fork tender (potatoes will pierce easily with a fork). Drain sweet potatoes.
Combine. Transfer cooked sweet potatoes to a large bowl. Add milk, butter/oil, syrup, salt, vanilla, and egg/egg sub.
Mash with a potato masher, fork, or hand mixer until no lumps remain. If needed, add 2-3 Tbsp additional milk if your mixture seems too thick. (For perfectly smooth mash, you can work in batches and puree in a food processor or blender!)
Transfer. Pour the mashed sweet potato mixture into an 8×8 or 2 quart baking dish and smooth the surface. (You can make the sweet potato casserole up to this point the day before Thanksgiving, if desired. Simply cover the baking dish and refrigerate)
Next, Make The Pecan Topping & Bake
Preheat. When ready to bake the sweet potatoes, preheat the oven temperature to 375 degrees F.
Combine. In a medium bowl, combine pecans, butter/oil, syrup, cinnamon, and salt.
Sprinkle pecan crumble mixture on top of the sweet potatoes.
Cover the dish with foil and bake 20 minutes at 375 degrees.
Remove foil and bake another 20-25 minutes. If pecans begin to brown too quickly, simply cover with foil again.
Serve & Store. Enjoy warm from the oven. Store leftovers covered with plastic wrap or foil in the fridge 2-3 days. (You *can* transfer it to an airtight container, but I find the layers preserve better in the casserole dish.)
If you’ve got multiple things in the oven (like for Thanksgiving Dinner!), allow yourself some extra time. If your oven is set to a lower temperature or full of other dishes, you’ll need to bake this closer to an hour. Be sure to watch your pecans, so they don’t burn. (I only remove the foil when there’s about 20 minutes to go.)
FAQ + Tips And Tricks For The Best Paleo or Vegan Sweet Potato Casserole
Make-Ahead Tips. For best results, I recommend making the sweet potato filling and pecan topping and storing them separately until right before baking. You can keep them both in the fridge 1 day in advance, then assemble right before baking the next day.
Vegan Notes. For vegan, be sure to use dairy-free milk, vegan butter or coconut oil in place of butter, and either cornstarch or powdered egg substitute. If using powdered egg substitute, follow the directions on the package. Most call for about 1 Tbsp of water per 1 Tbsp of powder.
Double The Recipe. If you’re feeding a crowd, feel free to double the recipe to fit a 9×13 casserole dish! The bake time & instructions will stay the same.
CAN I MAKE THIS WITH MARSHMALLOW TOPPING INSTEAD? If you prefer your sweet potato casserole with marshmallows, you can use vegan marshmallows or try this paleo marshmallow fluff or this vegan marshmallow fluff topping!
More Thanksgiving Side Dish Recipes To Try
Instant Pot Mashed Potatoes (Vegan Option!)
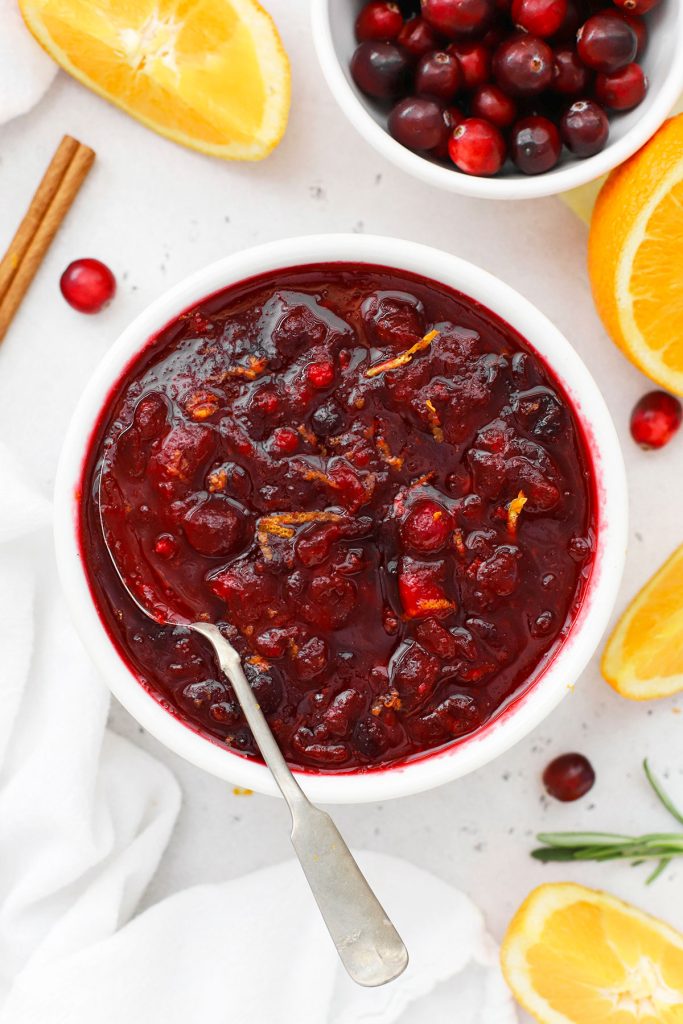
Gluten-Free Cranberry Sauce
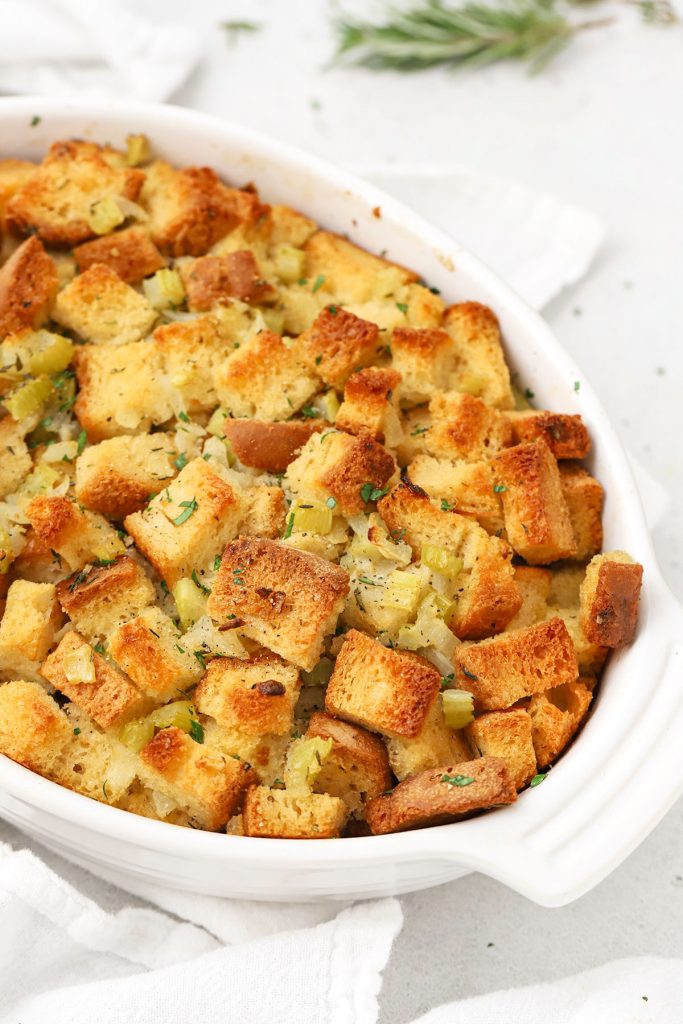
Gluten-Free Stuffing
Recipe Card
🌟 Did you make this recipe?
Leave a star rating below when you try our Healthy Paleo Sweet Potato Casserole recipe! We can’t wait to hear what you think!
Print
Description
A healthy take on a classic recipe! This paleo or vegan sweet potato casserole recipe has never been better. Tender mashed sweet potatoes topped with a crunchy pecan topping, and no refined sugar in sight!
Sweet Potato Mash Ingredients:
2 pounds sweet potatoes (about 3 medium potatoes), peeled and diced
1/3 cup non-dairy milk (I use unsweetened almond milk, cashew milk, or coconut milk)
3 Tablespoons butter, ghee, vegan butter, or coconut oil (melted)
1/4 cup pure maple syrup
1 teaspoon kosher salt
1 teaspoon vanilla extract
2 eggs, 2 Tbsp egg substitute (such as Ener-G egg replacer or The Neat Egg), or 1 Tbsp. cornstarch
Pecan Topping Ingredients:
1 1/2 cups pecans, roughly chopped
2 Tablespoons butter, ghee, vegan butter, or coconut oil (melted)
3 Tablespoons pure maple syrup
1/2 teaspoon cinnamon
pinch kosher salt or sea salt
Make The Sweet Potato Mash:
Cook Sweet Potatoes. Place sweet potato cubes in a large pot and cover by at least 2-3 inches of water. Bring to a boil over medium-high heat. Boil 8-10 min or until fork tender (potatoes will pierce easily with a fork). Drain sweet potatoes.
Combine. Transfer cooked sweet potatoes to a large mixing bowl. Add milk, butter/oil, syrup, salt, vanilla, and egg/egg sub.
Mash with a potato masher, fork, or hand mixer until no lumps remain. If needed, add 2-3 Tbsp additional milk if your mixture seems too thick. (For perfectly smooth mash, you can work in batches and puree in a food processor or blender!)
Transfer. Pour the mashed sweet potatoes mixture into an 8×8 or 2 quart baking dish and smooth the surface. (You can make the sweet potato casserole up to this point the day before Thanksgiving, if desired. Simple cover the baking dish and refrigerate)
Make The Topping & Bake:
Preheat. When ready to bake the sweet potatoes, preheat the oven to 375 degrees F.
Combine. In a medium bowl, combine pecans, butter/oil, syrup, cinnamon, and salt.
Sprinkle pecan streusel topping over the sweet potato mash.
Cover the dish with foil and bake 20 minutes at 375 degrees.
Remove foil and bake another 20-25 minutes. If pecans begin to brown too quickly, simply cover with foil again.
Serve & Store. Enjoy warm from the oven. Store leftover sweet potato casserole covered in the fridge 2-3 days. (You *can* transfer it to an airtight container, but I find the layers preserve better in the casserole dish.)
**If you’ve got multiple things in the oven (like on Thanksgiving), allow yourself some extra time. If your oven is set to a lower temperature or full of other dishes, you’ll need to bake this closer to an hour. Be sure to watch your pecans (I only remove the foil when there’s about 20 minutes to go).
Notes
Vegan Notes. For vegan, be sure to use dairy-free milk, vegan butter or coconut oil, and either cornstarch or powdered egg substitute. If using powdered egg substitute, follow the directions on the package. Most call for about 1 Tbsp of water per 1 Tbsp of powder.
Double The Recipe. If you’re feeding a crowd, feel free to double the recipe to fit a 9×13 casserole dish! The bake time & instructions will stay the same.
Make-Ahead Tips. For best results, I recommend making the sweet potato filling and pecan topping and storing them separately until right before baking. You can keep them both in the fridge 1 day in advance, then assemble right before baking.
Prep Time:30 minutes
Cook Time:40 minutes
Category:Side Dish
Method:Baking
Cuisine:American
Originally shared November 2016. Updated Nov 2021, then updated and republished again October 2024.
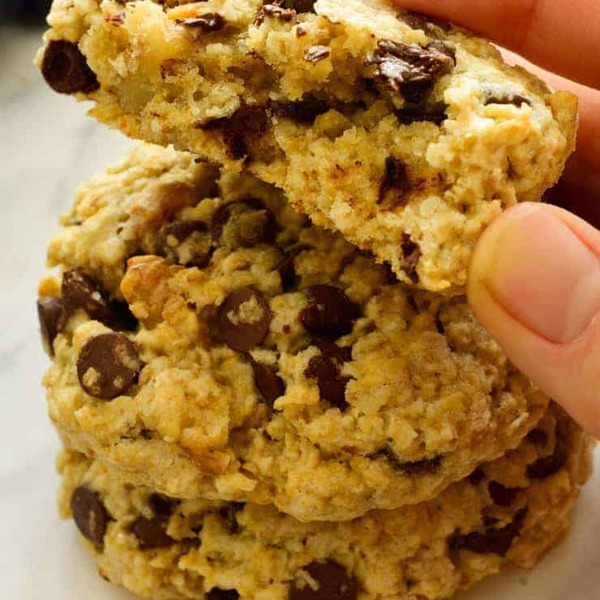
These vegThese vegan oatmeal chocolate chip cookies are everything you want from a cookie: crispy on the outside, soft on the inside and loaded with chocolate-y goodness. Best of all, they’re made in one bowl with pantry staples and no specialty vegan ingredients.
Jump to:
The best oatmeal chocolate chip cookies
What kind of oats are best in oatmeal cookies?
Ingredients you’ll need
How to make vegan oatmeal chocolate chip cookies
Substitutions and variations
FAQs
Storage and freezing
Wanna see how easy it is to make these vegan oatmeal chocolate chip cookies? Watch the video:
Vegan Oatmeal Chocolate Chip Cookies
The best oatmeal chocolate chip cookies
You’ve made it! You’ve found my super popular vegan oatmeal chocolate chip cookie recipe!
This 5-star recipe has been a hit with readers since I first published it in 2019.
What everyone loves about this recipe is how simple the ingredients list is.
You won’t need flaxseed, applesauce, vegan butter, gluten-free flours, aquafaba, or coconut oil.
In fact, you may already have everything you need in your pantry right now!
Not only is this recipe easy, but diary-free oatmeal chocolate chip cookies are healthy!
Oats are very healthy and nutrient dense. In particular, they contain beta-glucan, a fibre which reduces cholesterol and regulates blood sugar.
Furthermore, since this is a vegan recipe, it contains no dietary cholesterol or hormones found in butter.
(I find it curious and a little sus how the blogger who wrote top non-vegan oatmeal chocolate chip cookie recipe omitted the cholesterol from his nutritional information even though the recipe calls for ½ cup butter!).
What kind of oats are best in oatmeal cookies?
Whereas most vegan oatmeal chocolate chip cookie recipes call for rolled oats, this recipe calls for quick oats.
Quick oats is what makes this recipe work without the need for flax egg, applesauce, banana or any other vegan egg replacement.
Because quick oats are rolled thinner, they are softer and stickier when mixed with a liquid, and that’s what makes the batter for these cookies hold together.
Quick oats also provide the perfect texture you’d expect from any good oatmeal cookie. They’re crispy on the outside, soft and chewy on the inside!
Ingredients you’ll need
The ingredients for these vegan oatmeal chocolate chip cookies are all staple ingredients that are easy to find and economically priced.
Quick oats: This recipe specifically calls for quick oat rather than rolled oats because they are softer and stickier. That way you don’t need any vegan egg replacement.
All-purpose flour: These cookies are mostly made of oats with just a little AP flour added for its binding properties.
Sugar: Regular white sugar. Some people are concerned about bone char. Choose an organic brand, which can never be processed with bone char, or check online for a list of brands either made from beet sugar or confirmed to not use bone char.
Baking powder: Because this recipe does not contain acidic ingredients like brown sugar or cocoa powder, baking powder is used instead of baking soda. Do not substitute baking soda.
Salt: Every sweet recipe needs a little salt to bring out the flavors.
Chocolate chips: It’s usually not difficult to find vegan dark chocolate chips. As long as they’re not milk chocolate chips, a quick glance at the ingredients should confirm if they contain milk or whey.
Walnuts: I like to add nuts to my oatmeal cookies for a bit of extra crunch.
Oil: Any neutral-flavored oil such as vegetable, canola or sunflower.
Plant-based milk: Your favourite unsweetened plant-based milk. I usually use either oat or soy milk. Cashew of almond milk will work too.
How to make vegan oatmeal chocolate chip cookies
These vegan cookies are quick to whip up and require just one bowl!
Preparation: The dough is super quick to make so start by preheating your oven to 375 F (190 C).
The cookie dough is a bit sticky so it’s a good idea to line your baking sheet with parchment paper.
Mix: In a large mixing bowl mix together all the dry ingredients.
This recipe uses baking powder and baking powder activates and starts making bubbles in the batter when combined with liquid.
For that reason, we hold off on adding the oil and milk until the oven is heated in order to get the fluffiest cookies.
Once your oven is preheated, fold in the wet ingredients and mix the dough well to combine.
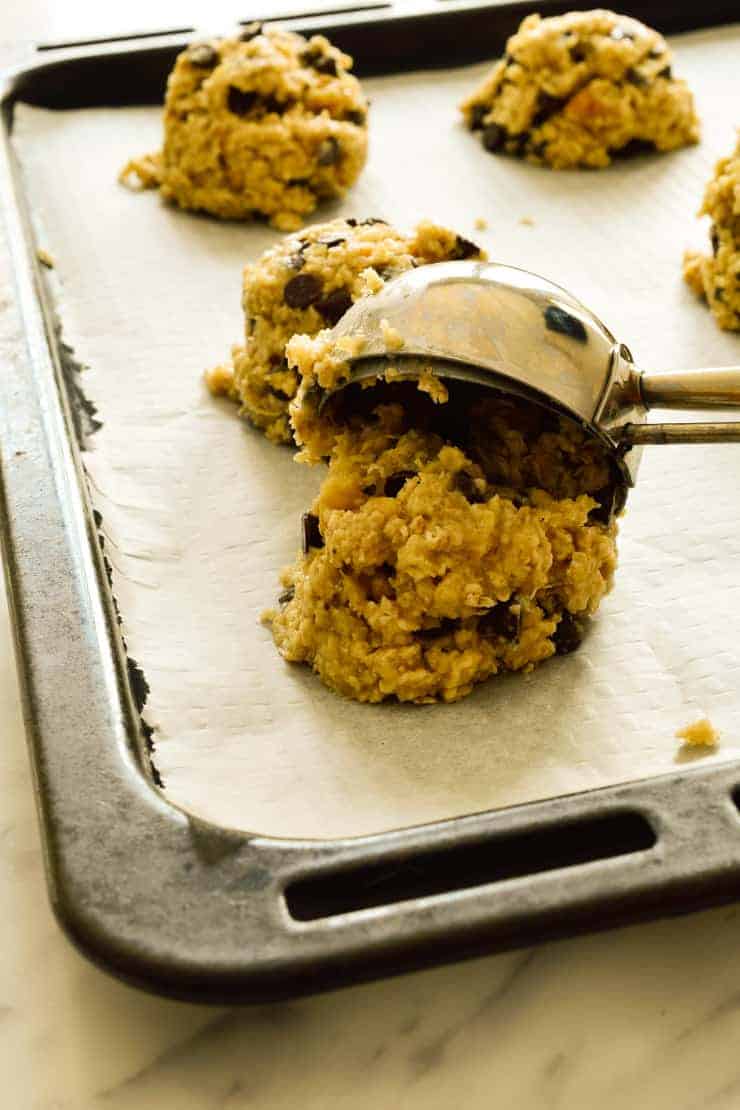
Form the cookies: Now it’s time to make the cookies.
The batter is a bit wet so you can use an ice cream or cookie scoop if you want to keep your hands clean.
Personally, I find it easier to just get in the with my hands and scoop the dough because I can squeeze the dough into more compact balls.
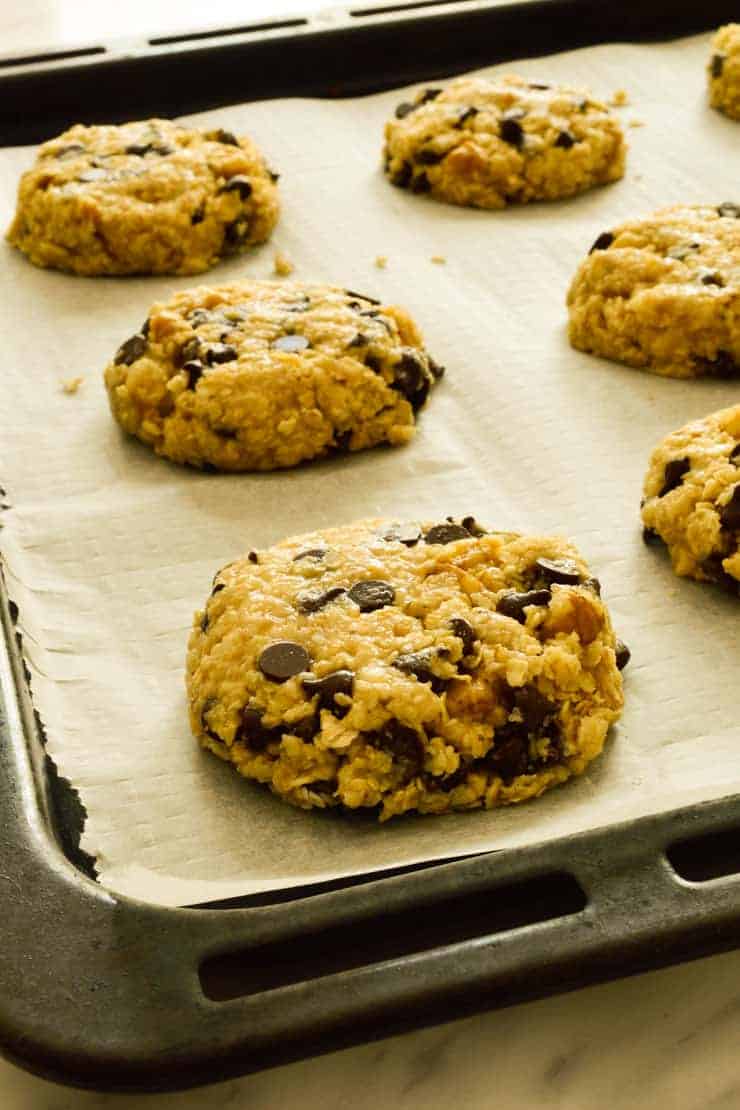
Either way, form the dough into balls and place them on your lined cookie sheet.
The use the palm of your hand to gently flatten the balls into a cookie shape.
Bake: Bake the cookies for 20 minutes.
They don’t brown too much on top but you’ll notice they have fluffed up nicely no longer look wet on top.
You can use a spatula to lift one up and check the bottom. They should be a nice golden brown colour on the bottom.
Cool: Straight out of the oven, these cookies are very delicate.
They firm up as they cool so I recommend leaving them on the pan to cool completely before eating or storing them.
Substitutions and variations
This recipe is easy to adapt.
In my cookbook 30-Minute Frugal Vegan Recipes, I made a similar oatmeal cookie but with dried cranberries and pumpkin seeds instead of chocolate chips and walnuts.
You can sub the chocolate chips for raisins or other dried fruit, and the walnuts for any other chopped nut like pecans or hazelnuts.
In case you don’t have chocolate chips you can chop up a vegan chocolate bar instead.
This recipe doesn’t call for any spices but you can add a pinch of cinnamon or nutmeg if you like.
FAQs
Can I substitute rolled oats for quick oats?
Personally, I’ve tried this recipe with rolled oats and it didn’t work because rolled oats don’t absorb as much liquid and the batter isn’t as sticky as with quick oats. So the cookies melted into a pool in the oven. However, I’ve had readers successfully make this recipe with rolled oats, but I don’t know how they did it because it’s never worked for me!
Can I make these gluten free?
Yes, you can substitute the all-purpose flour with a gluten-free flour that is meant for a 1:1 substitution. I don’t recommend trying to substitute with a different type of flour such as almond flour or coconut flour because the dough might not stick together.
Storage and freezing
Vegan oatmeal chocolate chip cookies can be stored in an airtight container for up to a week. Be sure that the cookies have cooled to room temperature before storing.
To freeze, once cookies are cool, first freeze them on the baking tray then transfer them to a freezer bag or a freezer-safe container with a tight-fitting lid.
To thaw, remove them from the container and thaw at room temperature, or reheat them in the oven at 275 F (135 C) for about 10 minutes or until heated through.
Wanna see how easy it is to make these vegan oatmeal chocolate chip cookies? Watch the video:
Vegan Oatmeal Chocolate Chip Cookies
These vegan oatmeal chocolate chip cookies are everything you want from a cookie: crispy on the outside, soft on the inside and loaded with chocolate-y goodness. Best of all, these one-bowl cookies are ready in just 30 minutes!
Print
Pin Recipe
Rate
Course: Snack
Cuisine: American
Total Price: $3.89
Price per Serving: $0.39
Prep Time: 10 minutesminutes
Cook Time: 20 minutesminutes
Total Time: 30 minutesminutes
Servings: 10cookies
Calories: 245kcal
Ingredients
1 ½cups (120 grams)quick oats*– $0.25
½cup (63 grams)all-purpose flour – $0.04
½cup (100 grams)white sugar** – $0.43
1tspbaking powder – $0.01
¼tspsalt – $0.01
⅔cup (130 grams)vegan chocolate chips – $2.00
⅓cup (40 grams)chopped walnuts (optional) – $0.92
¼cup (60 ml)neutral-flavored oil – $0.20
6tablespoonsplant-based milk – $0.03
Instructions
Preheat the oven to 375°F (190°C) and line a baking sheet with parchment paper.
In a large bowl, combine the oats, flour, sugar, baking powder, salt, chocolate chips and walnuts.
When the oven is heated, add the oil and plant-based milk to the dry ingredients and mix well.
Form the dough into balls. You can use a cookie or ice cream scoop, I just get in there with my hands and press the dough together into balls. You can make them as big or small as you like. I generally get about 10 cookies from this recipe.
Place the balls on the prepared baking sheet and gently flatten them with the palm of your hand.
Bake for 20 minutes, or until they no longer appear wet on top and the bottoms are beginning to turn golden brown.
Remove from the oven and let cool on the pan.
Notes
*Do not substitute rolled oats for the quick oats. The cookie dough won’t stick together and the cookies will melt into a pool in the oven.
**If you’re worried about bone char, check online which brands of sugar do not use it in their processing.
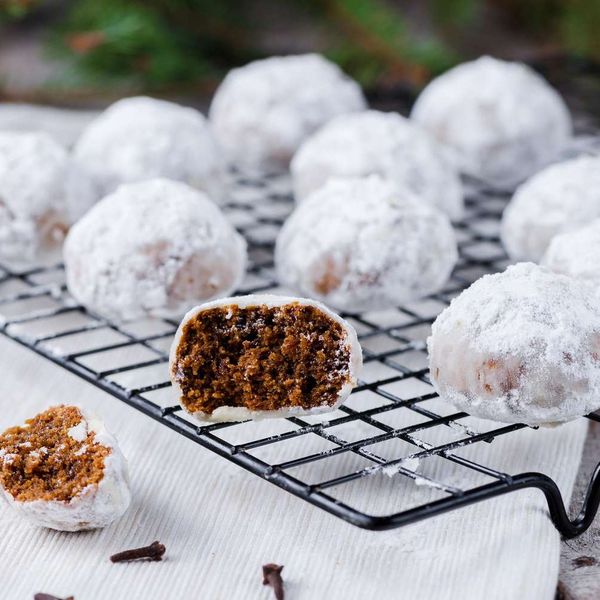
Pfeffernusse cookies are a spicy, fragrant cookie perfect for Christmas. The essential ingredient is, surprisingly, the black pepper, which combines with the rest of the spices and the molasses for a truly unique taste. It may look like a lot of spices when you’re baking these up, but the combination is, we promise, perfect. And, since they are vegan, you can feel extra good about treating yourself and the environment well for the holidays when you make your vegan Christmas cookies.
This version of pfeffernusse cookies is made with no eggs and dairy, but with vegan margarine and an egg replacer making it dairy-free and egg-free.
Cook Mode (Keep screen awake)
1/2cup room temperature vegan margarine, more for the pan
2 1/4cups all-purpose flour
1/2teaspoonground cinnamon
1/2teaspoonground cloves
1/2teaspoonground nutmeg
1/2teaspoonground allspice
1/4teaspoonbaking soda
1/4teaspoon freshly ground black pepper
3/4cup lightly packed brown sugar
1/4cupmolasses
Egg replacer for 1egg, such as Ener-g or Bob’s Red Mill, made according to package instructions
1/2teaspoon pure vanilla extract
1cupconfectioners’ sugar
Gather the ingredients.
The Spruce
Preheat the oven to 350 F. Lightly grease two baking sheets.
The Spruce
Combine the flour with the cinnamon, cloves, nutmeg, allspice, baking soda and pepper. Set aside.
The Spruce
Using an electric mixer, beat together the vegan margarine, brown sugar, and molasses until well combined and as light and fluffy as you can get it.
The Spruce
Add in the prepared egg replacer and vanilla, again beating until well combined and as fluffy as possible.
The Spruce
Gradually beat in the dry ingredients, mixing until well combined. The dough should be a bit more dry and crumbly.
The Spruce
Roll the cookie dough into 1-inch balls and place them on prepared cookie sheets. Do not flatten. If the dough is too crumbly, you can moisten your hands a bit when rolling the dough to get it to stick together.
The Spruce
Bake the cookies for 13 to 15 minutes, until just starting to crack; do not over-bake.
The Spruce
Allow the cookies to cool, then gently roll in confectioners’ sugar until completely coated. You can also place the sugar in a bag or a bowl and gently roll the cookies around.
The Spruce
Serve and enjoy!
Nutrition Facts (per serving)
130
Calories
4g
Fat
22g
Carbs
2g
Protein
×
Nutrition Facts
Servings: 24
Amount per serving
Calories
130
% Daily Value*
4g
5%
Saturated Fat 1g
4%
0mg
0%
27mg
1%
22g
8%
Dietary Fiber 0g
1%
Total Sugars 13g
2g
Vitamin C 0mg
0%
Calcium 19mg
1%
Iron 1mg
5%
Potassium 85mg
2%
*The % Daily Value (DV) tells you how much a nutrient in a food serving contributes to a daily diet. 2,000 calories a day is used for general nutrition advice.
(Nutrition information is calculated using an ingredient database and should be considered an estimate.)
Rate This Recipe
I don’t like this at all. It’s not the worst. Sure, this will do. I’m a fan—would recommend. Amazing! I love it! Thanks for your rating!
It might come as a shock to you but I am not a huge chocolate eater. I know, take a moment to gather your thoughts as I am sure they are spread all over the floor. For a girl who just bought her weight in vegan chocolate, one would think that I might have an addiction. Heck, this site should be proof alone. The truth is that I am more of a sugar lover. Hardcore granulated sugar. Lover. (Easy now, sugar haters. I’m all about moderation).
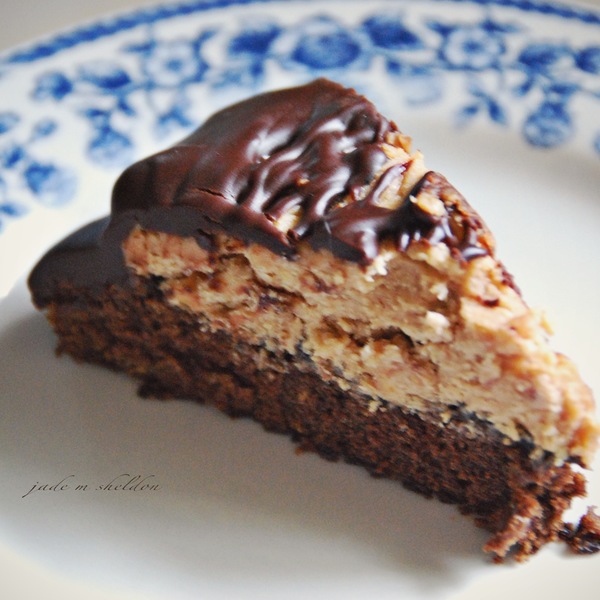
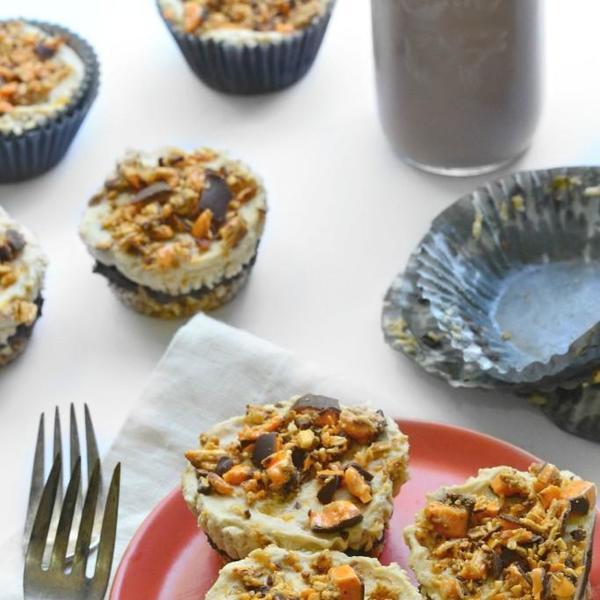
Does that mean I say no to chocolate? Um, no but if I’m eating chocolate I like it mixed with something salty. It off-sets the overall sweetness and richness (which is why these no-bake Mini Vegan Butterfinger Cheezcakes taste so good). Now how contradicting do I sound? I say I like sugar but also don’t like too much sweetness. But in the words of Wendy Williams, I’m a woman; I’m allowed to be complex.*
*Wendy Williams never said that.
A salty pretzel crust, lightly sweetened with a hint of brown sugar, layered with a rich and creamy peanut butter filling, melting in your mouth with each and every bite, and then topped with roughly chopped vegan Butterfinger bars. It’s like a mad scientist’s laboratory in my kitchen.
Print
No-Bake Mini Vegan Butterfinger Cheezcakes
Author:Cara Reed
Prep Time:25 mins
Cook Time:2 hours
Total Time:2 hours 25 mins
Yield:10 1x
Description
A salty, peanut butter and pretzel layer, coated with chocolate, topped by another fluffy, creamy peanut butter layer, and then sprinkled with chopped up vegan Thumbs Up bars. The perfect combo of salty and sweet.
For the Pretzel Crust:
2 c. gluten-free pretzels, grinded in a food processor until crumbly
5 Tbsp. coconut oil, melted (refined for non-coconut flavor)
1 Tbsp. peanut butter, melted
1 Tbsp. brown sugar, firmly packed
For the Peanut Butter Filling:
1 14 oz. can of coconut cream, chilled until completely solid
1 c. peanut butter (chunky or creamy)
1/2 c. agave or maple syrup
2 Tbsp. coconut oil
2 vegan Thumbs Up candy bars, chopped
Other ingredients:
2 Tbsp. dark cocoa (for the chocolate layer)
1 vegan Thumbs Up candy bar, chopped (to coat the tops)
Instructions
Line a muffin tin with 10 muffin liners and set aside.
Mix all the ingredients together for the crust until well-combined. Place approx. 1 Tbsp. of crust into each liner and firmly pat down. Place in the freezer.
Using an electric mixer, fluff the solid coconut cream, peanut butter, and sweetener of choice until mixed well. Set aside 1/2 c. into a bowl.
Add 2 Tbsp. dark cocoa into the 1/2 c. reserve. Mix together until blended.
Evenly distribute the chocolate layer between each liner. With the back of a spoon, spread out the chocolate fluff to even distribute.
Fold in the chopped up vegan Thumbs Up candy bar into the peanut layer. Evenly distribute on top of the chocolate layer and spread with the back of a spoon.
Sprinkle each mini cheezcake with the other chopped up Thumbs Up candy bar.
Freeze until completely set (at least 2 hours).
Nutrition
Serving Size:10
Calories:445
Sugar:33g
Sodium:210mg
Fat:28g
Saturated Fat:18g
Unsaturated Fat:14g
Trans Fat:0g
Carbohydrates:41g
Fiber:3g
Protein:9g
Cholesterol:2mg
For the vegan Butterfingers, you can thank this company for creating a most superb candy bar called Thumbs Up. They really taste similar to the original version, it’s worth the purchase. You will especially need to buy them in order to make these cheezcakes…
This post has been a part of Vegan MoFo 2014–the month-long celebration of vegan food. To see other incredible posts from fellow MoFo’ers, click here.
About Cara
Based in Chicago with her husband and son, Cara is the creator behind the site Fork and Beans: A place where kids can have fun with their food.
Reader Interactions
Trackbacks
[…] Mini Vegan Butterfinger Cheezcakes / Recipe […]
[…] Mini Butterfinger Cheezcakes – Fork and Beans goes all-out with the desserts during the MoFo. Cara loves Halloween, and I want to eat every single one of her spooky sweet creations. Right now, please. […]