Blog

  • Vegan Blueberry Peach Crisp

    Vegan Blueberry Peach Crisp

    recipe image

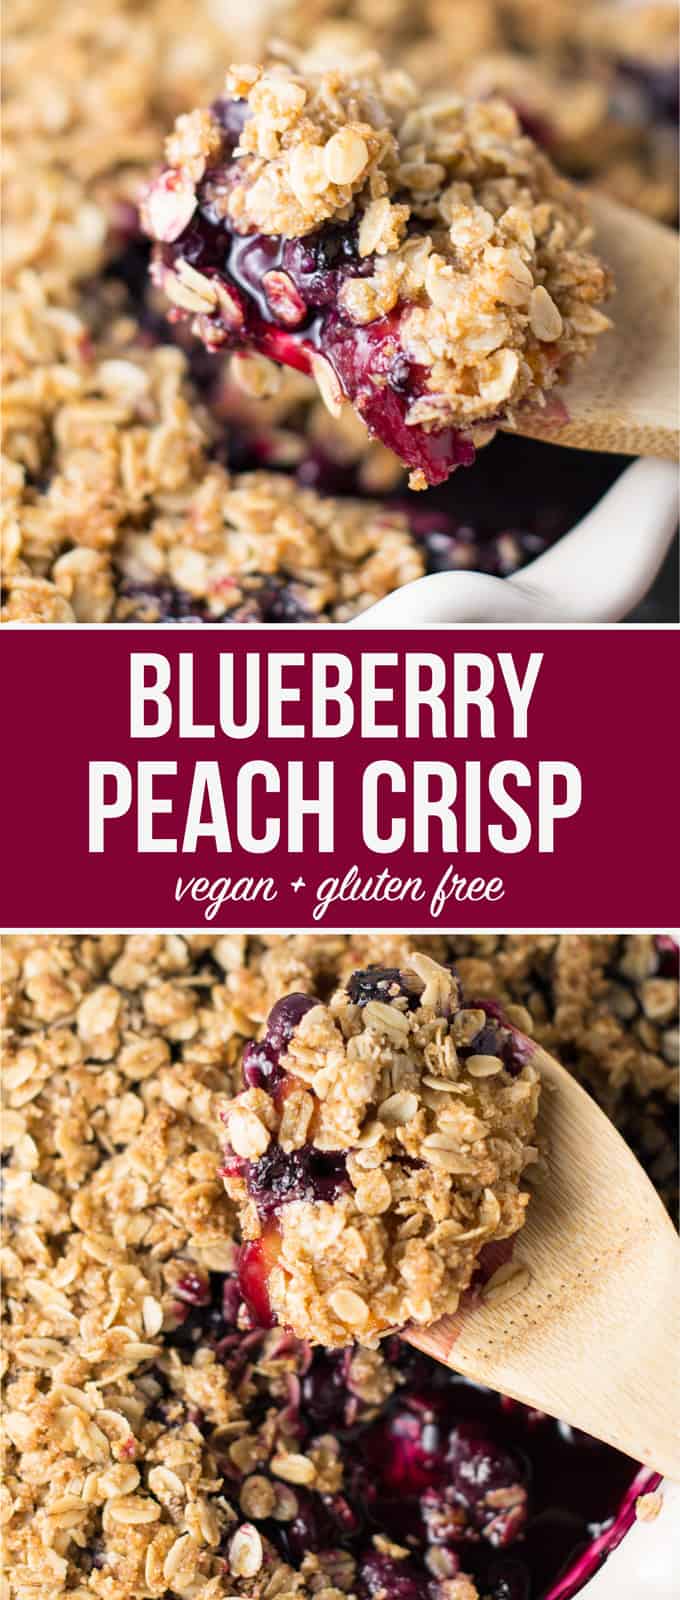
    This gluten free vegan blueberry peach crisp recipe is a simple and delicious healthier dessert made with easy to find ingredients. Use frozen fruit and a few simple ingredients to make this easy vegan dessert!

    gluten free vegan blueberry peach crisp


    Say helloooo to my new favorite summertime dessert!

    This vegan blueberry peach crisp is everything I love about a good dessert: it’s not difficult to make and pairs perfectly with a scoop of vanilla ice cream.

    I’m always down for a bowl of crisp with ice cream!

    If you can’t tell from my gluten free apple crisp, strawberry crispcranberry blueberry crisp, or easy peach crisp, I think it’s safe to say I am in love with crisp recipes!

    I love how simple they are to throw together, and the oven really does all of the work for you.

    First up, here are the ingredients that you need to make this recipe.

    Ingredients to make vegan blueberry peach crisp

    • frozen peaches
    • frozen blueberries
    • sugar
    • corn starch
    • salt
    • cinnamon
    • brown sugar
    • gluten free oat flour
    • gluten free rolled oats
    • coconut oil
    • vegan butter

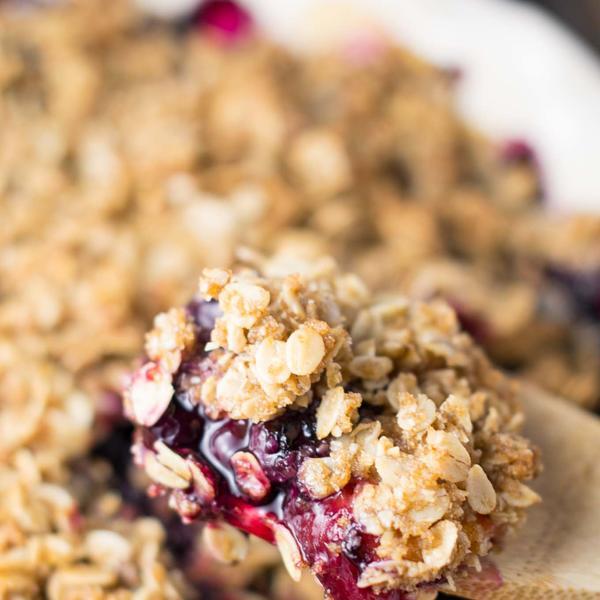
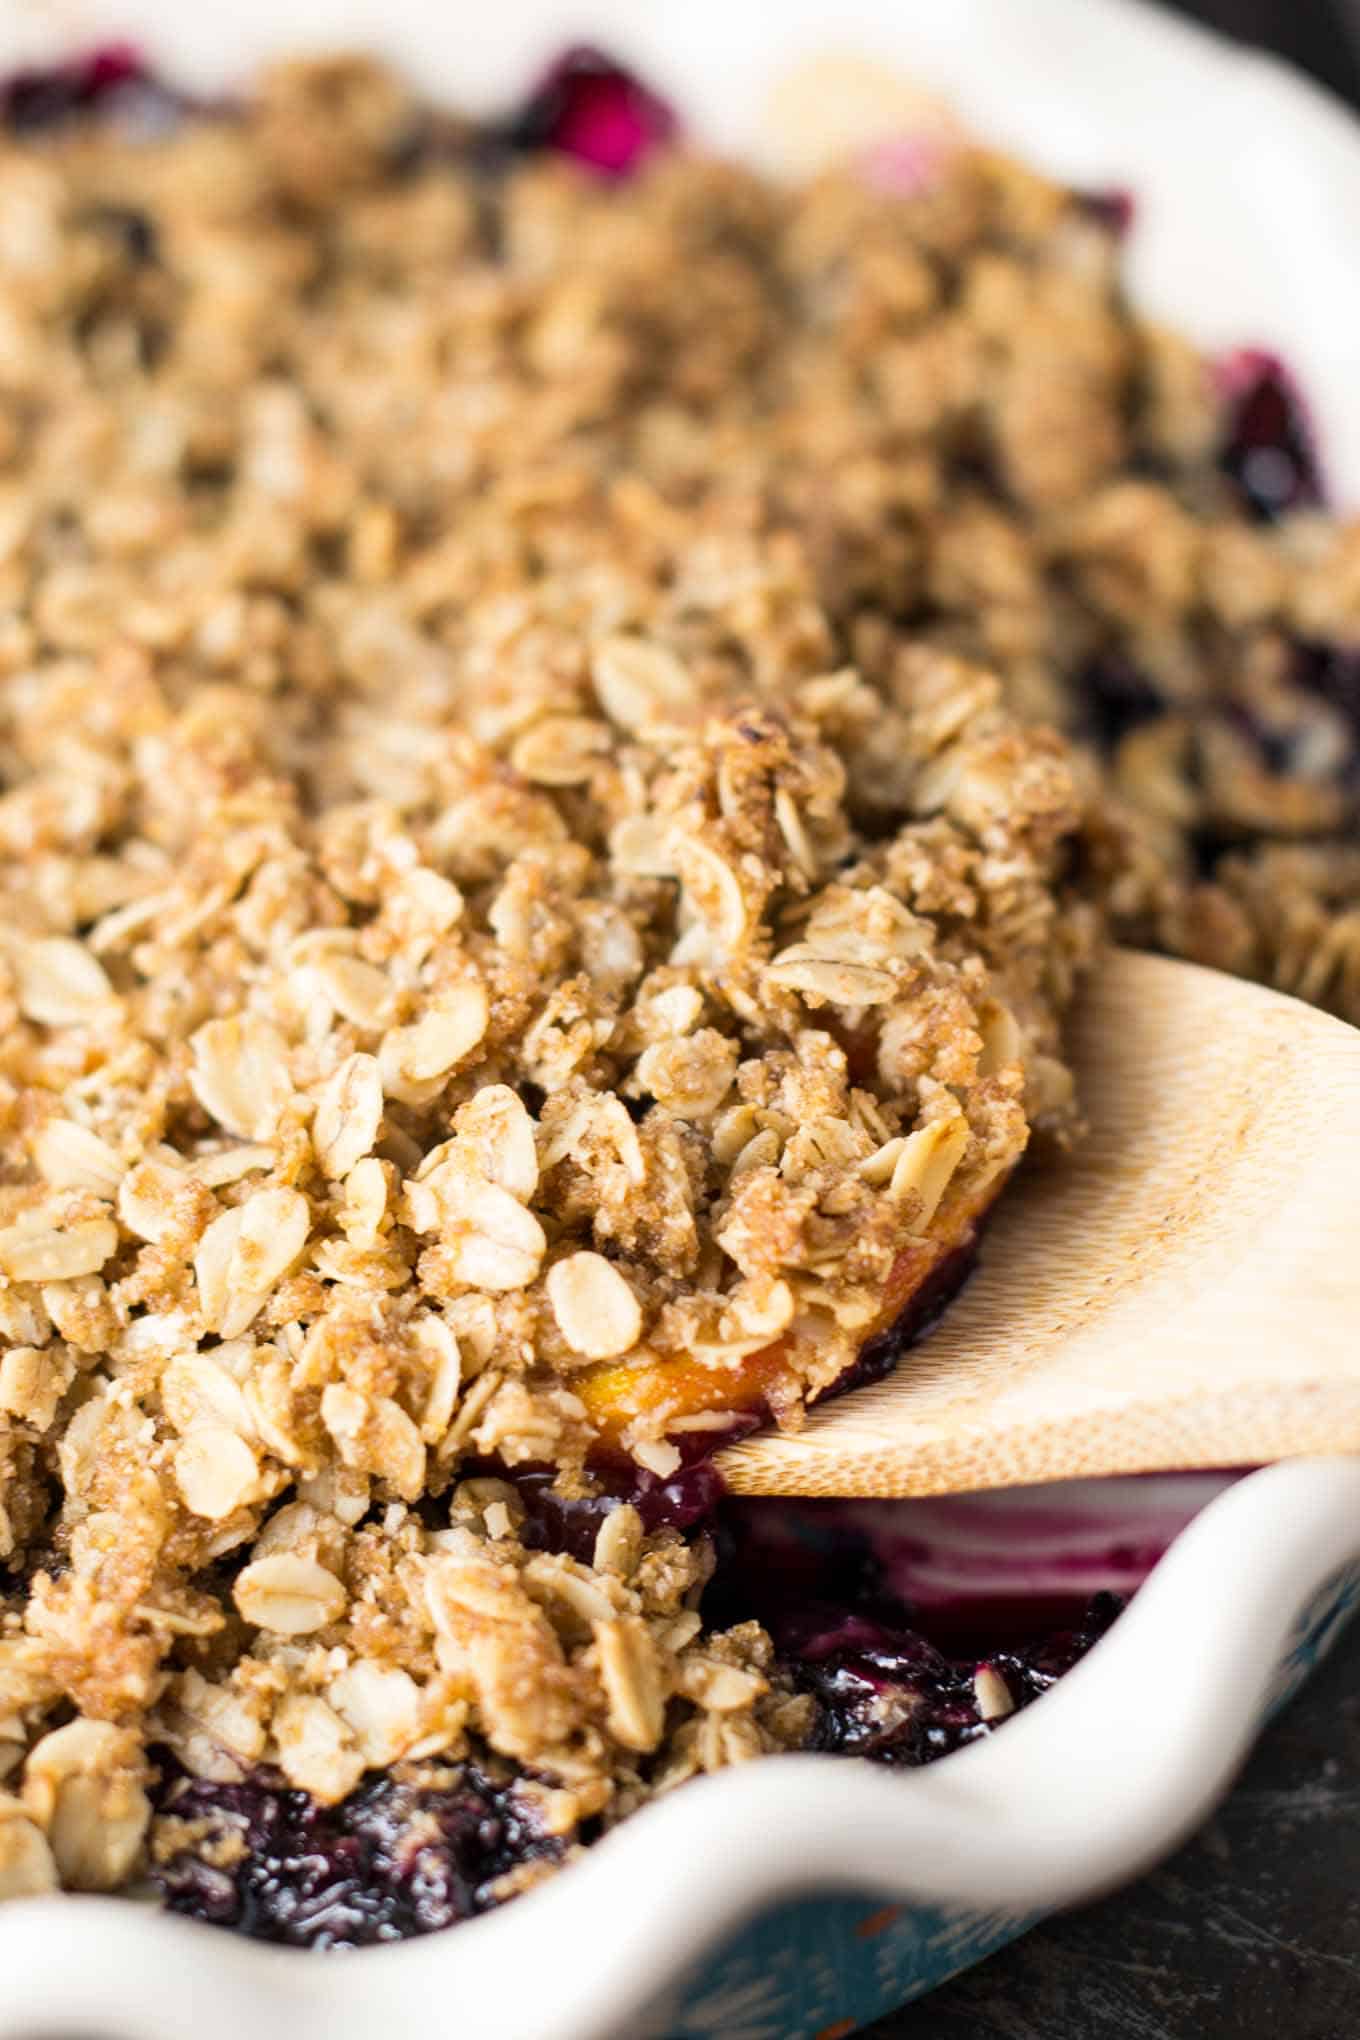
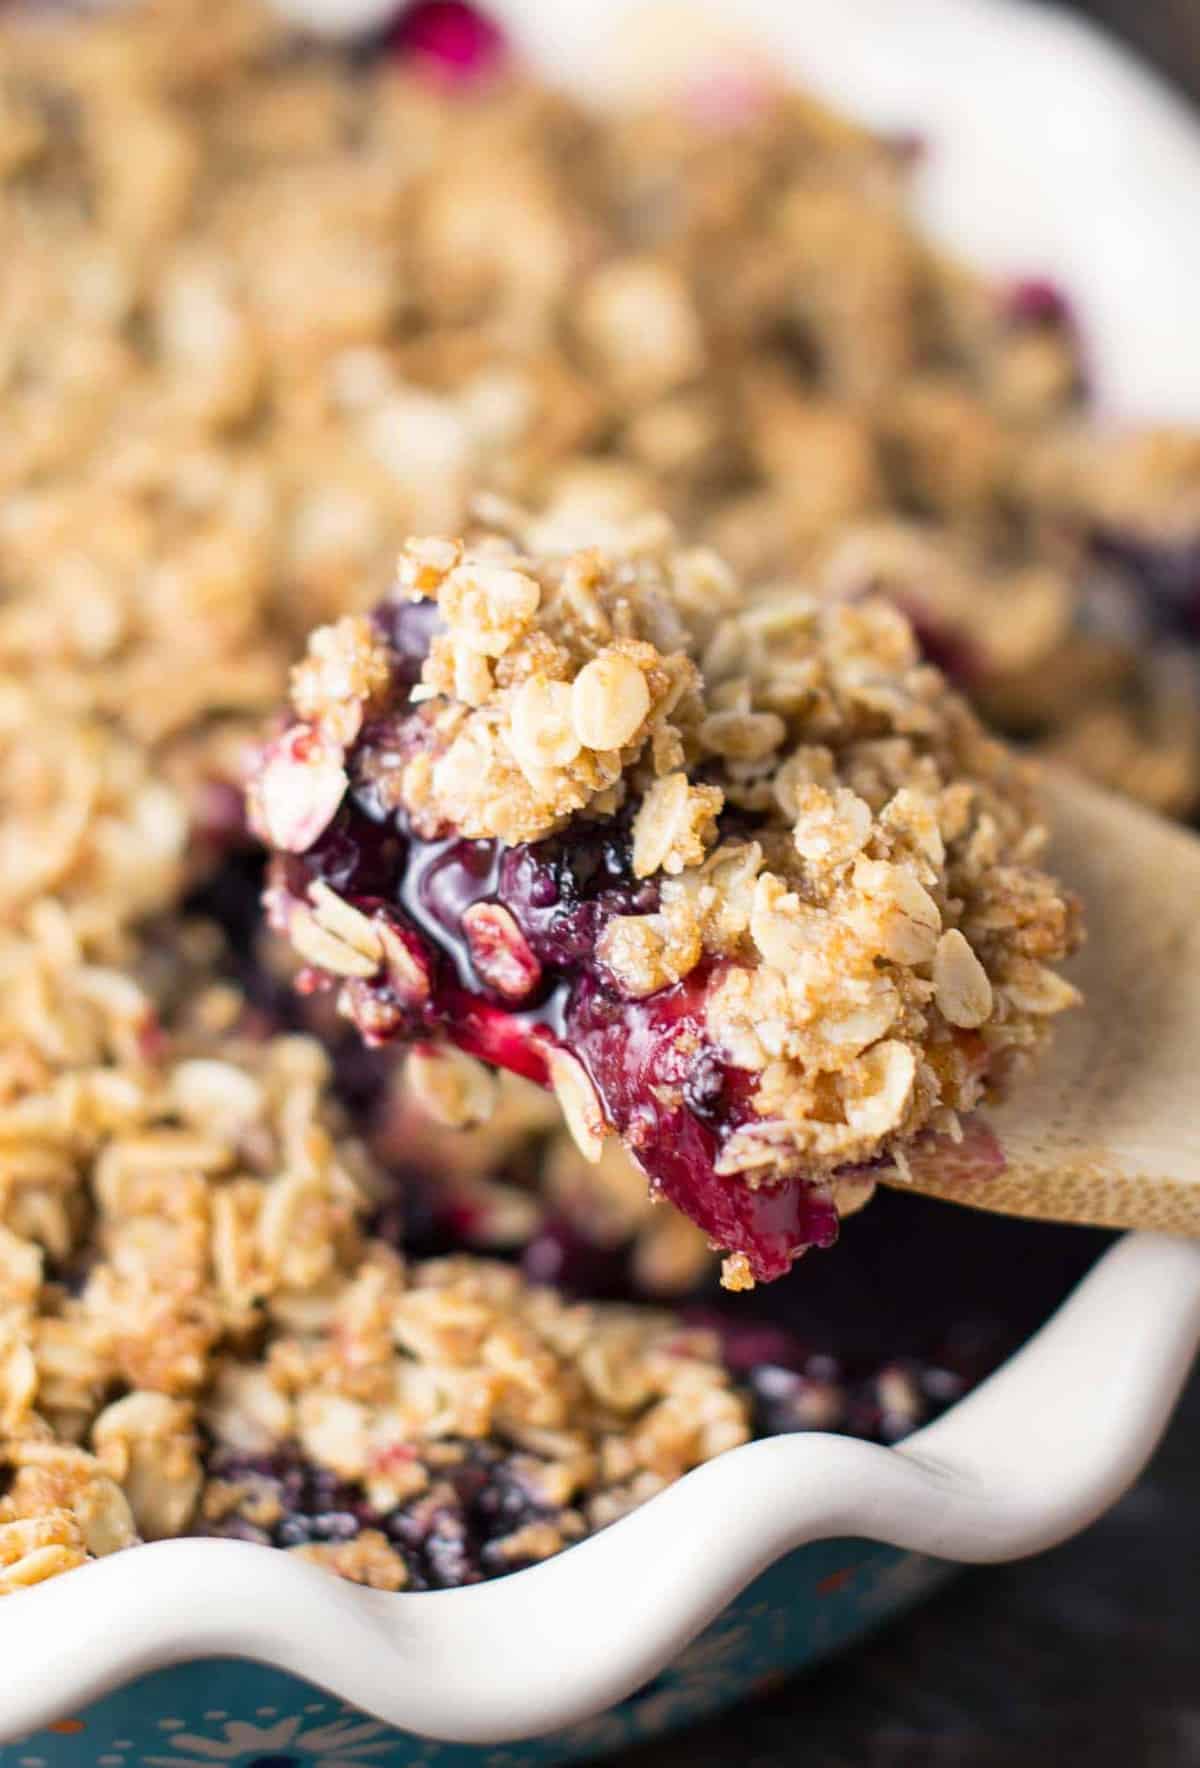
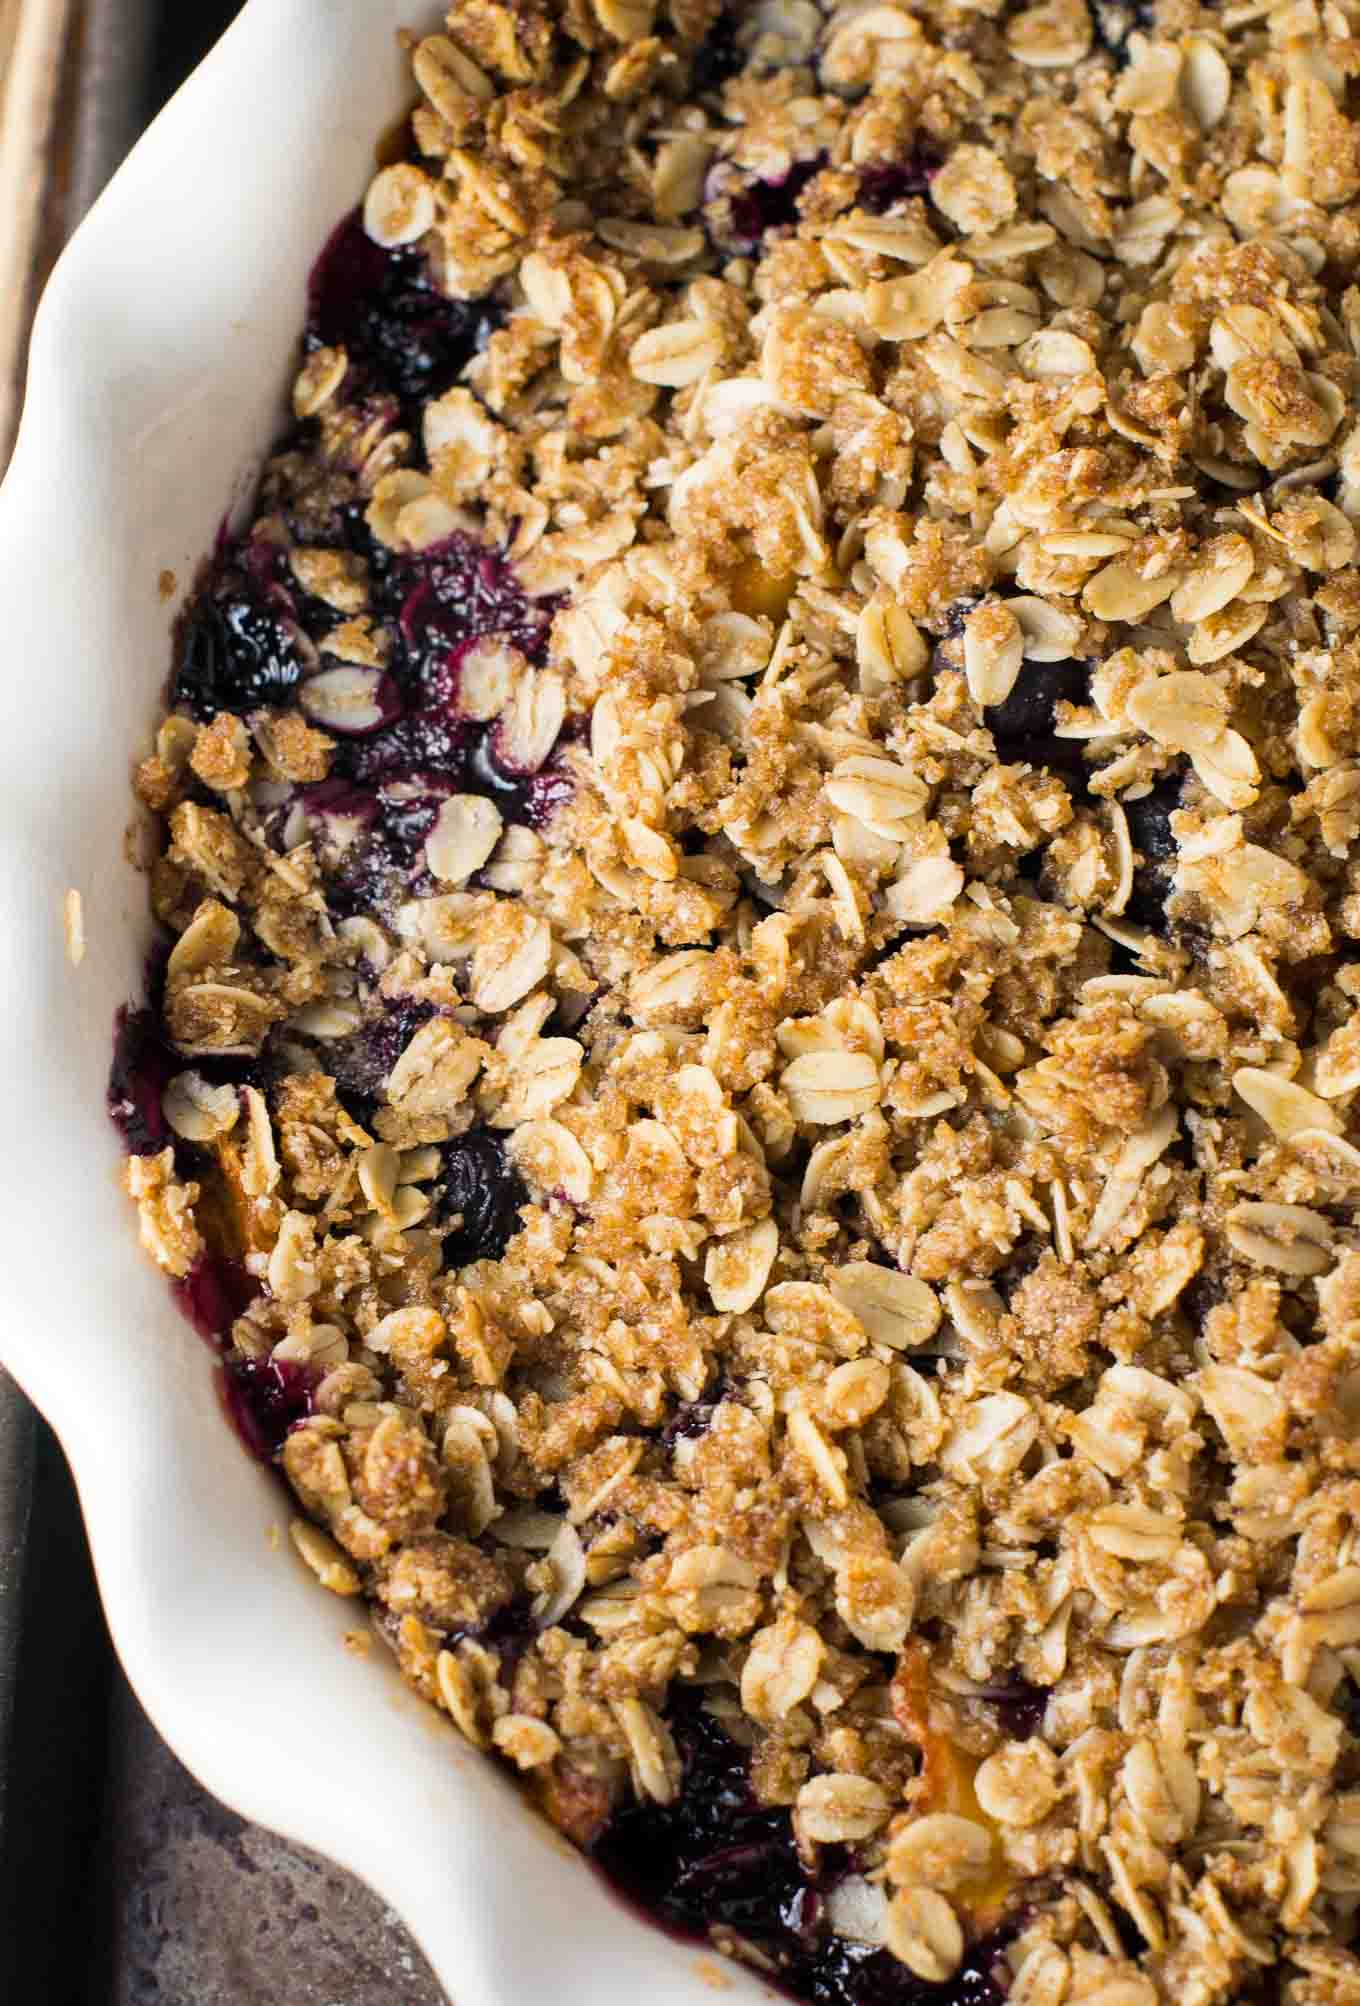
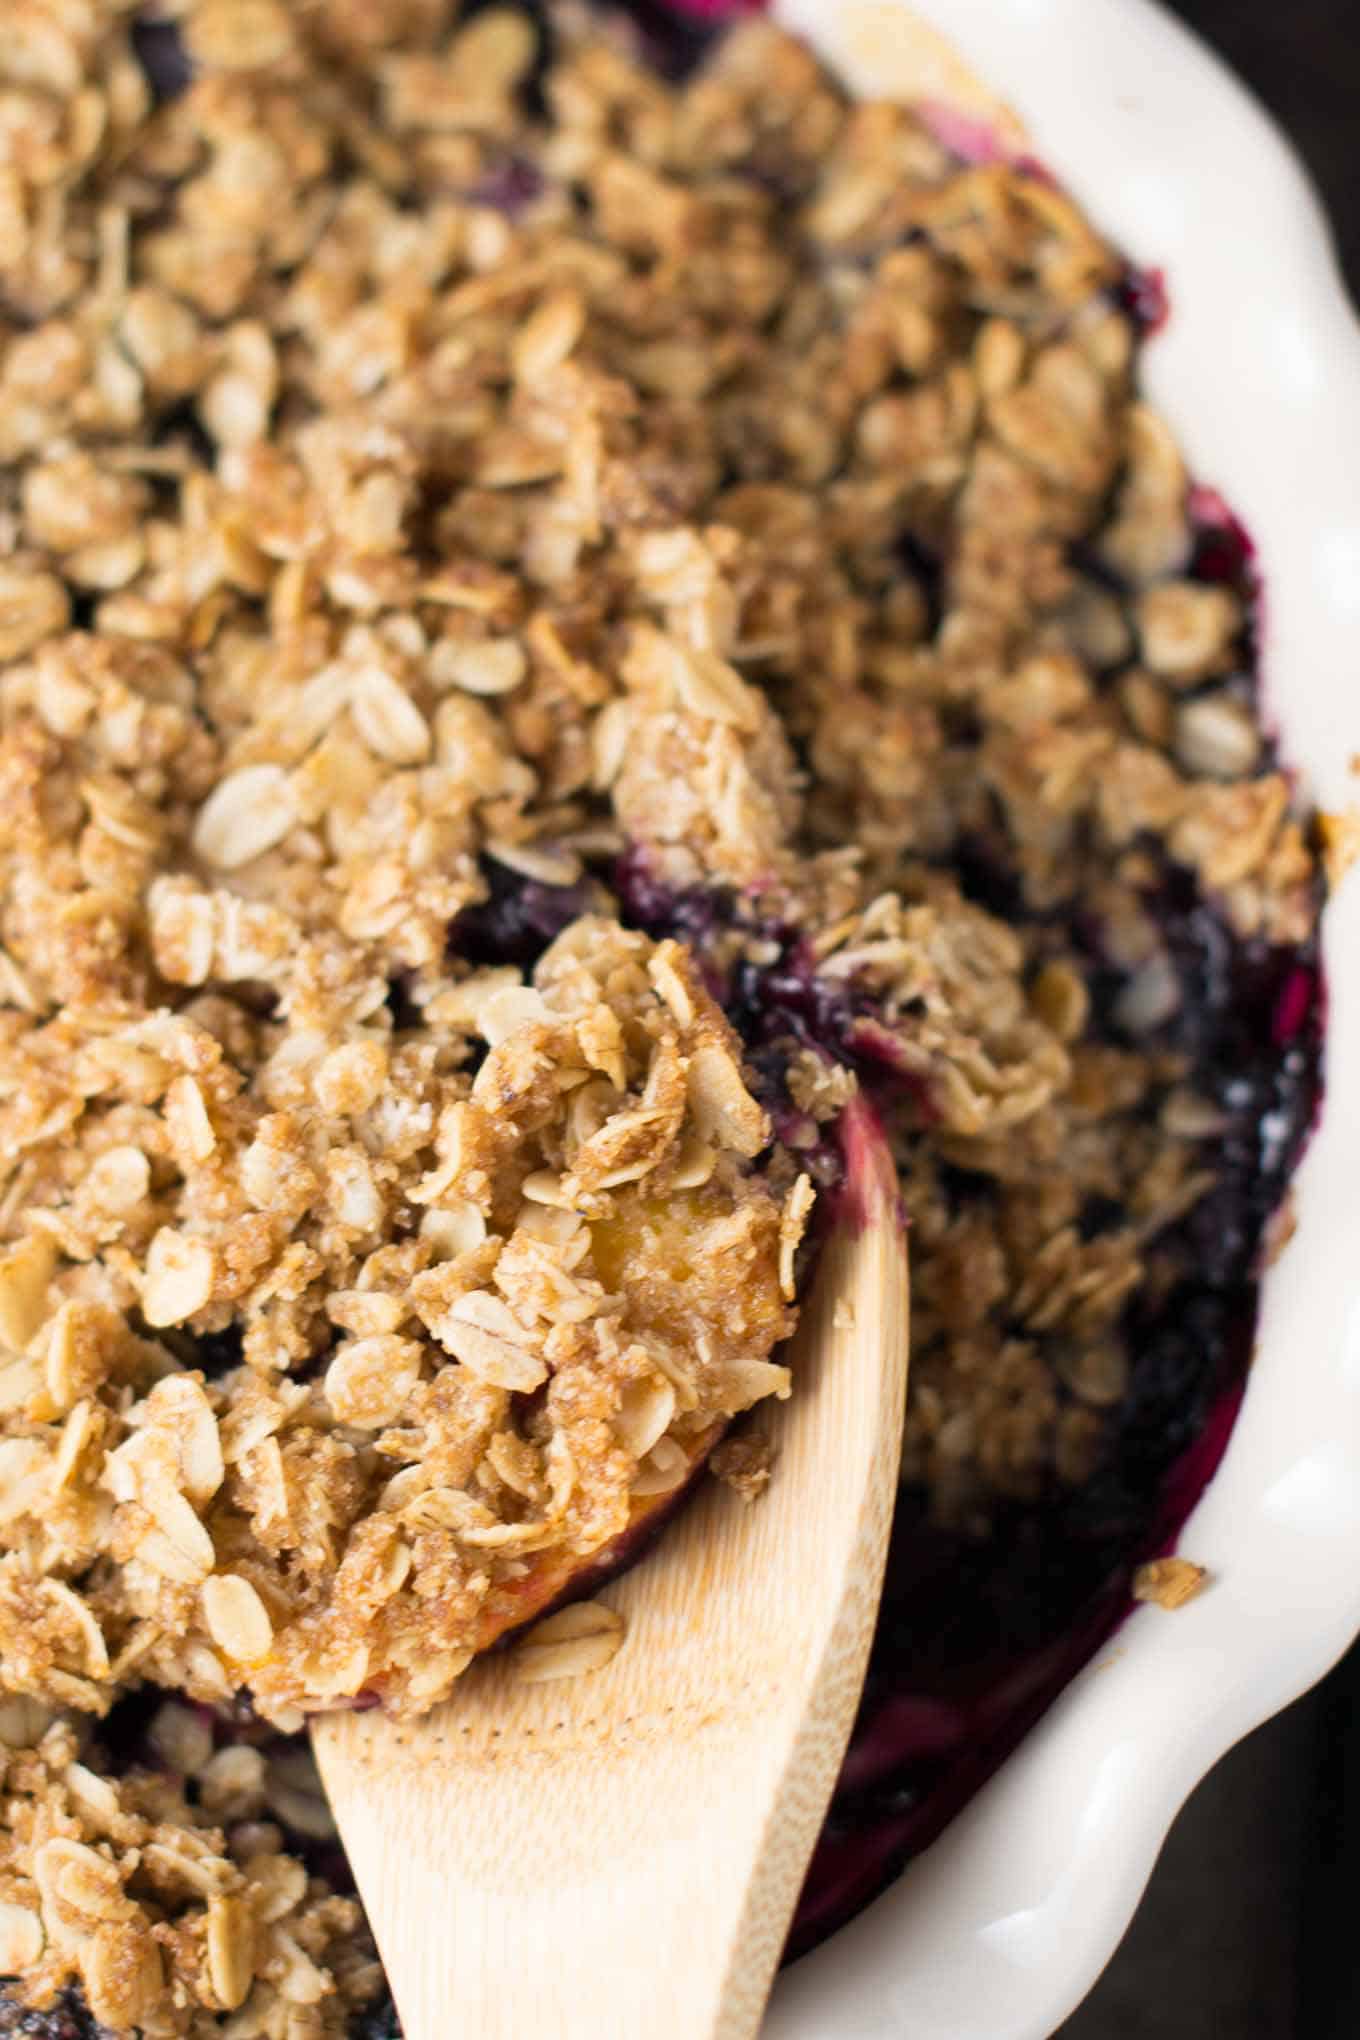
    The crisp topping is made with a mix of oat flour and rolled oats, making it gluten free.

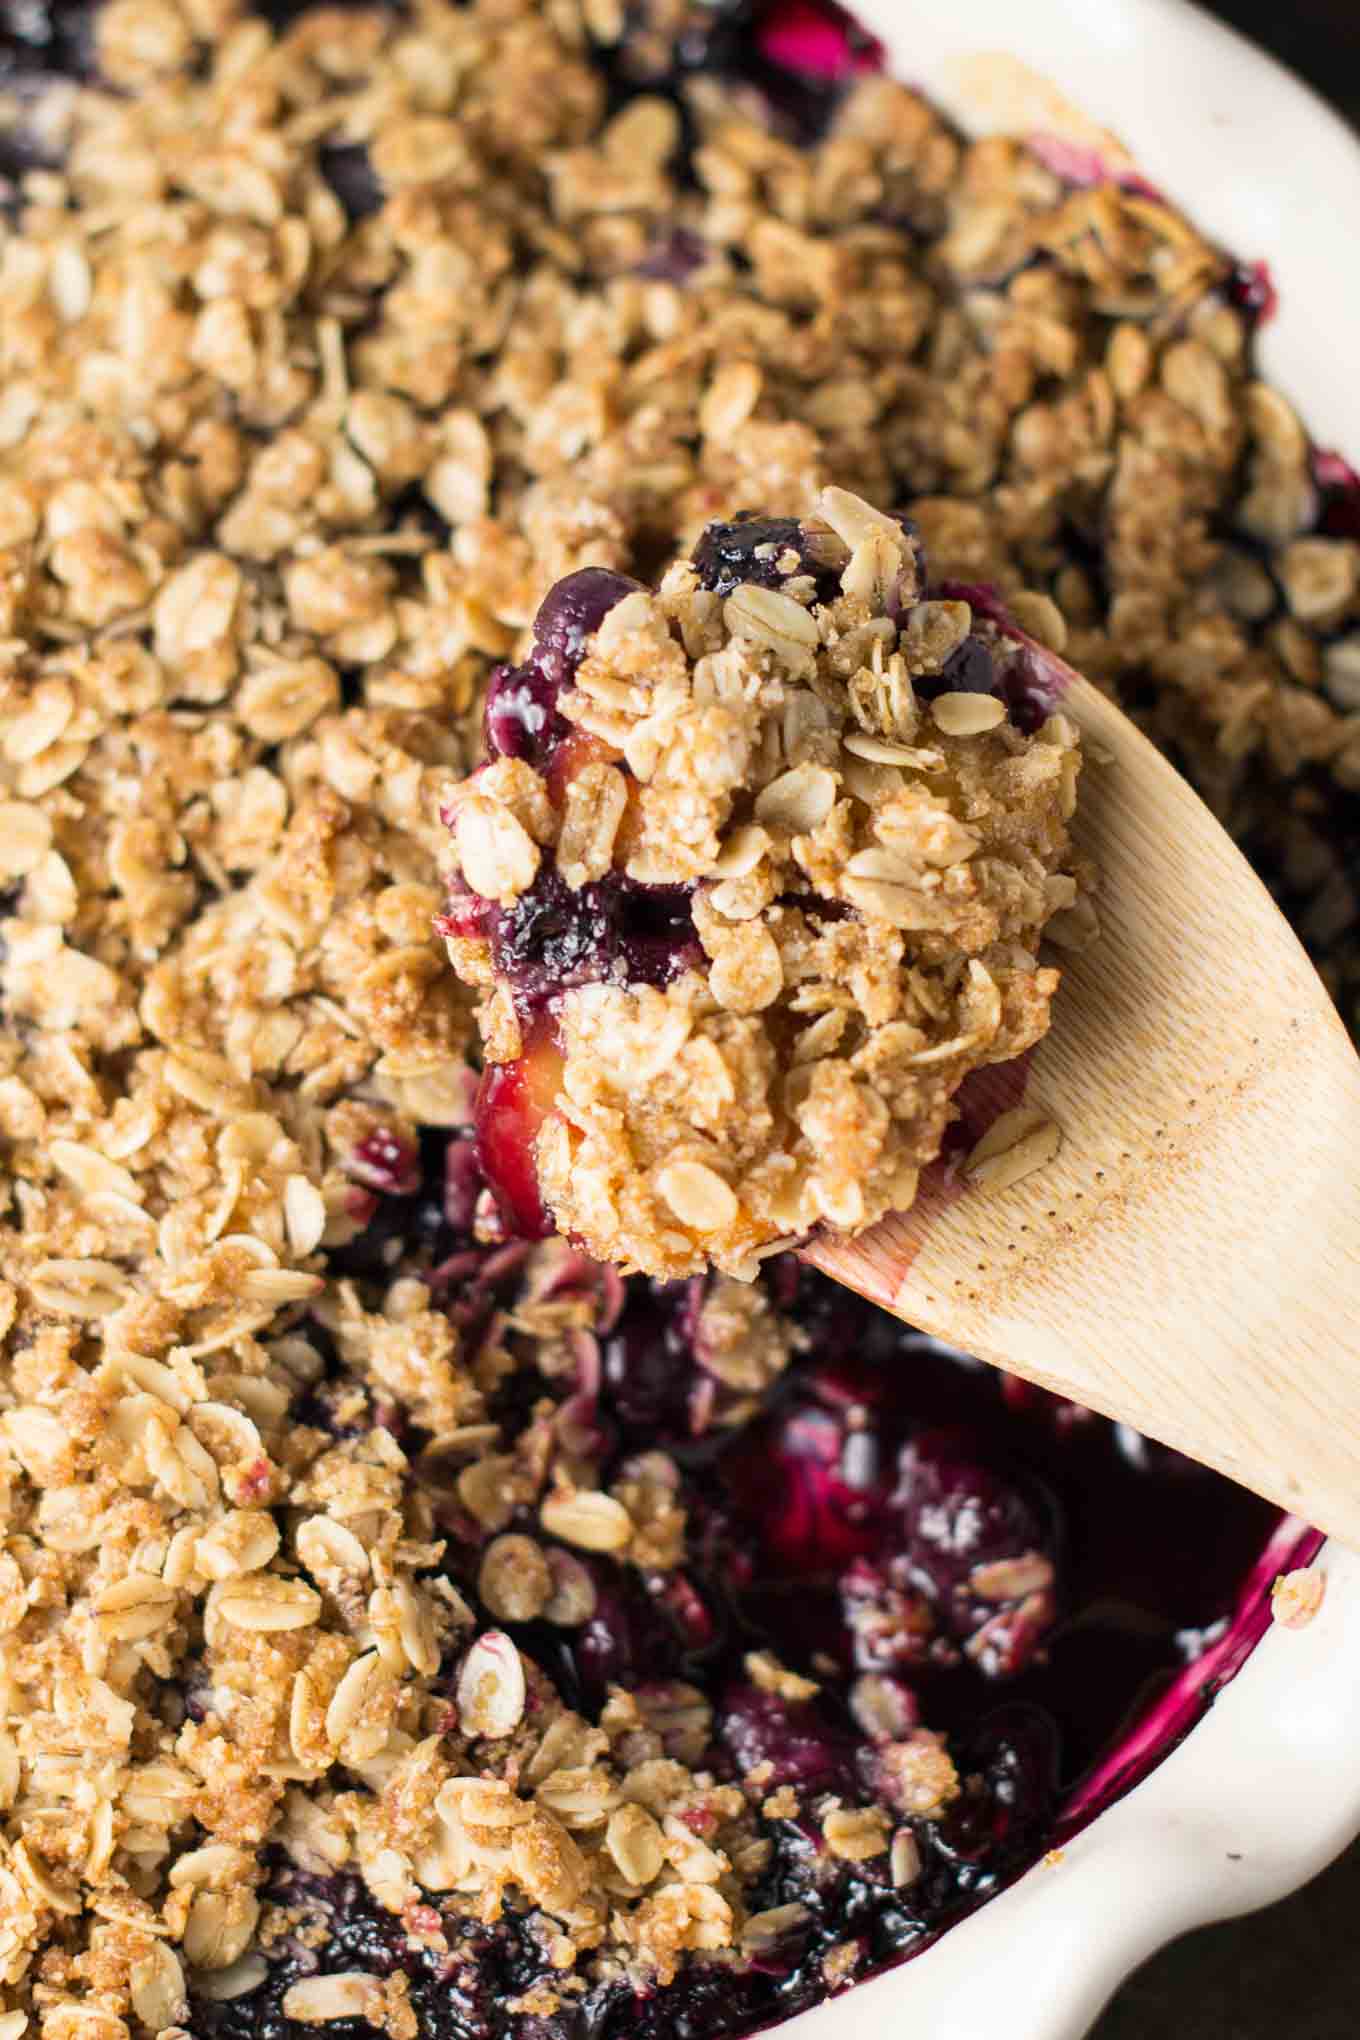
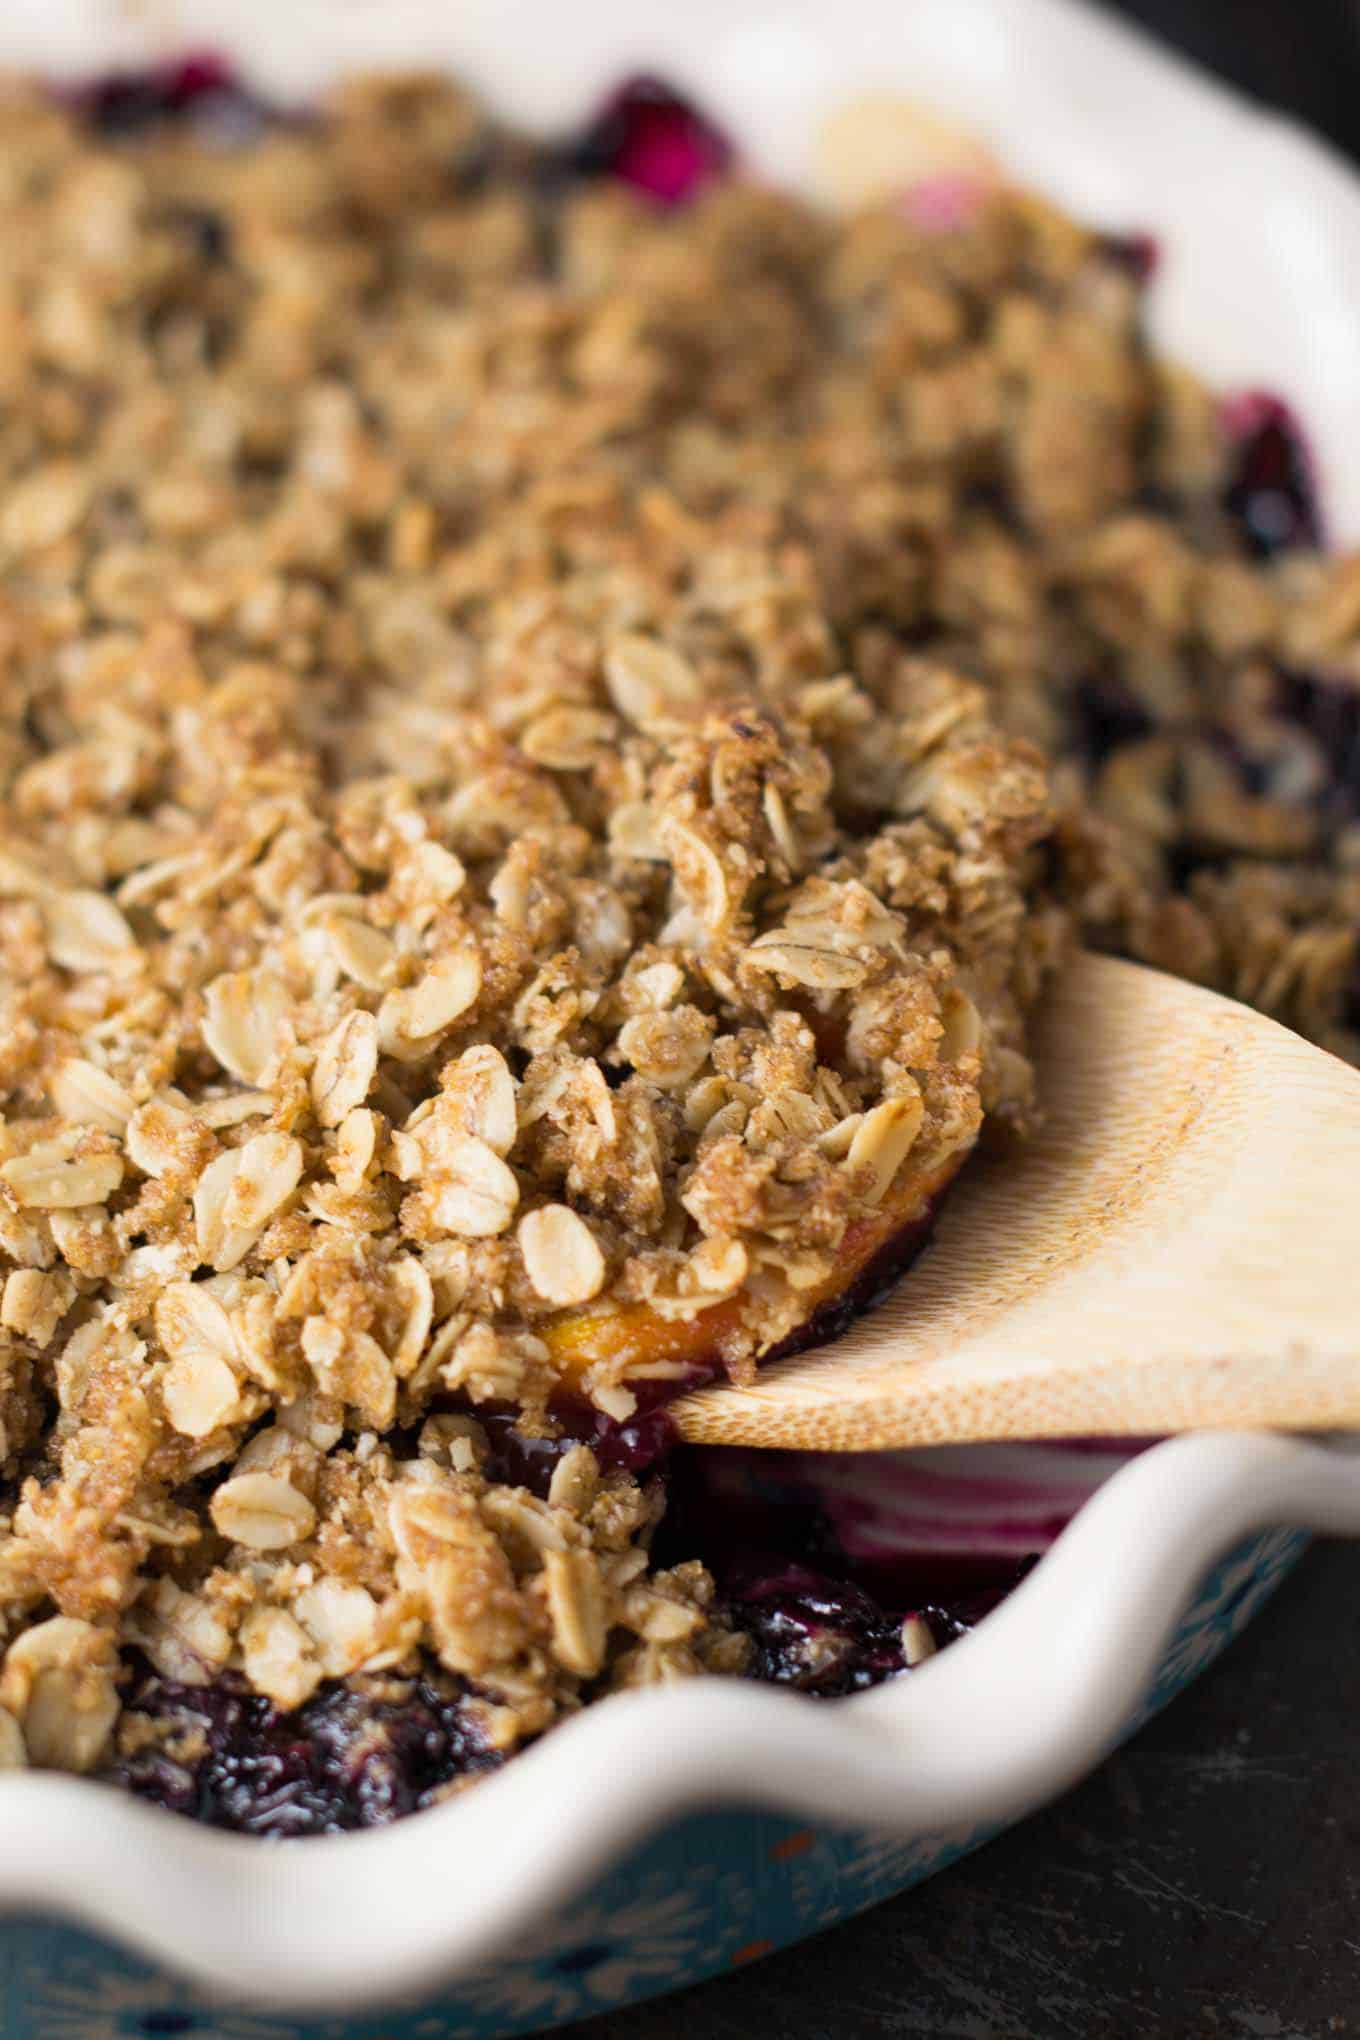
    It still has great texture, but like most crisp recipes, is best served fresh.

    Fresh crisp from the oven = melt in your mouth fruit with a crunchy crispy topping.

    Soooo good.

    gluten free vegan blueberry peach crisp recipe

    My husband’s all time favorite dessert is my vegan apple crisp recipe.

    It’s a classic favorite of ours every fall and we love it.

    While that recipe is fantastic, I wanted to create an easy berry crisp recipe that could be throw together in minutes without a lot of time spent chopping up fruit.

    This is a great summer dessert for when you really don’t feel like spending a bunch of time in the kitchen.

    Frozen fruit is what we are using in this recipe, so the prep work is super minimal (open bag and you’re done prepping the fruit!)

    Even someone that doesn’t like cooking can make this recipe fast!

    gluten free dairy free summer dessert recipe

    Sometimes you just need a quick and easy dessert, right?

    This would also be a great recipe to use up extra summer produce year round.

    If you have extra fresh peaches or blueberries to freeze, just store them until you are ready to use them.

    Stock up during the summer if you want that super juicy fresh peach flavor.

    I’m a frozen blueberry lover myself, so I’m glad that those are always available to me.

    Am I the only one that likes frozen blueberries better than fresh?

    My husband seems to think so.

    Random fact: frozen blueberries are one of the only things that immediately cures my stomach ache.

    If I eat a bowl I almost always feel better within just a few minutes!

    See my 15 Easy Vegan Desserts roundup for more favorite recipes!

    gluten free vegan crisp recipe

    I use both frozen peaches and frozen blueberries for this easy vegan blueberry peach crisp.

    This recipe is similar to my easy peach crisp recipe, but I made the crumble topping to be gluten free so that everyone can enjoy it!

    vegan blueberry peach crisp for summer

    Blueberries are one of my favorite fruits and add such a nice sweetness to this dessert.

    Even though I love frozen blueberries, I also love them all bubbly and warm in this crisp.

    There’s just something so comforting about a big bowl of berry crisp!

    vegan crisp recipe with frozen fruit

    While I admit that fresh peaches usually have more flavor, I still loved the flavor of frozen peaches once they cooked!

    If nothing else, it saves a ton of prep time.

    And I’m all for an easy and satisfying dessert that doesn’t take me a ton of time spent in the kitchen!

    gluten free vegan blueberry peach dessert

    This recipe is gluten free which is a plus if you know someone that can’t tolerate gluten!

    I have made this with gluten free relatives in mind.

    easy dessert with frozen peaches and frozen blueberries

    While nothing can quite top apple crisp in Robbie’s eyes, this blueberry peach crisp was a VERY close contender.

    gluten free vegan blueberry peach crisp recipe via @buildyourbite

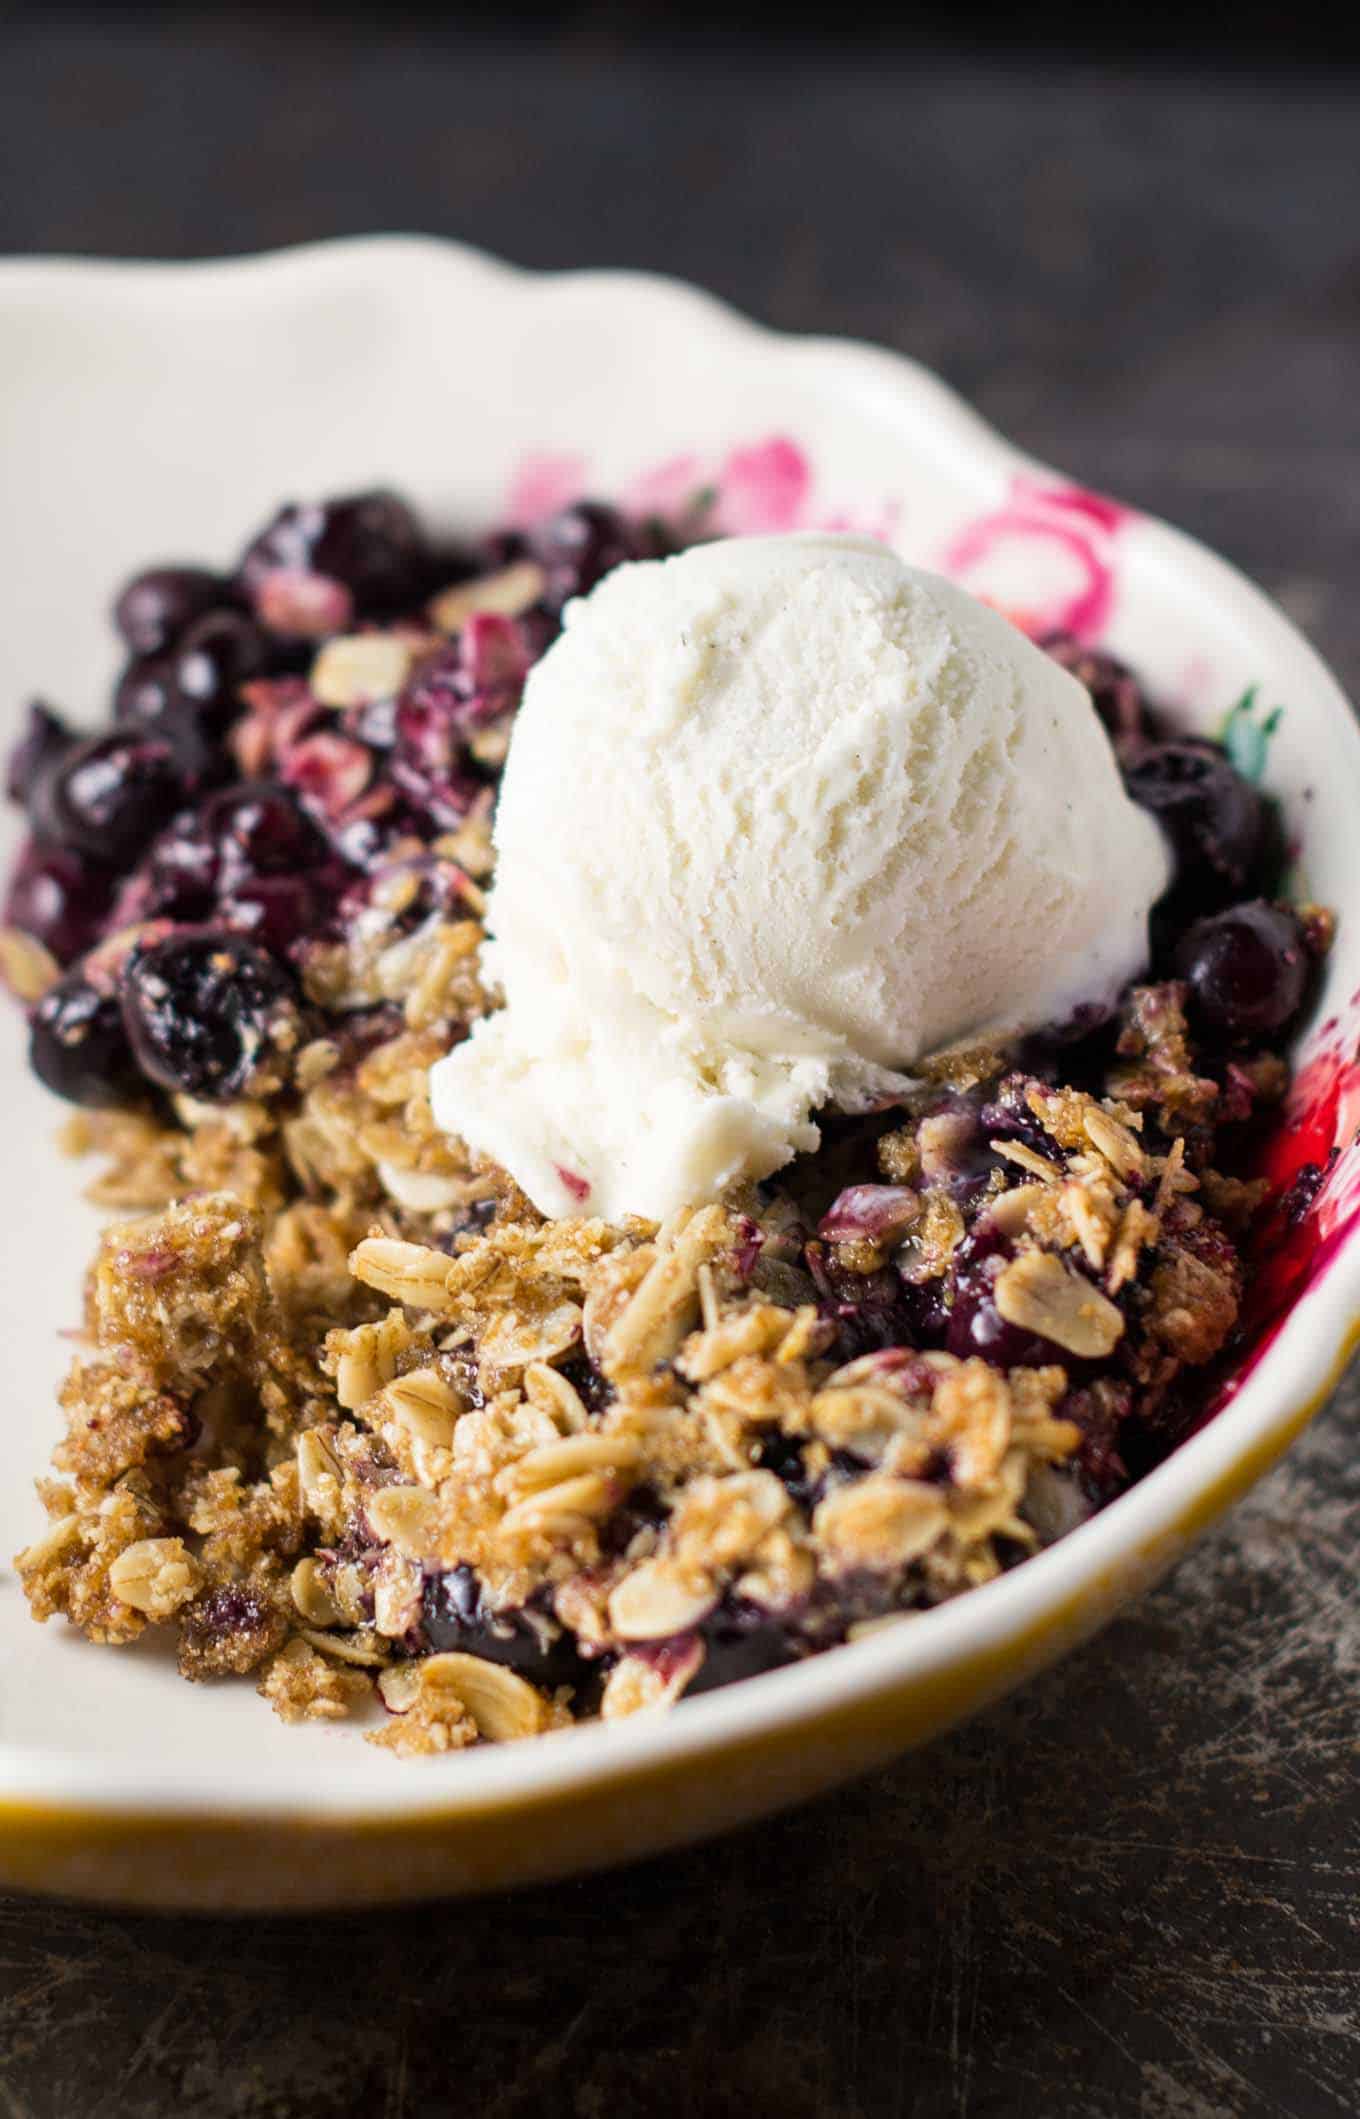
    Juicy, sweet, and perfect with a cool scoop of ice cream.

    Now that’s what I’m talking about!

    Are you making this recipe? I want to see! Don’t forget to tag me on instagram @buildyourbite and hashtag #buildyourbite with your recipe creations!

    Be sure to pin this recipe for later and follow Build Your Bite on Pinterest for all the latest delicious recipes!

    vegan blueberry peach crisp recipe #vegan #dessert #veganrecipe #healthydessert #healthyliving #vegancrisp #peachcrisp #dairyfree #glutenfree

    Did you make this recipe? Be sure to leave a star rating below!

    Vegan Blueberry Peach Crisp Recipe:

    For the filling

    • 2 cups frozen peaches
    • 4 cups frozen blueberries
    • 1/4 cup sugar
    • 2 tablespoons corn starch
    • 1/4 teaspoon salt
    • 1/2 teaspoon cinnamon

    For the crisp topping

    • 3/4 cup brown sugar
    • 1/2 cup gluten free oat flour
    • 3/4 cup gluten free rolled oats
    • 1/4 teaspoon salt
    • 2 tablespoons coconut oil, melted
    • 1/4 cup vegan butter, melted
    • In a large bowl, mix together all of the ingredients for the filling. You may need to let the berries thaw for 5-10 minutes and stir until the remaining ingredients stick to the fruit

    • In a separate bowl, make the crisp topping. Mix together all of the ingredients until it resembles wet sand

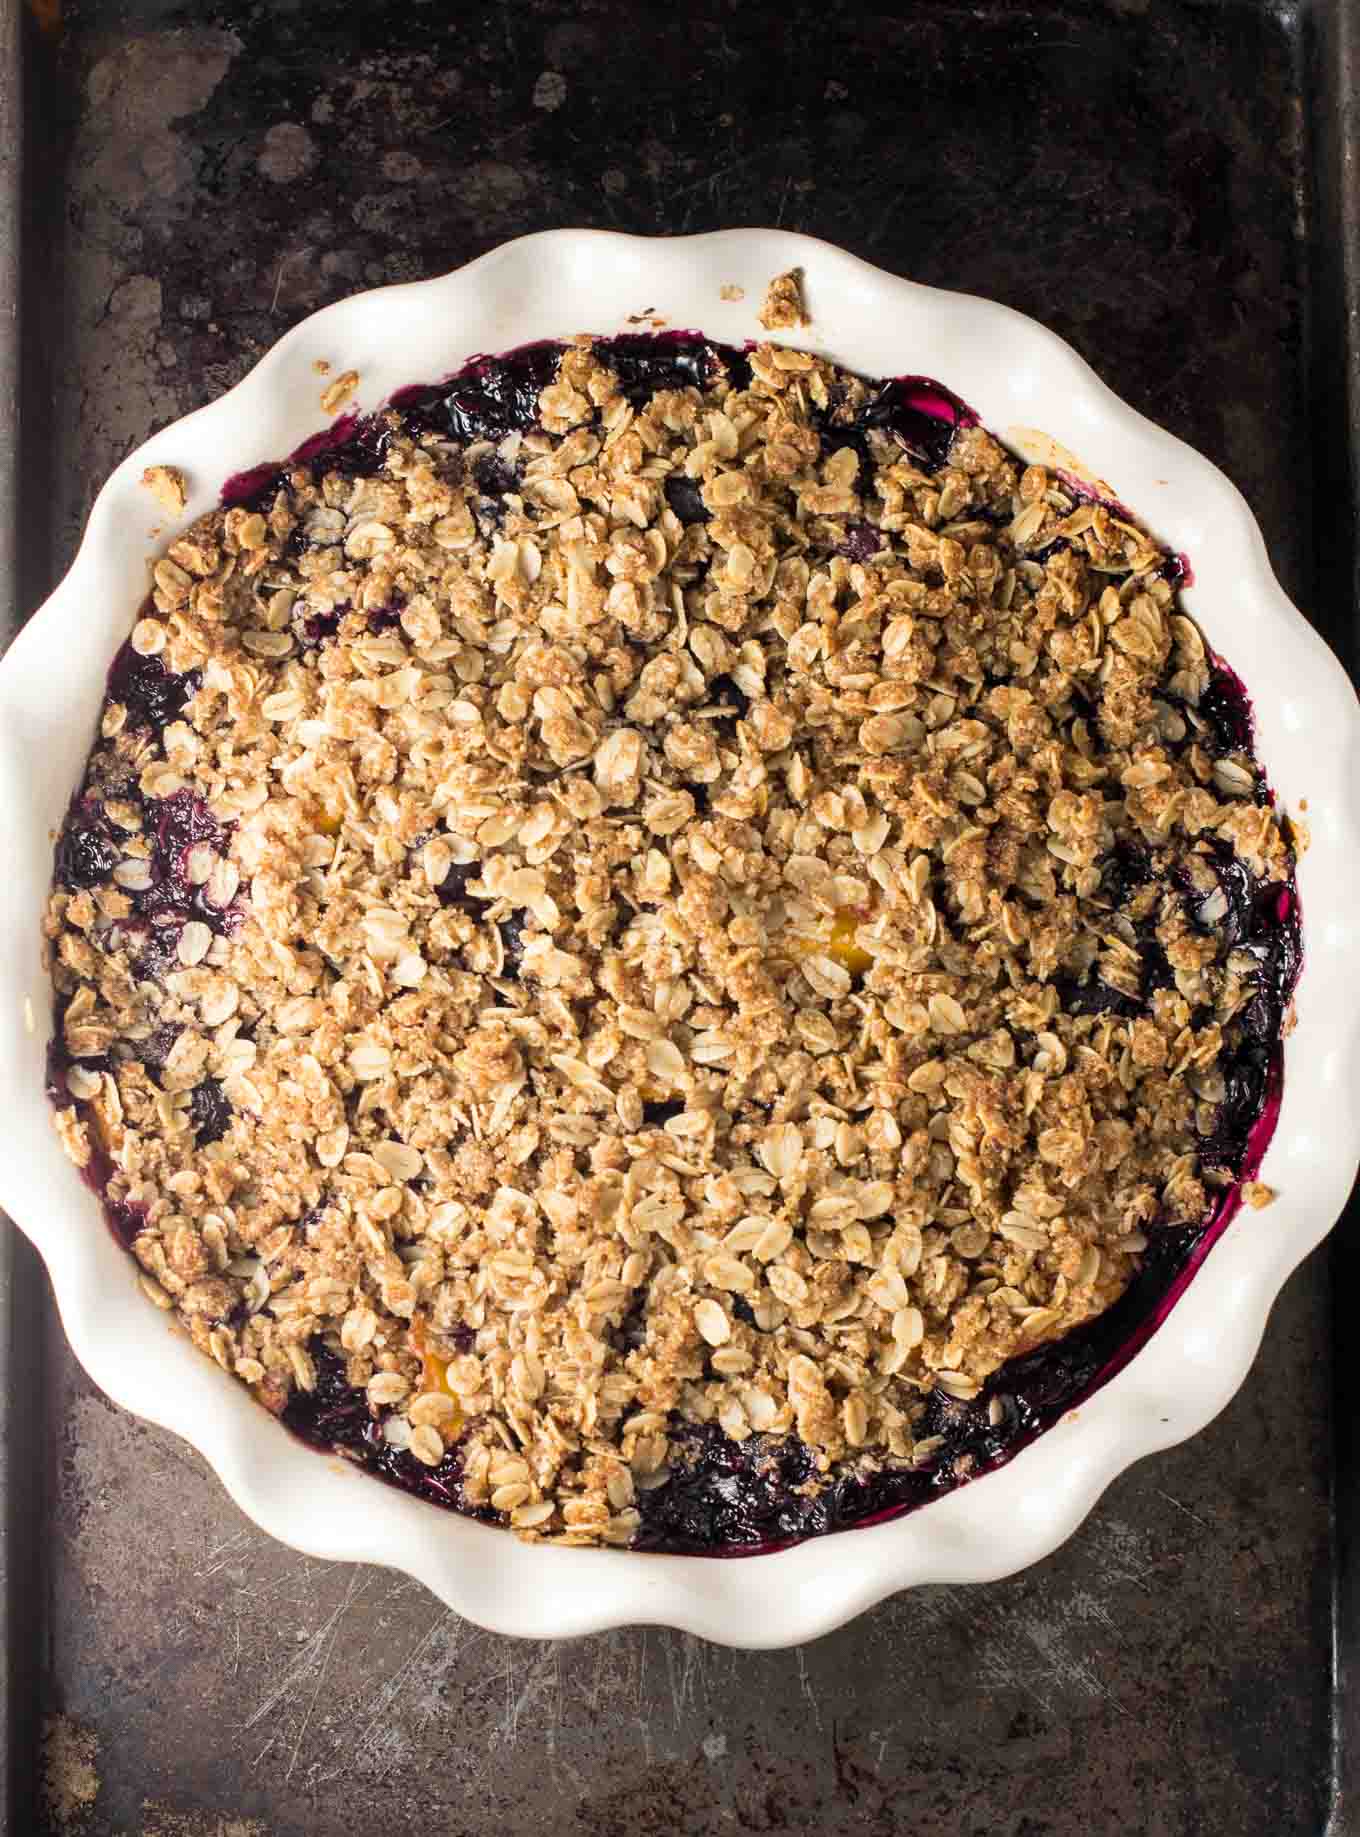
    • Pour the crisp filling into a pie dish

    • Sprinkle the topping evenly over the top

    • Bake the crisp at 350 degrees for 50-60 minutes, or until bubbling and the top starts to brown

    • Allow to rest for 10-15 minutes

    • Serve with ice cream

    The crisp topping is best served right away. Leftovers will not be quite as “crispy”, but still delicious.

    Calories: 298kcal, Carbohydrates: 53g, Protein: 3g, Fat: 10g, Saturated Fat: 4g, Polyunsaturated Fat: 2g, Monounsaturated Fat: 2g, Trans Fat: 0.03g, Sodium: 205mg, Potassium: 189mg, Fiber: 4g, Sugar: 37g, Vitamin A: 436IU, Vitamin C: 9mg, Calcium: 33mg, Iron: 1mg

    Read More

  • Vegan Zucchini Brownies

    Vegan Zucchini Brownies

    recipe image
    Ingredients:

    • * 1/4 cup vegetable oil
    • * 1/2 cup granulated sugar
    • * 1 teaspoon vanilla extract
    • * 1 cup whole wheat pastry flour
    • * 1/4 cup cocoa powder, plus extra for dusting the pan
    • * 1 teaspoon baking powder
    • * 1/2 teaspoon salt
    • * 1 cup grated zucchini
    • * [i]the frosting[/i]
    • * 3 tablespoon cocoa powder
    • * 2 tablespoon vegan margarine
    • * 1 cup powdered sugar
    • * 2 tablespoon almond milk
    • * 1 teaspoon vanilla extract

    Read More

  • Homestyle Vegan Pea Soup

    Homestyle Vegan Pea Soup

    recipe image

    by Kathy Patalsky · updated: · published: · About 4 minutes to read this article. Leave a Comment


    Is my warm bowl of Homestyle Vegan Pea Soup, served with a side of crusty wheat bread and vegan butter the best lunch ever?? OK, “best ever” is a strong statement – but right now as I dive in with my eager soup spoon, I have to say, this dish is a very worthy contender.

    Pea Soup Kick. Although I just a few weeks ago posted my hearty recipe for Harissa Split Pea Soup. But since the from scratch pea soup process was so gosh darn easy, I decided to do it again. And this time I keep the ingredients a bit more homestyle with rustic diced carrots and onion, cheezy nutritional yeast and some diced mushrooms too. Get my recipe!…

    Cheap (yummy, healthy) Lunch! I get so excited when I craft a recipe that is not only easy and restaurant-quality delicious, but also cheap! And yes, Split Pea Soup fits those qualities. I buy about 2 cups of dried organic split peas from Whole Foods (from the reasonably priced bulk-bin section), and I’m just about ready to make fantastic soup!

    Flavors. The liquid smoke adds a smoky layer that meshes perfectly with the warm ‘cheezy’ flavor of the nutritional yeast. Mushrooms, carrots and potato accents are perfect pea companions. ..if you don’t have nutritional yeast, that’s OK – but I highly recommend you try adding healthy nutritional yeast to your pantry!

    Healthy Peas. Peas are pretty much superheros when it comes to vegan nutrition. They are a great source of 100% vegan protein, fiber, and other assorted nutrients. They also fill you up and keep you going on a cold fall or winter day.

    …and NYC has been pretty chilly and snow-covered lately! Crave this soup, then make it!

    Homestyle Vegan Pea Soup


    vegan, makes 1 big pot – servings: about 5-6 bowls

    2 cups split peas, dried


    8 cups vegetable broth


    1 bay leaf


    1 small onion, diced (or ½ cup diced fennel)


    1 large carrot, sliced into rounds or half-round


    ¼ teaspoon black pepper (or to taste)


    ¾ – 1 cup nutritional yeast


    1 tablespoon garlic powder or 2 fresh cloves, minced


    2 tablespoon vegan liquid smoke (optional, but advised for smoky flavor)


    2-3 pinches cayenne (or to taste)


    1 cup shiitake mushrooms, sliced


    ½ cup mashed white potato or ½ cup dehydrated potato flakes


    1-2 tablespoon vegan buttery spread (optional, but adds a rich homestyle flavor I love. If you adds this, you do not need as much salt)


    2 tablespoon extra virgin olive oil


    salt to taste (at least ½ tsp)


    ¼ cup apple cider vinegar


    handful of chopped spinach or arugula (optional for added greens)

    garnish: fresh herbs like chopped dill, parsley, fennel fronds or cilantro.

    Directions:

    1. Soak your dried peas in salted water overnight.

    2. Add all your ingredients to a large soup pot. Bring to a boil. Reduce heat, cover pot with lid and allow to simmer for several hours. Be sure not to burn the bottom of the soup. Pea soup burns quite easily – so monitor it closely if this is your first time making it. Low temperatures for a long period of time work best. You could also use a slow cooker if you’d like.

    3. I actually enjoy my peas a bit al dente, but keep simmering until the peas are tender to your likeness. Serve same day, or for even better flavor results, allow the soup to sit in the fridge for 1-2 days and reduce and marinate the peas. Soup like this tends to be better the next day!

    4. Simply reheat and serve. *remove bay leaf before serving* Crusty bread and vegan butter are the perfect side to this cozy bowl. Garnish with fresh herbs.

    Happy pea soup eating!

    Read More

  • Clark’s Vegan and Gluten Free Chocolate Ch

    Clark’s Vegan and Gluten Free Chocolate Ch

    recipe image

    by 2 Comments

    Best Ever Oatmeal Chocolate Chip Cookies on Towel

    Even if I think really hard and try to remember, I still can’t recall exactly when Clark first made these cookies. I’m pretty sure it was our senior year at Purdue, but I can’t remember which apartment we were living in at the time. If memory serves me, he actually made them while I was away one weekend and then baked them again when I came back.

    I do remember him telling me that he “made – literally – the best chocolate chip cookies ever.” And I definitely remember agreeing 100%, nodding my head and muttering “mmmmmmmmmm omg” with a mouthful of cookie. Hot, chewy, wholesome, and loaded with melty chips.

    Hand Breaking Gluten Free Chocolate Chip Cookie

    It’s safe to say it was love at first bite with these chocolate chip cookies. I have no idea how many times we’ve made them since then. Now, when Clark makes them, he has them mixed up and going into the oven in less than 10 minutes.

    Like any good recipe, it is simple enough to memorize and make it into a ritual after you’ve made it a few times. You know how your mom eventually stopped following her lasagna recipe because she knew it by heart? This is one of those recipes.

    These are the cookies to have in your recipe arsenal. Whip them out for a party, take them to a sick friend, bake them just because it’s midnight and you have the munchies.

    3 Vegan and Gluten Free Chocolate Chip Cookies

    2 Vegan Gluten Free Chocolate Chip Cookies

    I know there are a million kinds of chocolate chip cookies out there, and everyone has their favorite. Some people like them crispy, some people like them chewy, some people only like their grandma’s recipe.

    There’s just something special about an oaty chocolate chip cookie – they satisfy the craving and they manage to fill you up at the same time, without a bunch of unnecessary sugar. You’ll love these no matter what because they’re so simple and straightforward.

    6 Gluten Free Chocolate Chip Cookies

    3 Gluten Free Chocolate Chip Cookies

    This post is brought to you in part by Colter Bay Village in Grand Teton National Park. This world-class campground is kind enough to provide 24-hour wifi access in their laundromat. Currently, we’ve got three devices charging while a load is in the dryer. We’re on day 6 of our road trip, so a laundry session was in order. I’ll include a couple of pictures of our road trip but if you want to see more of how awesome the wild West is, follow along on Instagram – I’m updating as frequently as wifi allows!

    You’ll have to excuse my brevity today; there are other folks waiting to use the charging station. Like, really. There is a line. And I bet they’re all as anxious to Instagram, email, and share stories as I am!

    Print

    Clark’s Vegan and Gluten Free Chocolate Chip Cookies


    5 Stars 4 Stars 3 Stars 2 Stars 1 Star

    No reviews


    • Author:
      The Fitchen


    • Total Time:
      31 minutes


    • Yield:
      15 1x

    Description

    A classic chocolate chip cookie made with wholesome ingredients. Chewy, melty, and with just a hint of crunch.


    • 1 ½ cups gluten free rolled oats
    • 1 ½ cups gluten free oat flour
    • 10 tablespoons brown sugar
    • 5 tablespoons coconut oil
    • 5 tablespoons vanilla coconut milk
    • 1 teaspoon sea salt
    • 1 teaspoon baking soda
    • ⅓ cup chocolate chips [vegan, if possible]


    Instructions

    1. Preheat over to 350º and line a large baking sheet with parchment paper.
    2. In a large bowl, combine all of the ingredients except chocolate chips.
    3. Use your hands to thoroughly mix everything – using your hands helps to melt the coconut oil.
    4. Add chocolate chips and mix throughout.
    5. Scoop cookies onto baking sheet. Our favorite method is to use a rounded 2 tablespoon measure spoon – that’s what helps to create their perfect shape!
    6. It’s alright if the cookies are close together – they hold their shape during baking and don’t spread out much.
    7. Bake for 14-16 minutes, remove from oven, and allow to cool.
    8. Store in an airtight container for up to 7 days.

    • Prep Time: 15 mins
    • Cook Time: 16 mins
    • Category: Dessert

    Badlands National Park South Dakota

    In Badlands National Park, South Dakota.

    Badlands National Park South Dakota

    Free campground near Badlands National Park, South Dakota.

    Frog

    Clark made a frog friend!

    Grand Tetons Wyoming

    Grand Teton National Park Wyoming

    Grand Teton National Park Wyoming

    Reader Interactions

    Read More

  • Healthy No Bake Cookies (Gluten Free, Vegan)

    Healthy No Bake Cookies (Gluten Free, Vegan)

    recipe image

    Healthy No Bake Cookies – All the chocolate peanut butter flavor you love from traditional no-bakes, made with healthier ingredients. These are gluten free, vegan, and delicious!

    Overhead view of Healthy No Bake Cookies on an Antique Cooling Rack from One Lovely Life

    One of the first recipes I ever learned to make was no bake cookies. I loved standing by the stove, stirring and sneaking taste after taste after taste of the batter. The combination of chocolate and peanut butter was so delicious to me, and I loved that I didn’t have to monitor batch after batch of cookies in the oven.

    The love has continued! These days, my recipe doesn’t include the 2 cups of sugar that the original had, but it still has the chocolate peanut butter flavor and the ease I love from the original. (PS – For a good time, look at the photos of that first no bake cookie recipe–ha!)

    Here’s how I made my childhood favorite a bit healthier…

    Front view of Healthy No Bake Cookies on an Antique Cooling Rack from One Lovely Life Close Overhead View of Healthy No Bake Cookies on a Cooling Rack from One Lovely Life

    What You Need to Make Healthy No Bake Cookies:

    PEANUT BUTTER. I use natural peanut butter, with just peanuts or just peanuts and salt. Crunchy or smooth peanut butter will work beautifully. (I like crunchy, my kids like smooth).

    PURE MAPLE SYRUP. Pure maple syrup–the real stuff, not pancake syrup–doesn’t add any maple flavor, just sweetness. I love it for these cookies and tend to find the best price at Costco or online. If you need a substitute, I wouldn’t recommend honey as it tends to overpower the other flavors, but you can get away with agave if you need to.

    UNSWEETENED COCOA POWDER OR CACAO POWDER. – Here’s where the chocolate flavor comes from! Cacao powder is raw, where cocoa powder has been roasted. Both work in this recipe, so pick your favorite! (Just be sure it’s unsweetened)

    COCONUT OIL. I use virgin coconut oil which does have a tiny bit of coconut taste, but you can use expeller pressed (refined) coconut oil for no coconut taste. Or, you can sub vegan butter or regular butter, if you prefer.

    VANILLA EXTRACT. A little vanilla is the “it” factor for me in these cookies. If you leave it out, you’ll notice something’s missing. PS – If you can ever find Mexican vanilla, dive on it!

    SALT. Another one of those essentials you’d miss if you left it out. Salt will wake up the other flavors and keep the cookies from tasting flat. If you use unsalted peanut butter, you may want to add an extra tiny pinch to the batter. (I also sometimes like to put a pinch of this coarse salt on top of the finished cookies)

    (GLUTEN FREE) ROLLED OATS. Oats themselves don’t contain wheat gluten, but they’re often farmed and processed in ways that cause cross-contamination. If you’re gluten free, make sure you buy certified gluten free oats. I like Bob’s Red Mill and Trader Joe’s brands. (You *can* use quick oats if you have to, but I recommend rolled/old fashioned for best results).

    Overhead view of Healthy No Bake Cookies on an Antique Cooling Rack from One Lovely Life

    Are Healthy No Bakes Really Healthier? 

    Calorie-wise, these healthy no bake cookies are very close to my classic no bake cookies. However, the macronutrient breakdown (carbs, protein, fat) of those calories looks a lot different:

    HEALTHY NO BAKES – 151 Calories, 7.9g fat, 15.8g carbs, 3.3g protein, 7.2g sugar, 2.1g fiber

    CLASSIC NO BAKES – 149 Calories, 5.2g fat, 23.5g carbs, 2.9g protein, 17.8g sugar, 1.2g fiber

    So, the healthy no bakes have about 1/3 fewer carbs, less than 1/2 the sugar, more protein, and more fiber than the classics. I’d say–yes! They’re a healthier treat.

    Close up view of Healthy No Bake Cookies on a Cooling Rack from One Lovely Life

    Tips for Perfect Healthy No Bake Cookies

    Don’t over-boil. I know a watched pot never boils, but an unsupervised pot will over-boil. These healthy no bake cookies will go grainy and crumbly fast if you boil them much longer than directed. Once you see bubbles coming to the surface of your mixture, you know they’re boiling. Let it go 2 minutes from that point.

    Parchment or a nonstick silicone baking mat. Use parchment paper or a reusable silicone baking mat to line your baking sheet. It’ll make removing the cookies MUCH easier after they’ve set.

    Cookie scoop – I use a 1 1/2 Tbsp cookie scoop and I usually get 12-14 cookies from my batch. You can use a larger scoop for fewer cookies or a smaller scoop for more cookies.

    Pat them down a bit. These won’t spread like traditional no bakes do, so after scooping, use your fingers or the back of your cookie scoop to flatten them out a bit.

    How to store. These healthy no bake cookies keep best in the refrigerator, and they’ll last about 1 week in an airtight container in the fridge. If you need to, you can freeze them.

    Healthy No Bake Cookies on an antique cooling rack with two bottles of almond milk from One Lovely Life

    More Delicious Treats to Love:

    • The BEST Healthy Homemade Popsicles
    • Perfect Gluten Free Brownies
    • The BEST Vegan Chocolate Pudding
    • Toasted Marshmallow Rice Krispies Treats

    Print

    Description

    These healthy no bake cookies have all the same chocolate peanut butter flavor as the original, but are made with healthier ingredients. They’re the perfect treat! 


    • 3 Tbsp coconut oil (can sub vegan butter or butter)
    • 1/2 cup peanut butter (creamy or chunky)
    • 1/2 cup pure maple syrup
    • 3 Tbsp cocoa powder or cacao powder
    • 1 1/2 tsp. vanilla extract
    • 1/4 tsp. salt
    • 1 1/2 cups rolled oats (Certified gluten free, as needed)


    1. Line a baking sheet with parchment paper or a reusable silicone baking mat. Set aside.
    2. In a medium saucepan, gently melt coconut oil, peanut butter, syrup, and cocoa powder together over low heat.
    3. When the mixture is combined, increase the heat to medium and continue stirring until the mixture comes to a boil. Boil 2 minutes, whisking or stirring constantly, then remove from heat.
    4. Add vanilla extract, and salt. Stir to combine.
    5. Add oats and stir to coat in the peanut butter chocolate mixture.
    6. Using a 1 1/2 Tbsp cookie scoop or a spoon, scoop cookies onto your prepared baking sheet. Gently pat down with your fingers or the back of your scoop or spoon to spread a bit.
    7. Chill in the refrigerator until set, about 1 hour.
    8. Store in an airtight container in the refrigerator up to 1 week.

    • Prep Time: 10 minutes
    • Cook Time: 10 minutes
    • Category: Dessert, Cookies
    • Method: No Bake, Stovetop
    • Cuisine: American

    Read More

  • Delicious Vegan Fried Rice

    Delicious Vegan Fried Rice

    recipe image

    A quick fried rice dish I threw together with some leftover vegetables that quickly became a friend and family favourite! It’s fast, easy, healthy, delicious, and light enough to serve with a main dish, yet filling enough to eat alone!

    Submitted by
    HeyAussie

    Published on April 4, 2019


    Cook Mode
    (Keep screen awake)

    Ingredients


    Original recipe (1X) yields 2 servings

    • 2 cups water

    • 1 cup white rice

    • 1 teaspoon dried oregano

    • 1 teaspoon dried basil

    • ½ teaspoon dried sage

    • ½ teaspoon cayenne pepper

    • ½ teaspoon Creole seasoning

    • ½ teaspoon salt

    • ½ teaspoon ground black pepper

    • ½ teaspoon lemon zest

    • 3 tablespoons extra-virgin olive oil

    • 1 tablespoon vegan margarine (such as Earth Balance®)

    • 1 green bell pepper, minced (Optional)

    • 1 carrot, minced

    • 1 stalk celery, minced

    • ½ small tomato, diced

    • 1 teaspoon soy sauce, or to taste (Optional)

    • 1 pinch salt and ground black pepper to taste

    Directions

    1. Combine water, rice, oregano, basil, sage, cayenne pepper, Creole seasoning, 1 teaspoon salt, 1 teaspoon pepper, and lemon zest in a saucepan; bring to a boil. Reduce heat to medium-low, cover, and simmer until rice is tender and liquid has been absorbed, 20 to 25 minutes.

    2. Mix olive oil and vegan margarine in a large pan over medium-low heat. Stir rice into oil mixture and add green bell pepper, carrot, celery, tomato, soy sauce, and salt and pepper to taste. Cook and stir mixture into heated through, about 5 minutes.

    Cook’s Note:

    The number of servings varies greatly, depending on if you plan to serve this as a side, or as a full meal.

    Use red bell pepper or any other vegetables in this recipe, if desired.

    Nutrition Facts (per serving)

    612 Calories
    27g Fat
    83g Carbs
    8g Protein
    Nutrition Facts
    Servings Per Recipe
    2
    Calories
    612
    % Daily Value *
    Total Fat
    27g
    34%
    Saturated Fat
    5g
    23%
    Sodium
    1034mg
    45%
    Total Carbohydrate
    83g
    30%
    Dietary Fiber
    5g
    16%
    Total Sugars
    4g
    Protein
    8g
    17%
    Vitamin C
    55mg
    61%
    Calcium
    90mg
    7%
    Iron
    5mg
    29%
    Potassium
    477mg
    10%

    * Percent Daily Values are based on a 2,000 calorie diet. Your daily values may be higher or lower depending on your calorie needs.

    ** Nutrient information is not available for all ingredients. Amount is based on available nutrient data.

    (-) Information is not currently available for this nutrient. If you are following a medically restrictive diet, please consult your doctor or registered dietitian before preparing this recipe for personal consumption.

    Read More

  • Vegan Cornbread Stuffing

    Vegan Cornbread Stuffing

    recipe image

    We’re checking if you’re a real person and not an automated bad bot. Usually, the captcha below will complete itself. If it doesn’t, simply click the checkbox in the captcha to verify. Once verified, you’ll be taken to the page you wanted to visit.

    Human verification is in progress ✨

    If for some reason after verifying the captcha above, you are constantly being redirected to this exact same page to re-verify the captcha again, then please click on the button below to get in touch with the support team.

    Contact Support

    Please mention the “Ray ID: 94787f1afb091193” and “Client IP: 35.239.153.170” to your ticket.

    Read More

  • Easy Vegan Thai Green Curry

    Easy Vegan Thai Green Curry

    recipe image

    A one-pot, easy and vegan Thai Green Curry with tons of healthful veggies and golden-crisp tofu.

    You might also like these recipes for Thai chickpeas, Thai massaman curry and Thai yellow curry.

    A fresh and aromatic Vegan Thai Green Curry Paste to make delicious dinners in a hurry

    This curry comes together in no more than 15 minutes so long as you have the vegan Thai Green Curry Paste on hand. And you can make it in one pot.

    But even better, it is chock-full of healthy veggies and clean vegan protein from tofu.

    I shared with you earlier this week my recipe for a delicious and aromatic Thai Green Curry Paste, and if you’ve made that, or have a store bought or homemade curry paste on hand, you are in luck. All you will now need to do is chop up a few veggies and tofu, open a can of coconut milk, and whip up a lip-smacking curry that makes for a very special meal.

    A fresh and aromatic Vegan Thai Green Curry Paste to make delicious dinners in a hurry

    While it’s easy enough to just buy the curry paste from any Asian grocery store, I make my own because it just tastes (and smells!) way better than store-bought versions. You can make the paste on a day when you have some time to spare, and keep it in the freezer or refrigerator for a rainy day.

    Into the curry I added zucchini, sweet potatoes, scallions, bell peppers, shallots and snow peas. You can use different veggies — any squash, carrots, potatoes and greens like spinach would all work. Take care to try and cut the veggies into same-size pieces. This not only ensures your curry looks even more beautiful, it also helps everything cook together at around the same time.

    If you want to make your Thai curry without tofu (it won’t be soy-free because my curry paste recipe has tamari in it), you can easily substitute chickpeas.

    A fresh and aromatic Vegan Thai Green Curry Paste to make delicious dinners in a hurry

    Serve

    Brown or white rice are both good, although quinoa would make it all even healthier. I go with whatever I am in the mood for that day.

    You can also just slurp this curry up by itself. With the tofu, it’s a complete meal.

    More global vegan curry recipes

    A fresh and aromatic Vegan Thai Green Curry Paste to make delicious dinners in a hurry

    A fresh and aromatic Vegan Thai Green Curry Paste to make delicious dinners in a hurry

    Easy Vegan Thai Green Curry

    Vaishali · Holy Cow Vegan

    A fresh and aromatic and easy vegan green curry ready in one pot and under 30 minutes.

    Prep Time 15 minutes

    Cook Time 15 minutes

    Total Time 35 minutes

    Servings 10 servings

    Calories 238 kcal

    Ingredients  

    • 1 tablespoon avocado oil or any neutral oil
    • 16 oz super-firm tofu/high-protein tofu (cut into ½-inch cubes)
    • 14 oz coconut milk (from a can. Don’t shake the can or stir after opening)
    • 2 shallots (sliced finely)
    • 1 large sweet potato (peeled if not organic, and cut into ½-inch cubes)
    • 2 medium zucchini (cut into ½-inch cubes)
    • Six spring onions (chopped, white and green parts both)
    • ¼ cup vegan Thai green curry paste
    • Salt to taste

    Instructions 

    • In a large saucepan, heat the vegetable oil. Then add the tofu cubes in a single layer and stir-fry until they turn a light gold. Remove and set aside.

    • In the same saucepan, add 2 tablespoon of the thick portion of the coconut milk. Add the curry paste and saute for a couple of minutes until very fragrant.

    • Add the shallots and spring onions, stir-fry for a couple of minutes, then add all the remaining vegetables and salt. Stir, cover and cook about 5-10 minutes or until veggies are tender.

    • Add half the coconut milk and enough water (or vegetable stock) to get the curry to the consistency you like.

    • When the curry begins to boil, add the remaining coconut milk and tofu and just warm through without bringing to a boil. Check salt, then turn off the heat.

    • Serve hot with rice.

    Notes

    • Time-saving tip: Use frozen, cut veggies if you don’t have the time to prep fresh veggies. No one will be the wiser.

    Nutrition Information

    Calories: 238kcalCarbohydrates: 14gProtein: 9gFat: 13gSaturated Fat: 13gSodium: 28mgPotassium: 377mgFiber: 2gSugar: 3gVitamin A: 4930IUVitamin C: 10.3mgCalcium: 59mgIron: 3.6mg

    Tried this recipe?Let us know in the comments below!

    I’ll leave you with a picture of Billy on his morning walk. Billy used to be an outdoor/indoor cat before he came to us, and he still has a yen for the outdoors, which he tries to satisfy by staging a well-timed escape every now and then. We live on a busy suburban street, and we have dozens of birds visiting our backyard at all times, so Desi has tried to rein this little guy in while satisfying his urge to go outdoors by giving him walks on a leash. He took a few days getting used to it, but will now run to us when we pick up the leash, much like a dog would, and he’s usually the first out the door, ahead of Leo and Lily.

    Billy the cat on a walk

    About Vaishali

    Hi! I’m Vaishali, a journalist turned food blogger. At Holy Cow Vegan I share easy, tasty recipes made with clean, wholesome ingredients that the entire family can enjoy.

    Reader Interactions

    Read More

  • Vegan Hazelnut Cocoa Cookies

    Vegan Hazelnut Cocoa Cookies

    recipe image

    “this recipe is easy, cheap and doesn’t require special tools. it’s perfect for the person who doesn’t like their sweets TOO sweet. these cookies are on the mild side. i also like to make small batches of cookies, so this recipe is great for just a few friends.”

    Ready In:
    35mins

    Ingredients:
    13

    • 12

      cup hazelnuts
    • 12

      cup white flour
    • 12

      cup whole wheat flour
    • 34

      cup white sugar
    • 1

      teaspoon baking powder
    • 18

      teaspoon salt
    • 14

      cup unsweetened cocoa powder
    • 14

      cup vegan margarine or 1/4 cup margarine
    • 12

      teaspoon vanilla extract
    • 14

      cup soymilk, plus
    • 1

      tablespoon soymilk
    • 1 12

      tablespoons ground flax seeds
    • 4 12

      tablespoons warm water

    directions

    • mix ground flax seeds with water and let stand until it gets thick (approx 3 minutes)– this is a vegan substitute for eggs and works better than any sub i’ve ever used.
    • mix dry ingredients.
    • mix wet ingredients.
    • mix all ingredients together.
    • drop by tablespoon onto greased cookie sheet, 2 inches apart.
    • cook at approx 325-350 for 10-15 minutes (i bake in a toaster oven@ 300 for 10 min).
    • cool on wire rack if you have one.
    • enjoy animal friendly cookies!
    • great with soy-coffee ice cream.

    Questions & Replies


    Got a question?


    Share it with the community!

    Want a Second Helping?

    Sign up for our newsletter to get recipes, easy dinner ideas, tasty treats and more delivered straight to your inbox.

    To withdraw your consent or to learn more about your rights, see the Privacy Policy.

    RECIPE SUBMITTED BY

    I live in Vegas, with my sweet Chihuahua- Hula. I love baking chocolate chip cookies, cooking up breakfasts (my fave meal!) for my great boyfriend and his two adorable kids. I make really gourmet coffees with simple ingredients in my kitchen and I’ve perfected the art of milkshakes using ice cream, my sturdy blender and Oreos.

    View Full Profile

    Read More

  • Vegan Pumpkin Spice Fudge

    Vegan Pumpkin Spice Fudge

    recipe image

    Ingredients:

    • 1. 3/4 cup pumpkin puree (not pumpkin pie filling)
    • 2. 1/2 cup coconut butter (be sure it’s well combined before you measure)
    • 3. 1/2 cup lightly packed medjool dates, pitted
    • 4. 1 tablespoon maple syrup (or honey if you’re not vegan)
    • 5. 1/2 teaspoon vanilla extract
    • 6. 3/4 teaspoon cinnamon
    • 7. 1/2 teaspoon ginger
    • 8. 1/4 teaspoon nutmeg
    • 9. 1/4 teaspoon ground cloves
    • 10. 1/8 teaspoon salt

    Instructions:

    1. Line an 8 by 5 loaf pan with parchment paper and spray paper lightly with cooking spray. Set aside.
    2. Place all ingredients in the bowl of a food processor and process until mixture is completely smooth; you shouldn’t see any chunks of dates remaining. Stop processing every now and then and scrape the sides and the bottom of the bowl. Pour into prepared pan and smooth the top. Freeze for 1 hour, then cut into squares and serve. Store uneaten fudge in the freezer.

    Read More