Blog

  • Vegan One Pot Mushroom Tetrazzini

    Vegan One Pot Mushroom Tetrazzini

    recipe image

    by Lauren Hartmann 118 Comments

    A one pot wonder? Or a one pot miracle?

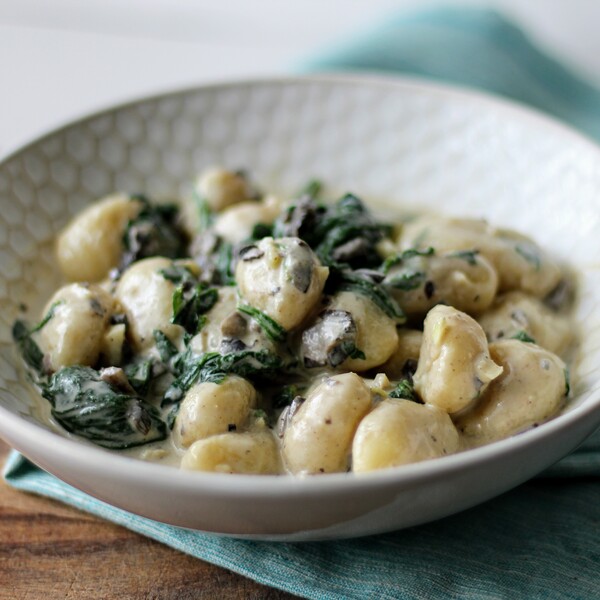
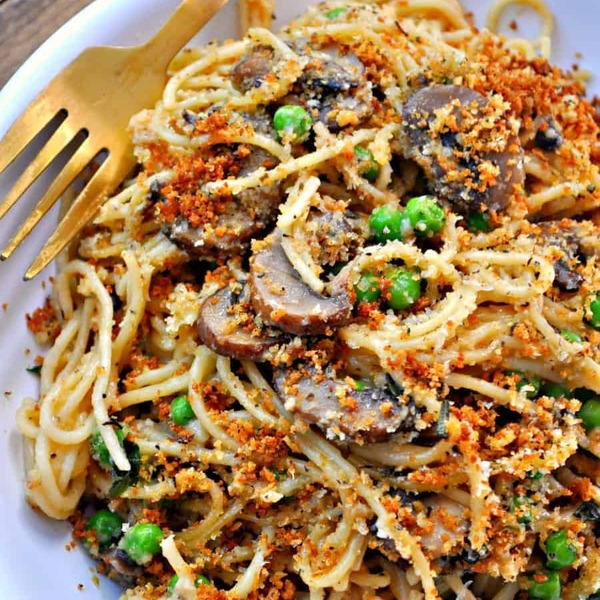
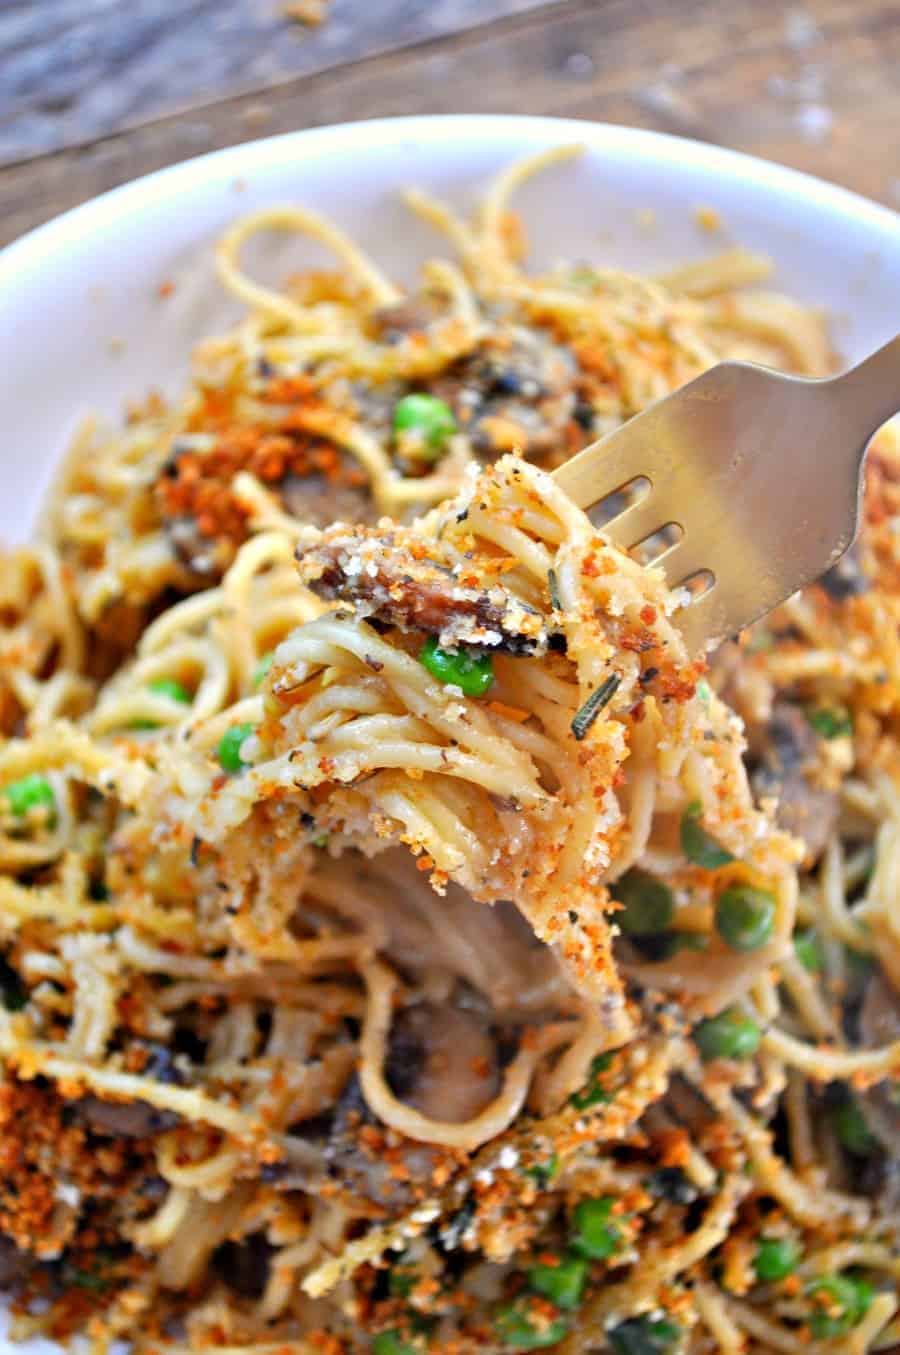
    My mom used to make chicken tetrazzini a lot. The flavor of this mushroom tetrazzini makes me feel all warm and cozy inside. It is the most comforting dish I can possibly imagine, perfect for all the cold winter days. When I woke up this morning, it was 23 degrees outside, and all I could think of was a big bowl of this amazing one pot meal! It is so damn delicious, I could not stop eating it.

    I want to eat this mushroom tetrazzini every day for the rest of winter. Good thing it is a one pot meal and ready in under 30 minutes! Making it super easy to fulfill my dreams! It comes out of the oven steaming hot, with brown and crusty bread crumbs on top! The edges of the dish that are crisp are my absolute favorite!

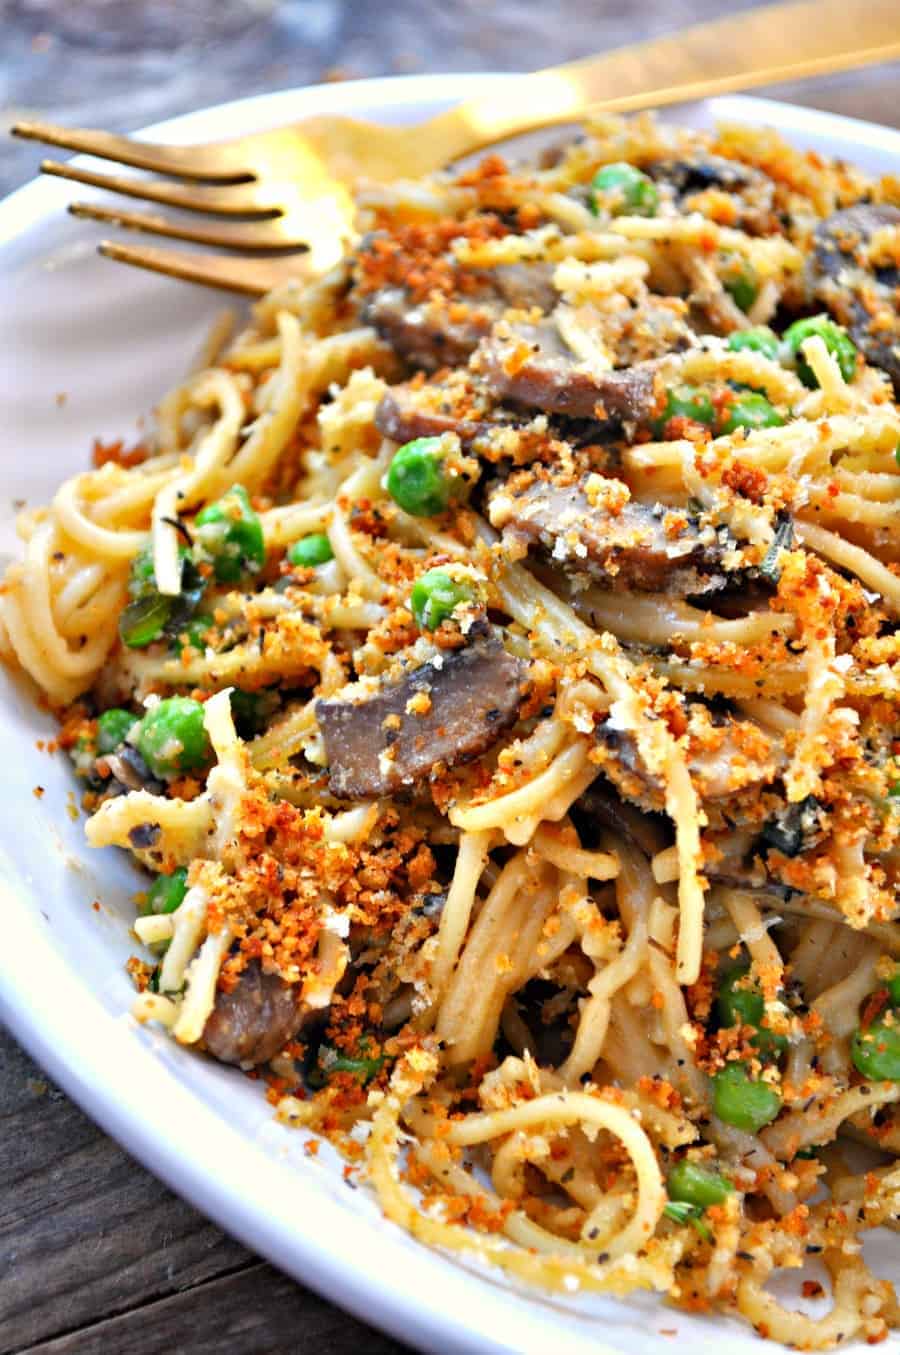
    My husband hates peas, and this is the only way he will eat them. He says this pasta dish is so good, it even makes peas taste good. I am personally a big fan of peas, however, you can always leave them out or replace them with something else. The peas are amazing, though, and I highly recommend them!

    Warm, creamy, dreamy, hearty, healthy. The flavor is kind of indescribable, but once you take a bit, you will understand. Then be confused about why something so easy and simple can taste so amazing.

    This should definitely be on your weeknight meal repertoire from now on. During the week, I want something quick but still outstanding, this is the answer to all your weeknight meal dilemmas. Easy to make gluten free, just use some gluten free all purpose flour to make the roux, and use your favorite gluten free pasta! I hope you enjoy, but I think it would be impossible not to!

    Vegan One Pot Mushroom Tetrazzini

    Print Recipe

    My vegan take on the classic Tetrazzini dish. Creamy noodles, mushrooms and peas. One pot then baked with bread crumbs on top!

    Prep Time 5 minutes

    Cook Time 20 minutes

    Total Time 25 minutes

    Servings 4

    Author Lauren Hartmann

    Instructions

    • Preheat the oven to 450 degrees.

    • Now in an oven safe pot, heat the olive oil on medium high. Then add the sliced mushrooms and garlic. Saute for 4-5 minutes until the mushrooms have released their liquid and it has evaporated. Season with salt and pepper. Once the mushrooms are done, remove them from the pot and set aside. 

    • Now add the vegan butter to the pot and melt. Reduce heat to low. Cook for a minute, stirring, then add the flour. Whisk together to make a roux. Cook for another minute or two until it has thickened. 

    • Now add the veggie broth and almond milk. Whisk to combine with the roux. Now bring heat up a bit, and bring to a boil. Season with a bit of salt and pepper.

    • Then add the spaghetti. I like to snap mine in half. Then stir to make sure it is fully covered by the liquid. Cook for just about 3-5 minutes(you want it still to be a bit firm when you put it in the oven so it doesn’t over cook). Stirring.

    • Then add back in the mushrooms and the frozen peas into the pot. Stir to combine. Cook for just another minute. Taste and adjust seasoning.

    • Now turn off the heat. In a bowl combine the panko and nutritional yeast. Sprinkle on top of the pasta. Now either drizzle with olive oil, spray with non stick spray, or put a few pieces of vegan butter on the top just to brown the bread crumbs. 

    • Bake at 450 degrees for about 10 minutes until bubbly and the top has browned. Serve immediately with parsley if you want!

    Notes

    If you want more super crispy bread crumbs for the top, you can just add them to a pan with some olive oil and brown them. It’s delicious!

    Reader Interactions

    Trackbacks

    1. […] Vegan One Pot Mushroom Tetrazzini from Rabbit and Wolves […]

    2. […] Vegan One Pot Mushroom Tetrazzini […]

    3. […] Vegan One Pot Mushroom Tetrazzini @ rabbitandwolves.com for full […]

    4. […] Vegan One Pot Mushroom Tetrazzini: 483 Calories per serving […]

    5. […] Vegan One Pot Mushroom Tetrazzini is creamy, easy and so yummy. My daughter LOVES peas, for some reason, but if your kids don’t love them, you can skip them! […]

    6. […] this is probably my other favorite pasta dish. This Vegan One Pot Mushroom Tetrazzini. It has a totally different feel though. It is so cozy and […]

    Read More

  • Baked Parmesan Zucchini

    Baked Parmesan Zucchini

    recipe image

    One of my favorite appetizers to order when out is zucchini. Typically fried, but you will not be disappointed with these Baked Parmesan Zucchini. Make it vegan simply by using a vegan mayonnaise and parmesan substitute. It’s that easy!

    close up of baked parmesan zucchini

    Start by washing the zucchini and patting it dry.

    zucchini on a purple towel

    Then slice the zucchini into quarters. I tried to find zucchini that were all very small and similar in size for uniformity.

    quarted zucchini

    It might sound strange, but I am using a vegan mayonnaise brushed on the zucchini in lieu of say, an egg wash. Not only does it really work well in helping the parmesan mixture to adhere, it also gives it flavor. I used a pastry brush and it worked great!

    brushing mayonnaise on zucchini

    For the parmesan topping, I added an Italian seasoning blend along with salt and pepper.

    tablespoon of italian seasoning

    Lay the zucchini strips brushed in vegan mayonnaise into the parmesan mixture a few at a time and coat completely.

    zucchini in breadcrumb mixture

    Line a cookie sheet with a baking rack and lay the coated zucchini strips on to it leaving enough space so they can get golden brown.

    breaded zucchini strips on a rack

    At the very end, I sometimes move the cookie sheet to the top rack in the oven for a bit more of that golden brown color.

    Serve with your favorite dipping sauce. I am using a ranch dressing mixed with taco sauce. Make it as mild or as spicy as you can handle!

    close up of baked parmesan zucchini

    Did you make this recipe for Baked Parmesan Zucchini? Leave me a comment below and let me know what you thought.

    And if you enjoyed the recipe, why not PIN IT FOR LATER! 🙂

    Pinterest image for Baked Parmesan Zucchini

    Baked Parmesan Zucchini

    Course Appetizer

    Cuisine American

    Keyword zucchini

    Prep Time 10 minutes

    Cook Time 20 minutes

    Servings 12 sticks

    Author Veg Life Staff

    Ingredients

    • 3 medium Zucchini washed and quartered lengthwise
    • 1/2 c Mayonnaise Vegan or Traditional
    • 1/2 c Parmesan Vegan or Traditional
    • 1 1/2 tsp Italian Seasoning Blend or to taste
    • 1/4 tsp Salt
    • 1/8 tsp Pepper

    FOR THE DIPPING SAUCE:

    • 1/2 c Vegan Ranch Dressing
    • 1 tbsp Mild Taco Sauce

    Instructions

    • Preheat oven to 350 degrees and line a cookie sheet with a baking rack that you have sprayed with a light coating of cooking spray.

    • Wash and slice zucchini lengthwise into quarters. So you’ll have four strips per zucchini.

    • On a plate, combine the vegan parmesan, Italian seasoning, salt and pepper.

    • Using a pastry brush, apply a thin coating of vegan mayonnaise then coat completely with the parmesan mixture.

    • Place onto the prepared cooling rack allowing enough room so they can evenly brown.

    • Bake for about 20 minutes until tender and golden (this may take more or less depending on your oven).

    • Combine the vegan Ranch dressing with the taco sauce in a small bowl.

    • Serve immediately.

    Read More

  • Vegan Coconut Lemon Bars

    Vegan Coconut Lemon Bars

    recipe image

    IMG_5127

    Our neighbors left a bag of lemons on our front porch last week.  Apparently they had a bumper crop and we were the lucky recipients of the excess. 

    I’ll be more than happy to take those off your hands.  🙂

    IMG_5128

    I searched and searched for lemony recipes. 

    And then I came upon Veganomicon’s lemon bar recipe.

    I was pretty curious as to how a lemon bar could be good without eggs, but I decided to give it a whirl.  I also changed the recipe by dusting the top with coconut flakes rather than confectioners’ sugar. 

    IMG_5215

    They turned out just fine 😉

    I really wish I had better photos of the end product, but by the time the lemon portion had set, so had the sun.  Without natural light I am not as good at making food look tasty, so I’ll give you the pictures of the process and the recipe, but stay tuned for better lit photos. 

    Vegan Coconut Lemon Bars

    IMG_5213

    Crust:

    • 1 3/4 cup all-purpose flour (I used whole wheat, but I’d recommend all purpose)
    • 2/3 cup confectioners’ sugar
    • 1/4 cup cornstarch (I used arrowroot)
    • 1 cup vegan butter (I used Earth Balance)

    IMG_5132

    IMG_5136IMG_5133

    IMG_5137 

    IMG_5138

    IMG_5140 

    IMG_5143

    IMG_5144

    IMG_5146

    Pulse the flour, sugar, and arrowroot in a food processor, adding EB in chunks at a time.  Blend until it resembles a course meal that will hold together when you ball it up in your hand.  Sprinkle into a PAM sprayed pyrex pan and press down firmly (I used my measuring cup) into an even layer.  Keep the edges slightly raised so it can hold in the lemon filling.  Refrigerate it while the oven preheats to 350, then bake it (unfilled) for 25 minutes. 

    I was really nervous putting the cold pan into the hot oven, thinking it would crack, but all was good, so have no fear.

    IMG_5175

    While that all goes down in the oven, you can get to work on the filling.

    Filling:

    • 1 1/3 cup water
    • 3 tbsp agar flakes
    • 1 1/4 cups granulated sugar
    • 1/8 tsp turmeric (omitted)
    • 2/3 cup fresh lemon juice
    • 3 tbsp arrowroot powder
    • 1 tbsp finely grated lemon zest (I left it coarsely grated)
    • 1/4 cup soymilk (I used coconut milk)
    • coconut flakes (to sprinkle on top)

    IMG_5130

    IMG_5131 

    IMG_5150

    IMG_5149IMG_5152

    IMG_5151 

    IMG_5153

    IMG_5155

    IMG_5157IMG_5158

    IMG_5159 

    IMG_5161 

    IMG_5163 

    IMG_5166

    IMG_5167

    IMG_5169

    IMG_5170

    IMG_5134IMG_5172

    IMG_5171

    IMG_5173 

    IMG_5178

    To prepare the filling, combine the agar and the water in a saucepan to soak for 15 minutes.  While it soaks, zest and juice the lemons.  This dual citrus squeezer is the handiest tool ever.  Mix the arrowroot to the lemon juice to dissolve.  Bring the agar/water combo to a boil for about 10 minutes or until the agar is completely dissolved.  Add the sugar, lemon mix, and coconut milk and let it simmer, stirring it until it starts to thicken.  Pour it over the crust and let it cool before putting it in the fridge to further set.  Once the filling has set, sprinkle coconut on top.

    IMG_5204

    Slice into squares and serve.

    IMG_5219

    Tangy, sweet, and downright delicious. 

    The only thing I would change would be increasing the amount of filling on top (I prefer a ratio of more lemon topping).  Okay, one more thing.  I’d also use all purpose flour instead of whole wheat.  It was good, but I bet the actual flour called for would have been better.  As for the coconut topping?  That was the best idea ever and I’m pretty sure it’s worth trying.

    I still have lemons to use…ideas?

    Related Posts Plugin for WordPress, Blogger...

    Read More

  • Vegan Mushroom Stroganoff Mac and Cheese

    Vegan Mushroom Stroganoff Mac and Cheese

    recipe image

    by Lauren Hartmann 91 Comments

    I may erect a statue to honor this vegan mac and cheese!

    Okay, you’re probably asking yourself right now, “what on earth is vegan mushroom Stroganoff mac and cheese?” Well, the answer to that question is something more delicious than you can possibly imagine! A beyond creamy cross between the most amazing vegan macaroni and cheese and the most perfect vegan mushroom Stroganoff. Flavors from both classic dishes somehow make one of the most mind-blowing things I’ve eaten… ever. 

    There is literally no way to mess this vegan mushroom Stroganoff mac and cheese up. Boil pasta, easy. Saute mushrooms, garlic and onions, cool. Whisk together a few ingredients for the best sauce of all time, no problem! Combine everything and you’re done! 

    I added elements of a classic vegan mac and cheese sauce and a veganized Stroganoff sauce. I honestly wasn’t sure what would happen, but I really can’t think of the right words to describe how incredible this is. The words may not even exist in the English language. You just really need to try it for yourself. 

    This recipe takes no time to whip up, but the cravings for it will last forever. So, you will probably just have to keep it on your regular dinner rotation. After the first time I made it, my husband asked me to make it again immediately. 

    Vegan Mushroom Stroganoff Mac and Cheese

    Print Recipe

    This outrageously delicious cross between mac and cheese and stroganoff may be your new favorite dish!

    Prep Time 10 minutes

    Cook Time 20 minutes

    Total Time 30 minutes

    Servings 4

    Calories 349

    Author Lauren Hartmann

    Instructions

    • Cook your macaroni according to package directions. Drain when the macaroni is done.

    • While the pasta is cooking, heat the olive oil in a large non-stick skillet on medium high.

    • Then add the sliced mushrooms, chopped onion and garlic to the skillet. Saute, reducing heat as needed until the mushrooms have released their liquid and they are nice and brown. This will take about 8-10 minutes. 

    • Sprinkle the mushrooms, garlic and onions with a pinch of salt and pepper. Then remove them from the skillet and put them in a bowl. Set aside for a minute.

    • Now, add the vegetable broth, vegan cream cheese, coconut aminos, nutritional yeast, Dijon mustard, thyme, and a pinch of salt and pepper to the skillet. Heat the skillet on medium.

    • Stir to start melting the vegan cream cheese. Then whisk to combine everything once the vegan cream cheese has melted. Whisk until smooth. 

    • Reduce heat to medium low, simmer, whisking frequently for about 5 minutes to  thicken the sauce a little. 

    • Taste the sauce and adjust the seasoning, adding more salt and pepper if needed. 

    • Next, add the mushrooms, onions and garlic back to the skillet, and stir to combine them with the sauce. 

    • Now, add the macaroni to the skillet. Toss to coat the macaroni in the sauce. 

    • Serve immediately with fresh cracked pepper. 

    Nutrition

    Calories: 349kcal | Carbohydrates: 77g | Protein: 21g | Fat: 19g | Saturated Fat: 5g | Potassium: 715mg | Fiber: 8g | Sugar: 7g | Vitamin A: 205IU | Vitamin C: 3mg | Calcium: 59mg | Iron: 2.7mg

    Reader Interactions

    Trackbacks

    1. […] Vegan Mushroom Stroganoff Mac and Cheese may be my favorite pasta dish on this list! A combination of 2 of my favorite things, I promise you […]

    2. […] From: Rabbit & Wolves […]

    3. […] kid loves a good macaroni and cheese and this is the best! Vegan Mushroom Stroganoff Macaroni and Cheese is the creamiest and most perfect thing […]

    4. […] Vegan Stroganoff Mac and Cheese […]

    5. […] 15. Mushroom Stroganoff Mac and Cheese […]

    6. […] so it sounds weird at first glance. But this vegan mac and cheese from Rabbit and Wolves is so delicious with its creamy sauce and rich mushroom flavor. Go on; try […]

    Read More

  • Vegan Lasagna Roll-ups

    Vegan Lasagna Roll-ups

    recipe image

    Easy, homemade, vegan & gluten free Lasagna roll-ups, made with tofu ricotta, and a flavorful vegan sausage crumble. Peanut & Nut free also.

    Garfield is not the only one who LOVES lasagna!

    My oldest son Zac is becoming a bit of a foodie. Maybe its because he’s been listening to me for all these years talk about food, or having them help me in the kitchen. Maybe it’s because he’s taking a Food Prep class in high school this year and is enjoying being creative in there. Maybe it’s just because he likes good food. 🙂 Whatever, the reason, it makes me proud to see him enjoying the tastes & flavors of REAL, home-cooked food. Usually, he’s the first to request certain dinners as well, especially when we’ve been in the season of eating out a little more than we should. (I know you’ve all been there!).

    Sometimes, it’s a request for chili, sometimes enchiladas, but most of the time, it’s lasagna. Vegan Lasagna to be exact. This recipe by far is his favorite and was so loved by others, it was included on Buzzfeed, much to my kiddos delight. However, sometimes I just get bored with making it the same way and decided to turn this recipe into Easy-to-serve, Roll-ups.

    These cute little rolls, didn’t take any longer than it would layering a big pan of traditional lasagna and I loved that each bite, was full of flavor and noodles. Kind of like when you eat from the center of the lasagna pan. 

    Easy, homemade, vegan & gluten free Lasagna roll-ups, made with tofu ricotta, and a flavorful vegan sausage crumble. Peanut & Nut free also.

    Here is just how easy this is…….

    Start by cooking your noodles of choice in boiling water (add a pinch or two of salt to prevent sticking). Typically, I’d tell you to follow package directions, however, I like to “undercook” them so they are bendable, without ripping. Remember, your noodles will still cook in the oven, so you don’t want them to get mushy.

    While those are boiling, go ahead and make your ricotta. I make it nut-free by using Tofu as the base, and then add in lemon juice, nutritional yeast, minced garlic, fresh basil, spices & diced sun dried tomatoes (which you can omit if you prefer). 20150112_134313

    Set this aside and start cooking your sausage (vegan of course). There are a lot of options to choose from, however, my favorite is by Tofurky. I’m including the link so you can check out the ingredients. This does contain gluten, so make sure you stay away from it if you are Gluten-free or Soy-free. Neat meat replacer could be an option for you if those are on your list of allergens, however, their products contain nuts, which is why it’s always important to READ YOUR LABELS.

    tofurky collage

    Once everything is boiled, blended & sautéed, it’s time to assemble! Pour some sauce into your casserole dish just to make sure the noodles don’t stick. It can be homemade or jarred, but just make sure it’s no-to-low sugar, and made with fresh, organic ingredients for the best flavor.

    Lay your noodles out on parchment paper, making sure they don’t touch. Start with a little ricotta, then Daiya mozzarella shreds & fresh spinach.

    Lasagna step1

    Top with your minced sausage.


    Easy, homemade, vegan & gluten free Lasagna roll-ups, made with tofu ricotta, and a flavorful vegan sausage crumble. Peanut & Nut free also.

    Then a little sauce.

    Easy, homemade, vegan & gluten free Lasagna roll-ups, made with tofu ricotta, and a flavorful vegan sausage crumble. Peanut & Nut free also.

    Roll each loaded noodle, 1 by 1 and place in your pan, seam side down. Continue until all your noodles have been used (or you run out of toppings). I tend to be a little frugal on my first couple rolls to make sure I have enough, so if you’re ever over for lasagna rolls, I apologize in advance if you get the “skimpy” roll.

    Lasagna Roll-Ups

    Once all your rolls are in the dish, pour a little extra sauce on top to help the rolls from drying out, then add extra shredded cheese. Bake 20 minutes or until everything is bubbling and melted. Serve with a side salad and some extra steamed veggies. If my Mom served this for you, she’d be sure to include Applesauce ;).

    If you’re a pasta lover like myself, you’ll also want to check out Vegetarian Mamma’s vegetarian bolognese, it’s full of veggies & flavor.

    Easy Vegan Lasagna Rolls

    Yield:
    6 -8

    Prep Time:
    15 minutes

    Cook Time:
    20 minutes

    Total Time:
    35 minutes

    Easy, homemade, vegan & gluten free Lasagna roll-ups, made with tofu ricotta, and a flavorful vegan sausage crumble.

    Ingredients

    • 1 Box of Gluten Free or Whole Wheat Lasagna Noodles
    • 2 Cups fresh Spinach leaves
    • 1 Jar Marinara Sauce (I used Roa’s Spicy Arrabiata flavor)
    • 2 Vegan “Italian” sausages cut into cubes (read labels to make sure it fits with allergy requirements)
    • 1 lb. Extra firm tofu
    • Juice of 1 lemon
    • 1 minced garlic clove
    • 2 TB. nutritional yeast
    • 1/2 tsp. sea salt
    • 1/2 tsp. black pepper
    • 4 TB. Sun dried tomatoes, soaked in warm water, drained & chopped (optional)
    • 1 TB dried Basil
    • 1 tsp. dried Oregano

    Instructions

    1. In a large stock pot, add 10 cups of water and 2 TB. salt. Bring to a boil and add noodles. Cook noodles to “al ” dente. Drain, rinse under cold water then drizzle with a little olive oil to prevent sticking. Set aside.
    2. Drain tofu and wrap in paper towel. Place on a plate then place a heavy pan on top of it and let it sit for about 10 minutes to press out some of the liquid. Drain liquid.
    3. Crumble tofu in a bowl. Add juice from lemon, garlic, nutritional yeast, salt and pepper, tomatoes (if using), basil and oregano. Then use a potato masher to blend it all together until it resembles ricotta.
    4. Preheat oven to 400°.
    5. In a large saucepan, add 2 TB olive oil and saute “sausage” cubes. Use the potato masher again and break into smaller pieces. Set aside.
    6. Prepare a 9×13, glass casserole dish by spreading 1/4 C. sauce on the bottom.
    7. Place parchment paper on your work surface and lay noodles out, row by row.
    8. Add your toppings, 1 by one in this order: Tofu ricotta, shredded mozzarella, spinach leaves, vegan sausage & sauce.
    9. Roll each lasagna strip into a nice, tight roll, then place in prepared dish, seam side down. Continue with remaining strips.
    10. Top with extra sauce and sprinkle with mozzarella shreds.
    11. Cover with foil and bake 10-20 minutes.
    12. Uncover and bake 10 more minutes so cheese melts on top.

    Lasagna Rolls, Vegan & Gluten Free

    If you’re looking for another creative way to eat your lasagna, how about trying my One Pot Lasagna Soup? It’s mm-mm good!

    Vegan & GF Lasagna Soup, loaded with veggies, topped with spinach and fresh tofu ricotta.

    I’d love to hear from you! Be sure to comment below when you make this dish and let me know what you think. And as always, be sure to follow Xander Friendly Foods on Instagram, Pinterest & Twitter for more recipes, health tips & favorite food shares.

    Share something delicious

    Read More

  • Vegan Chili

    Vegan Chili

    recipe image

    Santas Vegan Chili

    My mom makes a very good raw vegan chili back home in Minnesota but I was in the mood for traditional chili. There is something special about the flavor of a good chili that warms and fills the belly. This makes it one of my favorite foods for winter! Here is how I made it…

    Ingredients:

    • Olive oil
    • 3 garlic cloves, minced
    • ½ cup of red onions, diced
    • ½ cup of celery, sliced
    • ½ cup of green peppers, diced
    • ½ cup of mushrooms, sliced and chopped
    • ½ cup of carrots, sliced and chopped
    • 2 small to medium sized potatoes, peeled and chopped into cubes
    • 5 medium to large tomatoes, blended into a juice
    • 1½ cup of kidney beans, soaked in water overnight, drained and rinsed
    • 1 cup of Greek gigantes plaki beans, soaked in water overnight, drained, peeled and rinsed
    • 1 cup of corn
    • 1/2 Tablespoon of cumin
    • 1½ Tablespoon of dried oregano
    • 2 teaspoons of paprika
    • 2 teaspoons of red pepper flakes
    • 2 teaspoons of sea salt
    • ¼ teaspoon of ground black pepper
    • ½ teaspoon of mustard powder
    • 3 Tablespoons of organic raw cane brown sugar
    • 2 cups of water
    • 1 cup of raw vegan taco meat (click here for recipe)

    Get a large pot, ours holds at least 4 liters of liquid and it was almost full. Coat the bottom of the inside of the pot with a thin layer of olive oil. Place the pot over medium heat on the stove. Once you smell the oil heating up, add the onions, garlic, celery and carrots. Stir occasionally and add the sea salt and ground black pepper. After you see the celery sweating add the green peppers and mushrooms. Stir occasionally and in about a minute or two turn the heat down to low. Add the potatoes, cumin and oregano. Stir.

    Now you will add the tomato juice, mustard powder, brown sugar, paprika and red pepper flakes.  Next, add all of the beans. I cannot seem to find black beans here in Greece yet so I used more kidney beans to compensate. Add the water and crank the heat up to high to bring the mixture to a boil. Stir occasionally to prevent anything from burning along the bottom.

    Once boiling, turn the heat back down to medium-low to allow the chili to simmer. Add the corn. Keep stirring occasionally for the next 45 to 60 minutes (or until the kidney beans soften to your liking). Once the kidney beans are soft enough for you, remove the pot from the heat and mix in the vegan taco meat. Just like that, your vegan chili is ready to be served!

    Vegan Chili

    Read More

  • gluten free vegan pumpkin waffles

    gluten free vegan pumpkin waffles

    recipe image

    Ingredients:

    • 2 1/2 cups Sarah's gluten free flour blend
    • 1/4 cup brown sugar
    • 1 tablespoon baking powder
    • 1 1/2 teaspoons ground cinnamon
    • 1/2 teaspoon ground ginger
    • 1/4 teaspoon ground nutmeg
    • 1/2 teaspoon sea salt
    • 2 cups So Delicious unsweetened coconut milk, room temperature
    • 1 cup pure pumpkin puree
    • 3 tablespoons Earth Balance vegan butter, melted*
    • 2 teaspoons pure vanilla extract
    • So Delicious CocoWhip dairy free whipped topping or whipped coconut cream (optional)

    Instructions:

    1. Whisk together flour, brown sugar, baking powder, cinnamon, ginger, nutmeg and salt. Set aside.
    2. In mixing bowl, stir coconut milk, pumpkin puree, melted vegan butter and vanilla. Add flour mixture and mix until just combined.
    3. Heat waffle iron. Spray with cooking spray and pour batter into waffle maker (amount varies by iron so be sure to not overfill). Cook waffles until crispy and golden brown, 3-5 minutes.
    4. Repeat with remaining batter. Serve warm. Top with Cocowhip whipped topping and a sprinkle of nutmeg.

    Read More

  • Mushroom and Spinach Gnocchi

    Mushroom and Spinach Gnocchi

    recipe image
    Ingredients:

    • 16 oz pack vegan Gnocchi
    • 6 oz mushrooms, finely chopped
    • 1 cups spinach
    • 1 cup unsalted cashews, soaked for at least 4 hours or boiled for 15 minutes
    • 1.5 cups vegetable broth
    • 1/4 cup vegan parmesan
    • 2 Tbsp vegan butter

    Read More

  • Chickpea Cookie Dough Balls (Vegan)

    Chickpea Cookie Dough Balls (Vegan)

    recipe image

    Ingredients:

    • * 2 c cooked chickpea
    • * 1/4 c flour (i used cloud 9 gluten free mix)
    • * 1/4 c almond butter
    • * 1/3 c maple syrup
    • * 1 tsp cinnamon
    • * 1 1/2 tsp vanilla
    • * 1/2 tsp plus pinch sea salt
    • * 1/2 c chocolate chip (i use life brand's vegan mini chip)
    • for the chocolate shell:
    • * 1/2 c coconut oil
    • * 1/2 c cacao powder
    • * 1/4 c maple syrup
    • * 1/2 tsp salt

    Instructions:

    1. Combine all dough ingredients, minus the chocolate chips, in a food processor and pulse until silky smooth. Transfer mixture to a bowl and stir in the chocolate chips. Set in the fridge to firm up.
    2. In a double broiler on the stove, heat your coconut oil and then add cacao powder, maple syrup and salt. Stir until completely incorporated. Remove from heat and set aside to chill a bit.
    3. Remove dough bowl from fridge and, using an ice cream scooper (any size you wish), create dough balls. Place these on a parchment lined plate or cookie sheet and place in freezer for about 20 minutes to firm up some more. This will make them easier to roll into perfect spheres.
    4. Once nice and firm, remove dough balls from freezer, roll into balls with your hands and dip into chocolate. Repeat this step to create a thicker chocolate shell…and if you want to get really crazy, you could roll freshly dipped balls in coconut, chopped nuts, or more mini chocolate chips.

    Read More

  • Ginger Cookie Ice Cream Sandwiches {Vegan}

    Ginger Cookie Ice Cream Sandwiches {Vegan}

    recipe image

    It is officially summer and my favorite time to enjoy frozen treats!  These Ginger Cookie Ice Cream Sandwiches are the perfect dessert for a hot day.  The ginger cookies are crispy so that they hold up to the ice cream.  Sweet and spicy cookies with (in my opinion) the BEST vegan dairy free alternative on the market, So Delicious.  Not sponsored…just love their products.  You can use any variety of almond, soy, coconut or cashew dairy free ice cream. I happen to favor the almond milk vanilla variety for desserts like this.  P.S.  Have you tried their Salted Caramel Cluster cashew ice cream?  Oh.My.Gosh.  I am so addicted.  Even my non-vegan family members agree…it’s pretty darn amazing!  So let’s get started making the ginger cookies…

    Ginger Cookie Ice Cream Sandwiches

    Ginger Cookie Ice Cream Sandwiches

    These cookies differ from prior versions I have made in the past.  The crispiness of the cookie makes for a great ice cream sandwich.  Keep in mind, the cookie will soften a bit as it remains in contact with the ice cream.

    This is a very soft dough.  Some people may choose to refrigerate the dough prior to working with it, but I don’t have that kind of patience.  I used a small cookie scoop and placed the dough directly into sugar for rolling.  Once coated, they are easy to shape.

    Ginger Cookie Ice Cream Sandwiches

    Ginger Cookie Ice Cream Sandwiches

    Place the sugared cookie dough balls onto a baking sheet leaving at least 2″ between as this dough will spread.  I used a 1-1/4″ cookie scoop which after pressing with a flat-bottomed glass and baking, yields about a 2-1/2″ cookie. Perfectly sized for this recipe.  If the glass sticks, just dip into sugar before pressing.

    Ginger Cookie Ice Cream Sandwiches

    Ginger Cookie Ice Cream Sandwiches

    Bake for about 10-12 minutes at 350 degrees and allow to cool completely.  They will crisp up as they cool.  If you cover these cookies, they will soften.  They also freeze really well.  Be sure to make extra as it is really challenging not to sample a few as they are cooling 😉

    Ginger Cookie Ice Cream Sandwiches

    Ginger Cookie Ice Cream Sandwiches

    The SO Delicious ice creams generally only need to soften for about 8-10 minutes prior.  I used that same 1-1/4″ scoop and gave each sandwich a gentle squeeze.  Enjoy immediately!

    Ginger Cookie Ice Cream Sandwiches

    Ginger Cookie Ice Cream Sandwiches

    Before you go, why not check out some of our recent videos and be sure to subscribe to the YouTube Channel! 🙂

    Author Veg Life Staff

    Ingredients

    • 1 C + 3 Tbl All Purpose Flour
    • 1/4 C Sugar + extra for rolling
    • 1/4 C packed Brown Sugar
    • 1 stick vegan Margarine 8 Tbl, such as Earth Balance, softened
    • 2 Tbl Applesauce
    • 2-1/2 Tbl Molasses
    • 1 tsp Ginger
    • 1/2 tsp Cinnamon
    • 1/4 tsp Allspice
    • 1/8 tsp Cloves
    • 1/8 tsp Salt
    • Pinch of Black Pepper
    • 1 tsp Baking Soda

    Instructions

    • Preheat oven to 350 degrees.

    • Line a baking sheet with a Silpat (or parchment paper).

    • In a medium-sized bowl, combine the dry ingredients: flour, spices, baking soda, salt and pepper. Set aside.

    • In the bowl of an electric mixer, beat together the vegan margarine, 1/4 C of sugar and brown sugar until light and fluffy.

    • Add the applesauce and molasses, scraping down the sides of the bowl between additions.

    • Slowly incorporate the dry ingredients on low speed just until combined. Avoid over mixing.

    • The dough will be very soft, however you can use a cookie scoop and proceed right to baking. They will spread slightly, so make them smaller than you think you need. I drop them right into the bowl of sugar and using a fork, toss to coat.

    • You could also refrigerate the dough to enable rolling, but I find the previous method was quicker and worked equally as well.

    • Once the balls are coated with the sugar, transfer to a baking sheet and roll in your hands to form a ball.

    • Using a small, flat-bottomed glass or bowl, flatten the balls to approximately 1/4″ thickness. Remember to place at least two inches apart as they will spread.

    • I used a 1-1/4″ scoop which after baking, made the cookies about 2-1/2″.

    • Bake for approximately 10 minutes. The cookies will firm up as they sit.

    • Once the cookies have cooled and crisped up, they are ready to eat or…make ice cream sandwiches.

    • We used slightly softened So Delicious Dairy Free Almond Milk Ice Cream and that same 1-1/4″ scoop. Press gently and evenly and they are ready to enjoy!

    Read More