Update: We’ve moved back to the states, and are experiencing the joys of living in Wenatchee, WA for the first time! I’m spending most of my time in the kitchen canning, freezing, and drying fruit now and loving it!
We are a couple, Jason and Mollie, that loves to cook together. We have two wonderful DD’s, Enjoli (9) and Emily (7) that make life so much more fun! I, Mollie, studied Nutrition so I try to make most of our meals healthy while still tasting great! Our girls love helping us cook…and eat! We’re vegetarian and love eating healthy without missing any flavor! We try to eat mostly vegan, so we have many vegan recipes posted. We are world traveling missionaries and students that have visited many countries and have lived in the States, South Korea, and are currently in the Philippines. So we always need to adjust our menu based on the food available. Zaar has been a tremendous help!
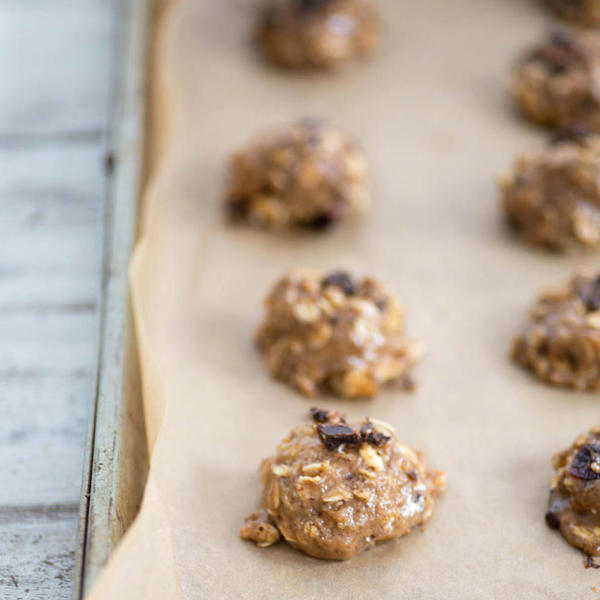
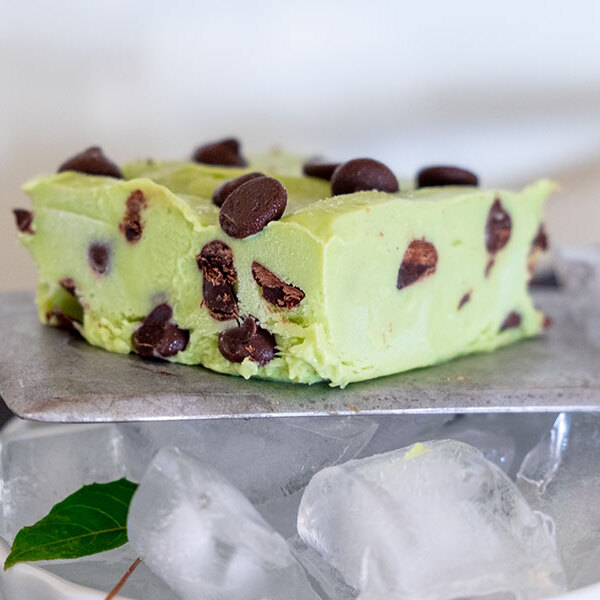
Vegan and Gluten-Free Cranberry Chocolate Cookies. The perfect healthy cookie to add to your holiday dessert platter.
I suppose it’s officially holiday cookie time. I have such fond memories of spending hours in the kitchen every December as a child, rolling out batch after batch of cookies to gift to neighbors and friends. While we experimented with a few new cookies each year, the classic must-make was the pizzelle, an Italian waffle cookie that takes hours to prepare, thanks to needing a special iron to press each one out of. It also doesn’t help that my grandmother’s recipe yields 12 dozen. Yup, 144 cookies from each batch, minus the ones my sister and I would nibble hot off the press. It’s probably no surprise that pizzelle day was my favorite of the holiday season; we would put on festive music and spend all day creating gifts of love.
Now that I’m on my own, I’ve crafted my own tradition of this special day. This weekend, I’m hosting a few girlfriends for a cookie exchange; I’m planning on a few warm cocktails, appetizers, plenty of cookies and lots of festive cheer.
While I will still make a batch of pizzelles, it’s tradition after all, I wanted to have a cookie that everyone can enjoy. Dairy-free, egg-free, gluten-free yet still packed with flavor. I tested these out last week and only after BL polished off an entire batch did I mention what was lacking. Of course, he couldn’t tell (or care) and really, that’s the point. Just because cookies aren’t packed with butter, eggs and sugar doesn’t mean they are any less decedent.
I adapted these cookies from Angela’s recipe, adding a few holiday flavors like cinnamon, walnuts and chewy cranberries. They are the perfect cookie to add to your holiday table, to gift, and to enjoy with loved ones.
If you try this recipe, let me know! Leave a comment, rate it, and tag your Instagram photos with #delishknowledge . I absolutely love seeing your creations. Happy cooking!
Save
Cranberry Chocolate Cookies
Vegan and Gluten-Free Cranberry, Chocolate and Walnut Cookies. The perfect healthy cookie to add to your holiday dessert platter. Adapted from Oh She Glows.
Servings: 18cookies
Prep Time: 15 minutesminutes
Cook Time: 15 minutesminutes
1/4cupalmond butter
1/ 4cup100% pure maple syrup
2tablespoonsnon-dairy milk
2tablespoonsneutral oil
1/8cupcane sugar
1teaspoonpure vanilla extract
1tablespoonground flaxmeal
1/2teaspoonsalt
1/2cupoat flour*
1/2cupalmond flour
1tablespooncornstarch
1/4teaspoonbaking powder
1/4teaspoonbaking soda
1teaspoonground cinnamon
1/3cupdried cranberries
1/3cupchocolate chips
1/4cupchopped walnuts
Preheat the oven to 375°F and line a large baking sheet with parchment paper.
In a large bowl of a stand mixer, or a large bowl, mix together the almond butter, maple syrup, non-dairy milk, oil, sugar and vanilla until very smooth.
Add in the ground flaxmeal, salt, oat flour, almond flour, cornstarch, baking powder, baking soda and cinnamon. Stir until combined.
Fold in the cranberries, chocolate chips and nuts.
Using a cookie scoop (or a spoon), place mounds of cookie dough onto the cookie sheet, keeping 3 inches between each cookie as they will spread while baking.
Bake for 13-15 minutes until the cookies are spread out and just golden.
Cool the cookies directly on the baking sheet for about 5 minutes to harden. Gently transfer each cookie directly onto a cooling rack for another 10 minutes, where they’ll firm up even more. Let cool completely before eating and storing.
Ingredient notes:
These have been tested both with oil and without. Both worked but I found the cookie to be chewier and glossier with added oil which is why it’s in the final recipe.
You can also remove the added cane sugar, but I feel like it balances the tart cranberries nicely. If you swap in raisins instead of cranberries (which are sweeter) then I don’t think you need the added cane sugar. Don’t omit the maple syrup as it will affect the wetness of the batter.
*To make oat flour, place rolled oats in your blender or food processor and blend until a powdered flour forms.
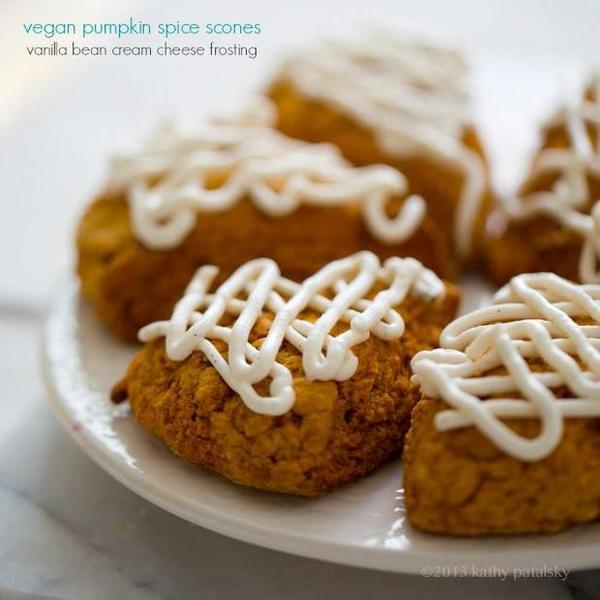
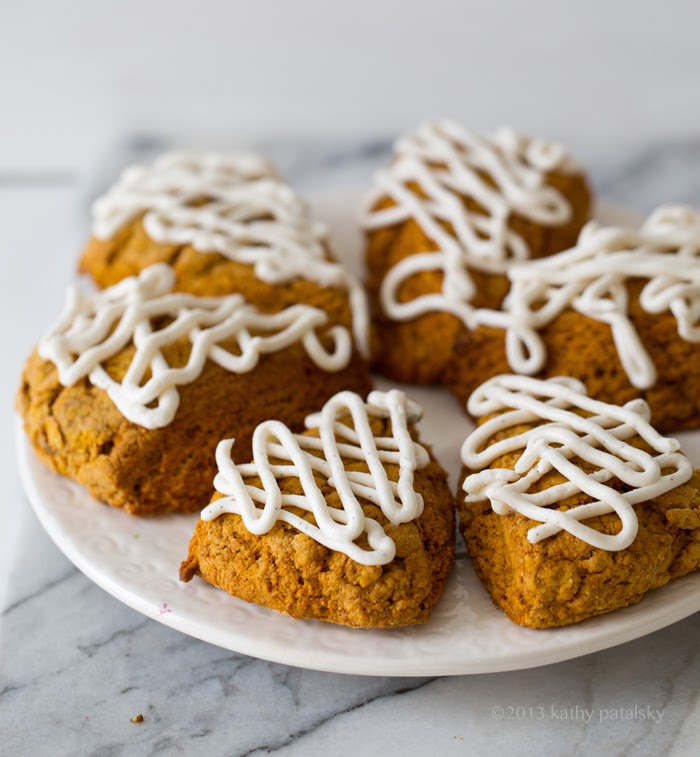
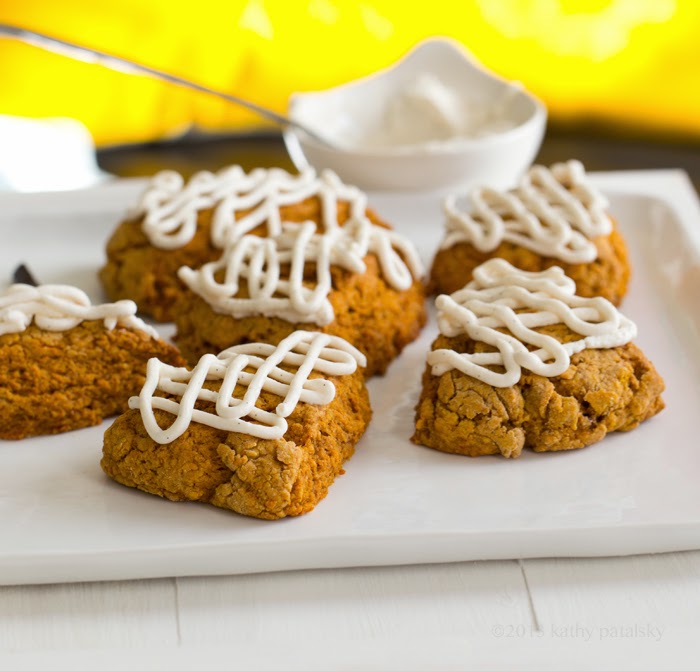
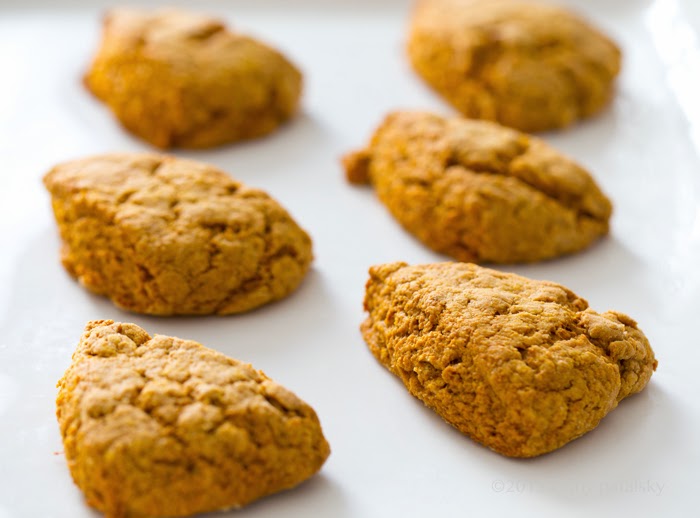
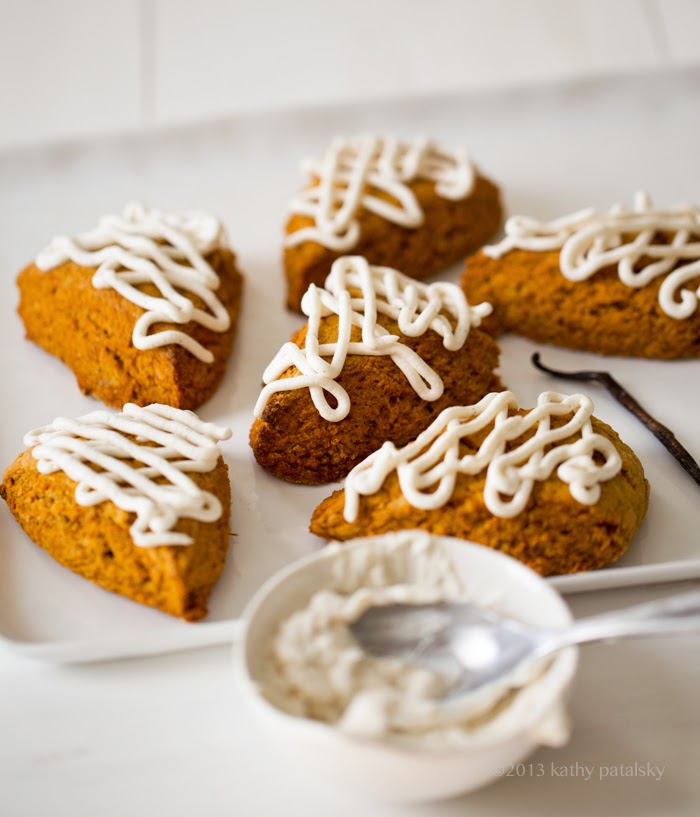
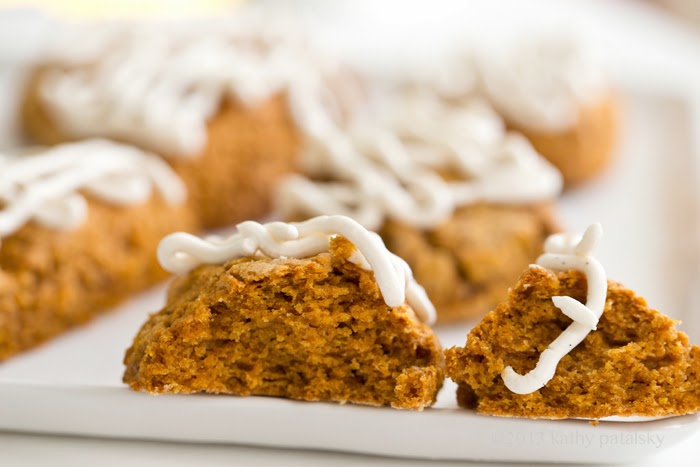
These vegan Pumpkin Spice Scones with real vanilla bean cream cheese frosting are a new fall favorite of mine. I don’t make scones often since traditional scones are loaded with butter. But scones can easily be slightly lightened up and veganized. All while still making your scones swoon-worthy! And these dreamy triangle scones had us craving coffee. Lattes. Something warm, dark and steamy for a perfect scone pairing.
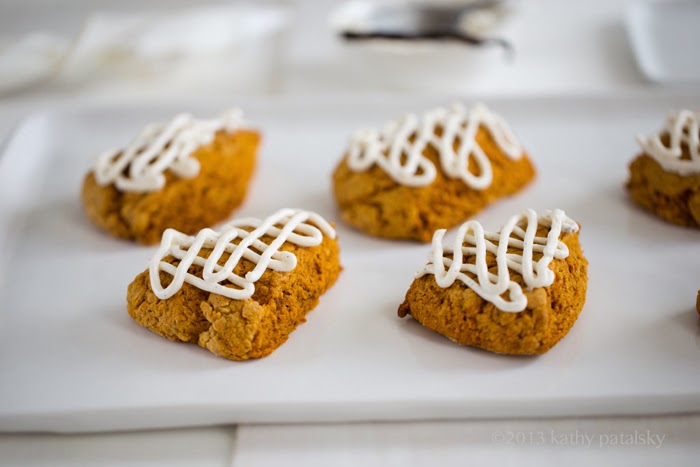
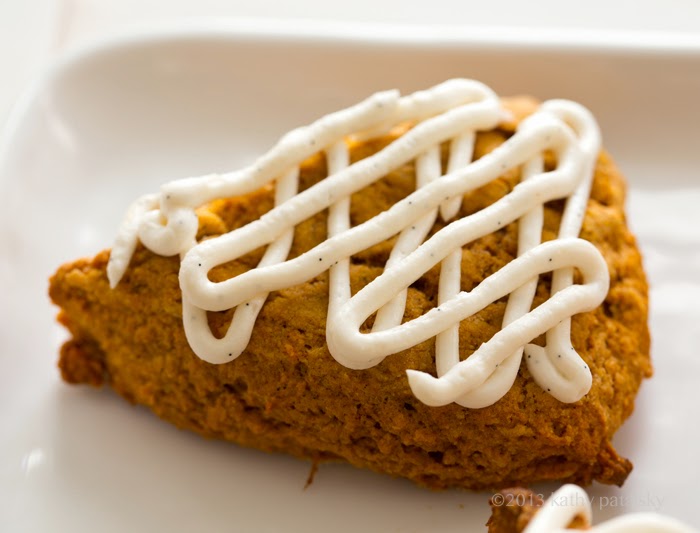
These fluffy, soft, vegan buttery scones are infused with real pumpkin, accents of cinnamon, nutmeg and vanilla bean. Scones feel naked without a glaze or frosting. So this silky, lightly sweet, cream cheese frosting is the perfect topping. These scones are breakfast or brunch approved. Nibble these cute triangles as you sip a warm mug and let fall envelope you like a warm, fuzzy fleece blanket. Have a scone baking session today!..
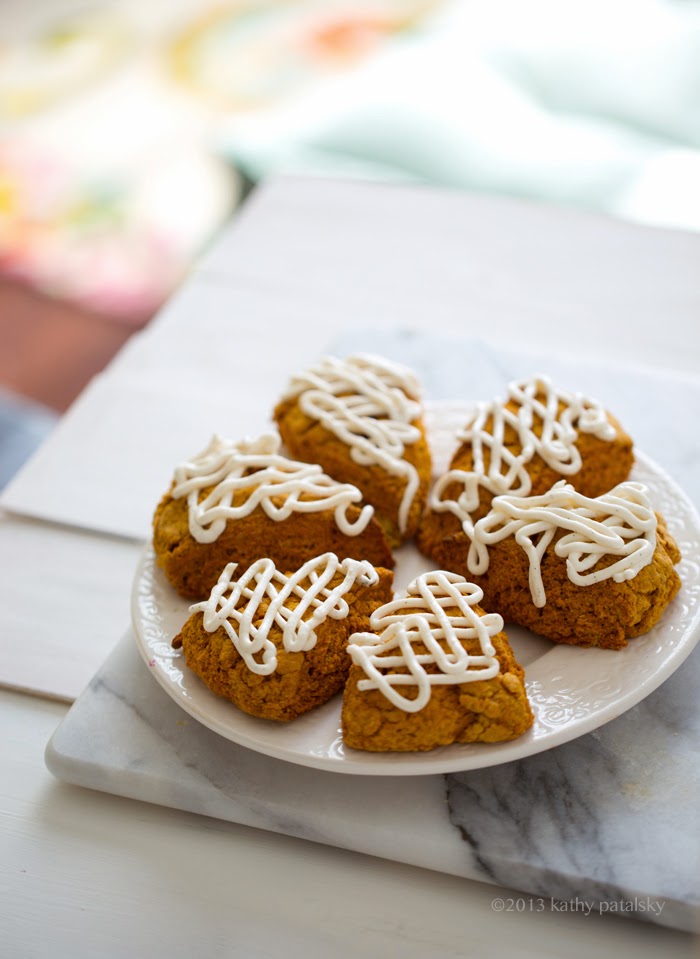
Scone platter. Happiness.
Closer.
These will wake you up and lure you cheerfully out of bed..
Me: I’m baking scones! (I shout from the kitchen.)
(Silence.)
Me: Like triangle shaped, Starbucks-y scones!
(Still nothing.)
Thinking to Myself: Hm, I’ve never really made triangle-shaped, classic-y scones before. Oh no, once. A long time ago. Blueberry. (I Cringe.) But those didn’t look like scones. More like giant triangle blueberry cookies. #Failure
(Baking. Baking. Baking.)
Me: Wow! My scones actually look like scones.
(I shout.)
Me: Hey, my scones actually look like scones!
(I serve a scone to the husband, aka taste tester. Silence. Uh-oh. Silence is never good.)
2. Combine the dry ingredients in a large mixing bowl. Stir in the wet ingredients until well combined in a soft, slightly sticky dough.
3. Place dough in the freezer (in bowl is fine if the bowl fits.)
4. After 10-20 minutes, pull dough from the freezer. It should be easier to handle now. Sprinkle about 2 tablespoon flour on a flat surface and press out your dough round into a thick circle about eight inches across and one inch thick.
5. Slice the round in half. Then into quarters. Then into eights. You should get eight triangles, about equal in size and shape.
6. Place the slices on a greased baking sheet. About an inch apart.
7. Bake at 410 for ten minutes, then reduce heat to 395 and bake for an additional 15 minutes, or until the tips of the scones begin to brown very slightly. The scones should puff up nicely, the vital wheat gluten and pumpkin really help with this even though this is a vegan, egg-free recipe.
8. Cool scones. Blend up your frosting. Place frosting in the fridge to firm up a bit. It should be soft yet firm when you transfer into a pastry bag for piping on top of scones in squiggly designs. The scones should be fully cooled or chilled when adding frosting. Serve cool or slightly warmed. Store covered in the fridge.
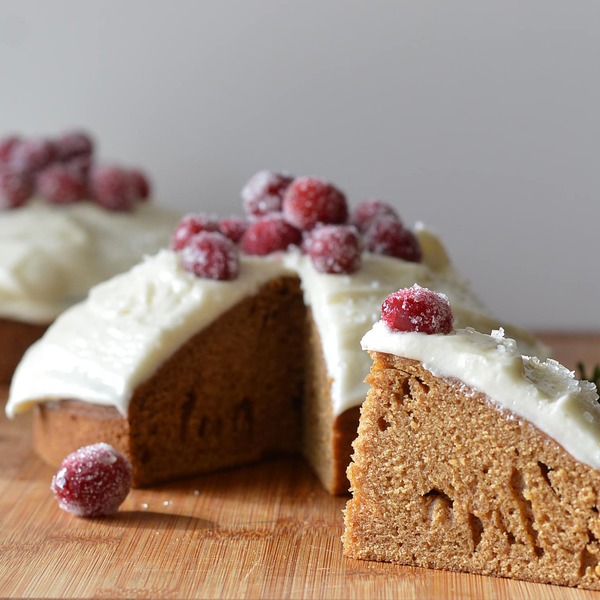
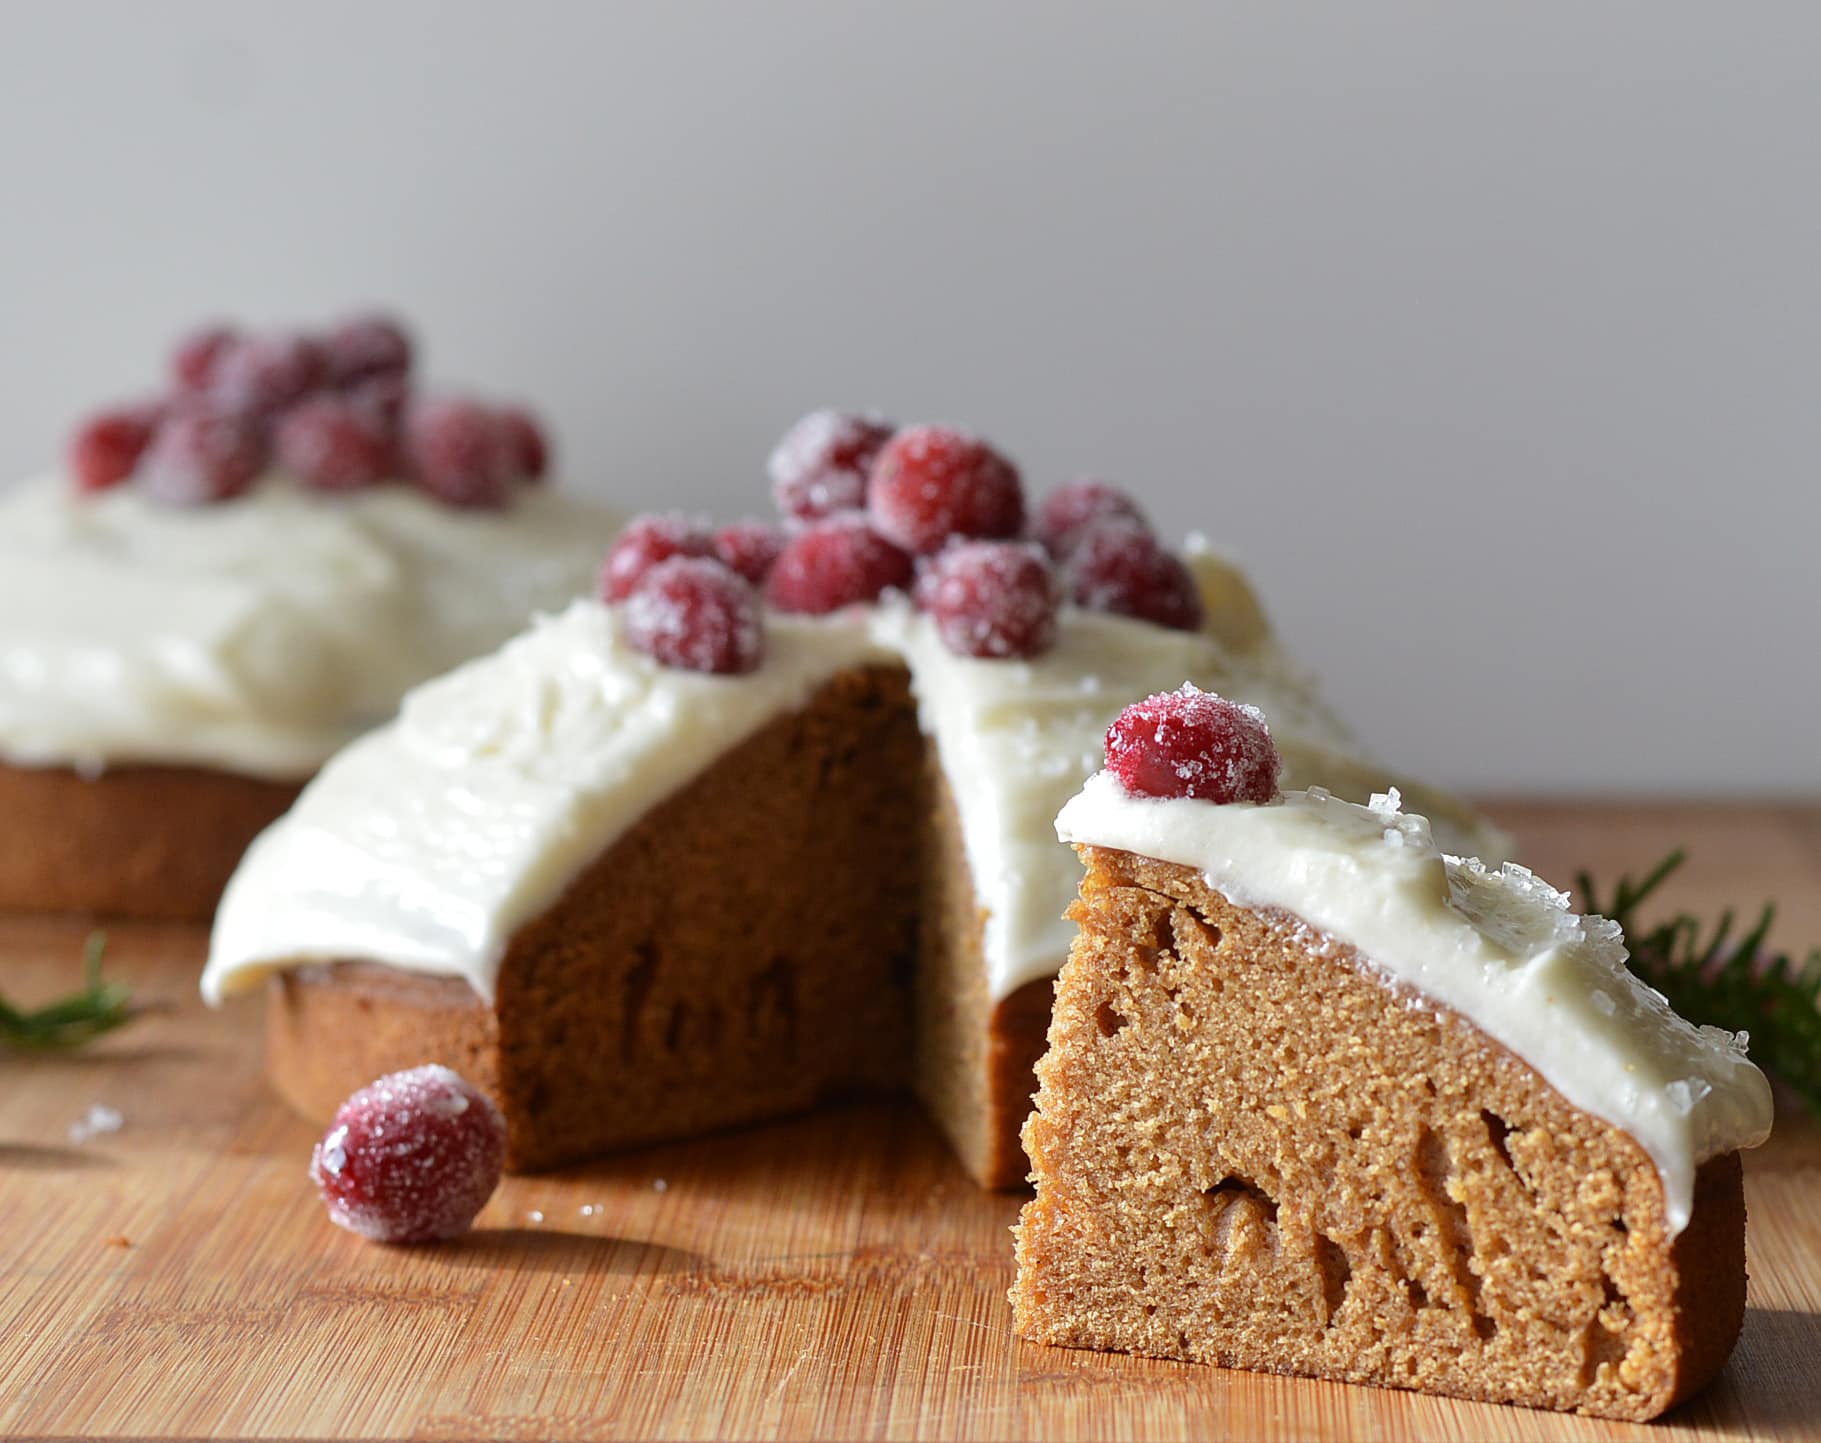
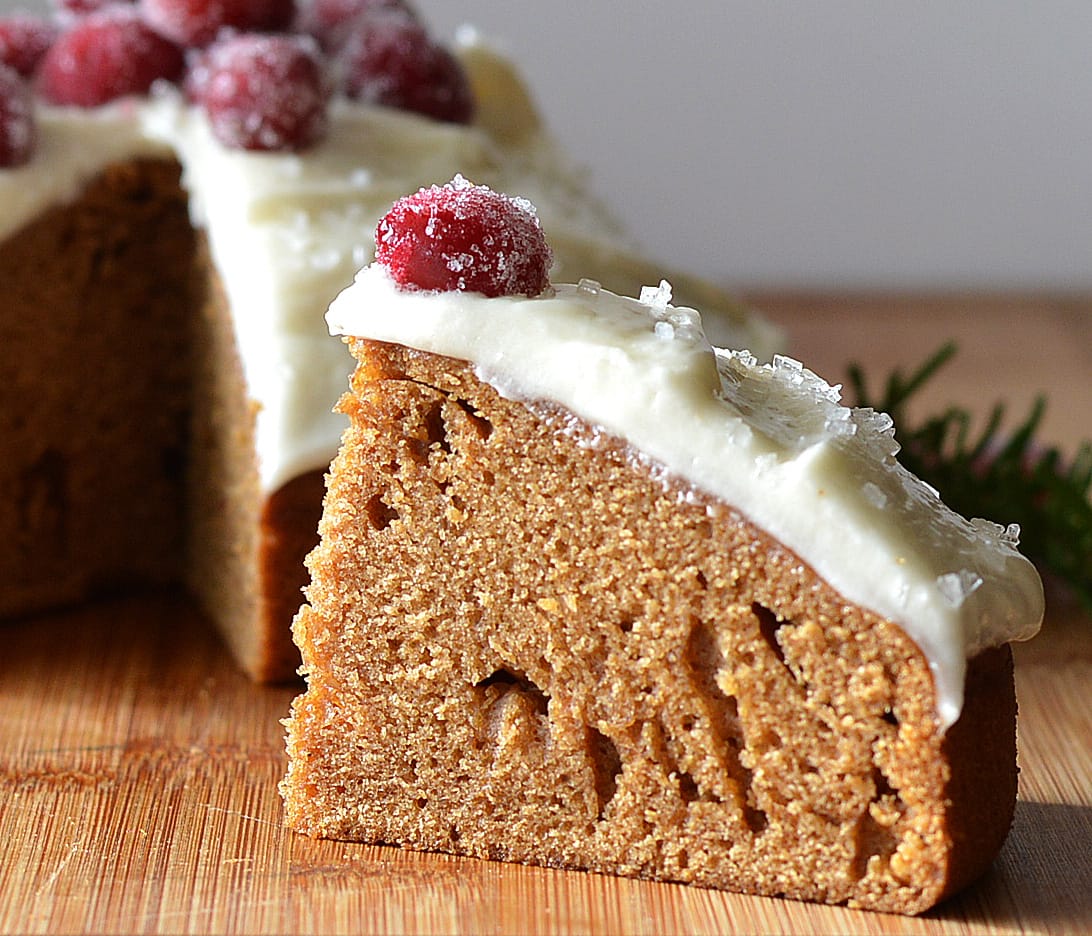
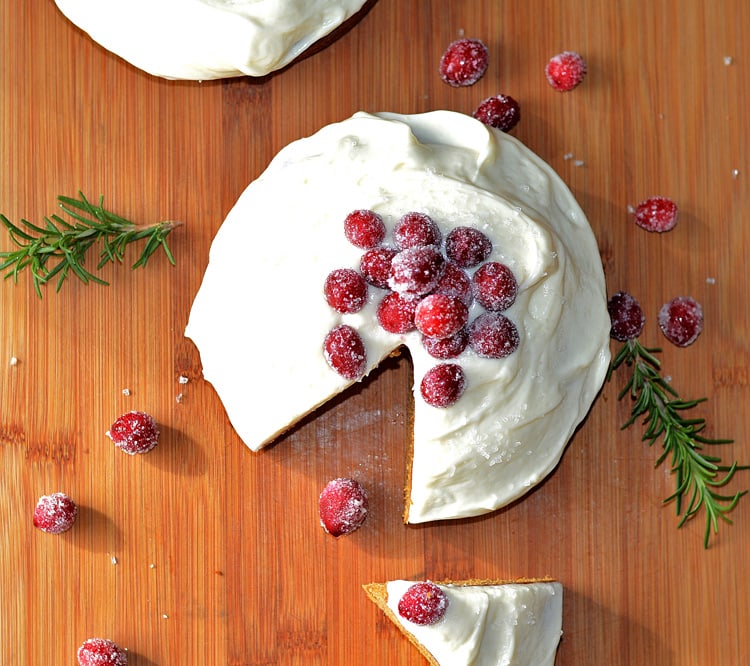
This Old Fashioned Gingerbread with Cream Cheese Frosting and Sparkling Cranberries makes a perfect holiday dessert. I made mine in two 6″ cake pans, but immediately realized how stunning these would be as individual cakes to serve to your guests. You could also make these into cupcakes using a really festive cupcake wrapper.
Old Fashioned Gingerbread
The cake is soft and spicy featuring all of the traditional ingredients such as molasses, ginger, cinnamon and cloves. We topped ours with a vegan cream cheese frosting and garnished with sparkling, sugared cranberries.
Old Fashioned Gingerbread
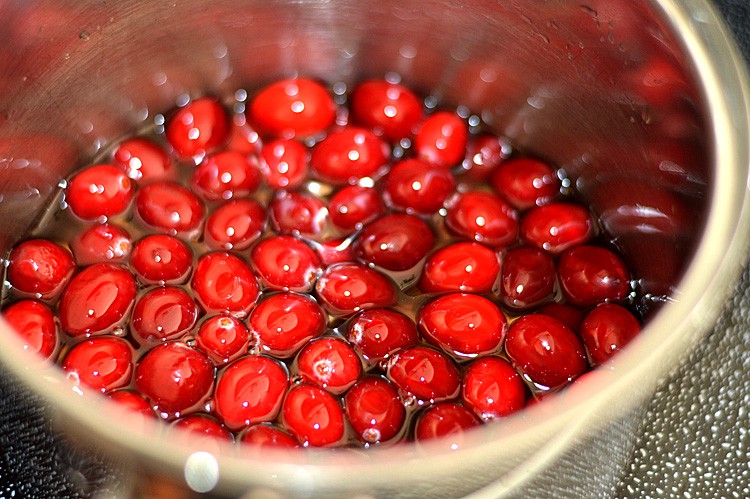
You’ll want to begin with the cranberries, as they take some time to marinate. In a small saucepan, simmer the water and agave until warm. Add the cranberries, cook for two minutes on low heat taking care not to go too long or too hot (because the cranberries may pop). Set aside to cool and refrigerate for a few hours.
Sparkling Cranberries
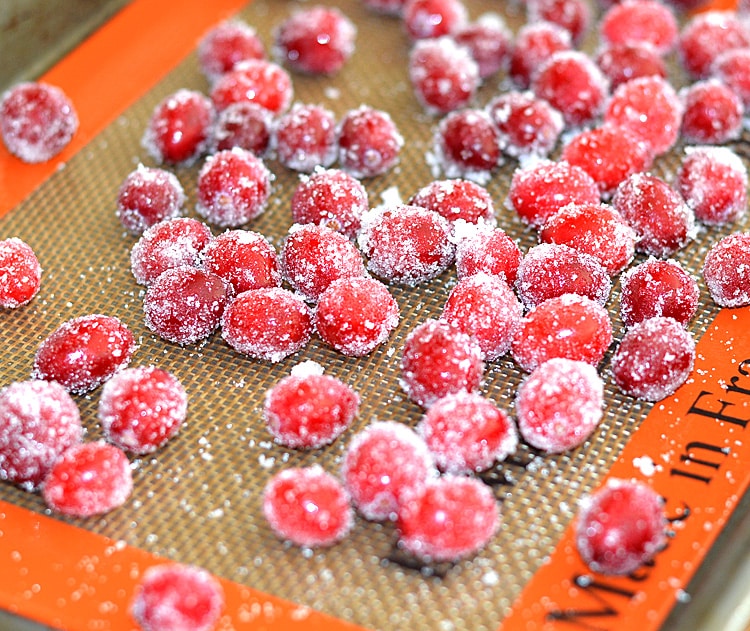
Now drain the liquid off and immediately toss the cranberries into sugar. Place onto a lined baking sheet and allow to dry at room temperature. I shake the pan every once in awhile to be sure all sides dry equally.
Sparkling Cranberries
To create the cream cheese frosting, combine the softened vegan margarine and cream cheese in the bowl of an electric mixer. Add the vanilla and powdered sugar until you reach frosting consistency. Top with a bit of sugar and the sparkling cranberries. I keep mine chilled in the refrigerator.
Old Fashioned Gingerbread
Before you go, why not check out some of our recent videos and be sure to subscribe to the YouTube Channel! 🙂
Author Veg Life Staff
Ingredients
FOR THE GINGERBREAD:
1/2CSugar
1/2Cvegan Margarine
1Tbl Ground Flax + 3 Tbl Waterrefrigerate for 20 minutes
1CMolasses
2-1/2CAll-Purpose Flour
1-1/2tspBaking Soda
1tspCinnamon
1tspGinger
1/2tspCloves
1/2tspSalt
1CWaterHot
FOR THE FROSTING:
8oz.Tofutti Better Than Cream Cheesesoftened
1/2Cvegan Margarinesuch as Earth Balance Buttery Sticks
2CConfectioner’sPowdered Sugar (use more if your frosting is too thin)
1tspVanilla
FOR THE SPARKLING CRANBERRIES:
1Cfresh Cranberries
1/4CAgave
1/4CWater
1/2CSugar
Instructions
To make the sparkling cranberries, heat a saucepan over low heat. Add the water and agave, simmering until warm. Add the cranberries and simmer for 2 minutes. Take care not to heat the cranberries too hot or too long, as they may burst. We want whole cranberries for this recipe. Set aside to cool and refrigerate for several hours.
Preheat the oven to 350 degrees.
Meanwhile, in the bowl of an electric mixer, cream together the margarine and sugar. Add the molasses and flax mixture, along with the hot water.
In a bowl, combine the dry ingredients and add to the mixing bowl. Beat on medium speed for 2 minutes.
Spray desired cake pans with cooking spray.
Evenly divide the batter (if using more than one pan) and bake until a toothpick inserted comes clean. This will vary based on the size of the pan(s) used.
While the cake is baking, drain the cranberries and immediately toss with sugar. Shake off any excess (i used the same strainer) and transfer to a lined baking sheet. Allow to sit at room temperature to air dry, shaking the pan occasionally.
Allow the gingerbread to cool 10 minutes in the pan. Remove from pan and allow to finish cooling on a rack.
To make the cream cheese frosting, combine the vegan cream cheese and margarine in the bowl of an electric mixer until smooth. Add the vanilla.
Add the 2 cups of confectioner’s sugar (or enough until it reaches frosting consistency) and spread onto cake.
Top with a bit more sugar and the sparkling, sugared cranberries.
Gluten-free desserts can be both indulgent and nourishing when made with wholesome ingredients. By using unrefined sugars, healthy fats, and plant-based ingredients, these treats offer a delicious way to satisfy your sweet tooth while staying mindful of your health.
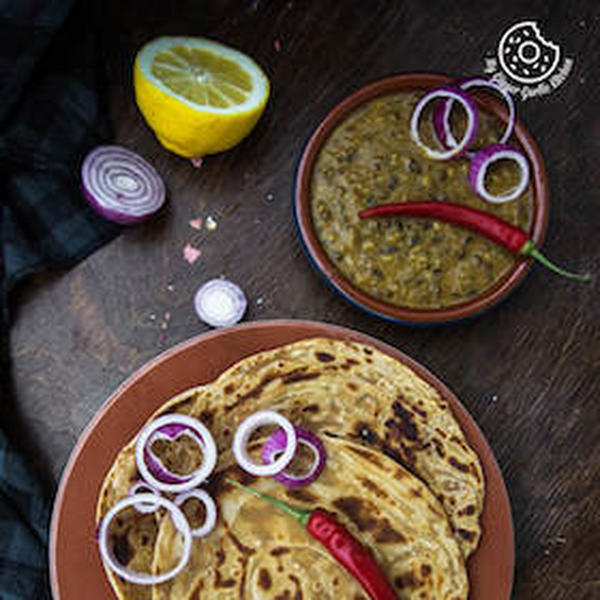
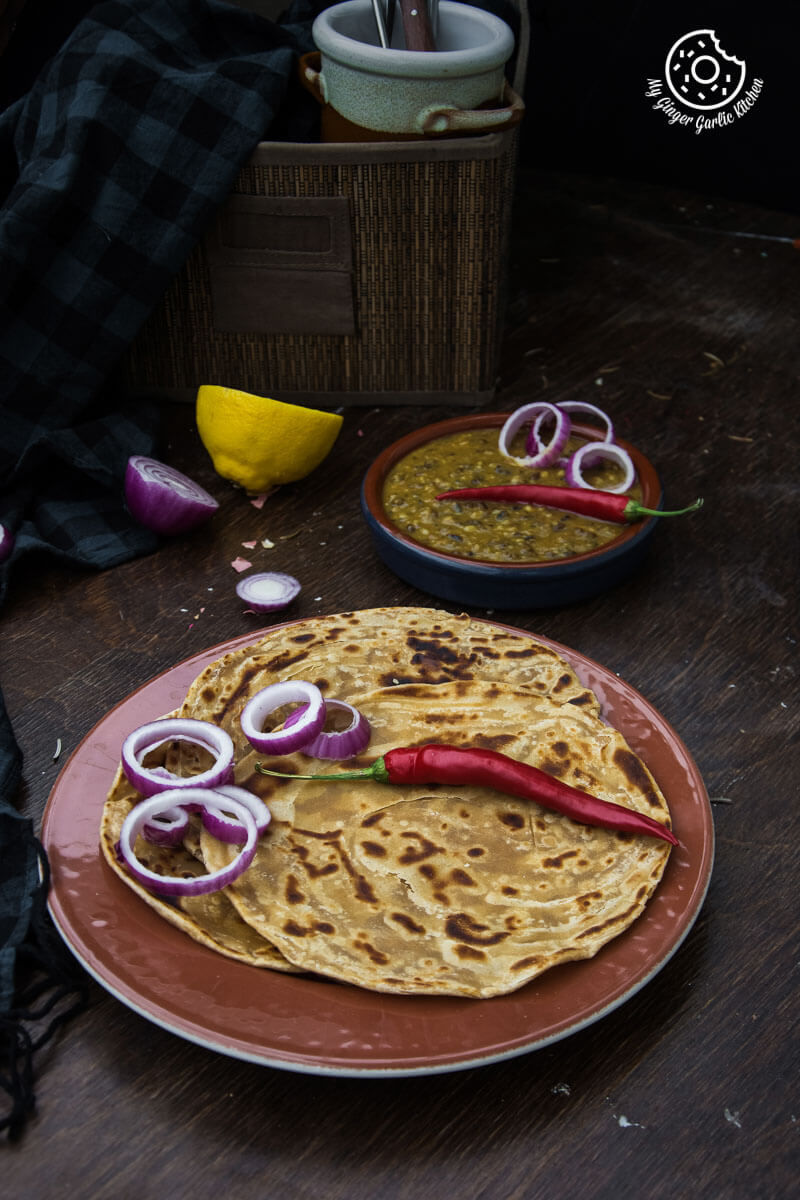
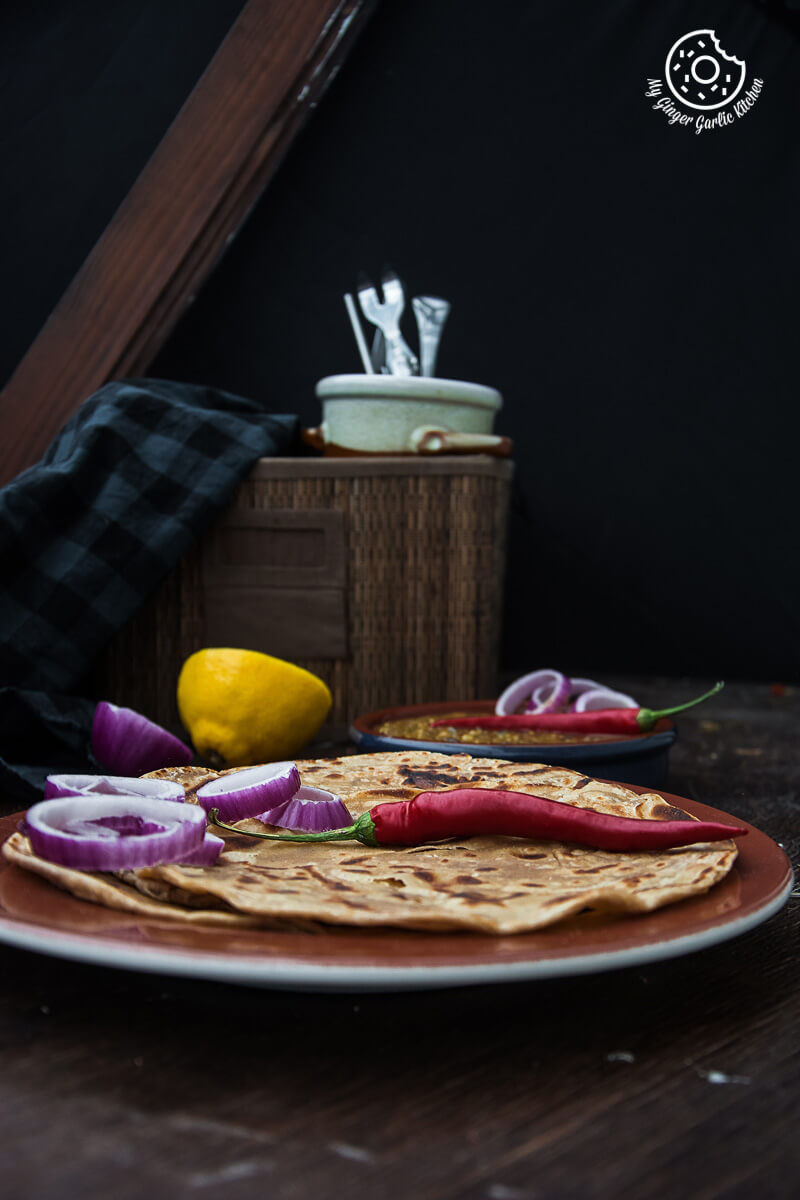
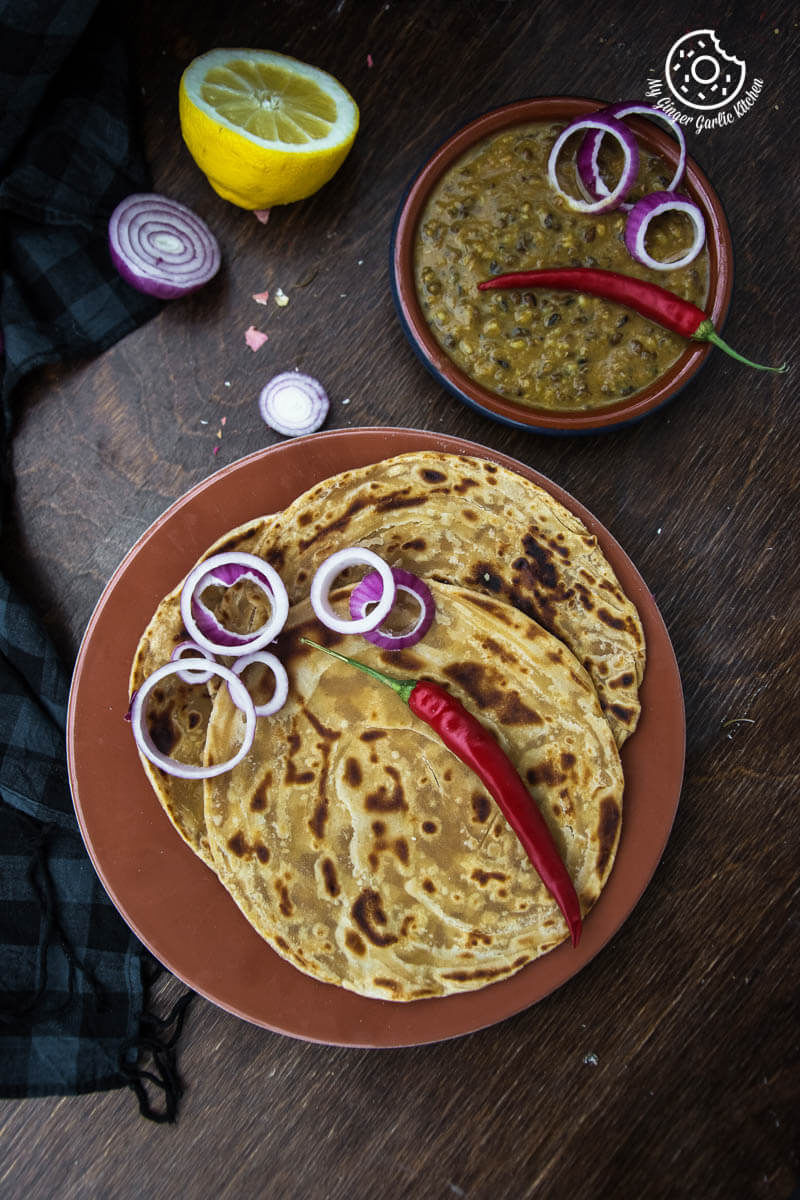
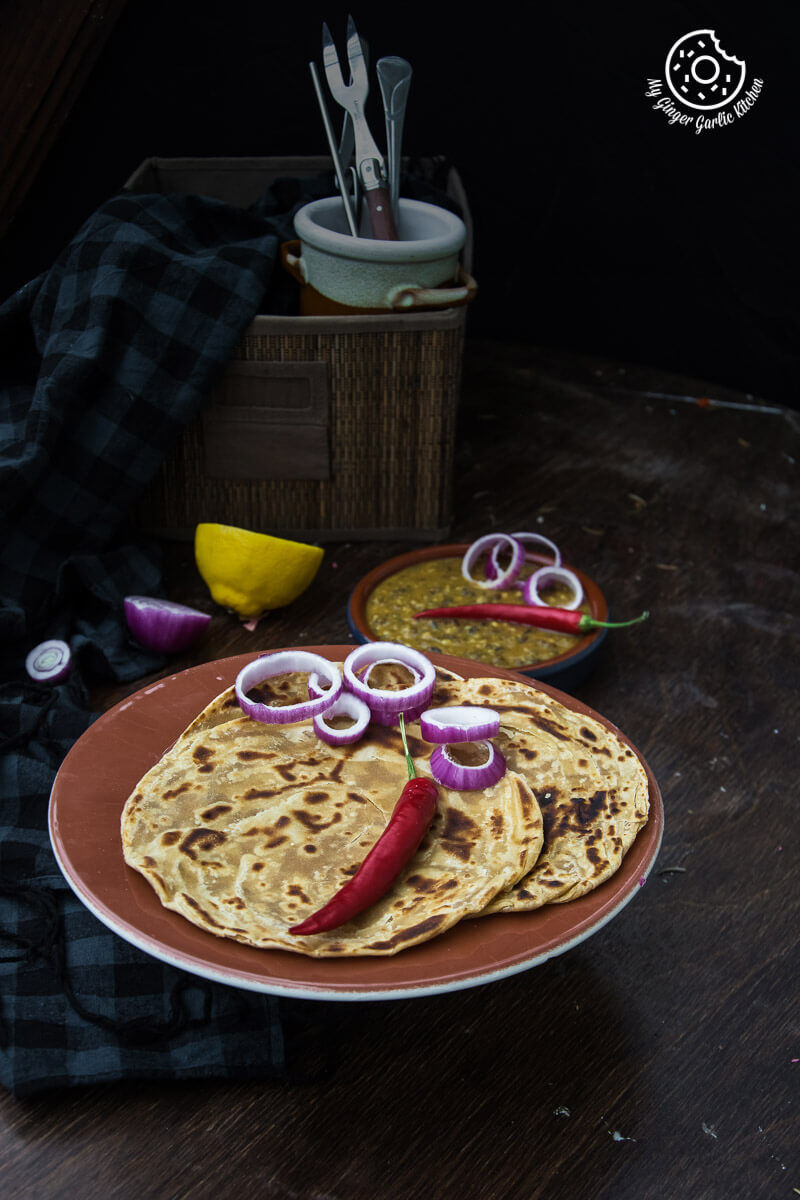
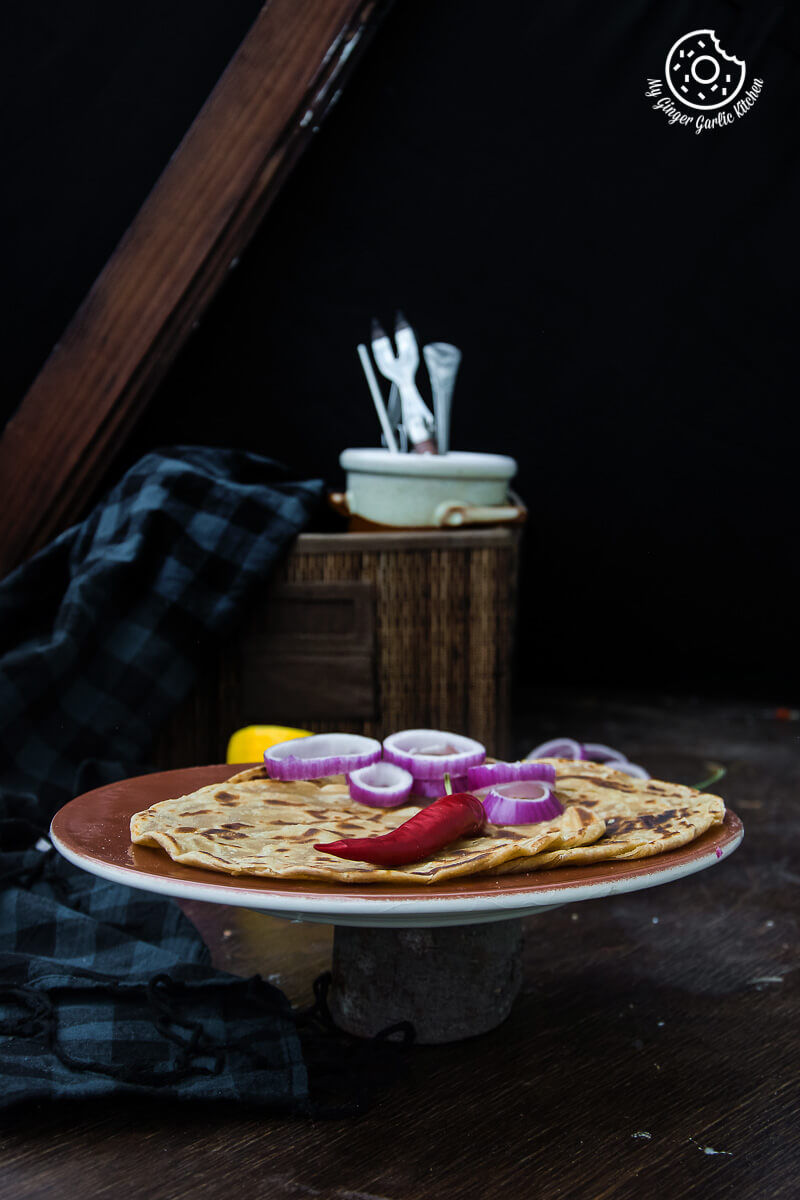
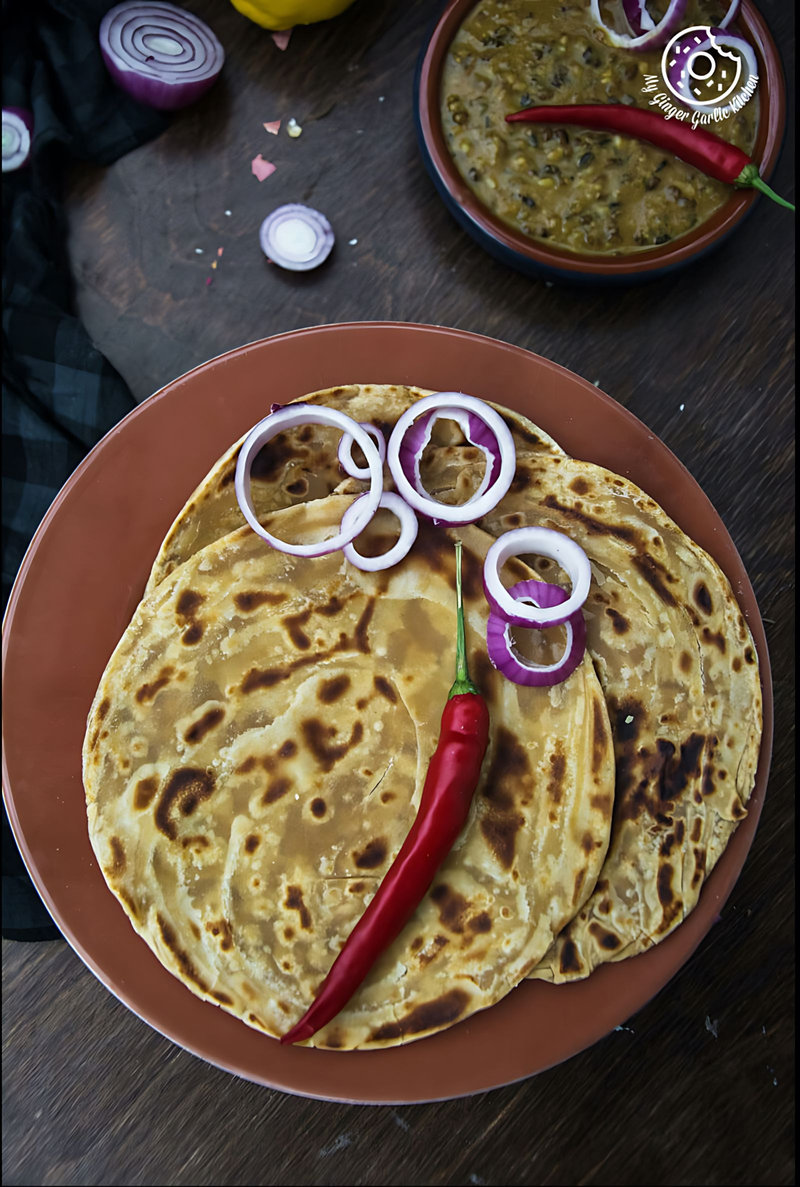
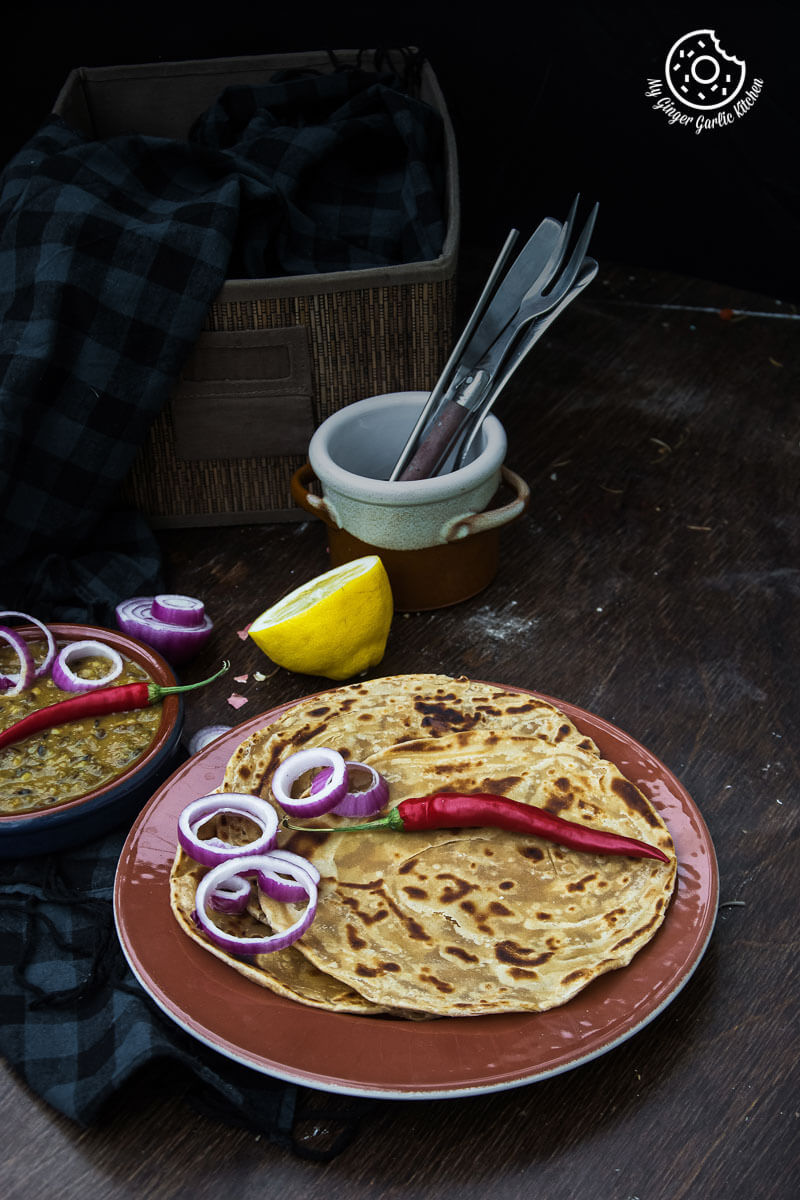
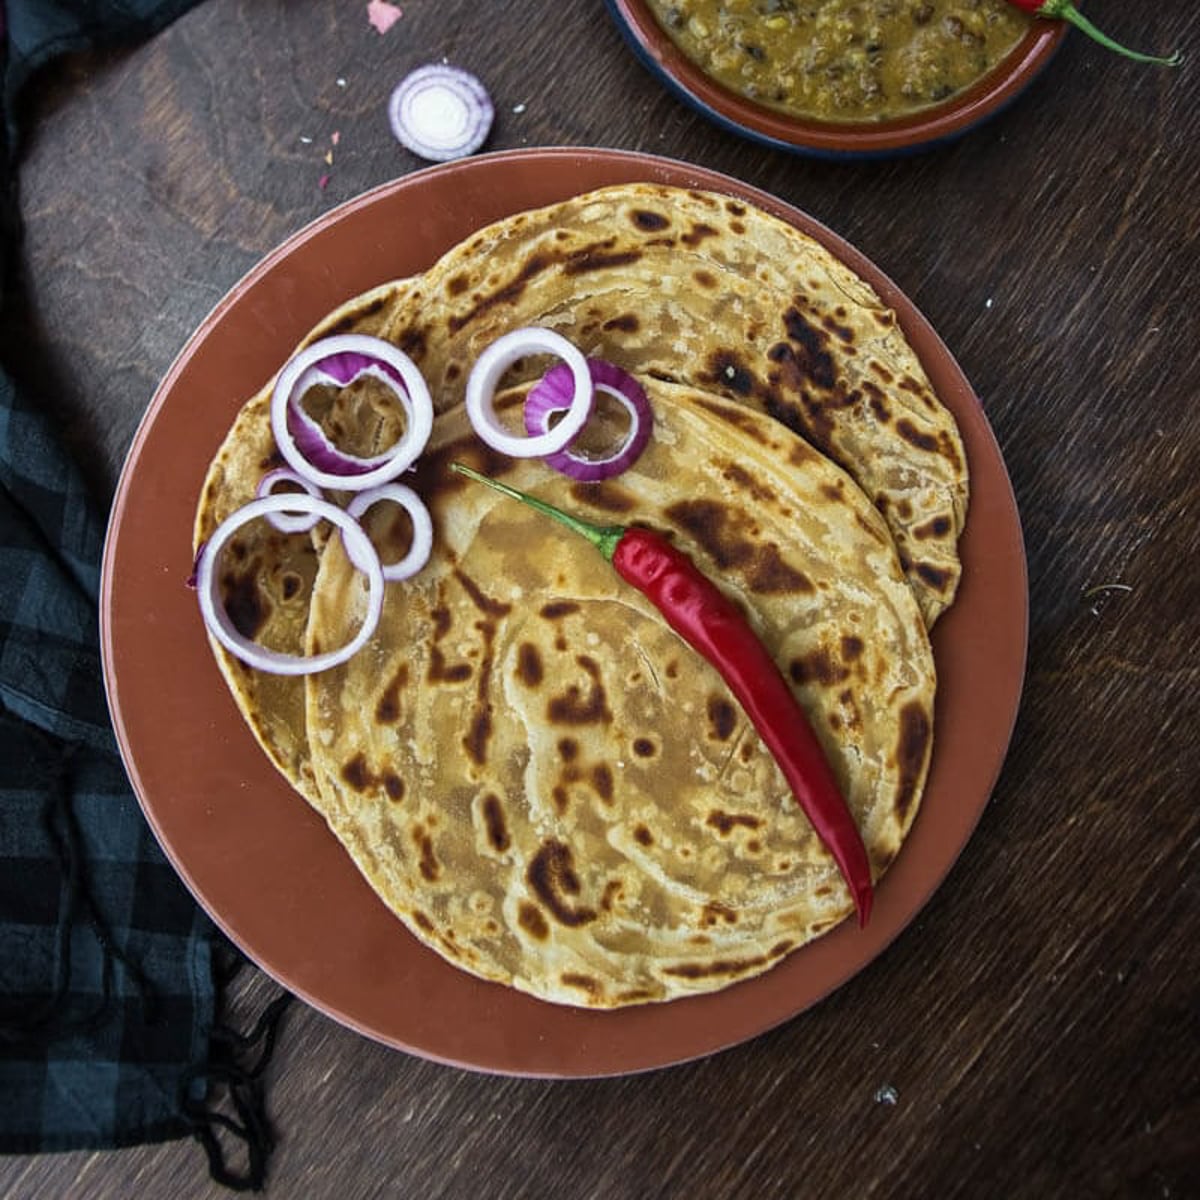
Lachha paratha is a popular North Indian flat-bread. In North India, Lachha paratha is also famously known as Punjabi bread. The word ‘Laccha’ literally means layers in Hindi. Thus, the name laccha paratha is the exact translation of the phrase ‘layered flat-bread’.
North India = Paratha Land
If you belong to Northern India, then you know that mornings and parathas have a great bonding. Be it breakfast, lunch-box, lunch, dinner, get-togethers, weddings, or parties; parathas are always there to be ticked in the menu list. All my North Indian friends can relate to me here.
Pin it to your DINNER BOARD to SAVE IT for later!
Follow My Ginger Garlic Kitchen on Pinterest for even more great ideas and deliciously appealing recipes!
Lachha paratha is a non-stuffed plain paratha. The good thing I love about plain non-stuffed parathas is that you can pair them with anything you like. They can literally win the award for their role of the best-supporting dish. Make any curry, lentils stew, soup, or raita, and pair them with this laccha paratha. The best side dishes to go with this paratha are:
The basic plain-paratha range covers plain circle parathas, plain triangle parathas, and lachha paratha.
Related: Sev Stuffed Paratha Recipe
What is Lachha paratha?
Lachha paratha is a popular North Indian flat-bread. In North India, Lachha paratha is also famously known as Punjabi bread. The word ‘Laccha’ literally means layers in Hindi. Thus, the name laccha paratha is the exact translation of the phrase ‘layered flat-bread’.
This paratha is also known as parat-wala paratha — multi-layered flat-bread, which is roasted with ghee or sometimes shallow fried. The parathas shallow-fried with ghee are richer than the roasted ones.
You can roast or shallow fry these parathas depending upon how rich you want them. I always prefer the ghee roasted version.
Related: Cabbage Peas Stuffed Paratha
Rolling Paratha is an adventure in itself:
Making this laccha paratha is like an artwork you craft with a dough ball. You can be as creative as you want in creating the layers. This paratha is made by rolling first, then, pleating/slicing/crimping, folding and then rolled into a dough ball again. Then, rolled again and roasted or shallow fried. This unique rolling process forms many layers, and once the paratha is cooked the layers become more visible and they can be separated easily. This unusual rolling procedure makes a paratha which is quite crispy from outside and soft from inside. Delicious!
There are different techniques of creating layers for this paratha. There may be many techniques, but for your ease, I have decided to share the three main techniques which I prefer to use.
You can use any of the above rolling techniques which I have shown in the video at the end of this post.
If you love parathas then you would also love rice thepla, and Rajma Tofu Paratha Pocket Bites With Boondi Raita
My Mom’s lachha paratha Recipe is the best:
TMy mom always made the lachha paratha with whole-wheat flour. That’s the way she knew. Or I should say, that’s the way we have been eating it all our lives.
She tried different techniques for creating layers, but never changed the flour — it was kind of an untold norm in my family. In north India, parathas are staple food and people don’t care much about the varieties when it comes to the plain parathas.
We always thought that lachha paratha is a North Indian dish which is made only with whole-wheat flour. But then one time in 90’s, when my family traveled to Southern India for the very first time, we found out something interesting.
Related: Mooli Paratha With Strawberry Grapes Chutney
The brief story about paratha:
It was a long trip and we were away from home for so many days, so we were desperately craving to have some North Indian food there. Being a North Indian, we were so glad to know that there were nice North Indian restaurants in South India too, obviously because of so many North-Indian tourists. We chose the one suggested by our hotel manager. He called it the best North Indian restaurant in town. Alright, so we went there and ordered some lachha parathas for dinner. The parathas looked nice but slightly different in texture and color than what we’re having back home. Despite this difference, they were so delicious — perfectly nice and crisp.
Related: Mushroom Kale Stuffed Paratha
We loved the slightly new taste in lachha paratha, so my Mom asked the waiter: “Which flour did you use in this paratha? Is it made of maida — all-purpose flour?” Then the waiter said: “Yes, it is made of Maida. We call it ‘Kerala Parotta’.
We also add the egg in this paratha, which is not used in North Indian Laccha/Lachhedar paratha. This is a famous street food here. And it’s shallow-fried too.”
And after that trip, my Mom also started making laccha paratha using all purpose flour. So today I am sharing this simple and easy North Indian laccha paratha which my Mom used to make. Hope every one of you will love it, as much as we do.
Indians love eatingg all types of parathas and rotis, be it stuffed paratha or plain parathas. Some other Indian flatbreads I adore are Plain Paratha, Makki Ki Roti, Duppad Roti – Pad Wali Roti, khichdi paratha, aloo pyaaz paratha, and Rajasthani Khoba Roti.
What do we call paratha in English?
A paratha is a literal translation of flatbread in the Hindi Language. The word Paratha is made with two words — parat and atta. This precisely means layers of the cooked dough.
Which flour is used for paratha?
A traditional paratha is made using chakki atta (whole wheat flour), or maida (all-purpose flour). However, you can also use multi-flour or any other flatbread making flour of your choice.
You can also use a combination of soy flour, ragi flour and chickpea flour (besan) or any other gluten-free flour for making gluten-free paratha.
What is Warqi paratha?
Warqi paratha exactly means layered paratha. Warq is used for layers here. Laccha partha and warqi paratha are prepared similarly.
What’s the difference between paratha and chapati?
Chapati and paratha both are flatbreads.
Chapati is rolled into a circle and rolled only one time. However, paratha is mostly a layered flatbread, that’s why it is rolled out and folded over multiple times so that a paratha gets perfect layers.
Chapati is always plain, but parathas can be stuffed.
Chapati is always rolled out into circles but parathas can be rolled into circles, triangles, and even square shapes.
Paratha is always roasted with some oil, ghee, or butter. Chapati is first puffed up on the pan or on the direct fire. And then brushed with ghee.
What’s the difference between laccha paratha and warqi paratha?
Laccha paratha is traditionally made from chakki atta (whole wheat atta).
Warqi paratha, on the other hand, is normally prepared from maida (all-purpose flour).
Laccha paratha is always savory, but some warqi paratha could be savory and sweet. Some warqi paratha recipes contain sugar and saffron aka Kesar.
Rolling/folding and roasting techniques are similar in both the parathas.
Is paratha vegan?
Yes, and no. If you use ghee for making dough and roasting paratha then paratha is not vegan. However, if you use vegetable oil for making dough and roasting parathas, then they can be made into the vegan.
Related: Pepper Onion Potato Paratha
Don’t forget to like us on Facebook for more latest updates
You may also like these paratha recipes:
Exotic Aloo Paratha
Aloo Palak Paratha Recipe
How To Make Punjabi Aloo Paratha – 2 Ways
Sev Stuffed Paratha Recipe
Gulkand Dessert Paratha With Gulkand Raita Recipe
Cabbage Peas Stuffed Paratha
Lachha Paratha Recipe – How to Make Multi-Layered Paratha (Step-by-step photo instructions)
Recipe Card
Lachha Paratha Recipe – How to Make Multi-Layered Paratha [Recipe]
Lachha paratha is a popular North Indian flat-bread. This recipe makes the best laccha paratha which is crispy, flakey yet soft in texture.
★★★★★
(Rating: 5 from 185 reviews)
Prep time 🕐
Cook time 🕐
Total time 🕐
30 mins
Category ☶
Cuisine ♨
Serves ☺
Breads
Indian
8
Nutrition Info ⊛
Serving size ⊚
255 calories
1 paratha
INGREDIENTS
For Lachha Paratha:
2 cups whole wheat flour
Salt as per taste
1 teaspoon Sugar (optional)
1 teaspoon Baking soda (optional)
2 tablespoon Ghee (use melted vegan butter or vegetable oil for vegan version)
Lukewarm water or milk for kneading the dough
Ghee or oil for roasting and smearing
Dry flour for dusting
INSTRUCTIONS:
Making Lachha Paratha Dough:
Combine the whole wheat flour, baking soda, ghee, salt, and sugar in a bowl. Mix it well.
Add lukewarm water and knead into a soft dough. (You can also use warm milk or a mix of milk and water).
Cover the dough and let it rest for around 30 minutes.
Divide the dough into 8 equal portions. And shape them into balls.
Lachha Paratha Rolling Technique – 1:
Take one dough ball and dip it into flour. Roll into a thin circle.
Brush with ghee and sprinkle with some dry flour.
Make a cut from the center. Now fold it completely along the radius.
Open the petals and press to make a roll again as shown in the video.
Now dip it into dry flour roll into a thin circle again.
Lachha Paratha Rolling Technique – 2:
Take one dough ball and dip it into flour.
Roll into a thin oval-shaped disc.
Brush with ghee and sprinkle with some dry flour.
Now, cut the rolled disc into thin strips using a knife or a pizza cutter.
Take all strips together and fold it into a thin log.
Brush with some more ghee and sprinkle with some more dry flour.
Roll it over again from one end to the other end to form a spiral as shown in the video.
Now dip it into dry flour roll into a thin circle again.
Lachha Paratha Rolling Technique -3:
Take one dough ball and dip it into flour.
Roll into a thin circle.
Brush with ghee and sprinkle with some dry flour.
Pleat the circle from the edge to edge as shown in the video.
Brush with some more ghee and sprinkle with some more dry flour.
Coil the pleated log into a spiral ball and secure the end by sticking it at the bottom. Press well.
Dip it into dry flour and roll into a thin circle again.
Lachha Paratha Cooking:
Heat a pan on medium heat. Place rolled paratha on it.
Roast the parathas from both sides on medium heat.
Brush both the sides with some ghee/oil roast and roast until golden brown on both sides.
Serve parathas hot with any dal or curry.
WATCH RECIPE VIDEO: Click the play button and video will load …
By Susan Voisin88 Comments Disclosure: This post may contain affiliate links. As an Amazon Associate I earn from qualifying purchases. Privacy Policy.
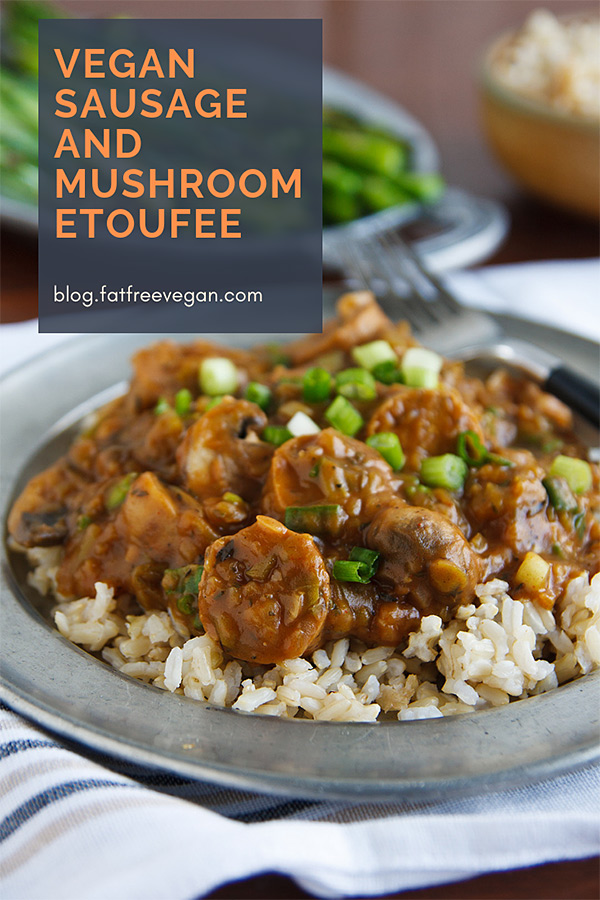
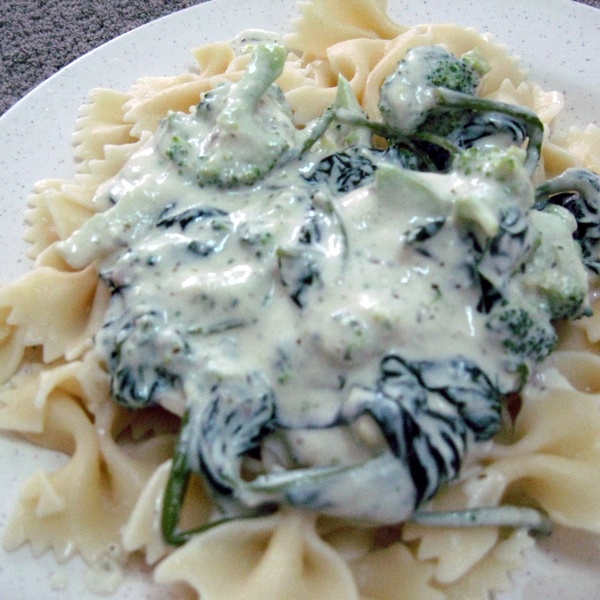
Creole and Cajun food doesn’t have to be loaded with meat and fat to taste decadent. This vegan etoufee is stuffed with all the spicy flavors of Louisiana.
I’m writing this from a hotel on St. Charles Avenue after a night of revelry in the streets of New Orleans. If you’ve never been to Mardi Gras, you might assume that the partying is confined to Fat Tuesday itself, but Mardi Gras day is just the culmination of all the parties and parades that have been going on over the last couple of weeks.
Yesterday, out on the street for over twelve hours, my family and I were able to catch six parades (and a couple of bags of purple, green, and gold beads). Tonight we’ll be back out there for four more, and we’ll stay to see Zulu and Rex on Tuesday before we return to real life.
You would think that because we’re in New Orleans we’d get to sample a lot of great New Orleans-style food, but the truth is that, though N.O. has become more vegan-friendly over the last few years, there don’t seem to be many restaurants that offer meatless versions of gumbo, etoufee, or even red beans and rice. While we’re here, we’ll seek out great Vietnamese food or maybe Tapas, but we won’t be able to find Eggplant Creole. Last week, in anticipation of our trip, I began craving spicy New Orleans food, and since I knew I probably couldn’t get it here, I made it myself.
Étouffée is basically seafood (usually) or meat cooked in a thick gravy that begins with a roux, a mixture of flour and oil that is cooked until it turns a rich brown color. Then the Louisiana trinity is added–onions, celery, and green pepper–along with broth and herbs and lots of red, black, and white pepper to achieve a sauce so flavorful that you could probably cook an old non-leather wallet in it and have it come out delicious. Making a vegan etoufee is easy–just use vegetable broth and non-meat protein–but making a fat-free etoufee is a little more challenging because the roux that gives it the rich, smoky flavor requires fat.
Dry Roux (Browned Flour)
Or does it? As it turns out, you can make a great “dry roux” just by browning the flour alone in a dry skillet. Like any roux, you have to stir it nearly constantly and make sure it doesn’t burn, but once it’s browned and blended with vegetable broth, it forms a thick, flavorful gravy that I, at least, prefer to an oily traditional roux.
I don’t usually use a lot of fake meats, and when I do, I make them myself. But since Mardi Gras is all about excess, I went all out and used a processed vegan sausage for this etoufee, and I have to say, it was one of the best, most decadent-tasting dishes I’ve made in a long time. I hope you’ll give it a try for a little taste of Mardi with not so much of the Gras.
Gluten-Free Friends: Obviously, this recipe is not gluten-free as written, but I’ve heard that people have had good luck making a roux from Bob’s Red Mill Gluten-Free All Purpose Flour Blend. Just use it to replace the flour, and brown it the same way. As for the sausage, you could try replacing it with cubes of baked tofu or tempeh or use red beans. And don’t forget to substitute gluten-free tamari for the soy sauce or use salt instead.
If you’re looking for more vegan Mardi Gras dishes, check out all my Vegan Louisiana Recipes.
A quarter teaspoon each of the cayenne, white, and black pepper will probably provide enough heat for most people, but if you like your food fiery, add more to taste, but try to keep the amounts balanced. If you don’t like spicy dishes, start with 1/8 teaspoon of each pepper and build up from there.
Prep Time 15 minutesminutes
Cook Time 45 minutesminutes
Total Time 1 hourhour
Servings 4
Ingredients
1/3cupunbleached white flour
2cups“no-chicken” or other vegetable broth
1medium onionfinely chopped
1rib celeryfinely chopped
1/2green bell pepperstemmed, seeded, and finely chopped
8ouncesmushroomsstemmed and halved
4clovesgarlicminced
1teaspoonsoy sauce
1teaspoondried thyme
1/2teaspoonsmoked paprika
1/4-1/2teaspooncayenne pepper
1/4-1/2teaspoonfreshly ground black pepper
1/4-1/2teaspoonfreshly ground white pepper
1/2teaspoondried basil
14-16ouncesItalian Fauxsagesor other vegan sausages, such as Tofurky, sliced thickly
4green onionsscallions, sliced
Instructions
Put the flour in a small skillet and heat it over medium-high heat. Cook, stirring almost constantly, until it is the color of light brown sugar, about 15 minutes. Be very careful–it burns easily if not stirred. If it burns, throw it out and start over again. When it reaches the right color, transfer it to the blender, add the broth, and blend it until smooth. Set aside.
While you’re stirring the flour, you can begin cooking the vegetables. Heat a large non-stick skillet. Add the onion and cook for about three minutes, adding water by the tablespoon if needed to prevent sticking. Add the celery and bell pepper and continue to cook until the onion is beginning to brown. Add the mushrooms and a tablespoon of water and cover tightly. Cook until the mushrooms begin to exude their liquid, about 3 minutes. Add the garlic and cook another minute.
Give the flour mixture another quick whirl in the blender and add it to the vegetables. Add the soy sauce and all the seasonings and cook, stirring often, until sauce has thickened. Reduce heat and add the sliced sausage. Cover and cook on low for about 15 minutes, stirring occasionally. If the gravy seems too thick, add a little more vegetable broth.
Check the seasonings and add more pepper and salt if needed. Stir in the green onions and serve over rice.
Notes
Nutrition info below is per serving, using Italian Fauxsages. Nutritional analysis will vary depending on the type of sausage used.
Nutrition Facts
Vegan Sausage and Mushroom Etoufee
Amount Per Serving (1 serving)
Calories 301 Calories from Fat 53
% Daily Value*
Fat 5.9g9%
Sodium 1159mg50%
Potassium 378mg11%
Carbohydrates 33g11%
Fiber 6g25%
Sugar 3.4g4%
Protein 34.4g69%
* Percent Daily Values are based on a 2000 calorie diet.
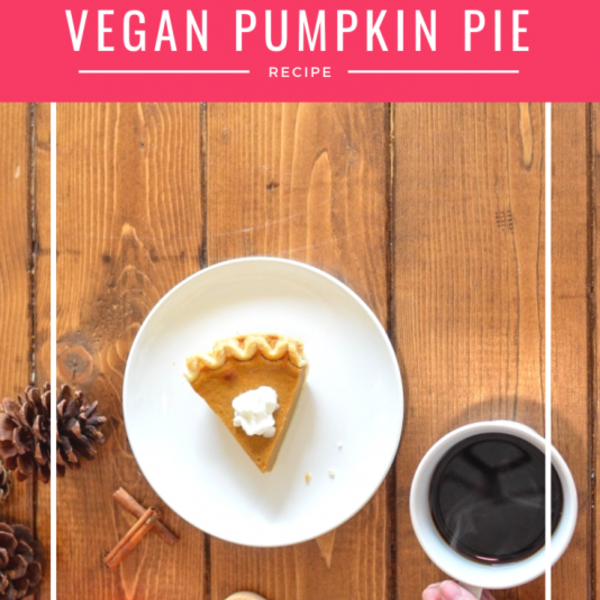
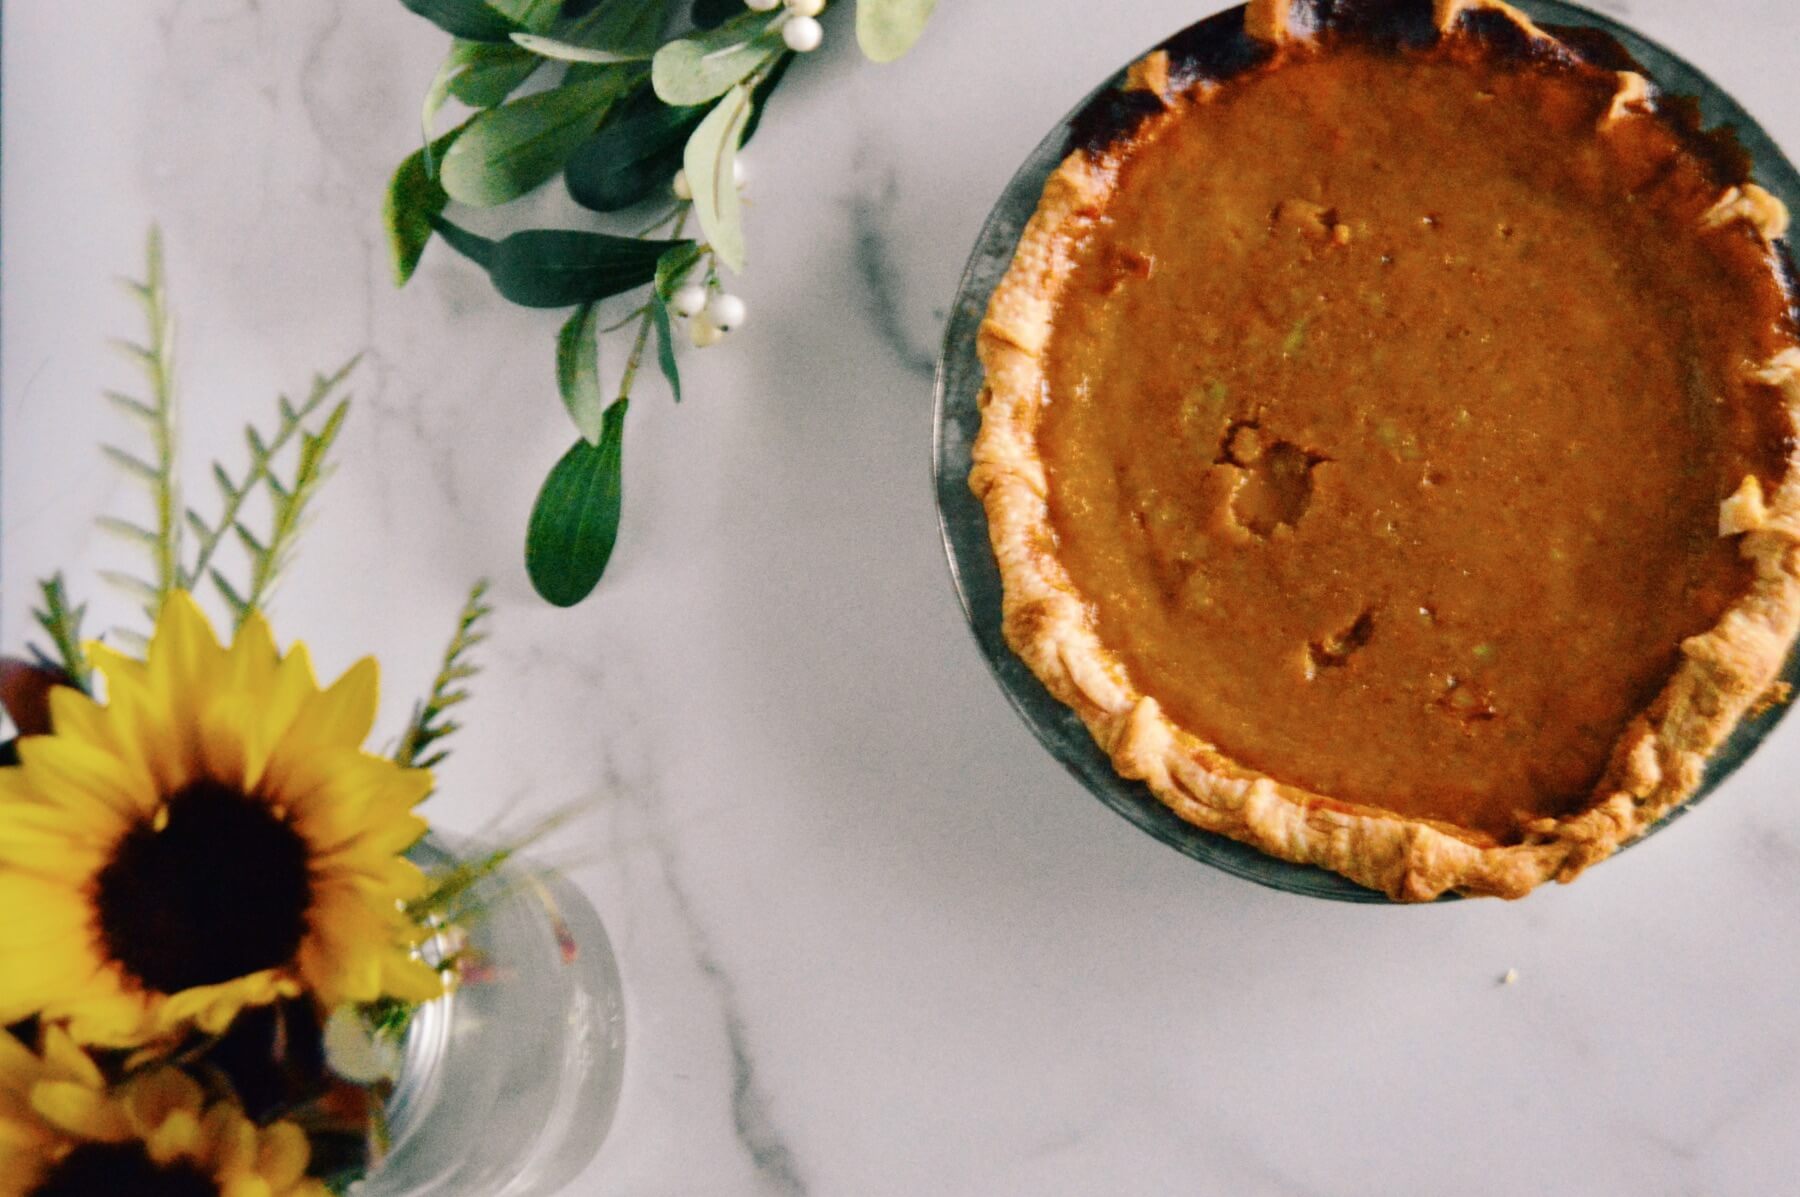
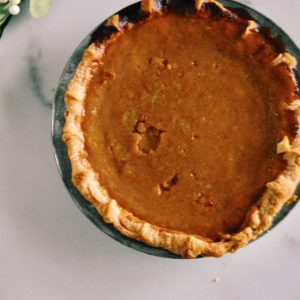
I am seriously getting in the fall spirit. Halloween Costumes and Fall Sweaters just aren’t enough! Pumpkin Pie, Tangerine Cranberry Sauce, and these Chai Tea Chocolate Truffles are all go to’s for me during the fall and winter. And I’m ready to create some seasonal desserts. Pumpkin Pie just happens to be one of my absolute favorites pies anytime of year.
This Vegan Pumpkin Pie Recipe is super special to me because it’s one of my very first recipes, create, adapted and perfected when I was a teenager! I’ve been baking my whole life and went vegan when I was in high school (it was short lived but amazing while it lasted.)
My favorite thing about this recipe is that it doesn’t include tofu. I don’t know what my problem is, I love tofu, but just not in desserts. The flavors don’t work for me. There was a moment in time where all Vegan Pumpkin Pie Recipes included tofu. Those were dark days.
If you want to go straight to the printable recipe card, scroll to the bottom, but if you are looking for tips and tricks to make the best Vegan Pumpkin Pie, then read on!
Fresh Baked or Pre-Made Crust
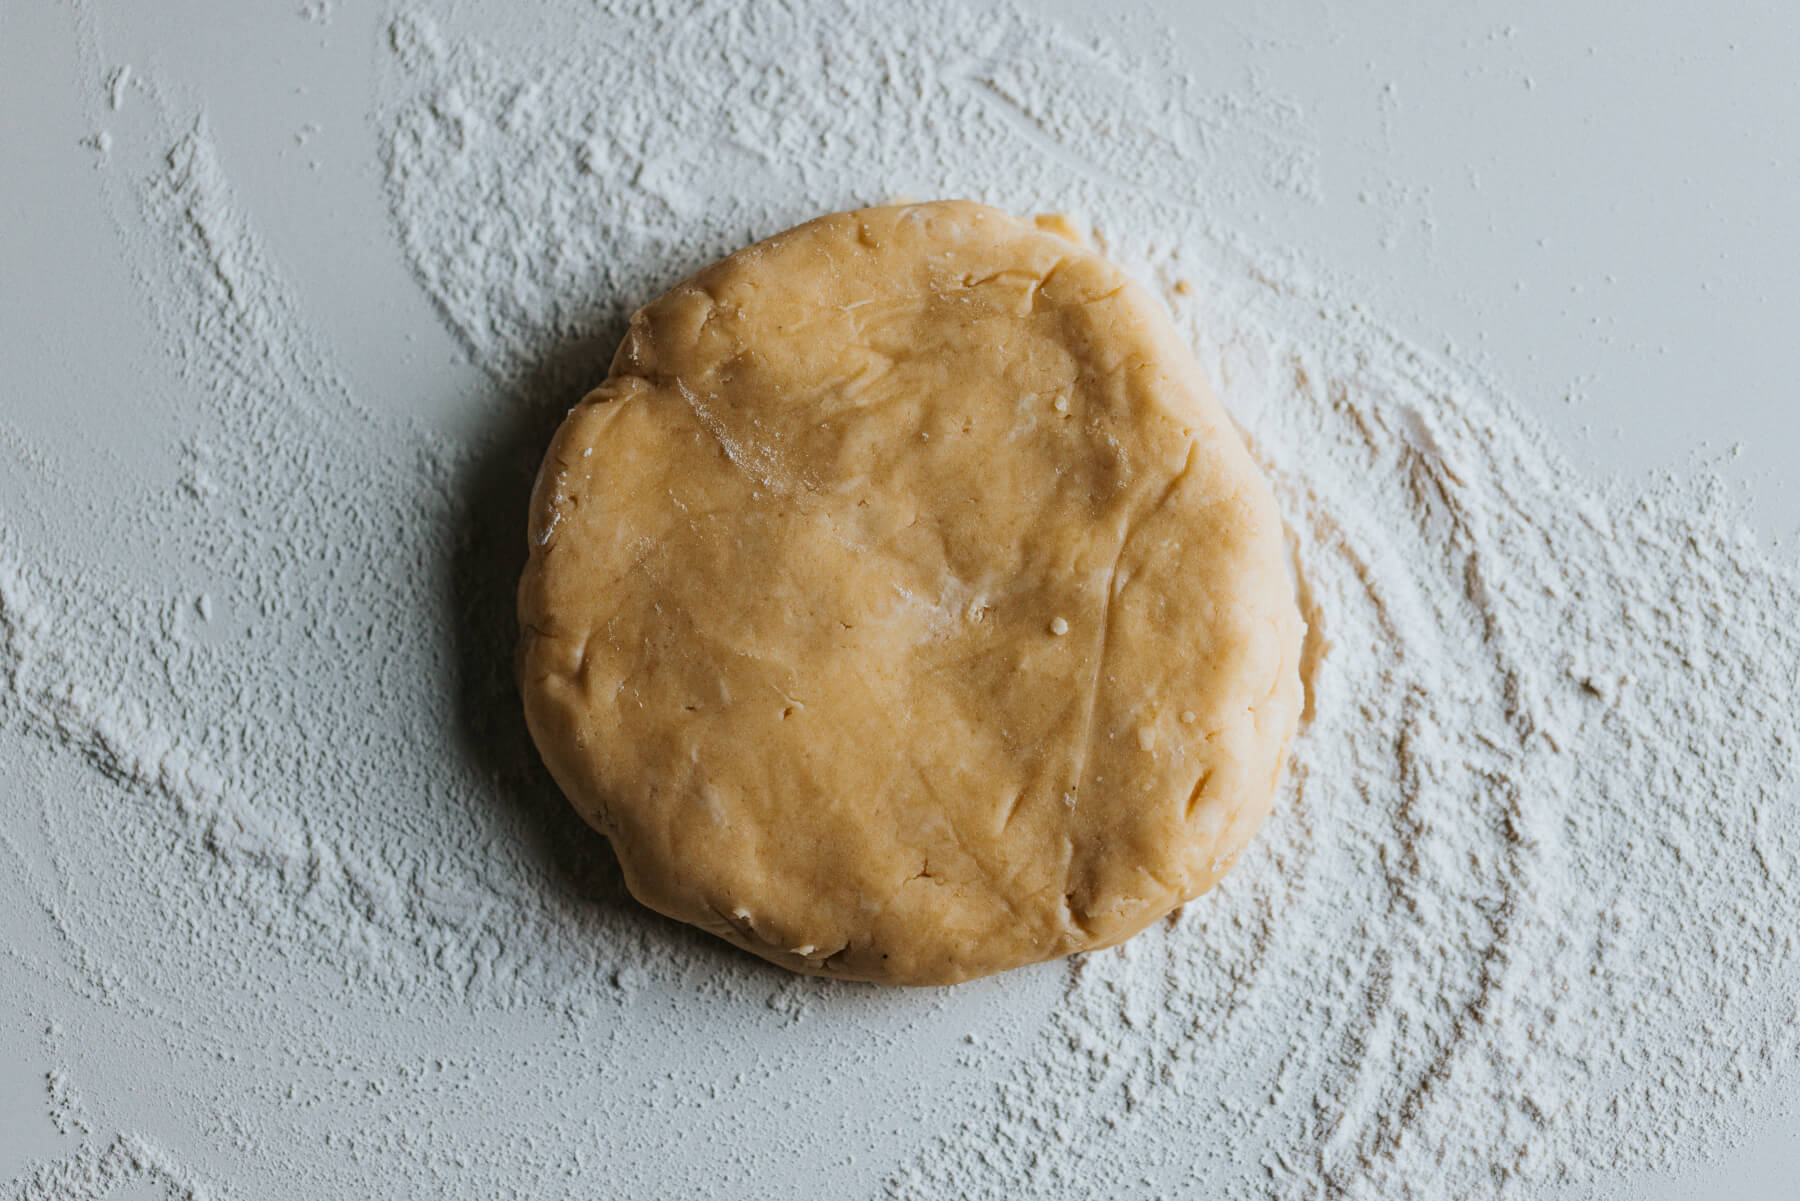
To make a totally delicious Vegan Pumpkin Pie, you don’t need to bake your own pie crust. Most pre-made pie crusts that you find in the frozen section are vegan and make for a delicious pie. If you want to bake your own here are some tips:
1. Chop your vegan butter into small pieces before you use it. Cold ingredients work best, and chopping butter into the short crust into small bits is an essential step of making the crust. Once you chop the vegan butter, return it to the fridge to re-chill until you are ready to use it.
2. Don’t overmix the short crust. For the perfect texture crust, you need to just mix the ingredients until blended. Overmixing can cause the crust to become too crumbly or tough.
3. You can pre-bake the pie crust. If you ever struggle with the bottom of your crust staying doughy or if you like a crispy crust, you can pre-bake the pie shell empty. To prevent it from rising, cover the pie crust with aluminum foil and set pie weights inside. Don’t have pie weights? I don’t either! I use a ceramic coffee mug set in the center. Then I bake my pie shell for around 10 minutes. Don’t bake it all the way, just bake it until the dough starts to look slightly dry.
Coconut Milk, Soy Milk, or Almond Milk
This Vegan Pumpkin Pie Recipe allows for a lot of substitutions. The first time I made this recipe, when I was a teenager Coconut Milk wasn’t a thing! The only non dairy available was soy milk. In this recipe, it’s totally fine to substitute the coconut milk for almond or soy. As far as the coconut cream, that gives the pie a bit of creamy richness. It doesn’t have a replacement, but it won’t alter the texture too much if you leave it out completely.
Additionally, I’ve always considered replacing the maple syrup with honey! Some people would say that honey is not vegan and that’s a tough call because bees are insects, not animals, and produce honey outside of their bodies in a way that does not harm them. If you want to experiment, you are welcome to try substituting the maple syrup for honey.
Just as long as you keep the basic ingredients in place, you can try getting creative with this recipe to adapt it to your own tastes!
How to Make Pumpkin Pie Spice from Scratch
Pumpkin pie spice is so convenient. But if you use a pre-blended mix the flavors have often settled together so they aren’t quite as punchy and pronounced. Instead, I like to make my own pumpkin pie spice blend which is so easy!
All you need is: 1/2 tablespoon Cinnamon, 1/3 teaspoon Ginger, 1/3 teaspoon Nutmeg, 1/4 teaspoon Allspice, and 1/4 teaspoon Clove. Just blend the spices together thoroughly and evenly before adding them to your pumpkin pie filling. The flavors are fresh, spicy and delicious.
How to Bake a Vegan Pumpkin Pie
To make your pie filling, just blend the ingredients completely, thoroughly and evenly. It’s important to make sure the texture will be even and the spices are perfectly blended.
But baking a pumpkin pie does have a few tricks.
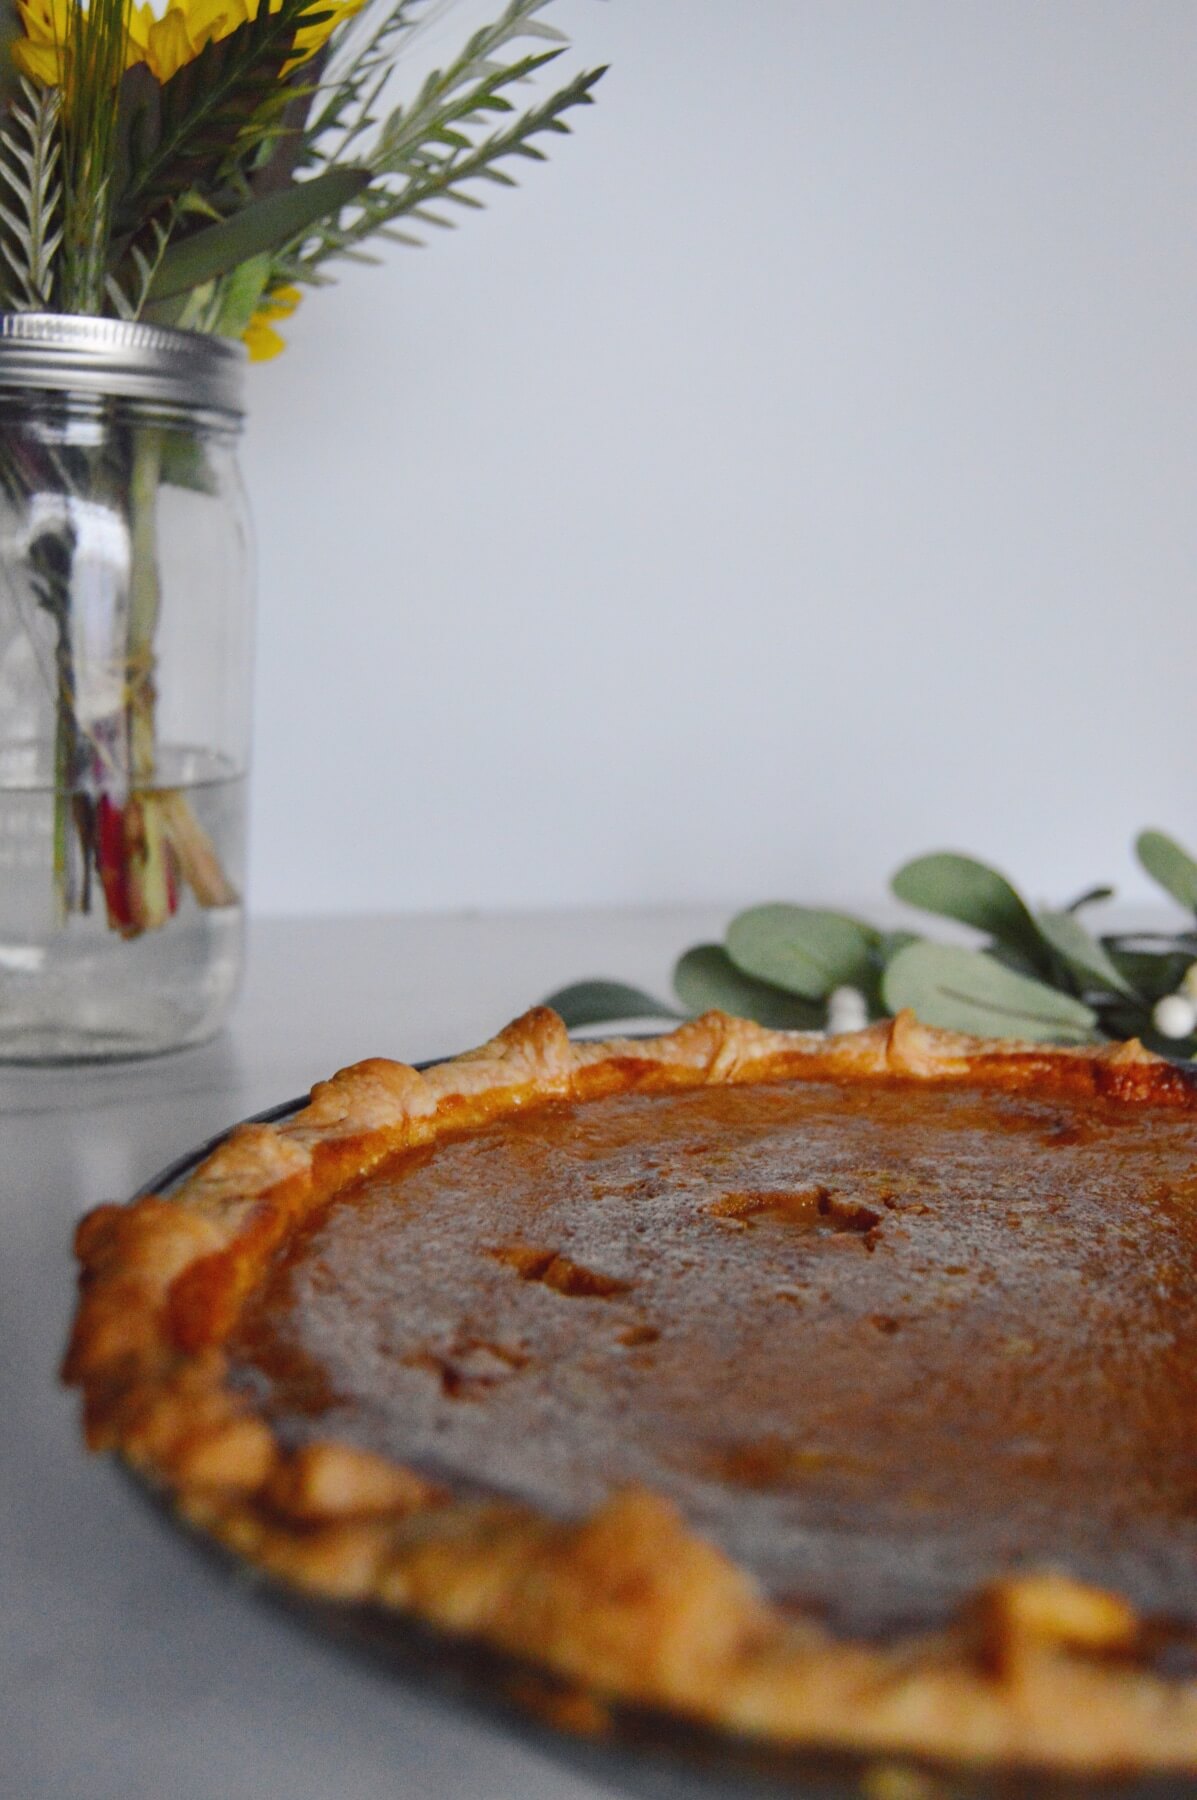
1. Your crust will likely brown before the pie filling is finished. It happens to me every time! But the solution is simple. Tear thin strips of aluminum foil. Remove the pie from the oven and gently cover the edges of the crust with the strips of aluminum foil leaving the center uncovered. Return the pie to the oven. The aluminum foil will slow down the baking of the crust and allow the filling to finish baking.
2. Knowing when your filling is finished is similar to a pecan pie. Any gooey creamy filling is hard to know when it’s done and ready chill. That’s because it doesn’t quite set when it’s in the oven and warm, that happens as the pie is cooling. To know when the Vegan Pumpkin Pie is ready, just give it a little jiggle. Not too hard. When you see the center of the pie jiggles evenly with the outer edges of the pie it’s ready. It’s not quite ready when there’s a lot more movement in the center than around the edges.
How to Serve a Vegan Pumpkin Pie
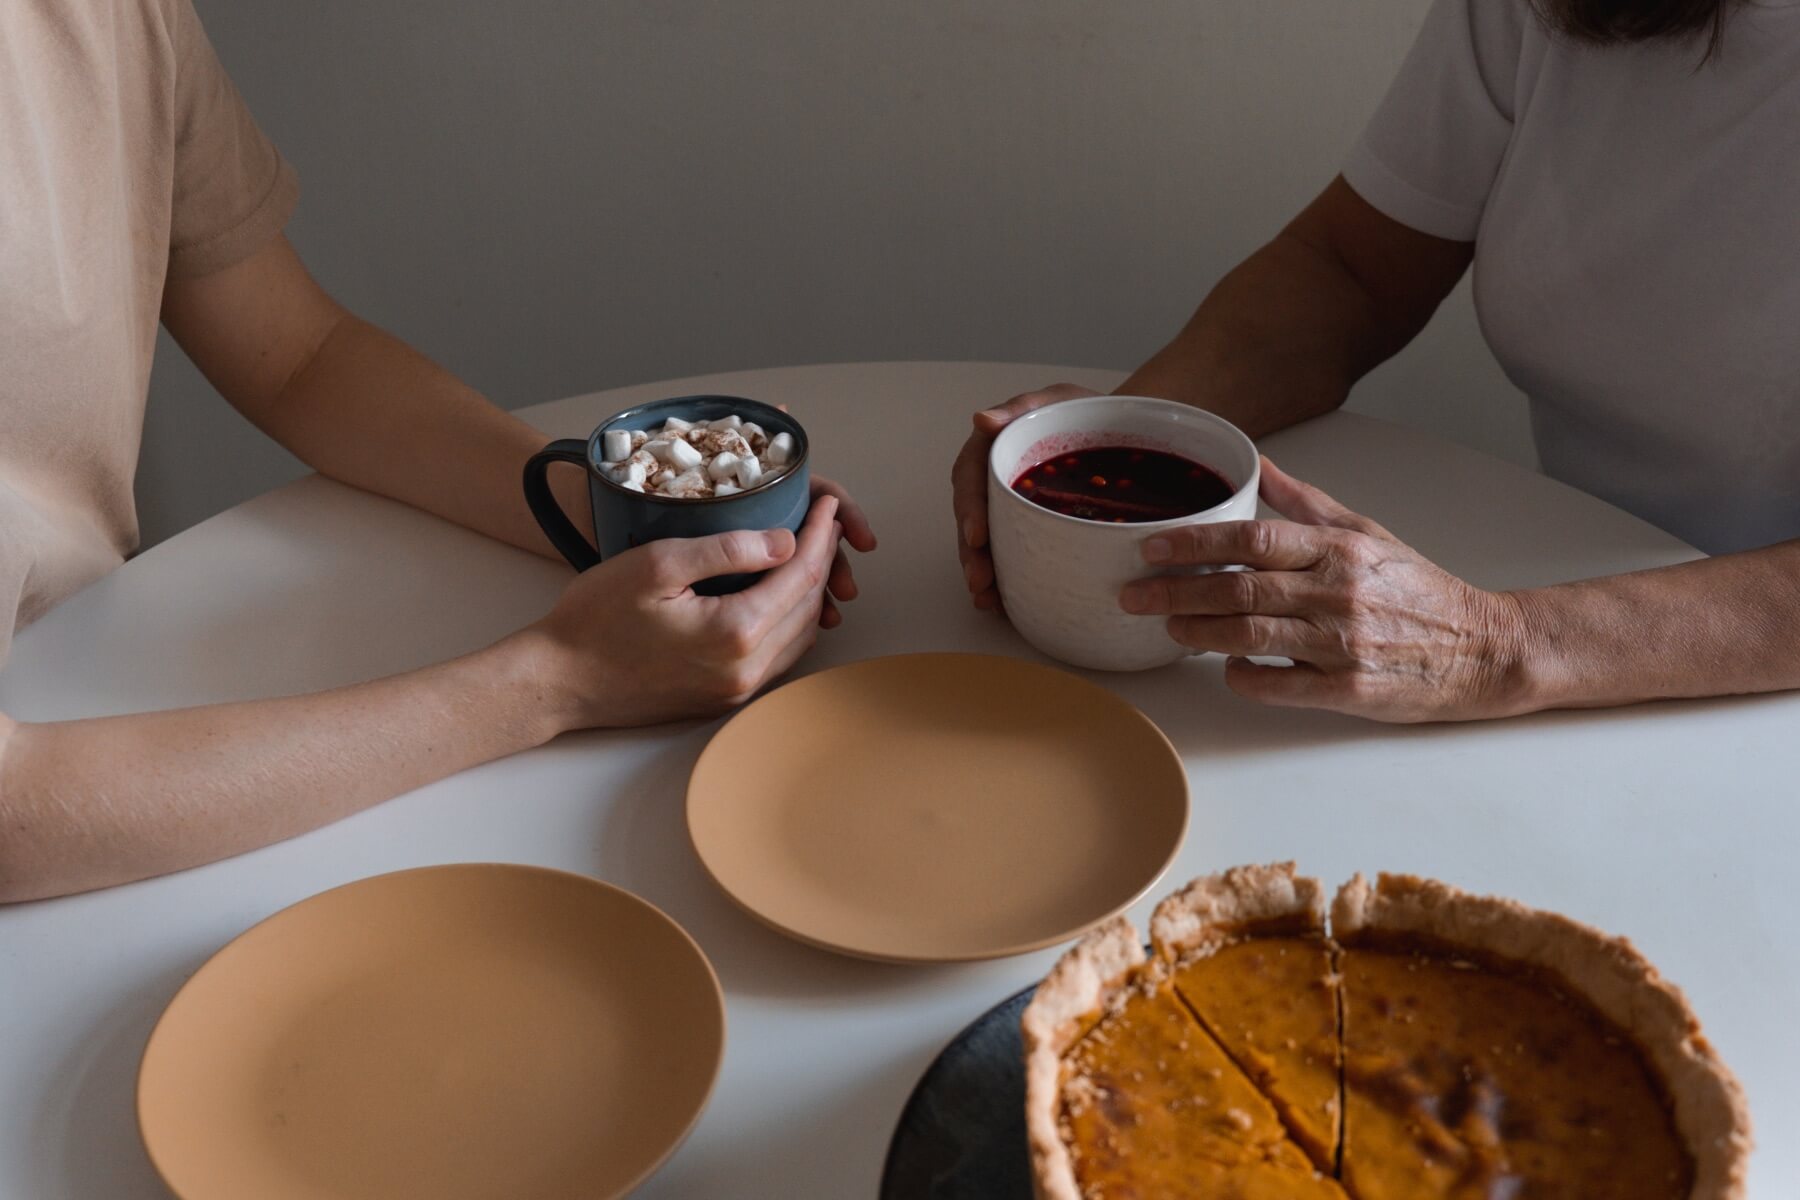
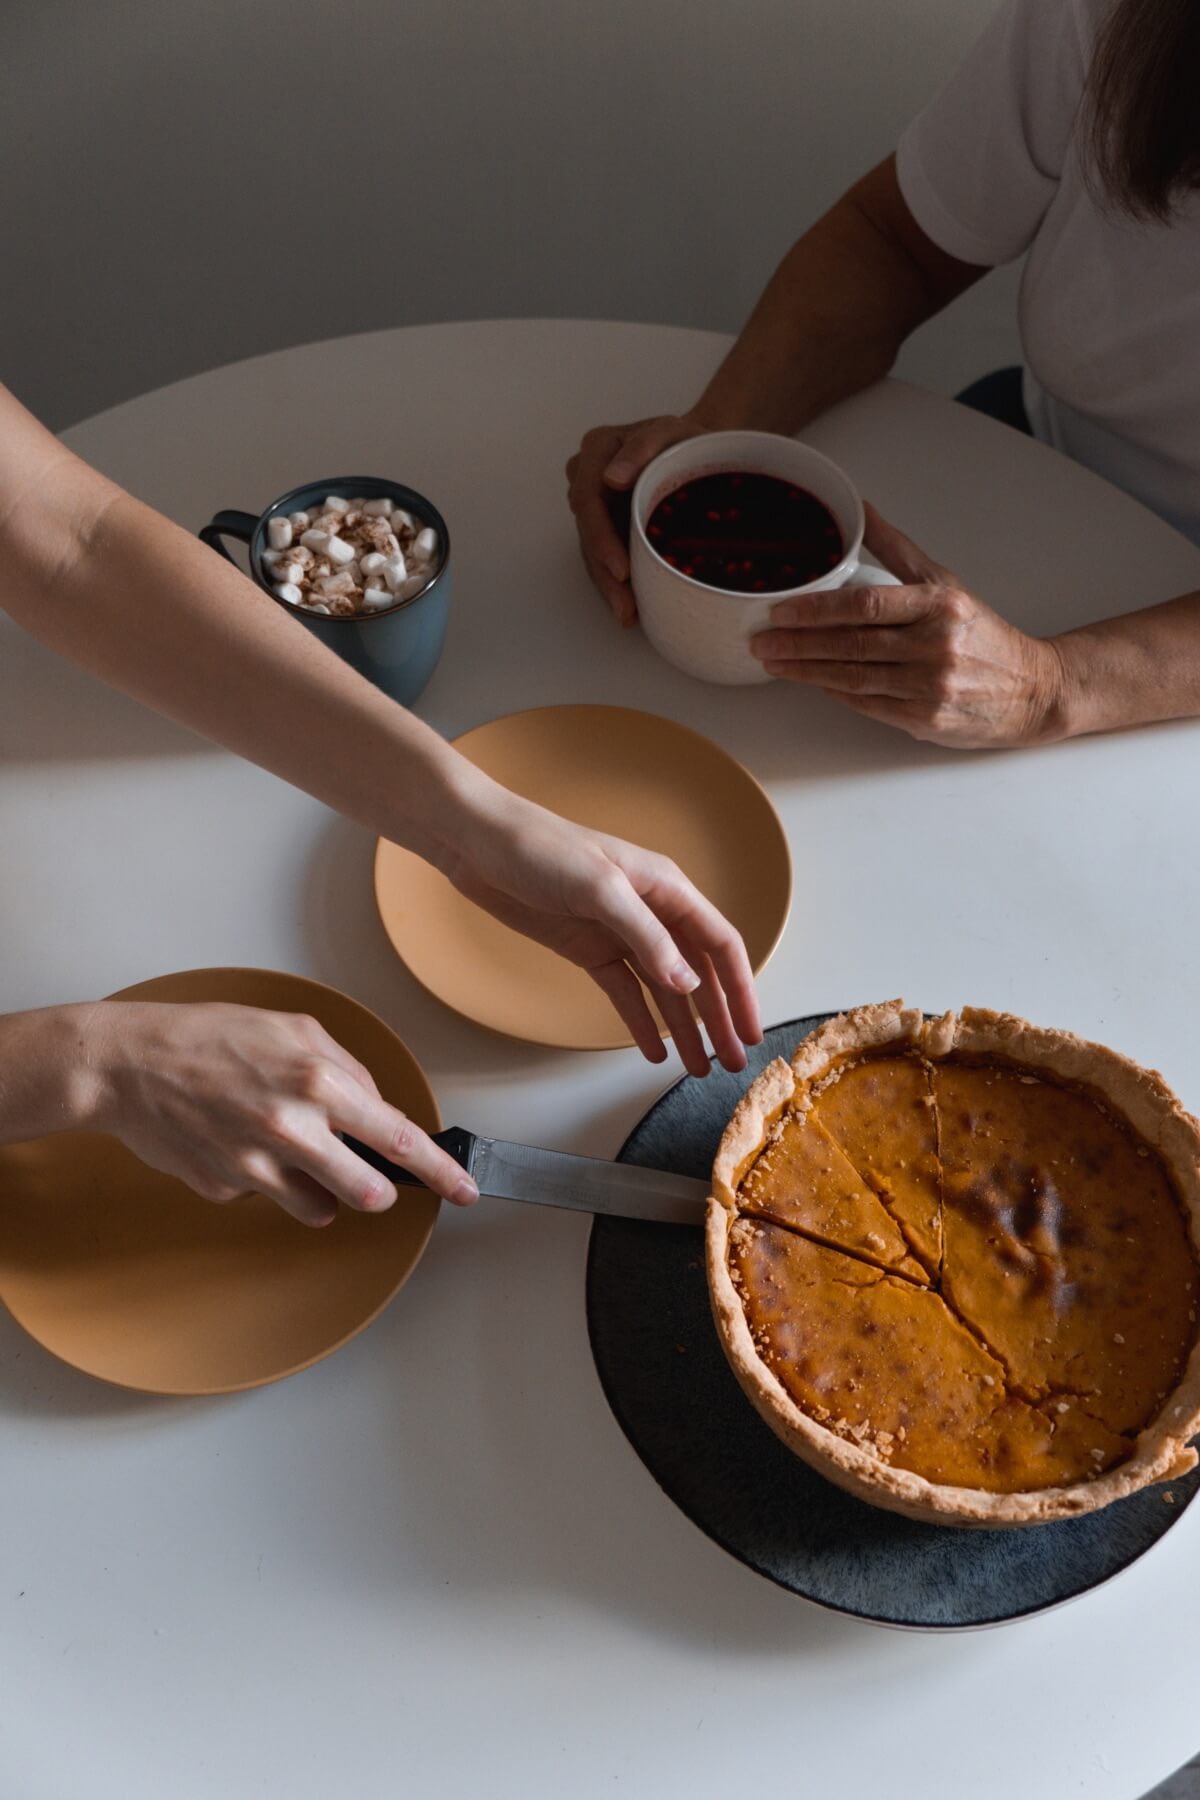
I can’t even fathom eating a pumpkin pie without whipped cream! It’s a must. The good news is there are so many different vegan whipped creams available. This one is my favorite.
You could also serve this pie with a vegan ice cream! Or a cup of coffee to give yourself all the pumpkin spice latte vibes.
This pie is a great alternative to a regular pumpkin pie and is perfect with a traditional holiday feast for the non-vegans with: turkey and cranberry, or glazed ham. And for vegans: butternut squash pasta, or any of these hearty soups.
Best Ever Vegan Pumpkin Pie Recipe
Brittany Bly
This Best Ever Vegan Pumpkin Pie is a delicious dessert that no one will know is vegan! The best part is that it’s easy to make and there is no tofu needed.
Prep Time 20 minutesmins
Cook Time 55 minutesmins
Total Time 24 minutesmins
Course Dessert
Cuisine Vegan
Pie Crust:
1Pre-made Vegan Pie Shell or
2cupsFlour
1/4cupSugar
1/2teaspoonSalt
1/2cupcold vegan butterchopped into small cubes
Pie Filling
1can Pumpkin15 oz *Not Pumpkin Pie Filling
2/3cupsCoconut Milk
1/3cupCoconut Cream
1/3cupMaple Syrup
3tablespoonsCorn Starch
1/2teaspoonKosher Salt
2teaspoonsVanilla Extract
1drop Vanilla Bean Pasteoptional
1/2tablespoonCinnamon
1/3teaspoonGinger
1/3teaspoonNutmeg
1/4teaspoonAllspice
1/4teaspoonClove
Non-dairy Whipped Cream or Ice Cream for topping
Preheat oven to 350°F.
Start by making the crust. In a medium sized bowl, whisk together the flour, sugar, and salt.
With a pastry cutter or your hands, thoroughly and evenly mix in the vegan butter until the dough starts to clump. Then transfer to a work surface or a cutting board to continue to knead until a dough forms.
Place the dough back in the bowl, cover, and chill in the fridge for 30 minutes to 1 hour.
Remove the dough from the fridge and place it on a floured work surface to roll out with a rolling pin.
Place the dough in a lightly greased pie dish and if you like a crispy crust, pre-bake your pie shell at 350°F for around 10 minutes or until the pie crust looks about half-baked – dry but still doughy.
To make your pie filling, in a mixing bowl, blend together all of the ingredients until smooth, completely and thoroughly mixed.
Pour the filling into pie crust and place it in the oven.
After half of the cooking time, around 20-25 minutes, check the edges of the crust to see if they are golden brown. If they are, wrap the edges in aluminum foil to prevent overcooking.
Also, check the pie filling just to see how far along it is. Give it a little jiggle – when the top holds together and jiggles together your pie is done (this will take up to 45 minutes). If the center of your pie has more movement than the edges, continue to bake the pie for longer.
Check the pie again at around 40 minutes, gently jiggle the pie again. Once the top of the pie filling is starting to look even, remove from the oven for it to continue to set.
Allow the pie to cool for around 4 hours before serving.
Garnish with non-dairy ice cream or non-dairy whipped cream for a special touch!
Keyword Autumn Desserts, Pop Shop America Recipes, Pumpkin Pie, Vegan Crust, Vegan Dessert, Vegan Pumpkin Pie Recipe, Vegan Recipes
The best thing about this Best Ever Vegan Pumpkin Pie Recipe is that no one will know that it is vegan! This is the perfect dish for a group gathering or a holiday dinner. Bon Apetit!


 “>
“>


")