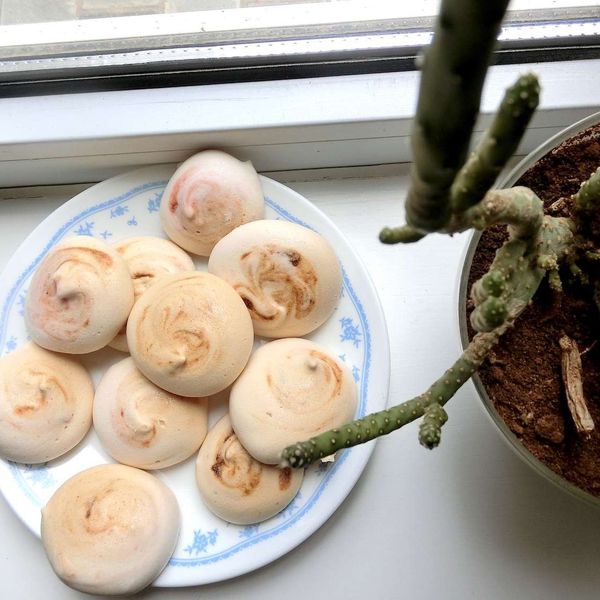
Meringues are defined as “an item of sweet food made by baking a mixture of stiffly beaten egg whites and sugar until crisp.” Except we won’t be using egg whites this time! Store in an airtight container.
Submitted by imheatherr
Updated on January 28, 2022
Cook Mode (Keep screen awake)
Ingredients
This recipe was developed at its original yield. Ingredient amounts are automatically adjusted, but cooking times and steps remain unchanged. Note that not all recipes scale perfectly.
Original recipe (1X) yields 50 servings
¾cupaquafaba
½cupwhite sugar
1teaspoonvanilla extract (Optional)
Directions
Preheat the oven to 250 degrees F (120 degrees C). Line 2 baking sheets with parchment paper.
Beat aquafaba in a large bowl with an electric mixer on high speed until stiff peaks form, 10 to 13 minutes. Whisk in sugar, 1 heaping tablespoon at a time, until well combined. Whisk in vanilla.
Pipe or drop tablespoonfuls of the mixture onto the prepared baking sheets.
Bake in the preheated oven until firm to the touch, about 70 minutes. Let sit on the baking sheets for 2 minutes then transfer to wire racks to finish cooling, about 25 minutes.
Cook’s Notes:
Aquafaba is the liquid from canned chickpeas. Drain a 15-ounce can of chickpeas to get enough aquafaba for this recipe.
For a pop of color, add a little berry puree with the vanilla if desired.
Nutrition Facts (per serving)
Nutrition Facts
Servings Per Recipe 50
Calories 9
% Daily Value *
Total Carbohydrate
2g
1%
Total Sugars
2g
Potassium
0mg
0%
* Percent Daily Values are based on a 2,000 calorie diet. Your daily values may be higher or lower depending on your calorie needs.
** Nutrient information is not available for all ingredients. Amount is based on available nutrient data.
(-) Information is not currently available for this nutrient. If you are following a medically restrictive diet, please consult your doctor or registered dietitian before preparing this recipe for personal consumption.
Photos of Heather’s Vegan Meringues
Photo by Allrecipes Member
Photo by
B Naomi Puttick
It was a complete disaster will never use this one again
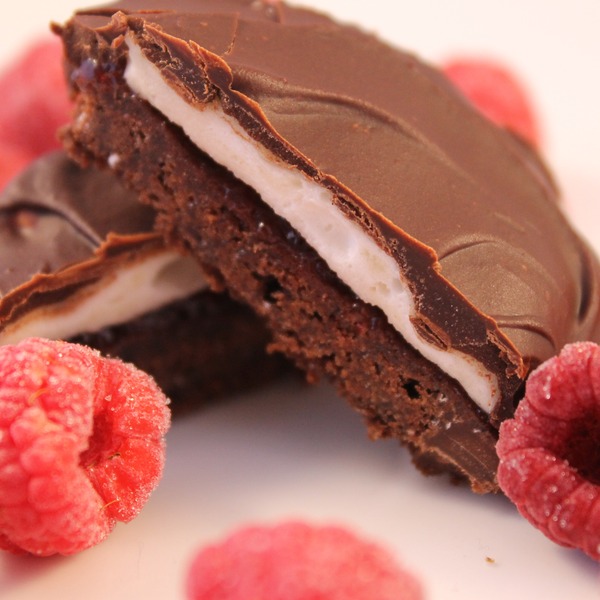
Or, what happens in vegan marshmallow cookies stays in….err, gets shared with everyone? 😉 Shouldn’t that really be Las Vegas’ slogan in this day and age anyway? I think we’re closer to living in a Big Brother-esque society than we’ve ever been, so keeping anything secret seems virtually impossible. Which is why I totally can’t keep these cookies a secret either! (Sometimes everybody knowing everything can be a good thing I guess? At least where sweet-sweet recipe-sharing is concerned).
After my foray into making vegan marshmallows last week, whose main purpose was actually so that I could incorporate them into these cookies, you’ll never guess what I found at my local (aka in Pickering, not even Toronto, so super, super convenient for me) organic grocery store? Ok, my lead-up there was a complete giveaway (raise your hand if you didn’t guess vegan marshmallows 😉 ). Now although I was extremely happy with the way my marshmallows came out, I’m not going to lie to you, more than likely, from this day forward, my laziness will completely override all else, and the purchase of commercially available vegan marshmallows will now become the new order of the day.
The idea for these cookies was born for me many moons ago when I first attempted to do hi-hat cupcakes. Though they went ok, it just ends up being so much cake/sugar/icing etc., and I started thinking about how I wanted to have something a smite more portable. So prior to my commencement of dabbling in the marshmallow making world (because as Dean Martin would say, it is a marshamallow world 😉 ), I started thinking about doing hi-hat cookies instead. It was later pointed out to me that these are really a lot more like Viva Puff cookies, so I suppose that’s what I should really call them 🙁 . Being the rebel I am though, the name I’m really going to give them is “Top of the Mornin’ to you Hi-Hat Cookies” because that sounds like way more fun to me 🙂 (and there’s nothin’ you can do about it ’cause I get to be the great and powerful Oz, aka mad scientist in the kitchen, aka I can do whatever I want….is it that obvious that I’m drunk on power and sugar at the moment? 😉 )
Because I was more thinking about the final execution of these cookies, for the actual cookie base, I thought I’d stick with a tried and true recipe for Korova cookies (aka peace offering cookies) that I’ve used many times before from one of my favourite vegan blogs. I pretty much follow it to the letter except that I’m lazy and omit the 5oz of chopped chocolate and just use 3/4 cups of chocolate chips instead (’cause I like to mix it up like…or mix it in like that 😉 ). Basically what I’m saying though is that you could really use any cookie recipe you like for this, since it’s really more about the jam, marshmallow and chocolate dipped topping anyway.
So ♫Dip-a-dee do da, Dip-a-dee eh, my oh my, what a cookie filled day ♫ (sad Amber, that was just so sad)
Top of the Mornin’ to you Hi-Hat Cookies (aka Vegan Viva Puffs)
Yield: approx. 30 cookies
Ingredients
1 recipe Korova Cookies (Note: this recipe has 1 small error in it, the ingredients say to use baking soda, and the directions say to use baking powder. Use baking soda)
2 tablespoons vegan butter
1 package (10oz) vegan marshmallows (or make your own here)
3/4 cups raspberry jam
1 cup chocolate chips
1 1/2 tablespoons vegan butter
1 tablespoon honey (or sweetener of choice)
Directions
1. Spread the top of each cookie with a layer of raspberry jam (feel free to make this layer as thin or as thick as you’d like). Place cookies in the freezer while making marshmallow fluff.
2. In a small saucepan on medium heat, combine the marshmallows and 2 tablespoons of vegan butter stirring frequently until marshmallows are melted and you have a marshmallow fluff consistency. Remove from heat.
3. Remove cookies from the freezer. Place a dollop of the marshmallow fluff on top of each cookie and spread it out as best you can using the back of a spoon. Place cookies back in the freezer.
4. In a small saucepan on medium heat, combine the chocolate chips, 1.5 tablespoons of butter and 1 tablespoon of honey. Heat and stir until smoothly melted. Remove from heat. Allow to cool for about 10 minutes.
5. Remove cookies from the freezer (marshmallow topping should be hard/chilled at this point). Carefully dip the whole top of each cookie in the chocolate mixture, then return the cookies to the freezer (or refrigerator) until the chocolate has solidified.
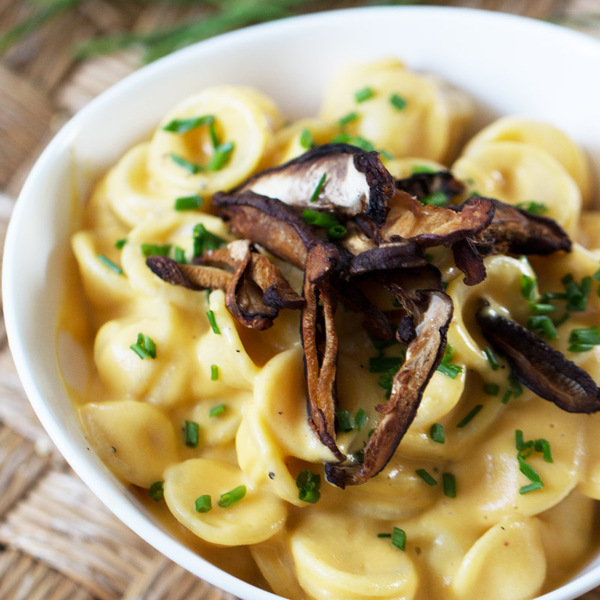
It’s raining today In Los Angeles which is a rare occurrence but a much-needed one. When it’s raining and cold, I’m always in the mood for something warm and comforting.
I have made many versions of vegan Mac over the years, but this one is the quickest and easiest to make in my opinion.
So let’s get to it.
This recipe is,
Savory
Creamy
satisfying
vegan mac n cheeze with shiitake bacon
Patty Malcolm | Chickfoodtv
Prep Time 15mins
Cook Time 30mins
Total Time 55mins
Ingredients
1tablespoonvegan butterI use miyokos
2cupsunsweetened almond milk
1cupnutritional yeast
2cupsraw cashewssoaked overnight
juice of one small lemon
1tablespoongarlic powder
1tablespoononion powder
1teaspoonsalt or to taste
1/2turmeric powder
smoked paprika for garnish (optional
chivesfinely minced for garnish (optional)
Shiitake bacon for garnishoptional
Shiitake bacon
1poundshiitake mushroomsstemmed and sliced ¼ in thick
¼cupgrapeseed oilor other cold pressed vegetable oil
1¼tspfine sea salt
freshly ground black pepper
Instructions
SOAK. Soak raw cashews covered in water overnight on countertop covered with a. dish towel.
BLEND. Add cashews, almond milk, lemon juice and seasonings to a blender and blend until smooth.
ADJUST. Taste and adjust seasonings if desired.
HEAT. Transfer Cheese sauce to a medium saucepan and heat on medium low heat. until warmed.
POUR. The cheese sauce over your choice of pasta and stir to incorporate.
GARNISH. Garnish with smoked paprika, shiitake bacon, chives and serve immediately.
ENJOY!
Shiitake mushrooms
PREHEAT. Preheat oven to 375 degrees.
MEANWHILE. In a large bowl, toss sliced mushrooms with sunflower oil, sea salt, and freshly ground pepper. Allow to marinate 30 minutes before cooking.
LINE. Line a baking sheet with parchment paper. Layout shiitake mushrooms in a single layer on baking sheet and bake for about 30 minutes, until steam disappears and the shiitakes are evenly browned.They will shrink considerably.
COOL. Remove the mushrooms and allow to cool, mushrooms will crisp as they cool.
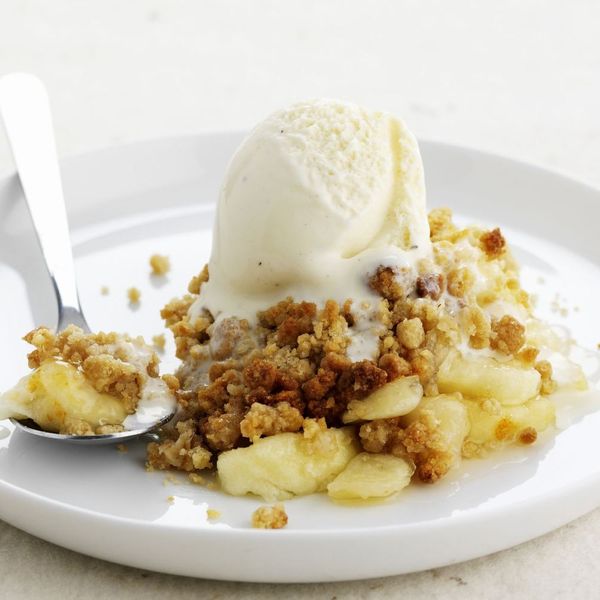
Try vegan ice cream with this recipe. Gareth Morgans/Getty Images
This vegan apple crisp is a favorite for casual family dinners as well as the holidays because it is not only dairy-free and egg-free, but it’s also super easy to prepare. No matter the dietary restrictions, everyone can enjoy this comforting dessert of cinnamon-spiced apples crowned with a crispy oat and nut topping. And it’s delicious served hot, room temperature, or cold, so you can make this apple crisp ahead of time. Although perfect as is, feel free to top with a scoop of dairy-free ice cream or vegan whipped cream.
Cook Mode (Keep screen awake)
For the Filling:
10 cups peeled and chopped apples (about 5 large apples)
3/4 cup white granulated sugar
1 tablespoon cornstarch
1 tablespoon ground cinnamon
1/4 teaspoon nutmeg
3 tablespoons water
1 tablespoon lemon juice
For the Topping:
2 cups quick oats (also known as 1-minute oats)
1 3/4 cups all-purpose flour
1 1/2 cups packed brown sugar
1/2 cup white granulated sugar
1/2 cup finely chopped pecans
1/2 teaspoon baking powder
1/2 teaspoon baking soda
3/4 cup dairy-free soy margarine (melted)
Garnish: vegan ice cream or whipped cream
Gather the ingredients.
Preheat the oven to 350 F. Lightly grease a 9- by 13-inch baking dish. Set aside.
Make the Filling
In a large mixing bowl, toss the apple pieces with the sugar, cornstarch, cinnamon, nutmeg, water, and lemon juice until evenly coated.
Pour into the prepared baking dish.
Make the Topping
In a medium mixing bowl, mix together the oats, flour, sugars, chopped pecans, baking powder, and baking soda until well-combined. Add the melted soy margarine, mixing until the mixture is consistent.
Using your hands, crumble the topping over the apple mixture.
Bake the Apple Crisp
Bake for 45 minutes to 1 hour, or until golden brown. Serve warm or cold, with dairy-free vanilla ice cream or vegan whipped cream, if desired.
Enjoy.
Tip
For a quicker preparation, you can leave the skins on the apples, but this recipe truly benefits from peeling them first.
5 Ways to Cook and Serve
In muffin tins: Cooking this vegan apple crisp in muffin tins will cut down the cooking time and create perfectly portioned desserts. Bake for about 20 minutes.
In ramekins: This recipe should make enough to fill 6 to 8 standard-sized ramekins. Bake for about 30 minutes.
In coffee mugs: Once baked, serve the apple crisp in coffee or latte mugs for a cozy, individual presentation.
In martini glasses: Fill glasses with the apple crisp and top with a dollop of vegan whipped cream.
In parfaits: Take your apple crisp to another level by serving it in layers with vanilla ice cream in a parfait-style dessert. This method can also help you stretch the apple crisp mixture and incorporate other add-ins.
Nutrition Facts (per serving)
298
Calories
9g
Fat
56g
Carbs
1g
Protein
×
Nutrition Facts
Servings: 15
Amount per serving
Calories
298
% Daily Value*
9g
11%
Saturated Fat 1g
7%
0mg
0%
231mg
10%
56g
21%
Dietary Fiber 3g
12%
1g
Calcium 54mg
4%
*The % Daily Value (DV) tells you how much a nutrient in a food serving contributes to a daily diet. 2,000 calories a day is used for general nutrition advice.
(Nutrition information is calculated using an ingredient database and should be considered an estimate.)
Rate This Recipe
I don’t like this at all. It’s not the worst. Sure, this will do. I’m a fan—would recommend. Amazing! I love it! Thanks for your rating!
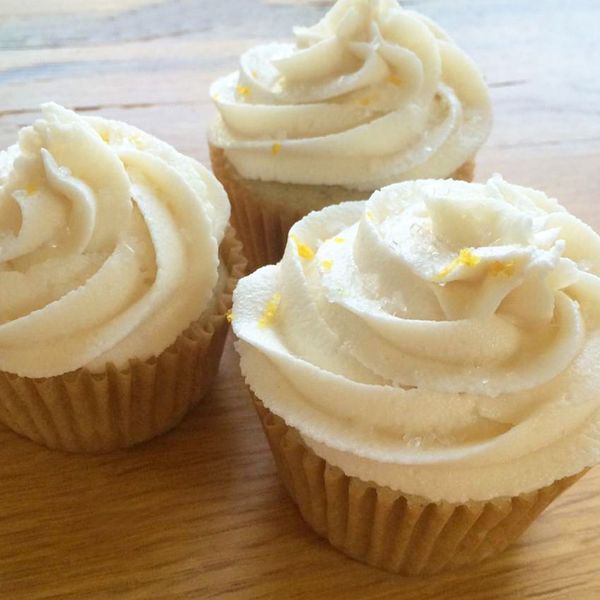
These vegan cupcakes taste amazing and are quick to make! You can play around and substitute different kinds of milk, oils, and extracts; I’ve used my favorites in the recipe, but just about any will work. Unfortunately, this recipe doesn’t rise well as a cake, but cupcakes are more fun anyway! These are great with a simple frosting of cocoa powder, powdered sugar, and orange juice.
Submitted by cornfairy
Updated on June 10, 2022
Cook Mode (Keep screen awake)
Ingredients
This recipe was developed at its original yield. Ingredient amounts are automatically adjusted, but cooking times and steps remain unchanged. Note that not all recipes scale perfectly.
Original recipe (1X) yields 18 servings
1tablespoonapple cider vinegar
1 ½cupsalmond milk
2cupsall-purpose flour
1cupwhite sugar
2teaspoonsbaking powder
½teaspoonbaking soda
½teaspoonsalt
½cupcoconut oil, warmed until liquid
1 ¼teaspoonsvanilla extract
Directions
Gather the ingredients. Preheat the oven to 350 degrees F (175 degrees C). Grease two 12-cup muffin pans or line with 18 paper baking cups.
Pour apple cider vinegar into a 2-cup measuring cup. Fill with almond milk to make 1 1/2 cups. Let stand until curdled, about 5 minutes.
Whisk together flour, sugar, baking powder, baking soda, and salt in a large bowl. Whisk together almond milk mixture, coconut oil, and vanilla in a separate bowl. Pour wet ingredients into dry ingredients and stir just until blended. Spoon batter evenly into the prepared cups.
Bake in the preheated oven until tops spring back when lightly pressed, 15 to 20 minutes. Cool in the pan set over a wire rack.
Arrange cooled cupcakes on a serving platter. Frost with desired frosting.
jcalliagas
Nutrition Facts (per serving)
152
Calories
6g
Fat
23g
Carbs
2g
Protein
Nutrition Facts
Servings Per Recipe 18
Calories 152
% Daily Value *
Total Fat
6g
8%
Saturated Fat
5g
27%
Sodium
167mg
7%
Total Carbohydrate
23g
8%
Dietary Fiber
1g
2%
Total Sugars
12g
Protein
2g
3%
Calcium
50mg
4%
Iron
1mg
4%
Potassium
32mg
1%
* Percent Daily Values are based on a 2,000 calorie diet. Your daily values may be higher or lower depending on your calorie needs.
** Nutrient information is not available for all ingredients. Amount is based on available nutrient data.
(-) Information is not currently available for this nutrient. If you are following a medically restrictive diet, please consult your doctor or registered dietitian before preparing this recipe for personal consumption.
Photos of Vegan Cupcakes
Photo by JoyfulBacon5388
Very bad, too much of oil, my cupcakes became a pancakes. Sad as wasted so much of ingredients
Photo by
kittenboops
I made these for my vegan friend, modifying the dry ingredients a bit to make chocolate cupcakes (a little less flour, add cocoa powder). I got a decent rise on my cupcakes and the texture was excellent — moist and not too dense. I thought they were good for being vegan, but I think the coconut oil is too overpowering. It tastes like a coconut cupcake. Next time I would try a neutral oil like canola or vegetable.
Photo by
J M
I have tried many different vegan cupcake/cake recipes over the year. This is a new favorite. I followed the directions exactly, with the exception of using coconut milk instead of almond milk. I added some chocolate chips to the batter and used vegan neopolitan frosting. They were a hit. Will make again.
Photo by
Toytle
We made rainbow cupcakes with this recipe for my daughter’s birthday and they turned out great! I was a little worried they wouldn’t rise as much since I had to manipulate the batter so much mixing the different colors, but they rose up perfectly! I used canola oil instead of coconut oil, and coconut milk instead of almond milk. They were delicious! Non-vegans would never know the difference!
Photo by
Tori Wilhelm
So much fun! We chose this recipe because we didn’t have eggs. But, somehow we had apple cider vinegar. We substituted the coconut oil with vegetable oil. We love it!! we were able to shspe them into hearts and add a nice buttercream frosting. super yummy.
This recipe was developed at its original yield. Ingredient amounts are automatically adjusted, but cooking times and steps remain unchanged. Note that not all recipes scale perfectly.
Original recipe (1X) yields 8 servings
1tablespoonolive oil
3clovesgarlic, minced
1onion, chopped
3tablespoonsolive oil
2stalkscelery, chopped (Optional)
2carrots, finely chopped
1green bell pepper, chopped
3beets, including greens, diced
1(16 ounce) canwhole peeled tomatoes
½cupcanned peeled and diced tomatoes
2potatoes, quartered
1cupshredded Swiss chard
2cupsvegetable broth
4cupswater
2tablespoonsdried dill weed
salt and freshly ground black pepper to taste
1(16 ounce) packagesilken tofu
Directions
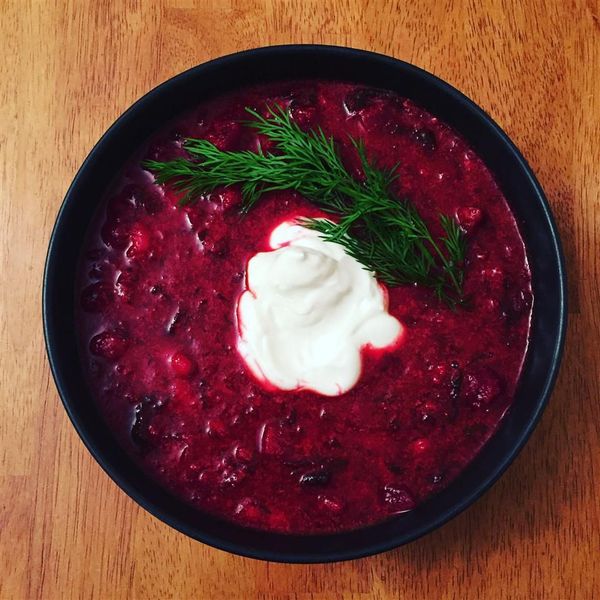
Heat 1 tablespoon of olive oil in a skillet over medium heat. Stir in the garlic and onion; cook and stir until the onion has softened and turned translucent, about 5 minutes. Set aside. Heat the remaining 3 tablespoons of olive oil in a large pot over medium-high heat. Stir in the celery, carrots, bell pepper, beets including the greens, whole tomatoes, diced tomatoes, potatoes, Swiss chard, and the onion mixture. Cook and stir until the chard begins to wilt, 4 to 8 minutes. Stir in the vegetable broth, water, dill weed, and salt and pepper. Bring to a boil, and reduce heat to low. Simmer for 1 hour.
Strain half the beets from the broth and place in a blender, filling the pitcher no more than halfway full. Hold down the lid of the blender with a folded kitchen towel, and carefully start the blender, using a few quick pulses to get the beets moving before leaving it on to puree. Add the tofu, and continue pureeing until smooth. Stir the tofu mixture back into the pot. Simmer until the mixture is reduced by a third, about another hour. Serve chilled or warm.
Nutrition Facts (per serving)
198
Calories
10g
Fat
22g
Carbs
8g
Protein
Nutrition Facts
Servings Per Recipe 8
Calories 198
% Daily Value *
Total Fat
10g
13%
Saturated Fat
1g
7%
Sodium
285mg
12%
Total Carbohydrate
22g
8%
Dietary Fiber
4g
16%
Total Sugars
7g
Protein
8g
16%
Vitamin C
35mg
39%
Calcium
273mg
21%
Iron
5mg
29%
Potassium
686mg
15%
* Percent Daily Values are based on a 2,000 calorie diet. Your daily values may be higher or lower depending on your calorie needs.
** Nutrient information is not available for all ingredients. Amount is based on available nutrient data.
(-) Information is not currently available for this nutrient. If you are following a medically restrictive diet, please consult your doctor or registered dietitian before preparing this recipe for personal consumption.
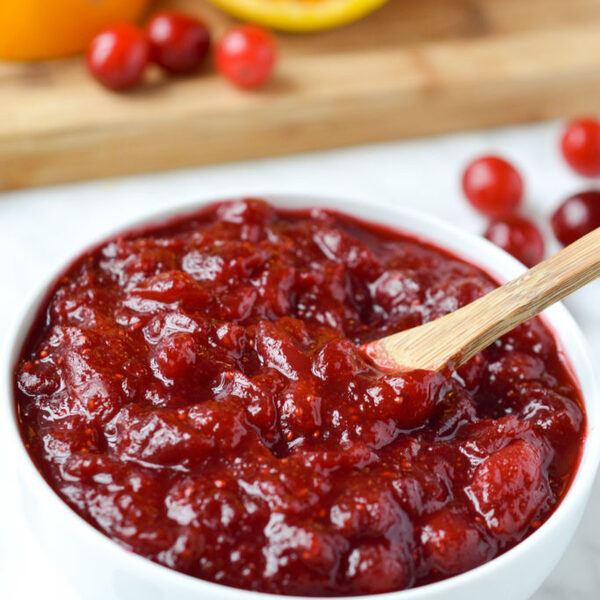
This 3-Ingredient Paleo Cranberry Sauce couldn’t be any easier to make. All you need to 15 minutes, cranberries, an orange and honey (or maple syrup) and a pot! This is a great alternative to store bought cranberry sauce which is usually packed with sugar! It’s Paleo, Vegan and SCD Legal.
Let’s be honest, no one lists cranberry sauce as their favourite part of a turkey dinner. In my family, it was always a last minute thought, scooped out of a can as the turkey was being carved.
There are so many things that I am loving about this paleo cranberry sauce. Firstly, it is incredibly easy to make, put the ingredients in a saucepan and stir, voila!
You don’t need to cook the berries for hours at a time, 10 minutes max and you have a rich and flavourful sauce. I also love how simple this Paleo Cranberry Sauce is, it contains just 3 ingredients, cranberries, honey (or maple syrup) and an orange, that’s all you need.
You can customize this recipe to your tastes by adding more or less honey depending on how tart you like it. You can also mush the cranberries with the back of your spoon when stirring if you like the sauce smoother, or leave them whole if you like a chunkier sauce. I find that the flavour of this sauce only improves over a few days, so I would recommend making it 2 to 3 days ahead of time.
Here are a few other Thanksgiving dishes that you might enjoy:
Caramelized Leek, Fennel & Onion Gratin
Roasted Fennel with Garlic & Herbs
Lemon Roasted Green Beans with Almonds & Shallots
Roasted Radishes
THE BEST Cauliflower Mash
Cauliflower Stuffing
Sheet Pan Roasted Brussels Sprouts, Butternut Squash, Bacon & Red Onion
If you make this recipe let me know in the comment section below, I would love to hear what you think or take a photo and tag me (@everylastbite_) on Instagram, I love seeing your photos!
3-Ingredient Cranberry Sauce
Every Last Bite
This 3-Ingredient Paleo Cranberry Sauce takes just 15 minutes to make! It’s low in sugar and perfect to serve with turkey (Vegan, GF, DF, SCD)
In a sauce pan on medium heat combine the cranberries, orange zest, orange juice and honey. Let simmer for approximately 15 minutes until the cranberries have all popped and the mixture has begun to thicken (it will thicken more as it cools)
Allow to completely cool before serving. You can store it in the fridge for approximately 1 week.
This post may contain affiliate links which won’t change your price but will share some commission.
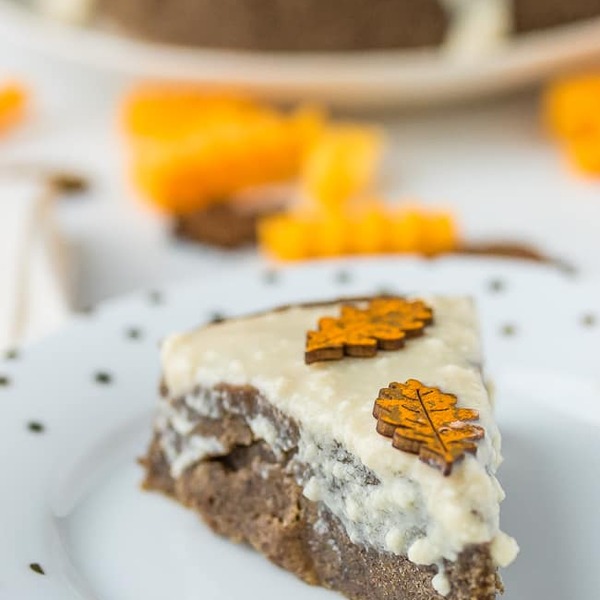
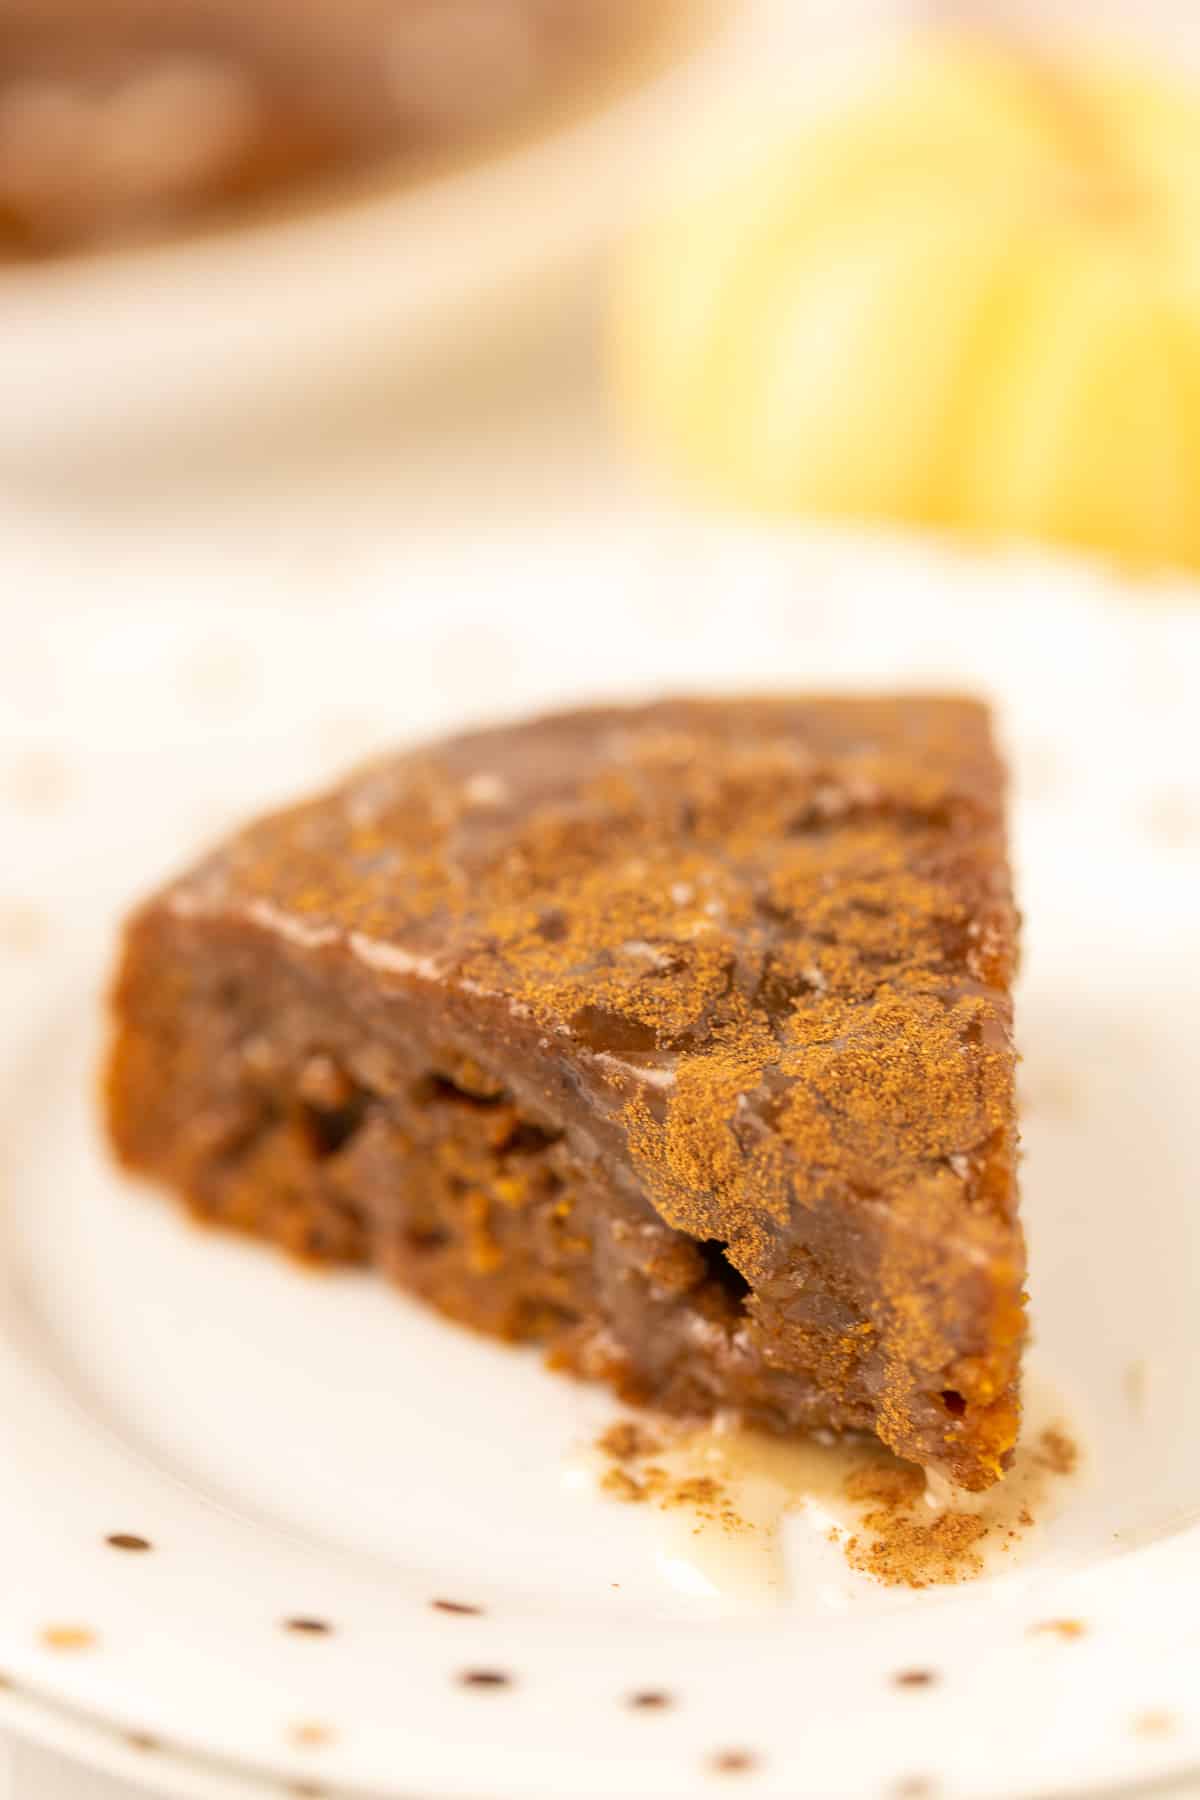
If you love fall flavors like pumpkin and cinnamon, then you’ve got to try this Instant Pot Pumpkin Spice Cake. This easy recipe gets cooked in the pressure cooker, and is a satisfying dessert. This pressure cooker cake recipe is gluten-free and dairy-free.
I was so amazed when I learned that you can bake in an Instant Pot. To be very specific, the cake actually gets steamed and not baked, but the result is the same.
This ability to bake (or steam) a cake in the Instant Pot is a wonderful feature for people who don’t have an oven or who can’t use the oven because it’s being used for something else.
It took a few rounds of testing to get this pressure cooker cake just right, but this Instant Pot Pumpkin Spice Cake is a winner! I do recommend getting a special cake pan with a removable bottom just for this recipe, but I assure you that it’s worth the investment of a few dollars.
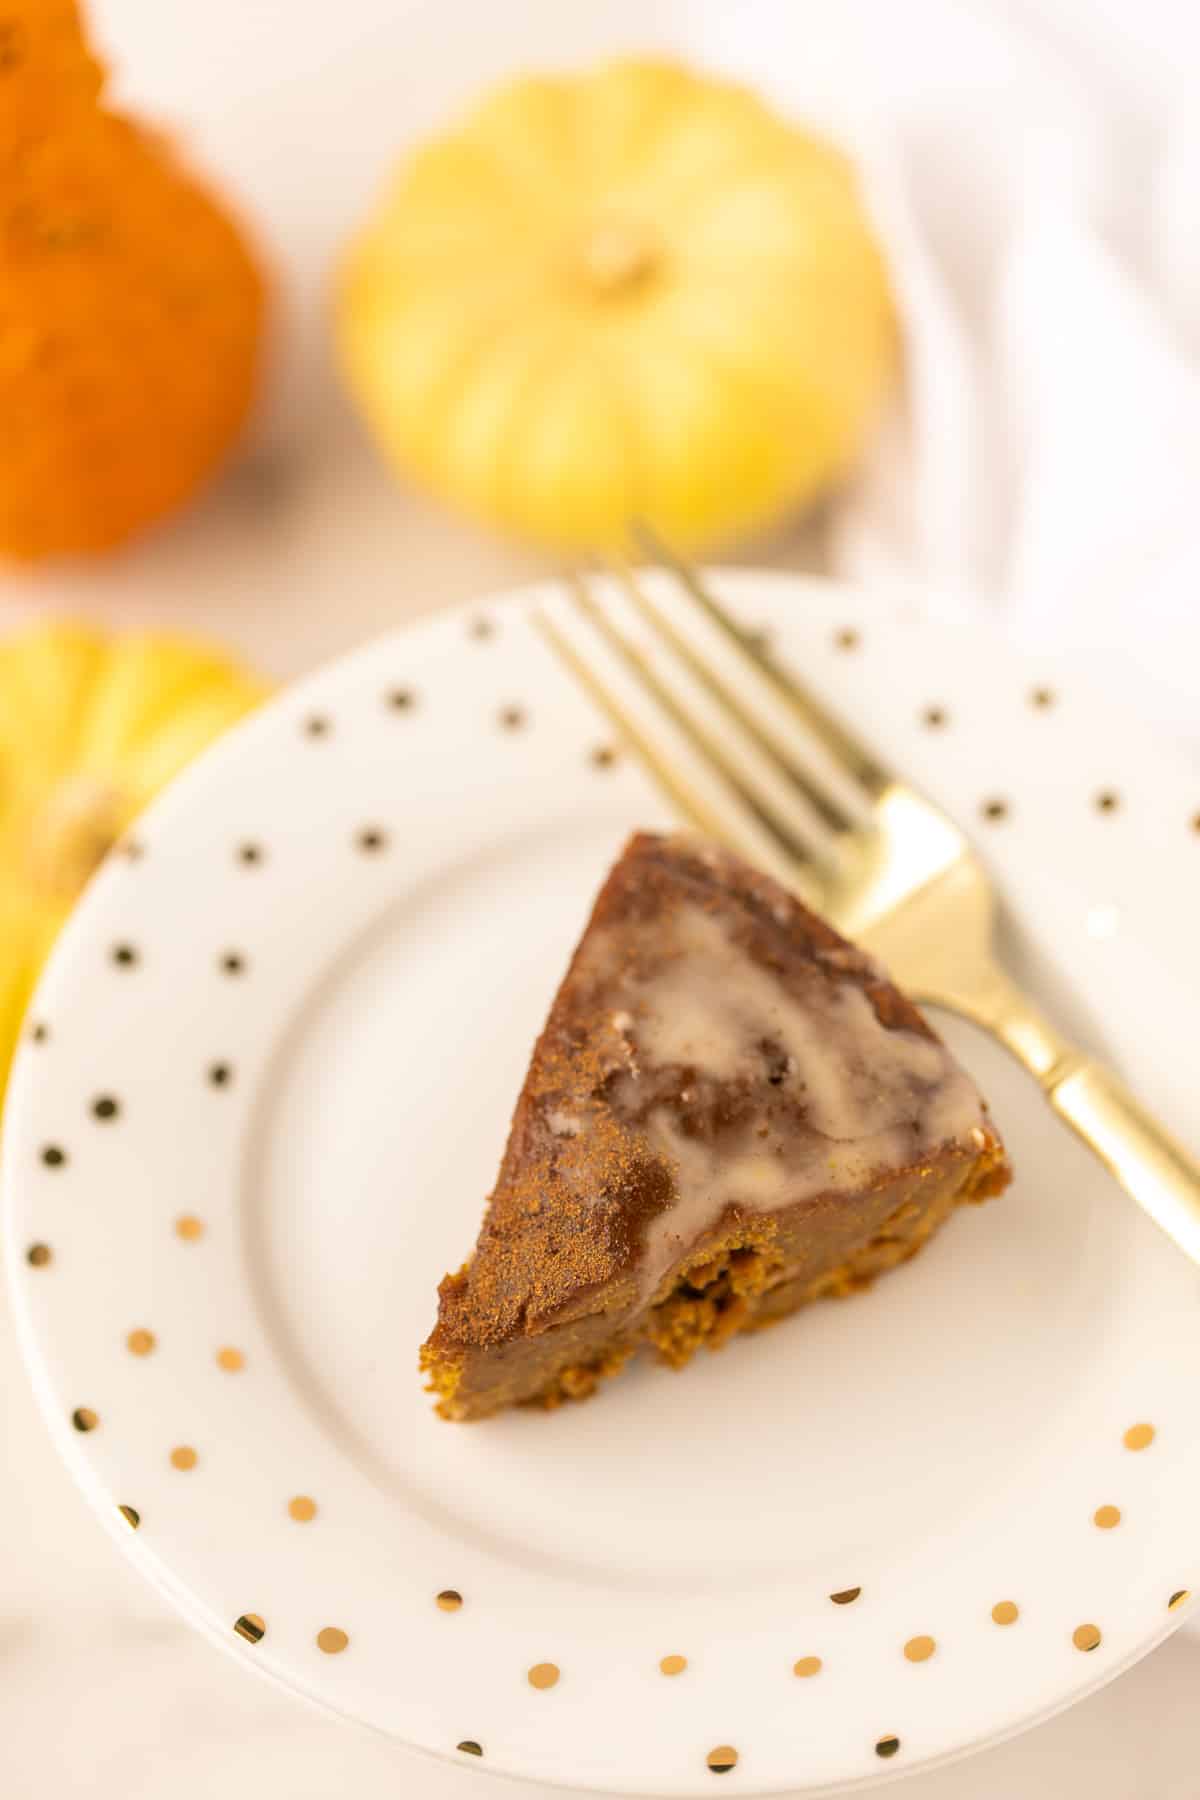
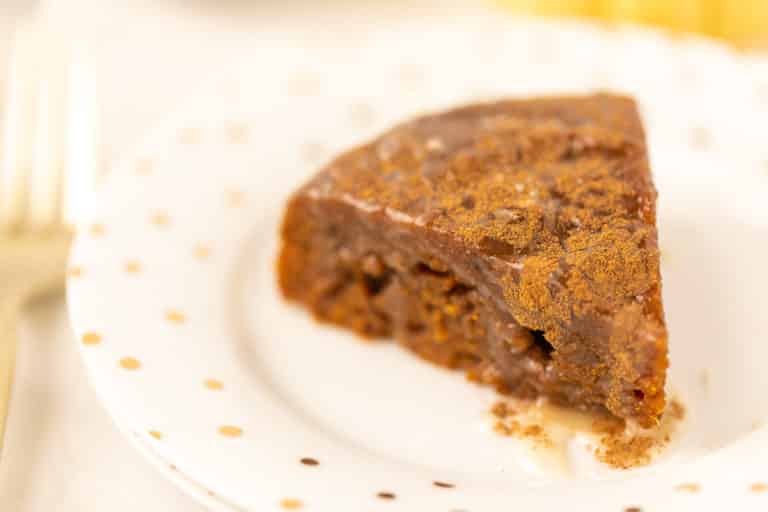
The texture of this cake isn’t exactly the same as a traditional oven-baked cake because it’s not nearly as fluffy. The texture is much more similar to that of a flourless cake. After it is cooled it is denser and thicker, but totally yummy!
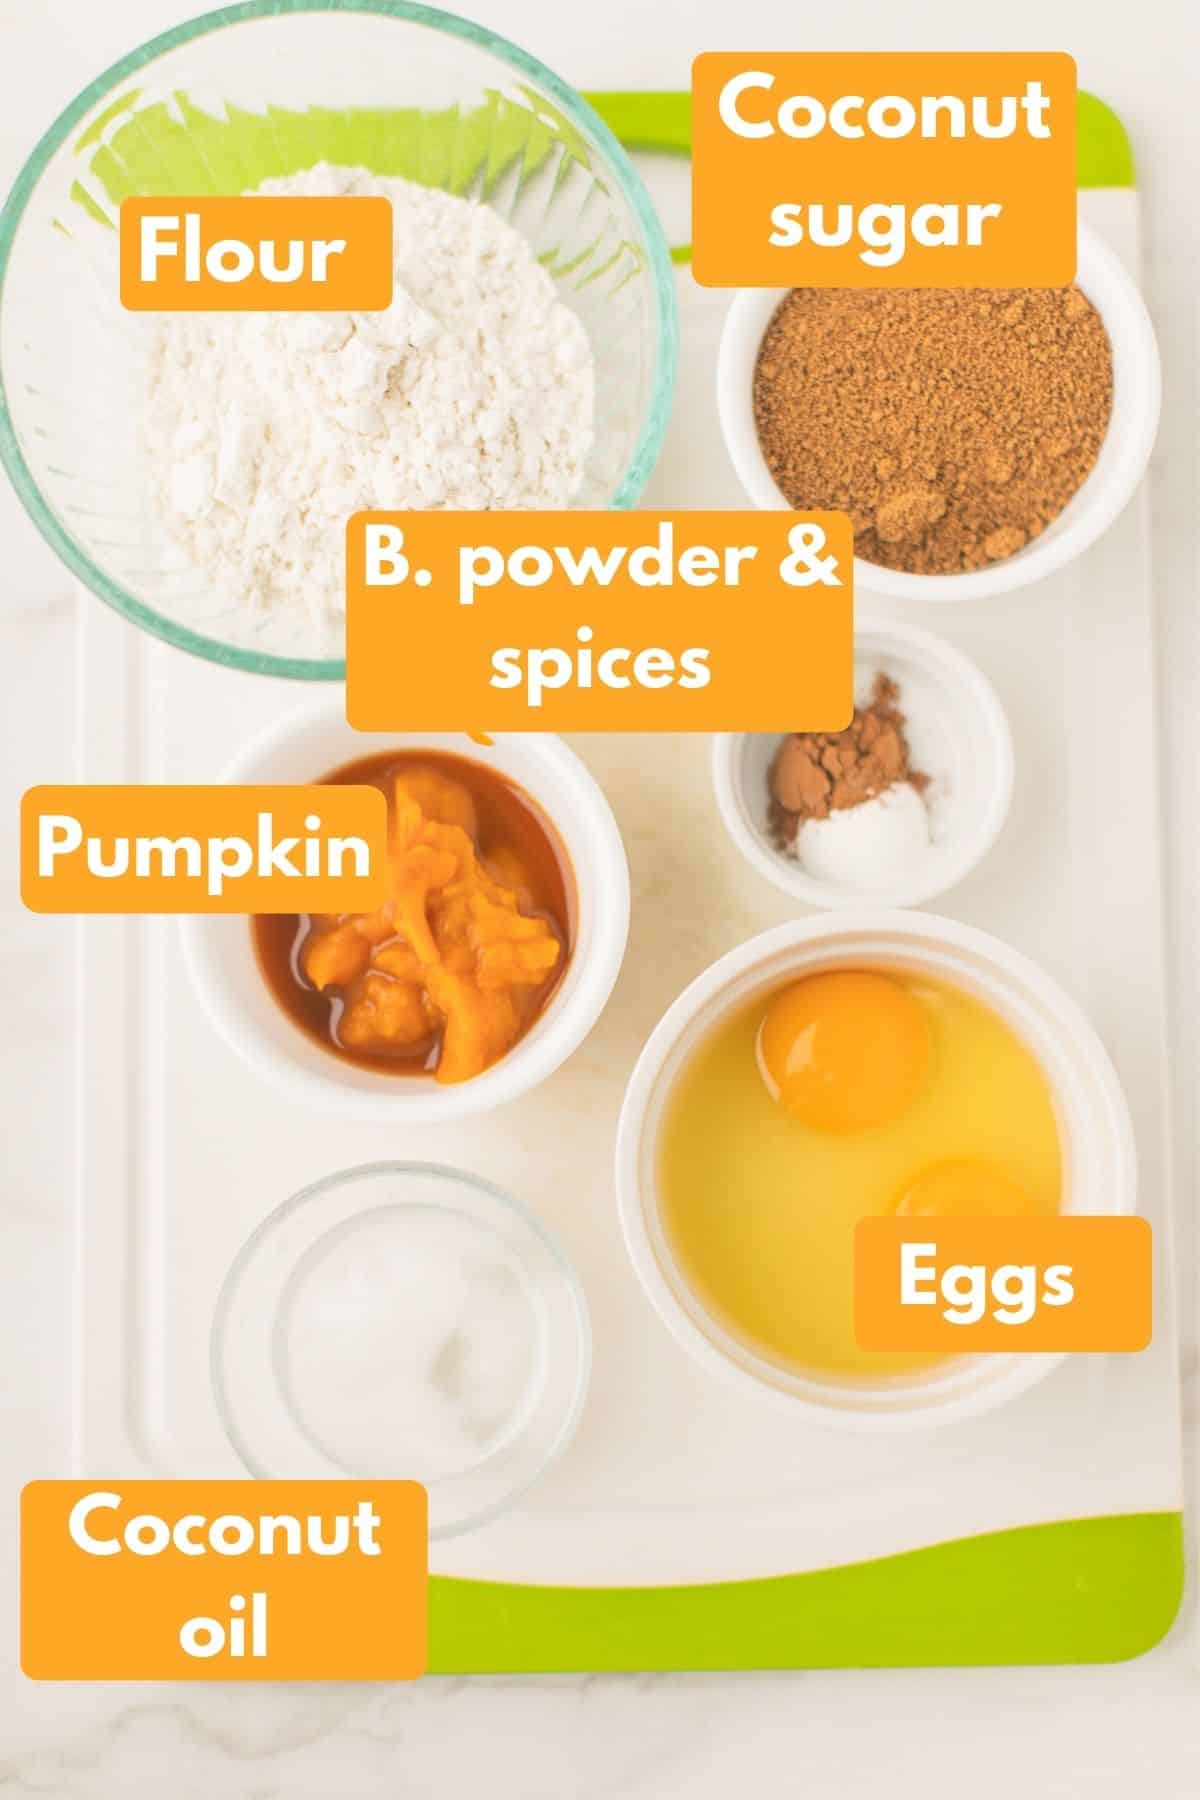
Key Ingredients
You’ll need all-purpose flour or gluten-free baking flour as the base of the cake. Even though the texture ends up being like a flourless cake, you do need flour to build the structure of this dessert.
Pumpkin puree adds seasonal flavor and even some nutrition to this Instant Pot dessert. Be sure to use pure pumpkin puree and not pumpkin pie filling.
Coconut oil adds moisture. You can use melted butter if you aren’t on a dairy-free diet.
Coconut sugar adds sweetness. You can use regular cane sugar, if you prefer.
Egg also adds moisture and a little fluffiness to the cake.
Be sure to check the full recipe card at the end of this post for the exact measurements.
Recipe Steps
Step One
The first step is to gather up your ingredients.
To make this recipe gluten-free, you’ll need to use a gluten-free flour mix like Bob’s 1-to-1 Baking Flour. If you’re not gluten-free, you can just use all-purpose baking flour.
Step Two
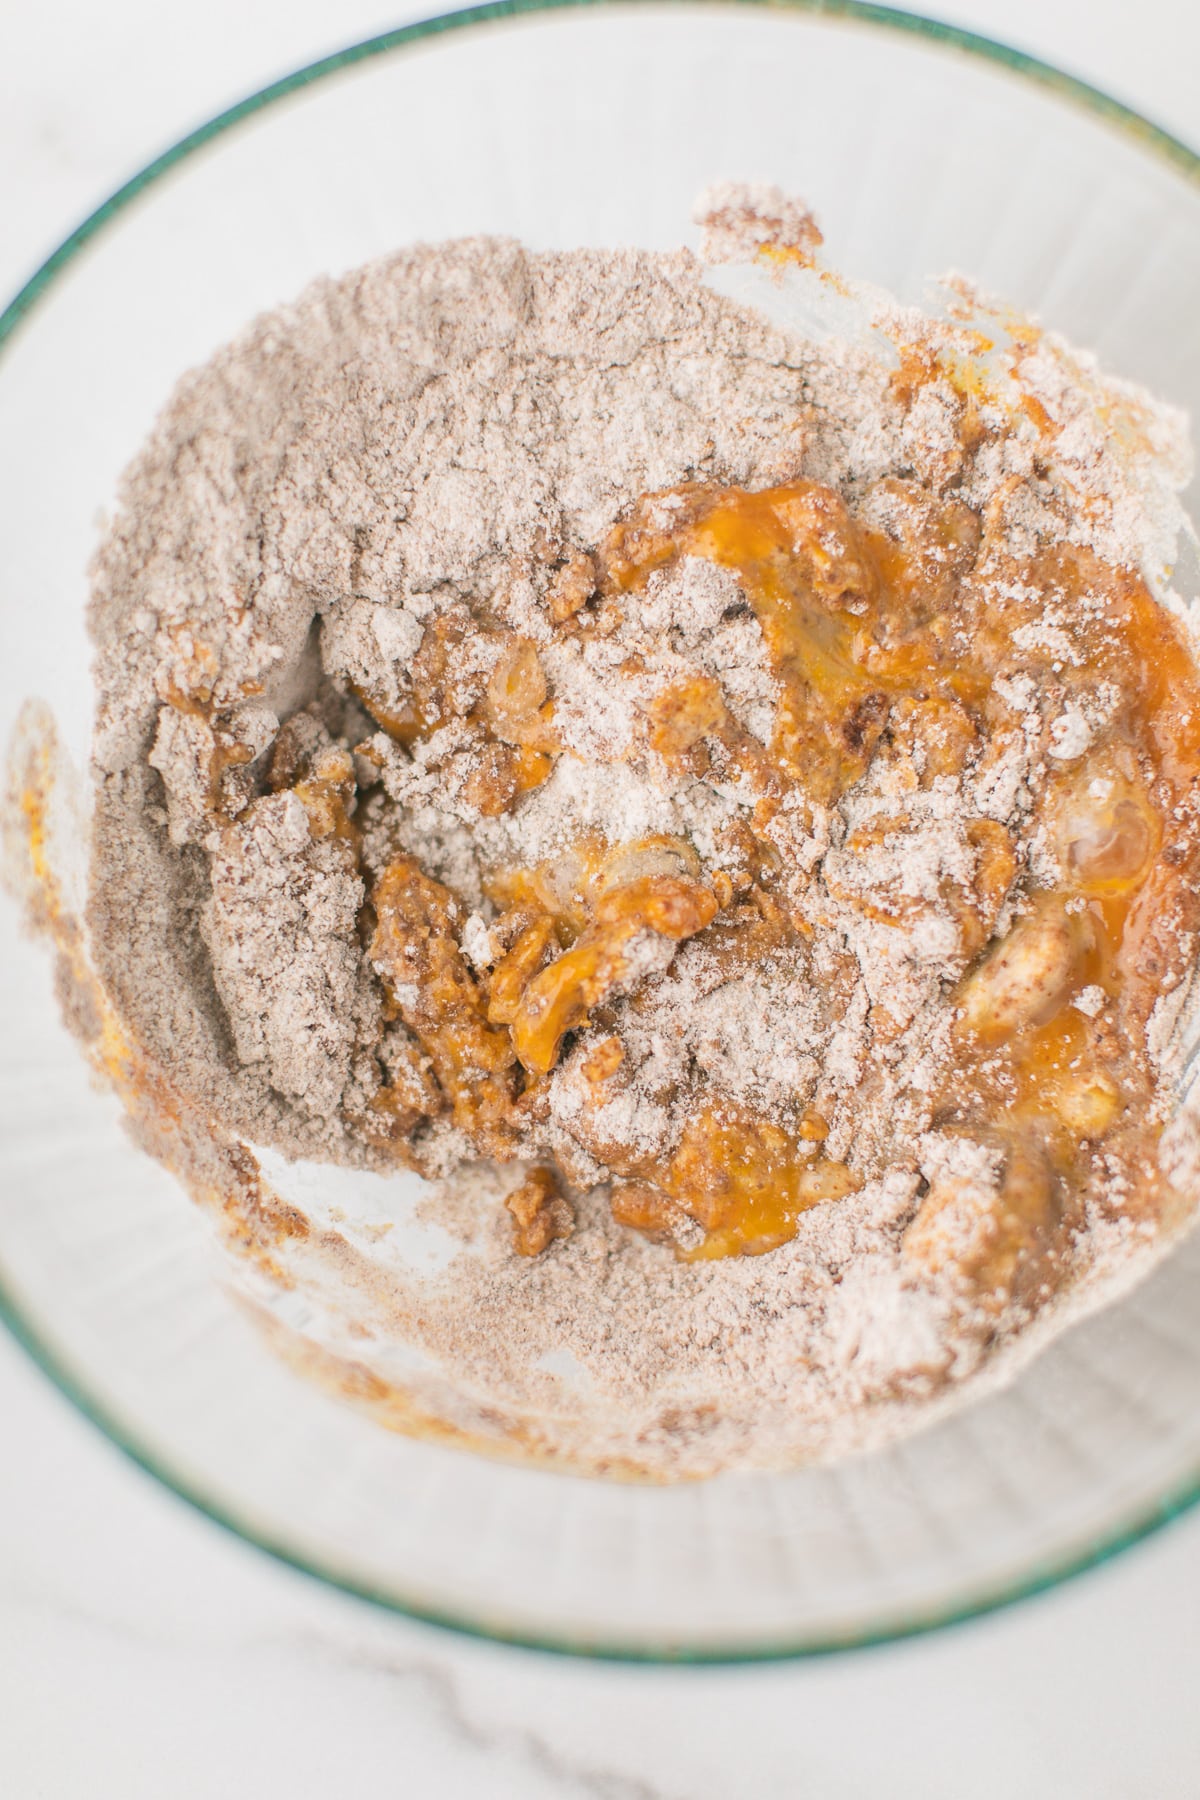
Next, combine all of your dry ingredients in a mixing bowl, and then stir in the wet ingredients.
See the recipe card at the end of this post for the exact measurements and nutritional information.
Step Three
Spray your cake pan with nonstick cooking spray and pour your batter into the pan.
I recommend this 6-inch cake pan.
Step Four
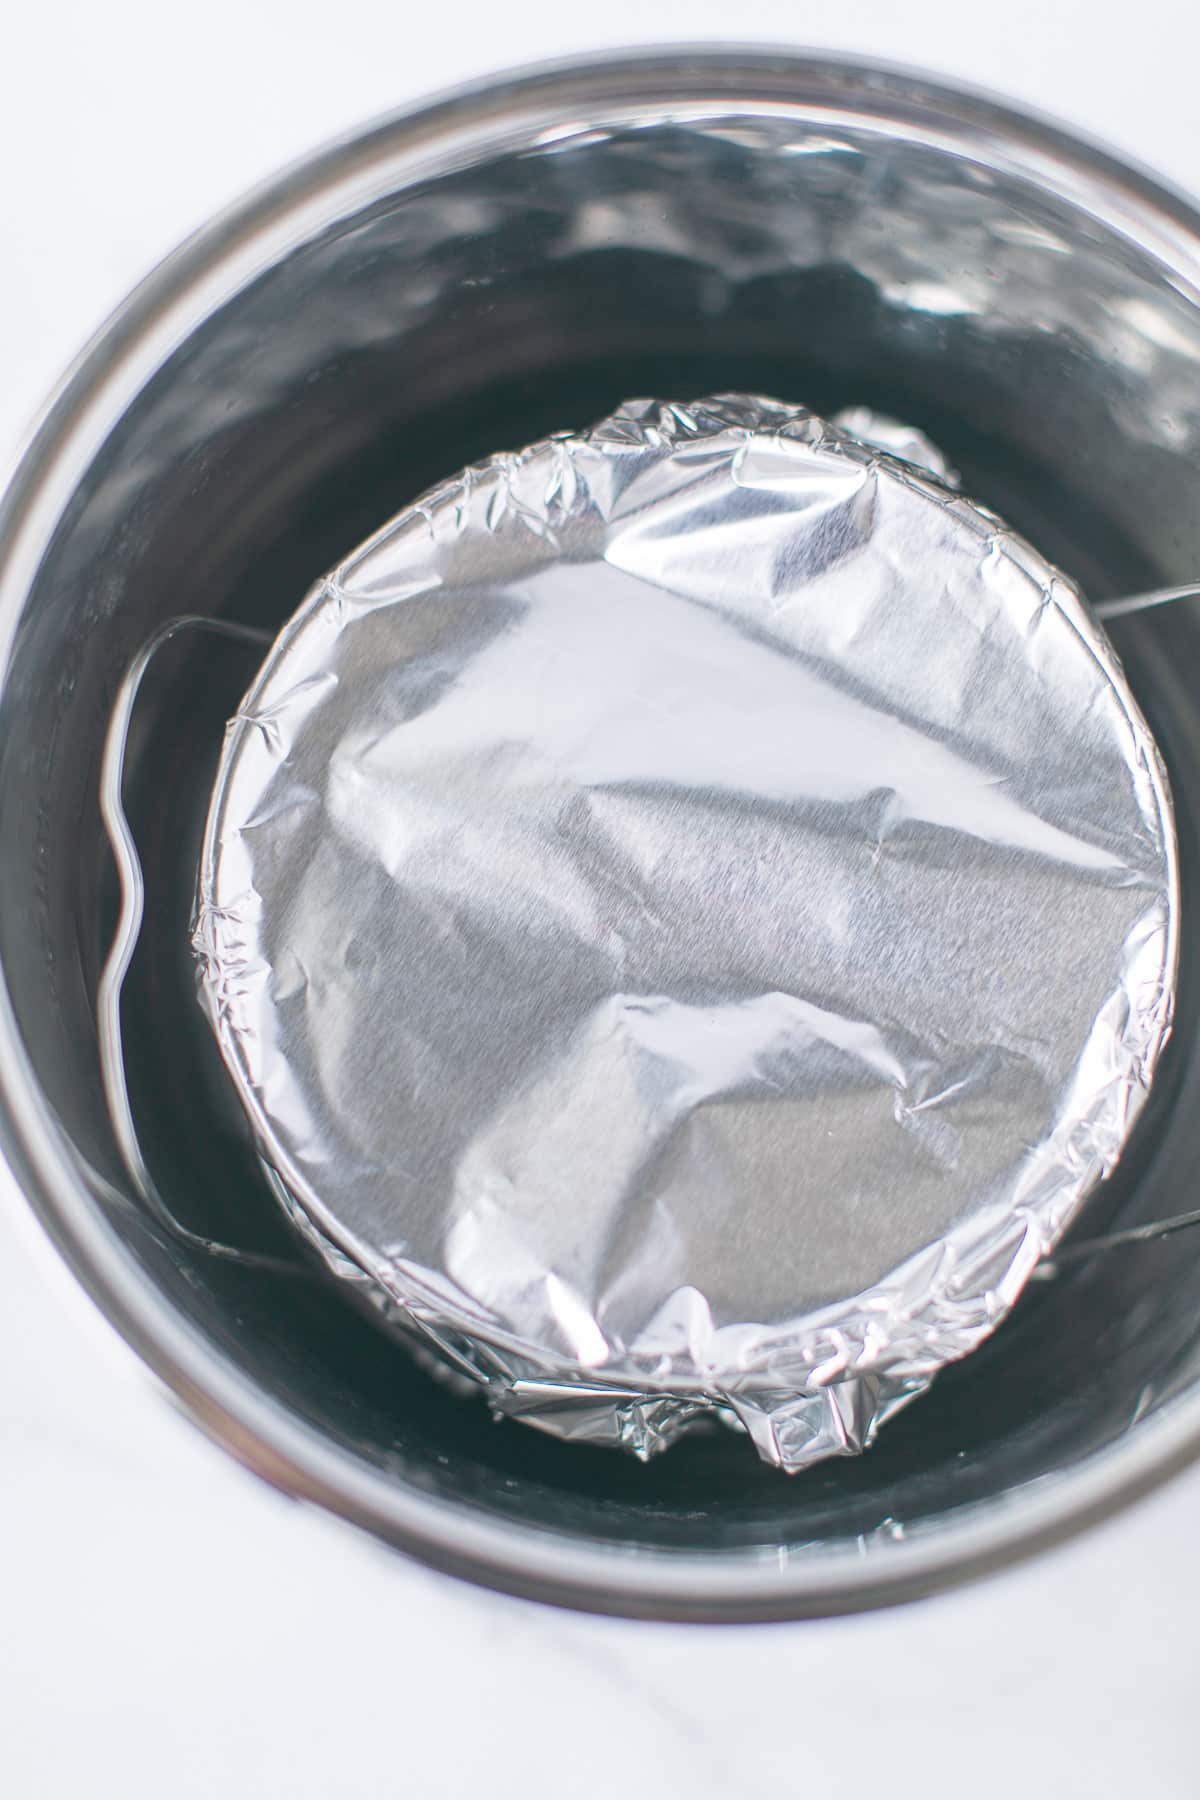
Before you bake the cake, it’s important to wrap the pan tightly with aluminum foil. This will prevent any excess moisture from getting onto the cake.
Step Five
Set the cake pan on top of the trivet inside a 6-quart or 8-quart Instant Pot. Add a cup of water to the bottom of the pot and lock on the lid. Set the time to 55 minutes at high pressure.
Then, when the cooking time is up, let the pressure come down naturally for 10 minutes.
Use the quick-release and carefully remove the lid. Take off the aluminum foil and let the cake cool for about 10 minutes.
Step Six
Remove the cake from the pan by pushing it out the top and then place the cake on a serving dish.
Drizzle the glaze on top and serve warm.
Recipe Tips
If you are not dairy-free, you can replace the coconut oil with butter or ghee.
You can use regular white granulated sugar if you don’t have coconut sugar.
Store any leftovers in a covered container in the refrigerator for up to 4 days.
This recipe is not easily doubled. If you want more than one cake, you’ll need to make the recipe again.
Recipe FAQs
I am not dairy-free. Can I use butter in this recipe?
Yes! You can use butter instead of coconut oil, if you prefer.
Can I use regular sugar instead of coconut sugar?
Yes, you can. I tend to use coconut sugar because it is slightly lower glycemic, but you can use regular white sugar, too.
More Instant Pot Thanksgiving Recipes
If you like this Instant Pot Pumpkin Spice Cake, you might like these other healthy Instant Pot recipes!
Instant Pot Candied Yams
Instant Pot Cranberry Relish
Instant Pot Mashed Potatoes
Instant Pot Pumpkin Pie Custard
Instant Pot Stuffing
Instant Pot Sweet Potato Mash
Instant Pot Turkey Tenderloin
Don’t Miss These Pumpkin Desserts!
Print
Nonstick cooking spray
1cup gluten-free flour (use all-purpose baking flour if you aren’t gluten-free)
1/2cup coconut sugar
1 teaspoon baking powder
1 teaspoon pumpkin pie spice
2 eggs, beaten
1/4cup coconut oil, melted
1/4cup pumpkin puree
1 teaspoon vanilla extract
For the icing:
1/2cup powdered sugar
2 teaspoons almond milk
Spray your cake pan with non-stick spray and set aside.
Set the trivet into your 6-quart Instant Pot and add 1 cup of water.
In a medium mixing bowl, combine the flour, coconut sugar, baking powder, and pumpkin pie spice. Stir to combine.
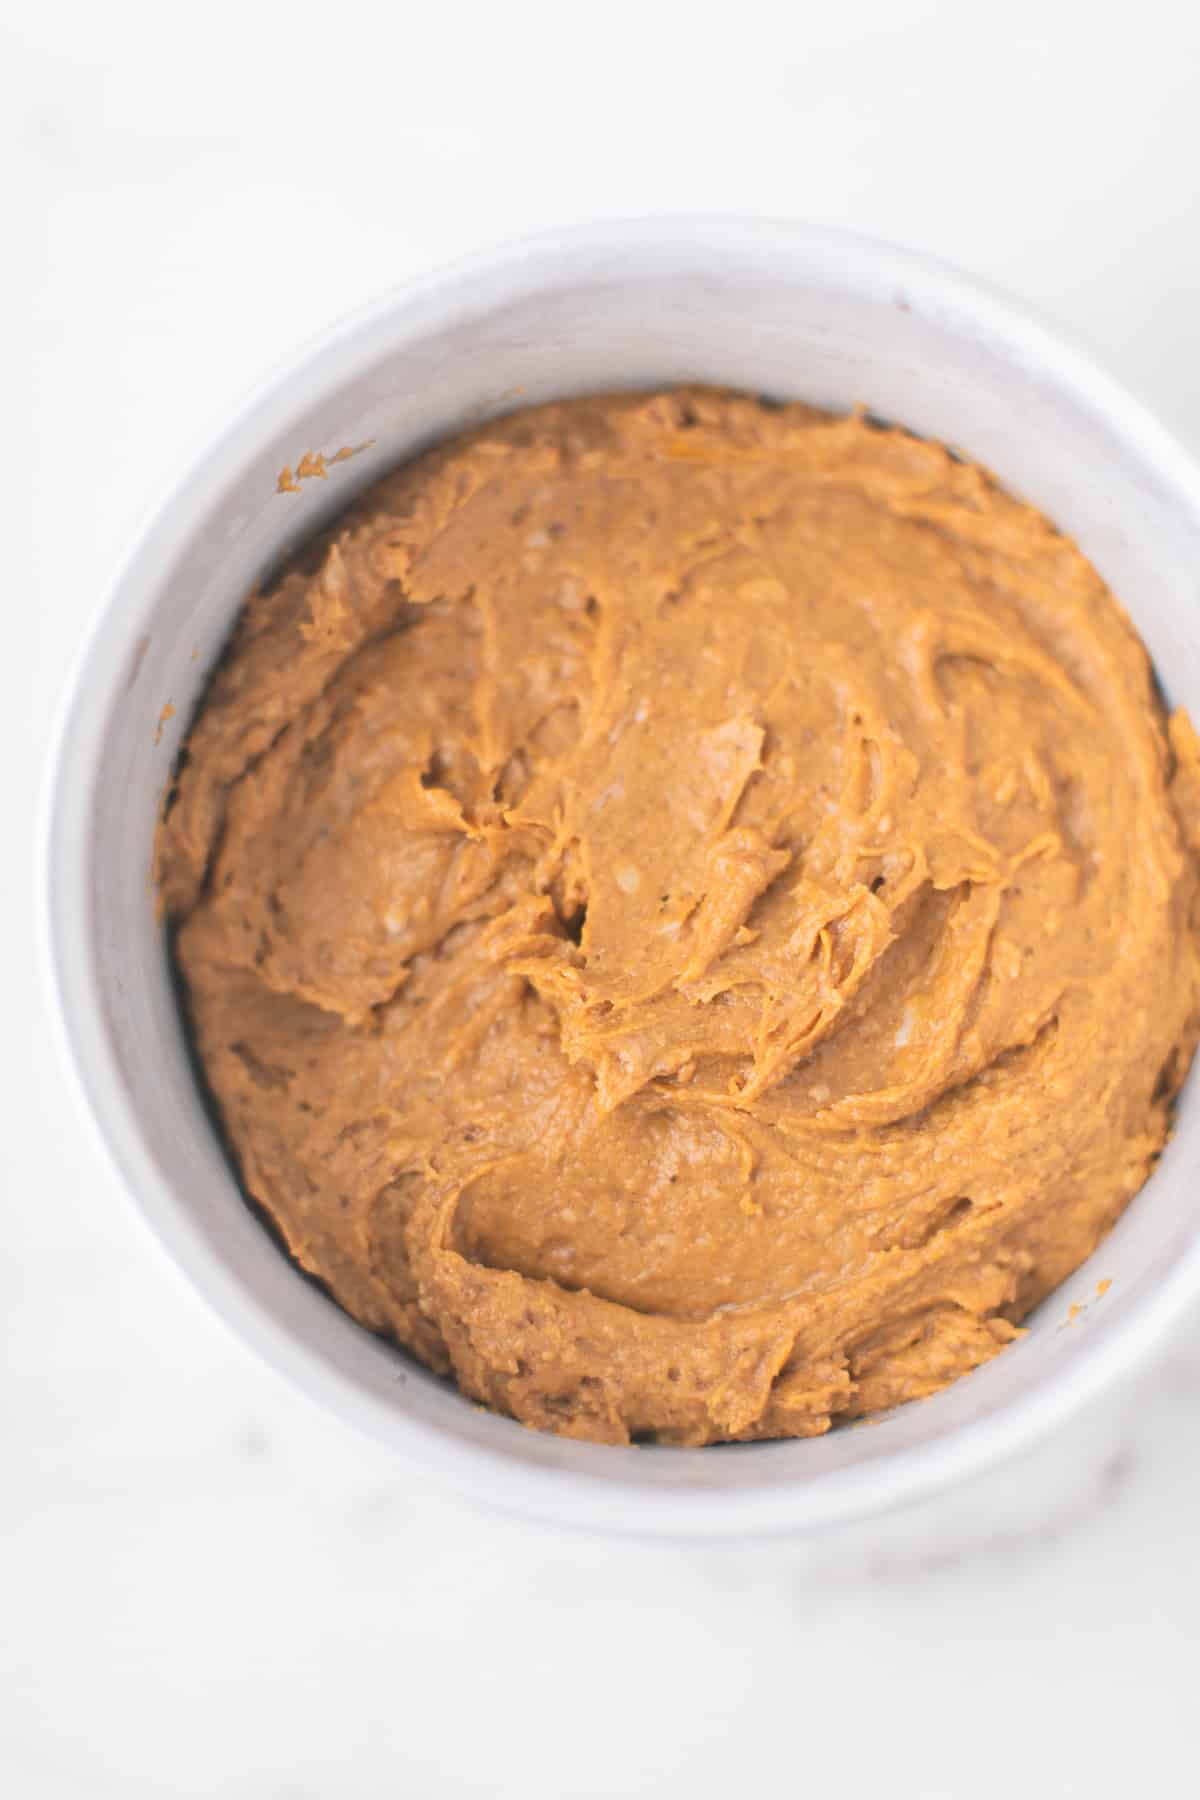
Then, stir in the eggs, coconut oil, pumpkin puree, and vanilla extract.
Pour the batter into the cake pan and wrap the pan tightly in aluminum foil.
Set the pan on top of the trivet. Lock on the lid and set the time to 55 minutes at high pressure.
When the cooking time is up, let the pressure come down naturally for about 10 minutes. Use the quick release to get rid of any remaining pressure and carefully remove the lid
Take the cake pan out of the Instant Pot and remove the aluminum foil. Take the cake out of the pan and set it on a serving platter.
Make the glaze by mixing together the powdered sugar and almond milk in a small bowl. Drizzle the glaze over the top of the cake and serve warm.
Notes
If you are not dairy-free, you can replace the coconut oil with butter or ghee.
You can use regular white granulated sugar if you don’t have coconut sugar.
Store any leftovers in a covered container in the refrigerator for up to 4 days. Re-heat before serving.
Nutrition
Serving Size:1/6 of recipe
Calories:195
Sugar:15.1 g
Sodium:31.4 mg
Fat:7.5 g
Saturated Fat:5.4 g
Carbohydrates:29.3 g
Fiber:1.9 g
Protein:4.3 g
Cholesterol:9.6 mg
Don’t forget to join my newsletter list to get exclusive clean eating recipes and tips. The newsletter is 100% free with no spam; unsubscribe anytime.
About the Author: Carrie Forrest is the author of the best-selling Instant Pot-authorized cookbook, The Healthy Meal Prep Instant Pot Cookbook. She has a master’s degree in public health with a specialty in nutrition and receives over 5 million annual visitors to her site. Send Carrie a message through her contact form.
This post may contain affiliate links which won’t change your price but will share some commission. We are participant in the Amazon Services LLC Associates Program, an affiliate advertising program designed to provide a means for us to earn fees by linking to Amazon.com and affiliated sites.
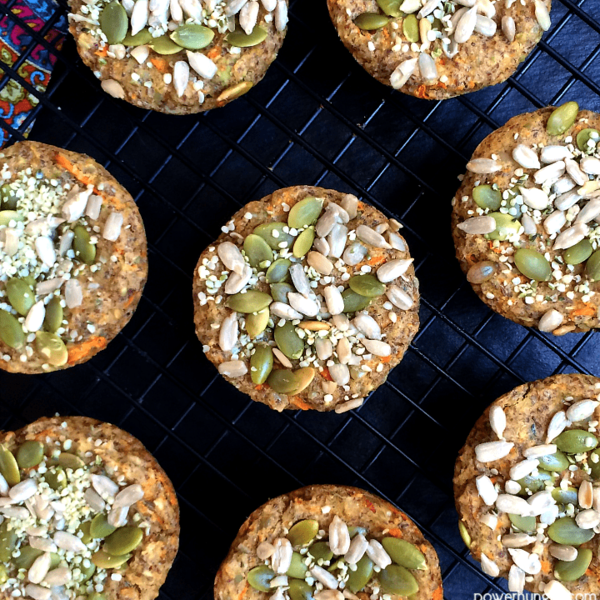
Savory vegan protein bars are a delicious break from sweet snacks! Made in a muffin tin, without protein powder, they are gluten-free, oil-free, and have 153 calories and 6.5 g protein each.
These savory vegan protein bars are in a category all of their own: I am crazy about them.
If you have ever hunkered for a savory power bar–one that you can vary to your heart’s desire with different herbs and spices, vegetables, nuts, seeds, and more–this is the recipe for you, too. Allow me to introduce you:
Recipe Benefits
Vegan (egg-free and dairy free)
Oil-free
Gluten-free
No protein powder required
Quick & easy to make
Made with familiar ingredients
153 calories each
6.5 grams of plant protein each
perfectly portable for hikes, runs, backpacking excursions, or daily trips to school and work
Ingredients for the Vegan Savory Protein Bars
The exact amounts of each ingredient are indicated in the recipe card at the end of the post. Toggle between US Customary (volume) and Metric (weights) for preferred measurement option.
The base for these bars comprises readily-available, affordable, familiar ingredients:
flaxseed meal (to hold everything together, plus to contribute healthy omega-3 fats)
shredded carrots (for moisture and subtle sweetness).
Some dried herbs, garlic powder, salt & pepper
I chose classic flavorings–garlic (I used garlic powder to streamline the process, but you can use fresh, if you like), a dried herb blend (complex flavor in on convenient ingredient), salt, and freshly cracked pepper–but the possibilities for flavor variation are vast.
Directions for Making the Savory Protein Bars
Note that the complete directions are also in the recipe card below.
The method took a few trials and errors, but I got it down so that the results are decidedly bar-like: a soft bite, but with some toothsome texture (the seed/nut topping adds a great contrast crunch) and firmness for portability on hikes, runs, backpacking excursions, or daily trips to school and work.
Yes, these are round (technically pucks instead of bars); it’s for convenience as well as texture. Regarding the former, baking in a muffin tin means no cutting (nor crumbling) post-bake. Fill cups, bake, remove from tin, done.
Using a muffin tin means instant portion control, too.
As for texture, baking in muffin tin cups yields more baked edges, a pleasing contrast to the tender centers.
I opted for carrots as my vegetable of choice. Just like the ubiquitous banana in many DIY energy bars, carrots are inexpensive, nutrient-dense, great-tasting, and convenient (they keep in the refrigerator crisper for weeks). But you can use equal amount of zucchini or other finely grated/chopped vegetables, such as parsnips, sweet potato, spinach, kale, you name it..
Each puck is balanced combination of slow-burning carbs and protein, so prepare for some serious energy and satisfaction. If it’s a savory protein bar you are after, simply add a scoop of your favorite unsweetened (plain) protein powder to the batter, as well as 1 or 2 additional tablespoons of milk or water.
Here’s to savory power! Let me know if you give these bars a try–I would especially love to hear (or see!) your unique adaptations. 🙂
1cupnondairy milk, or dairy milk, if not vegan, divided use
1/3cupflaxseed meal
2/3cuprolled oats, certified GF, as needed
1/3cupseeds or nuts, I used pepitas, hemp hearts & sunflower seeds
1/2cuprinsed and drained canned white beans
2tablespoonstahini or almond butter
2teaspoonsherbes de Provence or dried Italian herb blend
1teaspoongarlic powder
1/2teaspoonfine sea salt
1/8teaspooncracked black pepper
2medium carrots, finely shredded (use small holes of grater)
3tablespoonsadditional seeds or chopped nuts
Preheat oven to 350F. Grease or spray 8 cups of a standard size muffin tin.
In a medium bowl, stir together
3/4 cup
of the milk and flaxseed meal, Let stand at least 5 minutes.
Meanwhile, process the oats and 1/3 cup seeds/nuts in food processor until finely chopped (but not powdery); add to bowl with flaxseed meal.
In same food processor, process the beans, tahini, and remaining 1/4 cup milk until smooth; add to flaxseed mixture along with herbs, garlic powder, salt, pepper and carrots, stirring until blended.
Divide mixture evenly among prepare cups, smoothing tops. Sprinkle with seeds or nuts, gently pressing into batter.
Bake in the preheated oven for 30 to 35 minutes until golden brown at edges. Transfer to cooling rack and cool for 20 minutes, then remove from tin and cool completely.
Flax: I am sorry if you cannot eat flaxseed meal; there is no immediate substitute here. You would need to experiment.
Add more protein: You can easily add some unsweetened (plain) protein powder to these; you will want to add a few more tablespoons of milk, or water.
Vegetable Variation: An equal amount of zucchini or other finely grated/chopped vegetables (e.g., parsnips, sweet potato, spinach, kale) can be used in place of the carrots.
Categorized as: Bread, Breakfast, Flaxseed Meal, Gluten-Free Whole Grains, High Protein, high protein breakfast, high protein snack, muffin tin, Oats, Power Bars, Savory Power Bars & More, Snacks & Appetizers, Sunflower Seeds
You Might Also Like
About Camilla
I’m Camilla, food writer, author, runner, and spin instructor. PowerHungry® is where I share my easy, minimalist, plant-based recipes, designed for living a healthy, delicious, empowered life.