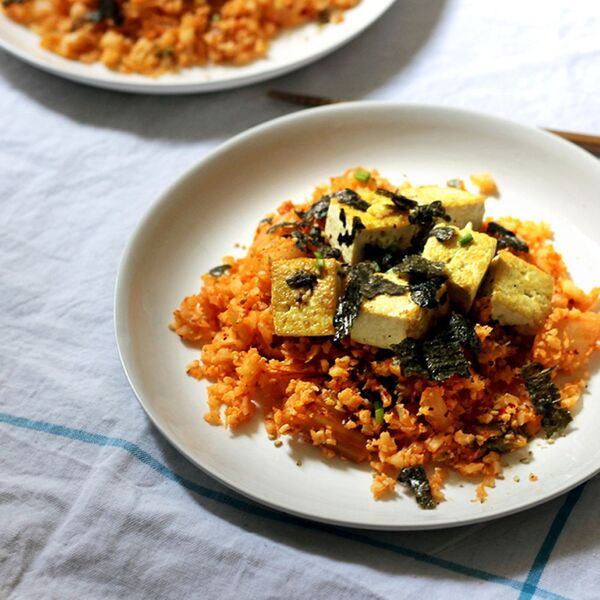
Kimchi fried rice recipe: incredibly complex, deliciousness, yet super easy and takes just 15 minutes. http://www.peacefuldumpling.com/vegan-korean-recipes-cauliflower-kimchi-fried-rice —Peaceful Dumpling
Ingredients
1/2 piece
head cauliflower (or about 2 cups rice)
1 cup
kimchi
1/4 cup
kimchi juice
1/2 tablespoon
vegan butter (important, don’t skip it)
1/2 tablespoon
extra virgin olive oil
1/5
block tofu, cubed
1 dash
sea salt (for tofu)
1
nori flakes (for garnish)
1
toasted sesame seeds (garnish)
1
chopped green onions (garnish)
Directions
1. Chop cauliflower into chunks and pulse in a blender or food processor (about 6-8 quick pulses) until they turn into “rice.”
2. Heat a nonstick pan over medium heat. Add EVOO. When the oil is hot, add tofu cubes and leave them alone for about 4 minutes. Seriously, just go do something and come back. This is how you get a nice golden crust. Check a few pieces to see the color, and then flip them over onto the other side, and cook for another 3-4 minutes. Sprinkle with sea salt. Set aside.
3. In the same pan, add vegan butter. Over medium heat, add kimchi and kimchi juice, and cook for about 3-4 minutes, lightly stirring. Add cauliflower rice and stir to combine. Cook for another 5 or so minutes, until cauliflower is completely cooked.
4. To serve, top rice with tofu cubes. Garnish the fried rice with nori flakes, sesame seeds, and green onions, and serve.
Classic eggplant Parm is filled with cheese, but this vegan eggplant Parmesan combines nondairy mozzarella cheese with nutritional yeast for a dairy-free cheesy substitute that gives you the comfort food factor without animal products. For the breading, use egg replacer, which you can find in natural-foods stores and the special-diet section of large supermarkets.
Updated on April 19, 2024
Cook Mode (Keep screen awake)
Ingredients
Cooking spray
3tablespoonsegg replacer
⅔cupwater
1cupfine dry whole-wheat breadcrumbs
1 ½teaspoonsdried basil, divided
1 ½teaspoonsdried oregano, divided
1 eggplant (about 1 pound), cut crosswise into 12 slices
2tablespoonsextra-virgin olive oil
1 28-ounce can no-salt-added crushed tomatoes
1teaspoongarlic powder
¼teaspoonsalt
¼teaspoonground pepper
1cupshredded vegan mozzarella cheese, divided
3teaspoonsnutritional yeast, divided
Chopped fresh basil for garnish
Directions
Place a large rimmed baking sheet in the oven. Preheat to 425 degrees F. Spray an 8-inch-square baking dish with cooking spray.
Whisk egg replacer and water in a shallow dish. Combine breadcrumbs and 1/2 teaspoon each basil and oregano in another shallow bowl. Dip each eggplant slice in the liquid, then press in the breadcrumbs.
Remove the heated baking sheet from the oven and add oil, tilting to coat. Arrange the prepared eggplant pieces on it (don’t let the pieces touch). Generously coat the tops with cooking spray. Bake for 15 minutes. Flip the slices and continue baking until golden brown, about 15 minutes more.
Meanwhile, combine tomatoes, garlic powder, salt, pepper and the remaining 1 teaspoon each basil and oregano.
Spread 1 cup of the tomato sauce in the prepared baking dish. Arrange 6 eggplant slices on top (they may overlap). Spread 1 cup sauce over the eggplant. Sprinkle with 1/2 cup cheese and 1 1/2 teaspoons nutritional yeast. Repeat with the remaining eggplant, sauce, cheese and nutritional yeast.
Bake, uncovered, until the sauce is bubbling, 15 to 20 minutes. Garnish with fresh basil, if desired.
Tips
To make ahead: Prepare through Step 5 and refrigerate for up to 2 days before baking.
Originally appeared: EatingWell.com, July 2018
Nutrition Facts (per serving)
407
Calories
20g
Fat
45g
Carbs
9g
Protein
Nutrition Facts
Servings Per Recipe 4
Serving Size 1 1/2 cups
Calories 407
% Daily Value *
Total Carbohydrate
45g
16%
Dietary Fiber
11g
41%
Total Sugars
11g
Protein
9g
19%
Total Fat
20g
26%
Saturated Fat
8g
41%
Vitamin A
1664IU
33%
Vitamin C
17mg
18%
Folate
83mcg
21%
Sodium
654mg
28%
Calcium
68mg
5%
Iron
5mg
29%
Magnesium
30mg
7%
Potassium
927mg
20%
Nutrition information is calculated by a registered dietitian using an ingredient database but should be considered an estimate.
* Daily Values (DVs) are the recommended amounts of nutrients to consume each day. Percent Daily Value (%DV) found on nutrition labels tells you how much a serving of a particular food or recipe contributes to each of those total recommended amounts. Per the Food and Drug Administration (FDA), the daily value is based on a standard 2,000 calorie diet. Depending on your calorie needs or if you have a health condition, you may need more or less of particular nutrients. (For example, it’s recommended that people following a heart-healthy diet eat less sodium on a daily basis compared to those following a standard diet.)
(-) Information is not currently available for this nutrient. If you are following a special diet for medical reasons, be sure to consult with your primary care provider or a registered dietitian to better understand your personal nutrition needs.
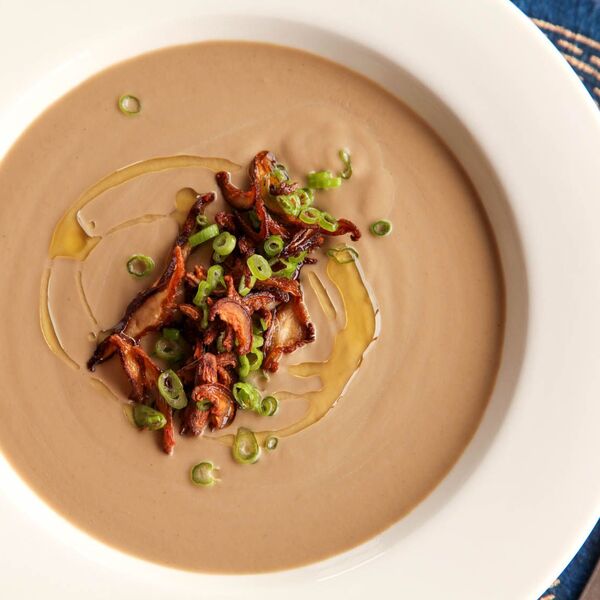
100% vegan cream of mushroom soup that’s every bit as rich and satisfying as a cream-based version, with brighter flavor and a more mushroomy intensity.
Vegan Cream of Mushroom Soup With Crispy Shiitake Chips Recipe
Cook Mode (Keep screen awake)
1/2ouncedried porcini or morel mushrooms (optional)
1quart Hearty Vegan Stock or store-bought vegetable broth
7tablespoonsolive oil, divided, plus more for serving
1largeleek, white and light green parts only, thinly sliced (about 3/4 cup)
2slicesvegan white sandwich bread, crusts removed, bread torn into pieces
2tablespoons vegetable or canola oil
Kosher salt and freshly ground black pepper
1/4cup thinly slicedscallions, for garnish
If using dried mushrooms, place in a large bowl and add vegetable stock. Set aside.
Heat 3 tablespoons olive oil in a large saucepan over medium-low heat until shimmering. Add leeks, onions, and garlic and cook, stirring frequently, until softened but not browned, about 8 minutes. Add button mushrooms and 8 ounces of shiitake mushrooms and cook, stirring frequently, until excess liquid evaporates and mushrooms start to sizzle, about 10 minutes.
Add flour and stir to incorporate. Cook for 30 seconds. Add sherry or white wine and cook, stirring constantly and scraping bottom of pan, until thick and syrupy, about 1 minute. Add soy sauce and miso and stir to incorporate. Add broth and soaked mushrooms. Add bay leaves and thyme sprigs. Bring soup to a simmer and adjust heat to maintain a bare bubble. Let simmer for 30 minutes.
Meanwhile, make the shiitake chips. Combine remaining sliced shiitake mushrooms with the vegetable oil in a medium non-stick skillet. Heat over medium-low heat and cook, flipping mushrooms and stirring frequently, until dehydrated and well-browned. Transfer to a paper towel-lined plate with a slotted spatula and season immediately with salt. Let cool.
Add torn bread slices to soup and soak for 30 seconds. Discard bay leaves and thyme and transfer soup to a blender. Close blender and blend, starting on low speed and slowly getting faster. Once blender is at full speed, slowly drizzle in remaining olive oil. Continue blending until completely smooth. Rinse out pot and pour soup back into it through a chinois or fine mesh strainer. Season to taste with salt and pepper.
Serve soup topped with crispy shiitake mushrooms, scallions, and a drizzle of extra-virgin olive oil
Special equipment
Blender
This Recipe Appears In
The Food Lab: Vegan Cream of Mushroom Soup With Crispy Shiitake Chips
Nutrition Facts (per serving)
281
Calories
22g
Fat
19g
Carbs
5g
Protein
×
Nutrition Facts
Servings: 4
to 6
Amount per serving
Calories
281
% Daily Value*
22g
28%
Saturated Fat 3g
13%
0mg
0%
1061mg
46%
19g
7%
Dietary Fiber 4g
14%
Total Sugars 6g
5g
Vitamin C 7mg
34%
Calcium 38mg
3%
Iron 3mg
14%
Potassium 579mg
12%
*The % Daily Value (DV) tells you how much a nutrient in a food serving contributes to a daily diet. 2,000 calories a day is used for general nutrition advice.
(Nutrition information is calculated using an ingredient database and should be considered an estimate.)
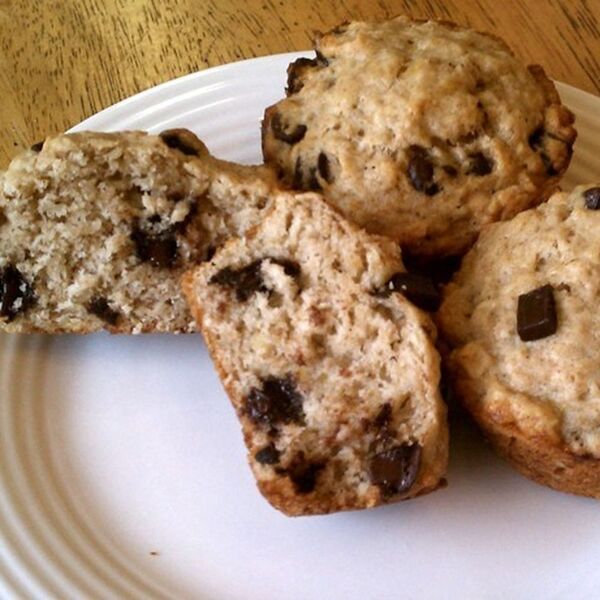
Almond butter and coconut oil replace dairy butter and eggs in these vegan treats, giving them the crisp but chewy texture that we all love. On its own, chocolate is a vegan ingredient but dairy products are often introduced during processing. Some chocolate chips may not be labeled vegan, but if they do not contain dairy products, such as whey, casein, milk, milk fat and milk solids, they are vegan. Check labels carefully.
Updated on April 19, 2024
Additional Time:
1 hr 5 mins
Jump to Nutrition Facts
Cook Mode (Keep screen awake)
Ingredients
1cupwhite whole-wheat flour
1cupall-purpose flour
1 ½teaspoonsbaking powder
¼teaspoonbaking soda
½teaspoonsalt
⅔cuppacked light brown sugar
½cupcoconut oil, melted
½cupwarm water
⅓cupunsalted smooth almond butter
2teaspoonsvanilla extract
⅔cupvegan chocolate chips, preferably bittersweet
Directions
Whisk white whole-wheat flour, all-purpose flour, baking powder, baking soda and salt in a medium bowl. Whisk sugar, coconut oil, water, almond butter and vanilla in a large bowl. Add the flour mixture to the sugar mixture and stir until just combined. Fold in chocolate chips. Cover the bowl and let stand at room temperature at least 30 minutes.
Preheat oven to 350 degrees F. Line a baking sheet with parchment paper. Using about 1 heaping tablespoon per cookie, drop mounds of dough, at least 1 inch apart, on the prepared baking sheet. Flatten the mounds to create 2-inch-wide cookies. Bake until lightly browned, 10 to 14 minutes. Let the cookies cool on the baking sheet for 2 minutes, then transfer to a rack to cool completely. Repeat with the remaining dough.
Tips
To make ahead: The cookies will keep in an airtight container for up to 3 days or in the freezer for up to 2 months.
Originally appeared: EatingWell.com, February 2019
Nutrition Facts (per serving)
231
Calories
13g
Fat
28g
Carbs
3g
Protein
Nutrition Facts
Servings Per Recipe 15
Serving Size 2 cookies
Calories 231
% Daily Value *
Total Carbohydrate
28g
10%
Dietary Fiber
2g
7%
Total Sugars
14g
Added Sugars
14g
28%
Protein
3g
7%
Total Fat
13g
16%
Saturated Fat
8g
38%
Vitamin A
0IU
0%
Folate
28mcg
7%
Sodium
151mg
7%
Calcium
59mg
5%
Iron
2mg
11%
Magnesium
27mg
6%
Potassium
103mg
2%
Nutrition information is calculated by a registered dietitian using an ingredient database but should be considered an estimate.
* Daily Values (DVs) are the recommended amounts of nutrients to consume each day. Percent Daily Value (%DV) found on nutrition labels tells you how much a serving of a particular food or recipe contributes to each of those total recommended amounts. Per the Food and Drug Administration (FDA), the daily value is based on a standard 2,000 calorie diet. Depending on your calorie needs or if you have a health condition, you may need more or less of particular nutrients. (For example, it’s recommended that people following a heart-healthy diet eat less sodium on a daily basis compared to those following a standard diet.)
(-) Information is not currently available for this nutrient. If you are following a special diet for medical reasons, be sure to consult with your primary care provider or a registered dietitian to better understand your personal nutrition needs.
A vegan, West-Indian spin on the shopping mall classic. Sourdough starter is used for the yeast so it’s a long, overnight ferment without being sour, and we used bread flour for that extra good chewy texture. Perfect for a cool morning, or a late night sweet treat. Be careful though, if you leave your windows open your neighbors will come knocking. —Romel Bruno
Ingredients
Dough
113 grams
Cold, Vegan, Cultured Butter, shredded or cut into small cubes
375 grams
Bread Flour
75 grams
Mature Starter
115 grams
Water
115 grams
Vegan Coconut Yogurt
1 teaspoon
Raw Turbinado Sugar
1 teaspoon
Finely Ground Sea Salt
1/2 teaspoon
Baking Powder
Spice Filling and Glaze
1/3 cup
Raw Turbinado Sugar
3 pieces
Green Cardamom Pods, finely ground
6 pieces
Clove Bud, finely ground
2 teaspoons
Cinnamon, finely ground
1/2 teaspoon
Turmeric, finely ground
2 pinches
Black Pepper, finely ground
2 pinches
Nutmeg, finely ground
6 pieces
Medjool Dates, diced
1/2 cup
Chopped Walnuts
2 tablespoons
Coconut Oil(for basting the dough and greasing the baking pan)
1 1/2 cups
Coconut Almond Milk (glaze)
2/3 cup
Raw Turbinado Sugar (glaze)
Directions
12 hours before baking, prepare dough. Start by combining bread flour and cold vegan butter by chopping with a dough scraper in a bowl or on a clean work surface until it takes on a sandy appearance.
Add the wet ingredients plus the sugar to the bowl(we mixed our sugar in with the water and vegan yogurt prior to adding to dough to help dissolve the large granules, but it’s not necessary). Start by stirring with rubber spatula until a dough starts to form and then finish by kneading with hands until all the flour is incorporated and a slightly tacky dough has formed (approx 5-10 minutes)
Cover the bowl with plastic wrap or a slightly damp kitchen towel and leave to rest overnight, or for approx. 12 hours in a warm, draftless place such as a cool oven.
Make your glaze, this could also be prepared as early as a week ahead of time and kept into the fridge until needed for action or right before you put your buns in the oven. Combine the sugar and the coconut almond milk in a medium saucepan and allow to simmer vigorously over medium heat for 20-30 minutes, stirring occasionally, until the sauce has reduced by half, thickened slightly, and has darkened to a sandy brown.
Prep and combine your spices with the sugar to create the filling. We also chose to add our diced dates to the sugar/spice mix to create an anti-stick coating for the very sticky dates. *Just a note feel free to use whatever spices call to your heart, or even classic cinnamon sugar would be amazing*
With the filling and the glaze prepped it is now time to roll the dough. After resting overnight your dough should have risen approx. 2 times, look fluffy and be full of beautiful air bubbles. Before removing the dough from the bowl make sure to incorporate the salt and baking powder by dimpling into dough and kneading until none can be seen.
Transfer the dough to a light floured clean work surface, flouring the top of the dough and rolling pin as needed. Use the rolling pin, and/or also feel free to stretch the dough by hand, holding by the edges and utilizing gravity, being wary not to go too thin and tear the dough, but even if you do just patch it up.
Once you have shaped a nice rectangle use a pastry brush to coat the top of the dough with a nice even layer of the melted coconut oil, so that the surface is glossy. Apply the sugar/spice mix and toppings of your choice atop the oil. Then just roll into a spiral! A bench scraper definitely helps with this
Once rolled into a log cut into 2-3 inch sections using the bench scraper and arrange nicely into a greased baking pan. Preheat the oven to 375 degrees and let the buns rise for an additional 15-20 minutes while the oven heats. Once the oven is hot, bake for 35-45 minutes or until golden brown. Remove from the oven and apply glaze immediately. Wait 15 minutes to cool before digging in…. if you can…
I’ll just say it…these are amazing. Make them immediately.
Note: my favorite way to make these is to use a combo of semi-sweet chocolate chips and dark chocolate chips. And these are also good with walnuts.
Nutrition Info (1 muffin): 219 calories, 8g fat, 2g fiber, 2.5g protein —thesinglebite
Ingredients
1/3 cup
Soy Milk
1 tablespoon
Lemon Juice
1 cup
All Purpose Flour
1/2 cup
Whole Wheat Flour
1/2 cup
Quick Oats
1 tablespoon
Baking Powder
1/2 teaspoon
Salt
1/4 teaspoon
Cinnamon
1/3 cup
Earth Balance Vegan Butter
1/4 cup
Sugar
1/4 cup
Light Brown Sugar (packed)
3
Ripe Bananas
1 teaspoon
Vanilla Extract
1/2 cup
Chocolate Chips
Directions
Pre-heat oven to 350 degrees. Lightly grease a muffin pan, set aside.
Mix lemon juice and soy milk in small bowl and set aside.
Whisk dry ingredients in a bowl (flours, oats, baking powder, salt, cinnamon), set aside.
In another bowl add butter, sugars, mashed banana and mix with an electric mixer on low speed for about a minute or two. Next whisk in the soy milk/lemon, and vanilla. Whisk together until mixed.
Add dry ingredients to wet ingredients and stir until just combined (you don’t want to over mix). Gently fold in the chocolate chips. Batter will be thick. Spoon into muffin tins and bake for 20-25 minutes.
Adding whipped aquafaba to the batter makes for airier (and vegan!) oatmeal pancakes.
Photograph: J. Kenji López-Alt
Why It Works
Toasting the oats gives them extra flavor.
Chickpea liquid can be whipped into a light, foamy meringue just like egg whites, providing lift and structure to these pancakes.
Like many kids in Asian households in the US, I grew up playing classical music, and I’m constantly surprised by just how similar learning music is to learning how to cook. Take, for instance, your typical progression. In music, you start out learning to play a few songs, focusing on those that will teach you the basic mechanics of finger and arm movements, just as you may focus your early cooking on simple recipes that emphasize knife skills or a technique like sautéing. From there, you might move on to learning individual songs—or recipes—practicing each one until you master it. But it’s only when you start focusing on technique and theory that you really start to learn. Practicing a song will teach you one new song, but practicing a new scale or a common chord progression will unlock a whole catalog of music.
I feel the same way every time I learn a new cooking technique. What can I do with this one?
A couple of months back was the first time that I whipped aquafaba, the goopy liquid inside a can of chickpeas, into a light, foamy, vegan meringue, and it blew my mind. I’m serious about this: A mixer with a whisk attachment and the drained liquid from a can of chickpeas is all you need. I went into a flurry of recipe testing, and you’ll be seeing some of the results of that testing in the coming months.
In the grand scheme of things, oatmeal pancakes are not really that different a song from regular pancakes, but you can consider them a remix.
Using aquafaba for vegan oatmeal pancakes is especially successful because oatmeal pancakes tend to be a little denser than, say, buttermilk pancakes to begin with, and aquafaba doesn’t have quite the lifting power and structure that eggs do. For these pancakes, I start by toasting oats in a skillet until they’re nutty and fragrant, then I grind them up in a food processor and combine them with some standard dry pancake ingredients: all-purpose flour, baking powder and soda, and salt. Next, I whip up the aquafaba into a dense, stable meringue sweetened with just a touch of sugar. Nut milk, vegetable oil, vanilla extract, lemon zest, and a little vinegar (to help with rise) make up the liquid ingredients.
I fold everything together, then ladle it onto a moderately hot griddle to bake.
They bake up light, nutty, and flavorful. Perfect for soaking up warm maple syrup, and that’s a tune we can all sing along to, whether we’re vegan or not.
May 2016
Fluffy Oatmeal Pancakes Recipe (Vegan)
Cook Mode (Keep screen awake)
5ouncesrolled oats (about 3/4 cup; 140g)
5ouncesall-purpose flour (about 1 cup; 140g)
2teaspoons (8g) baking powder
1/2teaspoonbaking soda
1teaspoon (4g) kosher salt
4tablespoons (60ml) liquid from 1 can of low-sodium chickpeas (reserve remaining liquid and chickpeas for another use)
1/4cup (60ml) vegetable oil, plus more for cooking
2teaspoons (10ml) vanilla extract
2teaspoonszest from 1 lemon
2teaspoons (10ml) cider vinegar or distilled white vinegar
Vegan butter substitute and maple syrup, for serving
Heat oats in a medium skillet over medium heat, tossing and stirring frequently, until toasted and nutty, about 4 minutes. Transfer to the bowl of a food processor, let cool a few moments, and pulse until about half the oats are powdered but a few larger flakes remain, 10 to 12 short pulses. Add flour, baking powder, baking soda, and salt and pulse to combine.
Place chickpea liquid and sugar in the bowl of a stand mixer fitted with a whisk attachment. Whisk on high speed until stiff peaks form, about 6 minutes. Meanwhile, combine almond milk, vegetable oil, vanilla extract, lemon zest, and vinegar in a bowl. Add dry mix to wet mix and fold with a rubber spatula to combine (the mixture should remain lumpy). Fold in whipped chickpea liquid, being careful not to let it deflate too much.
Heat a large, heavy-bottomed nonstick skillet over medium heat for 5 minutes (or use an electric griddle). Add a small amount of vegan butter or oil to skillet or griddle and spread with a paper towel until no visible butter or oil remains. Reduce heat to low. Use a 1/4-cup dry measure to place 4 pancakes in skillet and cook until bubbles start to appear on top and bottoms are golden brown, about 3 minutes. Carefully flip pancakes and cook on second side until golden brown and completely set, about 3 minutes longer. Serve pancakes immediately, or keep warm on a wire rack set on a rimmed baking sheet in a warm oven while you cook the remaining 3 batches. Serve with warm maple syrup and vegan butter.
Special Equipment
Food processor, stand mixer, or electric mixer, griddle or wide nonstick pan
Nutrition Facts (per serving)
121
Calories
4g
Fat
17g
Carbs
3g
Protein
×
Nutrition Facts
Servings: 16
Amount per serving
Calories
121
% Daily Value*
4g
6%
Saturated Fat 0g
2%
0mg
0%
213mg
9%
17g
6%
Dietary Fiber 1g
4%
Total Sugars 4g
3g
Vitamin C 0mg
2%
Calcium 64mg
5%
Iron 1mg
5%
Potassium 71mg
2%
*The % Daily Value (DV) tells you how much a nutrient in a food serving contributes to a daily diet. 2,000 calories a day is used for general nutrition advice.
(Nutrition information is calculated using an ingredient database and should be considered an estimate.)
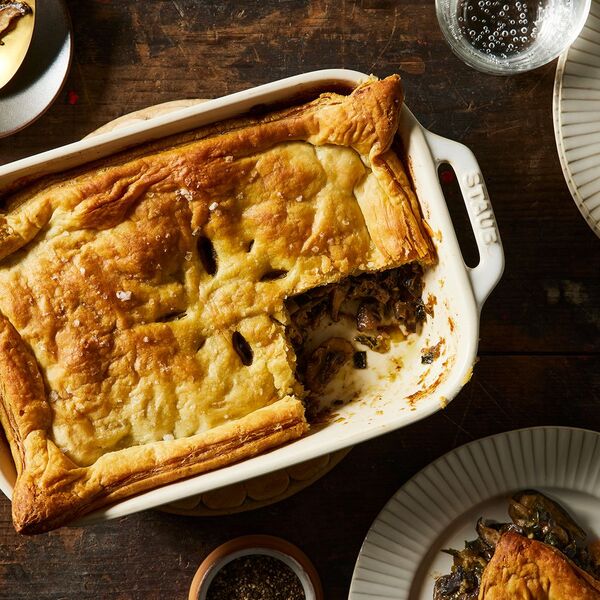
For when you need a meatless main that even the most carnivorous will enjoy, I’ve got you with this pie. The secret is in the flavor-rich filling: Meaty mushrooms meld with mellow miso and savory herbs, then splash around with a bit of white wine and vegetable stock or unsweetened oat milk (dealer’s choice, depending on whether you’re looking for super-savory or creamy-cozy). The whole thing’s then capped off with a sheet of slightly rolled puff pastry—if you’re plant-based, make sure you look out for a vegan type like Pepperidge Farm’s frozen puff—and baked till crispy on the top and richly stewy on the bottom.
If you’d like to make this and freeze it before the big meal, be my guest: You can fully bake it, then let it cool completely, wrap it well, and stick it in the freezer. Bake straight from frozen in a low oven (300°F for about 25 to 30 minutes should do the trick) with foil tented over the top so the pastry doesn’t burn. Pre-made filling will also keep in the fridge for up two two days; bring it to room temperature and thin out with additional stock or oat milk as needed before transferring to your baking dish and sticking it all in the oven. —Brinda Ayer
Test Kitchen-Approved
Ingredients
4 tablespoons
extra-virgin olive oil, divided
2
large or 3 medium leeks, tough outer layers removed, halved lengthwise, washed very well and white and pale green parts sliced thinly
1 pound
mixed mushrooms, sliced (a mixture of shiitake, cremini, oyster, maitake, and trumpet would be excellent)
Kosher salt and freshly ground black pepper, to taste
1 pinch
red pepper flakes
2 tablespoons
vegan butter (substitute more olive oil if you don’t like or have this)
2
cloves garlic, finely chopped
5
to 6 sprigs thyme, leaves only
5
5 to 6 sage leaves, thinly sliced into ribbons
1 tablespoon
white miso
2 tablespoons
all-purpose flour
1/4 cup
dry white wine, cider vinegar, or apple cider (hard or not)
1 3/4 cups
vegetable stock or plain unsweetened oat milk (for a richer texture), at room temperature
In a large skillet over medium-high heat, add the olive oil and heat until shimmering. Add the leeks and saute until softened and translucent, 6 to 8 minutes. Pour in the second two tablespoons of olive oil and heat momentarily. Add the mushrooms to the pan, plus a big pinch of salt and a few cranks of black pepper and red chile flakes, and cook until the mushrooms have expelled most of their liquid and begin to brown, 6 to 8 more minutes. Transfer the mushrooms and leeks to a separate container (like the 2-quart baking dish you’ll eventually use to bake the pie) and set aside.
To the same skillet, over medium heat, add the vegan butter and heat until fully melted. Add the garlic, thyme, and sage leaves and cook until fragrant and slightly browned, 1 to 2 minutes. Add the white miso and stir, cooking for another 30 seconds or so until it’s incorporated in the garlic and herb mixture. Next, add the all-purpose flour and cook for 1 to 2 minutes, stirring occasionally, until the flour is coated in the fat and no dry pockets are visible.
Carefully pour in the dry white wine, scraping the bottom of the pan and stirring the mixture so the liquid incorporates into the roux. Then, slowly add the vegetable stock or oat milk to the pan, stirring vigorously until no floury lumps remain. Bring the mixture to a rollicking simmer, then lower the heat and add the reserved mushrooms and leeks, plus the nutritional yeast, if using. Stir to combine and cook for another 3 or so minutes, letting the mixture thicken—you want it to be roughly the consistency of chowder, but not much thicker than that, as it’ll continue to firm up in the oven (add more liquid if yours evaporated too quickly). Taste and adjust seasoning as needed with more salt, pepper, or even sage or thyme leaves.
Transfer mushroom-leek mixture to a medium (2-quart) baking dish (a 7×10 or 7×11-incher should fit the mixture and work nicely with the size of the puff pastry sheet; a 10-inch cast-iron skillet also works), and smooth out into an even layer.
Roll the puff pastry so there’s a 1/4-inch overhang on all sides. Gently place puff pastry sheet over the baking dish, draping it so it hangs over the edges of the pan. Pinch the overhang onto the edge of the pan and add a few slits down the middle of the pie to let out steam and allow the pastry to fully puff up. Brush the top with aquafaba or melted vegan butter to encourage browning.
Place the baking dish in the oven and bake for 15 minutes; then lower the heat to 375°F and bake for another 25 to 30 minutes, until the pastry has puffed up fully (it should be considerably taller than when raw). If you see the top getting too dark too quickly, you can tent some foil over the dish for the second part of the bake. Let cool slightly before eating.
Brinda is the Director of Content at Food52, where she oversees all site content across Food52 and Home52. She likes chewy Neapolitan pizza, stinky cheese of all sorts, and tahini-flavored anything. Brinda lives in Brooklyn with 18 plants and at least one foster pup (sometimes more). Find her at @brindayesterday on Twitter and Instagram.
Put half the mushrooms in a food processor and pulse until roughly minced. Chop the remaining mushrooms into 1/4-inch pieces.
Heat oil in a large heavy pot over medium heat. Add onion; cook, stirring frequently, until translucent. Add carrots and celery; cook, stirring, until softened, 3 to 4 minutes. Add the minced and chopped mushrooms and salt; cook, stirring, until the mushrooms start to release their juices. Add oat milk; cook, stirring, until it evaporates. Stir in nutmeg. Add wine; cook, stirring, until it evaporates. Add tomatoes and bring to a boil.
Lower the heat to maintain a low simmer; cook for 45 minutes, stirring occasionally. (If the sauce looks dry, add boiling water, 1/4 cup at a time.)
Meanwhile, bring a large pot of water to a boil. Cook pasta according to package directions; drain. Serve the pasta topped with the sauce and garnished with Parmesan, if desired.
Tips
Tips: Look for a fiber-rich ancient-grain pasta, such as Gustiamo’s Sicilian Tumminia Busiate.
Violife makes an excellent vegan Parmesan, but you can also make a simple homemade version by processing raw cashews with garlic powder, salt and nutritional yeast.

/e456d585-5cf7-4ca8-ac55-eddfb96be9d2--cauliflower_kimchi_fried_rice3-700x630.jpg)


/45dcdbb5-ab25-48f7-b256-b7c64ec68cd5--IMG_2339.jpeg)

/3c433df2-0fa0-4613-ad91-e20a93ac034b--banana_choc_muffin.jpg)


/6eebb97a-636e-4510-a1cd-7517001b7d7d--2021-1026_vegan-mushroom-pie_3x2_mj-kroeger.jpg)