Cream of tartar helps to stabilize the aquafaba emulsion, helping to produce a voluminous foam that doesn’t collapse.
Cream of tartar lowers the pH of the meringue, preventing it from browning during heating, which yields a satiny white frosting.
Heating the frosting helps get rid of some of the bean aroma from the aquafaba, while bold flavorings help cover up what remains.
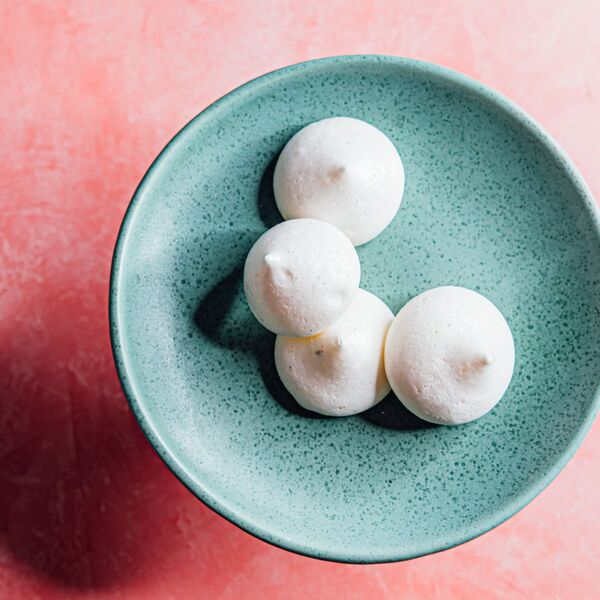
For people who avoid eggs due to allergies or dietary reasons, eating meringue cookies is completely out of the question. A classic meringue’s light, pillowy texture is made possible because of the unique properties of egg whites; when egg whites are whipped at a high speed with sugar, their proteins change shape (a process called protein denaturation) and trap air, forming a stable foam. However, an eggless “meringue” can be made using aquafaba, the cooking liquid of beans and legumes like chickpeas.
Aquafaba contains proteins (albumin and globulins, the type of water-soluble proteins seen in egg whites) and saponins (molecules that behave like soap and produce foams), and, when whipped with sugar, they produce a surprisingly convincing meringue substitute. With that in mind, I wanted to try to figure out the optimal cooking conditions to produce delicious vegan meringue cookies that are shiny, white, and pillowy, so I set up a bunch of different experiments, which you can read about by clicking on the link below.
In the end, I found that it’s best to use aquafaba from cans of chickpeas that have been cooked with kombu because it contains carrageenan, a carbohydrate that can form gels and is often used as an emulsifier in products like evaporated milk. I also found the addition of cream of tartar, an acid, to the meringue mixture both produces a more stable foam and cookies that have very little browning, as the acid inhibits caramelization and Maillard reactions. Finally, I found that aquafaba meringue needs a strong aromatic flavoring component, as adding even a large amount of vanilla extract did little to mask the beany smell. Ingredients with more robust aromas, however, like ground green cardamom or coffee, do a fantastic job of covering up the bean aroma.
Just like an egg-based meringue, the aquafaba meringue needs to be baked at a low temperature of 200°F/95°C for at least 2 hours. The lower temperature reduces the risk of browning and helps the meringue slowly dehydrate and hold its structure. Resist the urge to open the oven door for at least 1 hour, as the meringue might still be delicate and can deflate (my current oven is a bit of a nightmare and the door slams back pretty hard).
Aquafaba meringue cookies are one of the best ways to use what might otherwise end up as food waste. All it takes is sugar, canned chickpea liquid (if you can find the ones that are cooked with kombu, even better), cream of tartar, and an aromatic ingredient for a vegan treat that’s just as shiny, white, and pillowy as meringues made with egg whites.
Vegan Meringue Cookies Recipe
Cook Mode (Keep screen awake)
1/2cup (120ml; 130g) aquafaba (see note)
1/2cup (100g) superfine sugar
1/4teaspoon ground green cardamom
1/4teaspooncream of tartar
Preheat oven to 200°F (95°C) and set oven racks to middle positions; line two rimmed baking sheets with parchment paper. In the bowl of a stand mixer fitted with the whisk, combine aquafaba, sugar, cardamom, and cream of tartar.
Nik Sharma
Whisk at medium speed for 1 minute, then increase speed to high and whisk, stopping once or twice to scrape sides and bottom to ensure sugar is fully incorporated, until meringue reaches satiny, stiff white peaks, about 10 minutes (see note).
Nik Sharma
Using a 1-tablespoon measuring spoon or a pastry bag fitted with the 1/2-inch (1.27cm) round tip, spoon or pipe the meringue into 2-inch (5cm) circles spaced 1 inch (2.5cm) apart on the prepared baking sheets.
Nik Sharma
Bake the meringues without opening the oven door for 1 hour. Swap the baking sheet positions and rotate them front to back, then bake until the meringues are white in color and dry and firm to the touch, about 30 minutes longer (note that baking times can vary, and it may take up to 2 hours total baking time). Remove the sheets from the oven and let the meringues cool on the baking sheets.
Serve, or transfer the cooled meringues to an airtight container and store for up to 3 days.
Special Equipment
Stand mixer
Notes
Aquafaba is the cooking liquid collected from beans (in this case chickpeas). Canned liquid is best for reliable and consistent results, but you can also use the liquid from beans cooked at home. Please note that while home-cooked chickpeas can produce aquafaba that works, you may end up with varying results depending on how much water was used to cook the beans and how they were cooked. One 15-ounce (425g) can of chickpeas gives about 2/3 cup (160g) aquafaba.
The time taken to form stiff peaks tends to vary depending on the aquafaba source and viscosity. For this reason, it is better to use visual cues as an endpoint. Stiff peaks can appear anywhere between about 4 mins to 12 minutes.
Make-Ahead and Storage
The baked meringues can be stored in an airtight container at room temperature for up to 3 days. Depending on the ambient humidity in your room, the meringues can absorb moisture from air. You can reheat them at 150°F/65.5°C for 10 minutes to get rid of the absorbed moisture before serving. You can also drop a packet of food-safe silica gel beads along with the meringues in the airtight container; it will help prevent the cookies from absorbing too much moisture.
Nutrition Facts (per serving)
13
Calories
0g
Fat
3g
Carbs
0g
Protein
×
Nutrition Facts
Servings: 40
Amount per serving
Calories
13
% Daily Value*
0g
0%
Saturated Fat 0g
0%
7mg
2%
3mg
0%
3g
1%
Dietary Fiber 0g
0%
Total Sugars 3g
0g
Vitamin C 0mg
0%
Calcium 1mg
0%
Iron 0mg
0%
Potassium 6mg
0%
*The % Daily Value (DV) tells you how much a nutrient in a food serving contributes to a daily diet. 2,000 calories a day is used for general nutrition advice.
(Nutrition information is calculated using an ingredient database and should be considered an estimate.)
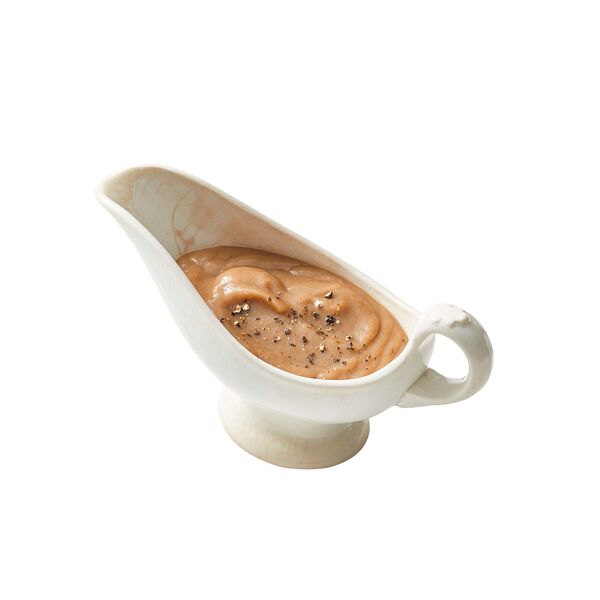
This super-simple sauce will please every eater at your Thanksgiving table with its rich mushroomy flavor.
Advertisement – Continue Reading Below
1/4c.
vegan butter
4
cremini mushrooms, finely chopped
1
large shallot, finely chopped
1/3c.
all-purpose flour
4c.
low-sodium mushroom or vegetable broth
2
sprigs fresh rosemary
1tsp.
low-sodium soy sauce
Pinch freshly grated nutmeg
Black pepper
Step 1Heat vegan butter in large skillet on medium. Add mushrooms and shallot and cook, stirring occasionally, until golden brown and tender, 6 to 8 minutes.
Step 2Sprinkle flour on top and cook, stirring, until golden brown, 4 to 5 minutes. Slowly whisk in broth. Add rosemary and bring to a boil. Reduce heat and simmer, stirring occasionally, until thickened, 8 to 12 minutes.
Step 3Stir in soy sauce, nutmeg and 1/2 teaspoon pepper and cook 1 minute. Strain just before serving.
Nutrition Information: Each 1/4 cup about 70 calories,
5 g fat (4.5 g saturated), 1 g protein, 255 mg sodium,
5 g carb, 0 g fiber
At Good Housekeeping, we want to make sure that every recipe we share will work in your kitchen. That’s why our team of culinary experts tests each recipe at least three times — and often, several more times after that. During the testing process, we switch up the appliances used (think: gas, electric and induction ranges) as well as the brands of ingredients. Dozens of people taste the dish along the way, helping us to develop the tastiest meals, sides, drinks and desserts.
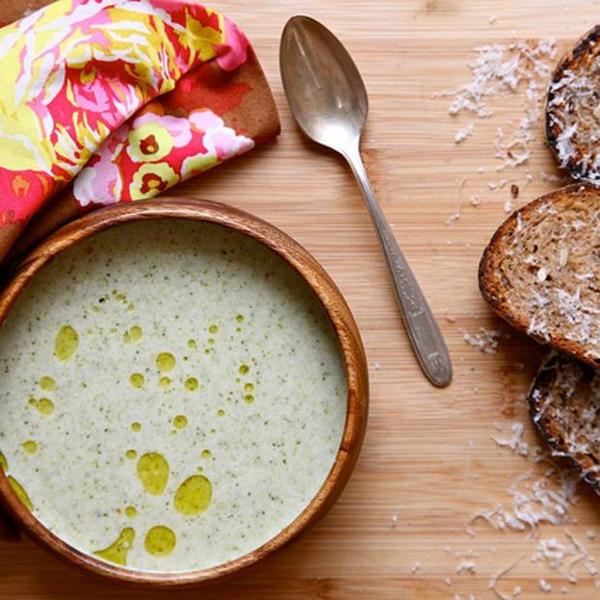
This is the soup I suggest you eat this weekend after you devour three doughnuts at breakfast, and before you eat tacos and french fries for dinner.
It has broccoli and raw cashews in it. It’s the picture of health.
Nevermind how much butter I put on that bread. Let’s focus on our health. Health after doughnuts and before tacos and fries. French Fry tacos should be a thing. Is that a thing? It needs to be a thing.
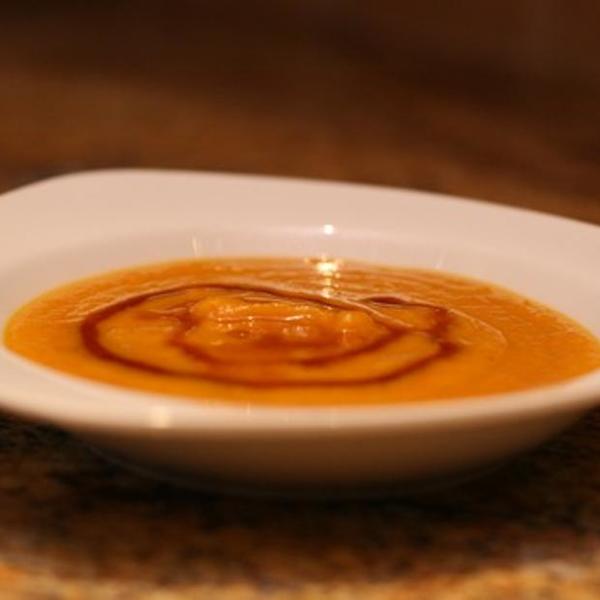
This soup is gorgeously healthy. It’s packed with bright green broccoli and cashews.
When raw cashews are soaked in water and blended with soupy ingredients, the nuts simulate cream. It really is a remarkable fact. Cashews blended with broccoli in this recipe makes a thick, flavorful and totally healthful soup.
The lemon adds some bright inspiration. The vegan worcestershire sauce adds an earthy, animal-y roundness. There’s spice from pepper and smoke from cumin. Garlic and onions should be in everything… so obviously they’re in this soup. Overall… it’s a health win. Get at it!
Oh! Ps . I’m really into soup.
Vegan Cream of Broccoli Soup
adapted from The 3-Day Cleanse
Print this Recipe!
1 1/2 cups raw cashews, soaked in water for 1 hour then drained
1 small onion, diced
2 cloves garlic, minced
1 tablespoon olive oil
2 heads of broccoli, chopped into bite-size florets
1/8 teaspoon fresh ground nutmeg
1 teaspoon cumin
1 teaspoon salt
1/4 teaspoon ground mustard seeds
fresh ground black pepper to taste
3 teaspoons fresh lemon juice
2 teaspoon vegan Worcestershire sauce
about 4 cups of water
Soak raw cashews in water for 1 hour. They’ll soften slightly. Drain.
Steam broccoli until tender. A fork should be able to easily pierce the flesh. Remove from steamer and set aside.
In a large saucepan over medium heat, add olive oil, and onions. Cook until onions are tender and translucent, about 5 minutes. Add garlic and cook for one minute more. Add cumin, salt, mustard seed, and black pepper and cook for about 30 seconds. Add cooked broccoli florets, and remove from heat.
In a blender, add half of the softened cashews, about 1/2 of the broccoli mixture, and 2 cups of water. Blend until smooth. Pour blended soup into a large soup pan. Blend the remaining cashews, broccoli, and 2 more cups of water. Blend until smooth. Pour into pan. Heat over low heat. Add lemon and worcestershire sauce. Taste and season as necessary. Add more water for a thinner consistency.
Serve warm. Soup will last, in an airtight container in the fridge for 4 days.
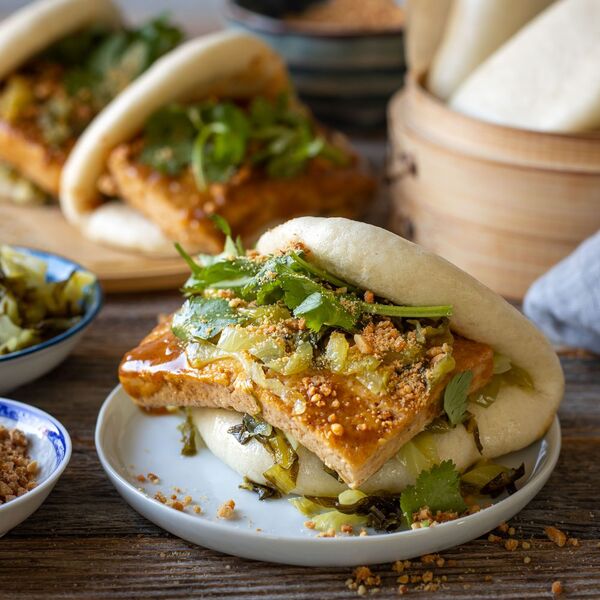
I first tried a vegetarian version of gua bao 刈包 (guà bāo), pork belly buns, at my Taiwanese friend’s potluck many years ago. It’s a common breakfast and street food snack in Taiwan. Gua bao has a signature look with an opening like a mouth—this is where you stuff your favorite filling. Traditionally, gua bao features braised meat, paired with sour mustard and crushed peanuts.
As I’m rounding up recipes for Lunar New Year, I thought why not share this veganized gua bao? It’s a cozy, satisfying snack, or a meal in itself. Imagine holding a warm bun, stuffed with savory tofu on a cold day. Ah…comfort food! This recipe is perfect for any day and, according to CNN Travel, “eating gua bao signifies devouring bad luck.” Isn’t it perfect to take a bite for a delicious meal and maybe for some good fortune too? —WoonHeng Chia
Test Kitchen-Approved
Ingredients
Bao dough:
1 tablespoon
granulated sugar
1/2 cup
warm water
1 teaspoon
active-dry yeast
245 grams
(1 3/4 cups plus 2 tablespoons) all-purpose flour
1 pinch
salt
1 teaspoon
neutral oil
Braised tofu:
1 pound
firm tofu, sliced into 6 slabs
3
slices peeled ginger
2
garlic cloves
3
scallions, tied into a knot
1
dried chile
2 cups
water
3
star anise
1
cinnamon stick
1 1/2 tablespoons
soy sauce
1 tablespoon
vegan oyster sauce
1/2 teaspoon
thick caramel sauce
1/2 tablespoon
granulated sugar
1 teaspoon
toasted sesame oil
1/2 teaspoon
ground white pepper
Salt, to taste
1/2 teaspoon
cornstarch
Neutral oil, for cooking
Garnishes:
8 ounces
sour mustard, soaked in water for 1 hour
2
slices peeled ginger
1
garlic clove
1
dried chile, soaked in hot water until soft
1 tablespoon
granulated sugar
1 handful
chopped cilantro leaves
Crushed toasted peanuts, tossed with granulated sugar
Directions
To make the gua bao, mix the sugar and warm water in a cup, then add the yeast. Let the mixture sit for about 5 minutes, until the yeast turns foamy.
Place the flour and salt in the bowl of a stand mixer and use a rubber spatula to stir to combine. Add the yeast mixture and stir until a shaggy dough forms. Stir in the oil.
Now fit the mixer with a dough hook and knead the dough at a low speed for 8 to 10 minutes, until a smooth dough forms. (If there are still dry spots of flour after 2 to 3 minutes of mixing, add some water, 1 tablespoon at a time.)
Transfer the dough to a clean work surface and divide it into 6 pieces (about 65 grams each). Work with one dough at a time and cover the rest with a cloth to prevent them from drying out. Knead each piece by hand to remove air bubbles. Now roll it into a ball, cover, and let rest for 5 minutes.
Meanwhile, cut out 6 (4×3-inch) parchment rectangles and set aside.
Lightly flour a work surface. Uncover a dough ball and flatten it with your palm. Roll into an oval about 3-inches in diameter (about 1/4-inch thick).. Brush with oil, then fold in half to form a semi-circle. Place on a parchment rectangle and transfer this to a steamer filled with water.
Repeat the above step with the remaining dough balls.
Proof the bao for about 45 minutes, until they have fluffed up. To check, gently poke the dough: If it bounces back, then it’s ready.
While the bao are proofing, work on the braised tofu. Heat a large nonstick pan and add a drizzle of oil. Pan-fry the tofu until golden brown. Transfer to a plate.
Using the same pan, add a little more oil and sauté the ginger until aromatic. Add the garlic, scallion, and chile, and keep cooking until fragrant. Pour in the water and add the star anise, cinnamon stick, and season with the sauces, sugar, sesame oil, white pepper, and salt (if needed).
Add the tofu back to the pan and bring the mixture to a boil. Now drop the heat to medium and simmer until the sauce is reduced to one-third of its volume. Remove the ginger, garlic, scallion, chile, star anise, and cinnamon. Combine the cornstarch with 1/2 teaspoon water, then stir this slurry into the sauce to thicken the sauce. Turn off the heat.
Prepare the sour mustard: Wash and rinse the soaked sour mustard with clean water 2 to 3 times. Thinly slice.. Heat a large pan and add the oil. Sauté the ginger, garlic, and chile until fragrant, then add the sour mustard. Stir-fry for 1 minute, then add the sugar and continue to cook for another minute. Dish out and set aside
Cook the proofed bao: Turn on the heat to high and bring the water to a boil. Lower the heat to medium-high and steam the bao for 8 minutes. Turn off the heat and let them stay in the steamer for another 8 minutes before removing them.
Remove the bao from the steamer, then stuff with braised tofu, sour mustard, crushed peanuts, and cilantro.
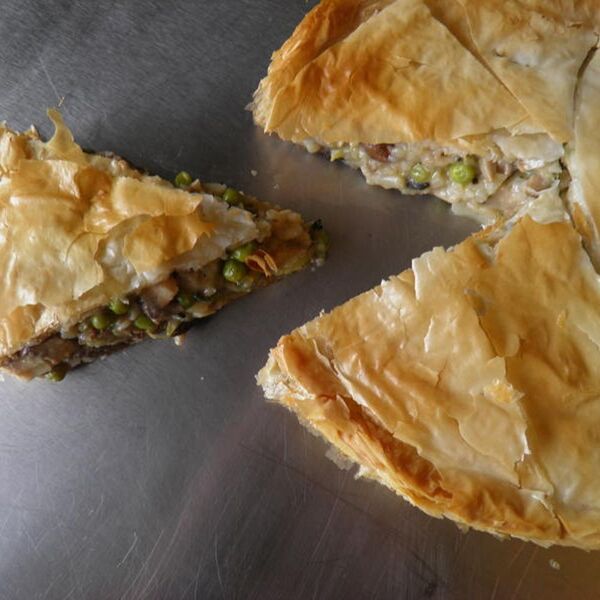
I think that everyone should have a vegan recipe or two in their repertoire. Not only are more people choosing veganism, a lot of people have food allergies and intolerences to dairy and egg. With my son having food allergies, I am always appreciative of having something for him at the buffet. It is easy to substitute vegan butter and soy sour cream with traditonal ingredients, if you wish. My son ate a huge piece of this tart while telling me the entire time he was pretty sure he did not like mushrooms. I served it the next day for lunch to a friend along side some poached salmon. —MyCommunalTable
Ingredients
4 tablespoons
olive oil + 1/2 cup for brushing on filo dough
4 tablespoons
vegan butter such as earth balance
20 ounces
assorted mushrooms, chopped
1 cup
celery, finely chopped
1
medium onion, finely chopped
6
gloves of garlic, finely chopped
3 tablespoons
fresh thyme, finely chopped
3 tablespoons
fresh marjoram, finely chopped
4 tablespoons
AP flour
1/2 cup
dry white wine
1 cup
vegetable stock
2 cups
grated baked potato. Approximently 2 medium baked potatoes
4 tablespoons
soy sour cream
salt &pepper, to taste.
1 cup
fresh or thawed peas
16
sheets of filo dough
Directions
In large saute’ pan, heat oil and butter over medium heat.
Add mushrooms, celery, onions and garlic. Cook until tender.
Stir in fresh thyme and marjoram.
Scatter flour over all the vegetables and stir. Cooking for a few minutes, so that the flour has a chance to cook.
Stir in wine and stock, then lower temperature a bit. Stir occasionally while the sauce thickens up.
Stir in soy sour cream. Start adding salt and pepper. The amount will vary according to how salty the stock is and/or what your palette likes. Make sure to taste it along the way.
Turn off heat and stir in grated potatoes and peas. Adjust seasoning again if necessary. Set aside to cool while prepping tart crust or place in fridge until ready to assemble.
Preheat oven to 375F. Brush sides and bottom of tart pan with olive oil.
Place first sheet of filo dough across tart pan, then brush with oil. Make sure to brush the dough that is on the side of the pan. Rotate placement of the next sheet slightly down from the last sheet. Brush with oil. Like it is the minute hand going around the clock face. Continue with all eight sheets around the tart pan. Make sure that the bottom, sides and edge of tart pan are all covered with filo and oil.
Place filling in tart pan. Cover tart with the next 8 sheets of filo in the same manner as the bottom layer. When finished, use kitchen scissors to trim edges, leaving a 1/2 inch over hang. Then go along edge and tuck edge into pan all the way around.
Bake for 35-45 minutes until filo is golden brown. Remove from oven and cool a bit.
When cool to the touch, release edges from tart pan with knife. Then invert on to a platter. Cut into wedges and serve.
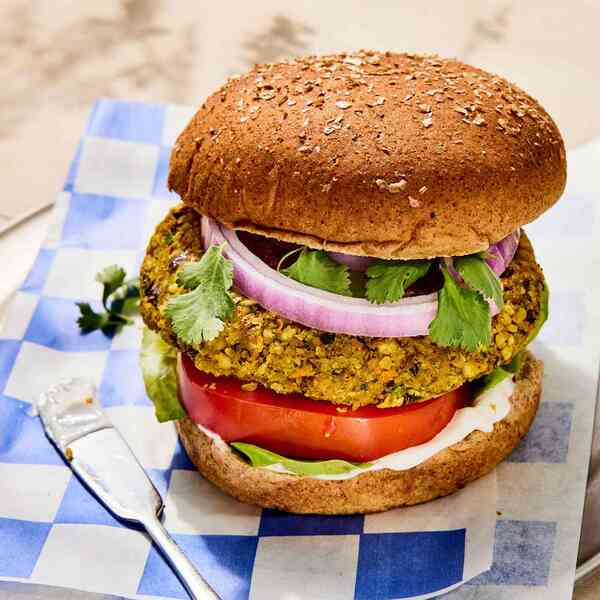
Meanwhile, peel onion and cut in half lengthwise. Chop half of the onion (you’ll have about 1/2 cup chopped). Slice the remaining half into half-moon slices (you’ll have about 1/2 cup sliced). Heat 1 tablespoon oil in a large nonstick skillet over medium heat. Add mustard seeds; cook, stirring occasionally, until fragrant and beginning to pop, 1 to 2 minutes. Add the chopped onion, garlic, ginger and chile; cook, stirring often, until starting to soften, about 3 minutes. Stir in garam masala, turmeric and salt; cook, stirring constantly, until fragrant, about 30 seconds. Remove from heat.
Pulse oats in a food processor until ground into a rough meal, about 10 pulses. Add chickpeas, cilantro, carrots, cashews and the mustard seed-onion mixture. Pulse until well combined and beginning to pull away from the sides of the bowl, about 10 pulses, stopping to scrape down sides as needed. Add the flaxseed mixture; pulse until combined, 2 to 4 pulses. Transfer to a large bowl. Divide into 4 portions (about 1/2 cup each); shape each portion into a 4-inch patty (about 1/2 inch thick).
Wipe the skillet clean. Add the remaining 2 tablespoons oil; heat over medium heat. Add the patties; cook until golden and crisp on both sides, about 4 minutes per side.
If desired, spread vegan mayonnaise evenly over split bun halves. Place 3 lettuce leaves and 2 tomato slices on each bottom bun and place 1 patty on top. Top with the sliced onion. Garnish with additional cilantro, if desired. Replace top buns and serve.
Nutrition information is calculated by a registered dietitian using an ingredient database but should be considered an estimate.
* Daily Values (DVs) are the recommended amounts of nutrients to consume each day. Percent Daily Value (%DV) found on nutrition labels tells you how much a serving of a particular food or recipe contributes to each of those total recommended amounts. Per the Food and Drug Administration (FDA), the daily value is based on a standard 2,000 calorie diet. Depending on your calorie needs or if you have a health condition, you may need more or less of particular nutrients. (For example, it’s recommended that people following a heart-healthy diet eat less sodium on a daily basis compared to those following a standard diet.)
(-) Information is not currently available for this nutrient. If you are following a special diet for medical reasons, be sure to consult with your primary care provider or a registered dietitian to better understand your personal nutrition needs.
Sound crazy?? Well Avocado and lime are like the creamy and tangy in any successful tea cookie combo. Add in the creaminess of the cream cheese, sweetness of the powdered sugar & sea salt to draw out the “dulce” and you’ve got a fluffy, light and unique treat. You’ll be surprised at how it rivals your favorite handheld desserts! —HealthyVoyager
Ingredients
1/2
large avocado
1/2 cup
vegan butter, room temperature
4 ounces
vegan cream cheese, room temperature
zest of 1 lime
1 teaspoon
vanilla extract
2 cups
flour
1/2 teaspoon
baking powder
coarse sea salt
Directions
Preheat oven to 375ºF.
In a mixing bowl, sift together flour and baking powder.
In another bowl, cream together avocado, butter, cream cheese, and powdered sugar until smooth.
Mix in lime juice, lime zest and vanilla.
Then slowly add in flour mixture until everything is completely incorporated.
With a teaspoon, drop spoonfuls of cookie dough onto sheet pan lined with parchment paper. Smaller dollops, like kisses, will come out nice and crispy.
Bake for 12 to 15 minutes, until cookies are golden around the edges. Sprinkle lightly with sea salt and enjoy!
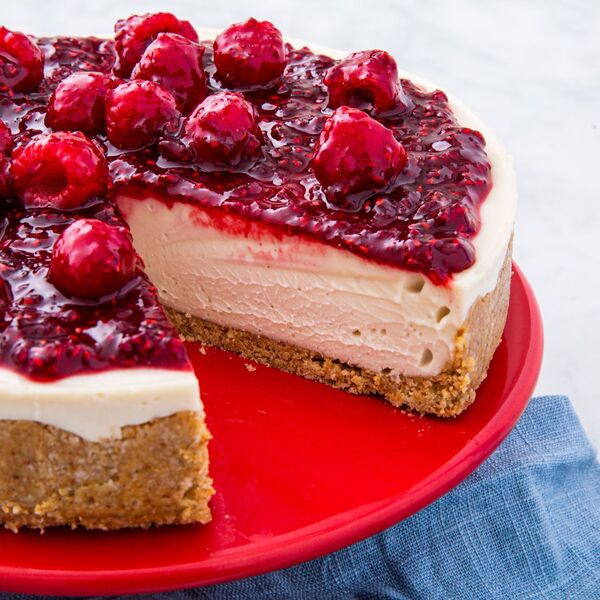
This cake is downright magic. A vegan cheesecake that tastes shockingly smooth, creamy, and rich. The secret? Soaked cashews! Cashews are an amazing ingredient that can be used across a variety of recipes, in anything ranging from a sweet & sour stir-fry to super creamy vegan mac & cheese, and it’s no exception here.
The backbone of this recipe is time. The cashews must be rehydrated fully for the best cheesecake texture. If you don’t have enough time to soak in cold water overnight, there’s a shortcut: soak for 2 hours in a big bowl of boiling water.
We call for refined coconut oil here because it has a more neutral flavor that allows for a milder playground where all the ingredients can coexist beautifully. If you love that deeply rich, fragrant coconut taste and don’t mind it overtaking the spotlight, opt for virgin coconut oil.
While the raspberry topping is optional, it truly makes this cheesecake better than all the rest. A little sweet, fruit acidity helps the creaminess shine without being overpowering.
Looking for a traditional cheesecake? Try our favorite classic cheesecake! If you’ve made this recipe, be sure to drop a comment down below and let us know how you liked it!
Editor’s note: This intro was updated to add more information about the dish on September 11, 2021
Advertisement – Continue Reading Below
1c.
quick-cooking oats
1/2c.
almonds
3/4c.
unsweetened coconut flakes
3Tbsp.
maple syrup
1/4tsp.
kosher salt
1/2c.
almond butter
3/4c.
coconut milk
11/4c.
granulated sugar, divided
2c.
cashews (soaked overnight, drained and rinsed)
1/2c.
refined coconut oil, melted, plus more for pan
2tsp.
pure vanilla extract
1
(8-oz.) container vegan cream cheese
3c.
fresh or frozen raspberries, divided
Step 1Make the crust: Pulse oats, almonds, and coconut flakes in a food processor until fine crumbs form. Transfer to a medium bowl and fold in maple syrup, salt, and almond butter.
Step 2Grease the bottom of a 8″ or 9” spring form pan with coconut oil and press crust evenly into bottom of pan.
Step 3Make the filling: In a small saucepan over medium heat, mix coconut milk and ¾ cup sugar and heat just until sugar is dissolved. Let cool.
Step 4In a high-powered blender, blend soaked cashews, cooled coconut milk mixture, coconut oil, and vanilla until thick and smooth. Blend in vegan cream cheese.
Step 5Pour filling mixture into crust and chill in freezer for at least 3 hours and up to overnight.
Step 6Make the fruit topping: Bring 2 cups raspberries and remaining 1/2 cup sugar to a low boil over medium heat and continue to simmer until sauce is slightly thickened, about 8 to 10 minutes. Let cool, then fold in remaining 1 cup berries.
Step 7Assemble the cake: Remove cheesecake from springform pan and let thaw at room temperature 1 hour before spooning raspberry topping all over top of cake.
Emily Hlavac Green
Wilton Wilton Aluminum Springform Pan, 9-Inch Round Pan for Cheesecakes and Pizza


/348dc32c-71ed-4bc9-8196-dc4236f74678--Vegan-Gua-Bao-Food52Website.jpg)

/93b34bbb-f319-4f83-b5e4-b30f72c92c22--P3090179.jpg)


/ec32a5f8-0f22-4779-9f7e-abef909f5ded--avocado-cookies-300x198.jpg)