Blog

  • Gluten-Free Sweet Potato Cardamom Macadamia Brownies

    Gluten-Free Sweet Potato Cardamom Macadamia Brownies

    recipe image

    Gluten-Free Sweet Potato Cardamom Macadamia Brownies

    • Serves
      12
    Author Notes

    This is a delicious recipe for my gluten-free sweet potato macadamia brownies with a touch of cardamom. Enjoy! —TheHealthyApple

    Ingredients

    • 1 cup

      sweet potatoes, mashed


    • 1/3 cup

      Earth Balance Vegan Butter Sticks


    • 1/2 cup

      sugar


    • 1/4 teaspoon

      baking soda


    • 1/4 teaspoon

      sea salt


    • 1/2 cup

      macadamia nuts, ground


    • 1 teaspoon

      cardamom


    • 1 cup

      semi sweet vegan chocolate chips


    • 2 tablespoons

      coconut flakes

    Directions
    1. In a medium sized saucepan, combine sweet potatoes, vegan butter and sugar. Cook over medium heat; bring to a boil and stir for 7 minutes.
    2. Remove 1/2 the mixture; transfer to a mixing bowl to cool. Add baking soda and sea salt; mix well. Transfer mixture to a baking pan and bake for 20 minutes or until golden brown. Remove from oven.
    3. Add cardamom, macadamia nuts, chocolate chips and coconut to stove top sweet potato mixture; mix well. Drizzle over cooked portion. Bake for another 15 minutes. Remove from oven, set aside to cool.
    4. Slice into brownie bites. Enjoy!

    Read More

  • Toasted Coconut and Almond Butter

    Toasted Coconut and Almond Butter

    recipe image

    Toasted Coconut and Almond Butter

    Photo by Alpha Smoot
    • Makes
      about 1 cup
    Author Notes

    You’ll find excuses to put this spread on everything and anything. I love it on toast or swirled into oatmeal. —Emily

    Test Kitchen Notes

    Excuse me while I dig straight into this jar with a spoon. The nut butter’s a standout and certainly my newest pantry staple in lieu of store-bought varieties. When you marry roasted almonds with toasted coconut, it’s nut butter umami. Dial it up with raw manuka honey and achieve pure, wholesome bliss. I suggest adding a tablespoon of coconut oil as you’re grinding the ingredients in a food processor: It speeds up the process a bit and adds a more robust coconut flavor. —Allison Walton

    • Test Kitchen-Approved
    Ingredients

    • 2 cups

      raw almonds


    • 1 cup

      unsweetened shredded coconut


    • 2 pinches

      sea salt


    • 2 1/2 teaspoons

      local honey (or maple syrup, if vegan)

    Directions
    1. Preheat the oven to 400° F. Line a baking sheet with parchment paper. Place the almonds in a single layer on the sheet, then toast in the oven for 8 to 10 minutes, or until lightly golden. Remove from pan immediately so that they do not continue to toast.
    2. Sprinkle the coconut over the same pan, place in the oven, and toast for about 3 minutes. The coconut will start to toast as soon as it comes into contact with the pan, so watch it carefully. You want it a very light golden color. Remove from the pan immediately when done.
    3. Add the toasted almonds coconut to a food processor. Add the sea salt, and pulse to blend. Scrape down the sides every minute or so, but it will take about 5 to 7 minutes total to get to nut butter consistency. When the desired consistency is reached, add the honey and pulse a few times to incorporate it. (If you add the honey sooner, the mixture tends to be a bit gluey.) Enjoy!
    4. Editor’s note: If the butter seems crumbly, stir in coconut or a neutral oil until it’s spreadable.

    Read More

  • Vegan Cream Of Mushroom Soup With Not So Vegan Herb Bread

    Vegan Cream Of Mushroom Soup With Not So Vegan Herb Bread

    recipe image

    Do you have things in your head like the look of your dream house?   Your dream wedding dress?  Do you have the names of your nonexistent children all picked out?

    I don’t have that.  Like… at all.

    Sometimes I feel like there’s a strange void in my girlbrain.  But… I dunno.

    So.  At least there’s that.

    I didn’t even like mushroom until a few years ago…. now here I am cooking down a whole pot of them.

    They’re so pretty…. and they’re about to turn into a delicious brown gray mush.

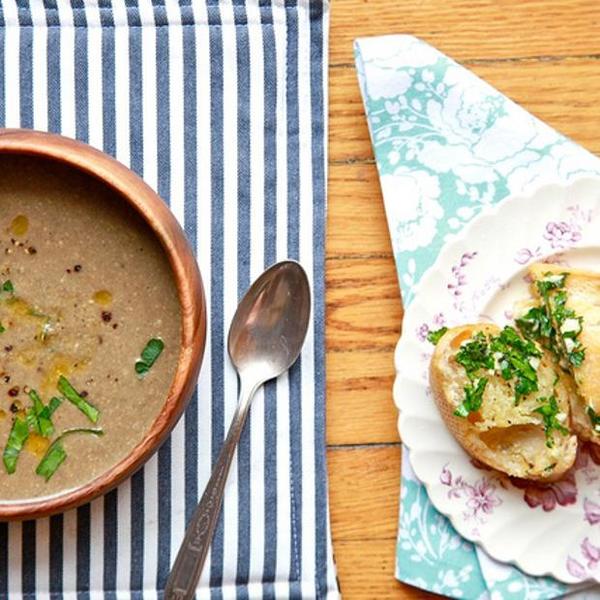
    This soup is creamy but vegan.  Get with the program.

    I blended raw cashews with water creating a rad Cashew Cream.

    See what’s happening here?  Divine.

    Blended cashews help create a creamy, but still earthy soup.  The soup doesn’t taste like mushroom and cashews blended up.  Nope.  The cashews disappear and just add a creaminess and very subtle sweetness.

    The soy sauce and Worcestershire sauce in the soup really compliment the earthiness of the mushrooms.  This soup is very simple and I think it’s just delicious.

    Soup sucks without bread.  I mean… come on.

    Because I’m not actually vegan, I made a ridiculous herby garlic bread to go with my perfectly vegan soup.

    So wrong.  I know.

    It was crazy good and I don’t feel bad at all.

    Vegan Cream of Mushroom Soup with Cashew Cream

    Makes about 6 cups

    Print this Recipe!

    For the Soup:

    2 tablespoons olive oil

    1 medium yellow onion, chopped

    3 garlic cloves, minced

    1 pound cremini mushrooms, cleaned and sliced

    1 tablespoons soy sauce (I used Bragg’s Amino Acids)

    1 tablespoon Worcestershire sauce (vegan please)

    about 1 teaspoon coarse ground black pepper

    3 cups vegetable broth

    salt to taste

    For the Cashew Cream:

    1/2 cup raw cashews

    1/2 cup water

    *Substitute Cashew Cream with 3/4 cup half and half or 8 ounces of silken tofu

    In a large pot, heat olive oil over medium heat.  Add onions to hot oil and saute until translucent and slightly browned, about 5 minutes.  Add garlic, stir, and cook for 1 minute more.  Add the mushrooms, soy sauce and Worcestershire sauce and cook until mushrooms are cooked and broken down, about 5 minutes.  Stir occasionally.  Add cracked pepper and  vegetable stock and cook at a simmer until mushrooms are completely soft.  This took me about 10 to 15 minutes.

    While the soup simmers, prepare the cashew cream.  In a blender, combine raw cashews and water.  Blend on high until smooth.  Pour into a measuring cup and set aside.  Don’t worry about washing the blender… we’re going to use it to blend the soup.

    When mushrooms are cooked through, add about one third of the soup to the blender.  Hot soup rises high in the blender so definitely be careful how high you fill the blender.  Blend soup on low, increasing the speed to high, until no large mushroom chunks remain.  Pour blended soup into a clean pot or large bowl.  Blend the remaining soup in batches.  *If using silken tofu instead of cashew cream.  Blend the silken tofu in with the mushrooms and broth.

    Add the cashew cream to the blended soup and stir to incorporate.

    Place a fine mesh strainer over the pot that you cooked the soup in.  In batches, pour the blended soup into the fine mesh strainer and work the soup through the strainer with a rubber spatula.  Don’t use a wooden spoon… you could get splinters in your soup… seriously.  Heat and serve the strained soup.  Or place in a freezer safe container for a few weeks down the road.

    Not So Vegan Herb Bread

    1 fresh baguette

    3 tablespoons unsalted butter, softened

    3 tablespoons coarsely chopped parsley

    1 clove garlic

    1 tablespoon olive oil

    3 tablespoons fresh grated Parmesan cheese

    salt and pepper to taste.

    Place a rack in the upper third of the oven and preheat to 350 degrees F.

    On a clean cutting board, use a fork to mash together softened butter, garlic, and chopped parsley.  Once incorporated, drizzle the olive oil over the butter mixture and work in the olive oil.  Add the Parmesan cheese, salt and pepper and incorporate with the fork.

    Slice baguette into thick slices, not slicing all the way through the loaf, but keeping the slices connected.  Spread parsley butter in between bread slices.  Wrap baguette in foil and bake for 10 minutes, or until butter is melted and fragrant.

    Remove from the oven and serve immediately.

    Read More

  • Vegan, Gluten-Free Double Chocolate Muffins

    Vegan, Gluten-Free Double Chocolate Muffins

    recipe image

    Vegan, Gluten-Free Double Chocolate Muffins

    Photo by Julia Gartland
    • Serves
      12
    Author Notes

    …or are these really just cupcakes without the frosting? Either way, you’ll never believe that muffins this moist, light, and chocolatey could be both vegan and gluten free. —Gena Hamshaw

    • Test Kitchen-Approved
    Ingredients

    • 1 tablespoon

      ground flax meal, whisked together with 3 tablespoons warm water and set aside


    • 2/3 cup

      sorghum or millet flour


    • 2/3 cup

      brown rice flour (superfine brown rice flour will give you best results)


    • 1/3 cup

      tapioca flour (also known as tapioca starch)


    • 1/3 cup

      potato starch


    • 2 teaspoons

      baking powder


    • 1 teaspoon

      baking soda


    • 1/2 teaspoon

      salt


    • 1/3 cup

      plus 2 tablespoons cocoa powder


    • 3/4 cup

      organic cane sugar


    • 1 cup

      vegan dark chocolate chips (such as the Enjoy Life brand)


    • 1 teaspoon

      apple cider vinegar


    • 1 cup

      soy or almond milk (plus extra as needed)


    • 1/3 cup

      cup vegetable oil (grapeseed, canola, safflower, etc.)


    • 1 cup

      applesauce or pumpkin purée

    Directions
    1. Preheat your oven to 350° F and lightly oil and flour a 12-muffin baking sheet.
    2. Whisk together the flours, starches, baking powder, baking soda, salt, cocoa powder, sugar, and dark chocolate chips.
    3. Whisk together the apple cider vinegar and almond or soy milk until frothy. Add the vegetable oil and applesauce or pumpkin, then stir in the flax mixture. Add the wet ingredients to the dry and mix very well, until the batter is totally even and smooth (there’s no gluten here to overdevelop, so don’t worry about mixing too much). If the batter is stiff or very thick, add an extra 1-2 tablespoons non-dairy milk.
    4. Scoop the batter into the muffin cups by the heaping 1/3 cup. Bake for 20 to 30 minutes, or until the muffins are firm on top. Cool completely before enjoying. The muffins will keep best when wrapped individually in plastic wrap and then stored in an airtight container.

    Read More

  • Vegan Chocolate Tart with Salted Oat Crust

    Vegan Chocolate Tart with Salted Oat Crust

    recipe image

    You don’t have to use a vegan chocolate to make this decadent tart—any bittersweet baking bar will be great.

    Ingredients

    Crust

    cups old-fashioned oats

    ¾

    cup whole wheat flour

    cup virgin coconut oil, melted, slightly cooled

    ¼

    cup light agave syrup (nectar)

    2

    tablespoons unsweetened cocoa powder

    ¾

    teaspoon kosher salt

    ½

    teaspoon ground cinnamon

    Filling and Assembly

    ½

    teaspoon instant espresso powder

    1

    cup unsweetened cocoa powder

    7

    ounces vegan dark chocolate, melted, slightly cooled

    cup light agave syrup (nectar)

    2

    teaspoons vanilla extract

    cup plus 1 teaspoon virgin coconut oil, melted, slightly cooled

    ¼

    teaspoon kosher salt, plus more

    2

    tablespoons old-fashioned oats

    1

    tablespoon demerara sugar

    Flaky sea salt

    Special Equipment

    A 9-inch-diameter or a 13¾x4½-inch tart pan with removable bottom

    Preparation

    1. Crust

      Step 1

      Preheat oven to 350˚. Pulse oats, whole wheat flour, coconut oil, agave, cocoa, salt, and cinnamon in a food processor until oats are coarsely ground and mixture looks like wet sand.

      Step 2

      Firmly press into bottom and up the sides of tart pan. Bake until crust is golden brown and smells toasty, 20–25 minutes. Transfer to a wire rack; let cool.

    2. Filling and Assembly

      Step 3

      Dissolve espresso powder in ¾ cup very hot water in a food processor. Add cocoa and let sit 5 minutes. Add melted chocolate, agave syrup, vanilla, ⅔ cup coconut oil, and ¼ tsp. kosher salt and process until mixture is very smooth and thick, about 30 seconds.

      Step 4

      Scrape filling into cooled tart shell and smooth top (if making tart in a rectangular shell, you may have a little filling left over; save for another use, like truffles). Tap tart lightly against counter to pop any air bubbles in filling.

      Step 5

      Cook oats and remaining 1 tsp. coconut oil in a small skillet over low heat, stirring constantly, until oats are toasted, about 3 minutes. Gradually add half of demerara sugar, stirring constantly, until sugar is melted, then remove from heat and stir in remaining demerara sugar just to coat. Season with kosher salt; let oat mixture cool.

      Step 6

      Scatter oat mixture over tart, sprinkle with sea salt, and chill until filling is set, at least 1 hour.

      Step 7

      Cut chilled tart into slices with a dry, hot knife; let sit at room temperature 15–20 minutes before serving.

      Step 8

      Do Ahead: Tart can be made 2 days ahead. Once filling is set, cover and keep chilled.

    Nutrition Per Serving

    Calories (kcal) 630 Fat (g) 40 Saturated Fat (g) 33 Cholesterol (mg) 0 Carbohydrates (g) 67 Dietary Fiber (g) 10 Total Sugars (g) 37 Protein (g) 8 Sodium (mg) 250

    Read More

  • Vegan Aquafaba Meringue Frosting

    Vegan Aquafaba Meringue Frosting

    recipe image

    An egg-free meringue that’ll hold its peaks for hours.

    Why It Works

    • Cream of tartar helps to stabilize the foam, which results in a voluminous meringue frosting.
    • Cream of tartar also helps to prevent browning due to caramelization of sugars and Maillard reactions. 
    • Heat helps denature the proteins in the aquafaba, helping to produce a more stable foam.

    Aquafaba, the cooking liquid left behind from cooked beans, is a multifaceted gift to cooks. Similar to egg whites, the proteins present in aquafaba give it the ability to produce foams when combined with sugar and aerated vigorously. When baked, the foam produces meringue cookies that are practically indistinguishable from their egg-based counterparts. I wanted to see if the proteins in aquafaba could be manipulated even further to produce frostings for cakes and pies—an aquafaba meringue frosting that was egg-free! 

    Here’s what I knew:

    • Aquafaba and egg whites produce foams because of water-soluble proteins that belong to the albumin and globulin families of proteins.
    • In egg-based meringue frostings, the sugar and egg whites are heated then aerated vigorously to help the proteins in the egg white denature and change their shape. The foam that forms is stable and also takes on a satiny sheen. Ovalbumin in egg whites denatures at 183.2°F (84°C), so this became the endpoint temperature for my recipe. 

    Based on these two pieces of information, I hypothesized that the proteins in aquafaba might behave similarly if I heated them with the sugar.

    I tested the idea out, along with a couple other ideas I had to improve the stability of an aquafaba-based meringue, and you can read about those experiments by clicking the link below. Long story short, by heating a mixture of aquafaba and sugar to 183°F (84°C) and then adding cream of tartar, an acid, you can produce a beautiful, fluffy, satiny, egg-less meringue that holds its shape and loft for hours, perfect for topping cakes and pies of all kinds. I also found that by adding strongly aromatic ingredients, like cardamom or coffee, you can mask much of aquafaba’s “beany” flavor and aroma; and, if you use a brand of canned chickpeas that uses kombu, a seaweed, as part of its cooking process, the resulting meringue is even more stable.

    Vegan Aquafaba Meringue Frosting Recipe


    Cook Mode
    (Keep screen awake)

    • 1/2 cup (120ml; 130g) aquafaba (see notes)

    • 1/2 cup (100g) superfine sugar

    • 1/4 teaspoon ground green cardamom

    • 1/4 teaspoon cream of tartar

    1. In a 2-quart saucepan, combine aquafaba with sugar and cardamom. Set over medium-low heat and cook, stirring and scraping with a silicone spatula, until mixture reaches 183°F (84°C).

      Nik Sharma


    2. Remove from heat and immediately scrape mixture into the bowl of a stand mixer fitted with the whisk. Add the cream of tartar and whisk at high speed until satiny white, stiff peaks form, about 15 minutes.

      Nik Sharma


    3. Frost cakes as desired with the meringue frosting.

      Nik Sharma


    Special equipment

    Stand mixer, instant-read thermometer

    Notes

    Aquafaba is the cooking liquid collected from beans (in this case chickpeas). We recommend using aquafaba from canned chickpeas for reliable and consistent results. Please note that while home-cooked chickpeas can produce aquafaba that works, you may end up with varying results depending on how much water was used to cook the beans and how they were cooked. One 15-ounce can of chickpeas gives about 2/3 cup (160g) aquafaba.

    Make-Ahead and Storage

    This frosting can be refrigerated in an airtight container for up to 3 days.

    Nutrition Facts (per serving)
    25 Calories
    0g Fat
    6g Carbs
    0g Protein

    ×

    Nutrition Facts
    Servings: 16
    Amount per serving
    Calories 25
    % Daily Value*
    0g 0%
    Saturated Fat 0g 0%
    0mg 0%
    1mg 0%
    6g 2%
    Dietary Fiber 0g 0%
    Total Sugars 6g
    0g
    Vitamin C 0mg 0%
    Calcium 0mg 0%
    Iron 0mg 0%
    Potassium 9mg 0%
    *The % Daily Value (DV) tells you how much a nutrient in a food serving contributes to a daily diet. 2,000 calories a day is used for general nutrition advice.

    (Nutrition information is calculated using an ingredient database and should be considered an estimate.)

    Read More

  • Cherry Tomato Zucchini Noodles

    Cherry Tomato Zucchini Noodles

    recipe image

    Cherry Tomato Zucchini Noodles

    Photo by VibrantPlate
    • Serves
      2
    Author Notes

    Cherry Tomato Zucchini Noodles are a light & delicious low-carb vegan meal with tons of flavor. —VibrantPlate

    Ingredients

    • 3

      medium zucchini


    • 200 grams

      cherry tomatoes


    • 4

      cloves garlic


    • olive oil


    • salt, pepper to taste


    • fresh basil leaves


    • 2 tablespoons

      breadcrumbs (or grated Parmesan / vegan substitute)

    Directions
    1. Wash and dry zucchini and cherry tomatoes.
    2. Preheat the oven to 200˚C/ 392˚F. Place cherry tomatoes in a small baking tray, then add grated garlic cloves. Drizzle with olive oil and season with salt and pepper to taste. Combine well, then place baking tray in oven and roast for about 20 minutes, until the cherry tomatoes burst. Remove from oven.
    3. Using a spiralizer or vegetable julienne peeler, cut the zucchini into thin strips resembling noodles. Add zucchini noodles to the cherry tomatoes and combine well, so that the noodles get well coated.
    4. Transfer zucchini noodles and cherry tomatoes to plates and top with a bit of breadcrumbs and fresh basil leaves and serve. You can replace breadcrumbs with parmesan or a vegan subsitute.

    Read More

  • Vegan Strawberry Ice Cream

    Vegan Strawberry Ice Cream

    recipe image

    strawberries

    I was thinking of having “If you change the ingredients in a recipe, results will vary” tattooed on my forehead, but there wasn’t enough room. (Although if my hairline keeps receding at this rapid pace, it may happen sooner than you think.) When I used to teach classes, folks were always wanting to tinker with recipes, especially ice cream, replacing the cream with what-have-you. Or to replace the sugar with something else. I’m not sure why, because I spend an inordinate amount of my life developing and testing recipes to get them just right.

    strawberries

    Unless I’ve personally tested it, it’s pretty hard to give my nod of approval and tell what will and what won’t work in recipes, especially when it comes to swapping out sweeteners and dairy products since their counterparts behave quite differently than one might think. Ice cream, of course, depends on cream to give it that particular texture and flavor. But I do like and use non-dairy alternatives at home on occasion and saw no reason why I couldn’t churn up a batch of ice cream without a drop of dairy.

    I started with soy milk, thinking that it had the richest flavor of them all and was the most readily available. But my first batch of ice cream had a murky taste, perhaps because I used agave nectar as well with it. It wasn’t bad, but I wasn’t digging my spoon back in to the container or licking the canister clean when I pulled out the ice cream.

    sliced strawberries Isola rice milk

    I then considered rice milk, which has a less-pronounced flavor, although it’s slightly less-rich than soy milk. I invited over Theresa Murphy, who teaches vegetarian cooking classes in Paris to come by for a taste and she said the best rice milk in France is an Italian brand, Isola. So I dashed right over to biocoop, a chain of natural food stores in France, and grabbed a liter.

    Because rice milk is light, and macerating the strawberries for an hour before blending them up augments their flavor, you’ll find this strawberry ice cream will have a very intense color and the flavor of the strawberries will really come through. One trick I’ll pass along is that if you’re strawberries aren’t perfectly ripe, you can add a tablespoon of crème de cassis. I usually keep a bottle on hand just for that purpose, although I didn’t need to use any here because it’s the middle of strawberry season and the strawberries were pretty terrific.

    I also get plenty of questions about alternative sweeteners, and while I like agave nectar, I found that when used as the primary sweetener in this ice cream, the flavor overpowers the strawberries. So I stuck with granulated cane sugar. (You can use refined or light unrefined.) I add a few spoonfuls of honey which add a nice background sweetness and helps keep the frozen ice cream scoopable. I realize that I’m probably stepping on a minefield with that one since there is a debate in the vegan community whether or not honey is vegan. If you don’t eat honey, replace it with an equal amount of another liquid sweetener or sugar.

    vegan strawberry ice cream

    Adding a bit of kirsch or another liquor keeps the ice cream softer once churned. Traditional ice cream has fat to keep it smooth. But if you don’t plan to eat this ice cream shortly after churning, you might want to take it out of the freezer to let it soften until it’s scoopable. The kirsch is optional and you can check out other options at Tips for Making Homemade Ice Cream Softer.

    Folks often ask why chunks of fruit freeze too hard in ice creams. It’s because fruit is mostly water (most fruit is at least 80% water, and strawberries are nearly 91% water ) and we all know what happens when water freezes. So unless you plan to eat the ice cream soon after churning, they’re going to freeze pretty solidly. For this ice cream, I puree it just to the point that it’s liquidy, but there are still slight bits of strawberries. You can also puree it until completely smooth and strain out the seeds, if that’s your preference. (See? I do offer some choices.)

    vegan strawberry ice cream vegan strawberry ice cream

    Good non-dairy accompaniments to a scoop of this strawberry ice cream are a nice dousing with chocolate sauce, alongside a dish of warm nectarine and cherry compote or red wine-poached rhubarb.

    Or serve pieces of candied ginger alongside, spoon crystals of strawberry granita alongside and serve them together in a large goblet, or serve a scoop in a glass with a splash of peach leaf wine.

    Use very ripe, tasty strawberries for this. Rice milk has a neutral flavor so the strawberries should really do most of the work in this. I don’t strain out the seeds in this ice cream. But you can strain them all out, or just some of them.

    As mentioned, I did try soy milk and didn’t like the taste. But for a richer ice cream, you can replace half of the rice milk with coconut milk. For those who eat dairy, you can use heavy cream in place of the rice milk.

    I left the liquor optional because some people avoid alcohol, but it does help keep the ice cream softer once frozen; since rice milk doesn’t have the fat of cream, it helps to keep the ice cream smoother. As mentioned, because this ice cream has much less fat than traditional ice cream, it will become quite firm when frozen for a long period of time. So eat it shortly after churning or remove it from the freezer before scooping, to give it time to soften.

    • 1 1/2 pounds (700g) fresh strawberries, rinsed and hulled
    • 1/2 cup (100g) sugar or honey, (or 1/2 cup, 125ml agave nectar)
    • 2 tablespoons honey
    • 1 1/2 cups (375ml) plain rice milk
    • 2 teaspoons fresh lemon juice
    • optional: 2 teaspoons kirsch, vodka, or orange liqueur, such as Grand Marnier
    • Slice the berries and toss them with the sugar (or agave) and honey, and let them macerate for one hour at room temperature.

    • Puree the berries and their liquid with the rice milk, lemon juice and liquor, if using, with a standard or immersion blender. You can puree it until completely smooth and strain out some or all of the seeds by pressing the mixture through a mesh sieve. Or you can leave it slightly chunky and omit straining it.

    • Taste, and add more lemon juice or liquor*, if desired.

    • Chill thoroughly, then freeze in your ice cream maker according to the manufacturer’s instructions. *You can add up to 3 tablespoons of liquor to this ice cream; the alcohol softens the texture so the more you add, the less-hard the ice cream will get. You can find more tips at the links below.

    Related Posts and Recipes

    Buying an Ice Cream Machine

    Making Ice Cream Without a Machine

    Strawberry Frozen Yogurt

    Tips for Vegetarian Dining in Paris

    Vegetarian Restaurants in Paris

    French Sugars

    The Vegan Scoop (Amazon)

    What is Gelato?

    Rhubarb-Berry Jam

    Ingredients for American Baking in Paris

    Agave-Sweetened Chocolate Ice Cream

    Tips for Making Homemade Ice Cream Softer

    Read More

  • Vegan Burrito

    Vegan Burrito

    recipe image

    a burrito cut in half, on a tray with five other whole burritos, with a small dish of lime wedges nearby

    Credit: Meleyna Nomura

    You won’t miss meat or dairy in this mouth-watering vegan burrito recipe.

    Serves6

    Prep15 minutes

    Cook45 minutes

    We independently select these products—if you buy from one of our links, we may earn a commission. All prices were accurate at the time of publishing.

    a burrito cut in half, on a tray with five other whole burritos, with a small dish of lime wedges nearby

    Credit: Meleyna Nomura

    This super-stuffed vegan burrito is filled with spiced black beans, zesty cilantro-lime rice, a cheesy (yet cheese-free) queso sauce, salsa, and guacamole, and sealed with a quick sear in the pan. The mix of fresh herbs, spices, savory vegetables, citrus, and clever queso sauce is what creates an incredibly tasty and satiating burrito without any animal products. This is a hearty meal you’ll make on repeat.

    Don’t skip pan-frying your burrito after assembling, as it truly levels up an already fantastic, flavorful burrito. Browning the tortilla in a light spray of oil caramelizes and crisps the burrito a la the Maillard reaction. It adds the slightest touch of sweet. Also, pan-frying safely “seals” your burrito together so nothing spills out. 

    Rather than top my loaded burritos, I like to include the “toppings” inside the burrito and serve with some extra queso on the side and, if I’m feeling spicy, a dash of hot sauce.

    You won’t miss meat or dairy in this mouth-watering vegan burrito recipe.

    Ingredients

    For the cilantro lime rice:

    • 2 cups

      water

    • 1 tablespoon

      canola oil

    • 1/2 teaspoon

      kosher salt

    • 1 cup

      long-grain white rice

    • 1/3 bunch

      fresh cilantro

    • 2

      medium limes

    For the burrito filling:

    • 1/2

      medium yellow onion

    • 3 cloves

      garlic

    • 2 tablespoons

      olive oil

    • 1 (about 15-ounce) can

      black beans

    • 1 tablespoon

      chili powder

    • 1/2 teaspoon

      ground cumin

    • 1/2 teaspoon

      sazón seasoning

    For the queso:

    • 1 (about 13.5-ounce) can

      full-fat coconut milk

    • 3 to 4 tablespoons

      nutritional yeast (3 tablespoons for a mild queso, 4 tablespoons for a “sharper” queso)

    • 2 tablespoons

      arrowroot powder

    • 1/2 teaspoon

      onion powder

    • 1/2 teaspoon

      garlic powder

    • Pinch

      ground turmeric

    To assemble and serve:

    • 6

      (10-inch) large burrito-sized flour tortillas

    • Salsa, guacamole, and hot sauce, for serving (optional)

    To make the rice:

    1. Place 2 cups water, 1 tablespoon canola oil, and 1/2 teaspoon kosher salt in a medium saucepan and bring to a boil over high heat. Meanwhile, place 1 cup long-grain white rice in a fine-mesh strainer and run under cold water until the water runs clear.

    2. Add the rice to the boiling water, stir once, and bring back to a simmer. Cover, reduce the heat to low, simmer until the rice is tender, 15 to 17 minutes. Meanwhile, chop the leaves and tender stems from 1/3 bunch fresh cilantro until you have 1/4 cup. Halve 2 medium limes. (This is also a good time to prep the ingredients for the filling.)

    3. When the rice is ready, ff there is any remaining liquid, cover again and cook for a few more minutes. Turn off the heat. Let the rice stand covered for 2 minutes. Uncover and fluff with a fork. Squeeze the lime halves over the rice, add the cilantro, and stir to combine. Transfer to a bowl.

    To make the burrito filling:

    1. Dice 1/2 medium yellow onion and mince 3 garlic cloves. Drain and rinse 1 can black beans. Shake until most of the water is removed.

    2. Heat 2 tablespoons olive oil in a medium skillet over medium heat until shimmering. Add the onion and sauté until softened, about 5 minutes. Add the garlic and cook for 1 minute. Add the black beans,1 tablespoon chili powder, 1/2 teaspoon ground cumin, and 1/2 teaspoon sazón seasoning. Reduce the heat to medium low and cook for 5 minutes. Remove the skillet from the heat.

    To make the queso:

    1. Place 1 can full-fat coconut milk, 3 to 4 tablespoons nutritional yeast, 2 tablespoons arrowroot flour, 1/2 teaspoon onion powder, 1/2 teaspoon garlic powder, and a pinch of ground turmeric in a medium saucepan over medium heat and whisk until smooth. Cook, whisking constantly, until thickened, 1 to 2 minutes. Remove the saucepan from the heat.

    Assemble the burritos:

    1. Heat a large frying pan over medium-high heat. Meanwhile, assemble the burritos. Spoon 1/2 cup of the rice,1/4 cup of the black bean mixture, 1 tablespoon queso, and a spoonful of guacamole and salsa, if using, across the center of each 10-inch flour tortilla in a line. Fold the left and right sides of the tortilla over the filling, then roll from the bottom up tightly over the filling.

    2. Coat the frying pan cooking spray. Add the burritos seam-side down (as many as will fit in a single layer). Cook until browned underneath, 1 to 2 minutes. Flip and cooking until the second side is browned, about 1 minute more. Serve the burritos with more queso and hot sauce, if using.

    Recipe Notes

    Arrowroot powder substitution: An equal amount of tapioca flour can be subtituted for the arrowroot powder.

    Make ahead: The rice can be cooked up to 1 day ahead and refrigerated in an airtight container. Add the cilantro and lime juice right before assembling. The black bean filling and queso can be made up to 1 day ahead and refrigerated in separate airtight containers.

    Alternatively, wrap each assembled burrito (not pan-fried) tightly in aluminum foil. Refrigerate or freeze in resealable plastic bags. Reheat uncovered in a 325ºF oven until warmed through, about 20 minutes if refrigerated or about 30 minutes if frozen, then pan-fry.

    Storage: Leftovers can be wrapped tightly and refrigerated for up to 3 days.

    Read More

  • Vegan Mayonnaise

    Vegan Mayonnaise

    recipe image

    Wheat Free

    No need to worry if your local market doesn’t carry egg-free mayo. Just whip up some of your own. This recipe works very well as a sandwich spread or in any mayonnaise-based dressing. As long as you use wheat-free vinegar, this mayo is indeed wheat-free.

    Recipe information

    • Yield

      almost 2 cups (450 g)

    Ingredients

    7 ounces (195 g) extra-firm tofu, drained and pressed

    1/4 cup (35 g) raw cashews, ground into a very fine powder

    1 tablespoon (15 ml) lemon juice

    1 tablespoon (12 g) raw sugar or (21 g) agave nectar

    1 1/2 teaspoons brown or Dijon mustard

    1 teaspoon apple cider or rice wine vinegar

    1/2 teaspoon sea salt

    6 tablespoons (90 ml) canola oil

    Preparation

    1. Step 1

      Place the tofu, cashews, lemon juice, sugar, mustard, vinegar, and salt in a blender or food processor and process until smooth.

      Step 2

      Slowly drizzle in the oil and pulse until you get the consistency that you like.

      Step 3

      Store in an airtight container in the refrigerator for up to 2 weeks.

    From The Best Veggie Burgers on the Planet: 101 Globally Inspired Vegan Creations Packed with Fresh Flavors and Exciting New Tastes by Joni Marie Newman. Text © 2011 by Joni Marie Newman; photography © 2011 Rockport Publishers. Published by Fair Winds Press.

    Read More