Arepas have been a breakfast staple in my family for as long as I can remember. Most often made in a big batch for weekend family gatherings (which was pretty much every weekend), the recipe was passed down from my abuela and perfected by my aunts. Properly cooked, they are crisp and chewy on the outside and fluffy on the inside.
My abuela always used white masa harina. Yellow was for making empanadas and banana leaf tamales. I did not encounter yellow corn arepas until I moved to New York City as an adult, but loved this gooey, cheese-filled version just as much. There is even a yellow sweet corn variety of masa harina I’ve seen at Latin markets–used for making arepas dulces. My favorite way to eat arepas is to make mini white corn arepitas and serve in a picada (platter of fried snacks) with a mug of hot chocolate on the side, just like I had in Cali, at a roadside stand on the way to visit relatives in the mountains.
I’ve cut the ingredient proportions significantly for this recipe. Rather than use the whole bag, as my family usually does, this calls for just 1 cup, which is enough to serve 2 people, but mainly, it is to help you get a feel for making arepas through repetition. For a crowd, I recommend multiplying this (please check out my tutorial on Food52’s YouTube!)
According to my Mom, the original way to make arepas was to ferment the dough for up to a week. Cheese is a more modern way to get that cultured flavor. My personal twist is to use cultured butter instead of the standard cheese and butter combo to get that depth of flavor. I use plant-based cultured butter to make this vegan. This recipe is big on “feeling” your way through versus measuring (think pizza dough). Have fun, especially if you use my aunt’s trick to shape the dough (see the YouTube video)! That’s my favorite part. —Anitalectric
Test Kitchen-Approved
Watch This Recipe
Vegan Arepas
Ingredients
1 cup
masa harina precocida (precooked variety)
1 cup
hot water
1/4 cup
salted cultured butter (plant-based or dairy), softened
1/2 teaspoon
sea salt
Directions
Place the masa harina in a medium bowl.
In a separate, small bowl, whisk the salt into the water with a fork until dissolved (should taste salty but less so than seawater). Pour the water back into the measuring cup.
Use your fingers to whisk continuously while pouring ½ cup of the water into the masa harina to form a shaggy dough. Add cultured butter, kneading until masa is smooth. Continue to add salted water one spoonful at a time until the masa starts to become soft and homogenous (it should start to form a ball). If you go too far adding water and the dough gets sticky, add a small handful of harina to balance it out. (Note: I usually end up using around 2/3 of the water.) (Abuela’s texture trick: aim for the soft, yielding consistency of your earlobe). Taste a small morsel of masa and adjust salt or butter if desired.
Rest the masa in the bowl, covered, for 10 minutes while you preheat pan over medium heat.
Form discs ½” to ¾” thick x 4.5” in diameter (or 2.5” in diameter for mini). Oil the pan (or gently brush softened butter on the arepas) and cook for about 10 minutes each side, until golden brown. Serve piping hot.
Recipe notes/tips:
If you shape the arepas too thin you will still get a crispy crust but will sacrifice inner fluffiness. Make sure to keep them at least ½” thick while shaping. (Think more English muffin, less tortilla.)
Use the shaping trick in the video so the sides stay tidy and do not crack. If the arepas crack excessively while shaping, you may need to add another spoonful or two of salted water.
Do not press down on arepas while cooking or you might crack them or smoosh out their inner fluffiness. Spreading butter on finished arepas helps them stay moist and flavorful.
Serve arepas hot off the griddle and eat immediately. I do not recommend eating arepas cold. Any extras can be stored tightly wrapped and refrigerated, reheated in a microwave (will not be the same as fresh).
This recipe is small by design to familiarize you with the dough. I recommend doubling, tripling or even quadrupling the recipe once you have the basics down.
Arepas are quite filling. I recommend 1-2 arepas per person.
If you cannot find cultured butter, I recommend regular butter, but substitute a portion with dry, finely crumbed cheese like cotija or parmesan for flavor.
If you cannot find masa harina precocida–the Colombian or Venezuelan variety, you can use Mexican masa harina in a pinch. Mexican masa harina is used for making corn tortillas, which are a world away from arepas. It has added lime (labelled “nixtamalizado”), and is not precooked. The flavor will be slightly sour and you may need to compensate with extra water and cooking time.
I am a self-trained vegan chef, pastry chef and baker. More recently, I founded Anita’s Yogurt in Brooklyn, NY. Anita’s Coconut Yogurt is now available from coast-to-coast and for nationwide delivery from our website. I still frequently bake desserts for my daughter and post recipe videos on instagram. Currently baking: Kombucha Muffins From Jerrelle Guy, Genius Nut and Seed bread from Sarah Britton.
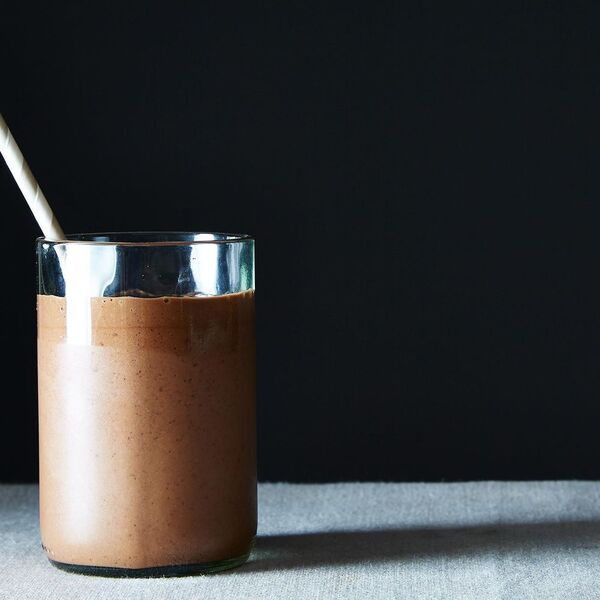
You’ll never believe that this shake is made with as few ingredients as it is, or that they’re all so ridiculously wholesome. Feel free to experiment a little with the non-dairy milk base you use, as well as the nut butter (cashew, coconut, and sunflower seed butter will all work; so will peanut butter, though the taste will be strong). This is a good recipe to treat more as a template than a prescription. —Gena Hamshaw
Test Kitchen-Approved
Ingredients
2
ripe medium or large bananas, peeled, chopped into pieces, and frozen
2 tablespoons
unsweetened cocoa powder
2
pitted medjool dates
1/4 cup
almond butter
1 1/2 cups
almond milk (soy or hemp milk will work well, too)
Directions
Blend all ingredients till smooth, adding a little more almond milk as needed. Serve.
In some unwritten chef rule book there exists the heinous concept that risotto can only be married to butternut squash or mushrooms. It’s not that I dislike either of these, but that I’m just crying out for some more original combination. This spelt risotto combines the deeply smoky flavor of paprika with the freshness of tomatoes, the sweetness of the onions, the astringency of the balsamic and lemon and the creaminess of the vegan cashew cheese.
I use spelt (or farro) instead of rice for numerous reasons: it has a lower GI, has a nuttier, more complex flavor, and has a far more interesting texture. It’s also a hundred times easier to cook well. Obviously, it isn’t strictly ‘risotto’, but the idea is similar. —Culina Sophia
Ingredients
2 tablespoons
olive oil
2
medium onions, finely chopped
25 grams
garlic, crushed with a garlic crusher
2 tablespoons
sun dried tomato paste
2 teaspoons
caster sugar
2 teaspoons
balsamic vinegar
1 teaspoon
thyme (fresh or dried)
1/2 teaspoon
chilli flakes
3/4 teaspoon
lemon zest
3/4 teaspoon
smoked paprika
500 grams
passata
250 grams
pearled spelt (or farro)
1 liter
boiling water
3 teaspoons
vegetable stock powder
80 grams
toasted pine nuts
1 teaspoon
lemon juice
100 grams
cashew vegan cheese (optional)
1 handful
coriander, to serve
Directions
In a large pot, over a medium/high heat, heat the oil. Add in the finely chopped onions and garlic, and cook until the onions are soft and translucent.
Stir in the sun dried tomato paste, sugar, balsamic vinegar, thyme, chilli flakes, lemon zest, smoked paprika and a pinch of salt. Cook ingredients together for a couple of minutes.
In a bowl, dissolve the stock in the boiling water, then pour roughly 250ml of this, together with the passata and spelt into the pot, and stir together on a medium heat.
Stir every now then to prevent the spelt from sticking, and add the rest of the water, a ladleful at a time, at roughly 10 minute intervals.
After 40-50 minutes, remove from the heat, stir in toasted pine nuts and lemon juice and season according to taste. The spelt grains should be soft all the way through with no chalkiness, and with some texture remaining. Most of the water should have been absorbed or evaporated so the consistency is thicker than that of a soup, without being solid, and not thin enough to pour.
To serve, crumble the cashew cheese over the top and scatter with coriander.
To make the sponge, heat the oven to 180C/160C fan/gas 4 and oil and line a 20cm square or round cake tin with parchment. Mix the vegetable oil, vanilla paste, lemon juice and plant milk in a jug. Tip the baking powder, caster sugar and flour into a large bowl. Make a well and slowly whisk in the vegetable oil mixture until smooth, then spoon into the prepared tin and bake for 30-40 mins until golden and a skewer inserted into the middle comes out clean. Transfer to a wire rack and leave to cool completely.
step 2
Meanwhile, make the compote. Put the raspberries, sugar, lemon and 50ml water in a small pan, bring to a simmer and cook for 4-6 mins until the fruit breaks down a little to a sauce. Remove and set aside to cool.
step 3
To make the custard, put the cornflour in a bowl and add a splash of the cold plant milk, and stir until lump-free. Pour this mixture into a saucepan with the remaining ingredients, including the rest of the milk, and cook over a low heat for 6-8 mins, stirring often, until you get a thick custard that coats the back of a spoon thickly. Cover the surface with a piece of parchment and set aside to cool.
step 4
To assemble, cut the sponge into squares or fingers, and place in the bottom of a trifle dish. Spoon over the compote, then add 150g of the raspberries. Give the cooled custard a brief whisk, then pour over the top of the raspberries. Chill for 1-2 hrs until the custard has set.
step 5
Whip all of the ingredients for the cream together until you get soft peaks (it’s best to taste the cream for sweetness before adding the icing sugar), and spoon over the top of the set custard. Chill until ready to serve. Scatter with the remaining raspberries, mint, almonds and a dusting of icing sugar to decorate, if you like.
Tip the flour into a medium bowl. Mix 2 tsp oil with 100ml water, then pour this over the flour and stir with a cutlery knife until the mixture starts to come together into a dough. Use your hands to form the dough into a ball, then quarter and cover with a tea towel. Set aside.
step 2
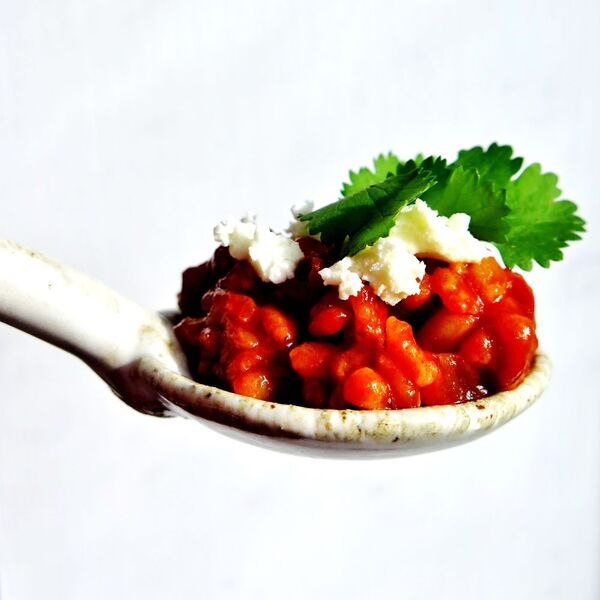
To make the beans, tip the peppers and oil into a large non-stick pan set over a medium heat. Cover and cook for 10 mins, stirring every now and then. Add the garlic and spices, then tip in the bouillon powder. Drain one of the cans of black beans and tip in the beans, then add the other can of beans along with the liquid from the can. Cook for a few minutes, stirring until the mixture has reduced. Mash the beans a couple of times with the back of a wooden spoon to thicken.
step 3
To make the sauce, tip the passata and chopped tomatoes into a small pan with the bay, chilli flakes (if using), garlic and 2 tbsp water, then cover and simmer over a low heat for 5 mins. For the guacamole, mix all the ingredients together (or half of the ingredients, if you’re following the vegan Healthy Diet Plan) and set aside.
step 4
Heat the oven to 200C/180C fan/gas 4. Heat a large non-stick dry frying pan over a medium heat. Roll out one of the dough quarters on a lightly floured surface until very thin – it should be a roughly 21cm circle. Carefully transfer to the frying pan and cook for 1 min, then flip and cook for a few seconds more until cooked through and lightly golden. Repeat with the remaining dough pieces so you have four wraps.
step 5
Working with one wrap at a time, spoon a quarter of the bean mixture down the middle, then roll up and lay in a shallow ovenproof dish. Repeat with a second wrap, arranging this one next to the first, then lay the remaining filled wraps in a second shallow ovenproof dish. Spoon the tomato sauce over the wraps in the dishes, then cover with foil. Bake one dish for 15 mins, then uncover and bake for 5 mins more until the tops of the wraps are crisp at the edges. Put the second dish in the fridge to chill for another day, if you’re following the vegan Healthy Diet Plan. Will keep for up to three days. Remove from the oven and spoon the guacamole over the top before serving. If following the plan, enjoy the second dish of enchiladas at a later date. Bake at the same temperature, adding 10 mins to the cooking time. Meanwhile, make the guacamole using the remaining half of the ingredients before spooning over at the end.
As the weather turns cool in the fall and eases into winter, this soup goes into an almost weekly rotation in our house.
Truth be told, its creamy texture (without the cream) and deep mushroom flavor bolstered by dried mushrooms tempts me all year long except on the hottest of summer days.
I love it for lunch with a sandwich or salad. When I want to add something extra to a dinner with friends, I like to serve small bowls as a first course. It wakes up your taste buds in anticipation of the meal that will follow.
Best Mushrooms for Creamy Mushroom Soup
The flavor of mushrooms is very pronounced in this soup, and it all starts with fresh cremini mushrooms (also sometimes called baby bella or baby portobellos.)
Cremini mushrooms are simply more mature white button mushrooms, with a brown color and firm texture; with even more growing time they become meaty portobello caps—but all three are the same variety. Because they are more mature than white button mushrooms, they pack a lot more depth of flavor.
A small amount (1 ounce) of dried porcini mushrooms reconstituted in boiling water really helps intensify the mushroom flavor. The soaking water gets diluted and added to the soup and the drained mushrooms simmer in the vegetable broth. If you can’t find dried mushrooms, just add another 8 ounces of fresh mushrooms to the mix.
Alternative mushrooms: Cremini and dried porcini mushrooms are my favorites to use in this soup, but you could swap out white button mushrooms or portobellos for them. As mentioned above, if you want to skip the dried mushrooms, add about 8 ounces fresh mushrooms for that extra flavor boost and be sure to give them plenty of time on top of the stove to evaporate excess liquid and allow the mushrooms to turn a deep golden brown before adding the stock.
Simply Recipes / Sally Vargas
The Best Way to Prep Fresh Mushrooms for Soup
Mushrooms are porous and absorb water if you rinse them too far in advance, but when you plan to cook them in a soup, you don’t need to carefully remove debris one mushroom at a time!
The fastest and easiest way to prep them is to swish them around in a large bowl of cool water. The dirt that clings to them should sink to the bottom of the bowl. Use your hands to transfer them to a layer of paper towels to drain. Do this just before you are going to make the soup.
You can slice the mushrooms with a knife, but a food processor is the quickest way to get your soup going. You are going to purée the soup at the end of cooking, so perfectly sliced mushrooms are not a prerequisite!
If you’re interested in learning more about buying and storing mushrooms, cooking mushrooms, and cleaning them we have some great resources for you:
How to Buy and Store Mushrooms
How to Clean and Prep Mushrooms for Cooking
A Better Way to Cook Mushrooms
And, as a bonus, here is some information on morel mushrooms if you’re interested.
How to Make Creamy Vegan Mushroom Soup
A high proportion of mushrooms to stock in this recipe translates into a creamy result when the soup is pureed.
A tablespoon of uncooked rice—an old French trick for thickening pureed vegetable soups—also adds body.
This is a handy way to serve a creamy vegan soup and skip the dairy. You will use some of the mushroom soaking water and vegetable stock for the soup broth, and they provide more than enough mushroom flavor to make this soup a hit!
Simply Recipes / Sally Vargas
Tips to Make this Soup Even Better!
Use a little lemon juice to brighten the final taste and balance the pronounced mushroom flavor.
Make some tiny croutons to add a little crunch. Sourdough has a lot of flavor, but if you want to make this soup gluten-free, just use your favorite gluten free bread.
Finally, add a little color by sprinkling snipped chives on top.
More Magnificent Mushroom Soup Recipes
Creamy Chestnut Mushroom Soup
Vegan Mushroom Barley Soup
Farro, Mushroom, and Spinach Soup
Cream of Wild Mushroom Soup
Chicken Soup with Ginger and Shiitake Mushrooms
Simply Recipes / Sally Vargas
Cook Mode (Keep screen awake)
For the croutons
2tablespoonsolive oil
2slicessourdough bread, crusts removed, cut into 1/4-inch cubes
For the soup
1ounce dried porcini mushrooms
2tablespoonsolive oil
2pounds sliced cremini mushrooms
2clovesgarlic, chopped
1/2yellow onion, chopped
1handfulfresh thyme, tied together with kitchen twine
1tablespoonlow-sodium soy sauce
1 quart (4cups)vegetable stock
1/4teaspoonsalt, plus more to taste
1/8teaspoonblack pepper, plus more to taste
1tablespoonuncooked white rice
2tablespoonslemon juice
2tablespoons chopped chives, for garnish
Make the croutons:
In a medium skillet over medium heat, add the oil. Once hot, add the bread cubes and cook, stirring often, until golden brown, about 5 minutes. Set aside on a plate to garnish the soup with later.
Simply Recipes / Sally Vargas
Simply Recipes / Sally Vargas
Soak the dried mushrooms:
Bring a kettle of water to a boil. In a small bowl, place the dried porcini mushrooms and cover with boiling water. Soak for 20 minutes.
Set a fine mesh sieve over a large measuring cup or bowl. Pour the mushrooms over the sieve to strain the soaking liquid. Reserve the soaking liquid and add additional water to the soaking liquid, if needed, to make 4 cups. Set aside until ready to use.
Simply Recipes / Sally Vargas
Simply Recipes / Sally Vargas
Simply Recipes / Sally Vargas
Make the soup:
In a large pot set over medium-high heat add the oil. Once the oil is warm and shimmers, add the sliced cremini mushrooms.
Cook, stirring occasionally, for 3 minutes to allow some of the liquid to evaporate. Add in the garlic, onion, thyme, soy sauce, and strained porcini mushrooms. Cook, stirring occasionally, for 20 minutes, or until the mushrooms are a deep golden color.
Add the stock, the mushroom soaking liquid, salt, pepper, and rice. Adjust the heat to medium-low so it cooks at a steady simmer (small bubbles). Cook, uncovered, for 20 minutes. Remove the thyme sprigs.
Puree the soup:
Use an immersion blender to purée the soup until smooth.
If using a countertop blender, add 1/3 of the soup to the blender, place the lid onto the blender but remove the insert cap and cover with a thick, folded towel to prevent steam from building up.
Keep your hand over the towel and blend until smooth. Return the soup to the pot. Repeat this blending process until all the soup has been puréed.
Stir in the lemon juice. Taste, and add more salt, pepper, or lemon juice, as needed.
Serve the soup:
Ladle the soup into bowls and garnish with croutons and chives.
Simply Recipes / Sally Vargas
Nutrition Facts (per serving)
209
Calories
10g
Fat
26g
Carbs
7g
Protein
×
Nutrition Facts
Servings: 6
Amount per serving
Calories
209
% Daily Value*
10g
13%
Saturated Fat 1g
7%
0mg
0%
760mg
33%
26g
9%
Dietary Fiber 2g
8%
Total Sugars 5g
7g
Vitamin C 3mg
15%
Calcium 50mg
4%
Iron 2mg
10%
Potassium 841mg
18%
*The % Daily Value (DV) tells you how much a nutrient in a food serving contributes to a daily diet. 2,000 calories a day is used for general nutrition advice.
Nutrition information is calculated using an ingredient database and should be considered an estimate. In cases where multiple ingredient alternatives are given, the first listed is calculated for nutrition. Garnishes and optional ingredients are not included.
Tofu creates a silky, egg-like base for the sauce, while miso and nutritional yeast give it a richer, eggy quality.
King oyster mushrooms are meaty enough to stand in for pork, and mild enough to not make the whole dish taste like mushrooms.
Sauerkraut brine adds the lactic tang of Pecorino Romano, while keeping the sauce 100% vegan.
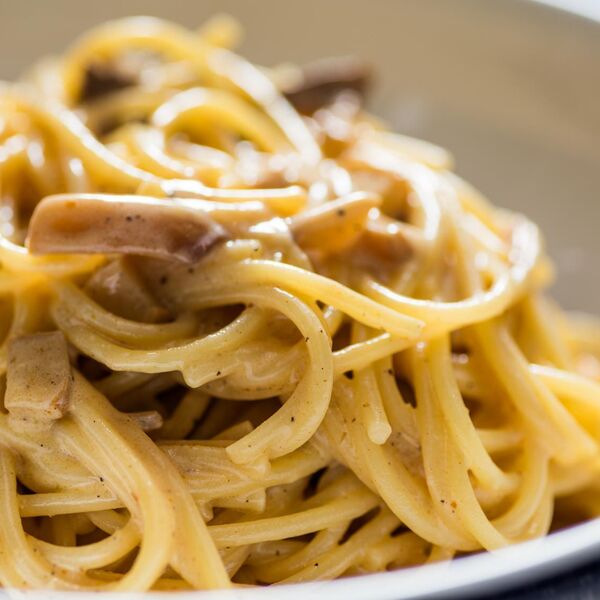
So, when I started thinking of what might be a good, simple recipe to ease myself into developing some vegan recipes for my own version of Kenji’s Vegan Experience, I did what any certifiably insane person would: I chose carbonara, a pasta sauce in which literally each major ingredient is the antithesis of vegan. Obviously, I’m a glutton for punishment.
After I’d given myself that near-impossible task, the road ahead of me was clear. No, not the road of quietly changing my mind and pretending carbonara had never crossed it. I had to figure out how to reproduce that eggy, creamy sauce; those porky bits of guanciale; and that sharp and spicy Pecorino Romano. The more I thought about it, the more I thought I was stupider than I’d ever realized. What the hell was I thinking?
Not one to back down easily, though, I considered each component, ate plenty of real carbonara to keep its flavor fresh in my mind, and came up with a game plan. After plenty of testing, I think I have something remarkable, something most people would consider impossible: a legitimate vegan carbonara.
Serious Eats / Vicky Wasik
Now for the disclaimer: I have created a version of the dish that obviously can’t include a single primary ingredient in the original sauce. Making something vegan that tastes exactly like a true carbonara, using nothing but readily available ingredients, really isn’t possible. But what I’ve done is capture the spirit of the dish. It has a sauce that’s creamy and rich as if made with eggs, even though it’s not. And it has little meaty bits throughout that do an admirable job of standing in for the pork. And yes, it even has the sharp, lactic tang and spiciness of pecorino. Would it fool a Roman? Almost definitely not. But my wife did come home one day, served herself some not knowing what it was, and then said, “Nice, I didn’t know you were going to make carbonara.” So, yeah, I think that counts for something.
If you’re a vegan who hasn’t had carbonara in a long time, this will absolutely scratch that itch. And even if you’re not, this vegan version is so good, it could easily become a staple, making carbonara less of a rare indulgence and more of an everyday meal. (We don’t usually dispense health advice on Serious Eats, but this is pretty much inarguably better for you than the original version.)
I’ll break it down into its components.
The Pork
Serious Eats / Vicky Wasik
This was by far the easiest substitution—all I needed was something that seemed meaty. I shied away from meat substitutes like wheat gluten, turning my attention to mushrooms instead. The key here, though, is that I didn’t want the dish to take on a noticeable mushroom flavor, which was a likely result with most varieties of mushrooms out there. My best choice: king oyster mushrooms.
They’re thick and meaty, but they’re also mildly flavored, so they lend a substantial bite without infusing the dish with an earthy essence. On top of that, they have especially wide stems and small caps, making them perfectly suited for cutting up into strips, just like guanciale or pancetta. When the pasta is cooked, it looks like it’s filled with bits of pork and not sliced mushroom caps.
In a pinch, if you can’t find king oysters, I’d suggest oyster mushrooms instead. They’ll cook up softer and more tender than king oysters, but they’re similarly mild in flavor.
The mushrooms alone can’t quite serve as a convincing pork substitute, though, and that’s where smoked paprika comes in. Now, traditionally, carbonara is not made with a smoked pork product, like American bacon; it calls instead for cured pork, like pancetta or guanciale. But if there’s one thing a smoky flavor can immediately evoke, it’s meat, and we need that effect here. Combined with the texture of the king oyster mushrooms, the paprika adds a whiff of bacon-y smoke. Like two goofballs in one of those silly horse costumes, only by working together do they pull off the illusion.
The Eggy Sauce
I had a lot of ideas about how to create a creamy, egg-like sauce for this pasta, including using aquafaba (the liquid from a can of chickpeas) or some kind of starch or nut butter, but I ditched most of them pretty quickly as their limitations became evident.
It didn’t take long for me to settle on silken tofu as the sauce’s base, since it can be blended into a naturally creamy sauce all on its own. Thinned with liquid, it’s a very convincing replacement for an egg sauce, and, since it’s heat-stable, you don’t have to worry about it breaking.
That got me the texture I wanted, but the flavor definitely needed help. A classic carbonara sauce is eggy, of course, which means it needs a kind of base richness beyond just the silky creaminess of tofu. And it’s loaded with both black pepper and the rendered fat from the pork. There’s also the critically important cheese, but I’ll get to that below.
For that deep, subtle richness, I blended in a small amount of white miso along with a good dose of nutritional yeast, which I’ve always found to have a somewhat chicken-y flavor. Together, they turn the tofu into something far more eggy.
On top of that, I let the black pepper rain down, and I mean really rain down. Like, a full-on nor’easter of pepper. A heavy hand is essential not only because black pepper is such an important flavor in carbonara, but also because it’s bold enough to cover up some of the other tricks lurking beneath. With enough black pepper, the sauce won’t taste tofu-y at all, and the miso and nutritional yeast will seem more legitimately eggy. The pepper is like heavy covering fire: an onslaught of such force that any weaknesses in your attack won’t be noticed by your taste buds.
Last step: fat. Rendered lard, naturally, is out of the question, but we need something that will make the sauce rich and unctuous. I ended up reaching for the most obvious Italian option, a bottle of extra-virgin olive oil. The main thing to know when incorporating the olive oil is that high-speed blending can give it a bitter flavor, so make sure to set your blender to its slowest speed. Then add the oil, and don’t blend it any longer than necessary to incorporate it.
The Cheese
That left the cheese, which presented no small conundrum. Pecorino Romano is the signature cheese in a carbonara, and its flavor is distinct. It’s sharp to the point of being spicy, with a pretty decent lactic funk. So I started thinking: What else has a sharp lactic tang that isn’t dairy? And that’s when it struck me: sauerkraut.
Sauerkraut forms when wild lactobacillus bacteria eat the cabbage’s natural sugars, transforming them into lactic acid. The finished kraut is tart and funky (read up on how to ferment your own here). By using some of the sour brine from kraut, I could slip that flavor into the sauce without introducing any dairy. Brine from any good-quality sauerkraut will work here.
The key is to add just enough to give the sauce a lactic-acid kick, but not so much that it takes on a lot of that sulfurous smell common to fermented cabbage. Since you have to be judicious in the amount of kraut brine you add, using it alone won’t provide the full spectrum of tartness that pecorino does, so I supplement it with just a splash of white wine vinegar or lemon juice.
It’s a weird idea, I know, and if you eat the carbonara knowing what the secret ingredient is, you can pick it out. But when I served it to people who didn’t know what it was, they had no idea. My wife, as I mentioned above, thought it was real carbonara, and I think that’s a pretty good indication of how well it works.
My last little touch is to sprinkle some cayenne pepper into the sauce, which adds the pecorino’s spicy factor—something the kraut brine doesn’t.
Putting It Together
Serious Eats / Vicky Wasik
Ultimately, this is a much easier dish to prepare than a classic carbonara. There’s no worry about eggs scrambling, for instance. All you have to do is sauté the mushrooms until they’re golden, cook the pasta, then transfer the pasta to the pan with the mushrooms. Pour enough of the pre-blended sauce on top to just coat the noodles, maybe add a splash of the pasta-cooking water, and cook it all together until the sauce thickens up.
Serious Eats / Vicky Wasik
Look at that and tell me: Just how crazy am I?
Serious Eats / Vicky Wasik
March 2017
Vegan Carbonara Pasta Recipe
Cook Mode (Keep screen awake)
7ouncessilken tofu (1/2 of a 14-ounce block; 200g)
1tablespoon (15ml) white wine vinegar or fresh juice from 1 lemon
Kosher salt
1/2 cup (120ml) extra virgin olive oil, divided
4 ounces (115g) king oyster mushrooms, stems and caps sliced into 1/2-inch “lardons”
1 pound (450g) dry spaghetti or penne
In a blender, combine tofu, sauerkraut brine, nutritional yeast, miso, cayenne or chile flakes, smoked paprika, black pepper, and vinegar or lemon juice. Blend at high speed, stopping to scrape down sides if necessary, until a very smooth, silky sauce forms. Season with salt. Add 1/4 cup (60ml) olive oil and blend in at low speed just until emulsified.
Serious Eats / Vicky Wasik
In a large sauté pan, heat remaining 1/4 cup (60ml) olive oil over medium-high heat until shimmering. Add mushrooms and cook, stirring, until browned, about 6 minutes.
In a pot of salted boiling water, cook pasta until just al dente. Transfer pasta to pan with mushrooms, reserving pasta-cooking water. Pour on just enough creamy sauce to coat all the pasta, then add about 1/4 cup (60ml) pasta-cooking water. Cook over medium heat, stirring, until sauce forms a silky glaze that coats pasta. Serve.
Serious Eats / Vicky Wasik
Special Equipment
Blender, large sauté pan
Notes
Use the brine from good-quality fermented sauerkraut—it should be nice and sour. You can also make your own kraut at home and use some of the brine from that. The sauerkraut brine adds the lactic acid that the cheese would normally contribute to the dish, but in a pinch, you could substitute 1/4 cup (60ml) each of water and dry white wine.
Read More
Vegan Fettuccine Alfredo
Pasta With Vegan Chickpea Sauce
Pasta With Rich and Hearty Mushroom Bolognese Recipe
Heat the oven to 200C/180C fan/gas 6. Crush the biscuits to crumbs in a bowl using the end of a rolling pin or by pulsing in a food processor. Mix in the cocoa powder, flour, syrup and enough vegan margarine or butter to create a dough. Butter a 23cm loose bottom tart tin and press the mixture into the tin.
step 2
Bake in the oven for 10-12 mins, then leave to cool in the tin.
step 3
Meanwhile, make the filling. Open the cans of coconut milk which will have separated with the water at the top and the thick coconut at the bottom. Discard the water (or use it to make a smoothie) and tip the thick coconut into a bowl.
step 4
Break the dark chocolate into pieces and melt in the microwave on high in 10-second bursts, stirring in between, or in a heatproof bowl set over a pan of simmering water until smooth. Add the coconut along with the golden syrup and whisk together, beating hard until there are no lumps of coconut left.
step 5
Pour the filling over the base of the tart and put in the fridge to set for 3-4 hrs, or overnight.
step 6
Spray the tart with edible silver or gold glitter spray, if you like, and serve with raspberries. Will keep in the fridge for three days – it actually tastes even better one or two days after baking.


/7cd745eb-509d-4862-9271-9294c79174ba--2021-0408_vegan-arepas_3x2_julia-gartland_203.jpg)

/d48f2809-a9ce-4460-ab69-1c893392d1a3--vegan_milkshake.jpg)

/6303859b-4a5d-4d4b-85b9-c7e9a4fcded2--IMG_4134_2-.jpg)