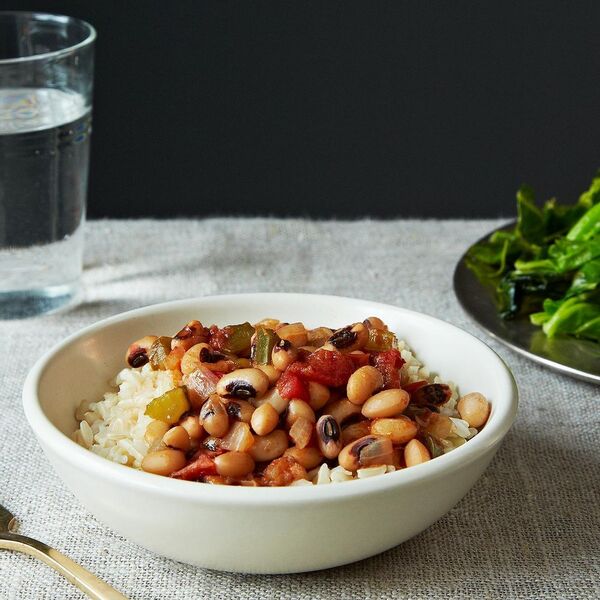
This traditional Southern New Year’s dish loses none of its characteristic flavor or heartiness when it gets a vegan makeover. —Gena Hamshaw
Test Kitchen-Approved
Ingredients
2 cups
black-eyed peas, dried
1 tablespoon
olive oil
1
medium yellow onion, chopped
2
medium green bell peppers, seeded and chopped
1
large stalk celery, chopped
1 teaspoon
dried thyme, crushed
1/2 teaspoon
smoked paprika
1/4 teaspoon
sea salt
4 cups
vegetable broth
one
15-ounce can of diced tomatoes
2 cups
dried long-grain brown rice or brown basmati rice
1 pinch
cayenne pepper
Ground black pepper, to taste
2
green onions, green parts only, chopped
Tabasco sauce (optional)
Directions
Place the black-eyed peas in a pot of water and soak overnight. Discard soak water.
Heat the olive oil over medium-high heat in a large pot. Add the onion, pepper, and celery. Sauté until the vegetables are soft, about 6 to 8 minutes.
Add the thyme, paprika, and soaked/drained peas. Then add the vegetable broth. Bring mixture to a boil and reduce to a simmer. Cook until the peas are tender but not mushy (about 35 to 50 minutes). If excess broth remains when the peas are cooked, you can gently pour it out of the pot. Strain the diced tomatoes and add them, along with the salt, to the bean mixture. Heat through. Check and adjust the seasoning with black pepper, cayenne, and salt as needed.
While the beans are cooking, cook the rice according to package instructions. Fluff and set aside.
Divide the rice into bowls. Top with the pea mixture and sprinkle evenly with green onion. Add a dash or two of Tabasco if desired.
I work in Switzerland, and the cafeteria at work serves a dull green, pureed soup of leftover vegetables every day. It’s a pass-able, workhorse soup. But a few tricks can turn a dull soup into a delicious soup: enough starchy vegetables (e.g., potato, celeriac, squash) to make it thick, not watery, and browning the vegetables before adding the stock.
The variations are endless. The Swiss greenmarkets have chopped up mixed vegetables (it looks like mostly leeks, squash, spinach) for soup making at home.
This is also a vegan recipe that is easy to turn into a vegetarian (and even more delicious) recipe by adding dairy products at the end (cream, milk and/or parmesan cheese). Or you could go all out and cook some bacon initially, brown the vegetables in the bacon fat and garnish with crumbled bacon at the end. —minipanda
Ingredients
6 tablespoons
olive oil
1
large or 2 small celeriac (aka celery root), large dice
6
leeks (white and pale green parts only), chopped into 1/4″ pieces
6
cloves of garlic, large dice
2
bay leaves
8 cups
vegetable / herb stock (see note in recipe)
salt and pepper to taste
Optional garnishes: cream, milk, parmesan cheese
Directions
Vegetable/Herb stock: I use vegetable bouillon cubes and herb bouillon cubes to make soup, because they are relatively cheap, and Switzerland is very expensive. I just chuck them into the pot with the 8 cups of water at the appropriate time. Perhaps you will make your own vegetable stock or herb stock (should fresh vegetables and herbs not be outrageously priced where you live). If you cannot find herb bouillon cubes, add 1 tsp dried herbs (e.g., 1/4 tsp dried parsley, 1/4 tsp dried dill, 1/4 tsp dried thyme, 1/4 tsp dried rosemary) to the water in lieu of the bouillon cube. Adjust salt to taste.
A note on chopping the vegetables: The soup is pureed in a blender at the end, so the vegetables do not be chopped nicely or that finely. Chopping the vegetables into small-ish pieces creates more of a surface area for browning and enables the soup to cook faster.
On leeks: After chopping the leeks, separate the rings/layers and float them in a large bowl of water. Any sand or dirt will sink to the bottom. Scoop the leeks out of the water and dry (I use a salad spinner).
In a large pot, add olive oil over medium high heat. Once the oil is shimmering, add chopped leeks.
Once the leeks start to brown, add the garlic. Keep a close eye to avoid burning the garlic. Add the celeriac (usually a minute after the garlic goes in). Brown the celeriac. Stir the vegetables to keep them from burning.
Once the vegetables are sufficiently browned, add your vegetable/herb stock.
Bring to a boil. Boil soup until the celeriac or other starchy vegetable is easily pierced with a paring knife. 20 minutes? depending upon the size of your dice.
Puree the soup in a blender in batches. Remember to only fill the blender part way to avoid the hot soup from exploding out of the blender. Also, I pour the blended soup in a large bowl and mix it all together before serving, to even out the odd contents of blended batches (all the celeriac in one batch vs. all the stock in another batch). Alternatively use a stick blender.
Add cream or milk and/or parmesan cheese, as appropriate.
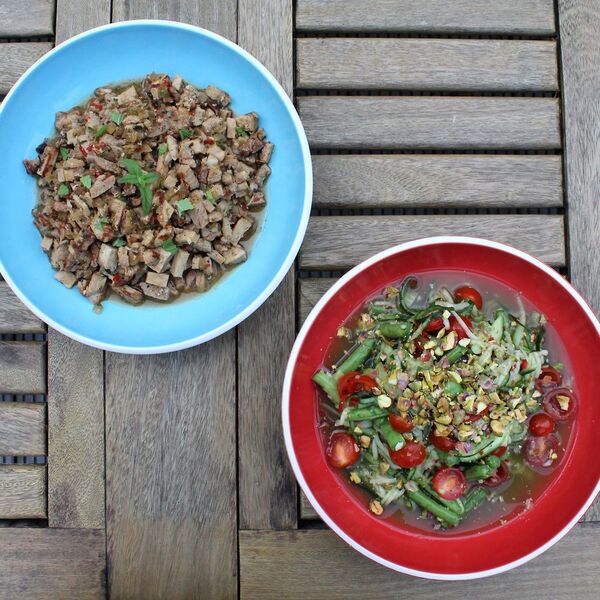
I first experienced this dish while living in Thailand when I was teaching English for a year with a charity between school and university. Som Tam is a salad of Laos origin, but has become a mainstay of Thai restaurants everywhere due to the spread of Isaan food and culture from the borders of North East Thailand. There’s not exactly a right or wrong way to make it, as a quick search of the web shall show, so don’t worry too much about not having certain ingredients. As you’ll see, my version here came simply from what I could get my hands on at the time.
Som Tam, which is usually made with green, unripe papaya, is one of my favourite things ever. To me it is the epitome of the Thai/Laos method of balancing flavours and textures. – You have the spice of the chilli, the sour tang of lime juice, the salty/savoury fish sauce, and the sweetness of the palm sugar; all mingling in the textures of crunchy green papaya (or cucumber in this case) and peanuts, the slight rubbery chew of the green beans, and the soft flesh of the tomatoes. If your mouth isn’t watering yet you may have a problem…
As I’ve already said, you can substitute the cucumber for any number of fruit/vegetables. I’ve done this recipe with unripe green mangoes before, but you could use the likes of pomelo, carrot, courgette (julienned, salted, left for 30mins to an hour, and squeezed to remove extra moisture), or any mix and match of ingredients with a reasonable crunch or bite. —Mark Low
Ingredients
1
Large cucumber
200g
Green Beans
150g
Tomatoes
4
Cloves of Garlic
2-3
Red Chillies
4-5 teaspoons
Fish Sauce (or vegan/vegetarian alternative)
4-5 teaspoons
Fresh Lime Juice
1 handful
Pistachios (to garnish)
Directions
Roughly chop the garlic and chilli. Pound with a pestle and mortar, or use a knife and a touch of coarse sea salt to make a rough paste on your chopping board.
Remove tips of green beans and cut into 2” sections before adding to mortar. Pound with garlic and chilli until beginning to bruise and break up. (You can just hit them with the back/side of a knife is you have no mortar and pestle)
Add roughly chopped tomatoes, fish sauce, lime juice and palm sugar. Combine well with a spoon and break up tomatoes slightly.
Julienne cucumber (I use a julienne peeler, as do most Thai/Laos restaurants, but a julienne attachment on a mandolin or some more time consuming hand chopping will work equally well) leaving some of the watery centre behind, and add to the mortar if large enough, or combine with the contents of the mortar in a suitable bowl.
Mix all the ingredients together well and allow to sit and mingle for a while. You’ll find more of the tasty som tam sauce develops as the salt in the fish sauce draws out the tomato and cucumber juices.
Stir well once more and plate up with a generous amount of chopped pistachios (I would normally use peanuts but was all out) sprinkled over the top.
Heat the oven to 190C/170C fan/gas 5. For the base, oil a 20cm tart tin and line the base with baking parchment. Pulse the oats in a food processor until coarsely ground. Add the rest of the ingredients along with a pinch of salt and pulse to combine. Firmly press the mixture into the bottom and sides of the tin. Bake for 8-10 mins until golden brown. Leave to cool completely.
step 2
Meanwhile, make the berry layer. Put the blueberries, citrus zest and juice, maple syrup and 150ml water in a small saucepan and simmer for 15 mins over a medium heat until the berries are soft. Blitz to a purée using a hand blender or food processor, then pass through a sieve and return to the pan (you should have 300ml liquid). Dissolve the agar in 100ml warm water, add to the pan and simmer for 2 mins. Leave to cool for 10 mins, then spread over the pastry base. Chill for 1 hr until set.
step 3
For the filling, put the blueberries, syrup and lemon zest in a small pan and cook for 5 mins over a medium heat until soft. Blitz using a hand blender or food processor, then pass through a sieve. Return to the pan along with the milk, vanilla, agar (dissolved in 4 tbsp warm water), cornflour and a pinch of salt, and whisk to combine. Cook over a medium heat for 2 mins, then cool, stirring occasionally. Pour over the cooled tart. Chill for 5 hrs or overnight. Decorate with more berries, lime zest and rose petals, if you like. Will keep chilled for two days.
Using a mortar and pestle gets great flavor out of the garlic and peanuts.
Thai curry paste combines many aromatic components in one easy-to-find ingredient, saving you time and money in the kitchen.
This peanut-tamarind sauce is great as a dip for spring rolls, or as a marinade and dip for satay.
Peanut-Tamarind Dipping Sauce for Spring Rolls or Satay Recipe
Cook Mode (Keep screen awake)
1/2cupshelled peanuts (3 ounces; 85g)
1tablespoon palm or light brown sugar (1/2 ounce; 15g)
3mediumcloves garlic
2tablespoons (30ml) light soy sauce
2tablespoons (30ml) vegan Thai red or Massaman curry paste
1tablespoon (15ml) tamarind concentrate
2tablespoons (30ml) vegetable oil
Dry chile flakes, to taste (optional)
If You Have a Mortar and Pestle (Recommended): Toast peanuts on a rimmed baking sheet in a 375°F oven or toaster oven until deep golden brown, about 5 minutes. Transfer to a plate to cool. Combine sugar and garlic in the mortar and pound with the pestle into a smooth paste. Add peanuts and pound to form a chunky paste. Add soy sauce, curry paste, and tamarind concentrate and firmly stir with a circular motion until a homogeneous chunky mixture is formed. Add vegetable oil and stir to combine. Add water to thin to a pourable but still thick consistency. Adjust heat with chile flakes, if desired.
If You Have a Food Processor: Toast peanuts on a rimmed baking sheet in a 375°F oven or toaster oven until deep golden brown, about 5 minutes. Transfer to a plate to cool. Combine peanuts, sugar, and garlic in the bowl of a food processor and pulse until a chunky paste is formed. Add soy sauce, curry paste, tamarind concentrate, and oil and process until a chunky homogeneous mixture is formed. Pulse in water, 1 tablespoon at a time, until sauce reaches a pourable but thick consistency. Adjust heat with chile flakes, if desired.
Sauce can be stored in a sealed container in the refrigerator for several weeks.
Special equipment
Rimmed baking sheet or toaster oven, mortar and pestle or food processor
This Recipe Appears In
Make These Easy Crispy Tofu Spring Rolls With Peanut-Tamarind Sauce
Nutrition Facts (per serving)
111
Calories
9g
Fat
6g
Carbs
3g
Protein
×
Nutrition Facts
Servings: 8
Amount per serving
Calories
111
% Daily Value*
9g
12%
Saturated Fat 1g
6%
1mg
0%
336mg
15%
6g
2%
Dietary Fiber 1g
4%
Total Sugars 3g
3g
Vitamin C 1mg
4%
Calcium 13mg
1%
Iron 0mg
2%
Potassium 110mg
2%
*The % Daily Value (DV) tells you how much a nutrient in a food serving contributes to a daily diet. 2,000 calories a day is used for general nutrition advice.
(Nutrition information is calculated using an ingredient database and should be considered an estimate.)
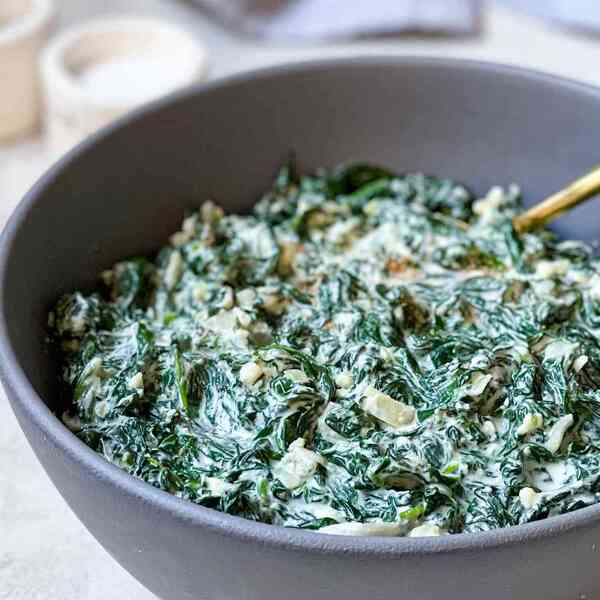
Vegan creamed spinach has all the flavor and texture you’ve come to expect from the classically decadent side dish, only it’s 100 percent plant-based. This creamed spinach recipe will satisfy vegans and non-vegans alike.
Published November 08, 2022
Simply Recipes / Katie Morford
Confession: I’m not a huge creamed spinach fan. Delicious? Absolutely! But when done the traditional way (with heaps of heavy cream and butter) it’s too rich for my taste. So when tasked with developing a vegan spin on standard creamed spinach, I was eager to explore.
The result is a plate of creamy greens that I will add to my side dish repertoire any day of the week. It has that luscious quality you look for in creamed spinach, just without the dairy.
What Makes It Creamy?
The spinach starts with a “cream” sauce built on a base of cashews soaked in oat milk. Cashews are naturally a bit sweet, not unlike heavy cream. When blended in liquid, the result is a lovely sauce that does a bang-up job swapping in for dairy.
Simply Recipes / Katie Morford
A Lighter Take On Creamed Spinach
This unconventional creamed spinach has a couple of notable upsides:
Because the recipe doesn’t have any butter, milk, or cream, it’s suitable for folks following a vegan, dairy-free, or paleo diet.
Using cashews instead of cream significantly cuts the amount of saturated fat and increases the unsaturated fat. Plus, the nuts deliver protein, magnesium, zinc, and iron. When combined with fresh spinach, the dish becomes a nutritional powerhouse.
Can I Make This with Frozen Spinach?
You’ll get the best results if you use fresh spinach sold in bunches, which means washing and stemming the greens. If you need a good shortcut, use frozen spinach instead. Here are a few tips to make it work:
Use bagged frozen spinach, not spinach sold in a solid frozen block.
Defrost the spinach completely and drain (you can do this in a microwave using the defrost setting to expedite the process).
Instead of wilting the spinach in the pan, just cook the spinach for about 2 minutes to release any additional liquid.
After wilting, squeeze out the liquid thoroughly (the same as with fresh spinach).
Skip chopping the spinach if your frozen spinach is already chopped.
Simply Recipes / Katie Morford
Make-Ahead Tips
Here are a few make-ahead tips—especially handy if you’re serving vegan creamed spinach for a dinner party or a holiday meal:
Wash, stem, and dry the spinach up to 3 days ahead. Wrap in paper towels and store in plastic bags in the produce drawer. When it’s time to cook, put the spinach in a colander and run it under the tap so it’s lightly wet when it hits the skillet.
Make the cashew cream sauce up to 1 day ahead and store it in the fridge. You may want to add a little more water to the pan when you add the sauce since it will have thickened overnight.
Dice the shallot and mince the garlic up to 1 day ahead and store in a covered container in the fridge.
You can cook this spinach up to 2 hours before serving, cover it loosely, and leave it on the back of the stove. Reheat gently just before serving.
You can easily double or even triple the recipe. You will have to cook the spinach in several batches and may find you don’t need all the cream sauce. Save any extra to enjoy the next day tossed with pasta and a shower of vegan Parmesan cheese. Consider it vegan alfredo!
Simply Recipes / Katie Morford
More Fun With Spinach
Spinach With Sesame and Garlic
Spinach Tofu Scramble
Green Cauliflower Rice
Pressure Cooker Saag Tofu (Indian Spinach and Tofu)
Sigeumchi Namul (Spinach Banchan)
Cook Mode (Keep screen awake)
1cupoat milk (or unsweetened nut milk)
1/4cupwater
1cup raw, unsalted cashews
2 to 3tablespoonslemon juice
1teaspoonkosher salt, plus more if needed
1/2teaspoon freshly ground black pepper
1pinchground nutmeg, optional
2 1/2pounds (4 to 5 bunches) fresh spinach, large stems trimmed off and discarded
1tablespoonextra-virgin olive oil
1/2cup diced shallot
1 large clove garlic, minced
Soak the cashews:
In a small bowl, pour the oat milk and water over the cashews, ensuring they are submerged. Soak for at least 1 hour or up to 12 hours (refrigerate if soaking for longer than an hour or so).
Simply Recipes / Katie Morford
Make the sauce:
Transfer the soaked cashews and soaking liquid to a blender along with 2 tablespoons lemon juice and the salt, black pepper, and nutmeg (if using). Purée until smooth.
Wash and wilt the spinach:
Wash the spinach and drain in a colander. Don’t spin dry (you want some water clinging to the spinach).
Heat a large skillet over medium-high heat. Add half the spinach and use tongs to turn it in the pan until wilted. This will take just a minute or two. Transfer to a bowl. Repeat with remaining spinach.
Simply Recipes / Katie Morford
Simply Recipes / Katie Morford
Squeeze and chop the spinach:
When cool enough to handle, take up handfuls of spinach and squeeze out as much of the liquid as possible. Be aggressive here.
Set the squeezed-out spinach on a cutting board and roughly chop.
Simply Recipes / Katie Morford
Sauté the shallots, garlic, and spinach:
Heat the olive oil in the same large skillet over medium-high heat. Add the shallots and sauté until tender and translucent, about 5 minutes. Add the garlic and sauté for 30 seconds, making sure it doesn’t brown. Add the spinach and stir just until warm.
Add the sauce:
Pour the cashew cream sauce over the spinach and stir well to blend. Taste and add more lemon juice and/or salt as desired. Serve warm.
Store leftover creamed spinach in an airtight container in the fridge for up to 3 days.
Love the recipe? Leave us stars below!
Simply Recipes / Katie Morford
Simply Recipes / Katie Morford
Nutrition Facts (per serving)
228
Calories
14g
Fat
22g
Carbs
10g
Protein
×
Nutrition Facts
Servings: 4
to 6
Amount per serving
Calories
228
% Daily Value*
14g
18%
Saturated Fat 3g
13%
0mg
0%
368mg
16%
22g
8%
Dietary Fiber 6g
20%
Total Sugars 6g
10g
Vitamin C 55mg
277%
Calcium 208mg
16%
Iron 7mg
38%
Potassium 1250mg
27%
*The % Daily Value (DV) tells you how much a nutrient in a food serving contributes to a daily diet. 2,000 calories a day is used for general nutrition advice.
Nutrition information is calculated using an ingredient database and should be considered an estimate. In cases where multiple ingredient alternatives are given, the first listed is calculated for nutrition. Garnishes and optional ingredients are not included.
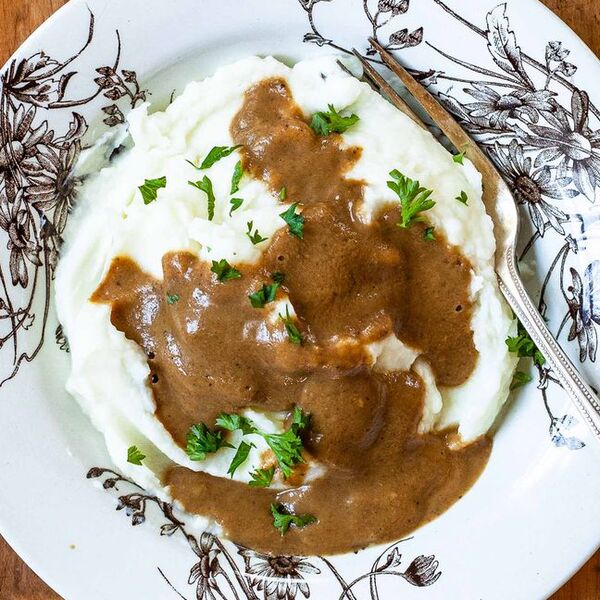
Vegan mushroom gravy is rich with the earthy flavor of crimini mushrooms, plus an umami kick from soy sauce and miso. Pour this vegan gravy over mashed potatoes, biscuits, or rice. It freezes well too!
Sally Vargas
Thanksgiving for vegetarians, and specifically vegans, can be a tricky affair, but it needn’t be! There are so many vegetables and plant-based sides to choose from, almost everyone around the table should be happy.
Be careful. You might want to make more of this gravy than you think you need because once vegans and omnivores alike taste it, you will want to lick your plate clean.
How to Make Vegan Gravy With Mushrooms
Oven-roasted onions and cremini mushrooms (also called baby bellas because they are actually baby Portobello mushrooms) give the gravy a fantastic depth of flavor. Roasting actually intensifies the flavor of most vegetables, and mushrooms are no exception.
You could get fancy and add a mix of mushroom varieties like shiitake or oyster mushrooms, but if you want to keep it simple, cremini are the way to go. Miso and soy sauce add umami to the gravy, imparting another layer of flavor.
If you have homemade mushroom or vegetable stock on hand, this is the time to use it, but no need to stress about it. Store-bought broth offers great results.
Sally Vargas
Troubleshooting Vegan Gravy
I get a lot of calls from friends about rescuing gravy over the holidays, but the main advice is: Do not stress. These are easy fixes! You know how you like your gravy, so trust in that.
Too thick? Gradually whisk in stock, a little at a time, until it reaches the desired consistency.
Too thin? Whisk together a slurry of flour or cornstarch and cold water (strain it if it has lumps). It should be soupy, not thick. Then whisk a small amount—about one tablespoon—into the simmering gravy. Stir and simmer the gravy for a couple of minutes to cook the starch. Repeat the process until the gravy achieves the consistency you like.
How to Get the Best Gravy Texture
You have two good options for this gravy. Once it comes together, you could serve it as is with the mushroom slices intact, or if you want smooth gravy, puree it in a blender or with an immersion blender.
The gravy tends to thicken if you puree it, so you will probably need to add more stock to bring it to the consistency you prefer.
Sally Vargas
How to Store and Freeze Vegan Gravy
The gravy will keep for up to five days in the refrigerator. You can also freeze it for up to three months. Defrost it in the refrigerator overnight, or simply reheat it from frozen over low heat in a saucepan. It may look curdled at first, so give it a good workout with a whisk when it is hot, and it will smooth out.
The Best Mushrooms for Vegan Gravy
The cremini mushrooms called for in this gravy have more of a savory flavor, and their brown color — along with the soy sauce in this recipe — helps to give it a familiar color. White mushrooms would work, but wouldn’t be as appealing.
You could use a wild mushroom mix, but in this recipe their flavor will be more clouded, so you wouldn’t get a good bang for the buck.
When shopping for cremini mushrooms, also look for them under the name baby bella. They’re the same thing. Look for mushrooms that are smooth, firm, and dry. If the mushrooms are slimy, soft, spotty, or have an off smell, don’t buy them. They’ve started to go bad.
What to Serve with Vegan Mushroom Gravy
Stovetop Rice
Vegan Biscuits
Brown Rice
Baked Potatoes
Instant Pot Potatoes
Miso adds extra depth of savory flavor to this vegan gravy, but it’s okay to skip it if you don’t have it on hand.
If soy is an issue, look for soy-free soy sauce and soy-free miso (such as chickpea miso), but avoid coconut aminos — a frequent substitution for soy sauce —because of its coconut aroma and flavor.
Cook Mode (Keep screen awake)
1poundcremini mushrooms, sliced 1/4-inch thick
1/4mediumonion, sliced 1/4-inch thick
3tablespoonsextra virgin olive oil
1/2teaspoonkosher salt
1/8teaspoon freshly ground black pepper
1teaspoondried thyme
1/4cup all-purpose flour
3 to 4cups unsalted vegetable or mushroom stock
1 1/2teaspoonssoy sauce
2teaspoons red, yellow, or white miso, optional
Preheat the oven:
Preheat the oven to 450ºF. Line a rimmed baking sheet with parchment paper.
Roast the mushrooms and onions:
On the baking sheet, mound the mushrooms in one pile and the onions in another, keeping the piles separate from one another. Sprinkle with the oil, salt, and pepper and toss to coat them.
Spread into an even layer on the baking sheet, still keeping the onions and the mushrooms separate, and sprinkle with thyme.
Roast for 20 to 25 minutes, or until deep brown. If the mushrooms are done before the onions, remove them from the pan, return the pan to the oven, and continue to bake until the onions are golden brown.
Sally Vargas Sally Vargas
Finish cooking the gravy:
Transfer the mushrooms and onions to a saucepan. Over medium heat, add the flour and cook while stirring for 2 to 3 minutes or until the flour browns lightly.
Add the stock, 1/2 cup at a time, until you’ve used 3 cups of the stock. Stir well after each 1/2 cup addition. Whisk in the soy sauce and miso (if using). Bring the gravy to a simmer and cook for 3 minutes, stirring often. Adjust the consistency by adding more stock if it is thicker than you like. Taste and add more salt and pepper to taste. (If you’re not using miso, you’ll need to season the gravy more heavily with salt.)
Gravy can be served as is or pureed in a blender. The gravy will thicken slightly when you puree it. After it is smooth, add more stock until the gravy reaches your preferred consistency.
*The % Daily Value (DV) tells you how much a nutrient in a food serving contributes to a daily diet. 2,000 calories a day is used for general nutrition advice.
Nutrition information is calculated using an ingredient database and should be considered an estimate. In cases where multiple ingredient alternatives are given, the first listed is calculated for nutrition. Garnishes and optional ingredients are not included.
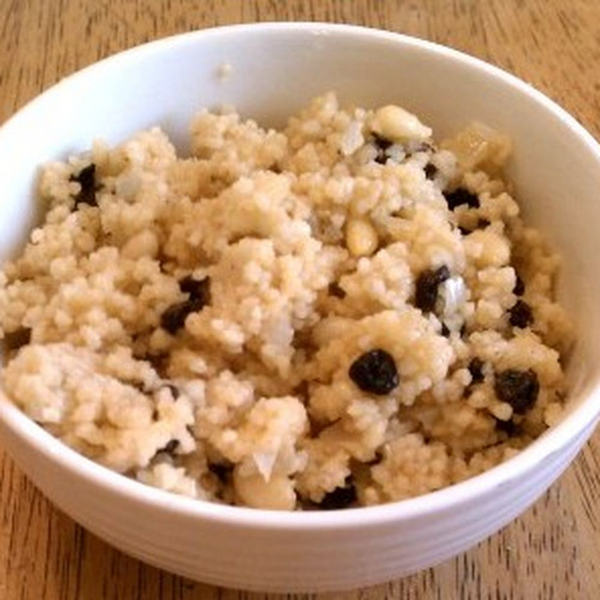
This side dish is super easy to make yet seems sophisticated. I created this recipe in an attempt to duplicate a delicious couscous Whole Foods had in their prepared foods section. I used this Food Network recipe to adapt from and made it healthier and vegetarian (also vegan!) by using whole wheat couscous, vegetable broth, and Earth Balance vegan butter. —thesinglebite
Ingredients
2 teaspoons
vegan butter (like Earth Balance)
1
small shallot
1 cup
low-sodium vegetable broth
1/2 cup
couscous (preferably whole wheat)
1/4 cup
pine nuts, toasted
1/4 cup
currants
1/4 teaspoon
salt
Directions
Melt butter in a small saucepan. Add chopped shallot and simmer for about 2-3 minutes, stirring a few times.
Add vegetable broth and bring to boil.
Once boiling remove from heat and add couscous. Give it a quick stir and cover. Let it sit covered for 10 minutes.
While it’s sitting toast pine nuts. Put the pine nuts in a small pan and cook over low-medium heat for about 3-5 minutes, until the nuts are fragrant. Shake the pan around a few times too.
Lastly, add the pine nuts and currants to the couscous and stir to combine everything.
Using cauliflower purée as a stand-in for cream magically makes this even more intensely spinach-flavored.
Updated September 13, 2023
Why It Works
Puréed cauliflower forms a creamy base to bind the spinach.
Eliminating dairy means the spinach flavor comes to the forefront, bright and clear.
Did you try making the vegan saag paneer recipe I published? You did? And you liked it? Woohoo! I was so darned happy with the results, it struck me that adapting the technique to make a vegan version of creamed spinach was the logical next thing to do, so that’s what I did.
Serious Eats / J. Kenji López-Alt
The Creamy Key
To get my saag paneer truly creamy, I bound the wilted greens with a creamy cauliflower purée. Turns out I like cauliflower-creamed spinach even more than I like dairy-based creamed spinach. It has all the same creaminess and richness, but because dairy can mute flavors, cauliflower-creamed spinach actually tastes more spinach-y than regular creamed spinach.
How do you like that!
To make it, I start by steaming some cauliflower florets in a pot with a little nut or grain milk (almond, cashew, rice, and soy all work fine) before puréeing into a smooth, creamy liquid. Next, I rinse the pot and sauté some onions in it.
One of the keys to really rich creamed spinach is to use the right fat. Vegetable oil works okay, but coconut oil, with its higher saturated fat content, produces a richer-tasting result.
Go Curly If You Can
Once the onions are tender, I hit the pot with a little garlic and a big shower of nutmeg before adding well-washed spinach a handful at a time, letting each handful wilt before adding the next. Mature curly spinach works best for creamed spinach, but if you can’t find it (as I often can’t out here on the West Coast), then mature flat-leaf spinach will do just fine. Avoid baby spinach, which turns mushy and papery when cooked.
Once the spinach is wilted down, I add the puréed cauliflower back to the pot and let the whole thing simmer until the spinach is completely tender and the sauce is thick and creamy.
Finally! A celebratory side dish worthy of a space next to your vegetables Wellington!
Serious Eats / J. Kenji López-Alt
No matter how many times I cook it, I’m always shocked by the extent to which spinach wilts down. You start with a pile bigger than your head, and you end up with enough spinach for only four to six people. Oh, well, I guess that just means you’ll have to make more.
Soup Up Your Spinach
P.S.: Quick bonus recipe I devised when trying to deal with an excess of creamed spinach: Add three cups of water or vegetable stock to the creamed spinach, then hit it with the hand blender and season with salt and pepper to make a deliciously creamy spinach soup.
March 2017
Vegan Cauliflower-Creamed Spinach Recipe
Cook Mode (Keep screen awake)
6ouncescauliflower florets (170g; about 1/3 of a small head)
6ounces almond, soy, rice, or cashew milk (2/3 cup; 170ml)
1pound (450g) mature curly or flat-leaf spinach, washed well and roughly chopped
Kosher salt and freshly ground black pepper
Combine cauliflower and milk of choice in a small saucepan. Bring to a simmer over medium heat, cover, reduce heat to lowest setting, and let cook until cauliflower is completely tender, about 10 minutes. Using an immersion blender or countertop blender, blend into a smooth purée. Set aside.
Serious Eats / J. Kenji López-Alt
Heat coconut oil over medium heat in a large saucepan until melted. Add onion and cook, stirring frequently, until softened but not browned, about 4 minutes. Add garlic and cook, stirring constantly, until fragrant, about 30 seconds. Add nutmeg and stir to combine. Add spinach one handful at a time, stirring and folding until each handful of spinach is wilted, before adding the next.
Serious Eats / J. Kenji López-Alt
Add cauliflower purée to spinach mixture and stir to combine. Bring to a bare simmer and cook, stirring occasionally, until spinach is completely tender and mixture is creamy. Season to taste with salt and pepper and serve.
Special Equipment
Immersion blender or countertop blender
Notes
Avoid baby spinach, which turns mushy and papery when cooked.
Nutrition Facts (per serving)
592
Calories
14g
Fat
88g
Carbs
66g
Protein
×
Nutrition Facts
Servings: 4
to 6
Amount per serving
Calories
592
% Daily Value*
14g
18%
Saturated Fat 5g
27%
0mg
0%
1924mg
84%
88g
32%
Dietary Fiber 51g
182%
Total Sugars 13g
66g
Vitamin C 647mg
3,236%
Calcium 2246mg
173%
Iron 61mg
340%
Potassium 12669mg
270%
*The % Daily Value (DV) tells you how much a nutrient in a food serving contributes to a daily diet. 2,000 calories a day is used for general nutrition advice.
(Nutrition information is calculated using an ingredient database and should be considered an estimate.)

/3a6bf4c5-3b98-4434-a0c9-cf30140256e5--2013-1217_gena_hoppin-john-009.jpg)


/d1ee8d91-f864-4e47-a0cd-23ab9788c2a6--20130119_181553.jpg)

/0d32e323-f36b-45e9-abb3-4701077e50b3--isaan_food_small.jpg)


/c37fcb9f-3de4-486e-ac2e-fc8bf75ae6ab--jk6H9IFQ.jpeg)


/fa87022d-b2aa-4e58-a437-d868fa58a482--IMAG0001.jpg)

