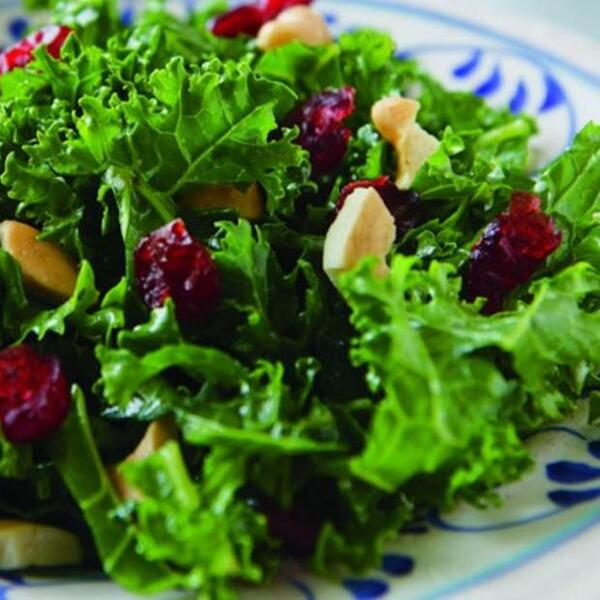
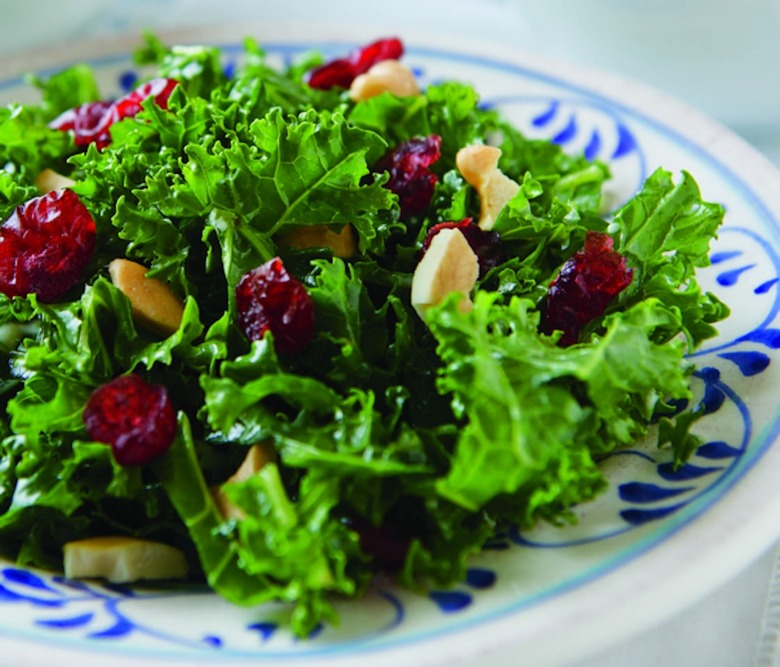
There are so many ways to vary this salad: You can toss in some slivered baby carrots, substitute another kind of nut, or add a bit of thinly shredded red cabbage for extra color or sliced celery or bok choy for extra crunch. Even in its simple form, as presented here, it’s luscious and festive. I find it almost addictive; but I suppose that if one is going to be addicted to something, it may as well be kale!
Massaged Kale Salad Recipe
1 large bunch kale
Olive oil or other healthy vegetable oil
2/3 cup dried cranberries
1/2 cup crushed toasted cashews or pumpkin seeds
1/2 cup vegan mayonnaise
2 tablespoons lemon juice
Strip the kale leaves off the stems, cut into ribbons and place in a large bowl.
With a little olive oil rubbed on your palms, massage the kale for a minute or so until it becomes bright green and softens a bit.
Stir in remaining ingredients and serve at room temperature.
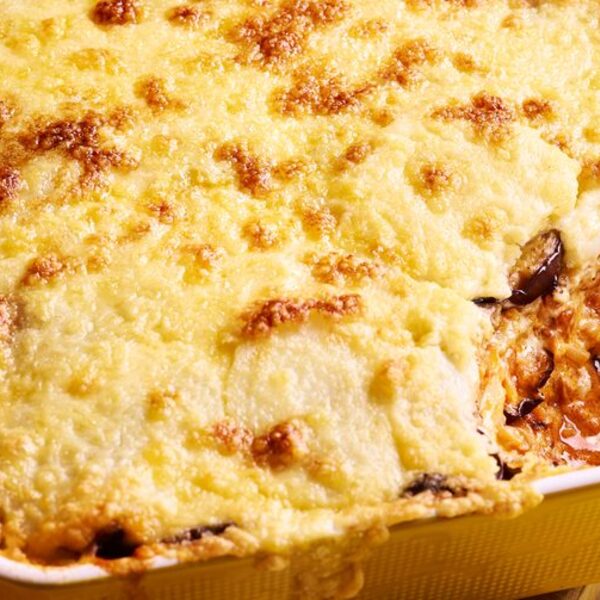
Put the aubergine slices in a large bowl and drizzle in 2 tbsp of the oil, season and toss well. Heat a large non-stick frying pan over a high heat and cook the aubergine slices, in batches, for 1 min on each side until charred and softening, then set aside on a plate. Heat the remaining oil in the frying pan and tip in the onion with a pinch of salt. Cook gently for 15 mins until softened, then add the garlic, oregano, cinnamon and cumin, and fry for a minute. Add the tomato purée and cook for another minute. Tip in the tomatoes and green lentils along with half a can of water, season and simmer for 15 mins until thickened.
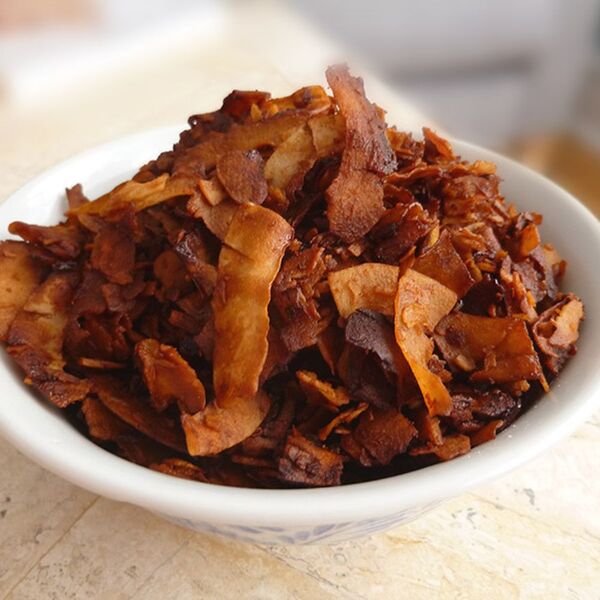
Savory, smokey and slightly sweet vegan “bacon” easily made from coconut flakes. —Melodie Hoke
Ingredients
2 cups
unsweetened coconut flakes
2.5 tablespoons
maple syrup
1 tablespoon
agave nectar
3 tablespoons
tamari
2 tablespoons
liquid smoke
Directions
Preheat oven to 350˚F. Place coconut in a medium bowl and set aside. In another bowl, whisk together maple syrup, agave, tamari and liquid smoke. Pour mixture over the coconut and stir until combined.
Evenly spread the coconut mixture on a baking sheet lined with parchment paper. Bake for 20-25 minutes, stirring often (every 3-5 minutes). Allow to cool completely before serving. Store in an airtight container at room temperature.
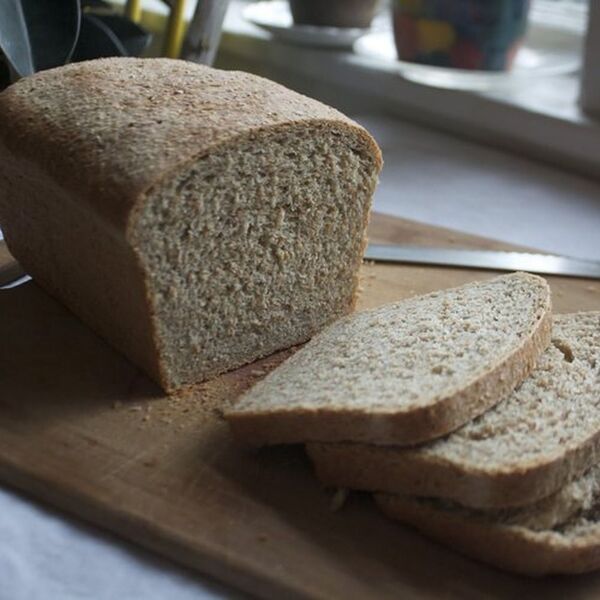
A nice loaf of bread with a hint of banana good for all sorts of sandwiches and toast and just plan eating. —Colleen Stem
Ingredients
2 1/4- 2 1/2 cups
all purpose flour
1 cup
whole wheat with bran flour (plus a little more for kneading
2
ripe bananas
2 teaspoons
yeast (or 1 packet)
2 teaspoons
salt
2 tablespoons
vegan butter or regular butter
1 1/2 cups
warm water
Directions
Peel bananas and blend them into a smooth puree. Add enough warm water to the banana mixture to equal 2 cups of liquid. Add the yeast and earth balance to the puree and mix until fully incorporated. Let sit for a few minutes to active yeast.
Whisk together the flours (start with the lesser amount) and salt in a large bowl. Dump the wet mixture into the bowl and mix together with a dough whisk or wooden spoon until you can no longer mix. If the dough is really wet, add in the other 1/4 of flour. Dump dough out onto a lightly floured surface and knead dough for about 10 minutes.
Place in a clean greased bowl and cover with plastic or wax paper and a towel and place in a warm place to rise. Depending on how warm your place is, it will take about 1 to 1 1/2 hours to double in size. Once risen, dump onto counter, shape into a log and place into a greased loaf pan. Cover again with plastic or wax paper and set to rise again for about 1/2- 45 minutes or until the dough forms a dome over the pan.
Preheat oven to 350.
When dough is done second rise, stick it into the preheated oven and bake. It should be in there for about 50 minutes, but check at 45 for a deep golden color and a internal temperature of 190. Once done, remove from oven, gently remove from pand and set on a wire rack to cool completely.
Heat the oven to 180C/160C fan/gas 4. Cut off enough of the cauliflower stalk so it sits flat, then cut a deep cross in the base of the stalk. Sit the cauliflower on a piece of foil, then rub over 1 tbsp oil. Sprinkle over 2 tbsp water, season well, then cover tightly with the foil, sealing the water and cauliflower inside the package. Put in a baking dish and cook for 1 hr 30 mins.
step 2
Meanwhile, cook the onions with a pinch of salt and 2 tbsp oil in a pan until soft and translucent. Stir in the garlic, mace, thyme leaves and flour and stir for 2 mins, then add the almond milk. Bring to a simmer, stirring, then season. When slightly thickened, remove from the heat and stir in the soya cream and mustard.
step 3
Rub the breadcrumbs with the remaining oil. Stir in the almonds.
step 4
Uncover the cauliflower and return to the dish. Pour the sauce all over the cauliflower and into the dish. Scatter the crumbs on top, and tear over the two whole thyme sprigs. Turn the oven up to 200C/180C fan/gas 6. Bake for 15-20 mins more, until the sauce is bubbling and thickened slightly, and the crumbs and cauliflower are golden. Cut into wedges and serve with a green salad and some garlic bread.
Classic Filipino sisig is made with pork belly and chicken liver cooked with onions, chiles and calamansi. Chef Kristine Subido offers a vegan option to this traditionally meat-heavy dish, with fried tofu and king trumpet mushrooms at the center. It retains the contrasting textures and flavors of the original with a little crunch coming from the raw red onion plus salty, sour, and sweet flavors from soy sauce, sherry vinegar, lime juice, and sugar. The lime mayonnaise drizzled on top ties the whole thing together. Have all the ingredients chopped and ready to go before you start cooking, because it comes together quickly.
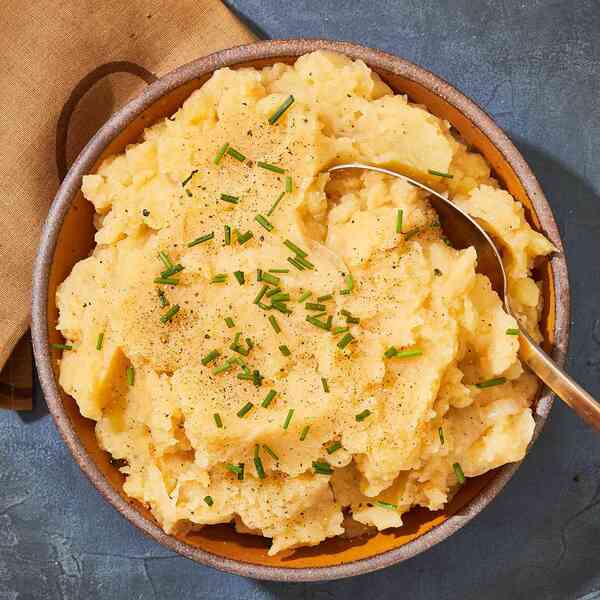
You don’t have to be a vegan to appreciate this easy holiday side dish. These vegan mashed potatoes have plenty of flavor thanks to sweet caramelized onions and the magic of nutritional yeast, which adds rich depth of flavor while keeping these mashed potatoes dairy-free.
Updated on April 19, 2024
Cook Mode (Keep screen awake)
Ingredients
¼cupextra-virgin olive oil
2mediumyellow onions, thinly sliced
3poundsmedium Yukon Gold potatoes, peeled and halved
1 ½cupsvegetable broth
2tablespoonsnutritional yeast
1 ¼teaspoonssalt
¼teaspoonground pepper, plus more for garnish
2tablespoonsfinely chopped fresh chives
Directions
Heat oil in a large skillet over medium heat. Add onions; cook, stirring often, until they begin to soften and turn deep golden, about 30 minutes.
Meanwhile, place potatoes in a large saucepan; add cold water to cover by 2 inches. Bring to a boil over high heat. Reduce heat to medium-high; gently boil until the potatoes are tender, about 15 minutes. Drain.
Return the drained potatoes to the pot and mash with a pastry cutter, a potato masher or a large fork. Add broth, nutritional yeast, salt, pepper and the caramelized onions; stir to combine. Transfer to a serving dish; sprinkle with chives and garnish with additional pepper, if desired.
Originally appeared: EatingWell.com, September 2020
Nutrition Facts (per serving)
141
Calories
5g
Fat
23g
Carbs
3g
Protein
Nutrition Facts
Servings Per Recipe 12
Serving Size 2/3 cup
Calories 141
% Daily Value *
Total Carbohydrate
23g
8%
Dietary Fiber
2g
7%
Total Sugars
2g
Protein
3g
6%
Total Fat
5g
6%
Saturated Fat
1g
4%
Vitamin A
89IU
2%
Vitamin C
8mg
9%
Folate
20mcg
5%
Sodium
332mg
14%
Calcium
21mg
2%
Iron
1mg
6%
Magnesium
29mg
7%
Potassium
518mg
11%
Nutrition information is calculated by a registered dietitian using an ingredient database but should be considered an estimate.
* Daily Values (DVs) are the recommended amounts of nutrients to consume each day. Percent Daily Value (%DV) found on nutrition labels tells you how much a serving of a particular food or recipe contributes to each of those total recommended amounts. Per the Food and Drug Administration (FDA), the daily value is based on a standard 2,000 calorie diet. Depending on your calorie needs or if you have a health condition, you may need more or less of particular nutrients. (For example, it’s recommended that people following a heart-healthy diet eat less sodium on a daily basis compared to those following a standard diet.)
(-) Information is not currently available for this nutrient. If you are following a special diet for medical reasons, be sure to consult with your primary care provider or a registered dietitian to better understand your personal nutrition needs.
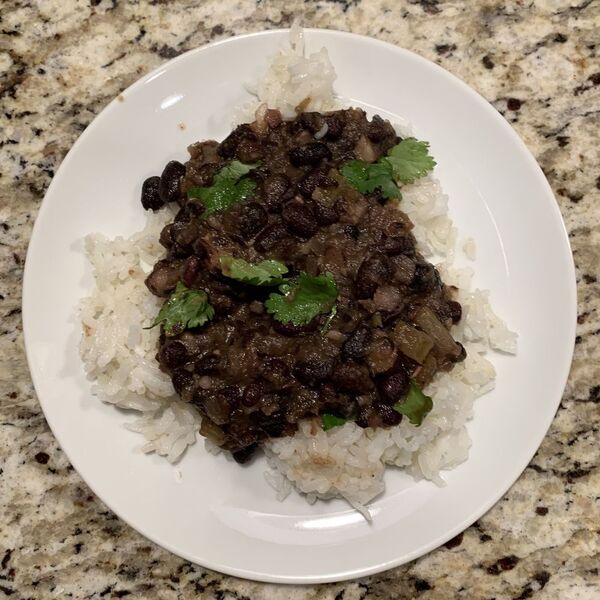
A hearty vegan black bean recipe, delicious over rice —Carol P.
Ingredients
1
onion, chopped
4
cloves garlic, minced
1 1/2 cups
celery, chopped
1 teaspoon
cumin
1 tablespoon
chili powder
1 pound
Dried black beans
1 tablespoon
red wine vinegar
3 tablespoons
olive oil
1 teaspoon
Sriracha
1
green bell pepper, chopped
4 cups
vegetable broth
1 tablespoon
oregano
Directions
Soak beans overnight in water (or for a quick way, boil in water for 2 minutes, off heat, let sit for an hour, then proceed with recipe), drain and rinse
Saute onions and soft, add garlic and celery, green pepper, cumin, chili powder, salt, and pepper
Add black beans to onion mixture and stir, then add vegetable broth (you may also use Better than Boullion for a stronger flavor).
Add oregano and Sriracha sauce
Bring to boil, reduce heat and simmer for three to four hours. Add vinegar. Also, add water/broth if it gets too thick.
When beans are soft, it’s ready to serve. To create a thicker stew, pulse a couple of times with an immersion blender.
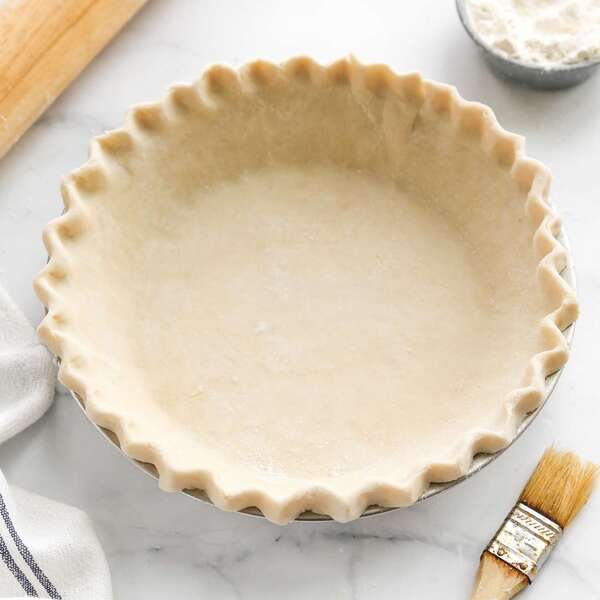
Here it is, the vegan pie crust recipe for every baker, from beginner to experienced. Use it for sweet or savory pies. Pie lovers approve!
Published November 02, 2022
Simply Recipes / Tara Omidvar
For years I attempted to make a vegan pie crust recipe that was both flaky and flavorful. I tried coconut oil, olive oil, shortening, you name it. The results were bland, a pale imitation of the irresistible crusts that dairy butter delivered. Nothing passed muster.
Turns out all I had to do was wait. With the explosion of plant butters on the market, we can finally have our vegan pie and love it, too. This pie dough recipe works in nearly any sweet or savory recipe calling for an all-butter pie crust.
Simply Recipes / Tara Omidvar
Plant Butter to the Rescue!
Faux butter has been on the market for years, but it hasn’t always been vegan. I grew up in the 1980s, and what my generation and those before knew as margarine can contain dairy-based ingredients, and therefore was off the table for vegan baking.
Once plant butters started appearing, it was finally possible to do a 1:1 swap for dairy butter to veganize many basic recipes in the baking repertoire. Think of plant butter as fancy margarine that’s much less likely to contain animal-derived products. Still do your diligence and check the label to verify if what you’re buying is vegan.
Like dairy butter, today’s plant butters are at least 80 percent fat. Any plant butter or margarine with less than 80 percent fat by U.S. law must be labeled a “spread”. Avoid plant butters that are spreads, as they’ll deliver underwhelming results in vegan baking.
Tip
Vegetable shortening doesn’t have any flavor, so it’s not our favorite for making crust. Note that butter-flavored shortening often contains dairy-derived flavoring and is therefore not vegan.
Expect Some Subtle Differences
Flavor-wise, plant butter delivers a very appealing pie crust. However, it has fundamental differences from a crust made with shortening or dairy butter.
Pie dough made with plant butter is more prone to cracking when you roll it out. This is because of chemistry! Molecules are not identical across fats. Dairy butter tends to be pliable, while tropical fats like palm oil (which is very common in plant butter) are crumbly and brittle. This translates to a crust that’s a little more finicky.
Simply Recipes / Tara Omidvar
Err on the side of handling your crust less and being okay with imperfections. If there’s a hole or a crack, lay a patch of excess dough over it and press lightly instead of mushing and pinching hard, which can soften and overwork the dough, resulting in a tough crust. Your lightly patched crust will look much better once it’s baked, I promise.
The flavor improves as the baked crust sits. Fresh out of the oven, the crust doesn’t seem like much, but after it’s cooled for 1 hour, the texture and flavor are like the pie dough you know and love.
Plant Butters to Use
Not everyone has access to the same plant butters. I tried this with different ones to see how they performed and tasted. Gladly, you can use any of them and get worthy results, though some are more finicky to use.
Country Crock Plant Butter with Olive Oil was soft, making it easy to work into the flour. However, it’s prone to getting too soft and greasy. When rolling it out, I needed to dust the crust with flour more generously than other doughs.
Earth Balance Vegan Buttery Sticks yielded a dough that was on the crumbly side, and prone to cracking when rolled out. I simply did some delicate patchwork in my crust and in the end was happy.
Miyoko’s European Style Cultured Vegan Butter held up the best, meaning it did not become greasy as I cut it into the dry ingredients. The crust I made with it was easier to roll out and had a wonderful flavor. The downside? This product is not as easy to find, plus it’s expensive.
Simply Recipes / Tara Omidvar
Fruity Dessert Recipes to Veganize With This Crust
Fresh Strawberry Pie
Sweet Cherry Pie
Blackberry Pie
Fig Galette
Rhubarb Ginger Galette
This recipe is for a single 9-inch crust. Double it to make a double crust and form into 2 separate disks, rolling each out individually.
Not all margarines are vegan; check the label to verify. Most products that call themselves “plant butter” or “plant-based” should be in the clear.
If your plant butter is unsalted, increase the salt to 1/2 teaspoon.
Cook Mode (Keep screen awake)
8 tablespoons (113g) salted plant butter
2 to 6tablespoonsice water
1 1/4 cups (160g) all-purpose flour, plus extra for rolling
1/2teaspoonsugar
1/4teaspoonsalt (see recipe note)
Cube and chill the plant butter:
Cut the plant butter into 1/2-inch cubes. Place on a small plate and pop it in the freezer so it stays as cold as possible while you finish your prep.
Put a large sheet of plastic wrap out on the counter so it’s ready for wrapping your disk of dough. That way you don’t have to wrangle around for plastic wrap later with sticky pie dough hands.
Simply Recipes / Tara Omidvar
Prepare the ice water:
If you don’t have ice, measure out the 6 tablespoons of water and chill it so it’s as cold as possible. Leave the tablespoon in the cup; you’ll use it later.
Simply Recipes / Tara Omidvar
Combine the dry ingredients:
In a large bowl, combine the flour, sugar, and salt.
Simply Recipes / Tara Omidvar
Work in the fat:
Get the plant butter out of the freezer and dump it into the bowl. Toss the pieces to coat in the flour mixture so they are not clumped together.
Using your fingertips, smoosh the fat into flakes and small pieces. If you’d rather not use your hands, use a pastry cutter.
Tip
Your fingertips are the coolest part of your hands and are less likely to warm the fat as you work it in. You want the plant butter bits to remain cool and pliable.
Don’t rush through this step. You are aiming to have flakes or pieces of butter no larger than the size of a pea. It’ll look like a crumbly mess, which is exactly as it should be.
Tip
If the butter starts to get greasy, pop the entire bowl in the freezer, wait 5 to 10 minutes, and then resume your work.
Simply Recipes / Tara Omidvar
Simply Recipes / Tara Omidvar
Drizzle in the ice water:
One tablespoon at a time, drizzle in the cold water and toss gently with your hands as if tossing a salad. You will not need all of the liquid.
Keep adding liquid, 1 tablespoon at a time, tossing and pressing together, until the dough resembles a rough, shaggy mass and keeps its shape when you squeeze a ball of it in your fist.
You’re not kneading the dough, per se; you’re just getting the water distributed so there are no dry, floury patches. Err on the side of slightly sticky rather than floury.
Simply Recipes / Tara Omidvar
Simply Recipes / Tara Omidvar
Simply Recipes / Tara Omidvar
Lightly knead, then wrap in plastic:
Lightly knead the dough just a few times so it forms a cohesive ball (I do this right in the bowl rather than on the counter). Then transfer it to the center of the plastic wrap, press it into a flat disk about 6 inches across, and wrap tightly.
Simply Recipes / Tara Omidvar
Simply Recipes / Tara Omidvar
Chill 30 minutes before rolling:
The dough is often easier to handle once it’s rested for at least 30 minutes in the refrigerator.
Tip
You can refrigerate the wrapped disk of dough for up to 3 days, or freeze it for up to 6 months. Thaw frozen dough overnight in the refrigerator.
Roll out the dough:
This is best done in a cool kitchen, which keeps the dough from breaking down and becoming fragile and greasy. If your kitchen is hot, consider working early in the morning, when it’s coolest.
Generously flour a clean counter or pastry cloth. Dust the rolling pin and the dough itself on both sides well with flour. If the dough has been in the fridge for more than a few hours, let it sit out for 10 minutes before rolling it out.
Tip
Don’t have a pastry cloth? Line your countertop with a few overlapping large sheets of plastic wrap. This makes for easy cleanup.
Working from the center of the dough, roll away from you and then toward you, rotating the disk of dough bit by bit as you roll. This helps keep it from sticking. Dust the dough and/or the counter with more flour as needed to prevent the dough from sticking.
To line a 9-inch pie dish, you’ll want a circle of dough at least 14 inches across.
Brush the excess flour off the dough with a clean, dry pastry brush or your hand. Lift the rolled-out dough into the dish by rolling it up on the pin and letting it drape over the center of the dish.
Some plant butters are more prone to making the dough crack or tear than others. If your dough seems brittle, just keep going and don’t worry about perfection. You can patch cracks with excess dough. Avoid pinching or mushing the patches together, as that can make the crust tough.
Simply Recipes / Tara Omidvar
Simply Recipes / Tara Omidvar
Shape the crust:
Trim the excess from the sides of the pan. If you’d like to create a folded and pinched edge, leave about 1 inch of overhang. If the dough is too brittle to easily fold without it cracking, just trim it so the crust is even with the rim of the pan.
To make a pinched crust, fold the overhang under the rim of the pan. Then use your thumb and forefinger to flute the edges.
Tip
Don’t worry about a picture-perfect crust! Imperfections often disappear once the pie is baked.
To blind bake the crust (fully bake the crust without any filling), proceed as you would with any other pie dough.
Love the recipe? Leave us stars below!
Simply Recipes / Tara Omidvar
Simply Recipes / Tara Omidvar
Simply Recipes / Tara Omidvar
Nutrition Facts (per serving)
190
Calories
13g
Fat
16g
Carbs
2g
Protein
×
Nutrition Facts
Servings: 8
Amount per serving
Calories
190
% Daily Value*
13g
17%
Saturated Fat 8g
38%
30mg
10%
158mg
7%
16g
6%
Dietary Fiber 1g
2%
Total Sugars 0g
2g
Vitamin C 0mg
0%
Calcium 7mg
1%
Iron 1mg
5%
Potassium 25mg
1%
*The % Daily Value (DV) tells you how much a nutrient in a food serving contributes to a daily diet. 2,000 calories a day is used for general nutrition advice.
Nutrition information is calculated using an ingredient database and should be considered an estimate. In cases where multiple ingredient alternatives are given, the first listed is calculated for nutrition. Garnishes and optional ingredients are not included.
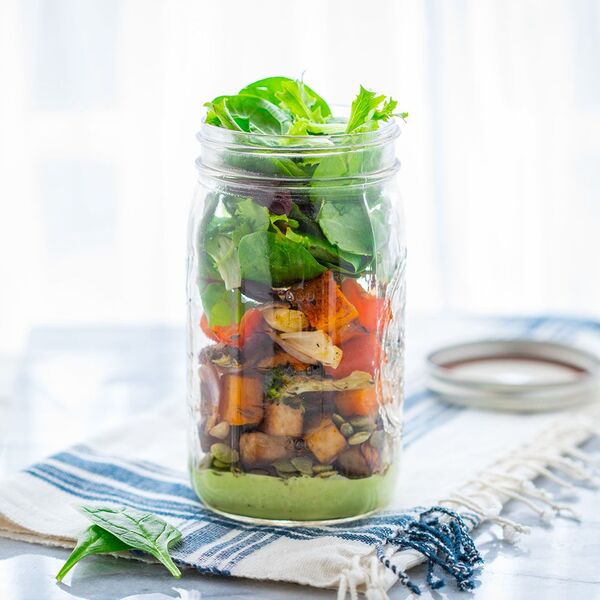
This vegan mason jar salad is easy to pack up and take for lunch. Layering the creamy cashew sauce into the bottom of the jar ensures that your big, bold power salad won’t become wilted by the time you’re ready to eat.
Updated on April 19, 2024
Directions
Layer into a 4-cup jar, in this order: sauce, tofu, pumpkin seeds, veggies and greens. Close tightly and refrigerate for up to 5 days.
To make ahead
Refrigerate for up to 5 days.
Originally appeared: EatingWell.com, December 2017
Nutrition Facts (per serving)
400
Calories
27g
Fat
21g
Carbs
27g
Protein
Nutrition Facts
Servings Per Recipe 1
Serving Size 4 cups
Calories 400
% Daily Value *
Total Carbohydrate
21g
8%
Dietary Fiber
8g
28%
Total Sugars
5g
Protein
27g
55%
Total Fat
27g
34%
Saturated Fat
5g
23%
Vitamin A
10729IU
215%
Vitamin C
105mg
117%
Folate
194mcg
48%
Sodium
383mg
17%
Calcium
307mg
24%
Iron
7mg
41%
Magnesium
139mg
33%
Potassium
895mg
19%
Nutrition information is calculated by a registered dietitian using an ingredient database but should be considered an estimate.
* Daily Values (DVs) are the recommended amounts of nutrients to consume each day. Percent Daily Value (%DV) found on nutrition labels tells you how much a serving of a particular food or recipe contributes to each of those total recommended amounts. Per the Food and Drug Administration (FDA), the daily value is based on a standard 2,000 calorie diet. Depending on your calorie needs or if you have a health condition, you may need more or less of particular nutrients. (For example, it’s recommended that people following a heart-healthy diet eat less sodium on a daily basis compared to those following a standard diet.)
(-) Information is not currently available for this nutrient. If you are following a special diet for medical reasons, be sure to consult with your primary care provider or a registered dietitian to better understand your personal nutrition needs.


/148a5587-79e1-4ba6-8f03-c9afe62027f5--CoconutBacon_3.jpg)

/cefeeaba-1c19-4391-96d9-f1403cf23628--1489501544735.jpeg)


/4a2f025a-560e-4295-96af-86f9f08149fa--IMG_0635_copy.jpg)