Blog

  • Vegan French-Fried Onions

    Vegan French-Fried Onions

    recipe image

    Be the first to rate & review!

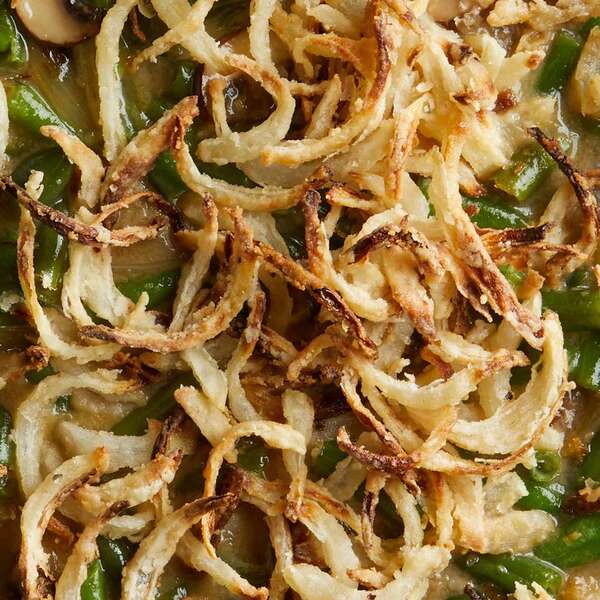
    Oven-frying lightly battered onion slices produces the kind of crispy onion rings we all love, but with less fat and fewer calories. Plus, we use almond milk to make this crispy onion topping dairy-free and vegan–perfect for topping a vegan green bean casserole!

    Updated on April 19, 2024


    Cook Mode
    (Keep screen awake)

    Ingredients

    • 1 medium onion, halved and sliced

    • 1 cup plain unsweetened almond milk or other nondairy milk

    • cup all-purpose flour

    • ¼ teaspoon ground pepper

    • ¼ teaspoon salt

    • Canola or olive oil cooking spray

    Directions

    1. Preheat oven to 400 degrees F. Combine onions and almond milk (or other milk) in a medium bowl. Let stand for 15 minutes. Drain (discard milk) and return to the bowl. Sprinkle with flour, pepper and salt and toss to coat. Transfer to a large rimmed baking sheet. Coat generously with cooking spray. Bake, stirring once or twice, until tender and crisp, 25 to 28 minutes.

    Tips

    To make ahead: The oven-fried onions can stand at room temperature for up to 2 hours.

    Originally appeared: EatingWell.com, October 2018

    Nutrition Facts (per serving)

    19 Calories
    0g Fat
    4g Carbs
    1g Protein
    Nutrition Facts
    Servings Per Recipe
    12
    Serving Size
    1 tablespoon
    Calories
    19
    % Daily Value *
    Total Carbohydrate
    4g
    1%
    Dietary Fiber
    0g
    1%
    Total Sugars
    0g
    Protein
    1g
    1%
    Total Fat
    0g
    0%
    Vitamin A
    42IU
    1%
    Vitamin C
    1mg
    1%
    Folate
    8mcg
    2%
    Sodium
    63mg
    3%
    Calcium
    40mg
    3%
    Iron
    0mg
    1%
    Magnesium
    2mg
    0%
    Potassium
    21mg
    0%

    Nutrition information is calculated by a registered dietitian using an ingredient database but should be considered an estimate.

    * Daily Values (DVs) are the recommended amounts of nutrients to consume each day. Percent Daily Value (%DV) found on nutrition labels tells you how much a serving of a particular food or recipe contributes to each of those total recommended amounts. Per the Food and Drug Administration (FDA), the daily value is based on a standard 2,000 calorie diet. Depending on your calorie needs or if you have a health condition, you may need more or less of particular nutrients. (For example, it’s recommended that people following a heart-healthy diet eat less sodium on a daily basis compared to those following a standard diet.)

    (-) Information is not currently available for this nutrient. If you are following a special diet for medical reasons, be sure to consult with your primary care provider or a registered dietitian to better understand your personal nutrition needs.

    Read More

  • Vegan sticky toffee pudding

    Vegan sticky toffee pudding

    recipe image

    Method

    • step 1

      Heat the oven to 180C/160C fan/gas 4. Butter the base and sides of a small baking dish – ours measured 20 x 15cm. Combine the flaxseeds with 3 tbsp warm water and set aside for at least 5 mins. In a pan, mix together the dates, Jord oat drink, vanilla and plant butter. Warm over a medium heat until the butter has melted. Meanwhile, combine the sugar, flour and mixed spice in a bowl and make a well in the centre.

    • step 2

      Once the butter has melted, remove from the heat and stir in the bicarbonate of soda. Pour the bubbly mixture into the flour well along with the soaked flaxseeds and combine well until no flour pockets remain. Pour into the baking dish and bake in the oven for 30-35 mins until a skewer inserted into the middle comes out clean.

    • step 3

      Meanwhile, make the sauce. Tip the butter and sugar into a pan and warm over a low heat. Once the butter has melted, turn up the heat and bring to a simmer to melt the sugar. Once the sugar is melted, pour in the coconut cream and bubble for a further 5-10 mins until thick and glossy. Stir in a pinch of salt and set aside. Pour the sauce generously over the sponge either in the dish or at the table. Cut into six slices to serve.

    Read More

  • Vegan Thai Summer Squash Vichyssoise

    Vegan Thai Summer Squash Vichyssoise

    recipe image

    Vegan Thai Summer Squash Vichyssoise

    • Serves
      6
    Author Notes

    I made this up on a whim. Something to cool down this ever so hot afternoon! —Angelica Page

    Ingredients

    • 1/2 pound

      summer squash, cubed


    • 1 pound

      potato, peeled and cubed


    • 1

      vidalia onion, sliced


    • 1 quart

      vegetarian no chicken broth or vegetable broth


    • 1 cup

      coconut milk


    • 2 teaspoons

      green curry paste


    • 1 bunch

      chives, minced

    Directions
    1. Heat broth to almost a boil and add squash, potato and onion. Cover and softly simmer for 15 minutes. Remove from heat and chill thoroughly.
    2. Blend with remaining ingredients setting aside half the chives for garnish, until pureed and velvety smooth.
    3. Serve simply and ENJOY!

    Read More

  • Vegan French Toast

    Vegan French Toast

    recipe image

    What is challah French toast, you ask? With its crisp edges and custardy center, French toast always feels decadent at breakfast or brunch. But when you make challah bread French toast, you push that luxury over the top. Whether it’s a braided loaf or one studded with raisins, soft, rich challah makes for an equally soft, pillowy French toast. In this recipe, the French toast is spiced with vanilla, cinnamon, and nutmeg.

    The key to cooking the perfect French toast is to thoroughly soak the thick slices of bread in the egg mixture, then cook it over medium-low heat so the edges don’t burn before the center of each piece cooks through. If you’re making French toast for a crowd, you can double this recipe and prepare it in batches. Stash cooked slices of French toast in an oven set to 200°F to keep them warm until you’re ready to serve everything. Warm maple syrup poured over the top is a classic touch. Feel free to swap or add in berries, cherries, or sliced bananas; apples or pears that have been cooked in a little butter; or toasted pecans, walnuts, or hazelnuts for a little extra texture.

    Use this recipe when you have leftover challah or simply want to make an especially delicious French toast. If you don’t have challah, a loaf of brioche is an ideal substitution. And if your bread is a bit dried out: All the better for it to sponge up the egg mixture.

    Read More

  • Vegan Kale + Pepita Pesto

    Vegan Kale + Pepita Pesto

    recipe image

    Vegan Kale + Pepita Pesto

    • Makes
      2 cups
    Author Notes

    A whole bunch of kale can quickly be turned into a gorgeously green pesto, flecked with toasted pepitas, a touch of cilantro and chili if you so desire. If I’m making it knowing the kids will be eating it I leave these out, but if I’m being greedy… I put them in, that way only I get to eat it. Naughty mum, I know.

    As with any pesto this is wonderful stirred through cooked pasta, smeared onto toast, swirled through a bowlful of steaming hot soup or vegetable stew, or thinned down with a little extra lemon juice and olive oil and used as a wonderful dressing. I like to use the leaves and stalks of cilantro in my pesto, just chop up the stalks a little. By all means, use just the leaves if preferred. I’ve only come across white miso that’s made with rice, but some miso pastes are fermented with wheat or barley, so double-check the ingredients if you are gluten-free. —Emma Galloway | My Darling Lemon Thyme

    Ingredients

    • 1 bunch

      kale (approx 250-300g), washed, spun + stems removed


    • 2

      cloves garlic


    • 1 cup

      lightly toasted pepita seeds


    • 1 cup

      loosely packed cilantro leaves + soft stems


    • 1-2

      green Serrano chilies, seeded + roughly chopped


    • 185 milliliters

      extra virgin olive oil


    • 2 tablespoons

      fresh lemon juice


    • 1 tablespoon

      white (shiro) miso paste

    Directions

    1. Place kale, garlic, pepitas, cilantro and chilies, if using, into a food processor. Pulse until finely chopped, you may need to stop it occasionally to scrape down the sides or move things around a little to get it all going. With the motor still running, drizzle in the olive oil in a steady stream. Lastly add the lemon juice and miso, give it one final whiz, taste and season with sea salt and black pepper. If not using straight away pack into a clean glass jar, cover with a thin film of olive oil and store in the fridge for up to 1 week.

    Former chef | Author of My Darling Lemon Thyme-Recipes from my real food kitchen | Photographer

    Read More

  • Scottish Oatmeal Breakfast with Teff Grain and Flax Seeds

    Scottish Oatmeal Breakfast with Teff Grain and Flax Seeds

    recipe image

    Scottish Oatmeal Breakfast with Teff Grain and Flax Seeds

    • Serves
      1
    Author Notes

    This is a breakfast I created to use Scottish oats, which are whole oat groats that have been flattened in a slow grinding process, producing something like rolled oats, but retaining all the nutritional value of the whole grain. They take longer to cook than rolled oats but would get too mushy if cooked overnight in a slow cooker like steel cut oats. To make these work for a quick weekday breakfast, I was inspired by a recipe from Heidi Swanson of toasting rolled cereal the evening before. I found that toasting these in some butter and then soaking them in boiling water made them easy to finish off the next morning. Then I experimented with other grains and liked including some nutty teff grain for body and flax seeds for texture. I’ve also made this with a mixture of rolled and steel cut oats, and I’ve swapped in chia seeds for the teff grain, all with good results. This hot cereal is delicious with lots of different toppings. I suggest dried apricots, hazelnuts and a drizzle of maple syrup. Will including the nutritional powerhouse of teff grain and superfood of flax seeds in your daily breakfast bring you health and superhuman powers? Maybe not. But taking the extra few minutes in the evening to start a warm bowl of oatmeal for the following morning, and infusing your house with the fragrance of buttery, toasted grains in the process, will make you feel cared for, which apparently accounts for a great deal of the healing power of placebos. A good breakfast when you’d like a little extra insurance for getting through a demanding day. —Fairmount_market

    Ingredients

    • 1/4 cup

      Scottish oats


    • 1 scant tablespoons

      teff grain


    • 1 scant tablespoons

      flax seeds


    • 1 teaspoon

      butter (or substitute coconut oil for a vegan version)


    • 1 cup

      boiling water (divided)


    • 1 pinch

      salt


    • dried fruit, nuts, maple syrup, and a splash of milk for toppings

    Directions
    1. The evening before, heat a small saucepan and set a kettle to boil with 2/3 cups water. When the pan is warm, melt the butter or coconut oil. Then add the grains, and cook, stirring, for about five minutes, until they are toasted and very fragrant. Turn off the heat. Carefully add 2/3 cups boiling water (it will splatter), stir, and cover.
    2. The next morning, add 1/3 cup water to the pan and reheat (for a richer porridge, use 1/3 cup cow’s milk or almond milk). Let the oatmeal and teff mixture simmer for about five to eight minutes, stirring occasionally, until it is the desired tenderness and thickness. Serve warm, sprinkled with the toppings and a splash of cold milk.
    3. Note: For a family of two adults and two kids, I triple the recipe:
      3/4 cups oats,
      1/8 cup teff grain,
      1/8 cup flax seeds,
      1 Tbsp butter,
      ~1/2 tsp salt (to taste),
      3 cups boiling water.

      You can of course cook this all at once if you have more time in the morning. Simply add all of the boiling water to the toasted grains and cook for about 15 to 20 minutes.

    I’m a biology professor and mother of two, and in my (limited) free time I love to cook, which is much more forgiving than laboratory science. Last year I helped start a farmers market in my neighborhood, and to promote it, I created a food blog: fairmountmarket.blogspot.com. I enjoy the challenge of coming up with recipes for local, seasonal ingredients and finding fun ways to cook with my children.

    Read More

  • Sweet Fig Compote

    Sweet Fig Compote

    recipe image

    Sweet Fig Compote

    • Serves
      8
    Author Notes

    This fig preserve .. with its deep, sophisticated flavor .. is perfect for any time of the year —VeggiesByCandlelight

    Ingredients

    • 1 1/4 cups

      water


    • 3/4 cup

      dried mission figs, chopped


    • 1/4 cup

      dried golden raisins, chopped


    • 1/4 cup

      dried pears, chopped


    • 1/4 teaspoon

      salt


    • 2 teaspoons

      vanilla


    • 2 teaspoons

      fresh squeezed lemon juice


    • 1 tablespoon

      honey (** a vegan option would be brown rice syrup or coconut sugar)

    Directions
    1. In a small pot over medium-low heat, combine water, figs, raisins, pears and salt.
      Cook until reduced to a jam consistency (~ 20-30 min)
    2. Add the vanilla, lemon juice and brown rice syrup .. and cook 3-4 min longer
    3. Use an immersion blender .. or a few pulses in your food processor .. to make a thick paste-like spread

    Read More

  • Vegan Slow-Cooker Sweet Potato Chili

    Vegan Slow-Cooker Sweet Potato Chili

    recipe image

    Health Bites|

    Vegan Slow-Cooker Sweet Potato Chili

    My favorite thing about this chili is that it can be made in bulk and frozen for those nights when you have absolutely no time to cook — it happens to all of us!For more recipes like this one, visit Health Bites.

    Sweet Potato Chili

    • cooking oil
    • 2-3 garlic cloves, minced
    • 1 medium onion, diced
    • 4 tablespoon tomato paste, such as amore italian tomato paste
    • 3-4 tablespoon paprika, such as celebration herbals organic paprika
    • 1-2 teaspoon cumin, such as simply organic cumin
    • 1 teaspoon oregano, such as celebration herbals organic oregano
    • 3 tomatoes, diced
    • 1 tablespoon red wine vinegar, such as napa valley naturals red wine vinegar
    • 1/4 cup mild chile peppers, diced
    • 2 fifteen-ounce cans black bean, such as eden organic black beans
    • 1 medium sweet potato, peeled and chopped
    • grated vegan cheese
    • 1 cup vegetable stock (or more if needed)
    1. Add oil to pan, sauté garlic and onions until tender.
    2. Add and mix all other ingredients except sweet potatoes and cheese.
    3. Oil slow-cooker pot and add a layer of the bean mixture, then layer with chopped or sliced sweet potatoes, salt, pepper, and grated vegan cheese.
    4. Repeat all the layers until you run out of beans, and cover with vegetable stock.
    5. Cook on low for 4 hours, then serve!

    Read More

  • Raw Vegan Coconut Almond Macaroons

    Raw Vegan Coconut Almond Macaroons

    recipe image

    Raw Vegan Coconut Almond Macaroons

    • Makes
      dozen
    Author Notes

    After having a delicious raw vegan blondie macaroon at a Beanocchio cafe, I came home and had to try replicating the recipe. —chelsgrant

    Ingredients

    • 1 cup

      almonds


    • 1/2 cup

      toasted unsweetened coconut


    • 1/2 cup

      unsweetened coconut


    • 1/4 cup

      agave

    Directions
    1. Soak the almonds for an hour. Drain, disposing of liquid. Reserve almonds.
    2. Toast 1/2 cup of coconut in a small saute pan over low heat.
    3. Line a baking sheet with parchment or wax paper.
    4. Put all ingredients into a food processor. Pulse until finely ground and begins to hold together.
    5. Using a tablespoon, scoop mounds of the mixture and place onto prepared baking sheet. Note: when scooping, be sure to press mixture into the tablespoon to ensure it forms a mound and holds together. If the mixture is sticking in the spoon, have a cup of hot water to dip the spoon into between scoops.
    6. Refrigerate for one hour. These little mounds of joy were soft but held together, even when bitten into. They tasted even better on the second day.

    Read More

  • Chia Jam and Peanut Butter Cups

    Chia Jam and Peanut Butter Cups

    recipe image

    A fun dessert or special snack, these chocolate cups are filled with an easy chia jam and peanut butter. A delicious take on the classic pb and j.

    If you ever want to feel fancy with doing the least amount of work possible, make chocolate peanut butter cups. Now, if you want to do a extra little somethin’ somethin’, make these chocolate CHIA JAM peanut butter cups! Now, I realize that chocolate peanut butter cups probably aren’t considered fancy, but I feel like any time you make a layered dessert you can use the word fancy. And peanut butter cups are just that… layered! A little chocolate, some peanut butter mixture, a dollop of berry chia jam, and top it all off with chocolate! Can you say YUM!?!? I think I legit just heard you all say it through the computer. YUM

    These chocolate chia jam peanut butter cups are full of peanut butter and jam flavor. It’s like a grownup version of your favorite childhood sandwich, but you also get to add chocolate! I could say these chocolate chia jam peanut butter cups bring me back to my childhood. But they totally don’t. I actually was a fan of the peanut butter and sugar sandwich growing up. Yes… I said sugar. I wasn’t a fan of soggy bread, so jelly on my sandwiches was not my jam. Instead, I did a little sprinkle of granulated sugar for some extra sweetness and crunch! My mom did this with her sandwiches, and her mom did that same! Who knew traditions could revolve around a little granulated sugar on a sandwich?

    ou’ll going to LOVE these chocolate chia jam peanut butter cups, I just know it! There’s something about that peanut butter and chocolate combo that makes me so happy! I also love how customizable these are for those of us with celiac disease or food allergies. You can use your favorite brand of chocolate – mine is gluten-free and dairy-free. If you have a peanut allergy, you can use sunflower seed butter instead. The fact that these chocolate chia jam peanut butter cups are SO easy, I know I’ll be making them all the time to share with my friends and family!

    SOME CHOCOLATE CHIA JAM PEANUT BUTTER CUPS TIPS AND TRICKS

    I’ve made these chocolate chia jam peanut butter cups so many times and I love to store them in my freezer for whenever I’m in the mood for a sweet treat! I’ve learned some tips and tricks along the way that I think will help you:

    -You can use whatever type of chocolate chips you like best. I used Guittard extra dark chocolate which is gluten-free and dairy-free.

    -A creamy peanut butter is best for this recipe as you want the center to be thick when combined with the powdered sugar.

    -If you want to cut down time on the recipe, can use any type of jarred jam that you would like instead of the chia jam.

    -Use paper muffin liners. Trust me. I’ve tried going without the liners and it’s a mess!

    If you want to make the peanut butter cups smaller, use a mini muffin tin and mini muffin liners. You’ll get about 24-30 mini peanut butter cups this way – perfect for entertaining!

    Dark chocolate, creamy peanut butter filling, sweet berry chia jam – this recipe is an easy no-bake dessert using simple ingredients that is great for entertaining! It’s also gluten-free, dairy-free AND vegan!

    Print


    5 Stars 4 Stars 3 Stars 2 Stars 1 Star

    No reviews


    • Author:
      Megan Hastings


    • Total Time:
      50 minutes


    • Yield:
      12 cups 1x
    • 2 cup frozen mixed berries Mine was a mixture of blueberries (strawberries, and blackberries)
    • 2 tbsp granulated sugar
    • 1 tbsp chia seeds
    • 1/2 cup creamy peanut butter
    • 2 tbsp powdered sugar
    • 2 cups chocolate chips divided (I used vegan chocolate chips)


    Instructions

    1. In a medium sauce pan, add frozen berries and granulated sugar. Stir to combine.
    2. Bring to a boil, stirring occasionally. The juices from the berries will be released and the berries will get soft. Start crushing the berries with a spoon or spatula.
    3. Add the chia seeds and continue cooking for another minute.
    4. Take off of the heat and let cool and thicken completely. Set aside.
    5. In a small bowl, combine peanut butter and powdered sugar and mix thoroughly. Set aside.
    6. In a microwave safe bowl, add half of the chocolate chips, reserving the other half for later. Microwave in 30 second increments, stirring in between, ensuring you do not overheat the chocolate as it will burn and seize. The total time should be about 1.5 minutes.
    7. Line a muffin tin with paper muffin liners. Spoon the chocolate into the paper liners, just covering the bottom of each cup. With the back of the spoon, push some of the chocolate up the sides of the paper liner to create a well in the center. Place the muffin tin in the freezer for 10 minutes, to the chocolate harden.
    8. Once the chocolate has hardened, spoon the peanut butter in the center of each muffin cup. Then top the peanut butter with the chia jam. Place in the freezer again for 10 minutes to allow the filling to set.
    9. Place the remaining one cup of chocolate chips in a microwave safe bowl. Microwave in 30 second increments, stirring in between, until the chocolate is completely melted.
    10. Top the peanut butter and chia jam filling with the melted chocolate making sure it is completely covered. Tap the muffin tin against the counter to level out the chocolate. Return the muffin tin to the freezer for 10-15 minutes, to allow the chocolate to completely harden. Defrost for at least 5 minutes before serving.

    • Prep Time: 35 minutes
    • Cook Time: 15 minutes

    Read More