Blog

  • Vegan Cookie Dough Pops

    Vegan Cookie Dough Pops

    recipe image

    Vegan Cookie Dough Pops

    Photo by amy (Wooden Spoon Baking)
    • Makes
      8
    Author Notes

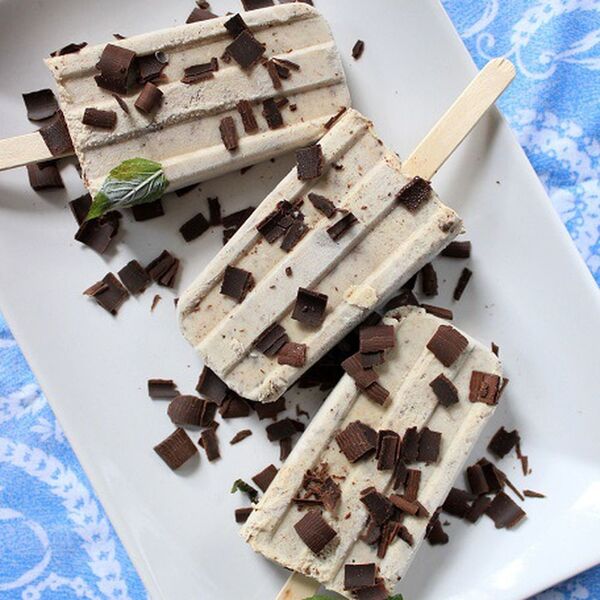
    I have a huge sweet tooth, but hate turning the oven on in the summer. Eating straight cookie dough sounds like a plausible solution, until you remember it’s also bikini season. Nope. I made these cookie dough pops to get my sugar fix while staying cool, and as an added bonus they’re vegan! You can use blanched almonds if peeling them sounds tedious. —amy (Wooden Spoon Baking)

    Ingredients

    • 3/4 cup

      certified gluten-free oats


    • 1/2 cup

      almonds


    • 4

      large medjool dates, pitted and chopped


    • 1

      14-ounce can coconut milk


    • 1 teaspoon

      vanilla extract


    • 1 tablespoon

      agave syrup


    • 1/4 teaspoon

      salt


    • 2 1/2 ounces

      dark chocolate, shaved into curls with a vegetable peeler (check the label for dairy)

    Directions
    1. Get your popsicle mold ready and set aside.
    2. Pour oats into a bowl and cover with water. Do the same with the almonds. Refrigerate both bowls at least 4 hours or overnight to allow oats and nuts to soften. When you’re ready to blend, drain oats in a sieve and pour into your blender. (They’ll be quite mushy.)
    3. Drain almonds. (Skip this next step if using blanched almonds.) Set a kettle on to boil and put almonds back in their bowl. When water is boiling, pour over almonds and allow to stand 5 minutes until just warm. Skin almonds by breaking skin gently with your fingernail and squeezing out the nut.
    4. Add almonds, dates, coconut milk, vanilla, stevia, and salt to blender. Blend ingredients for 2 minutes until creamy, scraping down sides occasionally with a spatula. Pour in chocolate shavings and mix with a spatula to distribute evenly.
    5. Pour mixture into prepared molds. Push in sticks and freeze according to manufacturer’s directions. Invert mold and run under or dip in warm water to loosen popsicles. Store in freezer for up to a week.

    Read More

  • Perfect Vegan Pie Crust

    Perfect Vegan Pie Crust

    recipe image

    Perfect Vegan Pie Crust

    Photo by James Ransom
    • Prep time
      20 minutes
    • Makes
      A double crust for smaller pie pans or a single crust with lattice topping for deep-dish pie pans
    Author Notes

    Think a perfectly flaky pie crust is impossible without butter? Think again. This pie crust is totally authentic and yet totally dairy free—all thanks to the magic of coconut oil. —Gena Hamshaw

    Test Kitchen Notes

    You may think that making a deliciously flaky pie crust vegan is an impossible task, but it can be done, and we will show you how. This go-to recipe, perfect for Thanksgiving to accommodate all tastes and dietary restrictions, is very easy to make, and you probably have all the ingredients in your fridge and pantry already. Featuring coconut oil, you won’t need any butter or additional dairy. As some reviewers have mentioned, if you’re concerned that your pie will taste a little too coconutty, you should try using refined coconut oil.

    The developer for this recipe enjoys using the food processor to make her pie crusts, which, she admits, could make some crust connoisseurs cringe. But using one makes the whole process fast and simple. Seriously, there’s no reason to be intimidated if you want to take on the task of making a beautiful pie crust at home. Sometimes it takes a couple of tries, but it’s well worth it when it all comes together. Of course, you could also use your hands to make this dough too if you want to go the more rustic vibe. Just try not overwork the dough too much and let the ingredients get too warm. It’s also convenient that you can keep the crust in the fridge until you’re ready to fill and bake. We love this crust with a blueberry filling, an apple filling, even a strawberry one if you want a springtime pie, but feel free to experiment with your favorite, in-season fruits. —The Editors

    • Test Kitchen-Approved

    Watch This Recipe

    Perfect Vegan Pie Crust

    Ingredients

    • 2 1/4 cups

      all-purpose flour, plus more for the surface


    • 1 tablespoon

      cane or demerara sugar


    • 1 teaspoon

      kosher salt


    • 1/2 cup

      (or more) coconut oil, cool enough to be solid


    • 1/3 to 1/2 cups

      ice water

    Directions
    1. Place the flour, sugar, and salt in a food processor fitted with the S blade. Pulse to combine. Add the oil and pulse until the mixture is crumbly and will stick together when you squeeze it. Pulse in ⅓ cup water, until the dough holds together when you make a handful of it and is visibly starting to come together in the food processor. It’s fine to have a lot of crumbs still—that’ll make a good, flaky crust—but it should be easy to shape into a large ball. If necessary, add a little more water until the texture is right. Alternately, you can cut the oil into very small pieces and work into the flour with bare, dry hands. Add the water and knead until it has the texture described above.
    2. Turn the dough onto a lightly floured surface. If you’re not ready to use the crust, shape into a flat ball, wrap with plastic, place in a freezer bag, and freeze. If you are ready to use it but not at this very second, store in the fridge until it’s time to bake.
    3. When you are ready to use the crust, make sure it’s soft enough to roll. Using a rolling pin, roll the dough into a large circle—enough that you can imagine easily covering your pie pan—using extra flour to keep things from sticking as you go. Gingerly lift onto your pie pan (little tears are fine; you can fix them later). Squeeze the edges to make a pretty, puckered pattern. Refrigerate the crust until ready to bake.

    Read More

  • Raw Vegan Coconut Macaroons

    Raw Vegan Coconut Macaroons

    recipe image

    Raw Vegan Coconut Macaroons

    • Makes
      2 dozen
    Author Notes

    I’m a lover of macaroons…I came across the raw macaroon, Hail Merry, at a store and instead of paying the money for the few that I was able to get in a package, I improvised and came up with my own recipe. They have continually been a huge crowd pleaser, and with the use of Maple Syrup and other healthy ingredients…they make a great treat for all occassions, and kids love them too! —Julia Reid

    Ingredients

    • 1 cup

      organic almond flour


    • 1 cup

      organic shredded unsweetened coconut


    • 4 tablespoons

      Grade B Maple Syrup


    • 1 teaspoon

      organic almond flavoring


    • 1/4 teaspoon

      organic vanilla flavoring


    • 1 dash

      kosher salt

    Directions
    1. Place all ingredients in a mixing bowl and stir together with a spoon until well blended.
    2. I take as much mixture that will fill a plastic scoop (approximately 1 firmly packed tablespoon), and once pressed firmly in the scoop, I gently tap it out onto my hand and place on a plate. It will hold the form of whatever you’ve pressed it into. Continue with this step until all of mixture has been formed into delectable bite-size macaroons!
    3. Refrigerate in an airtight container once made, to preserve freshness…enjoy!

      A note to strict raw foodies…maple syrup is not raw…but it is the most delicious and I can’t suggest any more delectable way to make these.

    4. If variations are desired…you can dip in chocolate, add cinnamon, macadamia nuts, strawberries, or cherries, as I found out in Rawmazing.

    Read More

  • Vanilla Cashew Vegan Ice Cream

    Vanilla Cashew Vegan Ice Cream

    recipe image

    It’s important to use refined coconut oil here; you don’t want any coconut-y flavors competing with the vanilla.

    Ingredients

    1

    vanilla bean, split lengthwise

    1

    cup raw cashews

    ½

    cup plus 2 tablespoons organic or granulated sugar

    ½

    teaspoon kosher salt

    1

    cup refined coconut oil, melted, cooled slightly

    Special Equipment

    An ice cream maker

    Preparation

    1. Step 1

      Place vanilla bean and cashews in a large bowl and add 2 cups boiling water. Cover and let sit at room temperature at least 12 hours (hydrating the cashews thoroughly is key for a silky, smooth ice cream).

      Step 2

      Transfer cashews and their soaking liquid to a blender. Scrape in seeds from vanilla bean; discard pod. Add sugar, and salt. Purée until smooth, about 30 seconds. With the motor running on medium speed, slowly stream in oil and purée until thick and creamy.

      Step 3

      Immediately process cashew mixture in ice cream maker according to manufacturer’s directions. (Head’s up: this will take longer than a traditional dairy-based custard to reach soft-serve consistency.) Do not chill before processing or oil will harden into tiny bits and texture will be grainy.

      Step 4

      Transfer to an airtight container and press plastic wrap directly onto surface. Freeze until firm, at least 4 hours.

      Step 5

      Do Ahead: Cashews can be soaked 3 days ahead; cover and chill. Ice cream can be made 1 month ahead; keep frozen.

    Read More

  • Peanut Butter Cookies (Vegan)

    Peanut Butter Cookies (Vegan)

    recipe image

    Peanut Butter Cookies (Vegan)

    • Makes
      24 cookies
    Author Notes

    These healthy peanut butter cookies are soft, chewy, and packed with peanut butter flavor


    ~ Adapted from 101cookbooks —VeggiesByCandlelight

    Ingredients

    • 2 cups

      whole wheat pastry flour


    • 1 cup

      natural peanut butter (I used chunky)


    • 1 cup

      maple syrup


    • 1/3 cup

      extra virgin olive oil


    • 1 teaspoon

      baking soda


    • 3/4 teaspoon

      fine grain sea salt


    • 1 1/2 teaspoons

      vanilla paste (or vanilla extract)

    Directions
    1. Preheat oven to 350F degrees.
    2. In a medium mixing bowl combine the flour, baking soda, and salt.
    3. In a separate larger bowl combine the peanut butter, maple syrup, olive oil, and vanilla.
    4. Pour the flour mixture over the peanut butter mixture and stir until barely combined (still a bit dusty looking)
    5. Let sit for five minutes, give one more quick stir (just a stroke or two)
    6. Drop by heaping tablespoonfuls onto parchment-lined baking sheets. Press down on each one gently with the back of a fork.
    7. (** Note: This is a loose batter, so if you’re set on doing criss-crosses, go ahead and chill the batter for an hour or so before this step)
    8. Bake for 10-11 minutes … keeping an eye on them so they don’t over bake .. or they’ll be dry.
    9. Let cool five minutes and transfer to a cooling rack.

    Read More

  • Spring Vegetable Paella [vegan]

    Spring Vegetable Paella [vegan]

    recipe image

    Spring Vegetable Paella [vegan]

    • Serves
      6-8
    Author Notes

    Bursting with flavours and straightforward, this vegan Spring vegetable paella is the perfect dish to make when you are entertaining.


    Healthy and hearty you will not miss the meat or fish! —The Flexitarian

    Ingredients

    • 8.8 ounces

      asparagus


    • 7 ounces

      carrot


    • 7 ounces

      frozen broad beans


    • 7 ounces

      broccoli


    • 10.5 ounces

      ar chargrilled artichoke hearts in olive oil


    • 1

      large onion


    • 6

      garlic cloves (crushed)


    • 2 cups

      Bomba paella rice


    • 31/2 to 4 cups

      vegetable stock


    • 1 teaspoon

      paprika


    • 1 pinch

      saffron


    • 1 dash

      smoked paprika


    • 2

      preserved lemons (finely chopped)


    • 1

      salt & pepper


    • 1 handful

      parsley leaves (chopped)

    Directions
    1. Peel carrots and cut them into sticks (2 cm long x 1/2 cm wide).
    2. Cut asparagus in 3 to 4 cm chunks, having snapped off their tougher ends first.
    3. Cut broccoli florets in quarters.
    4. Heat some olive oil in a large skillet or paella pan.
    5. Add finely chopped onion and garlic. Cook until soft and golden.
    6. Add carrots, broccoli, asparagus and broad beans. Cook for a few minutes.
    7. Add rice, paprika, saffron and vegetable stock.Mix well. Simmer gently until stock is absorbed, making sure not to overcook the rice.
    8. When rice is cooked, add drained artichoke hearts cut in half plus preserved lemons.
    9. Add a dash of smoked paprika and chopped parsley leaves. Blend carefully. Season to taste.
    10. Serve straight away.

    Read More

  • Vegan Split Pea Soup

    Vegan Split Pea Soup

    recipe image

    Vegan Split Pea Soup

    Photo by Megan Olson
    • Serves
      6
    Author Notes

    Vegan Split Pea Soup made with simple & budget friendly vegetarian ingredients, this low calorie, easy-to-make soup is a hearty bowl of comfort and health! —Megan Olson

    Ingredients

    • 1

      medium onion peeled & diced


    • 2

      celery ribs, chopped


    • 1

      green bell pepper, chopped


    • 1

      red bell pepper, chopped


    • 2

      cloves garlic, minced


    • 1 cup

      carrots, peeled & chopped


    • 1/2

      large sweet potato, cubed


    • 2 cups

      dried split peas


    • 2 cups

      Gluten Free vegetable broth


    • 1/2 teaspoon

      oregano


    • 1/2 teaspoon

      cayenne pepper


    • 1/4 teaspoon

      paprika


    • 1

      bay leaf


    • salt & pepper to taste


    • green onion for garnish

    Directions
    1. Heat a large pot over medium-high heat
    2. Add onion, celery, bell pepper & carrots with a splash or two or broth
    3. Cook until veggies soften 10 minutes
    4. Add garlic & spices sauté another 5 minutes
    5. Pour broth into pot with sweet potato, split peas & bay leaf
    6. Turn heat down to medium-low
    7. Simmer 45 minutes covered until green peas begin to soften & pop
    8. Remove half the soup, place in blender & pulse to puree
    9. Add pureed soup back to the pot & stir well
    10. Serve immediately & garnish with green onions

    Read More

  • Vegan Roasted Broccoli Soup

    Vegan Roasted Broccoli Soup

    recipe image

    Access to this page has been denied because we believe you are using automation tools to browse the website.

    This may happen as a result of the following:

    • Javascript is disabled or blocked by an extension (ad blockers for example)
    • Your browser does not support cookies

    Please make sure that Javascript and cookies are enabled on your browser and that you are not blocking them from loading.

    Reference ID: #e3b0b3e8-bf8a-11ef-a099-41b90756f033

    Read More

  • Vegan Bakery-Style Blueberry Muffins

    Vegan Bakery-Style Blueberry Muffins

    recipe image

    Vegan Bakery-Style Blueberry Muffins

    Photo by Melissa Huang
    • Prep time
      20 minutes
    • Cook time
      20 minutes
    • Makes
      11 muffins
    Author Notes

    These muffins not only have the best tops (ha) but the fluffiest texture. These are vegan, dairy-free, and oil-free. —Melissa Huang

    Ingredients

    • 460 grams

      mashed ripe bananas


    • 100 grams

      granulated sugar


    • 190 grams

      non dairy milk


    • 30 grams

      ground flaxseed


    • 400 grams

      all purpose flour


    • 1 tablespoon

      baking powder


    • 1 teaspoon

      ground cinnamon


    • pinch

      of nutmeg


    • pinch

      of salt


    • 1 cup

      fresh blueberries

    Directions
    1. Preheat oven to 400 degrees Fahrenheit. Line a regular muffin tin with parchment liners.
    2. In a large bowl, mash the bananas. Add the non dairy milk, sugar, and ground flaxseed. Mix to combine.
    3. Add the flour, baking powder, cinnamon, ground nutmeg and salt into the wet mixture. Stir until nearly all combined. The flour will look like too much at first, but just keep mixing!
    4. When the batter is almost mixed completely, add the blueberries in. Continue to fold as to not smush any of the blueberries and avoid over mixing.
    5. Spoon the batter to fill the cups all the way to the top. Try to pack as much batter into each cup.
    6. Bake at 400 degrees Fahrenheit for 15 minutes and then another 15-20 minutes at 350 degrees Fahrenheit.
    7. Allow to cool in the tin until you can touch it. Then allow the muffins cool completely on a wire rack. Enjoy!

    Read More

  • step 1

    Toast the bread until dark brown, then leave to cool. Blitz in a food processor to rough crumbs.

  • step 2

    Heat half the oil in a saucepan and cook the onion for 10 mins until just brown and sticky. Add the bay, thyme and milk, then season with the spices and salt and pepper. Bring to the boil and simmer for 5 mins.

  • step 3

    Remove the herbs, then stir in all but a handful of the breadcrumbs. Cook over a low heat until thick. If you like, blitz until smooth. Will keep, chilled, for two days.

  • step 4

    Meanwhile, fry the rest of the crumbs in the remaining oil until golden.

  • step 5

    Add the cream to the sauce and heat through, then tip into a dish and spoon over the fried crumbs and a drizzle more oil. Will keep, covered, in the fridge for up to two days.

Read More