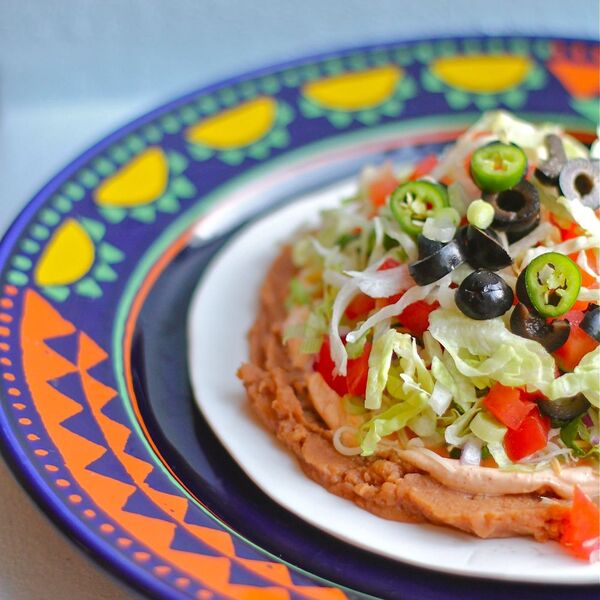
the perfect appetizer for any party or bbq that’s been lightened up with greek yogurt + fresh veggies. this dip gets devoured by guests! —Dina Rulli
Ingredients
1
16 oz can vegetarian refried beans (black or pinto)
1/2 cup
greek yogurt or vegan sour cream
1/2 cup
vegenaise (or mayo)
1 – 2 tablespoons
taco seasoning
1/2 cup
hot sauce (i use el pato or cholula)
1 cup
shredded mexican cheese blend (vegan or dairy)
1 cup
shredded iceberg lettuce
2
ripe tomatoes, diced
2
scallions (green onions), sliced (green parts too)
1
small can sliced black olives
2 tablespoons
cilantro, chopped
1
jalapeno pepper, sliced (optional)
1
bag tortilla chips
Directions
in a small bowl, mix together greek yogurt, veganaise + 1 tbsp taco seasoning. taste test + add more taco seasoning if necessary
in a serving dish, layer in this order:
beans
greek yogurt mixture
hot sauce
cheese
lettuce
tomatoes
green onions
black olives
cilantro
jalapeno pepper
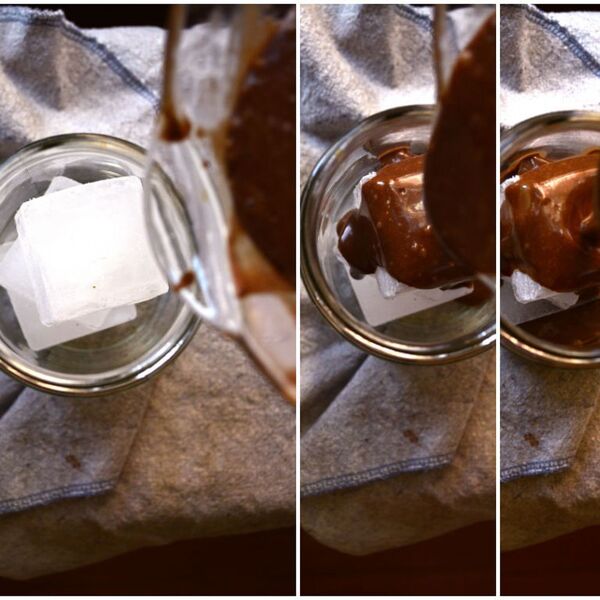
This cold drinking chocolate is chilly, light, and frothy. It straddles a middle ground, texture-wise, between chocolate milk and chocolate shake, but the flavor is more delicate and refreshing than both. I’ve tucked an avocado in there, which disappears in flavor but does nice work of thickening things up and adding some healthy fat. The brown rice milk and raw honey add just a hint of sweetness, and I imagine it would make as great of a light breakfast as it would summery dessert. —AT BURNING DEGREES
Ingredients
1
avocado
2 1/4 cups
brown rice milk (unsweetened)
3 tablespoons
creamy raw honey
1/4 cup
natural cocoa powder
1/4 teaspoon
sea salt
ice cubes & mint sprig (to serve)
Directions
Add all of the ingredients to a blender a puree on high until it’s frothy and completely smooth.
Pour into glasses with plenty of ice cubes. Garnish with mint sprigs if you’re feeling fancy.
My tiny hometown newspaper once printed a column by my six-year-old self offering a peanut butter cookie recipe in which you put the oven “at burning degrees.” Things have gotten better since then. (I think.)
Our own Chris Morocco set an almost impossible task for himself: to create a from-scratch veggie burger recipe with patties that could go straight from the mixing bowl to the grill without falling apart. To make things even more challenging, Chris was aiming for vegan burger patties that would come together with a prep time of 20 minutes or less (about the same time it takes to make a beef burger) and with relatively few ingredients—bonus points if they were also gluten-free. A tall order. “There was a good chance this would be the mission that I simply never came back from,” he admits.
Chris opted for an updated black bean burger patty, bulking it out with shredded tofu and quinoa, and adding garlic and chili powder for seasoning. The real key to success, however, was the mayonnaise (a vegan one is also great) and a surprise ingredient: almond butter. Combined, the two give the plant-based patties crucial richness. Meanwhile, flaxseed and cornstarch bind the burger mixture together. You can shape these homemade veggie burgers in advance, wrap the patties tightly in plastic wrap, and refrigerate for up to three days or stash them in the freezer for three months (cook straight from frozen). If you don’t have a grill, a cast-iron pan set over medium-high heat on a stovetop will work fine and still deliver some crispy bites.
Chris likes to serve the cooked burgers in store-bought buns stacked with the works, including chipotle yogurt—simply mix adobo sauce from canned chiles and Greek yogurt. Or, blend vegan mayo with sriracha and ketchup as an alternative. Best veggie burger ever? We’ll let you be the judge.
Ingredients
2
Tbsp. extra-virgin olive oil, plus more for greasing
1
14-oz. block extra-firm tofu, drained
2
14.5-oz. cans black beans, rinsed, drained well
¼
cup almond butter
¼
cup mayonnaise (vegan, if you are vegan)
2
garlic cloves, finely grated
4
tsp. chili powder (make sure it’s salt-free)
4
tsp. Diamond Crystal or 2 tsp. Morton kosher salt
2
cups cooked quinoa (we prefer red or black), cooled
Prepare a grill for medium-high, direct heat. Clean and oil grate. Shred 1 14-oz. block extra-firm tofu, drained using the large holes of a box grater. Firmly squeeze tofu in between paper towels to drain as much excess liquid as possible.
Step 2
Heat 2 Tbsp. extra-virgin olive oil in a large nonstick skillet over medium. Cook tofu and 2 14.5-oz. cans black beans, rinsed, drained well, tossing occasionally, until beans look slightly dried out and their skins are darkened, 10–12 minutes.
Step 3
Meanwhile, whisk ¼ cup almond butter and ¼ cup mayonnaise (vegan, if you are vegan) in a medium bowl until smooth. Whisk in 2 garlic cloves, finely grated, 4 tsp. chili powder (make sure it’s salt-free), and 4 tsp. Diamond Crystal or 2 tsp. Morton kosher salt. Add tofu-bean mixture and 2 cups cooked quinoa (we prefer red or black), cooled and stir well to combine.
Step 4
Stir ¼ cup flaxseed meal and ¼ cup cold water in a small bowl. Let sit until a thick paste forms, about 1 minute. Add to tofu-bean mixture along with 2 Tbsp. cornstarch and stir well to combine.
Step 5
Using oiled hands, form mixture into 8–10 patties about ½” thick (about a scant ¾ cup each). Grill until lightly charred around the edges, about 2 minutes. Turn carefully using a metal spatula to cleanly lift off grate and grill until lightly charred on second side and warmed through, about 2 minutes more.
Step 6
Place burgers on bottoms of toasted buns. Pile high with pickled onions, tomato, lettuce, pickles, and chipotle yogurt. Close with top bun and serve.
Turning our hearty, satisfying lactation cookies vegan is as simple as a couple of swaps.
Serious Eats / Vicky Wasik
Why It Works
Commercial oat flour minimizes the need for all-purpose flour, for a higher dosage of oat per cookie.
Refined coconut oil is odorless and flavorless, with a melting point and creaming properties similar to those of butter.
An oat slurry provides water, protein, and emulsification, much like a whole egg, but with a subtle flavor that blends seamlessly into the dough.
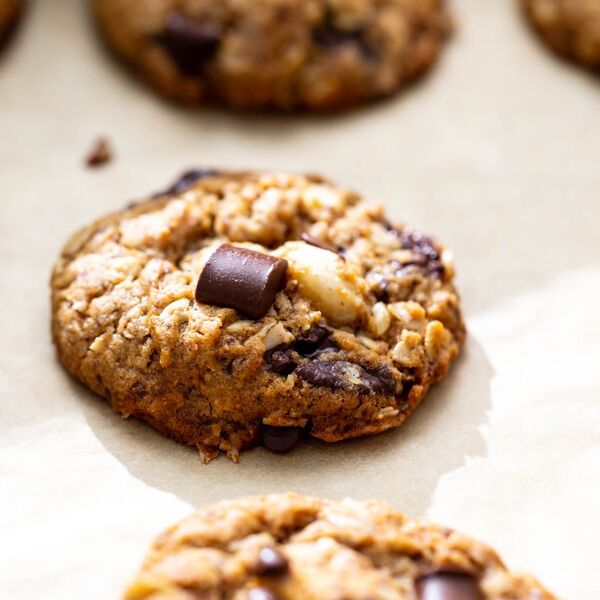
Replacing the egg in our original lactation cookies with an oat slurry gives them an extra dose of oats, one of several ingredients in these cookies reputed to help nursing mothers produce more milk, while swapping refined coconut oil for butter turns them totally vegan.
There’s no hard and fast evidence that ingredients such as oats, flax seed, barley, ginger, brewer’s yeast, macadamia nuts, and cinnamon can work as galactagogues when consumed as a snack, but there’s no denying that these malted oatmeal cookies, studded with chocolate chips and macadamia nuts and scented with warm spices, are delicious all the same. Calling them “lactation cookies” is just a bit of insurance for nursing moms, guaranteeing that they can hoard them all for themselves.
September 2019
Vegan Lactation Cookies Recipe
Cook Mode (Keep screen awake)
For the Dry Mix:
7ouncesold-fashioned rolled oats, not instant or thick-cut (about 2 cups; 200g)
6ouncesdark chocolate chips (about 1 heaping cup; 170g), preferably a blend of percentages and styles (see our list of favorite supermarket chocolate chips for recommendations), plus more for garnishing
3 ounces commercial oat flour, such as Bob’s Red Mill (about 3/4 cup plus 1 tablespoon; 85g); not homemade (see note)
3ouncesnon-bitter brewer’s yeast powder, such as BlueBonnet (about 2/3 cup, spooned; 85g)
2 1/2 ounces all-purpose flour, such as Gold Medal (about 1/2 cup, spooned; 70g)
2 ounces flax meal (about 1/2 cup, spooned; 55g)
For the Oat Slurry:
1 1/2ouncesold-fashioned rolled oats, not quick-cooking or instant (about 1/2 cup minus 2 1/2 teaspoons; 42g)
3ounceswater (about 1/3 cup plus 1 tablespoon; 85g)
For the Cookie Dough:
8ouncesrefined coconut oil (about 1 1/3 cups; 225g), solid but creamy, about 70°F (21°C)
7ounceswhite cane sugar (about 1 cup; 200g)
2ouncesbarley malt syrup, such as Eden Foods (about 3 tablespoons; 55g)
1ouncevanilla extract (about 2 tablespoons; 30g)
1 1/4teaspoonsbaking soda
1 1/4teaspoonsground cinnamon
1teaspoonground ginger
3/4 teaspoon (3g) Diamond Crystal kosher salt, or more to taste; for table salt, use about half as much by volume or the same weight
1/4teaspoon freshly grated nutmeg
2ouncesprepared oat slurry (about 1/4 cup; 55g)
For the Dry Mix: In a large bowl, combine rolled oats, chocolate chips, macadamia nuts, oat flour, brewer’s yeast powder, all-purpose flour, and flax meal, tossing with a flexible spatula until mixture is completely homogenized. Proceed immediately to the next step or transfer the dry mix to an airtight container and store at cool room temperature until the date stamped on the package of macadamia nuts.
For the Oat Slurry: In a tall, narrow container just wide enough to accommodate the head of an immersion blender, combine rolled oats and water. Purée with an immersion blender until thick and smooth, then strain through a fine-mesh strainer, pressing on the solids with a flexible spatula until they give up all their liquid. Discard the fibrous oat solids and reserve 2 ounces of the thick and gooey purée to use as directed below. This step should not be done in advance, as the oat slurry will continue to thicken and will become unusable over time.
For the Cookie Dough: Set oven rack to middle position and preheat to 350°F (180°C). In the bowl of a stand mixer fitted with a paddle attachment, combine coconut oil, sugar, barley malt syrup, vanilla extract, baking soda, cinnamon, ginger, salt, and nutmeg. Mix on low speed to combine, then increase to medium and cream until soft, pale, and light, about 5 minutes. Along the way, pause to scrape the bowl and beater using a flexible spatula.
While mixing on medium speed, add oat slurry and continue beating until smooth and homogeneous, scraping bowl as needed. Reduce speed to low and add dry mix all at once. Continue mixing until thoroughly incorporated, with no visible patches of dry mix. Scrape bowl and beater with flexible spatula, then fold dough a few times by hand to be sure the texture is even.
Using a 2-tablespoon cookie scoop, divide dough into approximately 40 portions. If you like, top each piece with a few extra chocolate chips for garnish. Arrange up to 12 portions of dough on a parchment-lined half-sheet pan and transfer remaining dough to a heavy-duty zipper-lock bag for cold storage. The dough can be refrigerated for about 2 weeks or frozen for up to 3 months, then thawed to about 70°F (21°C) before being baked as directed.
Bake portioned freshly made or thawed dough on parchment-lined half-sheet pan until puffed and golden brown and firm to the touch around the edges, but a little soft and fragile in the center, about 12 minutes. Enjoy warm, or let cookies cool and transfer to an airtight container, where they can be stored for up to 1 week at room temperature.
Special Equipment
Immersion blender, nonreactive fine-mesh strainer, stand mixer, flexible spatula, 2-tablespoon cookie scoop, half-sheet pan
Notes
Commercial oat flour is made from whole, raw oat groats milled to a texture as fine as that of traditional flour. Homemade “oat flour” generally starts with rolled oats ground in a food processor; not only does this produce a coarser texture, but the composition is different as well, as rolled oats are made from steamed husked oat groats, which reduces their thickening power and nutritional value. Commercial oat flour thus provides a higher “dose” of oats than rolled oats alone, while also acting as a better thickener for the cookies.
Make-Ahead and Storage
In a heavy-duty zip-top bag, the dough can be refrigerated for about two weeks or frozen for up to three months, then thawed to about 70°F (21°C) before being baked as directed. Once baked, the cookies will keep for about one week in an airtight container at cool room temperature.
Read More
Lactation Cookies
Nutrition Facts (per serving)
175
Calories
11g
Fat
17g
Carbs
3g
Protein
×
Nutrition Facts
Servings: 40
Amount per serving
Calories
175
% Daily Value*
11g
14%
Saturated Fat 6g
30%
0mg
0%
72mg
3%
17g
6%
Dietary Fiber 2g
8%
Total Sugars 8g
3g
Vitamin C 0mg
0%
Calcium 15mg
1%
Iron 1mg
6%
Potassium 102mg
2%
*The % Daily Value (DV) tells you how much a nutrient in a food serving contributes to a daily diet. 2,000 calories a day is used for general nutrition advice.
(Nutrition information is calculated using an ingredient database and should be considered an estimate.)
Have you tried to eat a plant-based diet? You may already know there are now tons of great vegan products on the market. I went vegan for two years and tried my fair share of vegan meats, milks, and condiments, but one thing I struggled with was finding a great plant-based alternative to scrambled eggs.
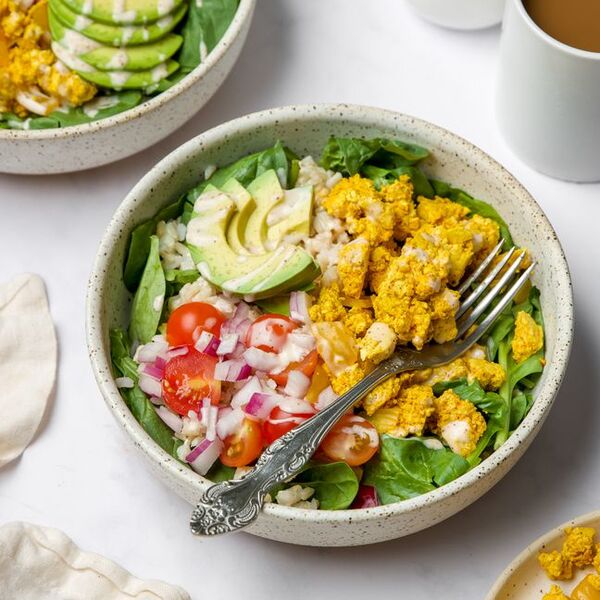
With the right mix of spices and flavors, tofu can be transformed into a substitute for scrambled eggs. This recipe uses nutritional yeast and a creamy chili lime aioli to mimic the savory, umami flavors found in a typical egg-based breakfast. Nutritional yeast, found in most grocery stores, is a dairy-free seasoning that has an indulgent cheesy flavor.
This tofu scramble is served over a bowl of greens, brown rice, beans, and an assortment of veggies like tomatoes, red onions, and avocado.
Best Tofu for Tofu Scramble
Tofu can be found in a range of textures: silky, soft, medium, firm, and extra firm.
Firm tofu works best in this recipe. Extra firm tofu also works, but it will result in a more dense, less spongy texture. Anywhere from silky to medium is too soft, and it will become mushy when crumbled.
If you want to learn more about tofu and all the wonderful ways to use it check out our Guide to Tofu: How to Press, Prep, and Cook Different Tofu Types and Textures.
Simply Recipes / Hannah Zimmerman
What’s in the Vegan Chili Lime Aioli?
The chili lime aioli really takes this recipe from good to mouth-wateringly delicious. It adds an element of creaminess and a ton of flavor. The base is vegan mayonnaise, otherwise known as veganaise. You can find it at most grocery stores next to the regular mayonnaise. To the veganaise, I add a little lime juice, chili powder, and garlic powder.
Tips and Tricks for Making Tofu Scramble
Tofu is a versatile ingredient that can assume many flavors and textures, which is why I love to use it in vegan dishes. Here are some tips to make your tofu perfectly replicate a soft scrambled egg.
Tofu comes submerged in water to keep it fresh, so it’s often pressed to remove the water before cooking. Do not press the tofu for this recipe. Cooking it will remove most of the water, so if you press the tofu the scramble may become too dry.
Be gentle stirring the tofu while cooking it. You want some larger chunks of tofu, rather than breaking it all up into tiny pieces.
Use a nonstick or well-greased pan. If the tofu sticks to the bottom of the pan, you will get undesirable, crispy bits in your scramble.
Simply Recipes / Hannah Zimmerman
Tofu Scramble Burrito Bowl Variations
One reason why I love this recipe is because it’s so customizable. You can change it up a bit each time you make it, so it will never get old. Here are some ways to get you started:
Add different spices and sauces to the tofu scramble like cumin, chili powder, cayenne, sriracha, and salsa.
Swap the brown rice for another grain. Quinoa, couscous, farro, and barley are all great options!
Add your favorite veggies to the bowl. Bell peppers, corn, roasted sweet potatoes, and mushrooms all work well.
What to Serve with Tofu Scramble?
This recipe is perfect for breakfast with a cup of coffee or a glass of your favorite juice. Tofu scramble also stores well in the fridge, so you can make it ahead and heat it up in the microwave later if you need a quick breakfast or a lunch on-the-go.
Storage Instructions
You can refrigerate your tofu scramble in a sealed container for up to one week. If you are making this recipe ahead of time, store each component (the tofu scramble, beans, aioli, etc.) separately, then assemble the bowl when you are ready to eat it.
Simply Recipes / Hannah Zimmerman
Quick-lunch Bowl Recipes
Salmon Avocado Poke Bowl
Black Bean Burrito Bowl
Fish Taco Salad Bowl
Zucchini Noodle Chicken Pesto Bowl
Ginger Pork Rice Bowls
This recipe calls for cooked brown rice. If you don’t have leftovers to use up, then make that first following package instructions.
Cook Mode (Keep screen awake)
For the tofu scramble
1tablespoon vegetable or canola oil
1/2mediumwhite onion, diced
1clovegarlic, minced
1 (14–ounce) block firm tofu
2tablespoonsnutritional yeast
1/2teaspoonpaprika
1/4teaspoonturmeric powder
1/2teaspoonsalt, plus more to taste
1/8teaspoon freshly ground black pepper, plus more to taste
For the chili lime aioli
1/4cupvegan mayonnaise
1/2lime, juiced
1/2teaspoonchili powder
1/4teaspoongarlic powder
2tablespoonswater, as needed
To assemble the burrito bowls
4cupsbaby spinach, baby kale, arugula, or mixed greens
2cupscooked brown rice
1/2red onion, finely diced
1cupcherry or grape tomatoes, halved
1/2cup canned black beans or kidney beans (optional)
1/2avocado, diced (optional)
Cook the onions and garlic:
In a nonstick pan over medium heat, add the oil and onions, and sauté for 2 to 3 minutes until translucent. Add the garlic and continue to sauté for 2 more minutes.
Simply Recipes / Hannah Zimmerman
Add the tofu:
Drain the tofu, but do not press it to remove excess water. Use your hands to crumble it into bite-sized pieces and add it to the pan. Use a spatula to stir the ingredients until they are evenly distributed.
Simply Recipes / Hannah Zimmerman
Add the spices:
Sprinkle in the nutritional yeast, paprika, turmeric, salt, and black pepper. Gently stir the tofu to evenly coat it with the spices. The turmeric will turn the tofu bright yellow.
Simply Recipes / Hannah Zimmerman
Continue cooking:
Cook the tofu for 3 to 7 minutes, stirring every 1 to 2 minutes until the water from the tofu has evaporated. Taste and season with more salt if needed. Remove the pan from the heat and set it aside.
Make the aioli:
In a small bowl, combine the vegan mayonnaise, lime juice, chili powder, garlic powder, and 1 tablespoon water until smooth. If it’s still thick, add 1 more tablespoon of water to thin it out a bit more.
Simply Recipes / Hannah Zimmerman
Assemble the bowls:
Divide the greens, rice, onion, tomatoes, beans, avocado, and tofu scramble between two bowls. Drizzle the aioli on top and enjoy!
Simply Recipes / Hannah Zimmerman
Nutrition Facts (per serving)
673
Calories
34g
Fat
71g
Carbs
32g
Protein
×
Nutrition Facts
Servings: 2
Amount per serving
Calories
673
% Daily Value*
34g
43%
Saturated Fat 5g
25%
0mg
0%
717mg
31%
71g
26%
Dietary Fiber 11g
40%
Total Sugars 8g
32g
Vitamin C 41mg
207%
Calcium 677mg
52%
Iron 8mg
43%
Potassium 1172mg
25%
*The % Daily Value (DV) tells you how much a nutrient in a food serving contributes to a daily diet. 2,000 calories a day is used for general nutrition advice.
Nutrition information is calculated using an ingredient database and should be considered an estimate. In cases where multiple ingredient alternatives are given, the first listed is calculated for nutrition. Garnishes and optional ingredients are not included.
Mix the soya milk with the lemon juice in a jug and set aside for a few minutes to thicken. Cut 150g of the marzipan from the larger block. Roll this out on a work surface lightly dusted with icing sugar until it’s just slightly smaller than the base of a 23cm cake tin. Using the dairy-free spread, butter a 23cm springform cake tin and line with a double layer of baking parchment. Heat the oven to 180C/160C fan/gas 4.
step 2
Mix the dried fruit, lemon zest, chopped cherries and orange zest and juice together in a large bowl, tossing a few times until well combined.
step 3
Beat the vegan spread with the brown sugar until pale using an electric whisk, then add the flour, almonds, baking powder, spices and vanilla. Tip in the milk mixture until you have a smooth batter. Fold in the fruit along with a pinch of salt and any juice from the bowl until well combined – don’t worry if the batter looks slightly curdled.
step 4
Spoon half the batter into the prepared tin, then gently smooth the surface with the back of the spoon and top with the round of marzipan. Spoon over the remaining batter and smooth the surface again. Bake for 30 mins, then reduce the oven to 150C/130C fan/gas 2 and bake for another 1 hr 45 mins-2 hrs, or until a skewer comes out clean and the cake is well-risen and firm. Carefully remove from the tin and leave to cool completely on a wire rack. Cut into slices to serve. Will keep for two weeks in an airtight container.
step 5
Brush the warm apricot jam over the cooled cake. Cut a 200g piece from the remaining marzipan and roll it out again as before. Cut out a 23cm circle using the base of the cake tin as a guide. Use the rolling pin to help you lift the marzipan circle over the cake and gently press it onto the surface (the apricot jam will help it stick). Divide the remaining marzipan into 11 pieces and roll into balls. Use a little more jam to stick the balls around the edge of the cake – these represent the 12 apostles, minus Judas. If you like, use a kitchen blowtorch to slightly burnish the marzipan balls and topping until just golden (do this carefully so they don’t burn).
Our recipes are for those looking to master the basics, the classics or the I’ve-never-cooked-this-before-but-really-want-to. We start with high quality foods to turn even the easiest weeknight meal into a creative, delicious expression. The kitchen is where we can stop to connect with the here and now, and bring recipes to life through our love of food.
Whatever Makes You Whole.
Recipes for Special Diets
Special Occasions and Holidays
Holiday Recipe Collection
Looking for menu inspiration? Explore our holiday recipe collection for all your favorite dishes and colorful twists.
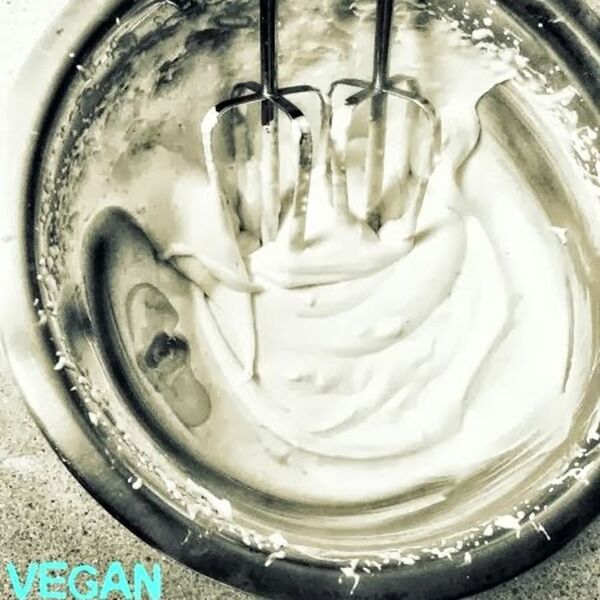
So easy and delicious! Make it and put it on everything in sight! Great for cakes, cookies, drinks, fruit, cereal, brunch, desserts of all kinds… —DUZE @BakingBackwards
Ingredients
1 tiny can full fat coconut milk (160ml), refrigerated overnight in the coldest spot in your fridge
pinch coarse sea salt
1 tsp cinnamon
1 tsp maple syrup
1 tsp mild tasting evoo or other neutral flavored oil (optional, helps reduce coconut flavor)
1 tsp vanilla extract (optional, I don’t bother)
Directions
Put a small metal mixing bowl in your freezer for 2 minutes.
Take the can of coconut milk out of the fridge. Do not shake and do not flip the tiny can over. Open. Carefully scoop out the coconut cream that has settled at the top of the can, adding it to your now chilled bowl. Avoid removing any of the opaque coconut water at the bottom of the can. Pour the remaining water into a container and store in the fridge for another recipe.
Add the salt and cinnamon and oil (if using). Grab an electric mixer and beat the cream on high for a few seconds until it resembles whipped cream. Drizzle in the maple and beat to incorporate. Put the bowl back in the freezer for 2 minutes before adding to desserts or coffee.

/1bf3aca0-4148-4a7d-8829-ac7f60743976--IMG_0053.jpg)

/718ec323-8f20-417d-9d66-66a94bc7baf6--cold-drinking-chocolate-pouring.jpg)


/bb9c89ee-ad79-4e5c-ab4e-59604d3f006d--photo_5-.jpg)