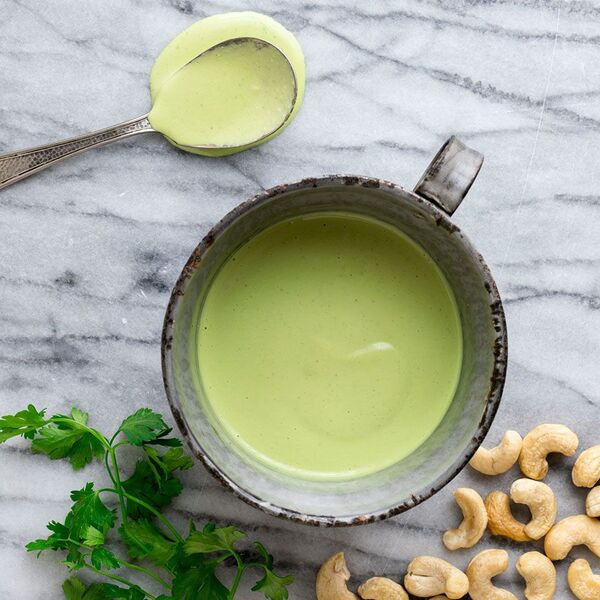
You’ll never guess this creamy sauce is completely vegan, and actually made from pureed cashews. To keep it gluten-free, use tamari.
Updated on April 19, 2024
Cook Mode (Keep screen awake)
Ingredients
¾cupraw cashews
½cupwater
¼cuppacked fresh parsley leaves
1tablespoonlemon juice or cider vinegar
1tablespoonextra-virgin olive oil
½teaspoonreduced-sodium tamari or soy sauce
¼teaspoonsalt
Directions
Combine cashews, water, parsley, lemon juice (or vinegar), oil, tamari (or soy sauce) and salt in a blender. Puree, stopping and scraping down the sides as necessary, until smooth.
Tips
To make ahead: Refrigerate for up to 5 days.
Originally appeared: EatingWell.com, December 2017
Nutrition Facts (per serving)
76
Calories
6g
Fat
4g
Carbs
2g
Protein
Nutrition Facts
Servings Per Recipe 8
Serving Size 2 tablespoons
Calories 76
% Daily Value *
Total Carbohydrate
4g
1%
Dietary Fiber
0g
1%
Total Sugars
1g
Protein
2g
4%
Total Fat
6g
8%
Saturated Fat
1g
6%
Vitamin A
158IU
3%
Vitamin C
3mg
4%
Folate
6mcg
1%
Sodium
90mg
4%
Calcium
7mg
1%
Iron
1mg
4%
Magnesium
32mg
8%
Potassium
83mg
2%
Nutrition information is calculated by a registered dietitian using an ingredient database but should be considered an estimate.
* Daily Values (DVs) are the recommended amounts of nutrients to consume each day. Percent Daily Value (%DV) found on nutrition labels tells you how much a serving of a particular food or recipe contributes to each of those total recommended amounts. Per the Food and Drug Administration (FDA), the daily value is based on a standard 2,000 calorie diet. Depending on your calorie needs or if you have a health condition, you may need more or less of particular nutrients. (For example, it’s recommended that people following a heart-healthy diet eat less sodium on a daily basis compared to those following a standard diet.)
(-) Information is not currently available for this nutrient. If you are following a special diet for medical reasons, be sure to consult with your primary care provider or a registered dietitian to better understand your personal nutrition needs.
Photo by Julia Garland. Prop Stylist: Molly Fitzsimons. Food Stylist: Lauren Lapenna.
Prep time
15 minutes
Cook time
2 hours 15 minutes
Serves
8 to 10
Author Notes
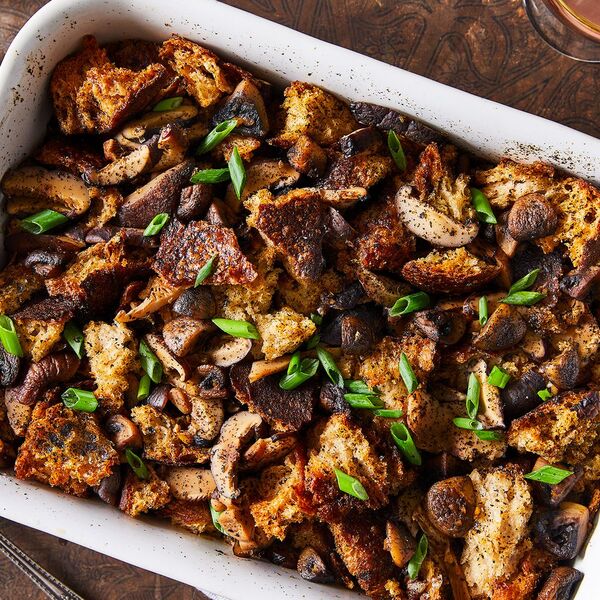
This vegan stuffing isn’t missing any meaty flavor, thanks to two kinds of mushrooms, cheesy nutritional yeast, and briny ground nori. Between the chewy shiitakes and jagged croutons, there’s tons of textural interest. Use best-quality extra-virgin olive oil here and don’t skimp—it’s key to bringing out all those savory flavors. I prefer a crusty loaf for this stuffing, for its fluffy-meets-hardy contrast. Try something like sourdough, country loaf, or miche.
My stuffing formula is simple: First, make crisp croutons out of any bread by cutting it up, tossing it with seasonings, and baking until dry and crunchy (just like that stuff in the box!). This adds a base layer of flavor and allows the bread to drink up even more tasty broth. You can make the croutons up to 1 week in advance, so come Turkey Day you have less to worry about.
Next, add fast-cooking or par-cooked mix-ins. Much like a strata or frittata, the mix-ins will just be warmed through in the stuffing. Dense veggies (like raw potato or squash) and raw meats (like ground beef or sausage) won’t have time to cook through. Instead try quick-cooking vegetables like spinach, corn, or shredded Brussels sprouts, or precooked ingredients like hunks of mortadella and wilted onions.
Finally, bring on the moisture with a flavorful chicken broth, vegetable stock, dashi, or milk. You want to add enough to hydrate every crouton without leaving a soggy puddle behind. Following these steps, you’ll never need a stuffing/dressing recipe again, but here’s one for you to try anyway. (And okay, here’s one more: my Cornbread Stuffing, but Make It Taco.) —Sohla El-Waylly
Test Kitchen-Approved
Watch This Recipe
Vegan Stuffing With Mushrooms & Nori
Ingredients
4
large sheets roasted nori
1
loaf (20 ounces) crusty bread, torn into 1 to 1 ½-inch pieces (about 12 cups)
5 tablespoons
neutral oil (like safflower or grapeseed), divided
2 tablespoons
nutritional yeast
3 teaspoons
kosher salt, divided, plus more
3 1/2 ounces
(3 cups) whole dried shiitake mushrooms
1 pound
cremini or button mushrooms, washed, stems trimmed, and quartered
Freshly ground black pepper
12
garlic cloves, smashed, peeled, and chopped
3
scallions, thinly sliced on a bias
Good extra-virgin olive oil, to serve
Directions
Heat oven to 325°F. Tear the nori into pieces and blitz in a spice grinder or blender until mostly fine, like nutritional yeast flakes.
Spread the bread onto a sheet tray, drizzle with 4 tablespoons of oil, and toss to evenly coat. Sprinkle with the nutritional yeast, half of the ground nori, ½ teaspoon salt, and toss to evenly coat. Taste and add more salt if needed.
Bake, tossing once during cooking, until toasty and crisp, 40 to 45 minutes. Once the bread is out of the oven, increase oven temperature to 375°F.
Meanwhile, in a medium saucepan, combine the shiitakes, 8 cups of water, 2 teaspoons of salt, and bring to a simmer over high heat. Reduce the heat to maintain a gentle simmer, cover, and cook until the shiitakes are tender and the liquid is flavorful, about 30 minutes.
Strain the shiitake broth into a 4-cup measuring cup. Once the shiitakes are cool enough to handle, remove and discard the stems and thinly slice the caps.
In a large skillet over medium-high heat, add the remaining 1 tablespoon of oil and heat until shimmering. Add the creminis and season with salt and pepper. Cook, stirring occasionally, until shrunken and beginning to brown, 8 to 10 minutes. (If at any point there’s too much browning on the bottom of the skillet, add a splash of water and scrape it up with a wooden spoon.)
Add the chopped garlic and continue to cook until the mushrooms are deeply browned, 3 to 5 minutes. Add ½ cup of shiitake broth to the pan and scrape up any brown bits stuck to the bottom. Taste and season with salt and pepper as needed.
Add the croutons to a big bowl and scrape the cooked cremini mixture on top. Add the sliced shiitakes, the remaining ground nori, and toss everything to combine. Add enough shiitake broth to make the bread moist but not soggy (you may not use it all—but if you need more, add water as needed). Toss to combine and taste the mixture, add more salt and pepper if needed. Transfer the mixture to a 3- to 4-quart casserole dish.
Bake until steamy and brown, 40 to 45 minutes.
Serve warm or hot. Just before serving, sprinkle with the scallions and drizzle olive oil on top.
Sohla El-Waylly is a Food52 Resident, sharing new riffable recipes every month that’ll help you get creative in the kitchen. Watch her cook on YouTube in her new series, Off-Script With Sohla. Before she started developing fun recipes for home cooks, she worked as a chef in N.Y.C. and L.A., briefly owning a restaurant in Brooklyn with her husband and fellow chef, Ham El-Waylly. She lives in the East Village with Ham, their two dogs, and cat. Find out what else she’s up to on Instagram @sohlae
Velvety smooth and with a hint of heat, this beautiful bright-yellow soup is delicious, healthy, and super easy to make! Carrots are a rich source of vitamin A and ginger, cinnamon and peppercorns are good for circulation and digestion.
There is a variation to this soup which I like a lot. Substitute some of the carrots with sweet potatoes and beets. Ratio of 40% carrots, 40% sweet potatoes, and 20% beets works well, but don’t be too concerned about the math and experiment according to your own tastes. —Larisa Litvin
Ingredients
2 tablespoons
Ghee (or Coconut Oil for a vegan version)
2 cups
Onion, chopped
4 teaspoons
Fresh Ginger, chopped
7 cups
Carrots, chopped
6 cups
Water
2 teaspoons
Salt or to taste
1
Cinnamon Stick
10
Whole Peppercorns
1 bunch
Parsley, chopped
Directions
Heat the ghee (or coconut oil) in a large saucepan over medium heat. Add the onion and sauté until translucent, about 5 minutes. Add the ginger and carrots and sauté frequently stirring for 2 minutes.
Add the water, salt, cinnamon stick, and peppercorns. Bring to a boil. Reduce the heat and simmer, covered, until the carrots are tender, about 20 minutes.
Remove the cinnamon stick and some or most of peppercorns, according to your taste.
In a blender puree until very smooth.
Return the soup to the saucepan and, if needed, reheat it over medium heat until hot.
The delicious flavors of a caprese salad inside a crisp buttery flake churro like cheese straw. Fresh basil brings these crispy cheese snacks to life and is a delightful addition to the mozzarella and tomato inside the crispy snacks. —Glutenfreekg
Ingredients
2
Sticks of vegan butter
2 cups
Gluten free bisquick
2.5 cups
Shredded mozzarella soy cheese
1/4 cup
Fresh chopped basil leaves
3 tablespoons
Tomato paste
1/2 teaspoon
Flour de sel salt
1 tablespoon
Sugar
1
Jar of your favorite marinara sauce
Directions
1. Preheat oven to 300 degrees F. in a large bowl using an electric mixer cream butter, salt, tomato paste, sugar, basil leaves chopped for 2 minutes. Add in the mozzarella cheese and mix on medium for ~ 1 minute until well mixed. Adding in 1/2 cup increments, add the flour on low speed until all flour is mixed in. When all flour is added beat on medium high for a minute or so until it becomes a well combined mixture.
2. Transfer mixture to a cookie press with a star tip and pipe onto a greased cookie sheet in 6 inch long straws.
3. When straws cool slightly serve with your favorite marinara sauce warmed up! Enjoy!
Horchata is a refreshing beverage made from white rice, almonds, sugar, cinnamon and sometimes milk in Mexico and many parts of Latin America; Spain and other countries have their own variations. As a whole-foods enthusiast, I like to use brown rice instead of white, pure maple syrup in place of sugar. The nuts make this horchata rich and creamy without the addition of dairy milk.
Level: Easy
Total: 13 hr 15 min
Prep: 15 min
Inactive: 13 hr
Yield: 5 cups
Nutritional Analysis
Per Serving
Serving Size
1 of 8 servings
Calories
271
Total Fat
14 g
Saturated Fat
1 g
Carbohydrates
31 g
Dietary Fiber
4 g
Sugar
7 g
Protein
7 g
Cholesterol
0 mg
Sodium
3 mg
Deselect All
1 1/2 cups whole raw almonds
1 cup raw long-grain brown rice
1/4 cup pure maple syrup
1 tablespoon pure vanilla extract
Soak the almonds and rice in plenty of water for 12 to 24 hours. Drain and rinse, and transfer them to a blender. Add 5 cups water, and blend on the highest speed until smooth.
Line a medium strainer with several layers of cheesecloth or a thin kitchen towel, and place it over a medium bowl. Pour the mixture through the strainer, gather the corners of the cloth and gently squeeze out all the liquid; discard the pulp.
Return the liquid to the blender, add the maple syrup and vanilla and blend until combined. Pour the horchata into a jar, and refrigerate for up to 5 days. Serve chilled.
Few things signal the start of soup season better than a bowl of silky butternut squash soup. This recipe has a few tricks up its sleeve that help to set it apart from the usual suspects. The first is Chinese five spice powder. The warming spices give the soup an extra autumnal flair, while the spice mix’s Schezuan peppercorns add some subtle spiciness.
Here, you will find half of the shallots sautéed and blended into the soup, and the other half quickly shallow fried for garnish. You can do the same with a few of the soup’s other flavor components if desired—extra garlic cloves can be sliced, or more ginger can be julienned and fried until crisp. If you like a little extra spice, finish the soup with a drizzle of chili crisp—it pairs well with all of the other flavors.
In addition to being one less thing to peel and chop, baking the squash halves in a hot oven helps maintain the squash’s silky smooth flesh. In addition, a turn during roasting aids in the caramelization process, which brings out all of its natural sweetness. Other seasonal squash varieties can be substituted for the butternut squash. While milder in flavor, acorn squash resembles butternut squash very closely in texture. Honeynut squash, is more regional than other substitutes, but looks almost exactly like a miniature version of a butternut squash; plus, honeynuts have a sweet, concentrated honey-like flavor (hence the name!) and roast beautifully. It is safe to say that these bake quite a bit faster than their larger counterparts—start checking for doneness at about 45 minutes. The same goes for sweet potatoes. Slice about two pounds worth of sweet potatoes (look for large heavy spuds) in half lengthwise before roasting. Depending on the variety you find at the farmers’ market or grocery store, your soup may be slightly less creamy than if you were to use butternut squash, but sweet potatoes will definitely impart plenty of sweet yet earthy flavor. Lastly, sugar pumpkins are a great substitute for butternut squash. They go toe-to-toe in terms of sweetness and creamy texture. These pumpkins have a short season toward the beginning of fall, but if stored correctly, they can last for a few months.
In-season squash, when cooked thoroughly, turns smooth and creamy when blended, so creating a vegan-friendly version of this soup is super simple. The only thing you really have to do is swap the usual chicken broth for vegetable stock or water. Kettle & Fire makes a delicious store-bought option, but making your own at home is as simple as can be. Save your vegetable scraps throughout the week (think onion and garlic skins, carrot peels, mushroom stalks, leek greens, and parsley stems) and throw them in a pot with water and a handful of peppercorns. Bring the stock to a simmer and cook for about one hour before straining—it should smell very fresh and fragrant. The stock will keep in the freezer for three months.
If you usually opt for some cream stirred into your soup before serving, go with a drizzle of full-fat coconut milk. A spoonful of plant-based sour cream can also be stirred into the soup just before serving. —Riley Wofford
Test Kitchen Notes
This is delicious—brighter, more vegetarian, and with more dimension than your typical squash soup! The flavor of the squash is really highlighted by the addition of carrots and the five-spice; it rings out clearly. And the five-spice, even at just 1/2 teaspoon, brings so much flavor: subtle, warm, fragrant, double-take-making. And the toppings bring it all together. We can’t wait to make this again (and to make the slow-roasted squash on its own. Yum.) —Food52
Test Kitchen-Approved
Ingredients
1
2-pound butternut squash, halved and seeded
1/4 cup
extra-virgin olive oil
2 teaspoons
grated fresh peeled ginger (from about 1-inch piece of ginger)
1/2 teaspoon
five-spice powder
Kosher salt and freshly ground pepper
1
large carrot, peeled and chopped into 1/2-inch dice
4
shallots, chopped into 1/8-inch slices and divided
1
large garlic clove, minced
4 cups
vegetable broth or water
Vegetable oil, for frying
Roasted white sesame seeds and fresh cilantro leaves, for serving
Directions
Preheat oven to 400°F. Drizzle cut sides of squash with 1 tablespoon olive oil, then rub with ginger and five spice powder; season with salt. Place cut-sides down on a parchment-lined baking sheet. Cover with foil and bake until squash is very tender, about 1 hour 15 minutes. Remove from oven and let cool slightly.
Heat remaining 2 tablespoons olive oil in a large pot over medium. Add carrot, half the shallots, and garlic and season with salt and pepper. Cook, stirring occasionally, until carrots are just tender, 6 to 8 minutes. Scoop flesh of squash into pot and break down into smaller pieces with a spoon; discard skins. Stir in broth or water and season with more salt. Bring to a boil. Reduce heat to medium-low, partially cover pot, and simmer 30 minutes, stirring occasionally, to allow flavors to meld. Let cool 5 minutes.
Meanwhile, heat 1/4-inch of vegetable oil in a small skillet over medium until oil shimmers. Add remaining shallots and fry, stirring occasionally, until crisp and golden, about 4 minutes. Drain on paper towels and season lightly with salt.
Transfer squash mixture to a blender and purée until smooth, adding water as needed to reach your preferred consistency (alternately, purée with an immersion blender). Season to taste. Serve soup with crispy shallots, sesame seeds, cilantro, and a drizzle of olive oil.
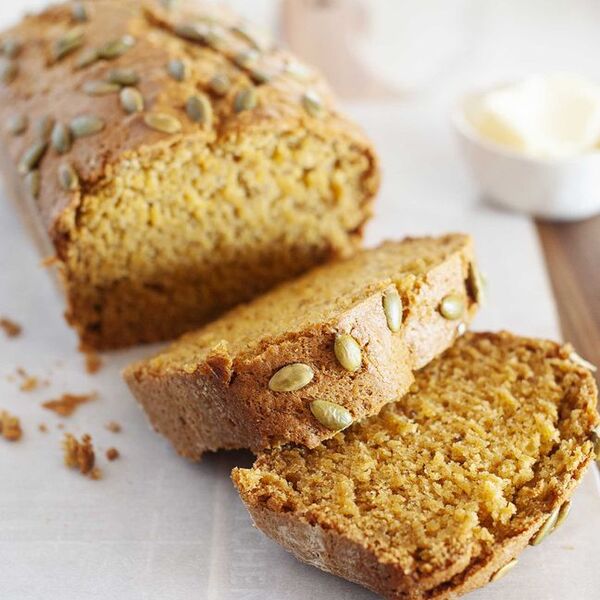
Of all pumpkin treats, pumpkin bread is my favorite. It’s what I always order at Starbucks if they happen to have it.
Well, Starbucks does not always have pumpkin bread. This recipe allows me to indulge my habit at home, whenever I want. After baking a batch I have to give the loaves away so I don’t go crazy sneaking off with slices throughout the day. It’s been my go-to recipe for years. A bit sweeter and cakier than other pumpkin breads, it delightfully conjures up the slices they sell at Starbucks—except moister. I love it with a cup of coffee. It’s one of those recipes you make to confirm to yourself that fall has arrived.
A Recipe With a Secret
This recipe started out as Piper Davis’ pumpkin bread from her excellent cookbook, The Grand Central Baking Book. I work with a few vegans and didn’t want them to get left out of the fun, so I veganized it by replacing the eggs with ground flaxseed, plus a few other tweaks. And you know what? No one can tell the difference! I’ve made it egg-free ever since.
The Best Pumpkin to Use in Pumpkin Bread
I use canned pumpkin purée. Yes, you can use homemade pumpkin purée, but to be frank, canned pumpkin is unfailingly better and it’s way less work. This recipe uses one whole small can of pumpkin so you don’t have to fret over how to use up a lingering few tablespoons.
Do not use canned pumpkin pie mix, which has spices and sugar already added to it.
Sara Bir
Flaxseed or Aquafaba
Eggs play an important role in giving quick breads structure. To make this eggless quick bread, you have two simple plant-based options that help bind the batter and lend the same cakiness that eggs would.
Flaxseed: Ground flaxseed makes a gel when you mix them with water. This gel acts as an egg replacer to add structure to cookies, cakes, and quick breads. They’re a trusty ingredient in vegan baking. You can find flaxseed in the natural food aisle of most grocery stores. They have a short shelf life, so it’s best to keep them in the freezer.
If you’re looking for tips on making flaxseed egg replacer read our post: How to Make a Flax Egg.
Aquafaba: You likely have a can of beans in your pantry, which means you have an existing alternative to a flax egg! Aquafaba is a fancy name for the liquid in a can of chickpeas. Yes, the stuff we usually tell you to drain and rinse off—turns out that goopy bean juice is a fantastic egg replacer.
To use aquafaba as an egg replacer in this recipe, just add 1/2 cup of the liquid from a can of beans and omit both the water and the ground flaxseed. Liquid from chickpeas works best, but I’ve also used the liquid from canned kidney beans and white beans and had success. Aquafaba stores for up to a week in the fridge, but you can also freeze it in ice cube trays for easy portioning. Pop the frozen cubes out of the tray and store in a zip-top bag.
Spice Swaps and Mix-Ins
Out of an ingredient, or want to get creative? You can play with spices and mix-ins for different flavor directions.
Add up to 1 cup chopped walnuts or pecans.
Add up to 1 cup vegan chocolate chips. (Many popular semisweet chocolate chips have milk and butterfat.)
Add up to 1 cup raisins or dried cranberries.
Add up to 1/2 cup finely chopped crystallized ginger.
Replace the spices in the recipe with 1 tablespoon Chinese five-spice powder. (I’m currently really taken with this version.)
Use 1 tablespoon pumpkin pie spice instead of the spices in the recipe.
Sara Bir
Pumpkin Bread Sugar Swaps
The amounts of white and brown sugar here are not set in stone. You can tailor it to your liking.
Use all white sugar. The flavor of the pumpkin and spices will come through more.
Use all brown sugar. Your pumpkin bread will have more of a gingerbread flavor.
Replace 1/2 cup of the sugar with maple syrup. Using only maple syrup will overwhelm the other flavors.
Reduce the sugar by 1/2 cup. The bread won’t be as moist and tender, but if you prefer less sweet desserts, it’s worth a go.
Flour Swaps for Pumpkin Bread
Feel free to swap the all-purpose flour with any of the following. I’ve made this bread all the following ways, and the texture and flavor remain essentially the same.
White whole wheat flour for all the all-purpose flour.
Whole wheat pastry flour for all the all-purpose flour.
Spelt flour for all the all-purpose flour.
Half all-purpose flour and half regular whole wheat flour.
Can I Make Gluten Free Pumpkin Bread?
I wouldn’t recommend making this pumpkin bread gluten-free. This particular recipe makes a dense batter, and for it to work as a gluten-free loaf, it would need eggs for added structure. If you use only gluten-free flour in this bread, it will be very dense and gluey.
Sara Bir
Can I Make Muffins, Mini Loaves, or a Single Loaf?
Sure! This recipe will yield at least two dozen muffins, or six 5 1/2 x 3-inch mini loaf pans. (I particularly like the way this batter rises in mini loaves, plus they are convenient for giving to friends.) You can also bake this in a standard-size Bundt pan or halve the recipe and make a single loaf.
Freezing Pumpkin Bread
I actually prefer this bread after it’s been frozen and thawed. After freezing and thawing, the texture and flavor of this bread improves; it becomes moister and cakier, and it slices more neatly.
To freeze: Wrap cooled loaves in plastic wrap, then in foil. Freeze them for up to 3 months. Thaw overnight in the fridge, or on the counter for three to four hours (no need to unwrap).
More Pumpkin Spice Goodness
Pumpkin Tiramisu
Pumpkin Muffins
Pumpkin Cookies
Pumpkin Spice Ice Cream
Pumpkin Cheesecake
Since this makes two loaves, you can freeze one and eat one. Perfect! Flavor-wise, it’s best cut into the day after it’s baked, so the spices can mingle.
You can use 1 tablespoon pumpkin pie spice instead of the spices in the recipe.
If using aquafaba instead of flax, omit the flax and water and add 1/2 cup aquafaba to the pumpkin mixture in Step 3.
Cook Mode (Keep screen awake)
3tablespoonspumpkin seeds
1 (15-ounce can)pumpkin puree
1 1/3 cups (304g) packed light brown sugar
1/3cupcanola or avocado oil
1/4 cup (32g)ground flaxseed meal
2/3cup unsweetened non-dairy milk (or conventional milk, if you aren’t making it vegan)
1/2cupwater
1teaspoonapple cider vinegar
3 1/4 cups (446g)all purpose flour
1 2/3 cups (324g)granulated sugar
1 1/2teaspoonsbaking soda
1teaspoonbaking powder
1teaspoonsalt
1 1/2teaspoonscinnamon
1teaspoonground ginger
1/4teaspoon ground cloves
1/4teaspoon ground allspice
1/4teaspoon ground nutmeg
Heat the oven and prepare the pans:
Preheat the oven to 350° F and position a rack in the center. Grease and flour two 8 1/2 x 4 1/2-inch loaf pans.
Sara Bir
Toast the pumpkin seeds:
Place the pumpkin seeds in a small, dry skillet over medium heat. Cook, shaking the pan often, until the seeds brown lightly and make little popping sounds, about 3 minutes. Immediately pour them into a small bowl. Set aside.
Sara Bir
Mix the liquid ingredients:
In a large bowl, whisk together the pumpkin purée, brown sugar, oil, and ground flaxseed until the brown sugar is mostly dissolved. Whisk in the milk, water, and vinegar. Set aside.
Combine the dry ingredients:
In another large bowl, whisk together the flour, granulated sugar, baking soda, baking powder, salt, cinnamon, ginger, cloves, allspice, and nutmeg.
Mix the batter:
Add the flour mixture to the bowl with the pumpkin mixture. Mix with a wooden spoon or rubber spatula until you have a cohesive batter with no dry streaks. The batter may have some small lumps, but that’s okay.
Sara Bir Sara Bir
Bake the loaves:
Divide the batter between the prepared pans and sprinkle the toasted pumpkin seeds on top. Bake the loaves until a toothpick or skewer inserted in the center comes out free of crumbs and the loaves spring back when you lightly press their center with your fingertip, about 55 to 65 minutes.
Sara Bir
Cool the bread:
Cool the pans on a wire rack for 5 minutes, then remove from the pans and cool on the racks completely before slicing.
Sara Bir
Leftovers! Bread will keep, tightly wrapped, for about 4 days at room temperature, and up to 3 months in the freezer.
Nutrition Facts (per serving)
5150
Calories
96g
Fat
1,027g
Carbs
65g
Protein
×
Nutrition Facts
Amount per serving
Calories
5150
% Daily Value*
96g
123%
Saturated Fat 65g
323%
13mg
4%
4705mg
205%
1027g
373%
Dietary Fiber 38g
136%
Total Sugars 642g
65g
Vitamin C 19mg
94%
Calcium 1042mg
80%
Iron 33mg
181%
Potassium 2421mg
52%
*The % Daily Value (DV) tells you how much a nutrient in a food serving contributes to a daily diet. 2,000 calories a day is used for general nutrition advice.
Nutrition information is calculated using an ingredient database and should be considered an estimate. In cases where multiple ingredient alternatives are given, the first listed is calculated for nutrition. Garnishes and optional ingredients are not included.
This recipe is adapted from Jo Stepaniak’s simple and forgiving “golden gravy” in Vegan Vittles. Feel free to adjust the herbs you use to suit your taste. Caramelized onions or sautéed mushrooms also make a fantastic addition. —Gena Hamshaw
Test Kitchen-Approved
Ingredients
1/4 cup
chickpea or brown rice flour
3 tablespoons
nutritional yeast flakes
1 1/2 cups
low-sodium vegetable broth
1 1/2 to 2 tablespoons
reduced-sodium tamari or soy sauce (you may need to modify based on how salty your broth is)
1 tablespoon
olive oil
1/2 teaspoon
dried thyme, crushed
1/2 teaspoon
garlic powder
black pepper, to taste
Directions
Heat the brown rice flour or chickpea flour, along with the nutritional yeast flakes, in a small saucepan over medium heat. Stir them frequently, until fragrant.
Remove from heat and whisk in the vegetable broth, tamari, olive oil, thyme, and garlic powder.
Return to heat and cook, whisking constantly, until the gravy is thick and bubbly. Season to taste with black pepper. Serve.
A mixture of frozen tofu, tempeh, and dehydrated lentils gives the chorizo a huge level of textural contrast.
Whole dried chiles form the flavorful base along with charred poblanos and a slew of fresh and dried herbs and spices.
Unlike most vegan chorizos around, this version behaves exactly like regular chorizo when cooked.
I’ve been getting more and more relaxed about my original hard-line no-faux-meats! approach to vegan recipe development. And while I’ve already tackled vegan cheese sauce, a vegan replacement for Parmesan, and even a bowl of vegan ramen as rich and creamy as any meat-based version, I’ve yet to go full-faux and attempt to make anything that is meant to fully emulate meat.
Today all that changes.
Mexican chorizo is an outlier in the sausage world in many ways. It’s nothing like its raw, dry-cured counterpart in Spain or its coarse, lightly fermented brothers in South America. It’s unique in that it’s eaten pretty much invariably without a casing. It’s a sausage that is meant to be crumbled and broken up. A sausage that’s so moist and has such a high proportion of flavorings to meat that it wouldn’t hold its shape in a casing even if you wanted it to.
This makes it a pretty much ideal candidate for vegan-ification. Without the need for a meat or other protein-based binder, you don’t have to deal with the common pitfall of vegan sausages or burgers being too mushy or wet. A very large amount of seasoning and spices dominate the flavor profile—even in pork chorizo, the pork itself is hard to taste through the chiles—which means that it shouldn’t be too hard to get a good taste-alike going on.
Serious Eats / J. Kenji López-Alt
The ideal meat-based chorizo must:
have a boldly flavored but balanced blend of chiles and spices.
have the ability to be cooked either very moist and rich or crumbled and deeply browned.
have textural contrast ranging from tender and meaty to crisp.
taste great on its own, but also be a good flavoring agent for other ingredients like potatoes, eggs, or queso dip.
have a distinct vinegary tang.
On the other hand, the ideal vegan chorizo must:
be made solely of non-animal-derived products.
See 1 through 5 above.
See what I’m getting at? I wanted to make a vegan chorizo recipe that doesn’t just come close to regular chorizo in the flavor department, but outright nails it. I wanted a meat-free chorizo with textural contrast up the wazoo, and a chorizo that changes texture as you cook it just like its meat-based counterpart. I wanted a chorizo that is tangy, rich, and complex. In short, I wanted nothing less than the best darned meat-free chorizo imaginable.
Chiles and Spices
I started my quest by heading to three different supermarkets and picking up every variety of vegan chorizo on the shelves. Though most had a few redeeming qualities here and there, they were all, without exception, not even close to the ideal I was looking for. Flavors that didn’t pop and textures that were too mushy or pasty. In fact, the closest thing I could find to a good vegan chorizo substitute is the Sofritas mixture they serve at Chipotle, though even that mixture I find to be a little bit too wet rather than simply moist and succulent.
Still, I could glean a few things from scanning the ingredients lists: Those that made use of tofu were texturally superior to those that used actual faux meats like TVP or wheat derivatives. I made a mental note to return to this when it was time to work on texture. For now, I focused on flavor.
I’ve already worked on a traditional pork chorizo recipe, so I had a good place to start. In that recipe, I used garlic, oregano, cumin, black pepper, ground cloves, coriander seeds, cinnamon, a splash of red wine vinegar, and dried ancho chile powder. I made a very quick batch of vegan chorizo using some shredded tofu and some vegetable oil in place of the pork in my original recipe—this is the approach most existing vegan chorizo recipes take. As expected, it was pretty abysmal. A pale imitation of the real thing.
To make a satisfying vegan chorizo, I was going to need to pull out the big guns. Chile powder is an OK place to start for a quick recipe like that one, but for this vegan version, I was prepared to go all-out, which meant ditching the ancho powder in place of actual whole dried chiles.
Serious Eats / J. Kenji López-Alt
Using my basic chili paste to replace chili powder as a guide, I started by microwaving three chiles—a guajillo (for its sweet, fresh flavor), an ancho (for its deeper, raisin-y notes), and a couple of arbols (for their heat)—on a plate in order to toast them (you can also use a skillet or the toaster oven). I then placed them in a microwave-safe measuring cup, added some water and a handful of raisins (to boost that richer ancho flavor), and microwaved them until the water was simmering. Once adequately softened, I could blend them along with a canned chipotle chile into a flavorful paste that would form the backbone of the flavor in my chorizo.
On to the fresh aromatics. Onions and garlic were a given. To add more chile flavor, some moisture, and a smoky background to complement the chipotle chiles, I also decided to add a roasted poblano pepper to the mix. The easiest way to deal with a single pepper is to either hold it directly over the flame of a gas burner until it’s charred on all sides, or to place it under the broiler, turning it every few minutes until completely blackened. Once you let it rest in foil, the blackened skin peels right off and the tender flesh underneath gets infused with smoky flavor.
Serious Eats / J. Kenji López-Alt
Oregano is one of those herbs that does quite well in dried form, taking on a distinct aroma and flavor from its fresh counterpart, but to really get the best of both worlds, I decided to use fresh oregano in addition to the dried. The remaining spices: cinnamon, cumin, coriander, and cloves (has anyone else noticed how many spices start with the letter C?) were invited to the party as well.
Chorizo’s distinctly bright, acidic flavor comes from the addition of vinegar—more than in any other sausage that I know of. I used a full 1/4 cup in my 1 1/2 pound batch to get the requisite flavor. While I was at it, I wondered if there were more ways I could punch up the umami factor. With meat, that savoriness is built in. Tofu or other vegetable-based products can use a bit of a boost. Soy sauce was an easy win (and is not at all uncommon in Mexican cuisine anyway), but I also added a big dab of miso paste.
Miso and vinegar.
Serious Eats / J. Kenji López-Alt
I’ve been using miso paste a lot in vegan (and non-vegan) foods recently, like in this kale and polenta soup or in this vegan Parmesan substitute. It has a much rounder, more savory flavor profile than straight-up soy sauce and has the added benefit of providing a bit of binding texture, keeping sauces tighter. Combined with the chile purée I was using, I could kiss goodbye to the watery, tortilla-destroying liquid that many vegan chorizos give off.
I had the flavor of the seasonings nailed where I wanted them, but the plain old shredded tofu wasn’t going to cut it in terms of texture. I refocused my attention on that arena.
Frozen Assets
I was looking for three distinct textural elements in my mixture: chewy and bouncy, meaty and tender, and crisp. It’s what I’d look for in a good meat-based chorizo, and I wasn’t about to lower my standards here.
Having recently moved from New York where winter days rarely rise above 40°F to San Francisco where I occasionally think about reaching for a light jacket before heading outdoors in my t-shirt, I know how much of an effect temperature can have on a person’s mood. Tofu is pretty similar in that way. If you’ve ever put a block of tofu in the freezer to save for later, you’ll know that after defrosting, it has a completely different texture than when it went in, with a porous, almost spongy structure.
Fresh tofu on the left, frozen on the right.
Serious Eats / J. Kenji López-Alt
It’s a pretty common trick: Freezing tofu causes ice crystals to form. As the tofu thaws, the ice melts, draining out and creating large pits and crevices within the tofu block. The result is tofu that is lower in water with a chewier, meatier texture. I knew that in this recipe I’d be finely chopping my tofu, but I wondered if a bit of freezing would help anyway.
I tested three batches side by side. The first was tofu I simply ground in a food processor. The second was tofu that I froze first, then ground. The third was tofu that I froze then allowed to defrost while sitting in a plate full of my chile mixture, the idea being that the chile flavor would get absorbed as the water left it.
Marinate while thawing.
Serious Eats / J. Kenji López-Alt
The third method was the least successful: marinating tofu as it thaws does indeed draw in a bit of flavoring, but it also dilutes the rest of the puree with the water that comes draining out from inside. Much better is to defrost plain on a bed of paper towels, then add the flavorings separately once the excess water has been removed.
Freezing was a definite improvement in terms of texture—the chewy and bouncy texture was there even after a mere 15 minutes in the freezer—but it was still lacking in tender, meaty and crisp elements.
For the meatiness, I turned to a second soy-based product: tempeh.
Ground tofu and tempeh.
Serious Eats / J. Kenji López-Alt
Tempeh is a traditional Indonesian product made from whole soybeans that are fermented and pressed into a block. Because the beans are left whole, it has a much meatier, nuttier texture than tofu does, though its flavor can be a bit off-putting to some people. Combining the two products together gave me a good mixture of two out of three of my textural elements. Now to address the last one: crunchiness.
My wife and I have been eating a lot of lentils recently in the form of a big batch of lentil soup I made a few weeks back. My favorite preparation so far? I took the lentil soup and cooked it down in a skillet until the lentils were almost dry then stuffed them into tacos. Treated this way, they take an intense flavor and a nearly crisp texture. What if I could maximize this effect by really dehydrating them?
Dried lentils.
Serious Eats / J. Kenji López-Alt
I drained and rinsed a can of lentils then spread it out over a foil-lined rimmed baking sheet which I then transferred to a 325°F (160°C) oven, letting the lentils cook until they were dense, crisp, and cracked. Not quite so dry that they’d hurt your teeth, but dry enough that even after re-absorbing some moisture from the rest of the ingredients they’d retain their crispness.
I folded the lentils in along with the tofu and tempeh, letting everything cook down until browned and reduced, seasoning it with salt and pepper along the way. This has got to be it, I said to myself as I dipped a spoon into the mixture which looked and smelled almost exactly like Mexican chorizo.
Close, I thought, but not quite there. It had the flavor and texture I was looking for, but the mouthfeel, the way it spreads across the palate, was not quite right. It’s got to be the fat.
See, animal fat like pork, beef, or chicken, is highly saturated. On a molecular level, this means that its fatty acid chains are less kinked and can stack together in a more stable formation. This is why highly saturated fats are solid at room temperature and fats low in saturated fat (like vegetable oil) are liquid. Think of them as a bucket of legos. With saturated fats, those legos are all stacked and stuck together, forming a solid. With unsaturated fats, a few of the bricks may be stuck together here and there, but they mostly flow past each other when you tip the bucket out.
In my vegan nacho cheese sauce, the real key to good mouthfeel was replacing vegetable oil with highly saturated vegetable shortening. Shortening is essentially vegetable oil to which extra hydrogen atoms have been added in a process called hydrogenation. It results in a vegetable-based fat that is saturated enough to behave more like an animal fat, giving you richer texture and more creaminess. It’s what makes vegan pie crusts rich and the center of Oreos creamy.
Shortening.
Serious Eats / J. Kenji López-Alt
It was also the missing piece of the puzzle in my vegan chorizo. With the shortening in place, I finally had everything on lock.
Serious Eats / J. Kenji López-Alt
How did I celebrate? With an inaugural taco, of course.
Serious Eats / J. Kenji López-Alt
The best part is that you can treat the mixture exactly like regular chorizo. Want it soft, tender and moist with a few crisp bits here and there like in the taco above? Throw it in the pan, heat it up, and you’re good to go.
Want it dry, fatty, and crumbled? No problem: cook it down until the fat separates and it crisps up in the skillet, giving you plenty of flavorful fat to coat whatever you toss it with, whether it’s eggs or fried potatoes.
Serious Eats / J. Kenji López-Alt
Now how’s that for flavor?
The recipe isn’t the easiest—there are a few steps to take beyond your standard vegan chorizo recipe—but I guarantee you the end results will be better than any store-bought chorizo on the market, vegan or not. Don’t believe me? I dare you to make this recipe and deny it. I double dog dare you.
February 2015
Vegan Chorizo for Omnivores Recipe
Cook Mode (Keep screen awake)
1 (10–ounce) block of extra-firm cottony (non-silken) tofu, drained and cut into 1-inch slices
1 fresh poblanopepper
1(15-ounce) can black or Puy lentils, drained and rinsed
1whole sweet dried chiles like Costeño, Guajillo, or Choricero, stems and seeds removed
1 to 2smallhot dried chiles like Arbol or Cascabel, stems and seeds removed (optional)
1whole rich fruity dried chile like Ancho, Mulatto, Negro, or Pasilla, stems and seeds removed
2tablespoonsraisins
1wholechipotle chile in adobo sauce with 2 tablespoons sauce from can
2cupswater
6ounces plain tempeh
1/4cup vegetable shortening or coconut oil
1mediumonion, diced (about 1 cup)
Kosher salt and freshly ground black pepper
3mediumcloves garlic, minced (about 2 teaspoons)
2tablespoons minced fresh oregano leaves
2teaspoonsdried Mexican oregano
1/2teaspoonground cinnamon
1tablespoon freshly toasted and ground cumin seeds
1teaspoon freshly toasted and ground coriander seeds
3wholecloves, toasted and ground
1tablespoon yellow or red miso paste
1tablespoonsoy sauce
1/4cupred wine vinegar
Line a large plate with a double layer of paper towels. Place tofu on top in a single layer and transfer to freezer. Freeze for 15 minutes, then remove and let thaw while you prepare the other ingredients.
Adjust rack to 4 inches below broiler element and preheat broiler to high. Line a rimmed baking sheet with aluminum foil and place the poblano on top. Broil, turning occasionally, until blackended on all sides, about 6 minutes total. Remove from oven, lift foil and wrap it around the poblano to form a tight seal, transfer to a plate and set aside. Reduce oven temperature to 325°F (160°C) and leave the door open to allow oven to cool slightly.
Line rimmed baking sheet with a fresh piece of foil and spread lentils on top in a single layer. Transfer to oven and cook until mostly dry and crunchy, 20 to 30 minutes.
Serious Eats / J. Kenji López-Alt
Meanwhile, place dried chiles on a microwave-safe plate and microwave until toasted, about 30 seconds. Transfer to a glass liquid measuring cup. Add raisins, chipotle chiles and their juice, and water. Cover with plastic wrap and microwave until simmering, about 1 1/2 minutes. Remove from microwave and let stand 2 minutes. Transfer to a blender and blend until completely smooth. Set mixture aside.
Cut tempeh into 1-inch pieces. Working in batches, transfer to a food processor and pulse until chopped to the texture of ground meat, about 10 to 12 short pulses. Set aside.
When cool enough to handle, carefully unwrap and peel poblano pepper, discarding skins and seeds. Finely dice cooked flesh. Melt shortening in a large saucepan over medium-high heat. Add onions and poblanos, season with salt and pepper, and cook, stirring, until softened, about 4 minutes. Add garlic, fresh and dried oregano, cinnamon, cumin, coriander, cloves, and cook, stirring, until fragrant, about 1 minute. Add miso paste, soy sauce, red wine vinegar, and chile mixture. Add crumbled tofu, tempeh, and dehydrated lentils. Stir to incorporate and season to taste with salt and pepper. For a moister, saucy texture, add a few tablespoons of water. For a dryer, crumblier, well-browned texture, add 2 tablespoons more oil and continue cooking until most of the excess liquid has evaporated and mixture is dark brown with crisp bits, about 15 minutes. Serve in tacos, burritos, mixed with eggs, on nachos, or in any recipe that calls for fresh Mexican chorizo.
Special Equipment
Food processor, blender
Make-Ahead and Storage
The chorizo can be made in advance and stored in a sealed container in the refrigerator for up to one week or frozen for up to two months.
Read More
Fully Loaded Vegan Queso Dip
Easy Fresh Mexican Chorizo
The Best Vegan Nacho Cheese Sauce
Dried Olive and Miso Shake (The Best Vegan Parmesan Substitute)


/ec3a38f3-7510-4bec-92fc-4a5f32b00940--2021-1015_nori-stuffing_3x2_julia-gartland_6185.jpg)


/10348b8e-d3c0-417d-b48b-542cf219508b--untitled-64.jpg)


/0bc7c3c7-8c48-4e96-8b5c-531d645908f1--image.jpg)


/16721df7-de68-4522-b3b3-fa3865e61026--2022-0907_vegan-butternut-squash-soup_seo_3x2_ty-mecham.jpg)


/027c5dd7-61c6-4c5a-aee1-b0b12051d657--10842931374_b1bff8bfd0_b.jpg)