Blog

  • Instant Pot Vegan Red Pozole

    Instant Pot Vegan Red Pozole

    recipe image

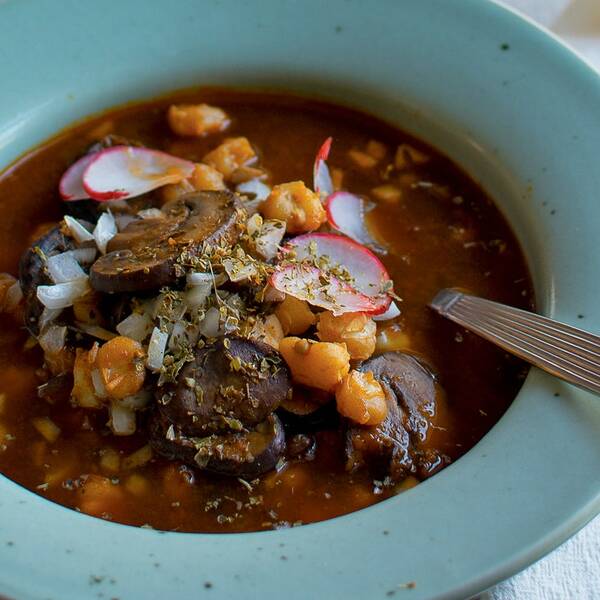
    Pozole is one of the most beloved and legendary dishes in Mexico. There are records of it as a celebratory meal dating as far back as the Aztecs. Three types of pozole reflect the Mexican flag: red, white, and green. The white doesn’t have an additional sauce added to it. Green pozole is flavored with tomatillos, cilantro, and green chiles. The one we’re making in this vegan red pozole recipe for the Instant Pot is a rich stew made with dried chiles.

    At its base is its namesake ingredient—pozole, which in Mexico is a specific type of field corn grown exclusively for this dish that is bigger and sweeter than the type grown for tortillas. Hominy is most widely used here in the United States, where our varieties of corn are severely limited in comparison.

    The garnishes for pozole aren’t optional; don’t skip them and think it will be the same.

    This recipe was excerpted from ‘Plant Powered Mexican’ by Kate Ramos. Buy the full book on Amazon. This pozole appears in our Vegan Comfort Food Meal Plan for 2023, and this collection of Mexican soups.

    Recipe information

    • Total Time

      1 hour 15 minutes

    Ingredients

    For the pozole

    2 cans (24 ounces) hominy

    2 dried ancho chiles, stemmed, seeded, and rinsed

    2 dried guajillo chiles, stemmed, seeded, and rinsed

    1 medium white onion, chopped

    3 cloves garlic, peeled and chopped

    1 tsp. ground cumin

    2 whole cloves

    1 Tbsp. kosher salt, plus more to taste

    ¼ cup olive oil, divided

    2 pounds cremini mushrooms, wiped clean, and sliced

    6 cups water

    For serving

    ½ medium white onion, minced

    2 Tbsp. dried Mexican oregano

    2 limes, cut into wedges

    5–6 thinly sliced radishes

    Special equipment

    Instant Pot or other electric pressure cooker

    Preparation

    1. Step 1

      Drain the hominy and place it in a large bowl. Cover with water and let soak while you prepare the other ingredients. Cover the dried chiles with very hot water and let them soak until soft and pliable, about 10 to 15 minutes.

      Step 2

      Remove the soaked chiles with tongs and save the soaking liquid. Add the chiles to a blender. Add the onion, garlic, cumin, cloves, salt, and ½ cup (120 ml) of the soaking liquid. Blend on high until smooth.

      Step 3

      Turn the Instant Pot to SAUTE on HI. Add half the oil and let heat for 1 to 2 minutes. Add half the mushrooms, stir to coat in the oil, then let cook, undisturbed, until they are lightly golden brown on the bottom. Stir and let cook until beginning to soften. Remove to a plate, and repeat with the remaining oil and mushrooms.

      Step 4

      Return all the mushrooms to the pot and add the blended chile mixture. Cook, stirring frequently, until the sauce has changed color to a dark red and is fragrant. Add the water and turn the Instant Pot off for a moment.

      Step 5

      Drain the hominy, give one last rinse, and add to the Instant Pot. Seal the Instant Pot. Select Pressure Cook HIGH (manual) for 10 minutes. It will take about 15 minutes for the machine to come up to pressure before the cooking cycle begins. When the 10 minutes of pressure cooking has finished, let the pressure release naturally for at least 10 minutes. Quick release the remaining pressure. Carefully open the lid. Taste and season with salt as needed.

      Step 6

      To serve: Ladle into bowls and pass garnishes at the table for everyone to top their own bowls to their liking.

    Cook’s note:

    To get a nicely browned mushroom, you can’t crowd the pan. Only put as many mushrooms as will fit in a single layer when sautéing them, otherwise they will just steam and become rubbery. Don’t move them around too much either. Let them get a nice golden crust before giving the pot a stir. Never add salt to a sautéed mushroom until the very end. The salt causes them to release moisture and prevents them from browning.

    Plant-Powered_Mexican_Cover.jpg

    Recipe excerpted from Plant Powered Mexican. Copyright © 2021 by Kate Ramos, published by Harvard Common Press. Buy the full book from Amazon or Harvard Common Press.

    Read More

  • Bliss-Inducing Basil Tahini Sauce

    Bliss-Inducing Basil Tahini Sauce

    recipe image

    Bliss-Inducing Basil Tahini Sauce

    • Makes
      1 cup
    Author Notes

    At my house it’s all about the sauce. For dinner we usually end up eating something simple, like a grain bowl with greens and some protein. This creamy, dairy free sauce is a great way to use plentiful Summer basil in a context other than pesto. Most often I put it in noodle bowls with a protein and toasted sesame, over eggs & biscuits, or over fresh green salads. I even use it as a sandwich spread! —RENEE

    Ingredients

    • 1/2 cup

      packed basil (up to 1 cup if you want intense basil flavor!)


    • 3 tablespoons

      tahini


    • 2 tablespoons

      olive oil


    • 1 teaspoon

      red wine vinegar


    • 1 teaspoon

      raw honey (or maple syrup if vegan)


    • 1/2 teaspoon

      black pepper, freshly ground


    • pinch

      cayenne


    • 1/4-1/2 cups

      water


    • salt to taste (I used about 1/2 teaspoon)

    Directions
    1. In a high powered blender, combine the basil, tahini, olive oil, red wine vinegar, honey/maple syrup, black pepper, cayenne, and ¼ cup water.
    2. Blend on high until you have a smooth, creamy sauce.
    3. Add up to ¼ cup more water (blending again to incorporate) until you get the thickness you like. Less water = thicker consistency (great as a sandwich spread). More water = thinner consistency (better as a sauce or dressing). Add salt, to taste. Voila!
    4. Can be made ahead and stored in the fridge, covered, up to 24 hours. Color is best when used immediately.

    Read More

  • Spring Skillet Cake (Vegan)

    Spring Skillet Cake (Vegan)

    recipe image

    Spring Skillet Cake (Vegan)

    Photo by butter, sugar, flowers
    • Serves
      8-10
    Author Notes

    This recipe is the result of a few culinary stars aligning in my life — or at least that’s how I interpreted a couple of food coincidences. First, vibrant stalks of rhubarb started to appear at the market: an elusive and exciting annual moment. Second, a single banana sat ripening in my fruit bowl, and I began to daydream of new ways to use it. (It’s not often that you find a recipe for just one over-ripe banana, in my experience.)

    After bringing home a big bundle of rhubarb, it dawned on me that the stalks might pair nicely with ginger: refreshing brightness alongside fragrant warmth. And I pictured different sweet fruits that would match nicely, and wondered if the blackening banana on my counter could fit the bill. I also remembered how mashed banana can replace eggs in baking, holding together the batter while diffusing its tropical taste — and this recollection heightened my hunger for a light, new dessert.

    Finally, orange zest would add a citrusy tang to echo and balance the tartness of the rhubarb. The result was not only a flavorful, ultra-moist, vegan dessert; it also turned out to be stunning, with a blanket of brilliant pink rhubarb draped over its top (and decadent caramely edges, too!).

    Bright-tasting and beautiful, this is a truly uplifting spring dessert. The creamy-sweet banana tames the tartness of the rhubarb, while the double dose of ginger offers a welcome warmth to the otherwise cool notes. With its luxuriously moist crumb, this citrus-speckled cake delivers a complex harmony of texture and flavor. All in all, it not only leaves you feeling satisfied and light, but also celebrates springtime in every bite.

    [This recipe was first posted on my web site, buttersugarflowers.com, in April 2015.] —ButterSugarFlowers

    Ingredients

    • 1/3 cup + 1 tablespoon vegetable oil of your choice (canola, sunflower, melted coconut oil, etc.)


    • 1 pound fresh rhubarb — preferably the deepest pink in color you can find, both inside and out of the stalks (this is purely for aesthetic reasons; pinker rhubarb yields a prettier cake)


    • 2/3 cup + 1/4 cup brown sugar


    • 2/3 cup + 1/4 cup brown sugar


    • 1 medium orange


    • 2 teaspoons finely grated fresh ginger root


    • 2 teaspoons powdered ginger


    • 1.25 cups all purpose flour


    • 2 teaspoons baking powder


    • 1 teaspoon baking soda


    • 1/2 teaspoon salt


    • 1/2 cup boiling water

    Directions
    1. Using 1 tablespoon of the oil, coat the interior (both bottom and sides) of a 9-10″ ovenproof skillet such as cast iron.

      Rinse rhubarb; trim and discard tough ends. Slice stalks in half, once crosswise, and then once lengthwise unless they are already very thin. If needed, trim further to fit across pan. Place rhubarb in skillet in a single parallel pile, then top with 1/4 cup brown sugar, spreading sugar to even it out a bit.

      Place pan over medium-low heat and cover with lid. Cook 5 minutes, remove lid, and use heatproof tongs to rotate top and bottom layers of rhubarb. (Pull the soft rhubarb up to the top and move the still-firm layer to bottom.) Cover with lid and cook another 5 minutes. Rhubarb should be very soft and juicy. Remove lid, remove pan from heat, and set aside.

    2. Preheat oven to 350 F. Peel the banana and mash it well with a fork until no longer lumpy, then measure it: you need between a heaping 1/3 cup and a scant 1/2 cup mashed banana (if yours yields much more than this, be sure to use no more than a scant 1/2 cup).

      Rinse and finely zest the orange; set zest aside. Juice the orange and measure out 1/4 cup juice, with any seeds discarded. Set aside. Heat a kettle of water.

    3. In a large bowl, beat 2/3 cup brown sugar and 1/3 cup vegetable oil. Add the vanilla, the mashed banana, and the grated ginger root. Mix well. Sift over the mixture: powdered ginger, flour, baking powder, baking soda, and salt. Begin to mix (batter will be thick), gradually adding the 1/4 cup orange juice and the boiling water. Beat well, scraping sides and bottom of bowl with spatula. Finally, fold in the orange zest until evenly distributed.

      Just before pouring batter into the skillet, gently rearrange rhubarb, pulling it to edges of the pan to ensure the bottom of the cake is completely covered in a single layer of rhubarb with no blank spaces. Slowly pour batter over rhubarb and place skillet in oven.

    4. Bake for 25 to 30 minutes, or until a toothpick inserted in the center of the cake comes out batter-free (a few moist crumbs are OK). Remove from oven, being careful not to touch hot skillet handle unprotected. Let sit at least 30-45 minutes or until pan is cool enough to grasp.

      Just when ready to serve, loosen edges of cake with a knife, and invert onto a plate. If cake has completely cooled or is the least bit stubborn about coming out of pan, place over medium heat on stovetop for 30 seconds before flipping. The cake is best served right away, but feel free to store it covered and refrigerated, eating within 24 hours.

    Read More

  • Roasted Veggie & Tofu Brown Rice Bowl

    Roasted Veggie & Tofu Brown Rice Bowl

    recipe image

    A healthy and satisfying vegan lunch for one, featuring roasted butternut squash, broccoli, peppers and onions with simple brown rice, lime-marinated tofu and creamy cashew tahini sauce.

    Updated on April 22, 2024

    Directions

    1. Arrange rice, veggies and tofu in a bowl or 4-cup sealable container. Sprinkle with scallions and cilantro. When ready to serve, top with cashew sauce.

    To make ahead

    Drizzle sauce over rice bowl just before serving.

    Originally appeared: EatingWell.com, December 2017

    Nutrition Facts (per serving)

    454 Calories
    24g Fat
    42g Carbs
    26g Protein
    Nutrition Facts
    Servings Per Recipe
    1
    Serving Size
    2 1/2 cups
    Calories
    454
    % Daily Value *
    Total Carbohydrate
    42g
    15%
    Dietary Fiber
    7g
    23%
    Total Sugars
    5g
    Protein
    26g
    51%
    Total Fat
    24g
    30%
    Saturated Fat
    4g
    21%
    Vitamin A
    7997IU
    160%
    Vitamin C
    90mg
    100%
    Folate
    78mcg
    20%
    Sodium
    362mg
    16%
    Calcium
    259mg
    20%
    Iron
    6mg
    32%
    Magnesium
    104mg
    25%
    Potassium
    605mg
    13%

    Nutrition information is calculated by a registered dietitian using an ingredient database but should be considered an estimate.

    * Daily Values (DVs) are the recommended amounts of nutrients to consume each day. Percent Daily Value (%DV) found on nutrition labels tells you how much a serving of a particular food or recipe contributes to each of those total recommended amounts. Per the Food and Drug Administration (FDA), the daily value is based on a standard 2,000 calorie diet. Depending on your calorie needs or if you have a health condition, you may need more or less of particular nutrients. (For example, it’s recommended that people following a heart-healthy diet eat less sodium on a daily basis compared to those following a standard diet.)

    (-) Information is not currently available for this nutrient. If you are following a special diet for medical reasons, be sure to consult with your primary care provider or a registered dietitian to better understand your personal nutrition needs.

    Read More

  • Vegan Banana Bread

    Vegan Banana Bread

    recipe image

    Total Time:

    2 hrs 20 mins

    Jump to Nutrition Facts

    Making really good baked goods without dairy and eggs can be a challenge, but we’ve cracked the code with our vegan banana bread recipe, and we’re sharing our secrets! It all starts with some clever swaps for the dairy and egg in traditional banana bread. We also have several tips for making vegan banana bread moist and tender, as well as advice on making the bread more nutritious.

    Tips for Making Vegan Banana Bread

    1. Swap Out the Egg

    Our vegan banana bread recipe starts with creating a simple egg substitute from flaxseed meal stirred together with water. Once the mixtures stands for a few minutes, it gets a consistency that’s remarkably similar to egg-and flaxseeds are a good source of omega-3s, so there’s a nutritional bonus too! While this recipe calls for a flaxseed meal “egg,” there are many other substitutions you can use for egg, including applesauce and mashed banana. If you try using applesauce, you’ll need 1/4 cup to replace one egg; if you’re using a banana, you’ll need about half of a medium banana. And if you want to replace egg whites, try using aquafaba (the liquid from canned chickpeas).

    2. Replace the Dairy

    Cow’s milk and butter are two other common ingredients in baked goods that need to be replaced to make them vegan. In the case of our banana bread, we’re using almond milk in place of cow’s milk, and canola oil instead of butter. The healthy fats in the flaxseed meal also help add back some richness that’s lost by cutting out dairy.

    3. Go Bananas

    Just like with traditional banana bread, overripe bananas work best for vegan banana bread. You can peel and freeze your bananas when they reach this point so you’re ready to make banana bread anytime. Simply thaw them in the fridge before using in your bread.Once mashed, bananas begin to brown very quickly, so wait to mash them until you’re ready to make the batter.

    4. Build a Better Batter

    For a healthier banana bread, we call for white whole-wheat flour in place of all-purpose flour. White whole-wheat flour is milder in flavor than regular whole-wheat flour but still has all the fiber benefits, so it’s ideal for healthier baked goods. For a lump-free banana bread, stir the wet ingredients together with a spatula and then switch to a whisk. When you add the wet ingredients to the dry ingredients, be sure not to overmix the batter-overmixing can make for tough baked goods.

    And perhaps the most important batter tip: Add some chocolate chips or coconut flakes for a more decadent treat! Pour the batter into a prepared pan and bake until a toothpick comes out clean.

    Check Your Wallet: Traditional Banana Bread vs. Vegan Banana Bread

    For a look at the difference in price between traditional banana bread and vegan banana bread, we turned to vegan chef Jenné Claiborne (@sweetpotatosoul). Claiborne explains that while vegan banana bread costs slightly more to make than traditional banana bread, it’s still relatively inexpensive, clocking in at just 32 cents per slice.

    Environmental Impact: Traditional Banana Bread vs. Vegan Banana Bread

    Claiborne also weighed in on the environmental impact of swapping a traditional banana bread recipe for a vegan version. “Egg production requires a lot of land and resources, so cutting back on egg consumption is beneficial to the environment,” says Claiborne, so there’s one point for the vegan recipe’s flaxseed egg. “Plus, the dairy in traditional banana bread actually has a bigger environmental impact than poultry or pork, when it comes to greenhouse gas emissions per gram of protein,” she adds, giving a point to that almond milk that replaces traditional dairy in the vegan recipe.

    Nutritional Comparison: Traditional Banana Bread vs. Vegan Banana Bread

    In terms of nutrition, our healthy vegan banana bread clocks in with 25 percent fewer calories compared to a traditional slice. You’ll also get a little bit more heart-healthy fiber.

    Vegan banana bread is delicious with a glass of nondairy milk, spread with peanut butter or other nut butters—or eaten straight out of the pan.


    Cook Mode
    (Keep screen awake)

    Ingredients

    • 5 tablespoons water

    • 2 tablespoons flaxseed meal

    • ¾ cup unsweetened almond milk

    • ¾ cup sugar

    • cup canola oil

    • 1 teaspoon vanilla extract

    • 1 ½ cups mashed overripe bananas (3-4 medium)

    • 2 cups white whole-wheat flour

    • 2 teaspoons baking powder

    • 1 teaspoon ground cinnamon

    • ½ teaspoon salt

    • ½ cup bittersweet chocolate chips (Optional)

    Directions

    1. Preheat oven to 350 degrees F. Coat a 9-by-5-inch loaf pan with cooking spray.

    2. Stir water and flaxseed meal together in a small bowl. Let stand for a few minutes.

    3. Whisk almond milk, sugar, oil, vanilla and the flaxseed mixture in a medium bowl. Stir in mashed bananas. Combine flour, baking powder, cinnamon and salt in a large bowl. Stir the wet ingredients into the dry ingredients until just combined. If desired, add chocolate chips, stirring just to combine; do not overmix. Transfer the batter to the prepared pan.

    4. Bake until golden brown and a toothpick inserted in the center comes out clean, about 1 hour. Cool in the pan for 10 minutes, then turn out onto a wire rack. Let cool for 1 hour before slicing.

    Tips

    To make ahead: Wrap and store at room temperature for up to 2 days or freeze for up to 3 months.

    Originally appeared: EatingWell.com, July 2018

    Nutrition Facts (per serving)

    207 Calories
    7g Fat
    35g Carbs
    3g Protein
    Nutrition Facts
    Servings Per Recipe
    12
    Serving Size
    1 slice
    Calories
    207
    % Daily Value *
    Total Carbohydrate
    35g
    13%
    Dietary Fiber
    3g
    12%
    Total Sugars
    16g
    Added Sugars
    13g
    26%
    Protein
    3g
    7%
    Total Fat
    7g
    9%
    Saturated Fat
    1g
    3%
    Vitamin A
    51IU
    1%
    Vitamin C
    3mg
    3%
    Folate
    7mcg
    2%
    Sodium
    190mg
    8%
    Calcium
    81mg
    6%
    Iron
    3mg
    17%
    Magnesium
    14mg
    3%
    Potassium
    147mg
    3%

    Nutrition information is calculated by a registered dietitian using an ingredient database but should be considered an estimate.

    * Daily Values (DVs) are the recommended amounts of nutrients to consume each day. Percent Daily Value (%DV) found on nutrition labels tells you how much a serving of a particular food or recipe contributes to each of those total recommended amounts. Per the Food and Drug Administration (FDA), the daily value is based on a standard 2,000 calorie diet. Depending on your calorie needs or if you have a health condition, you may need more or less of particular nutrients. (For example, it’s recommended that people following a heart-healthy diet eat less sodium on a daily basis compared to those following a standard diet.)

    (-) Information is not currently available for this nutrient. If you are following a special diet for medical reasons, be sure to consult with your primary care provider or a registered dietitian to better understand your personal nutrition needs.

    Read More

  • The best vegan tacos

    The best vegan tacos

    recipe image

    The best vegan tacos

    Photo by Alannah | Kale Mary
    • Makes
      10-12
    Ingredients

    • 1

      Can kidney beans, drained and baked at 200 degrees C for 15 minutes


    • 150 grams

      organic non-GMO tofu


    • 75 grams

      organic tempeh


    • 1/2

      brown onion, diced


    • 1 tablespoon

      garlic powder


    • 1 teaspoon

      chilli powder


    • 1 teaspoon

      dried oregano


    • 1 teaspoon

      dried rosemary


    • 1 teaspoon

      ground cinnamon


    • 1 teaspoon

      ground cumin


    • 1/2 teaspoon

      sweet smoked paprika


    • 1/4 teaspoon

      ground cloves


    • 1 tablespoon

      tahini


    • 1 tablespoon

      gluten-free soy sauce


    • 1/4 cup

      red wine vinegar


    • pinch of ground black pepper


    • 10-12

      Gluten-free corn tortillas


    • Fresh tomato, red onion and lime salsa, to serve


    • Avocado or guac, to serve


    • Sriracha, to serve

    Directions
    1. Blitz tofu and tempeh in a food processor a couple of times. Set aside.
    2. Heat coconut oil in a heavy-based pan. Add onion and saute until starting to caramelise. Add the garlic and cook on a medium heat for one minute before adding the spices. Once the spices are fragrant, add tahini, soy sauce and vinegar, followed by tofu and tempeh, baked kidney beans, and a pinch of pepper. Cook until liquid is soaked up and all ingredients are cooked through.
    3. Spoon mix into warmed taco shells topped with fresh tomato, red onion and lime salsa, avocado slices and a touch of sriracha.

    Read More

  • Chunky Vegan Choc & Date Balls

    Chunky Vegan Choc & Date Balls

    recipe image

    Chunky Vegan Choc & Date Balls

    • Makes
      12 large, 24 small
    Author Notes

    These choc and date balls are a super yummy treat for any time of the day – even though they taste like dessert! The consistency is perfect, and it’s a lot of fun to make (and eat)! A simple and easy recipe, this is sure to become a family favourite. —Avalon

    Ingredients

    • 1/2 cup

      almonds


    • 1/2 cup

      almond meal


    • 1 1/2 cups

      pitted dates


    • 2 tablespoons

      cocoa powder


    • 2 tablespoons

      golden syrup or maple syrup


    • 2 tablespoons

      water


    • 1 teaspoon

      vanilla extract


    • 2 tablespoons

      chia seeds

    Directions
    1. Place all ingredients except almonds into your blender or food processor.
    2. Blend, and then add almonds.
    3. Take small amounts of the mixture and roll into balls, and roll them in coconut.

    Read More

  • Five Ingredient Paleo Vegan Bounty Bars

    Five Ingredient Paleo Vegan Bounty Bars

    recipe image

    Five Ingredient Paleo Vegan Bounty Bars

    Photo by Justina
    • Serves
      12
    Author Notes

    Sweet, soft, moist and made up of only five healthy ingredients, these Paleo and vegan Bounty bars taste much better than the shop bought version and are ready in just a matter of minutes.


    —Justina

    Ingredients

    • 2 cups

      desiccated coconut


    • 3 tablespoons

      coconut oil


    • 4 tablespoons

      agave syrup


    • 1 pinch

      sea salt (optional)


    • 1 teaspoon

      vanilla bean paste


    • 100 grams

      dark chocolate

    Directions
    1. Mix all ingredients (except chocolate) in a blender for approximately five minutes so everything fully combines.
    2. Remove and mould/roll the mixture into individual bars and set aside on a grease proof tray.
    3. Melt the chocolate and individually roll the bars in the chocolate before placing back on the tray and placing in the fridge until the bars have cooled and hardened.
    4. Remove and enjoy!

    Read More

  • Mamma’s Strawberry Risotto

    Mamma’s Strawberry Risotto

    recipe image

    Mamma's Strawberry Risotto

    • Serves
      4
    Author Notes

    Make the most of strawberry season with this savoury Strawberry Risotto, veganized from my mother in laws recipe. In addition to veganizing this recipe I also used brown rice. Since brown rice takes longer to cook than white rice, you’ll have to par-boil it. To to do this, just add the brown rice to a pot of water and boil uncovered for about 20 minutes, drain, and spread in a large baking dish to cool and stop the cooking process. I used Baldo brown rice for risotto (you can also use arborio or carnaroli). —Nissrine @ Harmony à la Carte

    Ingredients

    • 2 cups

      Par-boiled Baldo Brown Rice for risotto (as indicated in the note above)


    • 200 grams

      Fresh Organic Strawberries (about 12 small strawberries + a few more for garnish)


    • 1

      Shallot, finely diced


    • 5-6 cups

      Vegetable Broth


    • 1/2 tablespoon

      Extra Virgin Olive Oil


    • Pinch

      Sea Salt


    • 1/2 cup

      White Wine or Champagne (optional)


    • dollop dashes

      Vegan Butter (optional)


    • Drop

      Sugar Free Balsamic Vinegar Glaze (optional)

    Directions
    1. Prepare homemade broth or heat store-bought broth (preferably low sodium and diluted in water to lighten the flavour) in a pot and keep hot throughout the cooking process, as indicated in point 6 above.
    2. Heat oil in a wok or skillet over medium heat. Add finely diced shallots and a pinch of salt and sauté for 2-3 minutes.
    3. Add cooled, par-boiled rice to a very hot pan and dry toast the grains for 2-3 minutes until slightly translucent and hot to the touch (do not brown the rice)
    4. Add wine or champagne, if using, and let cook for 5 minutes to allow the alcohol to evaporate.
    5. Add sautéed onions to the toasted rice and mix to combine.
    6. Cover in broth (about 3-4 ladles), stir and let simmer on medium-low heat.
    7. Once broth has been partially absorbed, add another ladle of broth to just cover the rice, stir then let simmer. Repeat this step several times until rice is cooked, but still firm to the bite (al dente). The texture of the risotto should be creamy, not runny or clumpy.
    8. In the final step, you can add a dollop of vegan butter or Almond Butter Cream to the risotto (optional) and a drizzle of balsamic glaze (optional) and stir it throughout before plating and serving.
    9. Garnish with fresh strawberries and serve hot – buon appetito!

    Read More

  • Vegan Chickpea Coconut Curry

    Vegan Chickpea Coconut Curry

    recipe image
    Ingredients:

    • 2 cups baby carrots
    • 2 peppers
    • 1 zucchini
    • 3 T plain soy yogurt
    • 1-2 t curry powder (to taste)
    • 1 heaping T of coconut oil

    Read More