Blog

  • Vegan Bobotie

    Vegan Bobotie

    recipe image

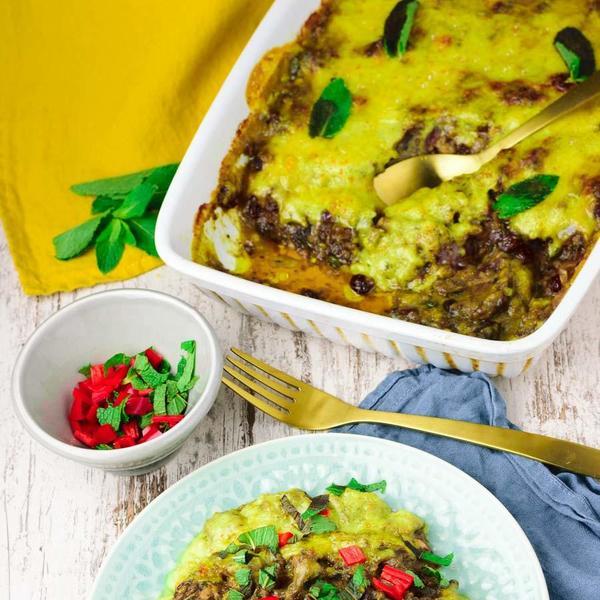
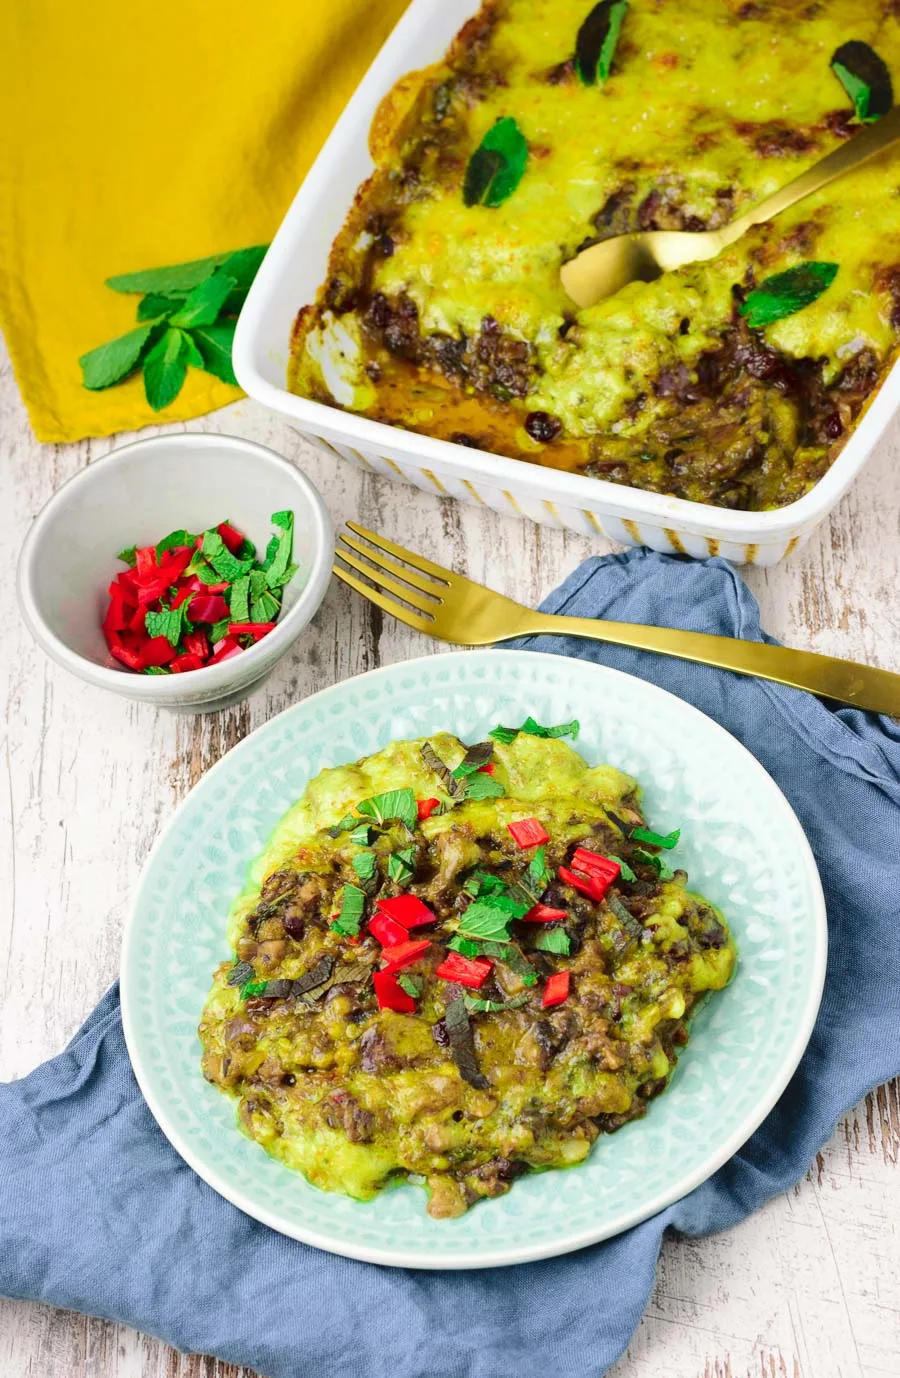
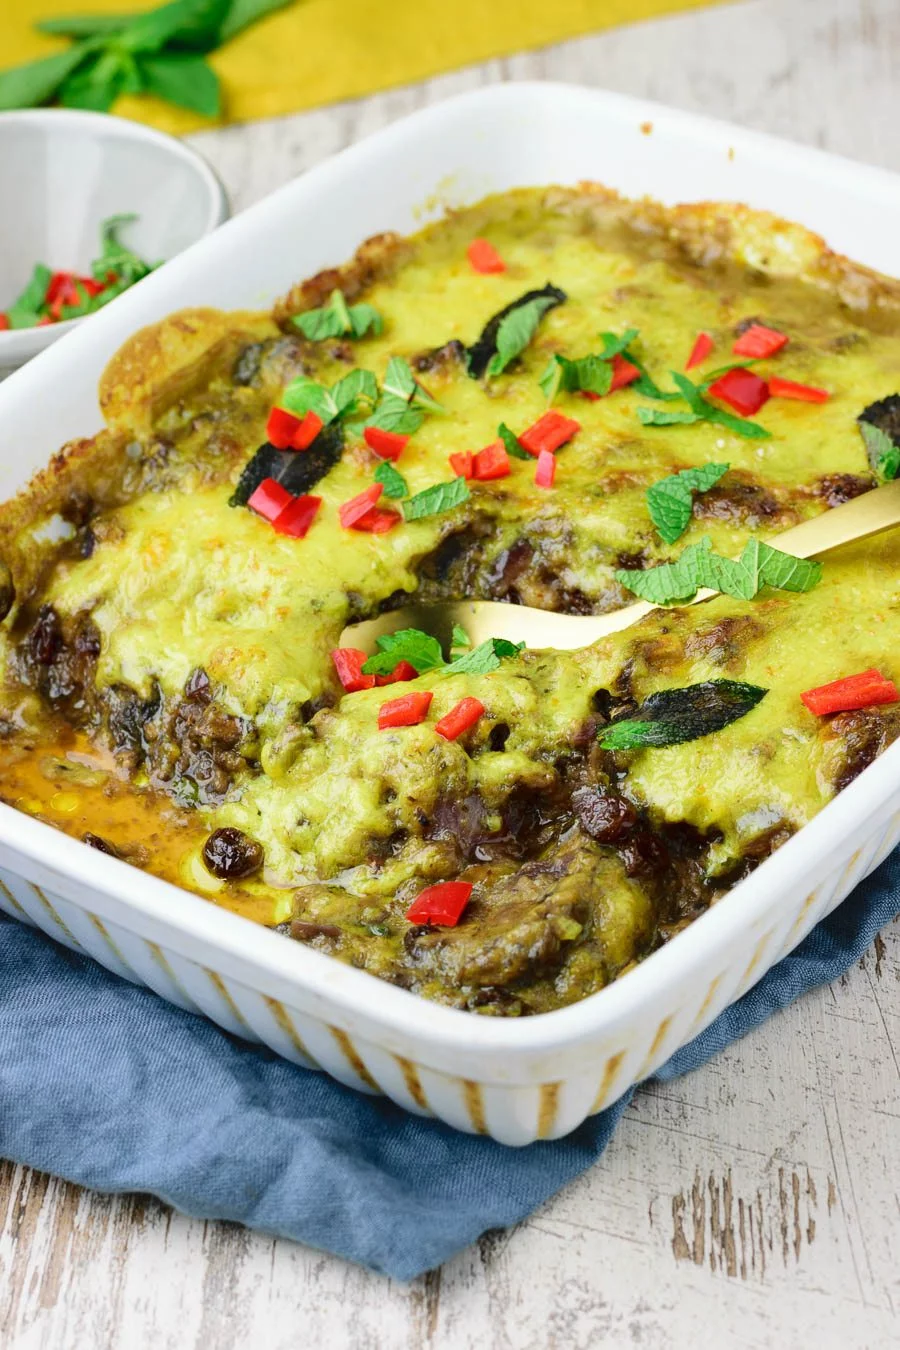
    The recipe for a Vegan Bobotie is a mushroom rich variant of a traditional South African dish. It has a combination of hearty flavors, with hot spices and a fruity component. Only 6 ingredients and 4 easy steps.

    Plate of Vegan Bobotie with the casserole dish in the background.

    I’m sure you wouldn’t have expected today’s recipe for a Vegan Bobotie. Maybe you never heard about it, so guys it’s time to get excited and come on board with me on this trip to South Africa.

    First, I guess, you ask what Bobotie is and why/how I came up with this easy recipe and share with you all. During a recent neighborhood party, for which I had made my amazing Best Hot Quinoa Burger, I talked to one of our neighbors.

    Her name is Fleur and as it turns out totally obsessed with South Africa. She had traveled there often and visited cities like Cape Town and Johannisburg as well as more rural regions.

    And in doing so she fell in love with South African food. After the vegan burger we enjoyed during the evening, Fleur ‘challenged’ me to make a vegan version of her favorite – Bobotie.

    She intends to eat healthier and more often meatless and a traditional Bobotie is essentially something of a meatloaf. Obviously, I had never heard of this dish before and didn’t fully grasp what I was up to when I accepted the challenge.

    It took some trail and error but eventually there was a version I was happy with. More importantly, a version that Fleur enjoyed when I invited her over. Mission accomplished. Hah, I hope you will enjoy my Vegan Bobotie as much as Fleur did!

    Bobotie, as a national dish of South Africa, is traditionally a mixture of meat, fruits, and a creamy topping. I have to admit I was a bit skeptical how I would manage to capture similar flavor notes in a vegan and gluten-free version.

    But I never give up and will work my butt off so that I can have a result that satisfies me – and also you. And that means not only that it is definitely delicious but also really easy to make.

    Closeup view of the Vegan Bobotie garnished with mint and chili.

    The first challenge for making a Vegan Bobotie was to find a substitute for the main ingredient. Instead of going for the obvious option of using crumpled tofu or tempeh, I aimed for something more vegetable based.

    I always thought that the color and texture of finely diced and then sauteed mushroom should resemble that of minced meat quite closely and this was the ideal opportunity to give it a try.

    I combined this with a spicy flavor from curry paste and some fruity components from a Mango Chutney.

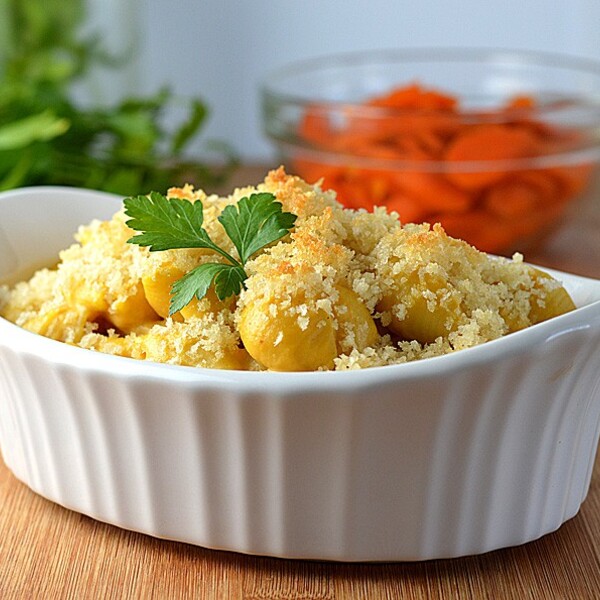
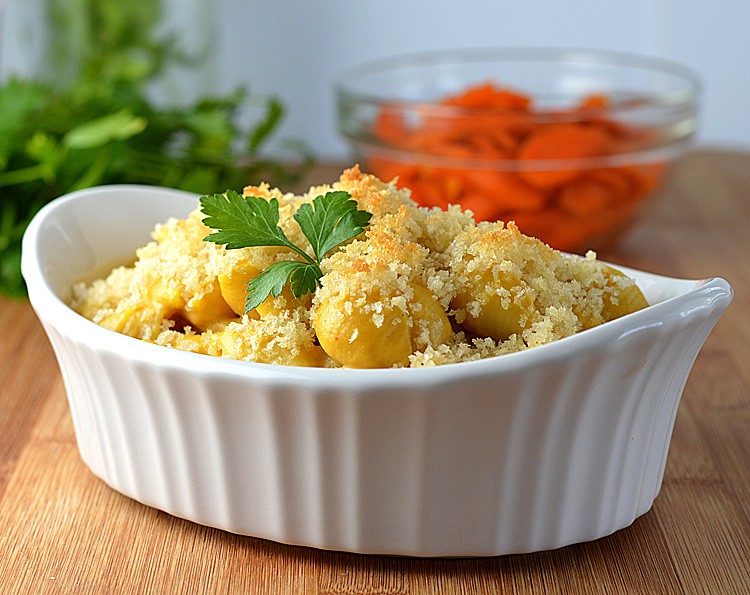
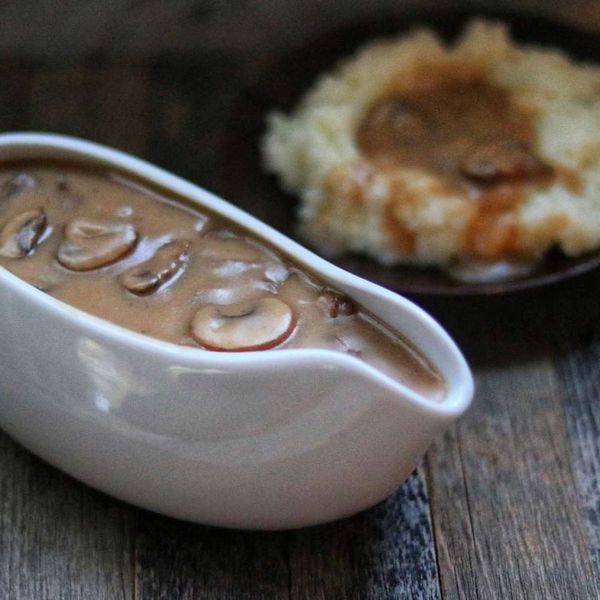
    To offer you a bit of variability, I give you two options for the creamy sauce that tops off the Vegan Bobotie. Either take the sauce of my Vegan Potato Casserole (minus the tahini) or choose the sauce of my Moussaka recipe and  leave out the nutritional yeast.

    I actually made both versions for Fleur, so I was so curious, which one was her favorite. We both agreed the sauce from the Vegan Potato Casserole is a bit creamier and richer than the sauce from the Moussaka recipe. But both are totally delicious and it’s up to you which one you prefer.

    Why you should give the Vegan Bobotie a try!

    Not only this an easy and exciting recipe you can serve your friends and family. It is a low carb recipe and you can also benefit from an infusion of nutrients coming from the mushrooms.

    Read “5 Health Benefits of Mushrooms”  and find out that they provide Vitamin D and iron, are low in calories, and boost your immune system.


    View of the Vegan Bobotie in the casserole dish, with a golden spoon.

    Making the Vegan Bobotie is straightforward as always.

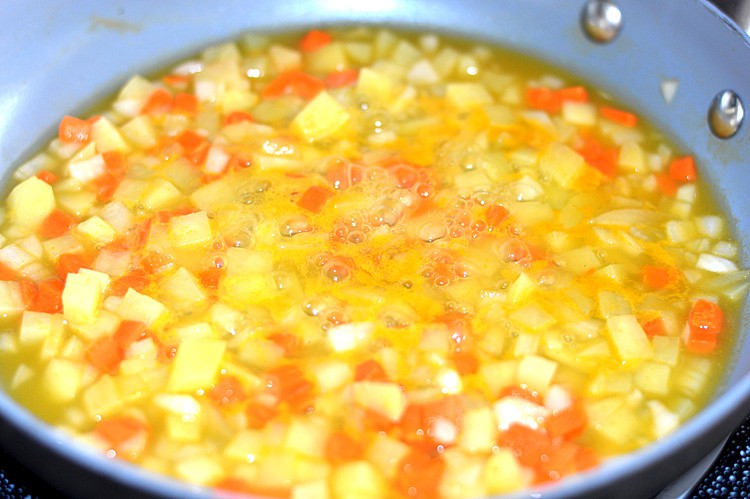
    This dish is no exception and you only need few ingredients and easy steps. Simply dice the mushrooms finely, sauté them, and mix with onion, curry paste, and some herbs. Whisk together your favorite sauce and give over the mushrooms in a casserole dish.

    Bake for 30 minutes and enjoy!

    Ingredients

    • 1 lb (500 g) mushrooms chopped
    • 1 onion
    • 2 Tbs raisins
    • 1 Tbs mango chutney (optional)
    • 1 Tbs curry paste
    • fresh herbs
    • sauce from the Moussaka without nutritional yeast

    Instructions

    1. Preheat oven to 390°F/200°C.
    2. Wash the mushrooms and dice them finely. Same with the onion. Sautee the mushrooms and add curry paste,Mango Chutney (optional), raisins, and herbs. Let simmer for a bit until the water from the mushrooms evaporates.
    3. Transfer to a casserole dish and top with your choice of sauce.
    4. Bake for 30 minutes until the sauce is golden brown.
    Nutrition Information:

    Yield: 8

    Serving Size: 1 cup


    Amount Per Serving:

    Calories: 384Total Fat: 27gSaturated Fat: 11gTrans Fat: 0gUnsaturated Fat: 12gCholesterol: 0mgSodium: 161mgCarbohydrates: 11gFiber: 1.6gSugar: 5.4gProtein: 23g

    Read More

  • Micro Veggie Cream Cheese

    Micro Veggie Cream Cheese

    recipe image

    by Kathy Patalsky · updated: · published: · About 3 minutes to read this article. 1 Comment

    Hiding veggies in your kids food is so last year. What’s in? Minimizing your veggies with my Micro Chop Method!

    Eat this: 6 radishes, 1 cup of carrots and 1 ½ cups of leafy green arugula. Try getting your kids to eat that raw veggie combo: Good luck. But what about if you micro chopped those healthy veggies into a creamy spreadable cream cheese dip that’s totally snack-friendly? Perfect! Serve my recipe for vegan Micro Veggie Cream Cheese and you won’t have to remind them to eat their veggies…because they just did! Click ahead for my recipe…


    Micro Chop Method.
    I’m not a big fan of hiding veggies in food. However, I have no problem with minimizing them! The basic theory: chop your veggies into super small shreds, dices and bits. Tiny bits are easier to eat than big monster sized chunks. I think many adults will even appreciate this idea. After you’ve sliced and diced your veggies into the tiniest of bits, fold and whip them into a creamy spread. I love using vegan cream cheese. You can even use this same method in spreads like peanut butter, hummus and guacamole.

    Healthy Veggie (and Fruit) Options. For cream cheese I love a colorful array of radishes, carrots, arugula or parsley. It’s crunchy, healthy and zesty! Other healthy veggies (and fruit) that you can easily micro chop include: celery, spinach, bell peppers, apples, raw broccoli, radishes, fennel, olives, scallions, zucchini, cucumber, onions, bean sprouts, mushrooms, parsley, cilantro, basil, cabbage, jicama, and so much more! I just don’t advise using anything mushy like tomatoes, strawberries or similar items.


    Here is the recipe:

    Micro Veggie Cream Cheese


    vegan, makes 2 cups

    1 cup vegan cream cheese


    6 radishes


    1 ½ cups arugula


    1 cup organic baby carrots


    pepper to taste

    Directions:

    1. Clean your produce.


    2. Scoop cream cheese out into a large mixing bowl.


    3. Micro chop your veggies in tiny dices, cubes, shreds and bits. I advise using a Chef’s knife or a Santoku knife. I love my Mini Santoku knife from Crate and Barrel-only $10. I found a Mini Santoku Knife from Amazon only $6.99.


    4. Scoop all the chopped veggies/fruit into your mixing bowl and whip well. Make sure to coat all the veggies in cream cheese and the manual mixing will whip some nice fluffy texture into the cream cheese.

    5. Add some fine black pepper if you’d like.


    6. Serve! Add a garnish of leftover micro veggies.


    NOTES:


    Optional Add-in: add an acid like lemon juice or apple cider vinegar to your recipe. This will thin out the spread or dip and give it an acidic kick! And you can always get fancy by adding in other herbs, flavors and accents. Try everything from dill and paprika to soy sauce and maple syrup! Creativity folks…

    Uses: Use it the same way you would any cream cheese. Makes a perfect snack-just add crackers! Spread it on bagels, toast, wraps, pitas and even as a veggie stick dip for double the veggies!


    Read More

  • Vegan Granola

    Vegan Granola

    recipe image

    This is an awesome, addictive, one hundred percent vegan granola. We always have a batch of this on hand to sprinkle on soy yogurt or eat with soy or rice milk.

    Submitted by
    jana

    Updated on April 10, 2025


    Cook Mode
    (Keep screen awake)

    Ingredients


    Original recipe (1X) yields 10 servings

    • cooking spray

    • 3 cups rolled oats

    • cup wheat germ

    • ½ cup slivered almonds

    • 1 pinch ground nutmeg

    • 1 ½ teaspoons ground cinnamon

    • ½ cup apple juice

    • ½ cup molasses

    • 1 teaspoon vanilla extract

    • 1 cup dried mixed fruit

    • 1 cup quartered dried apricots

    Directions

    1. Preheat oven to 350 degrees F (175 degrees C). Prepare two cookie sheets with cooking spray.

    2. In a large bowl, combine oats, wheat germ, almonds, cinnamon and nutmeg. In a separate bowl, mix apple juice, molasses and extract. Pour the wet ingredients into the dry ingredients, stirring to coat. Spread mixture onto baking sheets.

    3. Bake for 30 minutes in preheated oven, stirring mixture every 10 to 15 minutes, or until granola has a golden brown color. Let cool. Stir in dried fruit. Store in an airtight container.

    Nutrition Facts (per serving)

    291 Calories
    6g Fat
    55g Carbs
    7g Protein
    Nutrition Facts
    Servings Per Recipe
    10
    Calories
    291
    % Daily Value *
    Total Fat
    6g
    8%
    Saturated Fat
    1g
    4%
    Sodium
    14mg
    1%
    Total Carbohydrate
    55g
    20%
    Dietary Fiber
    6g
    20%
    Total Sugars
    18g
    Protein
    7g
    15%
    Vitamin C
    1mg
    1%
    Calcium
    85mg
    7%
    Iron
    4mg
    19%
    Potassium
    758mg
    16%

    * Percent Daily Values are based on a 2,000 calorie diet. Your daily values may be higher or lower depending on your calorie needs.

    ** Nutrient information is not available for all ingredients. Amount is based on available nutrient data.

    (-) Information is not currently available for this nutrient. If you are following a medically restrictive diet, please consult your doctor or registered dietitian before preparing this recipe for personal consumption.

    Read More

  • Maple glazed peach galette with cashew cre

    Maple glazed peach galette with cashew cre

    recipe image
    In order to minimize exposure to pesticides, herbicides, insecticides, chemical fertilizers, and/or GMOs, we always want to choose and buy as much organic ingredients as possible, especially wheat products like flours, and peaches, which are one of the most sprayed fruits.

    Ingredients:

    • * 1 cup unbleached soft wheat flour
    • * 1 cup soft whole wheat flour
    • * 1/4 tsp sea salt
    • * 1 tsp unbleached cane sugar
    • * 2 free range egg
    • * 1/2 cup vegan margarine (or grass fed butter if you're not vegan or

    Instructions:

    1. In a medium mixing bowl, mix the flours, salt, sugar, eggs, and margarine until it becomes a ball of dough. Use your (clean) hands 😉 If it's too wet, add a bit more flour, if it's too dry, you can add a tiny bit of water.
    2. Keep the dough in the bowl, cover it and put in the fridge for 15 minutes to cool down while you prepare the filling.
    3. Peel and slice all the peaches, put in a bowl, drizzle the maple syrup and vanilla. Mix well so that it's all covered.
    4. Take the dough out onto your clean countertop, or any other clean large surface, with flour on it so that it doesn't stick, and using a roller or a bottle, press the dough until it's as thin as you can get it. It doesn't have to be super thin and perfection is not necessary here. It'll taste just as good!
    5. Try to keep it relatively round, place on a cookie sheet with parchment paper, then pour the peach mixture in the middle and fold the edges of the dough all around. Use some of the peach and maple syrup juice to coat the edges of the dough (I just used my fingers).
    6. Bake in a 425F oven for about 25-30 minutes, depending on how large your pie is, and how thick your dough was.
    7. To make the cashew cream, simply put all the ingredients in your high powered blender, and blend until totally smooth. You can adjust the consistency by adding a bit more water if it's too thick.
    8. Serve the pie warm or cold, with drizzled cashew cream on top. So good!

    Read More

  • Vegan Apple Spice Snacking Cake

    Vegan Apple Spice Snacking Cake

    recipe image

    vegan apple spice snacking cake | pamela salzman

    I just took stock of my pantry because baking season has officially begun.  It started slowly with a few batches of cookie dough for back to school lunches.  Then Mr. Picky’s birthday rolled around last week and whoosh it’s Rosh Hashana this Wednesday night already!  I don’t need to tell you what is just around the corner, do I?

    grease the cake pan and line with parchment if desired

    Thankfully, I share the Jewish holiday cooking with my mother-in-law and sister-in-law.  We each host a meal and cook whatever we want.  I have the first day of Rosh Hashana lunch, as well as the break fast on Yom Kippur evening.  The break fast is actually one of my favorite holidays to host because people literally starve themselves for 24 hours (no water either!) and then come to my house to eat.  I could basically serve anything and it would be a hit!

    dry ingredients

    One of the nice traditions of the Jewish new year is eating seasonal foods.  Love that!  Apples are likely the most important food along with honey which symbolize the hope of a sweet year ahead.  I have been loving the new crops of local apples flooding the markets over the past month.  My kids particularly love Honeycrisp, Pink Lady (my personal fave), Granny Smith.  I use apples all over the place at this time of year — turned into applesauce, sautéed on top of pancakes and waffles, cooked into oatmeal, chopped in salads and folded into simple snacking cakes like this one.

    wet ingredients

    I saw a recipe a few years back for a Depression era chocolate cake called “Wacky Cake.”  The cake didn’t use any “expensive” ingredients like eggs, milk or butter and I think got it’s name “wacky” because somehow the crazy recipe actually produced a moist, delicious cake.  There are a gajillion recipes for the classic chocolate Wacky Cake, but last year I decided to put a twist on the (vegan) recipe and use apples and spices instead.  Delicious!

    batter before apples and raisins

    diced apples and golden raisins

    The result was a moist, fragrant and just sweet enough little cake that I think is just perfect for after school snacks, lunch box treats, brunch or anytime you need a seasonal dessert for a fall gathering, like Rosh Hashana!!  I make some sort of apple dessert every year for my luncheon, but I am very fond of this one because it is so darn easy and it freezes amazingly well.  It is also pretty clean: whole grain flour, minimal amount of unrefined coconut sugar, and very little oil (I use unrefined coconut oil.)  My entire family loves it!

    add walnuts to the top of the cake

    You can do different things with this easy cake.  You can double the recipe and bake the cakes in 9-inch round pans for a 2-layer cake.  I would use this vegan frosting or a classic cream cheese frosting to go between the two cakes and on top.  If you don’t like raisins, leave them out.  Or instead of placing the walnuts halves on the top of the cake, chop them up and fold them into the batter.  Or make this into muffins.  For my do-aheaders, make this today and freeze it for the upcoming holiday (Rosh Hashana, Halloween, Thanksgiving — GASP!)  If you are celebrating the new year this week, may it be a sweet one!

    vegan apple spice snacking cake

    vegan apple spice snacking cake | pamela salzman

    • 1 ¾ cups whole wheat pastry flour or whole spelt flour
    • ½ cup coconut palm sugar or brown sugar or cane sugar
    • 1 teaspoon baking soda
    • 1 teaspoon ground cinnamon
    • ½ teaspoon aluminum-free baking powder
    • ½ teaspoon sea salt
    • ¼ teaspoon ground nutmeg
    • 1/8 teaspoon cloves, optional
    • ¼ cup melted coconut oil or unsalted butter, not vegan
    • 1 Tablespoon apple cider vinegar or distilled white vinegar
    • 1 teaspoon pure vanilla extract
    • ½ cup water
    • ½ cup orange juice*
    • 1 large apple, peeled, cored and diced, about 1 cup
    • ½ cup unsulphured raisins, optional
    • 16 raw walnut halves, if desired
    • Preheat oven to 350 degrees. You can grease your pan with coconut oil or butter and line it with unbleached parchment paper if you want to remove it from the pan to serve it. Otherwise, no greasing necessary if you will cut pieces from the pan to serve.

    • Whisk together the flour, sugar, baking soda, cinnamon, baking powder, salt and nutmeg. Make a well (indentation) in the flour mixture.

    • Pour the coconut oil, vinegar, vanilla, water and orange juice in the well and stir until everything is just combined. Do not overmix!

    • Fold in diced apple pieces and raisins.

    • Pour batter into pan and smooth out top. If you want, evenly space walnut pieces over batter. Bake for 30 – 40 minutes or until a toothpick inserted in the center comes out clean.

    *Or use all water and up the coconut sugar to 2/3 cup.  You can also add diced dates.

    iconLike this recipe? Rate & comment below!

    Read More

  • Meatless Monday: Vegan Mac and Cheese

    Meatless Monday: Vegan Mac and Cheese

    recipe image

    I’m excited to announce that we’ve officially partnered with the Meatless Monday Campaign.  Launched in 2003 in conjunction with John Hopkins to get people to cut down on meat consumption for both health and environmental reasons, it has since become a truly global movement.  Schools, companies, restaurants and bloggers like me participate in the campaign on a weekly basis.  The recipes made will be shared on various media outlets to get the word out.

    Ours will still be the vegan recipes you’ve come to know, but also marketed to those who may not yet have become vegan. Maybe they are interested but don’t know where to begin. I think it’s a great resource, so on that note…let’s get started with this week’s recipe!

    Vegan Mac and Cheese.  Now, this recipe’s goal is to offer an alternative to cheese.  While you could certainly use a vegan cheese product, I have yet to find a melting vegan alternative I love.  So this is more of a flavorful cheese-like vegetable based sauce.

    It’s thick, creamy and tastes delicious!

    Vegan Mac and

    Vegan Mac and “Cheese”

    The very first thing we need to do is soak the cashews.  I wasn’t able to find raw cashews in my local store, so I got lightly roasted.  In this dish, it only added to the flavor.  We want to soak them for at least 30 minutes to an hour to make them soft enough to puree into a cream.  If you are not using a high speed blender, just soak them overnight. The water gets discarded prior to blending.

    Vegan Mac and

    Vegan Mac and “Cheese”

    Next, we saute diced potatoes, carrots and onions in a low-sodium vegetable broth.  This one is the Imagine brand which has a really rich color to it.  Once the vegetables become tender, it all gets added to the blender.  Allow to cool for a minute or two.  You never want to add a hot mixture to a blender.  Things expand and there is potential for the lid to be forced off.  We don’t want any kitchen accidents here.

    In addition to the cashews and vegetable mixture, we also add almond milk and seasonings.

    Vegan Mac and

    Vegan Mac and “Cheese”

    And this is what it looks like after 1 minute of blending.  At this point, it’s important to taste for seasoning and adjust for consistency.  A little salt and maybe a smidge more broth may be in order.

    Vegan Mac and

    Vegan Mac and “Cheese”

    Once you have a tasty, creamy sauce, it’s time to fold it into the pasta.  We boiled up some medium shells, but you could also use traditional elbows.

    Vegan Mac and

    Vegan Mac and “Cheese”

    If you like your mac and “cheese” a bit looser, you can enjoy it right now.  This next step is completely optional, but it’s how we do it in my family.

    Spoon the mac and cheese into an oven safe dish and top with panko bread crumbs.  We melted a bit of vegan margarine with those crumbs so we’d get a nice golden crust.  Pop it into a 350 degree oven just until browned and you are done.

    Vegan Mac and

    Vegan Mac and “Cheese”

    It looks pretty convincing, doesn’t it?  The secret to this vegan mac and “cheese” is all in the sauce.  It’s about building flavor.  This is a nice, healthy alternative to the traditional dish.  I served mine with glazed carrots and garnished with fresh parsley.

    This recipe serves four people.

    Vegan Mac and

    Vegan Mac and “Cheese”

    Before you go, why not check out some of our recent videos and be sure to subscribe to the YouTube Channel! 🙂

    Author Veg Life Staff

    Ingredients

    • 10 oz . Pasta medium shells or elbows
    • 1/2 C Vegetable Stock + 1/4 C Water
    • 1/2 C Potatoes any yellow variety, peeled and finely diced
    • 1/4 C Onions finely diced
    • 1 medium Carrot peeled and finely diced
    • 1/4 C Raw Cashews soaked for at least 30 minutes or overnight
    • 2 Tbl Almond Milk
    • 1 heaping Tbl Nutritional Yeast
    • 1/8 tsp Dijon Mustard
    • 1/2 tsp Salt or more to taste
    • 1/8 tsp Garlic Powder
    • 1/8 tsp Paprika
    • Pinch of Cayenne
    • 2 Tbl Panko Breadcrumbs
    • 1 Tbl Vegan Margarine optional, melted

    Instructions

    • Soak the cashews for at least 30 minutes, or overnight if you are not using a very high powered blender. We want them soft so that they puree into a cream.

    • In a large saute pan, add the vegetable broth, water, potatoes, carrots and onions. Saute until vegetables are tender.

    • Boil the pasta and drain – do not rinse.

    • Drain the cashews and add to the blender along with the vegetables. Allow this mixture to cool slightly before processing.

    • Add the almond milk, nutritional yeast and remaining ingredients to the blender.

    • Pulse to get the blending started and then puree for 1 minute or until completely smooth.

    • It is important to taste at this point for seasoning and adjust with additional stock if necessary for a thinner consistency.

    • Add the vegetable puree to the drained pasta gradually. You may not need or want it all. It will thicken as it stands and also if you choose to bake with the breadcrumb topping.

    • Spoon into an oven safe dish.

    • Combine the breadcrumbs and melted vegan margarine with a fork and spoon evenly over the mac and cheese.

    • Bake at 350 just until browned.

    • Serve with your favorite vegetable or a slice of crusty bread.

    Read More

  • Creamy Vegan Potato Salad Recipe

    Creamy Vegan Potato Salad Recipe

    recipe image

    “I recently shared this potato salad with my friends Kris, Michelle, Emily, Nicole, and my father-in-law, Bob; and the reaction was unanimous–“Oh Wow! I could eat this salad every day. This is a keeper. You need to put this on your site!” At the risk of appearing unashamedly self-congratulatory, I have to agree with my discerning friends. This potato salad has a creamy yet crunchy texture, with a zesty flavour that strikes a nice balance between sharp and sweet. It’s a wonderful example of how this quick raw vegan mayonnaise can act like the little black dress in your culinary wardrobe. With the right accessories —some fresh crisp vegetables and the right amount of sea salt and cracked pepper —the simple becomes the sublime, and this little potato dish is dressed to impress. Snouts far and wide agree —this recipe is a stunner, a winner, and not to be missed.”

    Read More

  • Instant Pot Banana Oatmeal

    Instant Pot Banana Oatmeal

    recipe image

    The ultimate healthy breakfast recipe, this warm, hearty Instant Pot banana oatmeal is delicious and easy! Whole grain, full of fiber, and vegan.

    I love the chewy texture and wholesome flavor of steel cut oatmeal. Add in creamy, tasty bananas with a bit of cinnamon and you have the perfect breakfast. I’ve been on a bit of an oatmeal kick ever since I figured out how easy steel cut oatmeal is to make in an Instant Pot. Pumpkin steel cut oatmeal has been in our breakfast rotation for months. Now we’re switching it up with this delicious Instant Pot banana steel cut oatmeal.

    Instant Pot Banana Oatmeal

    In my last post about oatmeal, I wrote about the difference between steel cut oats, rolled oats, and quick oats. Check it out here for a quick primer. Using an Instant Pot with steel cut oats is key, as you don’t need to stir or do much of anything – I love simple breakfasts!

    What is an Instant Pot?

    This post contains affiliate links. See my disclosure policy.

    An Instant Pot is a brand name of multi-use, programmable electric pressure cookers.  The Instant Pot brand offers several different sizes and there are a number of other brands on the market as well with similar features.  I have the Instant Pot Duo 6qt, so all of my instructions are based on that one.  All of the pressure cookers brands and models are pretty similar; they just name things a bit differently, so refer to your manual if I reference a button that you don’t have on yours – or leave a comment in the notes and I’ll try to help you out!

    Instant Pot Banana Oatmeal

    How to Make Instant Pot Banana Oatmeal

    Start by turning the Instant Pot on “Saute” and press the Saute button until it’s on “More.”  Add the margarine or butter (not vegan).  When the margarine has melted, add in the steel cut oats, water, and two bananas. No need to slice up the bananas, just peel and add them in whole. You don’t need to stir either.

    Seal the lid, close the pressure relief valve and press the “Pressure Cook” button until it’s on “Normal” and the “Pressure Level” until it’s on “High Pressure.”  Then press the +/- buttons until the time shows 00:10 for ten minutes.  The Instant Pot will say “On” while it’s getting up to pressure and then will start counting down.

    When it’s done, allow the pressure to naturally release for 10 minutes (just leave the Instant Pot when it’s done and it will start to count up).  When it’s on 00:10, then ten minutes are up.  Turn off the Instant Pot by pressing “Cancel” and quick release the rest of the pressure by opening the pressure relief valve (making sure to steer clear of the steam).

    When the float valve is down and the pressure is released, open the lid.  Stir in the cinnamon, salt, and brown sugar if using.  Let the pot sit for 5 to 10 minutes to allow the oatmeal to thicken. Serve the oatmeal with banana slices and peanut butter.

    Instant Pot Banana Oatmeal

    Looking for more Instant Pot recipes?  Try this Instant Pot Greek Yogurt, my absolute favorite recipe that I make every week.  This Instant Pot Mushroom Frittata is another easy breakfast recipe. If you try this Instant Pot Banana Oatmeal, leave a comment and review below and let me know how it worked out for you!

    Instant Pot Banana Oatmeal

    The ultimate healthy breakfast recipe, this warm, hearty Instant Pot banana oatmeal is delicious and easy! Whole grain, full of fiber, and vegan. 

    Prep Time5 minutes

    Cook Time40 minutes

    Total Time45 minutes

    Course: Breakfast

    Cuisine: American

    Servings: 4 servings

    Author: Danielle Howard

    Ingredients

    • tablespoons  vegan margarine (or substitute butter if not making this vegan)
    • cup  steel cut oats
    • cups  water
    • 3 large ripe bananas (divided)
    • 1/4  cup  brown sugar  (optional)
    • 1 1/2  teaspoons  cinnamon
    • 1/2  teaspoon  salt
    • Peanut butter for serving

    Instructions

    • Add margarine to pressure cooking pot, select “Sauté”. When margarine is melted add the water, oats, then two peeled bananas on top. Do not stir.

    • Seal the lid and close the pressure release valve. Press “Pressure Cook” until it’s on “Normal” and press the “Pressure Level” button until it’s on “High Pressure”. Then press the +/- buttons until you see 00:10 for 10 minutes.  The Instant Pot will say “On” until it gets up to pressure and then will start counting down from 10.

    • When the Instant Pot is done, just leave it alone (natural pressure release) for 10 minutes, then quick release the rest of the pressure after that.

    • When the float valve is down and the pressure is released, press “Cancel” to turn off the Instant Pot and open the lid.  Add the brown sugar (if using), cinnamon, and salt. Stir well. Let the oats sit in the pressure cooker for 5-10 minutes to let the oats thicken a bit.

    • Slice the remaining banana and serve the oatmeal with the banana slices and the peanut butter.

    Instant Pot Banana Oatmeal

    Read More

  • Vegan Crab Cakes (Happy Hearts “Crab” Cakes) from Sweet Potato Soul

    Vegan Crab Cakes (Happy Hearts “Crab” Cakes) from Sweet Potato Soul

    recipe image

    Home » Recipes » Vegan Crab Cakes (Happy Hearts “Crab” Cakes) from Sweet Potato Soul

    These Vegan Crab Cakes are crunchy on the outside, moist on the inside and pleased our entire family! With the perfect crust, texture and flavours, you’ve got to try them! It’s from Jenné Claiborne’s cookbook Sweet Potato Soul!

    Top down view of vegan crab cakes on a plate with salad on the side.

    What comes to your mind when you think of crab cakes? Great crust, flaky on the inside. Moist but still firm enough. Tender and of course, reminiscent of the sea. You definitely get that with these amazing Vegan Crab Cakes! This recipe is from my amazing friend Jenné from Sweet Potato Soul‘s Cookbook:  Sweet Potato Soul: 100 Easy Vegan Recipes for the Southern Flavors of Smoke, Sugar, Spice, and Soul.

    When I say that this girl throws DOWN in the kitchen with her recipes! I’m not Southern, but these recipes make me feel like I could’ve grown up there. I learnt so much from her book – the history, her family stories, and of course, all those amazing recipes! I’m talking things from Spicy Fried Cauliflower “Chicken” (that are fried and look DIVINE), to Bourbon BBQ Tempeh Sandwiches to Oyster Mushroom Étouffée (I tried this – it’s divine!) to even dessert like Date Rice Pudding (which I’ve also tried). OH, and I already got to taste a bunch of these recipes so I KNOW they are 100% legit.

    Vegan crab cakes, topped with sauce on a plate with salad on the side.

    Back in February I attended Jenné’s Book Launch in California (who can see my 5 star review on the website). It was a total blast, I met some amazing woman and the food was fantastic. Like, Sweet Jesus Mac and Cheese fantastic. It was the first time we met in person, so it feels even more incredible to be reviewing yet another recipe from her cookbook.

    Top down view of a cook book on a table.

    So, these vegan crab cakes. Jenné describes them as Happy Hearts “Crab” Cakes in her cookbook, and for good reason. One, these will make you happy, for sure. Two they’re made with hearts of palm and chickpea for that texture, which is so perfect! She goes into great detail in the recipe for how to make these vegan crab cakes, so be sure to check it out and definitely give it a try.

    Look at that photo friends, can you see that flakiness?! These vegan crab cakes plus her Roasted Red Pepper Aioli sauce really takes this meal over the top. I added raw kale in these photos, but the second time I ate them I had kale chips which added a beautiful textural element, so definitely try those. Arugula is my favourite kind of greens, so I can’t wait to get some fresh to try with this!

    Top down view vegan crab cakes next to an open cook book.

    I hope you enjoy friends! All of her recipes are vegan as stated above, so you can make anything from this cookbook. It’ll give you a real soulful experience from a true Southern girl, with a true gift for veganising the phenomenal recipes she grew up with.

    PIN THIS RECIPE:

    Montage of vegan crab cakes with title text.

    Top down view of vegan crab cakes on a plate with salad on the side.

    Vegan Crab Cakes (Happy Hearts “Crab” Cakes) from Sweet Potato Soul

    Servings: 12 servings

    Prep Time: 15 minutes

    Cook Time: 10 minutes

    Total Time: 25 minutes

    These Vegan Crab Cakes are crunchy on the outside, moist on the inside and pleased our entire family! 

    • 2 14-ounce cans hearts of palm, drained and chopped into large pieces
    • 1 ½ cups cooked chickpeas, see page 125 or 1 (15-ounce) can, drained and rinsed
    • 1 cup panko bread crumbs, plus ½ cup for coating
    • ¼ cup vegan mayonnaise
    • 1 jalapeño pepper, seeded and rinsed
    • 1 ½ tablespoons Old Bay seasoning
    • 1 teaspoon ume plum vinegar
    • 1 teaspoon Dijon mustard
    • 6 tablespoons grapeseed, canola, or safflower oil
    • Place the hearts of palm and chickpeas in a food processor and pulse to combine and mash. Don’t overprices it; you still want some “crabby” texture.

    • Scrape the hearts of palm mixture into a large bowl and add the 1 cup panko, vegan mayonnaise, jalapeño, Old Bay seasoning, vinegar, and mustard. Stir well to combine.

    • Line a large plate with paper towels and keep nearby.

    • In a large skillet, heat the oil over medium-high heat. Place the ½ cup panko in a shallow dish. Form the “crab” mixture into 2 inch-wide patties, making sure to pack the mixture tightly, and then coat them in the panko in the shallow dish. Place the patties in the skillet (do not overcrowd) and pan-fry for 3 minutes on each side. Transfer the patties to the prepared plate. Repeat with the remaining mixture.

    • Serve with a dollop of Red Pepper Aioli (page 209) and fresh greens.

    This recipe is from Jenné Clairborne’s Cookbook  Sweet Potato Soul: 100 Easy Vegan Recipes for the Southern Flavors of Smoke, Sugar, Spice, and Soul and printed strictly with one of

    Calories: 224kcal, Carbohydrates: 27g, Protein: 4g, Fat: 11g, Saturated Fat: 1g, Sodium: 165mg, Potassium: 1268mg, Fiber: 3g, Sugar: 13g, Vitamin A: 76IU, Vitamin C: 7mg, Calcium: 36mg, Iron: 2mg

    Disclaimer: Although jessicainthekitchen.com attempts to provide accurate nutritional information, kindly note that these are only estimates. Nutritional information may be affected based on the product type, the brand that was purchased, and in other unforeseeable ways. Jessicainthekitchen.com will not be held liable for any loss or damage resulting for your reliance on nutritional information. If you need to follow a specific caloric regimen, please consult your doctor first.

    Cuisine: American

    Course: Dinner, Lunch

    Read More

  • Vegan Mushroom Gravy

    Vegan Mushroom Gravy

    recipe image

    This quick-and-easy vegan mushroom gravy is rich, thick, and creamy but made without using any dairy! Simply delicious with mashed potatoes.

    Submitted by
    fabeveryday

    Updated on August 22, 2023


    Cook Mode
    (Keep screen awake)

    Ingredients


    Original recipe (1X) yields 4 servings

    • ¼ cup vegetable oil

    • 1 (8 ounce) package sliced fresh mushrooms

    • ¼ cup all-purpose flour

    • 2 cups vegetable broth

    • ¼ teaspoon salt

    • teaspoon ground black pepper

    • teaspoon garlic powder

    • 1 pinch dried thyme

    Directions

    1. Heat oil in a saucepan over medium-high heat. Add mushrooms and sauté until soft, about 8 minutes. Add flour and stir until mushrooms are evenly coated. Slowly pour in vegetable broth, stirring continuously, until flour has completely dissolved and is mixed into broth. Add salt, pepper, garlic powder, and thyme; stir to combine.

    2. Bring gravy to a boil. Reduce heat to low, stirring occasionally, and simmer until thickened, about 5 minutes.

    Nutrition Facts (per serving)

    172 Calories
    14g Fat
    10g Carbs
    2g Protein
    Nutrition Facts
    Servings Per Recipe
    4
    Calories
    172
    % Daily Value *
    Total Fat
    14g
    18%
    Saturated Fat
    2g
    11%
    Cholesterol
    0mg
    0%
    Sodium
    467mg
    20%
    Total Carbohydrate
    10g
    4%
    Dietary Fiber
    1g
    5%
    Total Sugars
    2g
    Protein
    2g
    5%
    Vitamin C
    3mg
    3%
    Calcium
    9mg
    1%
    Iron
    1mg
    8%
    Potassium
    234mg
    5%

    * Percent Daily Values are based on a 2,000 calorie diet. Your daily values may be higher or lower depending on your calorie needs.

    ** Nutrient information is not available for all ingredients. Amount is based on available nutrient data.

    (-) Information is not currently available for this nutrient. If you are following a medically restrictive diet, please consult your doctor or registered dietitian before preparing this recipe for personal consumption.

    Read More