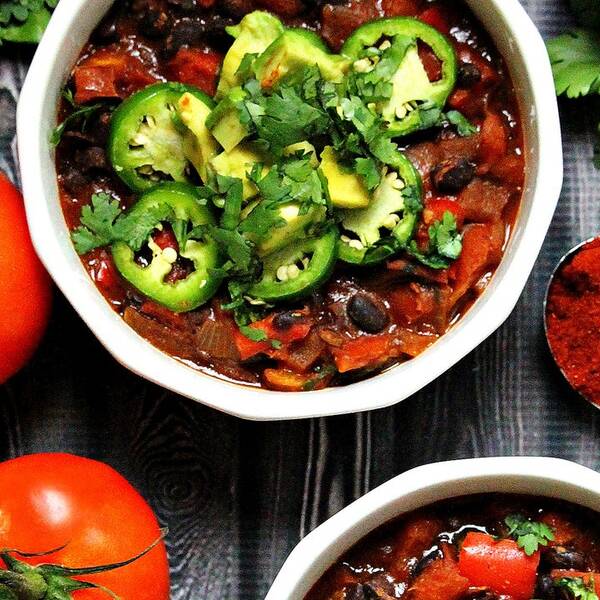

Warm tortillas, refried beans, sunny eggs, and a salsa you’ll write home about.
Preheat oven to 350 degrees F. Coat a 9-by-5-inch loaf pan with cooking spray.
Combine water and flaxseed meal in a small bowl. Let stand for a few minutes.
Whisk almond milk, sugar, oil, vanilla and the flaxseed mixture in a medium bowl. Stir in pumpkin puree. Whisk flour, baking powder, pumpkin pie spice (or cinnamon) and salt in a large bowl. Add the wet ingredients and stir until just combined. Stir in chocolate chips, if using. Transfer the batter to the prepared pan.
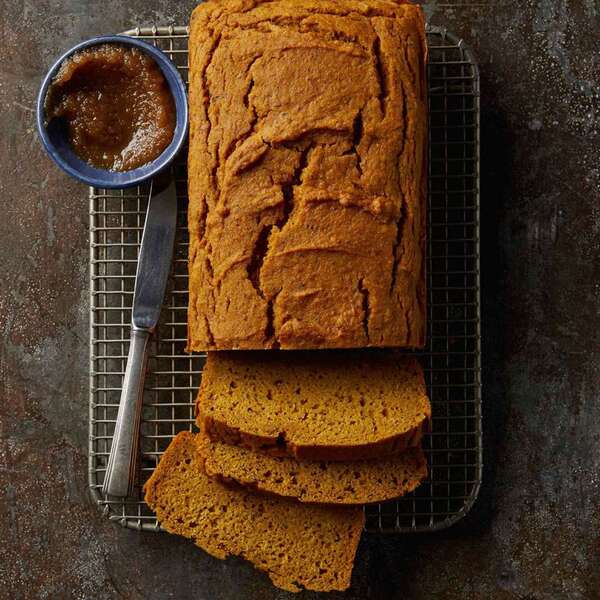
Bake until golden and a toothpick inserted into the center comes out clean, 1 hour to 1 hour 15 minutes. Cool in the pan for 10 minutes, then turn out on a wire rack. Let cool for 1 hour before slicing.
To make ahead: Store loaf, well wrapped, at room temperature for up to 4 days or freeze for up to 4 months.

There’s a reason my wife married me, and surprisingly it’s got nothing to do with my debonair charm, my rugged good looks, or my dashing sense of adventure. No. She married me on the promise of cheese sauce. Pools and pools of gooey, tangy, salty, creamy cheese sauce. And you know what, dear? I delivered on that promise.
It was several years ago—not one year after our nuptials*—that I started investigating how to make gooey cheese sauce out of almost any cheese, and less than a year after that, she had it: an unlimited supply of cheese sauce. Married life has been pure bliss since that day, I can tell you.
*Let the record show that it took her nearly two years to let me get that puppy I always wanted.
Bliss, that is, until vegan month rolls around. The one month of the year when my dear wife’s fries have to go un-dipped, her nachos un-topped, and her baked potatoes un-smothered.
In the interest of maintaining order in our happy home, I decided that it was time to finally tackle that issue head-on. The goal? To develop a recipe for a nacho sauce that is every bit as creamy, gooey, and smother-worthy as the real deal.
Now, some of you may be scratching your heads here. Haven’t I come down against faux products in the past?
Yes, I have, and that stance still holds. My issue is not with vegetable-based meat or dairy substitutes, per se, but with vegetable-based foods masquerading as meat. Tofu hot dogs just taste like bad versions of hot dogs, whereas a good grain- and vegetable-based burger patty (such as, oh, this one right here) can take the place of a regular beef patty—you can cook it the same way and serve it the same way—and be completely delicious in its own right, without trying to taste exactly like a burger patty.
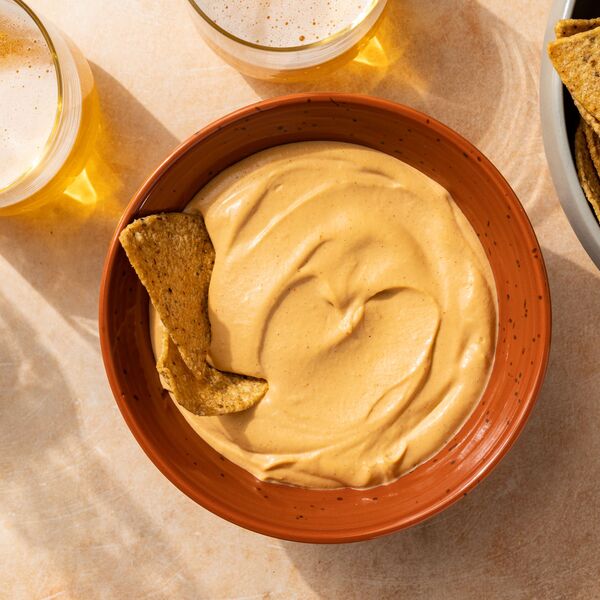
What we’re going for here is something similar: a sauce that hits all of the same notes as traditional nacho cheese sauce—tangy, a little spicy, and salty—with the same textural qualities—rich, mouth-coatingly gooey, creamy, and fatty—but made with 100% standard supermarket staples with a flavor that is downright delicious in its own right. A flavor that doesn’t leave you thinking, “this is pretty good… for vegan cheese.
The first order of business was to get a quick lay of the land by seeing what solutions other folks have come up with in the past. I made a few of the most popular vegan nacho sauce recipes on the internet. Most of them rely on ground cashews as their base, using paprika, powdered garlic or onions, lemon juice, and a crap-ton of nutritional yeast (a concentrated source of umami) for flavor.
The end results are not all that different from the spicy cashew cream I use to top my Spinach and Hominy Enchiladas. That is to say, not at all bad, but not really nacho-like, either, in flavor or texture.
To crack the code, I decided to look at exactly what’s in regular nacho sauce that makes it tick, and work backwards from there. Here’s what we’ve got.
Flavor is always the easiest thing for me to nail down, so I decided to start there.
Swapping out lemon juice for pickling liquid from a jar of pickled jalapeños and then swapping the powdered alliums for fresh onions and garlic helped in the flavor department, as did adding some paprika, a touch of cumin, and a single chipotle chile packed in adobo sauce (it’s amazing how their mild smokiness can add such dimension to sauces), but it still wasn’t quite right—it tasted almost too fresh and “real.”
Sautéing the onions and garlic first in oil along with some sliced jalapeño pepper helped tame that raw garlic bite, but the real trick was to use a mixture of fresh garlic and garlic powder. There’s something about powdered granulated garlic that is unique and reminds me of good junk food. I still like to sprinkle some on my pizza now and then. Sometimes you want that fancy San Pellegrino Aranciata and sometimes you just want Crush, if you know what I mean.
There was another big issue in the flavor department: The stuff still tasted overpoweringly of cashews. It wasn’t immediately obvious to me how to maintain the thickness of the sauce while reducing the amount of cashew flavor, so I decided to move on for now.
This is where I was after a couple dozen batches of sauce:
It’s smooth, thick, and saucy, but it wasn’t really gooey. It coated your mouth in the way that thinned-out nut butter does*, not the way fatty nacho sauce does. Could playing with the ratio and type of fat help in that department?
*Shocking, seeing as that’s basically what it was.
Knowing that animal-based dairy fats are more highly saturated than the vegetable-based fats I’d been using, I tried vegetable shortening in place of vegetable oil. Shortening is essentially vegetable oil to which extra hydrogen atoms have been added in a process called hydrogenation. It results in a vegetable-based fat that is saturated enough to behave more like an animal fat, giving you richer texture and more creaminess. It’s what makes vegan pie crusts rich and the center of Oreos creamy.
Turns out, it also worked wonders for my sauce. Nacho sauce always contains a lot of fat, and I found that the flavor and texture of mine steadily improved up until we hit 6 tablespoons per cup of liquid.
Speaking of liquid, I also found that swapping out some of the regular water I’d been using for almond milk also improved matters. Almond milk not only has fat and protein in it, but more importantly, it contains emulsifying agents that help to keep my sauce shiny and smooth.
Still, all the extra fat and emulsifiers in the world weren’t helping with the fact that there was simply no stretchiness or gooeyness in my sauce. How could I fix this?
“even without the cheese, beaten potatoes become insanely elastic. Could I harness this trait to my advantage?”
I tried adding thickeners of various sorts, ranging from flour and cornstarch, and even considered breaking my supermarket-only rule by introducing some xanthan gum or agar, but none of it really seemed to help. Then, when I was in the middle of a batch thickened with potato starch, it struck me: have you ever tried making mashed potatoes in a food processor or blender? It doesn’t work: the whole thing ends up as a gummy, sticky mess.
Why is that? It has to do with the specific types of starches that are contained within potato cells that get released when the cells are ruptured by the violently spinning blades of a food processor. In fact, there’s even a classic dish from the French Pyrenees called aligot which takes advantage of this fact: to make it, potatoes are cooked until very soft, then pounded and beaten along with garlic and cheese until you end up with an elastic mixture that can be stretched several feet out of the bowl on a spoon before falling back.
Sure, it’s got cheese in it, but I’ve done some tests on that recipe in the past: even without the cheese, beaten potatoes become insanely elastic. Could I harness this trait to my advantage?
I cooked up a new batch, substituting half of the cashews by weight with sliced russet potatoes (the starchiest potato of the bunch), toasting them a bit in the melted shortening before adding my water and almond milk.
After simmering the mixture until the potatoes were just tender, I transferred them all to my blender and fired it up.
Bingo. Not only was the resulting sauce texturally spot-on with a rich, full mouthfeel and a gooey, creamy, barely elastic texture, but those potatoes had also solved my flavor problem by diluting the impact of the cashews. All it needed was a little whisk of hot sauce (I prefer to call on my buddy Frank, but you can use whatever brand you like) and all the elements were in place.
How did I celebrate? Why, the way I often do: by feeding my wife delicious things for lunch.
How do you like dem nachos?
The best part? By using this potato-cashew-shortening trick and applying different flavor bases to it, I could alter my sauce to work in a huge variety of applications, like Vegan Cheesy Baked Potatoes with Broccoli:
…or Vegan Stovetop-Style Macaroni and Cheese:
…just to name a few. The first year I went through The Vegan Experience, I lost a few pounds in the process. I have a strong feeling that ain’t happening this time around.
Cook Mode
(Keep screen awake)
6 tablespoons vegetable shortening or palm oil
1 small onion, thinly sliced
2 medium cloves garlic, thinly sliced
1/2 jalapeño pepper, seeds and ribs removed, thinly sliced
1/2 teaspoon ground cumin
1 teaspoon ground paprika
1/2 teaspoon granulated garlic powder
1 chipotle pepper packed in adobo sauce, finely chopped, plus 1 teaspoon adobo sauce
4 ounces russet potato (about 1/2 medium), peeled and thinly sliced
4 ounces roasted cashews (about 1 cup)
1/2 cup water
1/2 cup almond milk
1 teaspoon hot sauce (such as Frank’s)
2 teaspoons pickling liquid from a can of pickled jalapeño peppers (plus peppers, to taste)
Kosher salt to taste
Melt shortening in a medium skillet over medium heat. Add onions, garlic, and jalapeños and cook, stirring, until completely softened but not browned, about 4 minutes. Add cumin, paprika, garlic powder, and chipotle (with sauce). Cook, stirring, until fragrant and mixture starts to sizzle, about 1 minute.
Serious Eats / Eric Kleinberg
Add potatoes and cashews and cook, stirring, until cashews are lightly toasted, about 2 minutes. Add water and almond milk. Bring to a boil, reduce to a bare simmer, and cook, stirring frequently, until potatoes are fully tender, about 10 minutes.
Serious Eats / Eric Kleinberg
Transfer mixture to the jar of a high-powered blender. Add hot sauce, jalapeño pickling liquid, and a pinch of salt. Start on low speed and slowly increase speed to high. Blend on high speed until completely smooth, about 2 minutes, adding water a few drops at a time as necessary to thin to desired consistency. Season to taste with more salt.
Serious Eats / Eric Kleinberg
Press mixture through a fine-mesh strainer, using the bottom of a ladle to get it through. Cheese sauce can be stored in the refrigerator in a sealed container for up to 1 week. To reheat, microwave in 30 second increments, stirring in between, or reheat in a small pan on the stovetop, stirring constantly, and adding extra water to loosen sauce as necessary.
Serious Eats / Eric Kleinberg
High-powered blender and fine-mesh strainer
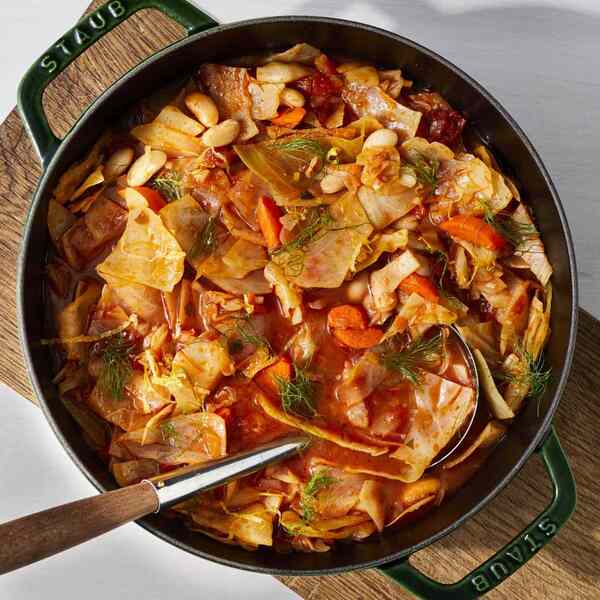
This vegan soup recipe is surprisingly easy to make. The flavorful broth is spiked with garlic, tomatoes and a hint of coriander. Just slice and dice your cabbage and fennel and you’ll be enjoying this quick healthy soup in no time.
Updated on September 19, 2023
Cook Mode
(Keep screen awake)
2 tablespoons extra-virgin olive oil
1 cup chopped carrots
1 cup sliced fennel, fronds reserved for garnish
½ cup chopped onion
2 teaspoons minced garlic
½ teaspoon ground coriander
½ teaspoon salt
6 cups low-sodium vegetable broth
1 (15 ounce) can no-salt-added diced tomatoes with basil, garlic and oregano
1 small head green cabbage (1 1/2 lbs.), chopped
1 (15 ounce) can unsalted cannellini beans, rinsed
2 teaspoons sugar
1 teaspoon chopped fresh oregano
Lemon zest for garnish
Heat oil in a large heavy pot over medium-high heat. Add carrots, fennel and onion; cook, stirring occasionally, until starting to soften, about 5 minutes. Add garlic, coriander and salt; cook, stirring constantly, until fragrant, about 1 minute. Add broth and tomatoes; bring to a boil. Add cabbage; reduce heat to medium. Cook, stirring occasionally, until the cabbage is tender, 20 to 25 minutes.
Stir in beans, sugar and oregano; cook until the beans are heated through, about 3 minutes. Sprinkle with lemon zest and reserved fennel fronds, if desired; serve immediately.
Originally appeared: EatingWell.com, January 2020; updated January 2023
| 205 | Calories |
| 6g | Fat |
| 31g | Carbs |
| 6g | Protein |
| Nutrition Facts | |
|---|---|
|
Servings Per Recipe 6 |
|
|
Serving Size 2 cups |
|
|
Calories 205 |
|
| % Daily Value * | |
|
Total Carbohydrate 31g |
11% |
|
Dietary Fiber 10g |
34% |
|
Total Sugars 15g |
|
|
Added Sugars 1g |
2% |
|
Protein 6g |
12% |
|
Total Fat 6g |
7% |
|
Saturated Fat 1g |
4% |
|
Vitamin A 4117IU |
82% |
|
Vitamin C 103mg |
115% |
|
Folate 11mcg |
3% |
|
Sodium 427mg |
19% |
|
Calcium 154mg |
12% |
|
Iron 3mg |
14% |
|
Magnesium 37mg |
9% |
|
Potassium 670mg |
14% |
Nutrition information is calculated by a registered dietitian using an ingredient database but should be considered an estimate.
* Daily Values (DVs) are the recommended amounts of nutrients to consume each day. Percent Daily Value (%DV) found on nutrition labels tells you how much a serving of a particular food or recipe contributes to each of those total recommended amounts. Per the Food and Drug Administration (FDA), the daily value is based on a standard 2,000 calorie diet. Depending on your calorie needs or if you have a health condition, you may need more or less of particular nutrients. (For example, it’s recommended that people following a heart-healthy diet eat less sodium on a daily basis compared to those following a standard diet.)
(-) Information is not currently available for this nutrient. If you are following a special diet for medical reasons, be sure to consult with your primary care provider or a registered dietitian to better understand your personal nutrition needs.
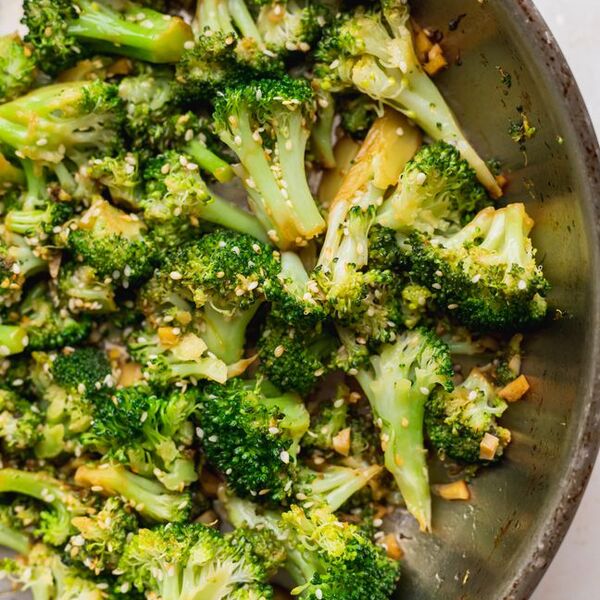

This easy broccoli stir-fry comes together in under 30 minutes and makes a great veggie side dish.
![]()
Simply Recipes / Cambrea Gordon
Do you get broccoli cravings?
Some people get chocolate cravings. I get broccoli cravings. Sometimes I think it’s my body’s way of telling me I’ve been laying on the bacon (or maybe the chocolate!) a bit too thick. But honestly, I could eat broccoli every day of the year and not get tired of it.
Here’s a quick and easy recipe for broccoli, stir-fried with a little ginger and sesame. The broccoli florets are quickly stir-fried initially, then steamed in a sauce of stock, sesame oil, and soy sauce.
This quick cooking technique works best with the florets. Don’t discard the broccoli stalks, peel them and slice them thick and eat them raw like you would a carrot; the raw stalks are great with dips.
What’s your favorite way of preparing broccoli? Our everyday standby is steamed broccoli, but we’re always looking for ideas.
The beauty of this recipe is its versatility and ease. You can add more of your vegetables (like sliced carrots, snow peas, water chestnuts, baby corn, celery) to make it more fun and colorful. Feel free to toss in some protein, like thinly sliced beef, chicken, or even shrimp for a more filling dish.
Be sure to use a larger pan if adding more ingredients. You don’t want to crowd vegetables too much and get them too soggy!
This isn’t a totally traditional stir-fry recipe. Usually, Chinese stir-fries are made over higher heat in a wok. This adapts the technique for home cooks who don’t have a wok or access to the high heat of restaurants.
A wok is great, if you have one, but totally not necessary.
You do want to use the largest skillet you have though so that the broccoli has a chance to cook evenly without getting too crowded. If you like a little char on your vegetables, feel free to cook the broccoli a couple of minutes longer over high heat.
Cook Mode
(Keep screen awake)
1 tablespoon sesame seeds
1/2 cup chicken stock (use vegetable stock for vegan option)
1 tablespoon soy sauce (use gluten-free soy sauce for gluten-free option)
1 tablespoon dark sesame oil
Peanut oil, or canola oil
1 pound broccoli florets, rinsed, patted dry, and cut into bite-sized pieces
1 tablespoon minced fresh ginger
2 cloves garlic, minced (about 1 tablespoon)
Toast the sesame seeds:
Toast the sesame seeds by first heating a small, stick-free saute pan on medium-high heat. Add the sesame seeds and jiggle the pan so they spread out in a single layer.
Let them cook until lightly browned, stirring occasionally, about 2 to 3 minutes. Do not walk away from them while cooking, as once they start to brown they can easily burn. Once lightly toasted, remove from heat and put into a small bowl. (Skip this step if using pre-roasted sesame seeds.)
Simply Recipes / Cambrea Gordon
Simply Recipes / Cambrea Gordon
Mix the stock, soy sauce, and sesame oil:
Mix the stock, soy sauce, and dark sesame oil together in a small bowl. Set aside.
Saute the broccoli, garlic, and ginger:
Heat 1 tablespoon of peanut or canola oil in a large, coverable saute pan on medium-high heat. Add the broccoli florets, and stir to coat the florets with the oil, Stir-fry for about a minute.
Clear a space in the middle of the broccoli and add the ginger and garlic. Add a little more oil to the ginger and garlic (about a teaspoon) and saute for half a minute, stirring just the garlic and ginger, until fragrant. Then, stir the garlic and ginger in with the broccoli.
Simply Recipes / Cambrea Gordon
Simply Recipes / Cambrea Gordon
Simply Recipes / Cambrea Gordon
Add the soy mixture and simmer:
Add the soy sesame oil mixture to the pan and bring to a simmer. Reduce the heat and cover. Let cook for 2 to 3 minutes, until broccoli is still firm but can be pierced with a fork. Remove from heat.
Remove the broccoli with a slotted spoon to a bowl. Return the pan to the stove. Increase the heat to high and boil down the liquid until just a couple tablespoons remain.
Turn off the heat, and return the broccoli to the pan. Add the toasted sesame seeds, and toss with the liquid. Serve fresh and hot from the stove.
Did you love this recipe? Let us know with a rating and review!
Simply Recipes / Cambrea Gordon
Simply Recipes / Cambrea Gordon
Simply Recipes / Cambrea Gordon
Simply Recipes / Cambrea Gordon
Simply Recipes / Cambrea Gordon
| Nutrition Facts (per serving) | |
|---|---|
| 129 | Calories |
| 9g | Fat |
| 11g | Carbs |
| 4g | Protein |
×
| Nutrition Facts | |
|---|---|
| Servings: 4 | |
| Amount per serving | |
| Calories | 129 |
| % Daily Value* | |
| 9g | 11% |
| Saturated Fat 1g | 5% |
| 1mg | 0% |
| 310mg | 13% |
| 11g | 4% |
| Dietary Fiber 4g | 15% |
| Total Sugars 2g | |
| 4g | |
| Vitamin C 74mg | 371% |
| Calcium 70mg | 5% |
| Iron 1mg | 7% |
| Potassium 404mg | 9% |
| *The % Daily Value (DV) tells you how much a nutrient in a food serving contributes to a daily diet. 2,000 calories a day is used for general nutrition advice. | |
Nutrition information is calculated using an ingredient database and should be considered an estimate. In cases where multiple ingredient alternatives are given, the first listed is calculated for nutrition. Garnishes and optional ingredients are not included.

PARTNER POST: Discover how delicious dairy-free sweet and savory cooking can be with DREAM Ultimate Almond.
No ice cream maker? No problem! Whip up this cool and creamy vegan dessert made with coconut milk and Dream’s new Ultimate Almond.
The new DREAM Ultimate Almond beverage can be found now at Whole Foods and soon at your local Sprouts. Click here for a coupon.

5 Stars 4 Stars 3 Stars 2 Stars 1 Star
No reviews
★★★★★
About the Book
Step into the world of Scandinavianish with NØRTH. From Swedish comfort classics to Danish smørrebrød and new twists on Nordic flavors, this cookbook invites you to explore the rich taste of the North in your own kitchen.
All recipes are presented with both imperial and metric measurements. Available in premium paperback, and for instant download for tablets, phones and computers.
$9.99
Works on all devices and screens
Buy Now
Previous Post

Next Post
Access to this page has been denied because we believe you are using automation tools to browse the website.
This may happen as a result of the following:
Please make sure that Javascript and cookies are enabled on your browser and that you are not blocking them from loading.
Reference ID: #15cd8de2-cb24-11ef-a485-66d6c85e4907


Vegan mint chocolate chip ice cream gets its richness from coconut milk and freezes beautifully. Super creamy! Super minty! Super chocolate-chippy!
![]()
I have a soft spot in my heart for dairy-free ice cream—and not because I can’t have dairy. My family and I eat our fair share of cheese, sour cream, and yes, real ice cream, too.
But I actually prefer ice cream made with coconut milk over ice cream made with eggs and dairy any day of the week. I love the flavor and natural sweetness of coconut milk, and think it really shines when made into ice cream.
If you’ve never made dairy-free ice cream before, you’re in for a treat: it doesn’t require much in the way of fancy ingredients.
I’ll walk you through making the ice cream base below, but a few things to know first:
1. The recipe calls for full fat coconut milk and there’s really no wiggle room there. Neither light coconut milk nor coconut cream will work here. Other non-dairy alternatives, like nut milks, won’t produce the same results—we need that coconut fat to make sure this ice cream is super creamy.
2. The cornstarch also does some of the heavy lifting in this recipe. It helps thicken the base and keep the ice cream from getting icy or freezer-burned—something that so many homemade ice creams fall victim to. (By the way, if you prefer arrowroot over cornstarch, you can substitute it 1-for-1 here.)
3. I use regular granulated sugar here, but I’ve experimented with both honey and agave. If you like liquid sweeteners, you can substitute those instead (the amount of each ingredient is the same). Surprisingly, the texture and overall flavor of the ice cream is basically the same no matter what sweetener you use.
One caveat: this recipe does take a little advanced planning. When the craving for ice cream strikes, know that you’ll have a few rounds of chilling ahead of you, each a couple hours long. I always make the base the night before, churn the ice cream the next morning, and throw it in the freezer so it’ll be all firm and ready to serve that evening.
Note that the FDA does list coconut as a tree nut, though many people with tree nut allergies are fine with coconut. If you’re not sure if the person or people eating your cookies has a tree nut allergy that includes coconut, check with them before making this recipe.
Cook Mode
(Keep screen awake)
2 (14–ounce) cans full-fat coconut milk
1/2 cup (100g) granulated sugar
1/4 teaspoon kosher salt
2 tablespoons cornstarch
1/4 teaspoon vanilla extract
3/4 teaspoon peppermint extract
3 1/2 ounces bittersweet chocolate, chopped into pieces (about 3/4 cup; use allergy-friendly chocolate if needed)
Prep your equipment:
The day before you want to make ice cream, place the freezer bowl of your ice cream maker into the freezer.
Make the base:
Pour 1/4 cup of the coconut milk into a small bowl and set aside. Combine the remaining coconut milk, sugar, and salt in a medium saucepan over medium heat. Warm, stirring occasionally, until the sugar has fully dissolved, about 2 minutes.
Make the cornstarch slurry:
Whisk the cornstarch into the bowl of reserved coconut milk until completely dissolved.
Add the cornstarch slurry:
Stir the cornstarch mixture into the warm coconut milk base on the stove and cook over medium heat until the mixture thickens enough to coat the back of a spoon, 6 to 8 minutes. Be careful not to let the mixture come to a boil.
Add flavoring:
Remove the mixture from heat and stir in the vanilla and peppermint extracts.
Cool the ice cream base:
Pour mixture into a shallow container and allow it to cool at room temperature for about 20 minutes. Cover the container and refrigerate for at least 3 hours, or for up to 3 days.
Churn ice cream:
When ready to churn your ice cream, make sure the base mixture is completely chilled. Pour the base into your ice cream machine and churn for 10 to 15 minutes, according to manufacturer’s instructions. You’re looking for a consistency that’s soft but thick, like frozen custard or soft serve ice cream.
Add the chocolate:
When ice cream is ready, with the mixer still running, add in the chocolate chunks and process until just combined.
Freeze until hard:
Scrape the ice cream into a loaf pan (or other freezer-safe container), and cover tightly with plastic wrap. Freeze for at least 3 hours to allow the ice cream to harden.
Before serving, allow ice cream to sit out on the counter until it’s soft enough to scoop, usually about 10 minutes.
| Nutrition Facts (per serving) | |
|---|---|
| 443 | Calories |
| 37g | Fat |
| 28g | Carbs |
| 5g | Protein |
×
| Nutrition Facts | |
|---|---|
| Servings: 4 to 6 |
|
| Amount per serving | |
| Calories | 443 |
| % Daily Value* | |
| 37g | 47% |
| Saturated Fat 30g | 151% |
| 0mg | 0% |
| 74mg | 3% |
| 28g | 10% |
| Dietary Fiber 3g | 10% |
| Total Sugars 17g | |
| 5g | |
| Vitamin C 1mg | 7% |
| Calcium 41mg | 3% |
| Iron 7mg | 40% |
| Potassium 429mg | 9% |
| *The % Daily Value (DV) tells you how much a nutrient in a food serving contributes to a daily diet. 2,000 calories a day is used for general nutrition advice. | |
Nutrition information is calculated using an ingredient database and should be considered an estimate. In cases where multiple ingredient alternatives are given, the first listed is calculated for nutrition. Garnishes and optional ingredients are not included.
Little kitchen shortcuts like a package of pre-cut butternut squash or storebought hummus give you a head-start on dinner and it’s a-ok to bask in these wins. Roast the squash alongside parsnips, red onions, and Brussels sprouts for a winter veggie medley that pairs well with any grain you like. Here, quick-cooking quinoa keeps this meal speedy, but this winter grain bowl would be just as fulfilling served with farro, millet, barley, or brown rice. Pro tip: Preheating your baking sheet before adding the cut vegetables promotes that crave-worthy caramelization.
Cook Mode
(Keep screen awake)
1 10-oz. pkg. fresh butternut squash, cut into 3/4-in. cubes
4 parsnips, peeled and cut into 3/4 in. cubes (about 2 cups)
8 oz. Brussels sprouts, trimmed and quartered lengthwise
1 small red onion
1/4 cup plus 2 Tbsp. olive oil, divided
2 tsp. kosher salt, divided
1 cup quinoa
3 cups fresh baby spinach
1 Tbsp. white balsamic or apple cider vinegar
1 tsp. Dijon mustard
1/2 cup hummus

Access to this page has been denied because we believe you are using automation tools to browse the website.
This may happen as a result of the following:
Please make sure that Javascript and cookies are enabled on your browser and that you are not blocking them from loading.
Reference ID: #1703e124-cb24-11ef-8d7e-57fa71f2b808


