Our recipes are for those looking to master the basics, the classics or the I’ve-never-cooked-this-before-but-really-want-to. We start with high quality foods to turn even the easiest weeknight meal into a creative, delicious expression. The kitchen is where we can stop to connect with the here and now, and bring recipes to life through our love of food.
Whatever Makes You Whole.
Recipes for Special Diets
Special Occasions and Holidays
Holiday Recipe Collection
Looking for menu inspiration? Explore our holiday recipe collection for all your favorite dishes and colorful twists.
Originally born in the Indian subcontinent in the olden days (like, very olden days, potentially 2600 BCE), curry has been reinterpreted through cultural diffusion into the traditions of many different cuisines. Each region offers different flavors from different spice mixtures, with varying textures and serving applications.
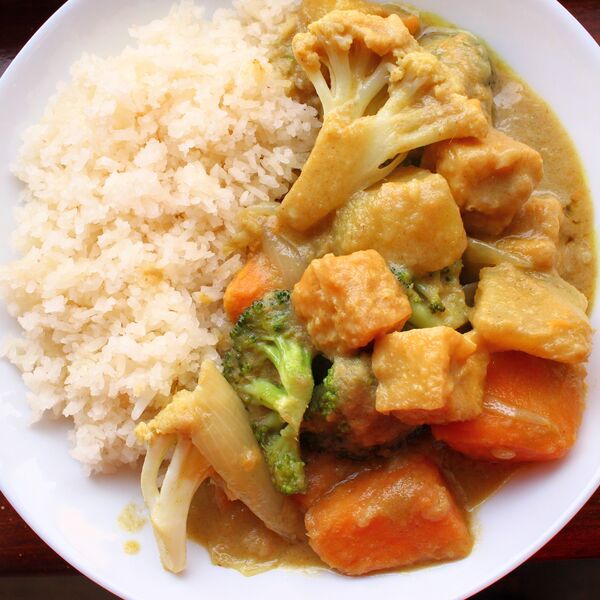
For this vegan curry, I went for ease, so that you can whip it up in under an hour for a fuss-free weeknight dinner. It’s by no means a “traditional curry,” and while I use Thai green curry paste in my version, I leave it up to you to choose what curry paste you might want to use, or have available to you. (See note below.)
Having said that, if you like your dishes super spiced and flavor-blasted, add in even more spices! You can add in fresh ginger, chili paste, cracked black pepper, or lime leaves to bump up those fragrant notes. It’s your dinner! Have fun with it!
I use five veggie elements here that soak up the curry sauce well: onion, sweet potatoes, broccoli, cauliflower, and fried tofu puffs. You can use whatever is in your fridge! Hardier vegetables like potatoes, parsnips, carrots, and kale will take longer to cook, while more fragile ones like bell peppers, tomatoes, and spinach will take less. If you’re looking to add in salad greens, wilt them in at the very end of the cooking process.
How much water goes into your pot is also up to you. For a looser, soupier curry, add more water; for a saucier, drier curry, add less. In summary, almost everything in this recipe is flexible!
If you’ve made this recipe, drop us a note down below in the comments and let us know how you cooked yours! For more ideas, check out these easy breezy weeknight dinner recipes.
Want more vegan recipes? Check out our new vegan dinners cookbook!
Advertisement – Continue Reading Below
2Tbsp.
extra-virgin olive oil
1
small onion, quartered
6
cloves garlic, thinly sliced
1/4cup
green curry paste (see note below)
2
sweet potatoes, peeled and diced into 1″ cubes
1
(14-oz.) can coconut milk
2
bird’s eye chilis (optional)
11/2cups
broccoli florets
11/2cups
cauliflower florets
1cup
fried tofu puffs
11/2cups
water, plus more as needed
Cooked rice or noodles, for serving
Step 1In a large pot over medium heat, heat oil. Add onion, garlic, and curry paste and stir until toasty and fragrant, about 3 minutes.
Step 2Add in sweet potatoes, coconut milk, and chilis (if using) and stir to combine. Bring to a simmer, then cover pot with a lid and let cook, stirring occasionally, until sweet potatoes are knife-tender, 12 to 14 minutes.
Step 3Stir in cauliflower, broccoli, tofu, and water, and cook until broccoli is vibrant green and tender, about 7 minutes. Add more water as needed to dilute sauce to desired consistency.
Step 4Serve with rice or noodles, if desired.
A note about curry paste: I think red and yellow curry pastes would work equally well, especially in combination with the rich coconut milk—I’d go so far as to say you can use Japanese curry blocks as a delicious substitute, or even dry curry powder. If using powder, decrease the 4 tablespoons of curry to just 3—the powder is often a bit more concentrated in its “spiceousness” and might be a tad too overpowering.
Free your mind. Prepare your taste buds for true gluten-free maple pumpkin deliciousness. Because this cake, my friend, is worthy of your attention. This cinnamon laced pumpkin spice cake is so fabulous, you’ll never believe it’s gluten-free.
Happy Fall!
Gluten-Free Pumpkin Spice Cake with Maple Icing
Ingredients:
Gluten-Free Pumpkin Cake:
3 extra large organic free-range eggs 2 cups organic light brown sugar, not packed 1/2 cup oil (you pick your favorite) 1 15-oz can cooked pumpkin (not the pumpkin pie blend- just plain canned pumpkin) 2 teaspoons bourbon vanilla extract 2 cups gluten-free flour mix* see notes 1 teaspoon baking soda 1 teaspoon baking powder 2 teaspoons ground cinnamon 1 teaspoon gluten-free Pumpkin Pie Spice 1/2 teaspoon sea salt Maple Cream Cheese Icing:
8 oz. softened cream cheese or vegan cream cheese 3-4 tablespoons softened unsalted butter or vegan margarine 3 to 4 tablespoons pure maple syrup 1 1/2 teaspoons bourbon vanilla extract 3 cups GF powdered sugar (more, if needed)
Instructions:
1. Preheat oven to 350ºF. Line a 10 x 13″ baking pan with greased parchment paper.
2. Beat the eggs in a large mixing bowl till light and frothy; add the brown sugar, beat till smooth; add the oil, pumpkin, and vanilla; beat to combine.
3. In a separate bowl, whisk together the dry ingredients (the GF flour mix through sea salt). Add the dry ingredients into the wet mixture a little at a time and beat to combine- for two minutes.
4. Pour the batter into the prepared baking pan. Bake in a pre-heated oven for 30 minutes, or until the cake is firm and a wooden pick inserted into the center emerges clean.
5. Cool on a wire rack while you make your icing.
6. For the Cream Cheese Icing: beat until the cream cheese and butter until fluffy. Add 3 tablespoons of the maple syrup, and vanilla. Add in the powdered sugar a cup at a time; beat till smooth. Add another tablespoon maple syrup, if needed. Add more sugar, if needed.
7. When the cake is cool, frost with the Maple Cream Cheese Icing. Sprinkle with finely chopped pecans or walnuts, if desired. For nut-free, skip the nuts.
Yields 15 pieces.
Store cake chilled. Wrap and freeze leftovers after 2 days for best taste and texture.
Recipe Notes
My GF flour mix changes from recipe to recipe. For this cake I used my standard baking mix – 1 cup sorghum flour (or brown rice flour) + 1/2 cup buckwheat flour + 1/4 cup tapioca starch + 1/4 cup quinoa flour. Quinoa flour has a strong, nutty taste that compliments pumpkin and spice. Almond flour also works well instead of the quinoa flour. [See comments below for more discussion on baking with various flours.]
In the beginning of my gluten-free journey- starting way back in 2001- I often used Pamela’s Ultimate Baking & Pancake Mix as my all-purpose GF flour mix. It works well in this recipe. I used a simple vanilla icing, and sprinkled sweetened flaked coconut on top.
To make sweets for future treats: This pumpkin cake freezes quite well. I place the whole frosted cake into the freezer for about 20 – 30 minutes before slicing and wrapping individual pieces (this chills the frosting a bit so it doesn’t stick as you slice and wrap). I store the wrapped pieces in a zip-sealed freezer bag.
To keep this scrumptious cake dairy-free use dairy-free frosting or vegan cream cheese and buttery spread, or organic coconut oil, or Spectrum Organic Shortening; and add an extra teaspoon or two of vanilla extract.
Reader Christine reports she made this recipe as cupcakes- with much success. She said it took about 20 minutes for the cupcakes to bake.
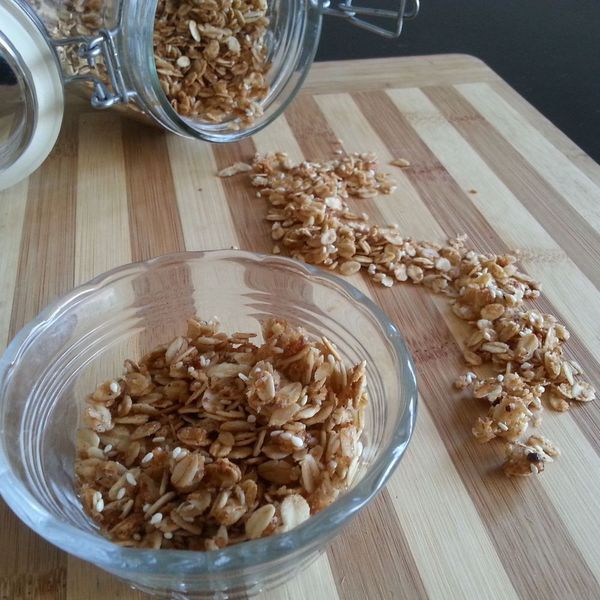
Simple, crunchy granola with a middle eastern flair. Not overly sweet and no overly big clusters. —valeria13pg
Ingredients
1 1/2 cups
rolled oats (I tend to go for big flakes)
1/4 cup
wheat germ
1/4 cup
shredded unsweetened coconut
1/4 cup
raw sesame seeds
1/2 teaspoon
cinnamon
4
cardamom pods, inner part (can be substituted for 1/3 tsp of ground cardamom)
Pinch
salt
2 1/2 tablespoons
neutral flavored oil (I used corn)
1 tablespoon
sesame oil (can be substituted with regular oil)
2 1/2 tablespoons
honey (sub in some maple syrup to make it vegan)
2 1/2 tablespoons
sugar
2 1/2 tablespoons
orange blossom water
Directions
Preheat oven to 325 degrees F and prepare a baking tray with parchment paper or a non stick mat.
Sauté in a pan the dry ingredients excluding the sugar (i.e. oats, wheat germ, coconut, sesame seeds, spices and salt). Once it’s fragrant, remove oat mix from pan and keep in a bowl on the side.
Note: I’ve also made it with ground flax seeds in place of the wheat germ and it turned out great as well (I do however prefer the milder taste of the wheat germ over the flax).
Turn the heat to low and warm in the pan the oils, sugar, honey and orange blossom water. Once it starts sizzling pour in the dry ingredients, mix and sauté for about 2 minutes.
Note: I used white refined sugar because that’s what I had at hand, if you try it with a different type please let me know how it works out (:
Spread the granola mixture on the tray and bake in the oven for 10 minutes. Remove from the oven to stir it and make sure the edges don’t burn (I typically bring the part baking on the edges into the middle of the tray and move what was baking in the middle onto the edges). Turn the oven to 350 degrees F and continue baking for an additional 5 – 10 minutes.
Remove the tray from the oven and let the granola rest until dry. At this stage, feel free to mix in some nuts and/or dried fruit (my favorite is sliced almonds lightly toasted on the pan and candied orange peel —if I haven’t devoured it already—). Store in an airtight container.
Pounding the aromatics in a mortar and pestle develops more flavor than simply blending them.
Toasted, pounded peanuts give a deeper, nuttier flavor than peanut butter without the cloying sweetness.
There were a lot of things I did and learned at the band camp* I attended throughout my youth, only some of them related to music, and most of them things I don’t care to expand on in mixed company. One thing I can talk about: our cook Glenn’s West African groundnut soup. Glenn’s version was a thick, peanut-packed broth made with chicken, but recipes for maafe (as it’s called in Mali) vary hugely. Some are soupy, some more stewy. Some feature chicken, some cabbage. Maafe can be heavily spiced with turmeric and chiles, or not spiced at all. The only common factor that ties the different versions together is the heavy use of peanuts and peanut butter in the soup base.
*OK, it was technically chamber music camp, which, if anything, is even dorkier.
I love it when recipes vary like this, as it gives me free rein to fiddle with it as much as I’d like without fear that I’m going to create something unrecognizable. My focus, then, is just on making a dish that’s totally delicious, that pulls as much flavor as it can out of its ingredients for results that are rich, satisfying, and, in this case, vegan.
I may have gone a little off the deep end here. Let me know if I lose you along the way.
Grinding the Nuts
Most recipes for the dish start with sautéing aromatics in a pot, adding tomatoes, stock, and peanut butter, then simmering it all with vegetables or meat. After trying out a few recipes that call for jarred peanut butter, I decided that the very first step I’d take would be to ditch it in lieu of actual peanuts. This offers a few advantages.
First, it allows you to control the degree of toasting on the nuts. Toasting the peanuts in oil until quite dark gives the stew a more savory, complex flavor than peanut butter alone. Second—and this is important—using peanuts allows you to control the level of sweetness. Commercial peanut butters are extremely sweet, and that sweetness comes out as cloying in the finished dish.** Third, it gives you more control over the finished texture.
** If you live near a grocery store that will grind nuts for you or have access to a brand of peanut butter with no added sugar that you enjoy, that’ll work too, but then you lose the pleasure of grinding up your own nuts. It’s surprisingly therapeutic!
Next was the question of how to add the peanuts to the soup. I tried just simmering them then puréeing the whole mixture in a blender or with an immersion blender, but I found it hard to get the texture right: I ended up with very smooth soup and the occasional large chunk of peanut.
It worked much better to pound the peanuts to a very rough paste in a mortar and pestle first, thus guaranteeing that I have a maximum peanut-chunk size. Subsequently blending it into the broth produced a soup that was pleasantly textured but not overly chunky.
With the mortar and pestle already out on my counter, I then started considering other ways I might use it to improve flavor.
As I found when working on my guacamole recipe and Daniel re-confirmed with his pesto tasting and testing, pounding ingredients with salt in a true mortar and pestle is the best way to extract flavors out of aromatics, producing more flavorful dishes than a blender, food processor, or hand-chopping ever could. The salt helps to draw out liquid via osmosis while the intense grinding action of the heavy mortar bursts more cells open, releasing more flavor than slicing and chopping do.
For my aromatic base, I used a combination of garlic, ginger, and Serrano peppers for heat. This is where things started to get just a bit wacky. While grinding up my aromatics, I couldn’t help but think: garlic, ginger, and chiles? Seems an awful lot like the beginnings of a good bowl of Thai khao soi! Would some of the other Thai flavors work in this soup? I threw a handful of fat cilantro stems (my go-to substitute for the cilantro root that’s typically called for) into the pestle and got to grinding.
Turns out it works. Very well.
I knew I was going to eventually blend the soup further and that I wanted some texture in it, so I wasn’t too concerned about pounding the aromatics into a completely smooth purée.
Twice as Nutty
OK, I thought to myself. My soup is a little nutty right now, but it needs to be at least… twice as nutty. Literally.
I already had mixed a few Thai flavors and techniques into the soup, so adding one more couldn’t hurt, right? It’s not uncommon in maafe recipes to stir a can of coconut milk into the soup as it cooks. Instead of simply adding the milk, I decided to separate the fat and use it to bloom my aromatic paste, which helps develop the paste’s flavor.
Serious Eats / J. Kenji Lopez-Alt
To make this happen, you need a can of full-fat coconut milk that has not been shaken or inverted recently. Open up the top and you’ll find a hard layer of coconut fat solidified on the top of that can which you can simply scoop out with a spoon.
Serious Eats / J. Kenji Lopez-Alt
This coconut fat is actually an emulsion of fat, water, and coconut solids. You can heat it in a Dutch oven and as it warms and water evaporates, it will eventually break, turning into a clear fat with bits of coconut solids floating in it. I always add a bit of additional vegetable oil to the pot to help the fat break down faster and prevent the coconut solids from burning before the emulsion has had a chance to fully break.
Once that emulsion is broken, the coconut solids will begin to sizzle. This is when you have to start stirring and keeping a careful eye on the pot—those solids can go from perfect to burnt in the blink of an eye. As is often the case with cooking, golden brown and nutty is the look you’re going for. At the moment that you hit that stage, add the curry paste and stir like crazy—you’ll simultaneously develop the flavor of the aromatics and drop the temperature of the coconut fat enough to prevent the coconut solids from burning.
If I were following a more traditional recipe, I’d start adding some ground dry spices and fresh tomatoes at this point. But with so much stuff already going on with the Thai additions, I found that anything more than a small dash of turmeric and some sliced fresh scallions was overkill. Aside from that, I added the rest of the first can of coconut milk and a second can along with some vegetable stock.
Going for Bulk
We’re getting close to the end now. I had my soup base, so now it was time to bulk it up. Sweet potato is a very common addition and I really liked the way it added sweetness, texture, and bulk to the soup, so I saw no reason to deviate from it.
I dropped in a couple of diced sweet potatoes along with the pounded peanut mixture before letting it simmer until tender. After that I puréed it right in the pot with an immersion blender (a standing blender or, in fact, no blender at all—if you don’t mind it very chunky—works just as well).
Serious Eats / J. Kenji Lopez-Alt
The final addition? A bunch of kale, because, despite its reputation as an overused vegetable, it’s still healthy, hearty, great in soups, and most importantly, totally delicious.
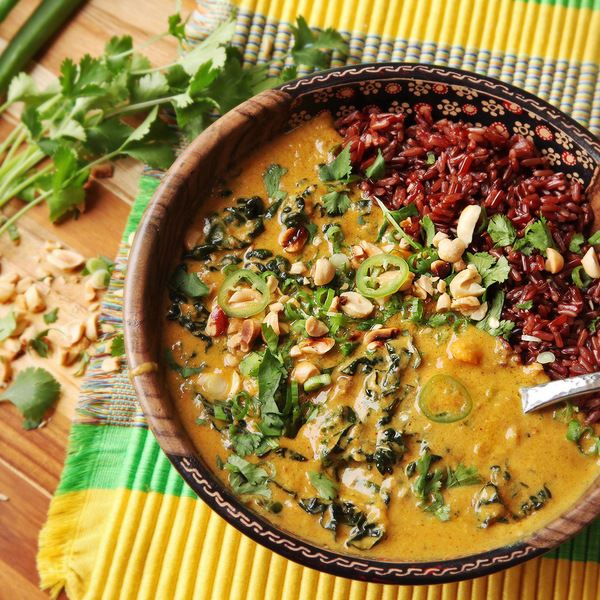
You can simmer it down as much as you’d like. I personally prefer it somewhere between a soup and a sauce so that I can serve it with rice (nutty husk-on brown, red, or black rice tastes particularly good here) and mix it all together in the style of an Indian curry. (Yes, we’re visiting three countries today.)
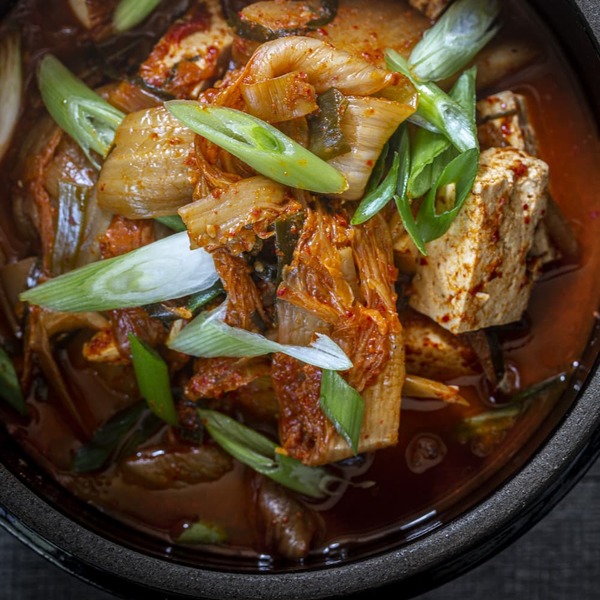
The soup is fantastic reheated the next day for a lazy supper, but I strongly suggest that you at least garnish it with some fresh elements to add more texture and flavor—chopped cilantro, sliced scallions, sliced chiles, and lightly crushed toasted peanuts.
Serious Eats / J. Kenji Lopez-Alt
If a bowl of West African peanut soup and a bowl of khao soi were to engage in a bit of late-night cross-cultural band camp-style shenanigans, this soup would be the deliciously illicit love child of that summertime fling. And I know. I’m very messy with the way I scatter those peanuts on top and get them all over the table and tablecloth. I don’t want to hear any guff about it. If there was one other thing I learned in band camp, it was when to keep my mouth shut.
Actually, that’s a particular skill I’m still learning (along with saying enough is enough when it comes to fiddling with recipes).
March 2016
Vegan Peanut, Sweet Potato, and Kale Soup With Coconut Recipe
Cook Mode (Keep screen awake)
6mediumcloves garlic
11/2-inch knob of ginger, peeled and roughly chopped
1 small bunch cilantro (about 1 1/2 ounces; 45g), thick stems reserved separately from leaves and tender small stems
1 Serrano or jalapeñochile, stemmed and halved, divided
Kosher salt
2 (14-ounce; 400ml) cansfull-fat coconut milk (see notes)
2 tablespoons vegetable oil, divided (90ml)
6scallions, whites and pale green parts only, thinly sliced, divided
1teaspoonground turmeric
1quartwater or homemade vegetable stock (see notes)
8 ounces sweet potatoes, peeled and cut into 1/2-inch dice (about 2 small sweet potatoes; 225g)
Rice, for serving (I like using red or black rice)
Combine garlic, ginger, thick cilantro stems, and half of the chile in the bowl of a mortar and pestle (see notes). Sprinkle with about 1 teaspoon of salt. Pound into a rough paste and set aside. Thinly slice remaining half chile and set aside for garnish.
Open 1 can of coconut milk and carefully spoon off about 3 tablespoons of the solid fat from the surface and place it in a large Dutch oven. Add 1 tablespoon of vegetable oil. Heat over medium-high heat, stirring frequently, until coconut fat separates and solids start to sizzle, about 4 minutes. Continue cooking, stirring constantly, until solids turn pale golden brown, about 1 minute longer. Add the pounded garlic/ginger mixture and cook, stirring, until aromatic, about 30 seconds. Add half of sliced scallions and turmeric and cook, stirring, until lightly softened, about 1 minute.
Add remaining contents of both cans of coconut milk along with 1 quart of water or stock. Add sweet potatoes. Bring to a boil, and reduce to a bare simmer. Cook until sweet potatoes are totally softened, about 15 minutes.
Meanwhile, combine peanuts and remaining tablespoon of oil in a medium skillet set over medium heat. Cook, tossing and stirring frequently, until peanuts are a deep golden brown, about 8 minutes. Immediately transfer to a bowl to prevent scorching.
Transfer 1/2 cup of peanuts to a cutting board and roughly chop. Reserve for garnish. Transfer half of the remaining peanuts to the now-empty mortar and pestle. Sprinkle with 1 teaspoon sugar and a pinch of salt. Pound to form a rough paste, then transfer to pot of soup. Repeat with the other half of the remaining peanuts.
When potatoes are fully softened, blend soup until mostly smooth but a little texture remains using a hand blender directly in the pot or by transferring to a countertop blender in batches. Bring to a simmer, stir in kale, and cook until kale is completely wilted and tender, about 5 minutes. Stir in lime juice. Season soup to taste with salt, pepper, and hot sauce. Stir in cilantro, reserving some for garnish. Serve soup with rice, sprinkled with cilantro, chopped peanuts, scallions, and sliced chiles.
Special Equipment
Mortar and pestle, immersion blender or countertop blender.
Notes
Do not shake the cans of coconut milk before opening them, as you want the fat inside to remain separated.
Do not use store-bought vegetable stock; if you don’t have homemade on hand, use water or a high-quality vegetable base like Better Than Bouillon vegetable base, diluted according to manufacturer’s instructions.
A heavy-duty granite mortar and pestle will give you better flavor than a food processor or mini chopper, but a food processor can be used in place of a mortar and pestle if you do not own one.
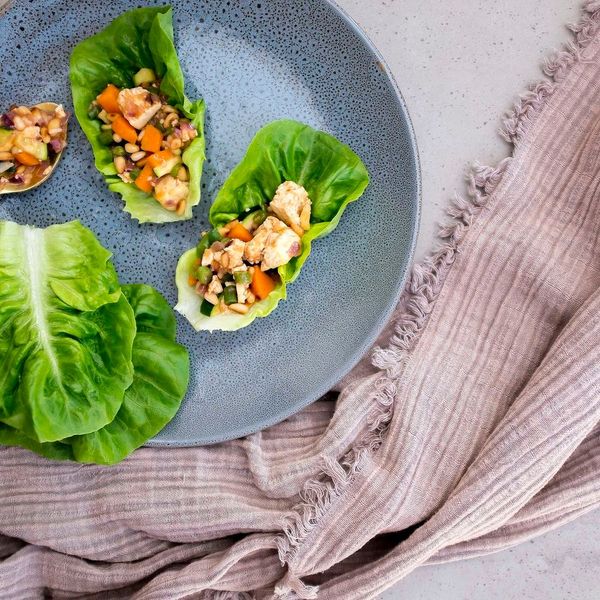
Cut the tofu into 6-8 even-sized pieces and bake in the oven for 20 minutes.
While tofu is in the oven, gently toast the pine nuts in a wide-based saucepan. Set aside.
Add dry sherry, soy sauce, rice wine vinegar, hoisin sauce and sriracha into a small bowl and whisk. Add arrowroot and mix until combined. Set aside.
Remove tofu from oven and let cool. Once cooled, use your hands to break up/crumble the tofu.
Heat some oil in a saucepan and add the onions. Saute for 10 minutes before adding the garlic and ginger. Once browned and fragrant, add carrot, zucchini and green beans and cook a further 5-8 minutes.
Add the tofu crumbles and pine nuts before adding the sauce ingredients to the pan. Cook until sauce thickens – approx. 5 minutes.
Think vegan desserts are out of your reach? Think again. While this recipe is a little time intensive, it feels much easier if you make the creamy chocolate filling a day or two ahead of time. You can also make the cake a day ahead of time, and then simply assemble it and make the ganache the day you’ll be serving. —Gena Hamshaw
Test Kitchen-Approved
Ingredients
Vegan chocolate layer cake
3 cups
all-purpose flour
2/3 cup
cocoa powder
2 teaspoons
baking soda
3/4 teaspoon
salt
2 tablespoons
apple cider vinegar
2 cups
almond, rice, or soy milk (I used soy)
2/3 cup
melted coconut oil
2 teaspoons
vanilla extract
1 3/4 cups
organic sugar
Creamy Chocolate Filling and Ganache
1 cup
pumpkin puree
1/4 cup
cocoa powder
1/4 cup
maple syrup
3 tablespoons
almond or cashew butter
6 ounces
bittersweet chocolate, chopped finely
1/2 cup
coconut milk
2 tablespoons
maple syrup
Directions
Vegan chocolate layer cake
Preheat your oven to 350° F.
Sift together the flour, cocoa, baking soda, and salt. Place these dry ingredients in a large mixing bowl.
Add the apple cider vinegar to the milk and beat until it’s frothy. Whisk in the oil, vanilla, and sugar.
Add about a third of the wet ingredients to the dry ingredients and mix them together (you can use a spatula, whisk, or a hand mixer on the lowest setting). Add another third, keep mixing for a few moments, and then add the final third. When ingredients are just fully incorporated, stop mixing.
Pour the cake batter into two round, 8 or 9-inch springform cake pans that have been greased with coconut oil. Bake for twenty-five minutes, or until a toothpick inserted into the center of the cake is clean. Allow the cakes to cook completely.
Creamy Chocolate Filling and Ganache
To make the creamy chocolate filling: Use a food processor to process the pumpkin, cocoa, maple syrup, and almond or cashew butter till smooth. Set aside.
To make the ganache: Stir the milk and syrup together in a small saucepan and bring to a gentle boil. Pour this mixture over the chocolate and stir until all of the chocolate is melted. Allow to cool to room temperature.
To assemble the cake: remove the cakes from their pans. Place one onto your cake stand and gently shave the rounded top off of it with a sharp knife. Spread the creamy filling over this layer. Gently place the other cake over it. Pour the ganache over the cake. Transfer to a refrigerator to set for an hour. Serve.
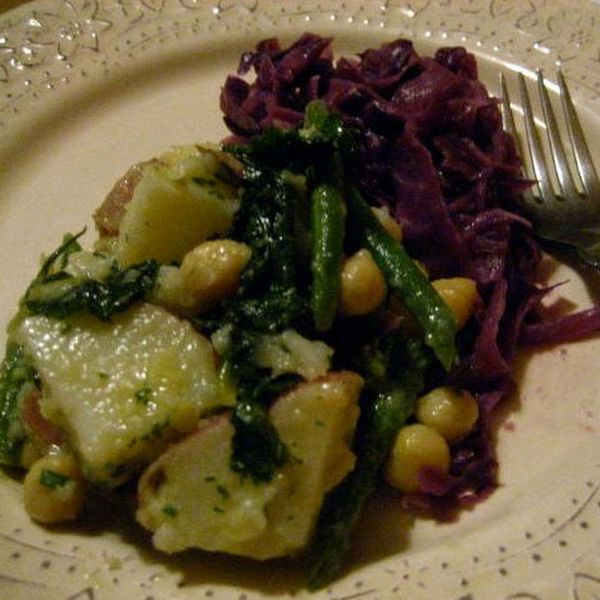
This is an easy dish to prepare and a tasty dish to enjoy. My German by birth friend said it reminded her of home. —MsShanaRobinson
Ingredients
2
small onions, thinly sliced with the grain (saute slice)
1
small head red cabbage, core removed and thinly sliced
1
granny smith apple, thinly sliced
1 tablespoon
dijon mustard
1 tablespoon
tahini
1/4 cup
apple cider vinegar
1 cup
veggie stock
salt, to taste
2 tablespoons
extra virgin olive oil or 1/4 cup veg stock to saute
Directions
Heat a high sided skillet over medium heat. Sprinkle bottom with salt and heat for one minute to create a non-stick effect. Add oil or stock and heat for 30 seconds.
Add onions and cook until translucent, about 5 minutes. Add cabbage, stir in and let wilt slightly, about 3-4 minutes. Add apple and a pinch of salt, stir to combine.
Add mustard, ground mustard, tahini and apple cider vinegar. Mix in. When thoroughly mixed, add stock and and pinch of salt. Bring to a boil. When boiling, reduce to a simmer and cook covered for about 15 minutes.
Remove cover and continue to cook, stirring occasionally until liquid is reduced to almost nothing and cabbage is very soft.
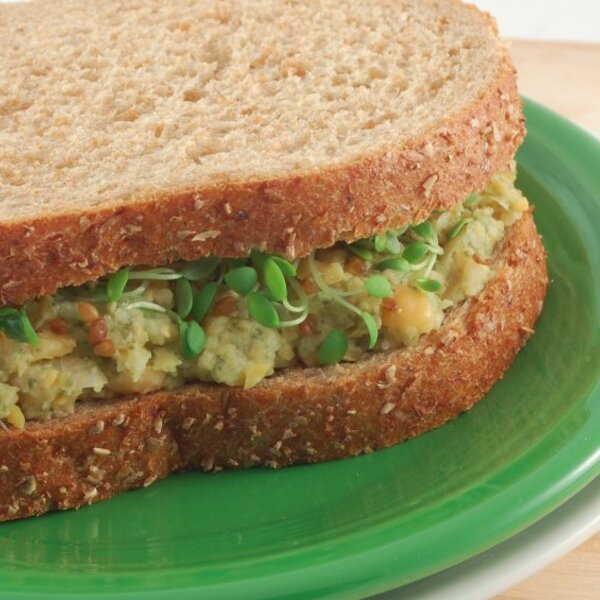
The Happy Herbivore’s Easy, Mock Tuna Salad Recipe
Who knew mashed up chickpeas could taste just like tuna salad? It’s amazing how this sandwich tastes like the real thing.. except without the fish, mercury, cholesterol and preservatives… It’s the healthiest and tastiest TuNo around!


/f8d012df-823e-4551-b4cd-5dbd03271a3a--20150203_082052.jpg)


/e9f25507-5c20-4437-9529-38fb0528c80e--Scb_made_HERO_r.jpg)


/f14ecf39-8aa5-414b-9d70-936fbe02face--2013-0924_gena_vegan-chocolate-cake-005.jpg)

/91236096-02df-4422-9104-fa98fdc9f419--IMG_3022.jpg)