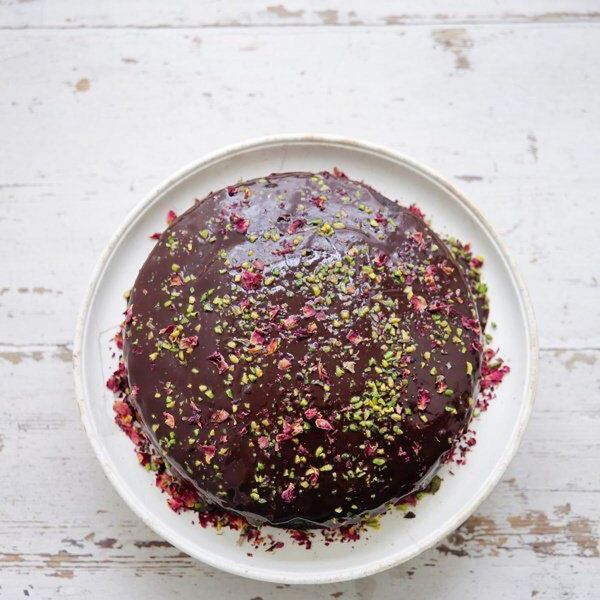
This recipe comes from Nigella Lawson and is a part of Food52’s Bake Off benefitting No Kid Hungry. It’s her chocolate cake of choice for people where dietary restrictions are not an issue. “I don’t even need to explain it’s vegan,” she says. “No need to offer explanations. You just need to offer the cake. On top of everything else, it’s incredibly simple to make.”
FREEZE NOTE: The cake can be made ahead and frozen, without icing. When cool, carefully wrap cake in a double layer of clingfilm and a layer of foil. Freeze for up to 3 months. To defrost, unwrap and place on a serving plate at room temperature for 3–4 hours. —Food52
Test Kitchen-Approved
Ingredients
FOR THE CAKE
1 1/2 cups
all-purpose flour
1 1/2 teaspoons
baking soda
1/2 teaspoon
fine sea salt
1 1/2 teaspoons
instant espresso powder
3/4 cup
unsweetened cocoa
1 1/2 cups
soft dark brown sugar
1 1/2 cups
hot water from a recently boiled kettle
6 tablespoons
coconut oil (90ml)
1 1/2 teaspoons
cider vinegar or white wine vinegar
1 tablespoon
edible rose petals
1 tablespoon
chopped pistachios
FOR THE ICING
1/4 cup
cold water
5 tablespoons
coconut butter (this is not the same as oil)
1/4 cup
soft dark sugar
1 1/2 teaspoons
instant espresso powder
1 1/2 tablespoons
unsweetened cocoa
6 ounces
bittersweet chocolate (min. 70% cocoa solids, see Intro), finely chopped
Directions
Start with the icing, though first preheat the oven to 350°F/180°C and pop in a baking sheet at the same time. Put all of the icing ingredients except the chopped chocolate into a heavy-based saucepan and bring to the boil, making sure everything’s dissolved. Then turn off the heat—but leave the pan on the hob—then quickly add the finely chopped chocolate and swirl the pan so that it is all underwater, so to speak. Leave for a scant minute, then whisk until you have a darkly glossy icing, and leave to cool. I find this takes exactly the amount of time the cake takes to make, cook, and cool. But do give the icing a stir with a spatula every now and again.
Line the bottom of your springform cake tin (you will need a good, leakproof one as this is a very wet batter) with baking parchment.
Put the flour, bicarb, salt and instant espresso, and unsweetened cocoa in a bowl, and fork to mix.
Mix together the sugar, water, coconut oil, and vinegar until the coconut oil has melted, and stir into the dry ingredients, then pour into the prepared tin and bake for 35 minutes. Though do check at the 30–minute mark to see if it is already done.
When it’s ready, the cake will be coming away from the edges of the tin and a cake tester will come out clean, apart from a few crumbs. This is a fudgy cake and you don’t want to overdo it.
Once the cake is cooked, transfer the tin to a wire rack and let the cake cool in its tin.
Turn to your icing, and give it a good stir with a spatula to check it is at the right consistency. It needs to be runny enough to cover the cake, but thick enough to stay (mostly) on the top. So pour over the unmoulded cake, and use a spatula to ease the icing to the edges, if needed.
If you wish to decorate, now is the time to do it. In which case, sprinkle joyously with rose petals and chopped pistachios or anything else that your heart desires; otherwise, leave it gleaming darkly and, indeed, sumptuously. Leave to stand for 30 minutes for the icing to set before slicing into the cake.
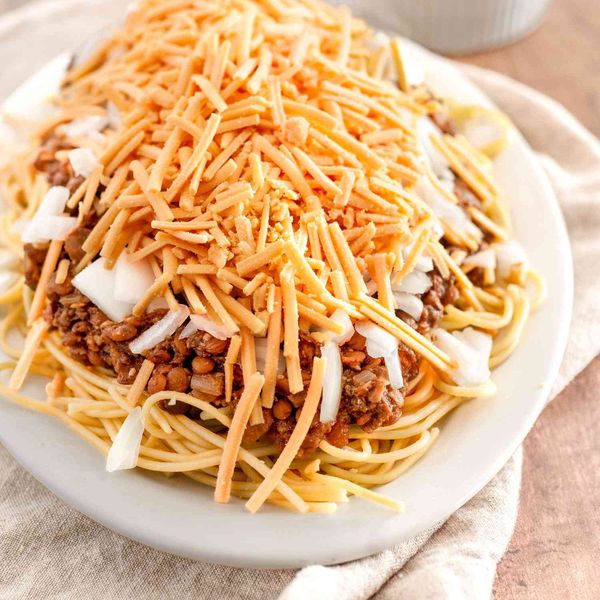
Lentils and meaty minced mushrooms stand in for ground beef in this plant-based spin on a Queen City treasure.
Updated February 08, 2024
Simply Recipes / Alison Bickel
Our Cincinnati chili recipe has a life of its own, with people all over North America sharing comments about how they make theirs–whether they are Queen City natives or have never set foot in a chili parlor before.
Cincinnati chili is one of my favorite comfort foods, and it’s easily veganized in this version with lentils and mushrooms standing in for the meat. It’s a reasonably healthful budget recipe with tons of leftovers. Serve it over spaghetti for a dinner that’ll stick to your ribs and leave you smiling. Now we’re talkin’!
Simply Recipes / Alison Bickel
What Makes Cincinnati Chili Special?
In a word, meat and spices. Traditional Cincinnati chili is made with lots of ground beef and has no beans in the chili, though they are occasionally served on top. As for the spices, they go beyond chili powder and cumin, including allspice, cinnamon, and cloves. The combination of spices reflects the Greek and Macedonian background of the owners running the working-class diners where this highly regional recipe originated in the 1920s.
This version stacks up admirably against its meaty predecessors. Cincinnati-based food historian Dan Woellert wrote a whole book called The Authentic History of Cincinnati Chili that’ll give you the inside scoop if you really want to know more.
Making It Vegetarian AND Vegan
To replace the beef, a mix of minced mushrooms and hearty lentils provides substance and flavor. You’ll also want to make sure your obligatory splash of Worcestershire sauce is vegan—many brands contain anchovies.
For many, shredded cheese is an important topping (see more below). Vegans can go cheeseless and this chili will still be delicious, but if you go with plant-based cheddar, get the finest shreds you can for maximum authenticity. The thin strands of cheese melt yieldingly into the chili, mitigating the heavy-handedness of the spices. As far as vegan shreds go, I find Kroger’s Simple Truth Plant-Based Cheddar Style Shreds to be the closest thing.
Now all we need is to develop a vegan goetta recipe and we’ll have all our bases covered.
Simply Recipes / Alison Bickel
The “Ways” of Cincinnati Chili
If you walk into a chili parlor (as those in Cincinnati refer to independent restaurants that serve this chili), you’ll see combinations referred to as “ways.” Set toppings out when you serve your chili and, as Fleetwood Mac might say, you can go your own way.
2-Way: Chili + spaghetti
3-Way: Chili + spaghetti + finely shredded cheddar cheese
5-Way: Chili + spaghetti + red kidney beans + diced onions + finely shredded cheddar cheese
Other Ideas for Serving Cincinnati Chili
Cincinnatians have major opinions about their chili, but they also often approve of getting creative. Besides, chili police only exist in internet comments.
A Coney dog is chili over a hot dog with onions and cheese. Use your favorite plant-based hot dog and vegan cheddar shreds.
Wrap it in a burrito, which is not unheard of, as Cincinnati’s famous Skyline Chili has “chilitos” on its menu at all times.
Top a baked potato.
Make Cincinnati chili cheese fries.
Fill a chili-cheese omelet. Since eggs are not vegan, you can use a scramble-able egg replacer like Just Eggs.
Simply Recipes / Alison Bickel
Beans and Lentils Galore
Easy Vegetarian Chili
Spicy Vegetarian Chili
Vegan Sloppy Joes
Smoky Vegan Lentil Stew
Refried Black Beans
Most mainstream Worcestershire sauces contain anchovies and are not vegan. Check the label to make sure it’s vegan. For an easy substitute, use soy sauce spiked with a little molasses.
Kidney beans are served on the chili as part of a 5-Way in Cincinnati, but I prefer to skip that topping, since the lentils in this chili contribute plenty of legume power on their own.
To use plant-based ground meat, such as Beyond Beef or Impossible Burger, omit the mushrooms and lentils. Use 24 ounces of plant-based meat crumbles, adding them in Step 2.
Cook Mode (Keep screen awake)
For the chili
16ounces sliced cremini mushrooms
1 (6–ounce) can tomato paste
5cupswater
1 (8–ounce) can tomato sauce
1 large yellow onion, minced (about 3cups)
6cloves garlic, minced
3tablespoonschili powder
1teaspoonground cumin
1teaspoonground cinnamon
3/4teaspoonground allspice
1/4teaspoonground cloves
1/2teaspooncayenne pepper
2teaspoonskosher salt, plus more to taste
2tablespoons vegan Worcestershire sauce (see recipe note)
1 1/2cupsbrown or green lentils (preferably French green lentils du Puy; do not use red lentils)
1tablespoonapple cider vinegar
1/2ounce chopped unsweetened chocolate, optional
For serving
Oyster crackers
Finely shredded plant-based cheddar
Minced yellow onion
Hot cooked spaghetti
Mince the mushrooms:
In two batches, pulse the mushrooms in a food processor until they are finely minced. Be mindful not to go too far, or they’ll turn to mush. Alternatively, you may grind the mushrooms in a food grinder or mince them by hand with a knife and cutting board. Set the mushrooms aside.
Cook the tomato paste:
Heat a large, heavy-bottomed pot or Dutch oven over medium-high heat. Add the tomato paste to the dry pot and cook, constantly scraping the bottom with a wooden spoon or silicone spatula, until the tomato smells rich and toasty, and you start to see browned, but not burned patches in the bottom of the pot. This should take 1 to 3 minutes.
Simply Recipes / Alison Bickel
Add the spices, lentils, and mushrooms:
Add the water, which will help keep the tomato paste from scorching. Stir well, scraping the bottom to free any stuck-on paste.
Add the tomato sauce, onion, garlic, chili powder, cumin, cinnamon, allspice, cloves, cayenne pepper, salt, Worcestershire sauce, lentils, and minced mushrooms. Mix them together into a sludge.
Simply Recipes / Alison Bickel
Simply Recipes / Alison Bickel
Cook for at least 1 hour:
Bring to a simmer over medium-high heat, stirring frequently.
Reduce the heat and continue to gently simmer, uncovered, until the lentils are tender but not falling apart. How long this will take will depend on the type and age of the lentils you are using.
Stir the chili often. You want the volume to reduce, but add water if needed so the lentils can cook through. When the chili reaches its ideal consistency, there will be bubbles slowly gurgling up like lava, and a spoon will leave a trail when you drag it through the chili.
Simple Tip!
Once the lentils are cooked, you can keep the chili cooking on the lowest heat possible for another hour or so to help the flavors meld.
Add the vinegar and chocolate:
Add the vinegar and chocolate, if using. Let sit for 10 minutes, then taste and adjust seasonings if needed.
Tip
The chocolate is not a traditional ingredient, but in this vegan version I like the small amount of fat and earthiness it adds.
Pulse with an immersion blender:
To break up the lentils and get a more convincing Cincinnati chili texture, stick an immersion blender in the pot and pulse it a few times.
Simply Recipes / Alison Bickel
Serve:
Serve as desired: over spaghetti, over a Coney dog, or in a bowl. Top with the combo of toppings that speaks to you.
Vegan Cincinnati chili will keep refrigerated for up to 1 week or frozen for up to 1 year.
Did you love the recipe? Give us some stars and leave a comment below!
Simply Recipes / Alison Bickel
Nutrition Facts (per serving)
147
Calories
2g
Fat
28g
Carbs
8g
Protein
×
Nutrition Facts
Servings: 8
Amount per serving
Calories
147
% Daily Value*
2g
3%
Saturated Fat 1g
4%
0mg
0%
615mg
27%
28g
10%
Dietary Fiber 7g
27%
Total Sugars 10g
8g
Vitamin C 13mg
66%
Calcium 80mg
6%
Iron 4mg
22%
Potassium 967mg
21%
*The % Daily Value (DV) tells you how much a nutrient in a food serving contributes to a daily diet. 2,000 calories a day is used for general nutrition advice.
Nutrition information is calculated using an ingredient database and should be considered an estimate. In cases where multiple ingredient alternatives are given, the first listed is calculated for nutrition. Garnishes and optional ingredients are not included.
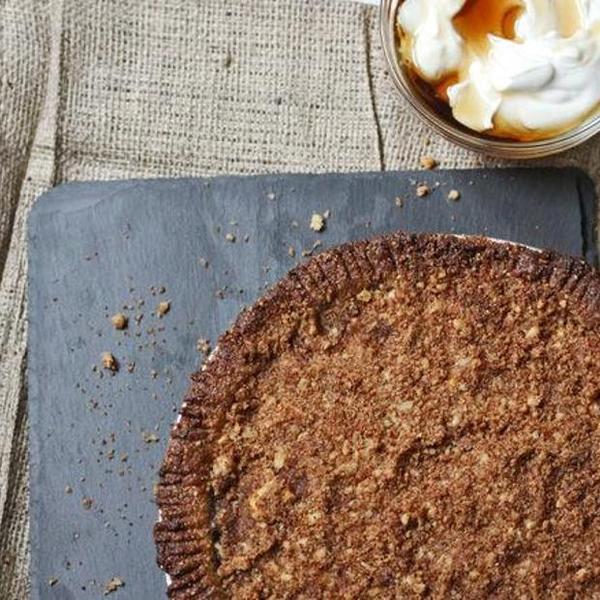
Pie is my favorite dessert of all time. I love to make pie just as much as I love to eat it. Usually in my kitchen, I like try to keep things as healthy as possible by omitting things like butter and gluten, however, when it comes to pie crust …. I let it slide, because I really do love a traditional butter crust. I have made this same crust using vegan butter and regular butter, so I gave the option here, since it works out the same. It really just depends on your tastes and preferences. I am a big fan of adding savory herbs to sweet baked dishes. This time of year, sage really brings out the fall-ness of a dish, but you could also experiment with other herbs such as thyme or rosemary.
—Jodi Moreno
Test Kitchen-Approved
Ingredients
Pie Crust and Filling
8 tablespoons
butter (regular unsalted or vegan butter)
1 1/2 cups
white flour
1/2 teaspoon
salt
2 tablespoons
ice-cold vodka (optional but recommended)
Ice water
Zest of 1 lemon
2 tablespoons
lemon juice
4
apples, peeled, cored, and diced
4
pears, peeled, cored, and diced
1/3 cup
coconut palm sugar
2 tablespoons
arrowroot (or cornstarch)
8
sage leaves, minced
Topping and Yogurt
1 cup
finely chopped walnuts
1 cup
rolled oats
1/2 cup
maple syrup
Pinch of salt
1 cup
plain Greek yogurt
3 tablespoons
honey
1/4 teaspoon
salt
Directions
Make the pie crust: Prepare to make the crust by cubing the butter and placing it in the freezer for 20 to 30 minutes. Also, in a medium-sized mixing bowl, mix together the flour and salt and place it in the freezer for about 10 to 20 minutes.
Then, prepare your ice water by placing a cup of water in a bowl with ice. Remove the flour mixture and butter from the freezer, place the butter into the bowl with the flour, and toss to coat the butter with the flour.
Then, using the tips of your fingers, rub the butter between your thumb and fore-finger, making thin butter flakes. Do this until the butter is well incorporated and is in small pieces.
Then, hydrate your flour by adding the chilled vodka and 1/4 cup of the water. Do not mix, instead just push the water down into the flour with a wooden spoon. The key here is to add as little water as possible while getting the dough to hold together. If you need additional water, add it a tablespoon at a time until the mixture holds together. Then, pick it up and form it into a ball (being careful not to handle it too much). Wrap it up tightly with plastic wrap and place it in the fridge for a minimum of 2 hours, or it can be kept overnight.
Prepare the pie filling + topping + yogurt: First, preheat the oven to 350º F.
Add the lemon juice and zest to a large mixing bowl, then add the pears and apples and toss to coat them with the lemon juice. Add the sugar, arrowroot, and sage and toss again until everything is combined. Set it aside while you prepare the crust.
In a bowl, mix together the walnuts, oats, maple syrup, and salt and set aside.
Lastly, combine the yogurt, honey, and 1/4 teaspoon salt and place in the fridge until you are ready to serve.
Roll out the crust: Place the dough onto a well-floured surface. Using a rolling pin, roll out the dough into an even circle. You want to use your pie baking dish to measure: Your dough should be about 1 inch larger in diameter than the pie dish.
Carefully transfer the dough to the dish and press down to form to the pie dish. If you like to crimp your edges, do so by going around the edge pushing the dough between your thumb, middle finger, and forefinger. Alternatively, you can go around the edge pressing down with a fork. Trim any excess dough around the edges.
To add the filling, and bake the pie: Using a slotted spoon, spoon the filling mixture into the pie crust.
Sprinkle the topping on evenly. Place the pie in the oven and bake for 50 minutes to 1 hour, or until the edges of the crust start to brown. Allow the pie to cool for about 10 minutes before serving. It’s best served warm with the salted honey yogurt or some ice cream.
Jodi Moreno is a Natural Foods Chef, Photographer, and creator of the blog What’s Cooking Good Looking where she shares her healthy, clean, seasonal recipes and photographs. She’s passionate about showing people that vegetables can play a main role on the plate.
Hello, pumpkin bread, meet gingerbread. When I was deciding how to use up what remained of a can of pumpkin puree, I couldn’t decide if I really wanted to make pumpkin bread when I was really feeling like gingerbread. Oh, and how about making it vegan? With dried cranberries, whole wheat flour, and pecans? But not too healthy, so a little lemon icing on top. —weshook
Ingredients
pumpkin gingerbread muffins
2 1/2 cups
white whole wheat flour, or whole wheat flour
2/3 cup
sugar, organic to keep truly vegan
1 teaspoon
salt
2 teaspoons
baking soda
2 teaspoons
ground ginger
2 teaspoons
cinnamon
1/4 teaspoon
ground cloves
1/2 teaspoon
nutmeg
1 cup
pumpkin puree
1/2 cup
vegetable oil, canola, olive…
1/4 cup
molasses
1/2 cup
corn syrup (or maple syrup)
3/4 cup
dried cranberries
1 cup
pecans, finely chopped (I ground them in a coffee grinder)
1 cup
boiling water
lemon icing
2 cups
powdered sugar
juice of one lemon
1 teaspoon
corn syrup
Directions
For the Muffins:
Preheat the oven to 375 degrees.
In a large bowl, stir together the dry ingredients and set aside.
In a 2-cup measuring cup, measure and combine the pumpkin puree, oil, molasses and syrup. It will be pretty full, but mine has room after the measurements to be able to stir together carefully. add this mixture to the dry ingredients and stir to combine.
Add the cranberries and pecans to the bowl. Add the boiling water and stir carefully. Don’t splash yourself!
Line or grease muffin pans. Divide the batter into the cups.
Bake 20 minutes or until a pick comes out clean. Cool in the pans on a rack for 5-10 minutes and then remove the muffins and continue cooling on the rack. I ate a couple right away before icing them, but if you want to ice them, let them cool completely.
For the lemon icing:
In a small bowl, combine the powdered sugar, lemon juice and 1 teaspoon corn syrup. Stir until smooth. You may need to add a little water to get the right consistency. It should be too thick to drizzle but when you spread it the marks smooth out by themselves.
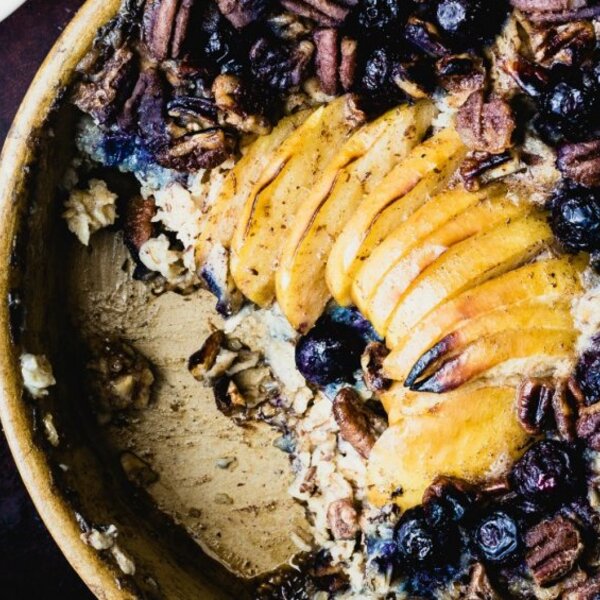
1 flax egg (2 tablespoons water plus 1 tablespoon flaxseed meal)
2 cup gluten-free rolled oats
1 teaspoon aluminum-free baking powder
1/3 cup sugar, such as truvia, or 1/3 cup coconut sugar
1 teaspoon cinnamon powder
1/2 teaspoon nutmeg powder
2-3 tablespoon coconut oil, melted
1 teaspoon vanilla extract
2 cup almond milk
1 apple, thinly sliced
1 cup blueberries
1/3 cup pecans
Preheat oven to 375 degrees F. In a small bowl, combine the ingredients for the flax egg and let it sit for 5-10 minutes or until thickened.
In a large bowl combine the rolled oats, baking powder, sugar, cinnamon, and nutmeg. In another bowl, whisk the coconut oil, vanilla, milk, and flax egg. Add the oat mixture to a 9-inch round baking dish.
Pour the milk mixture over the oats. Place the apple in the middle over the oat mixture and scatter the blueberries and pecans.
Bake for 35-40 minutes until the top is golden and the oats have set. I placed mine under the broiler for an extra 3-5 minutes.
Each bite of this rich Vegetarian French Onion Soup will have perfectly caramelized onions, savory mushroom broth, gooey cheese, and just the right amount of French baguette. You’ll be making this soup again and again all winter.
The heart of Vegetarian French Onion Soup is deeply caramelized onions, which are concentrated savory onions that melt into the soup. As they caramelized, the onions lose their pungency, become sweeter, and are the perfect base for the mushroom broth and seasonings.
The soup is simply seasoned with fresh thyme, bay leaves, salt, and black pepper. The mushroom broth adds a meaty and earthy flavor. A splash of vegan Worcestershire sauce and balsamic vinegar at the end add even more umami and depth of flavor.
The soup is divided into oven-safe bowls, topped with slices of French baguette, Swiss and Gruyere cheeses, and then broiled until the cheese is gooey and just slightly browned on top.
Although not traditional, I top the soup with a slice of Swiss cheese because it melts nicely. Plus, it provides a solid foundation to set the shredded Gruyere on so that it stays on top instead of falling into the soup.
The crusty slice of baguette soaks up the broth so it’s easy to scoop up with your spoon. Each bite is a combination of the rich onion flavor, savory broth, salty cheese, and softened bread. In a word, delicious!
Vegetarian French Onion Soup is a cozy, comfort meal for any time of the year, but especially during chilly days. I usually serve it on its own or with a salad for lunch or as a light dinner.
All About Caramelizing Onions
The most important part of making this soup is to caramelize the onions well. Caramelization is the process of slowly cooking the onions so that they become soft and golden brown. The onions release their natural sugars, concentrating their flavor.
There’s simply no way to replicate the flavor of caramelized onions other than cooking them slowly from scratch.
I use yellow onions in this recipe, but you could also use red onions if you prefer their flavor. I would pass on sweet onions, which lack the intense flavor you need to flavor the soup.
Aim for slicing the onions about 1/8 inch thick. The shape, whether whole rounds or halfmoons, does not matter as long as they are evenly and thinly sliced. Slicing them too thin can result in a barely-there consistency and you risk burning them. If too thick, you’ll have to cook them for a longer time and they won’t be uniformly caramelized.
It’ll take 45 minutes to 1 hour for the onions to caramelize. Cook them over medium heat the entire time and stir them every 5 minutes or so. After the first 10 to 15 minutes, you’ll notice the volume of the onions reduce in half, they’ll softened, and become translucent.
At the half hour mark, the volume of the onions will be even smaller and they’ll begin to turn a deep golden yellow with brown bits forming on the bottom of the pot. When the onions are caramelized, they are a deeper golden amber color with even more brown bits on the bottom of the pot.
Low and slow is the key to maximize flavor here. Frequent stirring will help prevent scorching. Some people add a spoonful of sugar to help the caramelization process, but it’s not necessary if take your time.
The Best Oil for Caramelizing Onions
I used a combination of butter and avocado oil to cook the onions. Butter adds the most flavor, but the milk solids in the butter tend to brown too quickly. You don’t want this because as butter browns it’ll darken the onions before they’re fully caramelized.
Avocado oil has a higher smoke point than butter, which helps prevent early browning and the butter from burning. I prefer avocado oil over olive oil or extra virgin olive oil because it has a higher smoke point and a milder flavor that doesn’t compete with the flavor of the butter. You can use any neutral oil like canola, vegetable, or grapeseed.
Simply Recipes / Sally Vargas
Ingredient Swaps that Work
French onion soup, including this vegetarian version, is traditionally topped with sliced French baguette and Gruyere cheese. I used mushroom broth in place of beef broth to make this soup vegetarian friendly. Here are other ingredient substitutions that would work:
If you can’t find boxed mushroom broth in your grocery store, look for mushroom bouillon. It’s a seasoned mushroom concentrate. Simply mix it with hot water to make the mushroom broth.
I haven’t tried vegetable broth in this recipe, but you certainly could. Some store-bought vegetable broths can be a little bland, so I’d recommend making your own. Otherwise, use a store-bought vegetable broth that you’ve tried and like.
Deglazing the pan with white wine is a traditional technique that adds loads of flavor. Deglazing simply means to add a liquid like the wine to help release stuck-on bits of food (so much flavor here!) from the bottom of the pan. I use white wine, but you could use a dry red wine instead. Instead of wine, you could use extra broth to deglaze the pan.
Instead of a French baguette, use any crusty loaf of artisan bread, like sourdough or Italian. You want the bread to be sturdy and have a chewy texture so it will hold its shape and does not fall apart in the soup. Don’t use soft sandwich breads or brioche.
It’s okay to use only Gruyere or only Swiss cheese to top the soup.
You can also mix it up and use any cheese that melts well. Some examples are:
Mozzarella
Aged sharp cheddar
Fontina
Gouda
Jarlsberg
Other Yummy Variations
Classic French onion soup is all about well-caramelized onions, good-quality broth, and the melty cheese topping. However, there are a few variations that would work with this vegetarian version if you want to try.
If you want a heartier soup, any type of mushrooms or white beans would pair well with caramelized onions. Add sliced mushrooms or cooked (canned is okay!) beans to the soup along with the mushroom broth after the onions have finished caramelizing.
A whole grain, like barley or farro, would also work well. If your grain isn’t pre-cooked, keep in mind you’ll also need to increase the amount of broth to account for cooking the grain.
For a creamy version, stir in a little heavy cream or half-and-half after the soup simmers for 15 minutes.
Simply Recipes / Sally Vargas
Serving Suggestions
Although filling as a main course when served with side salad, you can serve this soup as the first course of a larger meal. It would complement a meatless risotto, stuffed mushrooms, ratatouille, or a warm salad made with grains and roasted winter vegetables, like sweet potatoes, carrots, and squash.
Make Ahead and Storage Instructions
The base soup, without the baguette and cheese, can be prepared ahead of time and stored in an airtight container in the refrigerator for up to five days. Simply prepare the soup as directed, but don’t top it with bread or cheese.
If you’re not going to serve the soup within five days, you can portion it into zip top freezer storage bags or a freezer-safe food container and freeze for up to three months.
When you’re ready to eat, use either the stovetop or microwave to thaw and reheat the soup. Then, portion the soup into oven-safe bowls, top with the bread and cheese, and place them under the broiler to melt the cheese just before serving.
Simply Recipes / Sally Vargas
Caramelized Onions Always and Forever
Caramelized Onion Quiche
Caramelized Onion English Muffin Pizza
Caramelized Onion Dip
Caramelized Onion Tart with Gorgonzola and Brie
Maple-Glazed Chicken with Caramelized Onions and Pears
Cook Mode (Keep screen awake)
4tablespoonsunsalted butter
2tablespoons avocado oil or other neutral oil
4 large (8 to 10cups)yellow onions, cut into 1/8-inch slices
1/2cup dry white wine, like Sauvignon Blanc
2tablespoonsall-purpose flour
8cupsmushroom broth
3sprigsfresh thyme
2driedbay leaves
1 1/2teaspoonssalt
1/2teaspoonground black pepper
1tablespoon vegan Worcestershire sauce
2teaspoonsbalsamic vinegar
1 (12-inch) French baguette, cut into 1-inch slices
Heat a 5-quart Dutch oven or large pot over medium heat. Add the butter and oil. When the butter is melted, add the sliced onions, and stir to coat them in the fat.
Cook the onions for about 60 minutes, stirring about every 5 minutes with a wooden spoon, until caramelized. The onions should reduce in volume, become very soft, and turn a golden amber color with brown bits accumulating on the bottom of the pot.
As the onions cook, use the wooden spoon to scrape up the brown bits so that they don’t burn.
Simply Recipes / Sally Vargas
Simply Recipes / Sally Vargas
Deglaze the pot:
Increase the heat to medium-high heat. Add the white wine and use the wooden spoon to scrape up the brown bits on the bottom and sides of the pot. Bring the wine to a boil and stir frequently for about 4 minutes or until most of the liquid has evaporated.
Simply Recipes / Sally Vargas
Add the flour:
Sprinkle the flour over the onions. Stir the mixture until no visible flour remains. Cook for 3 to 4 minutes, stirring frequently.
Simply Recipes / Sally Vargas
Add the broth, herbs, and seasoning:
Add the mushroom broth and use the wooden spoon to scrape any brown bits stuck to the bottom and sides of the pot.
Add the thyme, bay leaves, salt, and black pepper, and stir to combine.
Simply Recipes / Sally Vargas
Simmer the soup:
Bring the soup to a slow boil. Once boiling, reduce the heat to medium-low and simmer uncovered for 15 minutes.
Simply Recipes / Sally Vargas
Finish the soup:
Stir in the Worcestershire sauce and balsamic vinegar. Scoop out the thyme stems and bay leaves and discard them.
Meanwhile, preheat the broiler.
Set the oven rack to the top, closest to the broiler, and turn the broiler on high.
Line a large, rimmed baking sheet with aluminum foil. Arrange six oven-safe bowls or soup crocks on the baking sheet.
Broil and serve:
Ladle the soup into the bowls. Fill the bowls leaving 1/2- to 1-inch space on top for the bread and cheeses. Top each with 2 slices of baguette, 1 slice Swiss cheese, and about 1/4 cup Gruyere cheese.
Carefully place the baking sheet into the oven and broil for 2 to 5 minutes. Keep an eye on it so that the tops don’t burn. Broil until the cheese is melted, bubbling, and just starting to brown. Serve it immediately while its warm.
Did you love this recipe? Give us some stars below!
Simply Recipes / Sally Vargas
Simply Recipes / Sally Vargas
Simply Recipes / Sally Vargas
Nutrition Facts (per serving)
811
Calories
34g
Fat
94g
Carbs
33g
Protein
×
Nutrition Facts
Servings: 6
Amount per serving
Calories
811
% Daily Value*
34g
43%
Saturated Fat 16g
82%
78mg
26%
2363mg
103%
94g
34%
Dietary Fiber 7g
24%
Total Sugars 22g
33g
Vitamin C 18mg
89%
Calcium 681mg
52%
Iron 6mg
32%
Potassium 775mg
16%
*The % Daily Value (DV) tells you how much a nutrient in a food serving contributes to a daily diet. 2,000 calories a day is used for general nutrition advice.
Nutrition information is calculated using an ingredient database and should be considered an estimate. In cases where multiple ingredient alternatives are given, the first listed is calculated for nutrition. Garnishes and optional ingredients are not included.
Loaded Organic Baked Potato With Broccoli And Cheese
This dish is a different take on the traditional baked potato. These savory toppings go great with the baked potato.
3 organic russet potatoes, rinsed and scrubbed
2 tablespoon olive oil
3 1/2 teaspoon cornstarch
1/4 teaspoon garlic powder
1/4 teaspoon salt
1 dash of pepper or cayenne
1 cup almond or soy milk
1 cup grated vegan organic cheddar cheese
1/2 teaspoon worcestershire sauce
3 tablespoon unsalted organic butter
3 cup organic broccoli
Preheat oven to 350 degrees. Pierce the potatoes 2 or 3 times on each side with a fork. Brush with olive oil and sprinkle with salt. Bake directly on the oven rack for 1 hour.
In a medium saucepan, add the cornstarch, garlic powder, salt, pepper, milk, and Worcestershire sauce. Bring to a boil over medium heat until the sauce begins to thicken. Reduce heat to low.
Add the Cheddar cheese and whisk until smooth. When potatoes are done, let them cool for about 5 minutes or until they are cool enough to handle. While the potatoes are cooling, steam about 3 cups of broccoli in 2 tablespoons water.
Microwave on high for 4-5 minutes. Cut a slit down the center of the potato and make an “X” in the center.
Squish both sides of the potato to open up the skin. Load up your potatoes with plenty of steamed broccoli and hot cheese sauce.


/d924dea0-4a64-40f2-841d-440efb1ffe26--Nigella_dark-and-sumptuous-chocolate-cake_Photo.jpg)


/67992047-f3fe-42c8-a016-0d9292a0b653--unnamed.jpg)


/460c372b-dc88-4c80-bec3-7fd14f9add98--IMG_20190508_091143418.jpg)