Blog

  • Slow-Cooker Vegan Butternut Squash Soup with Apple

    Slow-Cooker Vegan Butternut Squash Soup with Apple

    recipe image

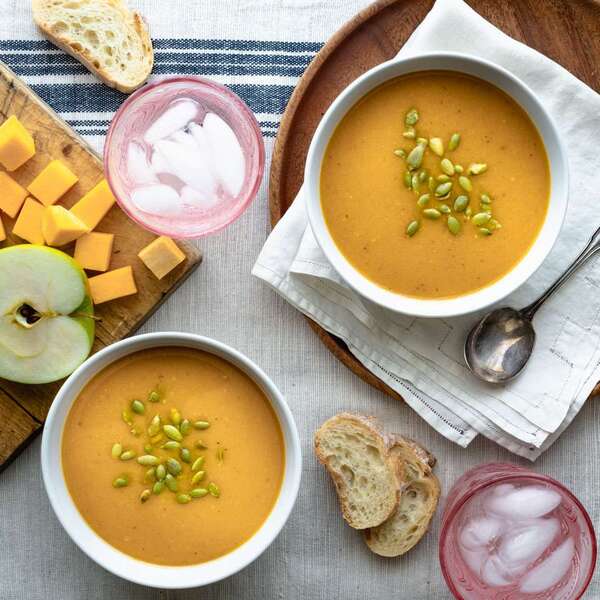
    You’ll never guess this crock pot butternut squash soup recipe is just dump-and-go simple. The boost of flavor from maple syrup, apple-cider vinegar and spices makes all the difference! Serve this light soup as an appetizer for a vegetarian Thanksgiving feast or with a salad and crusty bread for weeknight dinners.

    Updated on April 22, 2024

    Total Time:

    8 hrs 20 mins

    Jump to Nutrition Facts


    Cook Mode
    (Keep screen awake)

    Ingredients

    • 1 large sweet onion, diced

    • 2 cloves garlic, minced

    • 4 cups no-salt-added vegetable broth

    • 1 small butternut squash (about 2 1/2 pounds), peeled and diced

    • 1 Granny Smith apple, peeled and sliced

    • ¼ cup extra-virgin olive oil

    • 3 tablespoons pure maple syrup

    • 2 tablespoons cider vinegar

    • 1 teaspoon dried thyme

    • 1 teaspoon salt

    • ½ teaspoon ground pepper

    • ¾ teaspoon ground cinnamon

    • ¼ teaspoon ground nutmeg

    • Toasted pepitas or croutons for serving

    Directions

    1. Combine onion, garlic, broth, squash, apple, oil, maple syrup, vinegar, thyme, salt, pepper, cinnamon and nutmeg in a 5- to 6-quart slow cooker. Cover and cook on Low for 8 hours or on High for 4 hours.

    2. When the time is up, remove the lid and stir well. Puree with an immersion blender or in batches in a blender. (Use caution when blending hot liquids.) Serve topped with pepitas (or croutons), if desired.

    Tips

    To make ahead: Refrigerate for up to 3 days or freeze for up to 3 months.

    Equipment: 5- to 6-quart slow cooker

    Originally appeared: EatingWell.com, August 2019

    Nutrition Facts (per serving)

    167 Calories
    7g Fat
    27g Carbs
    2g Protein
    Nutrition Facts
    Servings Per Recipe
    8
    Serving Size
    1 cup
    Calories
    167
    % Daily Value *
    Total Carbohydrate
    27g
    10%
    Dietary Fiber
    6g
    22%
    Total Sugars
    11g
    Added Sugars
    5g
    10%
    Protein
    2g
    3%
    Total Fat
    7g
    9%
    Saturated Fat
    1g
    5%
    Vitamin A
    15840IU
    317%
    Vitamin C
    23mg
    26%
    Folate
    32mcg
    8%
    Sodium
    369mg
    16%
    Calcium
    89mg
    7%
    Iron
    1mg
    8%
    Magnesium
    47mg
    11%
    Potassium
    481mg
    10%

    Nutrition information is calculated by a registered dietitian using an ingredient database but should be considered an estimate.

    * Daily Values (DVs) are the recommended amounts of nutrients to consume each day. Percent Daily Value (%DV) found on nutrition labels tells you how much a serving of a particular food or recipe contributes to each of those total recommended amounts. Per the Food and Drug Administration (FDA), the daily value is based on a standard 2,000 calorie diet. Depending on your calorie needs or if you have a health condition, you may need more or less of particular nutrients. (For example, it’s recommended that people following a heart-healthy diet eat less sodium on a daily basis compared to those following a standard diet.)

    (-) Information is not currently available for this nutrient. If you are following a special diet for medical reasons, be sure to consult with your primary care provider or a registered dietitian to better understand your personal nutrition needs.

    Read More

  • Lunch Recipe: Colorful Lentil Salad with Walnuts & Herbs

    Lunch Recipe: Colorful Lentil Salad with Walnuts & Herbs

    recipe image

    Faith DurandSenior Vice President of Content at AT Media

    Faith is the SVP of Content at Apartment Therapy Media and former Editor-in-Chief of The Kitchn. She is the author of three cookbooks, including the James Beard Award-winning, The Kitchn Cookbook. She lives in Columbus, Ohio, with her husband and two daughters.

    updated Jan 29, 2020

    Post Image

    We independently select these products—if you buy from one of our links, we may earn a commission. All prices were accurate at the time of publishing.

    Post Image

    Looking for a make-ahead lunch for your lunchbox? Want something easy, healthy, and filling? Look no further than this lentil salad — it’s one more lunch salad for your repertoire, full of crisp and colorful bell pepper and onions, with nutty toasted walnuts and fragrant herbs. A sweet, tangy dressing pulls it all together.

    It’s really no secret that I adore grain and legume salads; our archives are full of recipes like these. Lentils make an especially good base for a lunch salad, though — even better than couscous or wheat berries. Lentils are high in protein and even more filling than those grains. If you want to add a few slices of roast chicken to make it even heartier, be my guest.

    This salad depends on a couple of ingredients. First, the lentils. It’s important to use lentils that won’t fall apart into mush as they are cooked. French green lentils hold their shape very well, and they would be lovely in this salad. You can also use Umbrian lentils, as I did here, and they have a very nice texture.

    Also, don’t skip the pomegranate molasses in the dressing; it’s the secret ingredient that pulls this all together — a little sweet, a little tangy, and very rich. This salad will keep very well in the refrigerator for up to five days.

    Ingredients

    • 1 pound

      (2 to 2 1/4 cups) dry Umbrian or green French lentils

    • 4 cups

      chicken broth (optional)

    • 1/2 cup

      dry-packed sun-dried tomatoes

    • 1

      large yellow onion

    • 3

      bell peppers (ideally a mix of orange, yellow, and red)

    • 3 cloves

      garlic

    • 1/2 cup

      olive oil, divided

    • 1 cup

      walnuts, toasted and chopped

    • 1 cup

      flat parsley leaves, roughly chopped

    • 1 cup

      mint leaves, roughly chopped

    • 1 1/2 ounces

      Parmesan cheese, divided (omit for a vegan salad)

    • 1

      lemon, juiced and zested

    • 2 tablespoons

      pomegranate molasses (make sure it is pure pomegranate molasses with no added sugar)

    • 2 teaspoons

      flaky or kosher salt, or more to taste

    • Freshly ground black pepper

    1. Rinse the lentils well and place them in a saucepan. Add the chicken broth, if using, or simply cover them with about 4 cups of water. Salt lightly. Bring to a boil, and then lower the heat and cover the pot, and cook the lentils for about 25 to 30 minutes. Test them after 20 minutes; cooking time will vary according to freshness and age of the lentils. You should turn off the heat when the lentils are toothsome and tender, but not yet mushy or falling apart. When the lentils are done cooking, spread them out on a baking sheet to cool.

    2. Meanwhile, finely chop the sun-dried tomatoes and place them in a heatsafe container. Pour about 1/2 cup of boiling water over the tomatoes and set them aside to steep.

    3. Dice the onion, and clean out the bell peppers and dice them as well. Finely mince the garlic. Heat about 1/4 cup of olive oil in a sauté pan over medium heat and add the onion, bell peppers, and garlic. Cook for 4 to 6 minutes, or until the onion is just beginning to be translucent, but the peppers have not yet lost their snap or color.

    4. Turn off the heat and mix the onion mixture with the lentils in a large bowl. Drain the tomatoes (reserve about 1/4 cup of the steeping liquid) and stir them in, as well as the toasted walnuts, chopped parsley and mint, and the lemon zest. Grate about 1 ounce of the Parmesan cheese and stir this in as well.

    5. In a smaller bowl or measuring cup, whisk together the remaining 1/4 cup olive oil, the 1/4 cup of steeping liquid from the sun-dried tomatoes, the lemon juice, and the pomegranate molasses. Toss this dressing with the lentils. Taste for seasoning, and stir in salt and pepper.

    6. Spread the lentils on a serving plate or in a bowl, and use a vegetable peeler to shave the remaining Parmesan into flakes. Sprinkle these over top and serve.

    Recipe Notes

    Recipe originally published August 2011.

    More Grain & Legume Salads from The Kitchn

Read More

  • Cauliflower Fried Rice with Shrimp

    Cauliflower Fried Rice with Shrimp

    recipe image

    Cauliflower Fried Rice with Shrimp

    Photo by Through The Kitchen
    • Prep time
      5 minutes
    • Cook time
      15 minutes
    • Serves
      3
    Author Notes

    A healthy spin on classic shrimp fried rice, full of vegetables and color! —Through The Kitchen

    Ingredients

    • 1/2 pound

      shrimp (I use Trader Joe’s Frozen Wild Caught Argentinian Shrimp, dethawed)


    • 12 ounces

      riced cauliflower (I use Whole Foods 365 frozen organic riced cauliflower, thawed)


    • 3/4 cup

      sweet yellow corn (I used Whole Foods 365 frozen organic sweet corn, thawed)


    • 3/4 cup

      peas (I used Whole Foods 365 frozen organic peas, thawed)


    • 3/4 cup

      shelled edamame (I used Whole Foods 365 frozen organic shelled edamame, thawed)


    • 1

      red bell pepper


    • 1 handful

      oyster mushrooms (or mushrooms of your choice)


    • 2 tablespoons

      Mykonos vegan butter


    • 4 tablespoons

      soy sauce (can sub coconut aminos or tamari if trying to avoid soy or you are gluten free)


    • 1 tablespoon

      olive oil


    • salt and pepper to taste

    Directions
    1. Chop red pepper and oyster mushrooms into bite sized pieces.
    2. In a large skillet, sauté the shrimp with a tablespoon of olive oil until cooked through.
      Note: omit shrimp for a vegan meal.
    3. In a large pot, add all the vegetables and cook on low-medium heat on the stove. Once warm, add cauliflower rice and butter. Stir until the butter melts all over the rice and veggies.
    4. Add 3 tablespoons of soy sauce (less/more depending on your preference) and stir. Cook for 5- 10 minutes on medium heat.
    5. Once shrimp are cooked, add one tablespoon of soy sauce to the pan and toss the shrimp.
    6. Add salt and pepper if needed to the veggies and rice, and divide among 3-4 bowls. Top each bowl with desired amount of shrimp, and voila!

    Read More

  • Vegan Banana Nut Bread, No Sugar Added

    Vegan Banana Nut Bread, No Sugar Added

    recipe image

    email

    vegan/no sugar added banana nut bread

    Advertisement – Continue Reading Below

    • 1 1/4 c. Splenda
    • 1/2 c. Butter flavored vegetable shortening
    • 2 tsp. egg replacer
    • 1 1/2 c. Mashed Ripe Banana’s
    • 1/2 c. Soy Milk
    • 1 tsp. vanilla
    • 2 1/2 c. self-rising flour
    • 1 tsp. baking soda
    • 1 tsp. Salt
    • 1 c. chopped nuts
      1. Step 1Heat oven to 350 Degrees
      2. Step 2Grease bottom only of Loaf Pan or prepare muffin cups
      3. Step 3Mix Splenda and Butter-flavored vegetable shortening in large bowl
      4. Step 4Stir in two teaspoons egg replacer and two tablespoons water alreaddy mixed until well blended.
      5. Step 5Add Banana’s, soy milk and Vanilla.
      6. Step 6Add Banana’s, soy milk and Vanilla. Beat until smooth.
      7. Step 7Stir in Nuts
      8. Step 8Pour into pan or muffin cups
      9. Step 9Bake about 1 hour or until toothpick inserted in center comes out clean.
      10. Step 10Cool 5 minutes. Loosen sides of loaf from pan: remove from pan.
      11. Step 11Cool Completely before slicing

    this image is not available

    Media Platforms Design Team

    vegan/no sugar added banana nut bread

    email

    Read More

  • Smoked Vegetable Kabobs With Roasted Garlic Smoked Butta

    Smoked Vegetable Kabobs With Roasted Garlic Smoked Butta

    recipe image

    A barbecue staple. These smoked vegetable kabobs are always a hit at the many different functions we cater. We kick it up a bit with a smoked butter to finish. Healthy? Maybe! For this recipe, you will need to soak eight to twelve 8-inch wooden skewers in water for 15 to 30 minutes.

    This recipe was excerpted from ‘Vegan Barbecue’ by Terry Sargent. Buy the full book on Amazon. Get more veggie skewers here →

    All products featured on Epicurious are independently selected by our editors. However, when you buy something through our retail links, we may earn an affiliate commission.

    Ingredients

    For the Roasted Garlic Smoked Butta

    ½ cup unsalted vegan butter, such as Miyoko’s

    1 head garlic

    1 tsp. extra-virgin olive oil

    2 Tbsp. chopped fresh herbs, such as parsley, rosemary, thyme, or chives

    ¼ tsp. kosher salt (optional)

    For Smoked Vegetable Kabobs

    4 medium red onions, halved

    4 medium zucchini, sliced into rounds

    2 red bell peppers, seeded and chopped into 1-inch squares

    2 orange bell peppers, seeded and chopped into 1-inch squares

    2 yellow bell peppers, seeded and chopped into 1-inch squares

    2 green bell peppers, seeded and chopped into 1-inch squares

    1 large eggplant, sliced into rounds

    Extra-virgin olive oil

    2 cups roasted garlic

    Smoked Butta

    Balsamic vinegar (optional)

    Preparation

    1. Make the Roasted Garlic Smoked Butta

      Step 1

      Remove the butter from the refrigerator and allow to come to room temperature. Meanwhile, preheat the oven to 400°F.

      Step 2

      Remove the excess peels from the outside of the garlic head. Slice off and discard ¼ inch (5 mm) from the wide/root end to expose the cloves. Make a little bowl of foil to set the head of garlic in, which will help hold the garlic cloves together and upright. Drizzle the olive oil over the garlic, then cover completely with foil. Roast in the oven for 40 to 50 minutes, until the garlic is soft throughout and lightly browned. Remove from the oven and allow to cool before handling.

      Step 3

      Peel the garlic. Combine the garlic, vegan butter, fresh herbs, and salt in a food processor. Blend until the ingredients are evenly incorporated.

      Step 4

      Using waxed paper, form the butter into a log and wrap tightly. Refrigerate until chilled. Slice and serve as needed, storing leftovers in the refrigerator. This compound butter will keep for 1 to 2 weeks in a sealed container in the refrigerator, or for up to 6 months in the freezer.

    2. Make Smoked Vegetable Kabobs

      Step 5

      Skewer the vegetables by alternating between red onion, zucchini, and the different colored bell peppers. Brush the veggies with a light layer of olive oil.

      Step 6

      Prepare the smoker for a 60-minute smoke session over low heat.

      Step 7

      Smoke the vegetables for 60 minutes. Remove from the smoker, brush with the smoked butter, and drizzle with balsamic vinegar, if desired. Enjoy!

    Vegan Barbecue-COVER.jpg

    Recipe excerpted from Vegan Barbecue © 2023 Quarto Publishing Group USA Inc. Text © 2023 Terry Sargent. Photography © 2023 Bites and Bevs LLC. Buy the full book from Amazon or Harvard Common Press.

    Read More

  • Hotteok (Korean Sweet Pancakes)

    Hotteok (Korean Sweet Pancakes)

    recipe image

    Hotteok (Korean Sweet Pancakes)

    Photo by Julia Gartland Prop Stylist: Megan Hedgpeth Food Stylist: Lauren Lapenna
    • Prep time
      1 hour 30 minutes
    • Cook time
      50 minutes
    • makes
      12 pancakes
    Author Notes

    Growing up, I’d eagerly await the days when my mom would give in to my pleas and buy the hotteok mix from the local Korean supermarket. I’d get the batter all over me and my mom would jansoli (“nag”). But then the crispy, chewy pancakes, filled to the brim with a syrupy mixture of brown sugar and cinnamon, would halt all the commotion. Taking that first bite together, with batter all over my arms, will forever be one of my favorite memories. Although classic hotteok have brown sugar, cinnamon, and nuts, you can use whatever you have at home. Swap out the nuts for pumpkin seeds, or use another gooey mixture altogether, like apple pie filling or strawberry jam. And if you want a savory treat, try filling it with mozzarella cheese and corn. This year, I collaborated with a local Asian-American bakery, Kitsby, to create a baking kit for a twist on the hotteok: the hotteok cookie. A bite into the soft brown sugar cookie reveals a cinnamon-hazelnut center, encapsulating the flavors of a classic hotteok. After you try these pancakes, head here to grab a kit of your own. —Janice Koo

    • Test Kitchen-Approved
    Ingredients
    • Pancake Dough

    • 1/2 cup

      (114 grams) lukewarm water


    • 1/2 cup

      (114 grams) lukewarm milk (any type of milk or vegan alternatives will work)


    • 2 tablespoons

      granulated sugar


    • 2 teaspoons

      dry-active yeast


    • 1 1/2 cups

      (180 grams) all-purpose flour


    • 1/2 cup

      (80 grams) sweet rice flour


    • 1 tablespoon

      neutral oil (such as vegetable or canola), plus more for shaping


    • 1/2 teaspoon

      salt


    • Neutral oil, for pan-frying

    • Brown Sugar Filling

    • 1/2 cup

      (107 grams) packed brown sugar (either light or dark sugar will work)


    • 1/4 cup

      (28 grams) chopped raw nuts (peanuts, hazelnuts, walnuts, etc.)


    • 1 tablespoon

      ground cinnamon

    Directions
    1. Add the water, milk, sugar, and yeast into a large bowl. Whisk till combined. Let sit for 5 to 10 minutes, till the yeast is activated and bubbles form at the top of the mixture. (If no bubbles have formed after 10 minutes, your yeast is probably inactive, and you might need a new jar.)
    2. Add the all-purpose flour, sweet rice flour, 1 tablespoon oil, and salt. Mix well till a sticky dough is formed and the flours are incorporated.
    3. Cover the bowl with a damp towel or plastic wrap and let sit until the dough doubles in size, about 1 hour.
    4. Once the dough has doubled in size, punch the dough with your hands a couple times to release the gas. Cover with the towel or wrap again and let rest for another 15 minutes.
    5. While the dough is resting, add the ingredients for the brown sugar filling to a small bowl and stir to combine.
    6. Once the dough is ready, put some oil on your hands to prevent the dough from sticking. Separate the dough into 12 portions.
    7. To a large nonstick pan, add enough oil to thinly coat the bottom and set over medium heat. Grease a spatula with oil (this will come in handy soon).
    8. As the pan is heating up, place one of the pieces of dough in your hand and form a ball. Flatten the dough into a disk about 5 inches in diameter, creating a shallow well in the middle by cupping the palm of your hand. Place one heaping tablespoon of the filling inside the well and lightly press down with a spoon. Gather the edges together, making sure not to let any of the filling spill out. Pinch to seal the edges together and form into a ball once again. If the dough tears anywhere, no worries—just pinch the sides of the hole together to mend.
    9. Place the hotteok seam side down on the pan, pressing it down with your spatula to form a circle about 4 inches in diameter. Cook for 1 to 2 minutes until golden brown, then flip over. Press down once again to further flatten and cook for another 1 to 2 minutes, until both sides are golden brown. (You can prepare the next pancake while this one is cooking.)
    10. Repeat with the remaining dough and filling, adding more oil as needed, then serve immediately.

    Read More

  • Gluten Free Vanilla Cupcakes With Vegan Chocolate Frosting

    Gluten Free Vanilla Cupcakes With Vegan Chocolate Frosting

    recipe image

    vanilla cupcakes vegan chocolate frosting recipe gluten-free

    157 Comments

    I am happy to introduce gluten free vanilla cupcakes with chocolate frosting and continue on my coconut flour recipe roll. I have been making (and testing) this dessert for close to two years and it is one of my personal favorites. I think it might be a hit with you too based on reports from taste testing friends.

    Passover really threw me for a loop. It wasn’t the guests we had visit for the holiday. It was the 100 matzo balls for my son’s third grade seder. That, plus charoset and maror for everyone at the event. My house was overtaken by a cooking frenzy last week; I focused on that and nothing else (except my children).

    Now everything has calmed down and I am happily back to this blog! I have been thrilled by the amount of chat in the comments over here. I have also received so many lovely emails from people thanking me for these recipes and all I can say is –you’re welcome! It is wonderful to love what you do and ALSO be appreciated for it. That is the proverbial icing on the cupcake.

    Vanilla Cupcakes with Chocolate Frosting

    vanilla cupcakes vegan chocolate frosting recipe gluten-free

    Print

    Pin Recipe

    Instructions

    • In a medium bowl, combine coconut flour, salt and baking soda

    • In a small bowl, blend together eggs, grapeseed oil, agave and vanilla

    • Mix wet ingredients into dry and blend with a mixer or hand blender until smooth

    • Pour batter into well oiled muffin pan

    • Bake at 350°F for 20 minutes

    • Cool completely

    Prep Time 15 minutes

    Cook Time 20 minutes

    Total Time 35 minutes

    My friend Patricia claims she and her son have fought each other over these cupcakes. I hope you like them as much as she does.

    Reader Interactions

    Read More

  • Working Blue Cupcakes: Ginger Cupcakes with Peach Filling and Blueberry Frosting

    Working Blue Cupcakes: Ginger Cupcakes with Peach Filling and Blueberry Frosting

    recipe image

    You don’t have permission to access “http://www.foodnetwork.com/recipes/working-blue-cupcakes-ginger-cupcakes-with-peach-filling-and-blueberry-frosting-recipe-1923537” on this server.

    Reference #18.7155c817.1738174780.376d6f46

    https://errors.edgesuite.net/18.7155c817.1738174780.376d6f46

    Read More

  • Gingerbread Waffles with Caramelized Squash

    Gingerbread Waffles with Caramelized Squash

    recipe image

    Be the first to rate & review!

    Makini Howell’s Plum empire in Seattle includes a fine-dining restaurant, salad-bar joint, dessert shop and food truck—to give people plenty of ways to try out plant-based eating. These aromatic waffles are a fall favorite at Plum Bistro.

    Updated on April 18, 2024

    Photo: Brittany Conerly


    Cook Mode
    (Keep screen awake)

    Ingredients

    • 1 tablespoon vegan butter, preferably unsalted, plus 4 tablespoons at room temperature, divided

    • 1 small butternut squash, peeled, seeded and cut into 1/4-inch cubes

    • Water as needed

    • 3 tablespoons brown sugar, divided

    • 1 tablespoon confectioners’ sugar

    • 2 ⅛ teaspoons ground cinnamon, divided

    • ¾ cup all-purpose flour

    • ¾ cup whole-wheat flour

    • 1 tablespoon baking powder

    • ½ teaspoon salt

    • 1 ¼ cups unsweetened soymilk

    • ¼ cup canola oil

    • 1 tablespoon grated fresh ginger

    • 2 teaspoons molasses

    • 2 teaspoons vanilla extract

    • Maple syrup for serving

    Directions

    1. Melt 1 tablespoon butter in a large skillet over medium-high heat. Add squash and cook, stirring occasionally and adding water 1/4 cup at a time if the pan seems dry, until the squash is tender and lightly browned, 12 to 14 minutes. Add 2 tablespoons brown sugar and cook until it melts, about 2 minutes more. Cover to keep warm and set aside.

    2. Meanwhile, mix the remaining 4 tablespoons butter, confectioners’ sugar and 1/8 teaspoon cinnamon in a small bowl until well blended. Set aside.

    3. Preheat waffle iron.

    4. Whisk all-purpose flour, whole-wheat flour, baking powder, salt and the remaining 1 tablespoon brown sugar and 2 teaspoons cinnamon in a large bowl. Whisk soymilk, oil, ginger, molasses and vanilla in a medium bowl. Add the wet ingredients to the dry ingredients and mix until combined.

    5. Ladle enough of the batter into the hot waffle iron to cover about three-quarters of the surface (about 1/2 cup for an 8-inch-square waffle iron). Cook until the waffle is golden brown and crisp, 2 to 4 minutes. Repeat with the remaining batter. Serve the waffles with the reserved squash, the cinnamon butter and maple syrup, if desired.

    Equipment

    Waffle iron

    Originally appeared: EatingWell Magazine, October 2021

    Nutrition Facts (per serving)

    555 Calories
    29g Fat
    69g Carbs
    9g Protein
    Nutrition Facts
    Servings Per Recipe
    4
    Serving Size
    1 waffle, 2/3 cup squash & 1 Tbsp. cinnamon butter
    Calories
    555
    % Daily Value *
    Total Carbohydrate
    69g
    25%
    Dietary Fiber
    7g
    25%
    Total Sugars
    18g
    Protein
    9g
    18%
    Total Fat
    29g
    37%
    Saturated Fat
    13g
    65%
    Vitamin A
    15045IU
    301%
    Sodium
    688mg
    30%
    Potassium
    771mg
    16%

    Nutrition information is calculated by a registered dietitian using an ingredient database but should be considered an estimate.

    * Daily Values (DVs) are the recommended amounts of nutrients to consume each day. Percent Daily Value (%DV) found on nutrition labels tells you how much a serving of a particular food or recipe contributes to each of those total recommended amounts. Per the Food and Drug Administration (FDA), the daily value is based on a standard 2,000 calorie diet. Depending on your calorie needs or if you have a health condition, you may need more or less of particular nutrients. (For example, it’s recommended that people following a heart-healthy diet eat less sodium on a daily basis compared to those following a standard diet.)

    (-) Information is not currently available for this nutrient. If you are following a special diet for medical reasons, be sure to consult with your primary care provider or a registered dietitian to better understand your personal nutrition needs.

    Read More

  • Make a Week of Vegan Breakfasts from Whole Foods for Less Than $25

    Make a Week of Vegan Breakfasts from Whole Foods for Less Than $25

    recipe image

    Ingredients:

    • ½ cup quick oats
    • ¾ cup unsweetened almond milk
    • 1 banana, sliced
    • 1 tablespoon crunchy peanut butter
    • 1 tablespoon chia seeds

    Read More