Blog

  • Strawberry Chocolate Chip Muffins

    Strawberry Chocolate Chip Muffins

    recipe image

    Luscious Strawberry Chocolate Chip Muffins- gluten-free, dairy-free, egg-free... and tasty!


    Strawberry Moon

    From the archives- a Mother’s Day recipe idea that you may have missed! xox Karina

    The moon rose almost full last night, hanging gold and low above the palm and ficus trees, urging the local beauty factor to give up its pretense of reality and meld with dreamland. The sky was a deep shade of violet with a wash of strawberry pink at the ocean’s edge. Santa Monica holds me in her sway. I am in love with her- and deeply grateful to be here, celebrating my first spring in California since the late seventies. I drink the friendly May sea air in gulps. I wander the alleys and sidewalks in a state bordering on bliss, photographing details and eye candy with my iPhone. 

    It is a visual feast.

    And I am savoring every bite.

    Spring: Six
    Snippets from my neighborhood


    Walking the streets with an artist’s eye is screwing with time in a Lostian sense. I am reliving art school and aging backwards in a slippery flashback time travel  Back to the Future buoyancy, wandering with a camera, photographing shop windows, pieces of strangers, a red high heel, a cloud shaped like a crow, a chalk mark, an empty cup. Am I nineteen or am I fifty-five?

    For the hours I navigate the neighborhood, I am neither.

    Age is not relevant in a state of observation and creative response- although I would be lying if I didn’t mention a certain advantage advancing age can offer. Being older- without the magnet of estrogen oozing from our pores- renders us invisible. This kind of freedom is not to be taken lightly. Its pleasure needs to be broadcast. Celebrated. Moving through time and space as something other than a trophy, a focus for desire, or a brooding hen is more fun than eating cotton candy barefoot. Nobody notices you. Nobody cares.

    For a visual person like me this is heaven. 

    Or my idea of heaven, anyway. Which I do not embrace with a literal imposition but grasp lightly with irony and an abstract, low down bare bones trust in the reality of now as we know it, no strings attached. Because heaven?

    It’s here on Earth.

    Route 66
    Roads? Where we’re going we don’t need— roads.


    Luscious Strawberry Chocolate Chip Muffins- gluten-free, dairy-free, egg-free... and tasty!


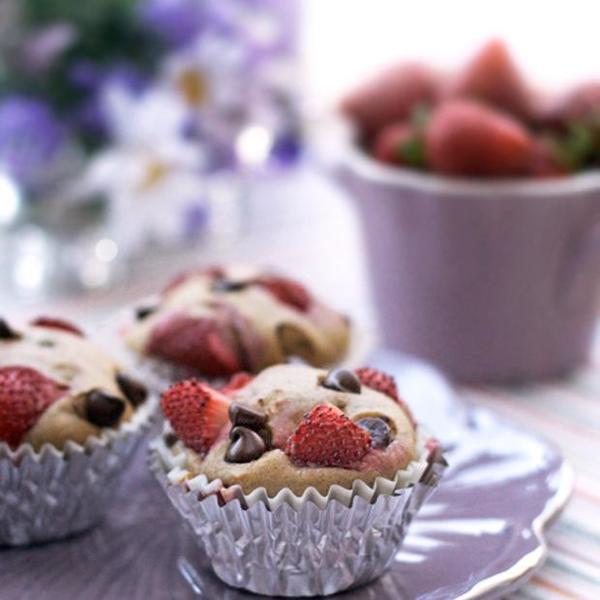
    Strawberry Chocolate Chip Muffin Recipe

    By Karina Allrich

    I changed up my usual gluten-free flour mix to create a lighter, fluffier vegan muffin (translation- more starch). And then I added chocolate chips. Gasp. Health food, this isn’t. But lip smacking tasty? That would be, Affirmative. This recipe is vegan, egg-free, but eggs will work just fine, if you prefer.


    Preheat oven to 350ºF. Line a 12-muffin tin with parchment or paper liners.

    Ingredients:

    1 rounded cup stemmed, cored, cut up fresh strawberries- set aside

    Whisk together the dry ingredients in a mixing bowl:

    3/4 cup sweet sorghum flour


    3/4 cup tapioca starch or potato starch (not potato flour!)


    1/2 teaspoon xanthan gum


    1/2 teaspoon sea salt


    1/2 teaspoon baking soda


    1 1/2 teaspoons baking powder


    1 cup organic light brown sugar

    Add in and beat:

    3/4 cup non-dairy milk


    1/2 teaspoon lemon juice


    1/4 cup coconut oil, softened


    2 teaspoons bourbon vanilla extract


    1 tablespoon Ener-G Egg Replacer whisked with 1/4 cup warm water till frothy (or 2 beaten eggs)

    Beat until the batter is smooth- it will be fairly sticky, but much like a thick cake batter.


    Stir in by hand:

    1/2 cup dark chocolate chips

    Instructions:

    Spoon only one tablespoon of the batter into the twelve lined muffin cups.

    Add three to four pieces of fresh strawberries- sticking them into the batter a bit but avoid pushing them to the bottom- this helps keeps the muffin bottoms from getting soggy.

    Divide the remaining batter evenly between the twelve muffin cups.

    Take the remaining strawberry pieces and push them slightly into the batter- about three to four pieces per muffin. Add a few extra chocolate chips to the tops.

    Bake in the center of a pre-heated oven till domed and firm- about 25 minutes. They should feel springy when lightly touched. if they dent, they’re not done. Bake for another five minutes. If in doubt, insert a clean toothpick into the center to check for doneness.

    Note: Cold and wet strawberries will chill down the batter; so if you use ice cold berries- or really wet berries- be aware they may make the muffin a bit soggy. I drained the berries well; and let them sit at room temperature while I made the batter and preheated the oven. 

    Cool the muffins on a wire rack. Super delicious served a little bit warm when the chocolate chips are melty. 

    Wrap and bag extras to freeze for easy, on-the-go treats.


    Recipe Source: glutenfreegoddess.blogspot.com

    All images & content are copyright protected, all rights
    reserved. Please do not use our images or content without prior
    permission. Thank you. 

    Read More

  • Crispy Mushroom Sisig

    Crispy Mushroom Sisig

    recipe image

    Crispy Mushroom Sisig

    Photo by Bette Blau Prop Stylist: Brooke Deonarine Food Stylist: Yossy Arefi
    • Prep time
      25 minutes
    • Cook time
      1 hour
    • Serves
      2 to 3
    Author Notes

    Sisig, a popular Filipino dish that’s often made with different parts of pork, has everything I want in a dish: salt, fat, acid, heat (Hi, Samin!), and crunch. In the Philippines, we order sisig as pulutan, or food to go along with drinks. Make it for a party, and I guarantee everyone will love you.

    Traditionally, sisig is made with pork ears, belly, and sometimes even liver. In an essay for World Travel, Filipino chef and writer Claude Tayag notes that the first version of sisig, created in the 1700s, was a salad with green papaya, similar to atchara. The meat version of sisig came later, post-colonization, around the 1890s, to prevent food waste from the American commissaries in Pampanga.

    In the 1970s, Aling Lucing from Angeles, Pampanga, popularized a grilled version that then inspired another Angeleno, Benedict Pamintuan, to serve it on a sizzling plate. It became so popular that Angeles became the sisig capital of the Philippines.

    In an episode of No Reservations, you can see Anthony Bourdain enjoying a plate of sizzling sisig with a group of people over some beers. “I think sisig is perfectly positioned to win the hearts and minds of the world as a whole,” said Bourdain in an interview with CNN Philippines back in 2017. If this isn’t enough to convince you that sisig is one of the best Filipino dishes you can eat, I don’t know what will.

    Since I started eating vegetarian, I’ve been trying to figure out how to create my ideal meatless version—without tofu or any processed meat replacement either. I thought about how to incorporate the different textures and flavors I loved in traditional sisig and found a solution in the chewy combination of king oyster mushrooms and regular oyster mushrooms. I particularly like how you can shred oyster mushrooms like you would any pulled meat.

    This recipe serves 2 to 3, but is easily doubled if you’re cooking for more people. I’ve omitted eggs (a typical addition to sisig) to make this vegan-friendly, but you can crack 1 large egg into the mushroom sisig just after it’s done cooking and mix it in or fry a couple of sunny-side-up eggs on the side to eat it with. I recommend squeezing over lime or calamansi juice just before serving, as opposed to while cooking, so the tanginess tastes fresh. When frying, make sure your oil is hot, to prevent moisture from coming out of the mushrooms—this will help them brown faster.

    Serve the sisig while it’s hot in your cast-iron skillet to give it that sizzling plate feel, then add a couple slices of lime or calamansi, garnish with scallions, and eat it with steamed white rice. —Ria Elciario

    • Test Kitchen-Approved
    Ingredients

    • 1/3 cup

      potato starch (or cornstarch)


    • 2 to 3 cups

      (230 grams) oyster mushrooms, shredded with a fork into 2- to 3-inch pieces


    • 6 tablespoons

      untoasted sesame oil, divided


    • 6 tablespoons

      neutral oil, divided


    • 6 or 7

      (200 grams) king oyster mushrooms, roughly chopped


    • Kosher salt


    • 1/4

      red onion, finely chopped


    • 5

      garlic cloves, sliced


    • 1

      red chile, thinly sliced, with seeds


    • 2 1/2 tablespoons

      soy sauce, plus more as desired


    • 1 tablespoon

      mayonnaise or vegan mayonnaise


    • 1 tablespoon

      lime juice (from about about ½ lime)


    • 2

      scallions, chopped, for garnish


    • Lime wedges or halved calamansi, for serving


    • Steamed white rice (like calrose or jasmine), for serving


    • Fried sunny-side-up eggs, for serving (optional)

    Directions
    1. Place the potato starch in a shallow dish and toss the shredded oyster mushrooms until coated.
    2. Cover the bottom of a 10-inch cast-iron skillet with 2 tablespoons each of sesame and neutral oils, then heat over medium-high. At the same time, fill a 10-inch frying pan with about ¼ cup each of the neutral and sesame oils, then heat over medium-high. To check if the oil is hot enough, drop a piece of mushroom into both pans and see if the oil bubbles around it. If it does, you’re good to start frying. Note: It’s crucial for your oil to be hot to prevent the mushrooms from letting moisture out!
    3. In the frying pan with more oil, add enough pieces of the starch-coated oyster mushrooms to fill but not crowd the pan, about ¼ inch apart, and fry each side for 3 minutes or until slightly golden brown and crispy. Transfer to a paper-towel-lined plate to absorb excess oil.
    4. At the same time, working in batches, add 1 cup of the chopped king oyster mushrooms and spread them out onto the cast-iron skillet (no need to toss) as much as you can. As they start to shrink, add more mushrooms and stir. Again, keep spacing them out as much as you can to prevent them from steaming.
    5. Once all of the king oyster mushrooms are in and shrunk a bit, let them cook undisturbed for 3 to 4 minutes or until you start to see them brown, then mix. Repeat this process until most of the mushrooms are golden brown, then season with salt to taste.
    6. Meanwhile, once the starch-coated oyster mushrooms are cool enough to touch, roughly chop them, then transfer into a mixing bowl lined with a couple of paper towels and toss for 2 to 3 minutes to get rid of more excess oil that will come out after chopping. Season with salt to taste.
    7. Add the onions and garlic to the cast-iron skillet, then cook over medium-high, stirring every couple of minutes for 4 to 6 total minutes, until the onions and garlic are tender. Add the chile, soy sauce, and mayonnaise, then mix together for about a minute before adding the starch-coated oyster mushrooms and lime juice. Mix until everything is fully incorporated and cook together for a couple more minutes. Add more salt to taste. Note: Make sure to gently mix in a scoop-and-fold motion after adding the starch-coated oyster mushrooms to help prevent them from sticking too much and to maintain their crispiness.
    8. Garnish with scallions and a couple slices of lime or calamansi to squeeze just before eating. Serve with steamed white rice and fried eggs, if you’d like.

    Read More

  • Baked Whole Wheat Pipe Rigate Pasta With Creamy Butternut Squash

    Baked Whole Wheat Pipe Rigate Pasta With Creamy Butternut Squash

    recipe image

    Baked Whole Wheat Pipe Rigate Pasta With Creamy Butternut Squash

    Photo by Community Grains
    • Serves
      6
    Author Notes

    Meat-free, dairy-free, and utterly comforting, this pasta embraces fall. —Community Grains

    Ingredients

    • 8-10 ounces

      whole wheat shell-shaped pasta (like Community Grains Pipe Rigate)


    • 1 tablespoon

      olive oil


    • 1 cup

      chopped yellow onion (about 1/2 an onion)


    • 2

      cloves of garlic, minced


    • 2 cups

      vegetable or chicken broth


    • 1 tablespoon

      of stone-ground mustard (heaping)


    • 1/2 teaspoon

      smoked paprika


    • 1/2 teaspoon

      kosher salt + more to taste


    • 1/8 teaspoon

      freshly ground black pepper + more to taste


    • 2 tablespoons

      tamari or low-sodium soy sauce, to taste


    • 1

      butternut squash, seeds removed


    • 2/3 to 1 cup

      Greek yogurt (or coconut oil for a vegan dish)


    • Optional additions: shredded kale, sundried tomatoes, and/or about ¼ cup grated parm for extra umami.


    • 1/2 cup

      whole wheat breadcrumbs


    • 1/2 teaspoon

      dried thyme (or 1 teaspoon of fresh thyme)


    • 1/4 teaspoon

      smoked paprika


    • 1/4 teaspoon

      kosher salt


    • 2 tablespoons

      olive oil

    Directions
    1. Pre-heat oven to 375F. Drizzle olive oil and a dash of salt over the two butternut squash halves, then lay them flesh side down on a greased baking sheet. Roast in the oven for 30-35 minutes, until tender. Remove from oven and allow to cool before scooping out the flesh (about 3 cups). Keep oven on.
    2. Cook the pasta according to package directions, stopping 1 to 2 minutes short of the recommended cooking time so that the pasta is al dente (about 4-5 minutes for our Pipe Rigate). Drain, return to pot, and set aside.
    3. Make the butternut sauce:
      Set large sauté pan with olive oil over medium heat. Add the onions and sauté, stirring occasionally, until soft and turning brown, 7-8 minutes. Add garlic and cook, stirring, for another minute. Add broth, stirring to loosen up the bits of onion at the bottom of the pan. Stir in the mustard, smoked paprika, salt, black pepper, and tamari. Simmer for 5 minutes and remove from heat.
    4. In a blender, combine the 3 cups of roasted butternut squash, Greek yogurt, and sautéed onions with broth. Blend until smooth and creamy, adding more broth or water until it’s thick but pourable, like a béchamel sauce. It will thicken as it bakes!
    5. Pour the butternut sauce over the pasta in the pot. Stir gently to combine. Pour into a 2-quart baking dish (approx. 8-inch by 8-inch). At this point, you could add the optional ingredients, such as shredded kale or sun-dried tomatoes.
    6. Make the breadcrumb topping:
      Add breadcrumbs to a small bowl along with the thyme, paprika, and salt. Mix to combine. Drizzle the olive oil over the breadcrumb mix and stir until combined. Spoon over the top of the pasta. Bake at 375F until bubbly and the breadcrumbs are golden brown, about 30-35 minutes.
    7. Allow to cool slightly before serving. Garnish with fresh herbs and enjoy.

    Read More

  • Harissa BBQ Pulled Jackfruit

    Harissa BBQ Pulled Jackfruit

    recipe image

    You don’t have permission to access “http://www.foodnetwork.com/recipes/harissa-bbq-pulled-jackfruit-13246295” on this server.

    Reference #18.c172117.1738348635.18e8ca97

    https://errors.edgesuite.net/18.c172117.1738348635.18e8ca97

    Read More

  • Spicy Sauteed Kale with Pan Roasted Garlic, Currants and Sun Flower Seeds (Vegan, gluten free)

    Spicy Sauteed Kale with Pan Roasted Garlic, Currants and Sun Flower Seeds (Vegan, gluten free)

    recipe image

    Spicy Sauteed Kale with Pan Roasted Garlic, Currants and Sun Flower Seeds (Vegan, gluten free)

    • Serves
      Enough for 2-3 people (or if you’re me, you’ll eat the whole thing)
    Author Notes

    I could probably eat this every day. I have created it in many variations, but this is my favorite.

    Traditionally, this dish is done with broccoli rabe and pine nuts. I can rarely find organic broccoli rabe and pine nuts are prohibitively expensive. —MsShanaRobinson

    Ingredients

    • 2 bunches

      kale, leaves removed from stems and ripped into bite size pieces, blanched and shocked. Excess water removed.


    • 4-6

      whole medium cloves of garlic, blanched.


    • 3 tablespoons

      extra virgin olive oil. Enough to create a small pool when pan is tilted.


    • 1/4 cup

      zante currants


    • 1/4 cup

      sunflower seeds


    • salt, to taste


    • 1

      lemon, cut into wedges for garnish

    Directions
    1. Heat saute pan over medium-high heat. Add oil. Tilt pan upwards, creating a little pool of oil at the bottom, with that portion over the flame. Oil will start to bubble when hot. Add garlic cloves and cook for 3-4 minutes or until slightly golden.
    2. When garlic is golden, place pan flat over heat and reduce to medium. Add currants, sunflower seeds, red pepper flakes and a pinch of salt. Stir to combine.
    3. When currants plump (about 2 minutes), add kale and a pinch of salt. Stir to coat kale.
    4. Kale will wilt when done (about 6) minutes. Make sure kale, currants, sunflower seeds and garlic cloves are combined well. Remove from heat.
    5. Serve hot with a lemon wedge.

    Read More

  • Yellow Split Pea Soup

    Yellow Split Pea Soup

    recipe image

    A bowl of hearty vegetarian and gluten-free spiced yellow split pea soup is a filling lunch or dinner. Top this recipe with yogurt, pepitas, and fresh cilantro, then dig in!

    Updated November 12, 2024

    Sheryl Julian

    Sheryl Julian

    As winter soups go, split pea is definitely in the stick-to-your-ribs category.

    Recently, I discovered that green split peas also come in a yellow variety. Simmer these along with a handful of Indian spices, and you have a bright, filling vegetarian supper.

    Sheryl Julian


    Yellow Split Pea Tips

    Look for yellow split peas at any well-stocked grocery store, especially one with a good selection of Indian ingredients. Store any split peas not used for this recipe in an airtight container in a cool place and use with a year.

    How to Make Yellow Split Pea Soup

    Develop the flavor in this simple soup by cooking some onion, celery, garlic, and fresh ginger in the pot before adding the spices (turmeric, cumin, and coriander!).

    Stir the yellow peas into the mixture, then let this soup simmer for a full hour and a half.

    The peas grow in the pot (and they thicken even more if you store the soup overnight), so add more water whenever you need to maintain a soupy consistency.

    Sheryl Julian and Emma Christensen

    Soup should nourish and warm you in the chilly months. Bowls of yellow split peas, garnished with yogurt or sour cream, a sprinkle of cilantro, and pepitas for salty crunch, fill the belly in the most pleasant way.

    Troubleshooting Tips

    • Don’t add the lemon until after the peas have fully softened. The acid in the lemon may prevent the beans from softening.
    • If the soup gets too thick while cooking, add a little more water.
    • To up the bright yellow in the soup, add a little extra ground turmeric.

    How to Store and Reheat Split Pea Soup

    Refrigerator: Cool the soup and store tightly covered for up to 1 week. Reheat on the stovetop until heated through.

    Freezer: Freeze in a freezer-safe zipper bag or container for up to 3 months. Defrost in the refrigerator and reheat on the stovetop until heated through. Or, warm frozen soup slowly in a saucepan over low heat.

    More Hearty Vegetarian Soups to Try

    • Broccoli Cheddar Soup
    • Pasta e Fagioli
    • Easy Tuscan Bean Soup
    • Farro, Mushroom and Spinach Soup

    If you’re having trouble with split peas that don’t seem to soften despite hours of simmering, the likely cause is old or expired split peas. Even if you just bought your split peas, who knows how long they’ve been sitting on the shelf — or in a warehouse before they were on the shelf! Our best advice is to purchase split peas from a reputable grocery store where it seems like turnover on beans and legumes is high. These stores are more likely to have reliably fresh split peas.


    Cook Mode
    (Keep screen awake)

    • 2 tablespoons olive oil

    • 1 large onion, finely chopped

    • 1 rib celery, finely chopped

    • 1 clove garlic, finely chopped

    • 1 (1-inch) piece fresh ginger, peeled and finely chopped

    • 1/4 teaspoon freshly ground black pepper, or to taste

    • 1 jalapeño or other hot pepper, cored, seeded, and finely chopped

    • 1 teaspoon ground turmeric

    • 1 teaspoon ground cumin

    • 1 teaspoon ground coriander

    • 1 pound (2 1/4 cups) yellow split peas

    • 2 quarts (8 cups) water, or more if needed

    • 1 bay leaf

    • 1/2 teaspoon kosher salt, or to taste

    • Juice of 1/2 lemon (about 4 tablespoons), or more to taste

    • 1/2 cup yogurt or sour cream, to serve (omit if making a vegan soup)

    • 2 tablespoons chopped fresh cilantro, to serve

    • 3 tablespoons roasted, salted pepitas, to serve

    1. Sauté the vegetables and seasonings:

      In a soup pot over medium heat, warm the oil. When the oil is hot, add the onion, celery, garlic, ginger, and pepper. Sauté, stirring often, for 8 minutes, until the onions are looking translucent and softened.

    2. Add the hot pepper and spices:

      Stir in the jalapeno (or other hot pepper), turmeric, cumin, and coriander. Cook, stirring constantly, for 2 minutes.

      Sheryl Julian


    3. Stir in the split peas:

      Continue stirring until they are coated with the onion/celery mixture.

      Sheryl Julian


    4. Add the water and boil:

      Pour in the water and bring to a boil, stirring. Add the bay leaf.

    5. Simmer the soup:

      Cover the pot and let the soup bubble gently for 1 1/2 hours, until most of the split peas have fallen apart and are tender.

      Stir the soup occasionally. If the soup looks like it has broken down at this point, add the salt, stir and cook for another 30 minutes until the soup looks thick and creamy, then move on to step 6.

      If your split peas still feel firm, cook for an additional 30 to 60 minutes (2 1/2 to 3 hours total cooking time) before adding the salt. Add more water if the soup seems too thick.

      Sheryl Julian


    6. Add the lemon juice and taste for seasoning:

      Once the split peas are tender, add the lemon juice, plus additional salt and black pepper to taste. Stir to combine.

    7. Serve the soup:

      Ladle into bowls and garnish with yogurt or sour cream, cilantro, and pepitas.

      Did you love the recipe? Give us some stars and leave a comment below!

    Nutrition Facts (per serving)
    371 Calories
    8g Fat
    56g Carbs
    22g Protein

    ×

    Nutrition Facts
    Servings: 6
    Amount per serving
    Calories 371
    % Daily Value*
    8g 10%
    Saturated Fat 1g 7%
    2mg 1%
    246mg 11%
    56g 20%
    Dietary Fiber 21g 73%
    Total Sugars 10g
    22g
    Vitamin C 8mg 38%
    Calcium 127mg 10%
    Iron 5mg 26%
    Potassium 848mg 18%
    *The % Daily Value (DV) tells you how much a nutrient in a food serving contributes to a daily diet. 2,000 calories a day is used for general nutrition advice.

    Nutrition information is calculated using an ingredient database and should be considered an estimate. In cases where multiple ingredient alternatives are given, the first listed is calculated for nutrition. Garnishes and optional ingredients are not included.

    Read More

  • Polenta with Wild Mushroom Ragu

    Polenta with Wild Mushroom Ragu

    recipe image

    Make this showstopper with a custom blend of your favorite funghi! If wild mushrooms are not accessible, creminis or button mushrooms would also work perfectly. If serving for a dinner party or event, the ragu can be made up to three days in advance; just reheat gently on the stovetop while you make the polenta.

    Advertisement – Continue Reading Below

    FOR RAGU

    • 1 oz.

      dried porcini mushrooms

    • 2 Tbsp.

      extra-virgin olive oil

    • 2

      shallots, finely chopped

    • 2

      garlic cloves, very thinly sliced

    • 2 lb.

      mixed wild mushrooms (such as shiitake, trumpet, oyster), trimmed and coarsely chopped

    • 1 Tbsp.

      chopped fresh tarragon, plus more for serving

    • 2

      bay leaves

    • 1 1/2 tsp.

      kosher salt, plus more to taste

    • 2 tsp.

      all-purpose flour

    • 1/2 cup

      red wine

    FOR POLENTA

    • 4 cups

      vegetable broth

    • 4 cups

      water

    • 2 cups

      polenta or corn grits

    • 3 Tbsp.

      vegan butter    

    • 1/2 cup

      nutritional yeast

      1. Step 1To make the ragu: Place the dried porcinis in a medium bowl and cover with 2 cups boiling water. Let soak 30 minutes. Strain liquid into a glass measuring cup, pressing on mushrooms to release liquid. Reserve liquid and coarsely chop mushrooms; set aside.
      2. Step 2In a large skillet, heat oil over medium heat. Add shallots and cook, stirring, until softened, 3 to 4 minutes. Add garlic and cook until softened, 2 minutes. Add mushrooms, tarragon, bay leaves, and 1/2 teaspoon salt. Increase heat to medium-high and cook, stirring occasionally, until mushrooms are tender and liquid is evaporated, 4 to 5 minutes.
      3. Step 3Add flour and cook, stirring constantly, 2 minutes. Add porcini mushrooms and wine and increase heat to high. Cook until liquid has reduced to nearly a glaze, scraping any bits from the bottom of the pan. Add porcini soaking liquid and bring to a simmer. Cook over medium-high until broth is thick and flavorful, 10 to 15 minutes. Remove bay leaves and season with salt to taste.
      4. Step 4To make polenta: Meanwhile, in a large heavy saucepan, bring broth and water to a boil. Add 1 teaspoon salt and gradually whisk in polenta. Reduce heat to low and cook, stirring often with a wooden spoon, until thickened to your liking, about 15 minutes. Stir in vegan butter and nutritional yeast until melted. Serve immediately topped with mushroom ragu. Garnish with chopped tarragon.

    Read More

  • Sichuan Shirataki Sesame Noodle Salad With Cucumber, Sichuan Peppercorn, Chili Oil, and Peanuts (Vegan) Recipe

    Sichuan Shirataki Sesame Noodle Salad With Cucumber, Sichuan Peppercorn, Chili Oil, and Peanuts (Vegan) Recipe

    recipe image

    Why It Works

    • Heating the oil and pouring it over dried chiles and Sichuan peppercorns infuses it with flavor, which then gets transferred to the noodles.
    • This dish is all about balancing heat, acidity, and sweetness in the dressing.
    • Slick shirataki noodles are a great vehicle for the flavorful sauce.

    Despite the fact that I keep a mostly vegetarian diet and stay 100% vegan for a full month out of every year, I’m just about the furthest thing you’ll find from a health nut. My general philosophy on healthy eating is this: We all know what crap is; don’t eat too much of it. My doctor seems to think it’s working alright for me thus far. I’m prefacing the article this way because, for better or worse, shirataki noodles—those slick, slippery, yam starch noodles you find next to the tofu at your supermarket—have a reputation as a low-calorie health food. But that’s not what this article is about and it’s certainly not why I keep a few packages of shirataki in my fridge at all times.

    The Case for Shirataki Noodles

    I’d eaten shirataki or similar yam noodles before, but it wasn’t until recently that I started noticing pouches of them suspended in water at American supermarkets. Admittedly, my first reaction on seeing them in the refrigerated display case was oh man, another “health” food jumping onto the gluten-free crazy train. But despite garish packaging and large starbursts filled with “Zero Calorie!” and “Gluten-free!” claims, what’s inside those bags is pretty much identical to the traditional Japanese preparation. Shirataki (or ito konnyaku) can vary in appearance and texture depending on where you are in Japan, but all are made with glucomannan starch extracted from devil’s tongue yams. It’s an indigestible dietary fiber that basically passes straight through you, giving you a noodle with zero net calories and zero net carbs.

    Serious Eats / J. Kenji López-Alt


    Does that talk of carbs and dietary fiber and calories make your eyes glaze over? Yeah, I feel the same way. If you eat shirataki noodles as a diet food, more power to you. But the real reason I love them (and perhaps the reason why you should too) is their texture, and that’s really all we need to talk about when it comes to shirataki. They are virtually flavorless on their own, which means that they are superb for picking up the flavors of whatever sauce they’re in. Texture-wise, they’re slippery and slick, sort of like a cross between spaghetti and Chinese green bean jelly and it’s this texture that makes them such a joy to eat.

    I love cold wheat noodle salads. dan dan noodles are one of my favorite Sichuan dishes, and a quick and easy spicy peanut noodle salad is one of my go-to simple late night meals. But even I’ve got to admit that wheat noodles can get frustrating from time to time. Sometimes I just want the flavor of those Sichuan peppercorns, vinegar, and chile oil without feeling sluggish and weighted down after finishing a bowl. Plus, wheat noodles can release starch as they sit in their sauce, turning what was once a light and refreshing sauce into a starchy and stodgy stew.

    Shirataki noodles solve both of these problems. Unlike pasta or Chinese noodles, shirataki have no loose surface starch and thus don’t stick together or alter a sauce’s texture at all. That first bite of noodles you take in the kitchen? The one where you’ve balanced all of the flavors and textures just right? That’s how the last bite is going to taste as well.

    If you go to a particularly well-stocked supermarket, you’ll find shirataki in a variety of shapes and flavors, some made purely with yam starch, others with added tofu or other proteins and starches intended to give them a specific texture that mimics more traditional noodles. As someone who generally spurns the advances of foods masquerading as other foods, I stick to the traditional variety.

    Serious Eats / J. Kenji López-Alt


    Because shirataki are so mild in flavor and so light in texture, it also means that you can really gorge yourself on a bowl of them, sopping up all that flavorful sauce without feeling like you just ate an entire six-pack of hot pockets like you used to be able to in college. With wheat noodles, my body says uncle long before my mouth and my tongue do. With shirataki noodles, they’re on relatively even footing.

    Prepping and Cooking Shirataki Noodles

    Then, of course, there’s the convenience aspect. Aside from a bit of draining and rinsing, shirataki noodles require no preparation at all. Drain, rinse, dress, and you’re ready to eat. It takes longer for me just to heat up a pot of water to cook wheat noodles than it does for me to prepare a cold shirataki noodle salad from start to finish. To make things even easier, I keep a little deli container full of Sichuan peppercorn and dried chile-infused oil in my fridge at all times. All I’ve got to do is toss them in a bowl with some shirataki along with some vinegar, soy sauce, and a few stray aromatics, and I’ve got myself a fresh, healthy, flavor-packed snack that eats like a meal in under five minutes. For pure convenience-to-flavor ratio, that’s pretty darn tough to beat.

    Shirataki are equally delicious and convenient in hot preparations. Have you ever been tempted to cook your fresh ramen noodles (like, say, these awesome ones from Sun Noodles) directly in the pot of hot broth on your stovetop? There are two good reasons not to do this. First, wheat noodles should be cooked in boiling (or at least close to boiling) water in order to set properly and get a nice chewy, bouncy texture. Once seasoned and ready to serve, most ramen broth shouldn’t be heated above the barest simmer in order to preserve flavor (and to ensure that it doesn’t break or coagulate). Secondly, and more importantly, wheat noodles shed a ton of starch as they cook, severely altering the texture of your broth by turning it thick and gummy.

    With shirataki noodles, cooking directly in the hot soup you’re going to serve them with is not just possible, it’s actually better, infusing more flavor into the noodles and saving you from having to heat up a separate pot of water. Just pour your broth into a saucepan, add your rinsed noodles, and heat everything up together on the stovetop.

    I know that some of you aren’t going to be convinced here. Slippery is a common texture in many East Asian foods, but not necessarily one that is familiar or comforting to the Western palate. For those of you who can’t get past slippery noodles, I’m afraid I can’t help you. But for the rest of you who, like me, have been vaguely wary of shirataki noodles and all that they imply, I strongly urge you to put those fears aside just long enough to try a bowl out. This Sichuan-style shirataki noodle and cucumber salad is a pretty good place to start.

    Serious Eats / J. Kenji López-Alt


    February 2015

    Sichuan Shirataki Sesame Noodle Salad With Cucumber, Sichuan Peppercorn, Chile Oil, and Peanuts (Vegan) Recipe


    Cook Mode
    (Keep screen awake)

    • 1 (8ounce) package shirataki noodles, drained

    • 3 dried Thai chiles or 1 teaspoon chile flakes (more or less to taste)

    • 1 tablespoon Sichuan peppercorns

    • 1/4 cup vegetable or canola oil

    • 1 medium clove garlic, minced (about 1 teaspoon)

    • 1 teaspoon minced fresh ginger

    • 3 tablespoons Chinese sesame paste or tahini

    • 1 tablespoon Chinese Chinkiang or black vinegar (see note)

    • 2 teaspoons soy sauce

    • 1 tablespoon sugar

    • 1 small cucumber, peeled, seeded, and cut into thin strips

    • 1/4 cup thinly sliced scallions (white and pale green parts only)

    • 1/2 cup chopped fresh cilantro leaves and thin stems

    • 1 tablespoon roasted sesame seeds

    • 1/4 cup roasted peanuts, crushed lightly under a pan or in a mortar and pestle

    1. Transfer shirataki noodles to a colander or strainer. Rinse under cold running water for 30 seconds, then set over a bowl to drain while you make the sauce.

      Serious Eats / J. Kenji López-Alt


    2. Crush dried chiles in a mortar and pestle or spice grinder until it has the texture of store-bought crushed red pepper flakes. Place in a heatproof container along with Sichuan peppercorns. Heat oil in a small saucepan over medium-high heat until shimmering. Pour hot oil over chiles and Sichuan peppercorns (it should sizzle vigorously). Let stand 5 minutes while you prepare the rest of the sauce.

    3. Combine garlic, ginger, sesame paste, vinegar, soy sauce, and sugar in a large bowl and stir with a spoon to combine. Carefully pour chile-infused oil into bowl through a fine-mesh strainer (add only half of the chile sauce if you prefer a less spicy dish). Discard dried chiles and Sichuan peppercorns. Stir sauce to emulsify, adding a few drops of water if it is very thick (sesame paste can vary in thickness). Add cucumbers, scallions, cilantro, sesame seeds, and drained noodles. Toss to coat, adjusting seasoning with more tahini, sugar, soy sauce, or vinegar to taste. Transfer to a serving platter, top with peanuts, and serve.

      Serious Eats / J. Kenji López-Alt


    Special Equipment

    Mortar and pestle or spice grinder

    Notes

    If you can’t find Chikiang or Chinese black vinegar, combine 2 teaspoons white vinegar with 1 teaspoon balsamic vinegar in its place.

    Read More

    • The Serious Eats Guide to Shopping for Chinese Noodles

    Read More

  • Zucchini Gratin

    Zucchini Gratin

    recipe image

    Gluten-Free Goddess Zucchini Gratin - vegan and dairy-free

    A Craving for Comfort Food

    Yesterday I craved an easy old favorite. Zucchini gratin. You know the one. Classic Italian comfort food, hot from the oven, bubbling with pan-tossed zucchini and garlic in a creamy cheesy sauce topped with Italian herbed bread crumbs. Zucchini gratin is the perfect marriage of tenderness and flavor. Melted gooey cheese and toasty crumbs. Gluten-free and dairy-free. 


    Wait. What? Seriously?


    Yes, Darling. A gratin to love. Even if you aren’t a foodie and need to avoid gluten and dairy like the plague, doesn’t mean you have to give up a lovely, cheesy, comforting gratin.


    It just means you have to plan a little.


    And make a list.


    And shop.


    And cook.


    And then. You can eat.


    And smile.


    Because it’s so freakin’ tap-dancing good.

    Zuke kisses,

    Karina

    xo

    Zucchini Gratin

    Karina’s Gluten-Free Zucchini Gratin Recipe

    Recipe posted September 2011 by Karina Allrich.


    Zucchini gratin is an easy home cooked side dish that will entice even veggie avoiders to indulge. If you don’t need to be dairy-free, use milk and shredded mozzarella cheese.


    Ingredients:


    1 tablespoon extra virgin olive oil, as needed


    4 medium zucchini, trimmed and sliced


    1-2 cloves garlic, chopped


    Sea salt, to taste


    2 organic free range eggs


    1/2 cup unsweetened non-dairy milk or milk


    3 tablespoons fresh chopped basil leaves


    1 cup gluten-free bread crumbs


    2 tablespoons almond meal


    2 teaspoons dried Italian herbs


    1 tablespoon extra virgin olive oil


    1 cup shredded vegan cheese or mozzarella


    Fresh chopped Italian parsley, for serving


    Instructions:


    Preheat oven to 375ºF.


    Lightly oil an 8-inch square baking dish or two 8-inch oval gratin dishes. Set aside.


    Heat a splash of olive oil in a large skillet, using medium-high heat, and add the zucchini slices and garlic. Season with sea salt. Shake and toss the zucchini to cook lightly- just until tender-crisp.


    Spoon the zucchini into the baking/gratin dish.


    Sprinkle with fresh chopped basil leaves.


    In a large measuring cup, beat the eggs with a fork. Add in the soy milk and beat till combined.


    Pour the egg mixture over the zucchini. Top with most of the vegan cheese.


    In a small mixing bowl toss the gluten-free bread crumbs with the almond meal, dried Italian herbs, and one tablespoon olive oil.


    Spoon the oiled bread crumbs on top.


    Sprinkle with remaining cheese.


    Loosely tent the gratin with a piece of foil.


    Bake in the center of the oven for 20 minutes or so, until hot and bubbling. Remove the foil and cook for another 5 minutes if the top needs needs browning.


    Serves 4.

    PRINT RECIPE

    Recipe Source: glutenfreegoddessrecipes.com


    All images & content are copyright protected, all rights reserved. Please do not use our images or content without prior permission. Thank you. 


    GFG Notes:

    To make your own gluten-free bread crumbs (highly, highly recommended), use two toasted plain waffles or two slices of your favorite gluten-free bread, processed into crumbs.

    If you are avoiding nuts, replace the almond meal with more GF bread crumbs.

    To replace the eggs, thicken the sauce with gluten-free flour: Add a tablespoon of olive oil to a saucepan. Add two tablespoons sweet rice flour; whisk to combine. Cook for a minute. Add the soy milk, stirring to warm through and thicken. Pour over the zucchini slices.

    If you prefer to use milk and dairy based cheese, I think goat cheese or good Parmesan would be lovely, as would fresh mozzarella.


    More gluten-free gratin recipes:


    Andrea Meyers – Zucchini Tomato Gratin

    Pinch My Salt – Zucchini and Tomato Gratin


    Read More

  • Curried Chickpea Salad

    Curried Chickpea Salad

    recipe image

    curried chick pea salad sandwich with onions and peppers

    pinterest

    PHOTO: ERIK BERNSTEIN; FOOD STYLING: LENA ABRAHAM

    A good mayo-based “deli” salad is one of life’s joys. A well-crafted tuna salad can really hit the spot, and a curried chicken salad is an amazing twist on the classic formula. Unfortunately, vegans and vegetarians are often left out to dry when it comes to most mayo-based salads.

    With this curried chickpea salad recipe, you have a simple, fast, meatless way to satisfy that itch. Instead of the raisins you might find in a standard curried salad, we added fresh red bell pepper and red onion for some vegetal sweetness and a bit of bite. You can eat this salad as is, but we love it spread on some toasted bread and topped with butter lettuce and juicy tomato slices.

    If you give this recipe a try, let us know how it came out in the comments below!

    Advertisement – Continue Reading Below

    • 1

      (15-oz.) can chickpeas

    • 1 Tbsp.

      extra-virgin olive oil

    • 1

      medium white onion, finely chopped

    • 1

      jalapeño, seeded and minced (optional)

    • 3

      cloves garlic, minced

    • 2 tsp.

      cumin seeds

    • 1 Tbsp.

      curry powder

    • 1 tsp.

      ground coriander

    • 1 tsp.

      turmeric

    • 1/2 tsp.

      kosher salt

    • 1/4 tsp.

      freshly ground black pepper

    • 1/4 cup

      mayonnaise or vegan mayonnaise

    • 2 tsp.

      lime juice

    • 1/2

      red bell pepper, chopped

    • 1/2

      small red onion, chopped

    • 1/4 cup

      fresh cilantro, finely chopped

    • Toasted sourdough bread, for serving

    • Butter lettuce, for serving

    • Thinly sliced tomato, for serving

      1. Step 1Thoroughly drain the can of chickpeas. Spread chickpeas onto a baking sheet and dry with paper towels.
      2. Step 2In a large skillet over medium-high heat, heat oil until it shimmers. Add white onion and jalapeño and cook until the onion has fully softened and begun to turn golden, 7 to 8 minutes.
      3. Step 3Add garlic and cumin seeds and cook, stirring often, for 2 to 3 minutes, or until very fragrant and the cumin seeds begin to pop. Sprinkle over curry powder, coriander, turmeric, salt and pepper. Toss and toast for 2 minutes, or until the onion has taken on a darker color.
      4. Step 4Add chickpeas and cook, tossing occasionally, so that the chickpeas are coated in the spice mixture, and have started to crisp in places.
      5. Step 5Transfer chickpea mixture to a large bowl and cool for 10 minutes. Once cooled, use a potato masher to mash the chickpeas until you have a homogeneous, almost dough-like, consistency, with some whole chickpeas still intact.
      6. Step 6Fold in mayo, lime juice, bell pepper, red onion, and cilantro. Season to taste with salt and pepper. Top toasted bread with chickpea salad, butter lettuce, and sliced tomato and serve.

    preview for I Tried 19 Shocking Canned Chickpea Recipes

    curried chick pea salad sandwich with onions and pepperspinterest

    PHOTO: ERIK BERNSTEIN; FOOD STYLING: LENA ABRAHAM

    Read More