Blog

  • Vegan Irish Stew with Savory Herb Dumplings

    Vegan Irish Stew with Savory Herb Dumplings

    recipe image

    Published: · Modified: by Alissa Saenz · This post may contain affiliate links · 129 Comments

    Rich stout beer is the key to creating an intensely flavorful, and totally delicious batch of vegan Irish stew! Top it all off with some fluffy herbed dumplings and you’re in vegan comfort food heaven.

    White wooden surface set with a bowl of Vegan Irish Stew, glass of stout, and pot.

    Saint Patrick’s Day is right around the corner, and I don’t know about you, but I always enjoy using the holiday as an excuse to cook up some Irish-inspired vegan comfort food. Irish stew is one popular non-vegan comfort food that seems to be a favorite for many folks, so I decided a vegan version was in order.

    What makes this stew Irish, you ask? Well, first off, it’s totally not authentic. It’s a bit like my vegan beef stew, and if you enjoyed that I think you’ll dig this too. But it’s the addition of some Irish stout, cabbage, and savory dumplings that make this stew totally inauthentically Irish. And totally delicious.

    Jump to:
    • Ingredients You’ll Need
    • How It’s Made
    • Leftovers & Storage
    • Frequently Asked Questions
    • More Vegan Stew Recipes
    • Vegan Irish Stew with Savory Herb Dumplings

    Ingredients You’ll Need

    • Olive oil. Feel free to substitute vegetable oil, corn oil, canola oil, or any high-heat oil that you normally like to cook with.
    • Cremini mushrooms. Just about any variety of fresh mushrooms can be substituted if you’d like. White button mushrooms, shiitake mushrooms (even though they’re totally not Irish), or even oyster mushrooms will all work. Not a fan of mushrooms? Try swapping them out with eggplant or seitan.
    • Celery.
    • Carrots.
    • Onion.
    • Garlic.
    • All-purpose flour. Whole wheat flour should work fine if that’s what you prefer to use.
    • Vegetable broth.
    • Cabbage. I used green cabbage, but red cabbage will work just fine as well, even if it gives your stew a different look.
    • Potato. The recipe calls for a russet potato, but a couple of red or gold potatoes will work just fine.
    • Fresh herbs. You’ll need fresh thyme and chives.
    • Stout beer. Stout is a dark, intensely flavorful beer brew. Make sure the stout you use is vegan by running the brand through Barnivore. Guinness and Sierra Nevada stout are both vegan. Porter is a good alternative to stout if it’s not available.
    • Tomato paste.
    • Salt & black pepper.
    • Nutritional yeast flakes. Not to be confused with baker’s yeast! Nutritional yeast is a product that you can buy in the natural foods section of most supermarkets. It will give the dumplings a cheesy flavor.
    • Baking powder.
    • Fresh chives.
    • Non-dairy milk. Use a variety that’s unsweetened and unflavored. The recipe suggests soy or almond, but if you need an alternative, check out my guide to dairy-free milks.

    How It’s Made

    The following is a detailed photo tutorial on how to make this dish. Scroll all the way down if you’d like to skip right to the recipe!

    Sliced mushrooms cooking in a skillet.

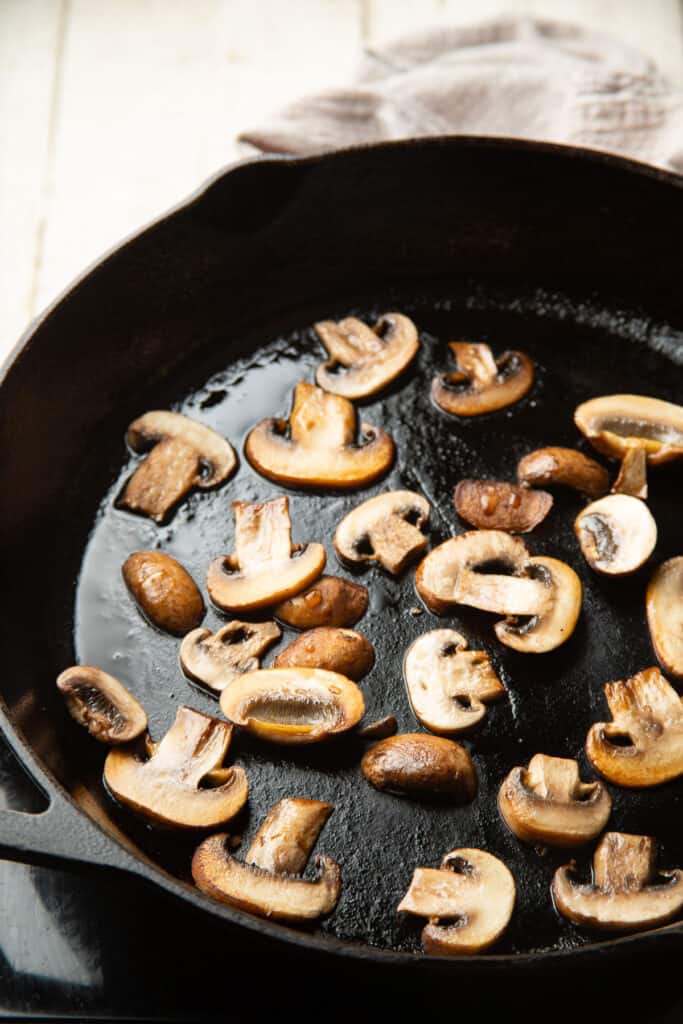
    Heat some oil in a large skillet or pot, then add your sliced mushrooms. Cook them for a few minutes on each side, until they’re lightly browned. Transfer them to a plate when they’re done.

    Carrots, onions, celery, and garlic cooking in pot with flour.

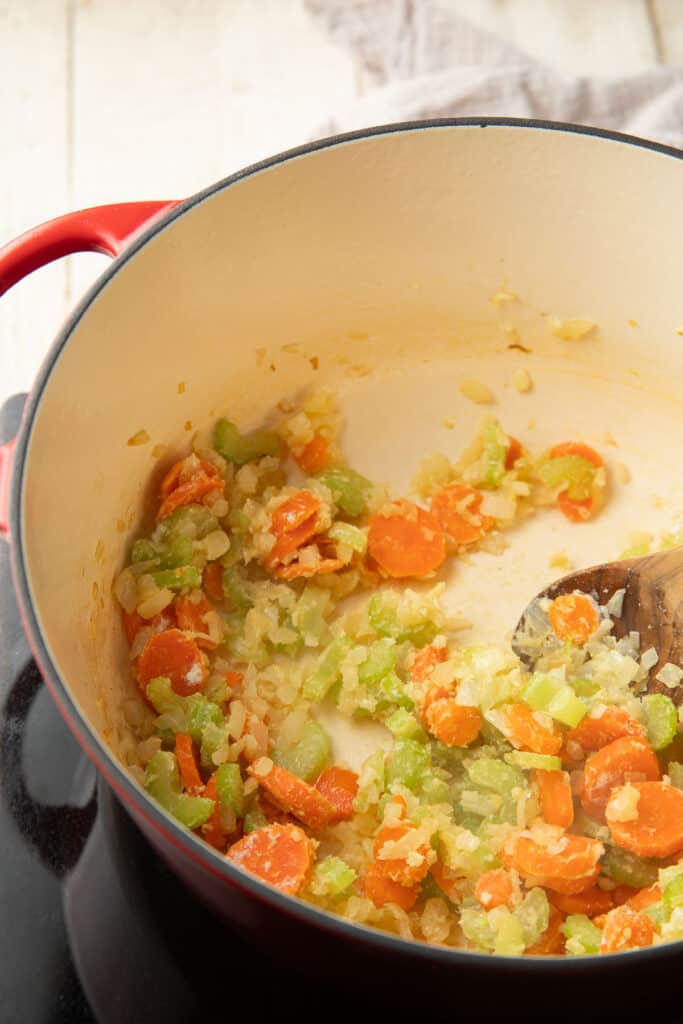
    Heat some more oil in the pot, then add sliced carrot, celery, and diced onion. Sweat the vegetables for a few minutes, until they start to soften. Add minced garlic and flour, stir everything up and cook the mixture for a minute more.

    Broth being poured into a pot of vegetables.

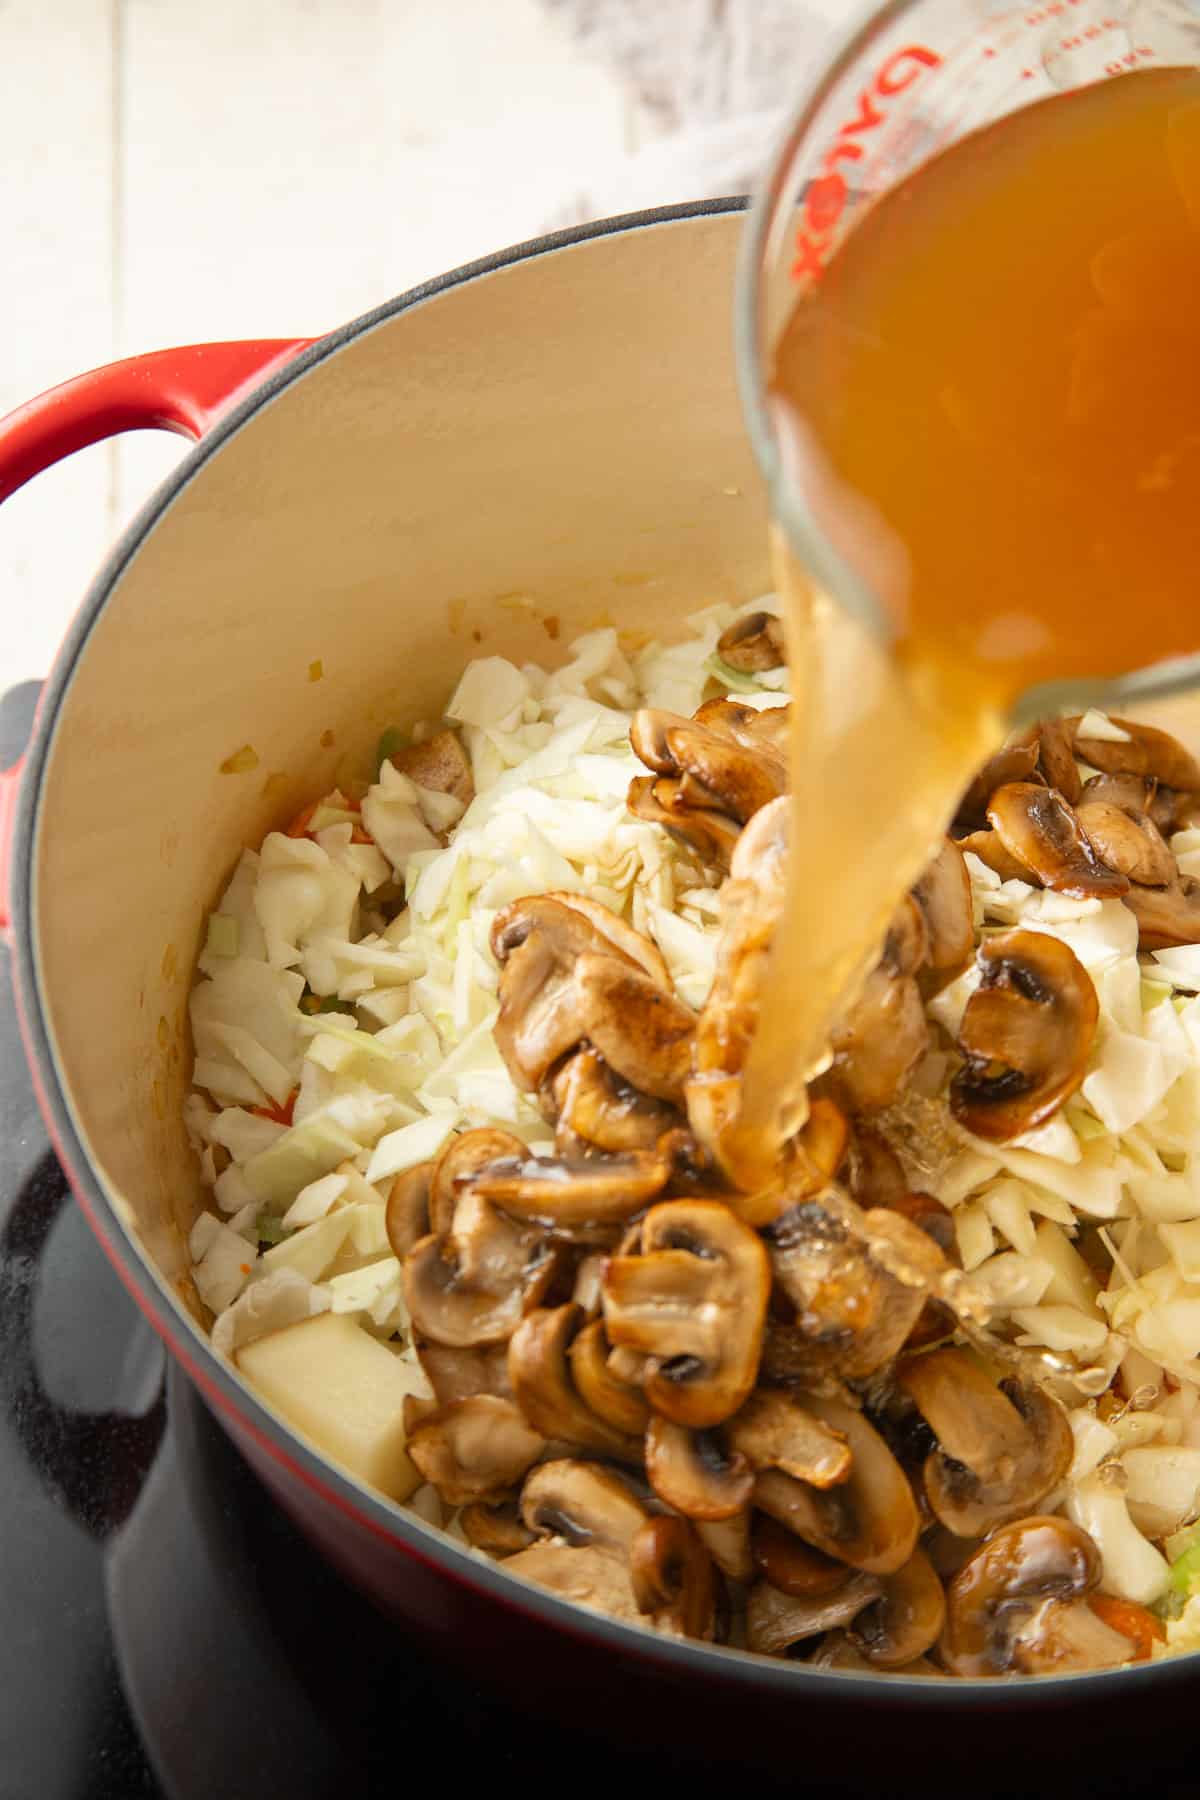
    Return the mushrooms to the pot, and add the cabbage, potato, and thyme. Stir it up, bring the broth to a simmer, and let it cook for a bit.

    Vegan Irish Stew simmering on the stove.

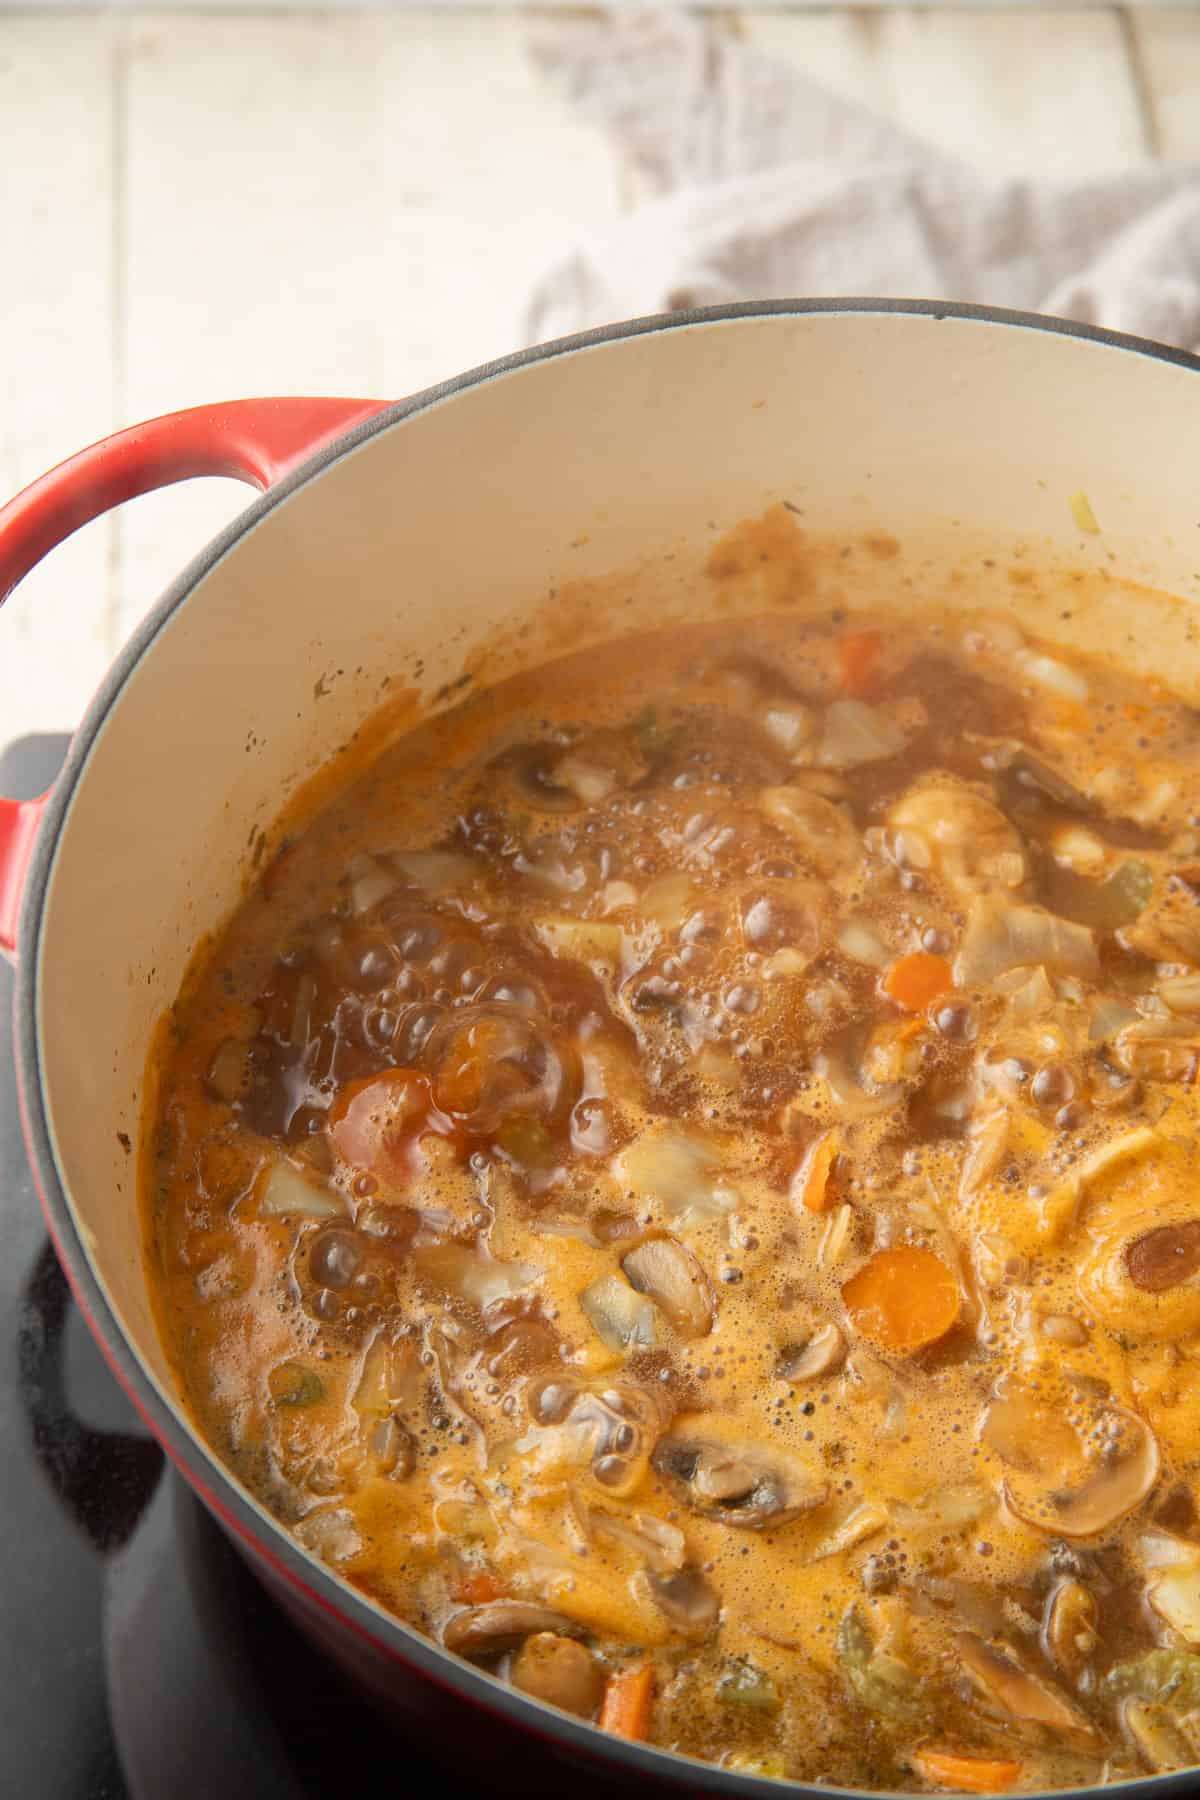
    After about ten minutes, stir in the beer and tomato paste. Let the stew continue to simmer for a few minutes longer.

    Tip: Acidic ingredients like beer and tomato paste can prevent the potato from cooking if added too early. This is why it’s important to let the stew simmer for about ten minutes before adding them.

    Bowl of herbed dumpling dough with a wooden spoon.

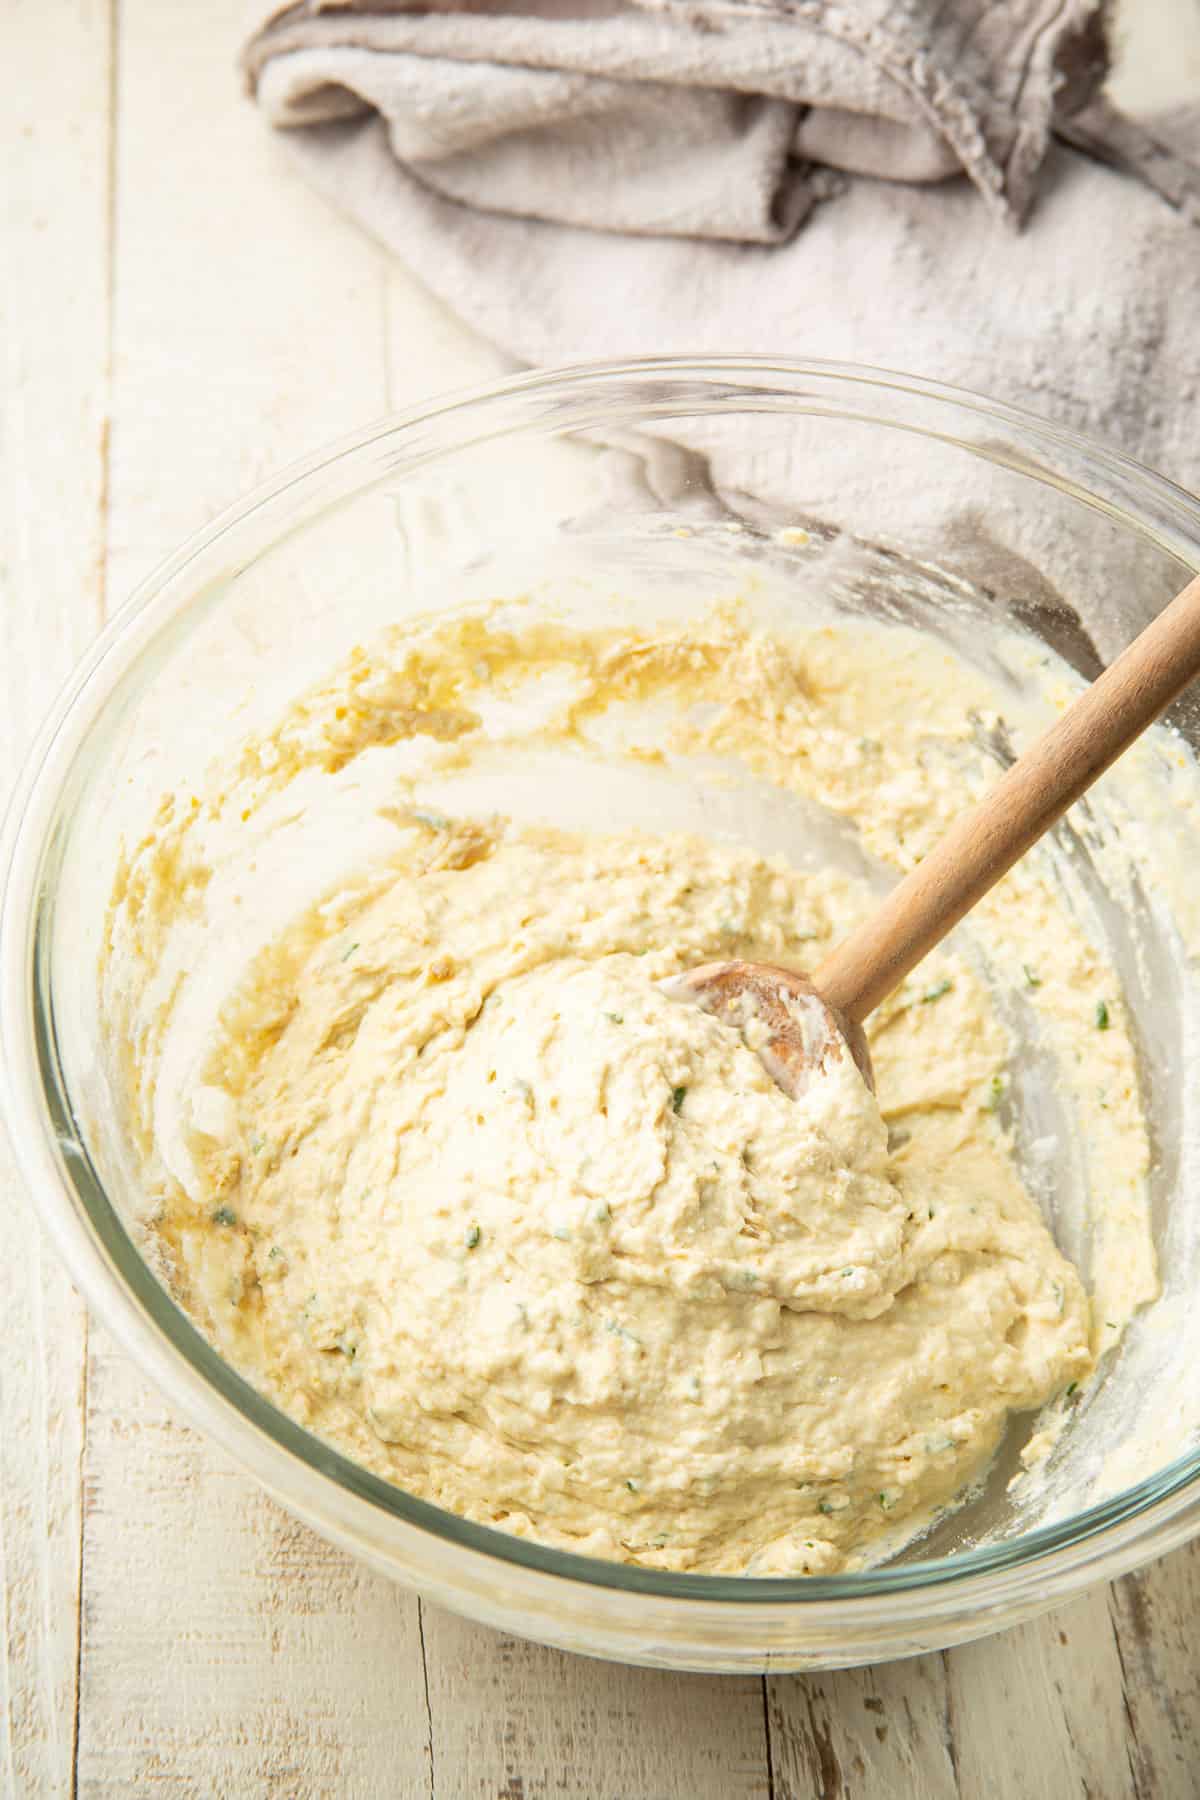
    Make the dumpling dough while the stew simmers. Stir the flour, nutritional yeast, baking powder, salt, thyme and chives together, then add non-dairy milk and oil. Be careful not to overmix the batter.

    Vegan Irish Stew with spoonfuls of dough on top simmering on the stove.

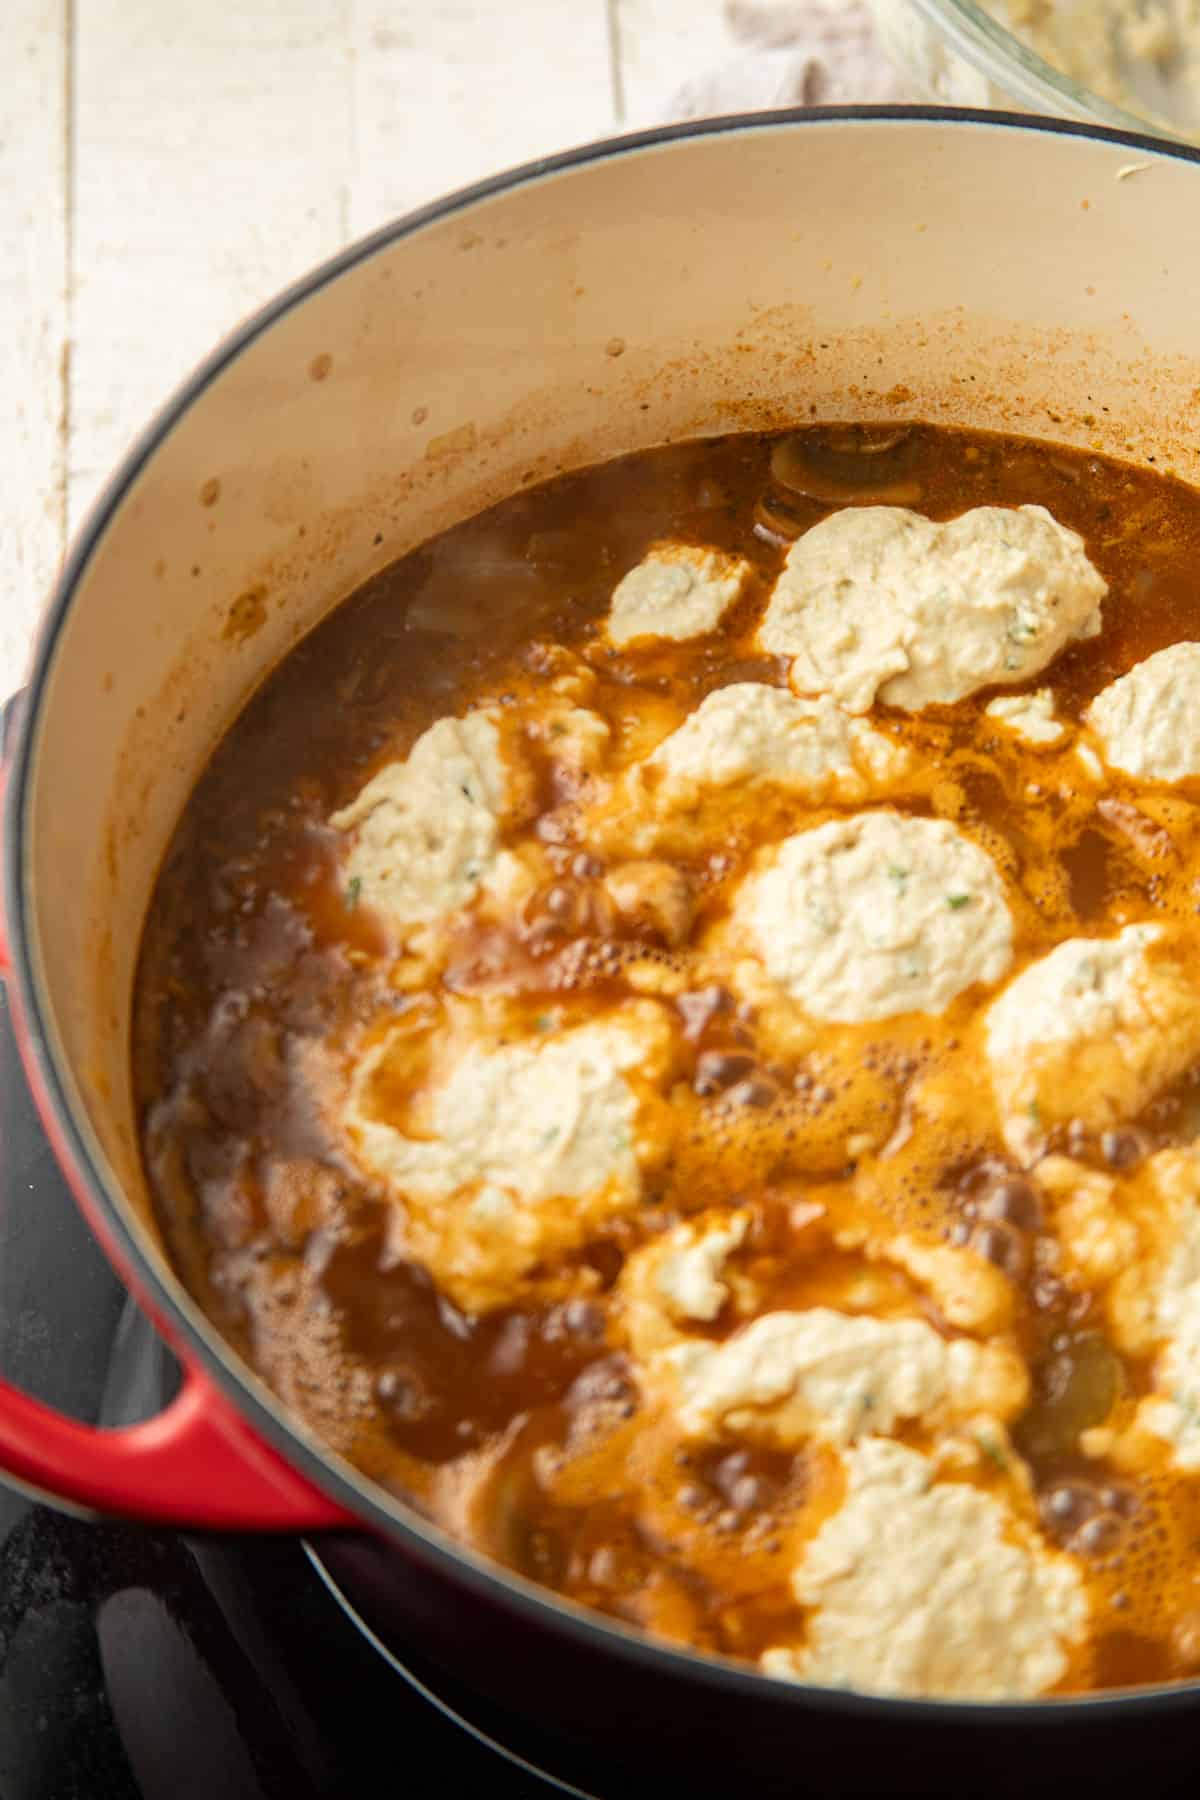
    Time to add the dumplings! But first, season the stew with salt and pepper to taste. Then drop dollops of dough into the stew.

    Dutch oven topped with a lid on a cook top.

    Cover the pot and let the stew simmer for about fifteen minutes.

    Pot of Vegan Irish Stew with dumplings simmering on the stove.

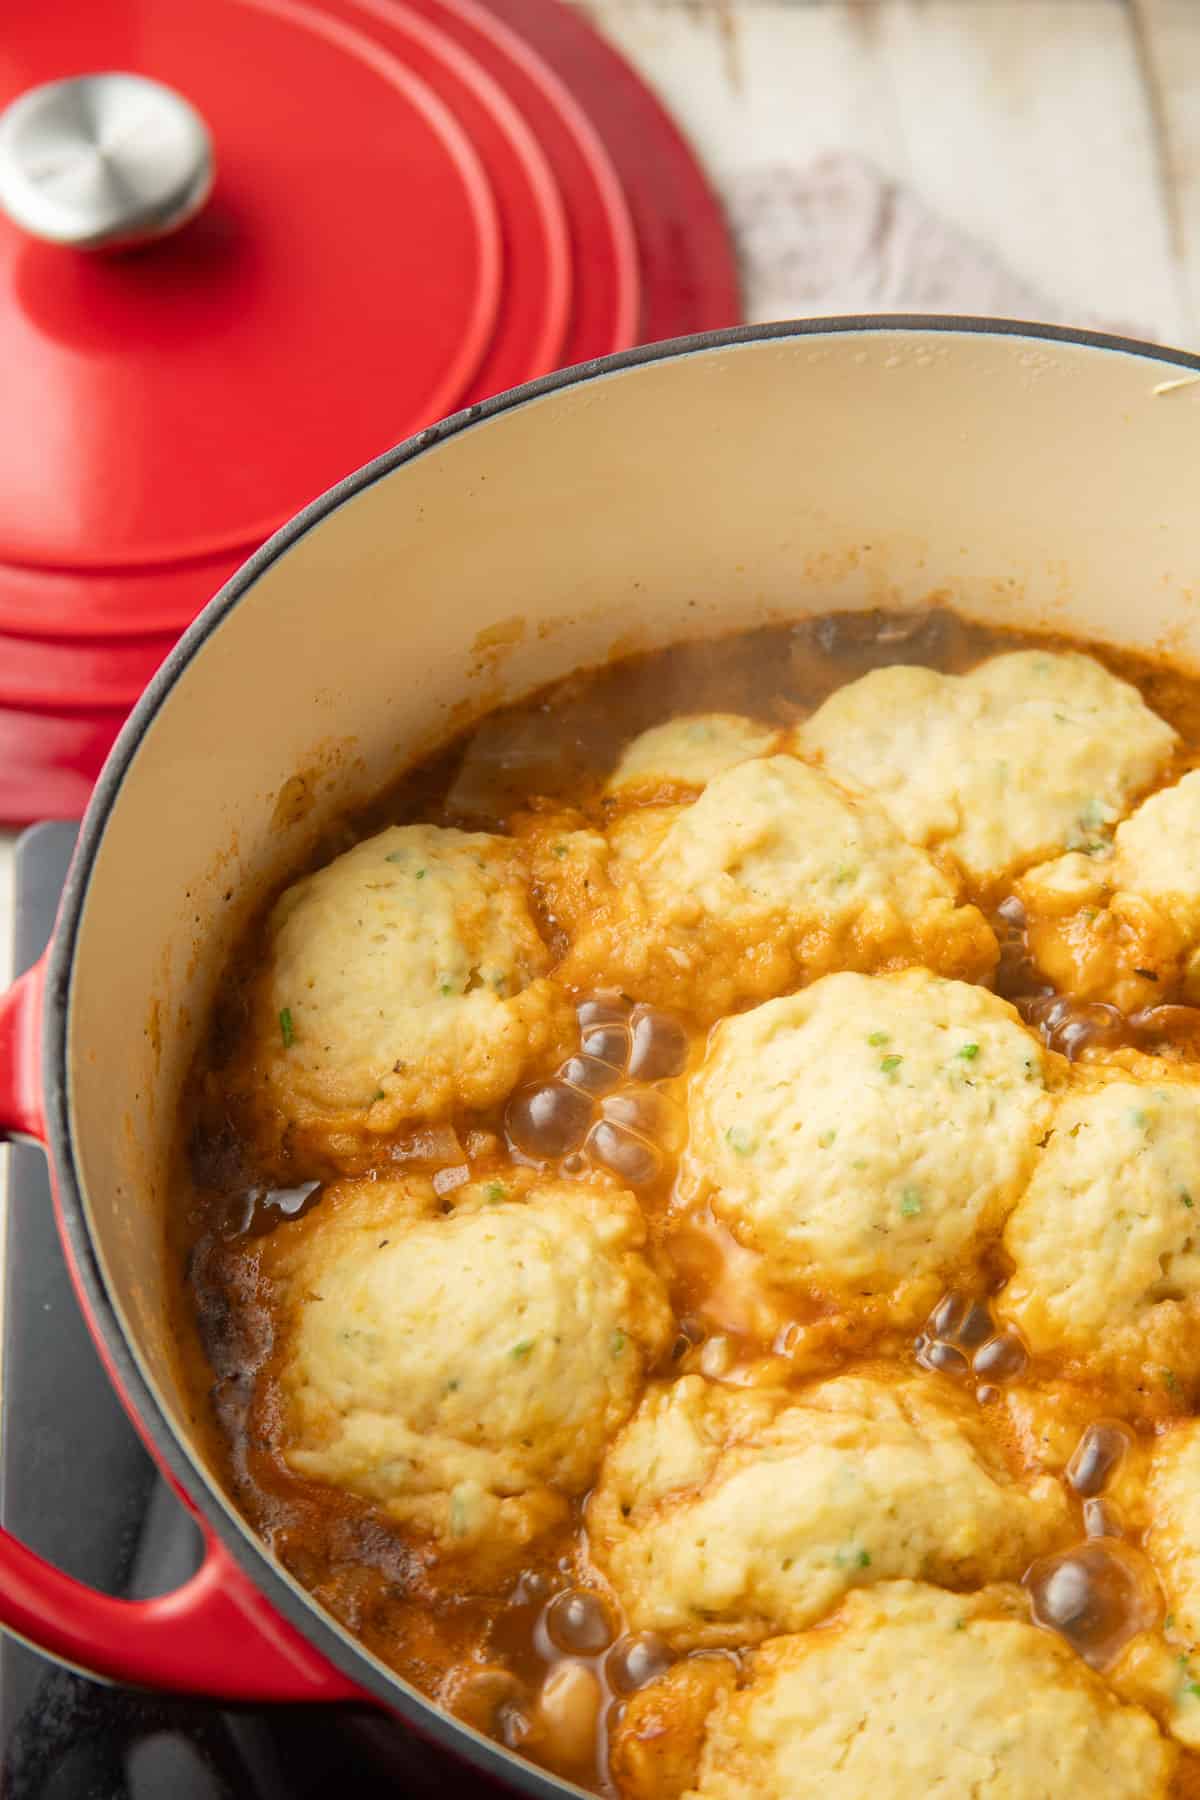
    The stew is done simmering when the dumplings have expanded and become puffy.

    Pot of Vegan Irish Stew with dumplings on top.

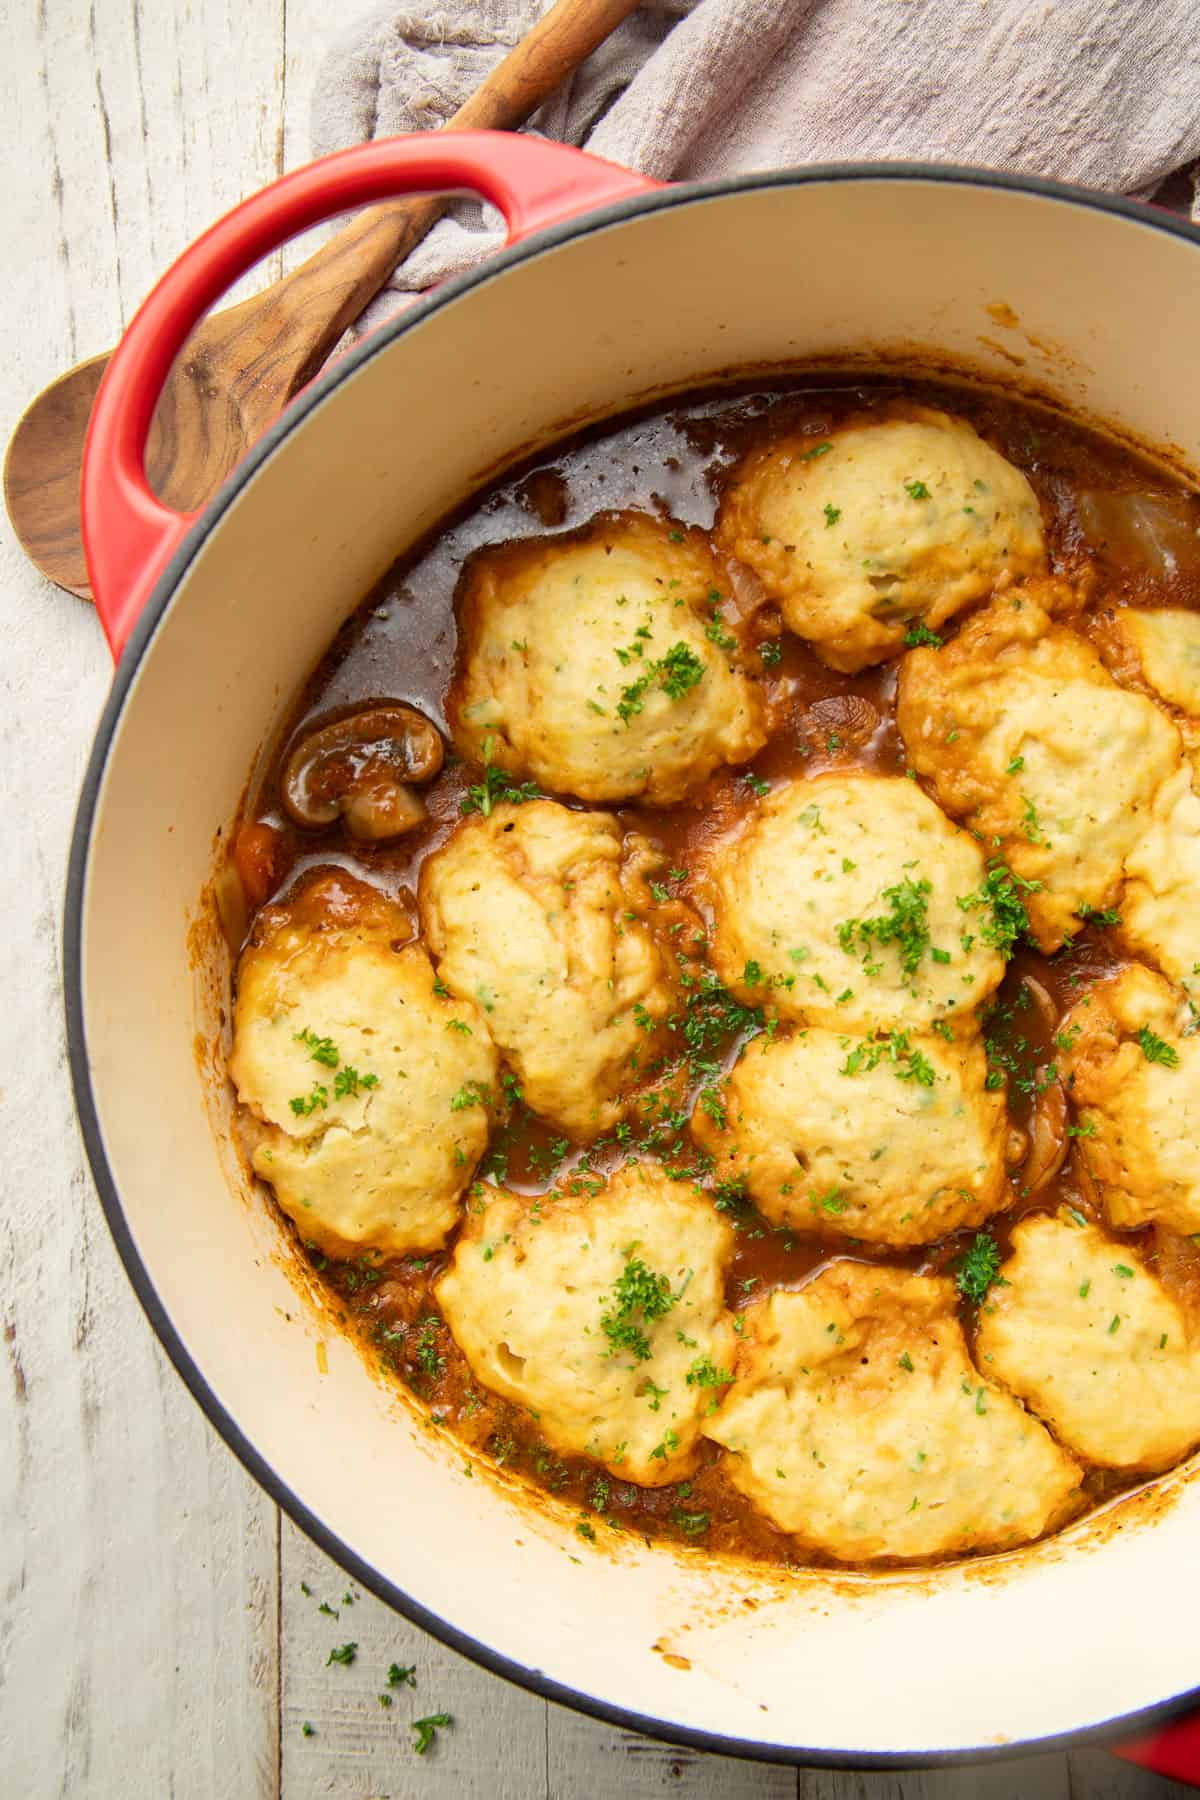
    Your vegan Irish stew is ready to enjoy!

    Leftovers & Storage

    Leftover vegan Irish stew will keep in an airtight container in the fridge for about 3 days. The dumplings will get a bit soggy as it sits, but it will still taste delicious.

    Frequently Asked Questions

    Is Guinness vegan?

    It is! Guinness removed animal products from their stout in 2018, and it’s now totally vegan.

    Can I make this stew without alcohol?

    You can! You can simply leave it out, or try an ingredient or two to replace the savory flavor that stout supplies. A few options that have worked for myself and readers are non-alcoholic beer, marmite, miso paste, soy sauce or liquid aminos, and balsamic vinegar.

    Can this vegan Irish stew be made gluten-free?

    Probably. I haven’t tested a gluten-free version, but I believe an all-purpose gluten-free flour blend should work to thicken the stew and make the dumplings. You’ll also need to use a gluten-free beer. Try one of the gluten-free stouts on this list, making sure to check with Barnivore that the brand you choose is also vegan.

    Bowl of Vegan Irish Stew with a red pot in the background.

    More Vegan Stew Recipes

    Like this recipe? If so, please stop back and leave me a review and rating below if you try it! Also be sure to follow me on Facebook, Pinterest or Instagram, or subscribe to my newsletter for more recipes like this one!

    Vegan Irish Stew with Savory Herb Dumplings

    Rich stout beer is the key to creating an intensely flavorful, and totally delicious batch of vegan Irish stew! Top it all off with some fluffy herbed dumplings and you’re in vegan comfort food heaven.

    Course Entree

    Cuisine American, Irish

    Prep Time 20 minutes

    Cook Time 1 hour 15 minutes

    Total Time 1 hour 10 minutes

    Servings 4

    Calories 591kcal

    Author Alissa Saenz

    Ingredients

    For the Stew

    • 3 tablespoons olive oil, divided
    • 1 pound cremini mushrooms, cleaned and sliced
    • 2 medium celery stalks, diced
    • 2 medium carrots, diced
    • 1 large onion, diced
    • 3 garlic cloves, minced
    • 3 tablespoons all-purpose flour
    • 3 cups vegetable broth
    • 3 cups chopped green cabbage
    • 1 small russet potato, scrubbed and diced
    • 1 tablespoon fresh thyme
    • 1 (12 ounce) bottle vegan stout beer (such as Guinness or Sierra Nevada Stout)
    • 2 tablespoons tomato paste
    • Salt and black pepper, to taste

    For the Dumplings

    • 1 ½ cups all-purpose flour
    • 3 tablespoons nutritional yeast flakes
    • 2 teaspoons baking powder
    • ¾ teaspoon salt
    • 2 tablespoons finely chopped chives
    • 2 tablespoons fresh thyme leaves
    • 1 cup unflavored soy or almond milk
    • 3 tablespoons olive oil

    Instructions

    • Begin by making the stew. Coat the bottom of a large pot with 2 tablespoons of oil and place it over medium heat. When the oil is hot, add the mushrooms in an even layer. Avoid crowding the pan and cook them in batches if needed. Allow the mushrooms to cook for about 5 minutes, flip, and cook 5 minutes more, until lightly browned on both sides. Remove them from the pot and transfer to a plate.

    • Add the remaining oil to the pot. When the oil is hot, add the celery, carrot, and onion. Sweat the vegetables for about 10 minutes, until they begin to soften.

    • Stir in the garlic and flour. Cook the mixture about 2 minutes more, until the garlic is very fragrant and the flour evenly coats the veggies.

    • Stir in the broth, cabbage, potato and thyme. Return the mushrooms to the pot. Raise the heat and bring the liquid to a boil. Lower the heat and allow the mixture to simmer, uncovered, for 10 minutes. The veggies should be a bit firm at this point.

    • After 10 minutes, stir in the stout and tomato paste. Continue simmering the stew for another 5 minutes. In the meantime, you can skip to the next step of preparing the dumpling dough.

    • While the stew simmers, make the dough by stirring the flour, nutritional yeast, baking powder, salt, thyme and chives together in a medium mixing bowl. Stir in the milk and oil to form a soft and sticky dough. Be careful not to overmix the dough.

    • Taste test the stew and season it with salt and pepper to taste, being careful, as it will be hot. Then drop 2-3 tablespoon dollops of the dough into the stew. Make sure to leave some space between them, as the dumplings will expand as they cook.

    • Cover the pot and lower the heat. Allow the stew to simmer for about 15 minutes more, until the veggies are tender and the dumplings are fluffy.

    • Remove the pot from heat. Ladle the stew into bowls and serve.

    Nutrition

    Calories: 591kcal | Carbohydrates: 73.9g | Protein: 17.6g | Fat: 23.6g | Saturated Fat: 1.9g | Sodium: 938mg | Potassium: 1659mg | Fiber: 8.5g | Sugar: 10.7g | Calcium: 250mg | Iron: 6.1mg

    About Alissa Saenz

    Hi, I’m Alissa! I’m a former attorney turned professional food blogger. I love creating vegan recipes with bold flavors! You can read more about me here.

    I’d love to connect with you on Facebook, Instagram, or Pinterest.

    Reader Interactions

    Read More

  • Flying Saucer Spaceship Edamame With “Space Sauce”

    Flying Saucer Spaceship Edamame With “Space Sauce”

    recipe image

    This kid-friendly “space snack” is out of this world! You may find it tricky to get your family to eat protein-rich edamame (whole green soy beans). Well not anymore! My Flying Saucer Edamame, with “Space Sauce” Snack, makes munching on soy beans as easy and fun as “3-2-1 Blast Off!”

    Healthy After School Snack. After a tiring day at school, it’s time to slip into your spacesuit and head out into the galaxy to collect some tasty green moon rocks! Imagination not included. Get the recipe, how-to slide show and spaceship place mat ahead!…

    More Space Sauce on your Moon Rocks Anyone? The plating for this intergalactic snack? A flying saucer spaceship. It’s perfect for transporting your space travel treasures: green moon rocks! Otherwise known as edamame soy beans. Moon rock scoopers: rice crackers. Flavor accent: maple cream space sauce! Three ingredient “Space Sauce” is perfect for building moon rock cracker sandwiches. Get ready to launch into this fun for all ages after school (or work) snack.

    Must See: The Spaceship Adventure in a Slideshow:

    Healthy Space Snack. This snack is healthy because it contains protein-rich soy beans, crisp low-fat or fat-free rice crackers and a yummy vegan cream cheese based dipping sauce. You can use any variety of rice cracker: sesame, plain, wasabi, seaweed, spicy, vegetable, black sesame or brown sesame like mine. But the main ingredient is the star of the show: soy beans! Soy beans are rich in essential amino acids (complete chain proteins), fiber, essential fatty acids and soy isoflavones. It’s not as easy as some people think to get kids (or adults!) to down those little green soybeans. This will assist you in that task. And if your family is already an edamame-fan, this snack is a fun way to perk up your bowl of edamame!

    Crafting a Spaceship. This snack takes about ten minutes to make from start to finish. And that includes steaming the soy beans. Easy right? But enough about food, you’ll need to make sure that you have enough supplies to build your flying saucer spaceship! Lets get to it!…

    Flying Saucer Spaceship Edamame with “Space Sauce”

    vegan, makes one spaceship plate plus extra “Space Sauce”

    Spaceship Supplies:

    1 small clear juice glass, hold about 1 cup of beans/

    1 plate, medium sized

    *any color/shape will work

    1 snack plastic baggy

    Ingredients:

    1 cup cooked edamame soy beans

    *I use pre-shelled/frozen beans

    10-16 rice crackers

    Space Sauce, about 2 tablespoon per plate/ship

    Space Sauce

    vegan, makes more than enough for one plate

    4-5 heaping tablespoon vegan cream cheese

    1 tablespoon maple syrup

    1 teaspoon soy sauce

    Directions:

    1. First, make the space sauce by combining all the ingredients in a small bowl. Stir briskly with a spoon until all the cream cheese lumps are gone and you have a beige-gray-colored creamy smooth sauce.

    2. Transfer the space sauce to your zippable plastic baggie. Seal tightly and place in the fridge to harden up a bit.

    3. Steam cook the soybeans. I simply place my entire bag of pre-shelled frozen soybeans into the microwave for 4-5 minutes. Poke a few holes to vent the steam. If you don’t like using microwaves, you can easily steam them stove top. I store the leftover beans in the fridge for snacking and salads. Cold edamame is delicious!

    4. Grab your glass. Fill your clear juice glass with about 1 cup of beans-or enough to reach the brim of the glass. Pack them in tightly. If you’d like, you can grind a bit of fresh black pepper over the cooked beans before packing them into the glass. Depending on whether you like the taste of cold or warm beans better (I like cold edamame best). If you need to cool off just-cooked beans, stick them in the fridge for a few minutes.

    5. Next, grab your spaceship plate. Place it upside down on, balanced on top of the bean-filled juice glass. Flip the plate and glass over carefully so that your plate is now laying flat and your secured bean cup is upside down in the middle of the plate. If any liquid seeps out of the cup-wipe it off with a napkin. Place your plate in the fridge to chill for about 5-10 minutes if you are going for the cold beans theme…


    6. Next, grab your space sauce from the fridge (it should have firmed up a tad) and cut a TINY corner end off of the baggie. This will be your squeeze baggie.

    7. Slowly squeeze out a (¼-1/2 inch thick) line around the very edge of the plate.


    8. Next, secure your rice crackers on the edge of the plate by sticking them half in the space sauce drizzle. You’re done! Now the fun part..


    9. Bring the completed spaceship to your diners and announce the spaceship landing (spaceship sounds are optional, but recommended).


    10. Announce that the spaceship will now be unloaded, and inside lie the collected galaxy space treasure: moon rocks!!!

    11. You (or your kids) can now lift up the juice cup (gently) to allow the beans, aka moon rocks, to spill all over the plate. The moon rocks can now be collected and eaten as you wish.


    12. Extra Space Sauce can be drizzled on the ship, over the moon rocks or poured into a re-fueling station side-cup.

    Happy space travels! Happy eating!

    …Moon Rock Cracker sandwich anyone???…


    Need some more SPACE ADVENTURE inspiration:

    Download a Spaceship Controls PDF placemat:

    Download a Planets Placemat:

    Blast off!!!

    Larger Slideshow-click to view:

    Read More

  • Easy Vegan French Toast

    Easy Vegan French Toast

    recipe image

    Try vegan French toast for dairy-free deliciousness! We use soy milk, but almond or other non-dairy milk might work. You could also add some nutritional yeast to the batter, if you like.

    Submitted by
    terpgirl23

    Published on June 19, 2020


    Cook Mode
    (Keep screen awake)

    Ingredients


    Original recipe (1X) yields 2 servings

    • 1 ½ cups soy milk

    • 2 tablespoons all-purpose flour

    • 1 teaspoon white sugar

    • 1 teaspoon ground cinnamon

    • 1 tablespoon vegetable oil

    • 4 slices bread, or more as needed

    Directions

    1. Whisk soy milk, flour, sugar, and cinnamon together in a bowl until well beaten. Pour into a pie pan or other wide, shallow dish.

    2. Heat oil in a skillet over medium-high heat.

    3. Dip each slice of bread into the soy milk mixture and place into the skillet. Cook until golden brown and crispy on both sides, 5 to 7 minutes.

    Nutrition Facts (per serving)

    331 Calories
    12g Fat
    46g Carbs
    11g Protein
    Nutrition Facts
    Servings Per Recipe
    2
    Calories
    331
    % Daily Value *
    Total Fat
    12g
    15%
    Saturated Fat
    2g
    9%
    Sodium
    434mg
    19%
    Total Carbohydrate
    46g
    17%
    Dietary Fiber
    3g
    11%
    Total Sugars
    12g
    Protein
    11g
    21%
    Calcium
    134mg
    10%
    Iron
    4mg
    19%
    Potassium
    278mg
    6%

    * Percent Daily Values are based on a 2,000 calorie diet. Your daily values may be higher or lower depending on your calorie needs.

    ** Nutrient information is not available for all ingredients. Amount is based on available nutrient data.

    (-) Information is not currently available for this nutrient. If you are following a medically restrictive diet, please consult your doctor or registered dietitian before preparing this recipe for personal consumption.

    Read More

  • No Bake White Chocolate Chip Protein Bars

    No Bake White Chocolate Chip Protein Bars

    recipe image

    Published: · Modified: by Lauren Kelly · This post may contain affiliate links.

    This White Chocolate Protein Bar recipe is no bake, delicious and easy to make. These protein packed bars take minutes to prepare and are vegan, dairy free and gluten free.  With over 10 grams of protein and under 200 calories per bar, these are perfect before or after a workout.

    No Bake White Chocolate Protein Bars sliced.Pin

    No-bake white chocolate protein bars are a delicious, easy-to-make snack that combines the sweetness of white chocolate with the health benefits of protein. If you are like me you are always trying to find delicious ways to add more protein to your diet.

    If you are looking for more high protein snack recipes, you will love this Vanilla Chai Protein Mug Cake, Peanut Butter Protein Muffins, Almond Butter Quinoa Butter Snacks and definitely this Protein Granola!

    These would be extra delicious with some Apple Chai Latte, Eggnog Latte, Low Carb Bulletproof Hot Chocolate or even some Spiked Apple Cider!

    Also, my cookbooks are both on sale now and would make a great gift! The Everything Wheat Free Diet Cookbook and The Greek Yogurt Cookbook are both the lowest prices I have seen!

    Why You Should Make White Protein Bars

    Who can relate…you have a few weeks of eating great and working out and then all of a sudden, you’re super busy, stressed out and you have no healthy foods prepared?  

    Most of the time, I really make an effort to eat well, drink a lot of water, sleep well and exercise at least 4-5 times a week.  And then spring sports for the kids started.

    And work has been super busy.  Something has to give, right?  Lately, that’s been my meal preparation.  And that is SO important to maintaining a balance, at least for me.

    I need that structure and planning in order to keep me on track.  And just like that, I stopped prepping.

    I started feeling tired, grumpy and stressed.  I wasn’t working out enough either never helps.  Until yesterday.  I started prepping meals and snacks again, slept 8 hours last night and made time for a run.  And because of all that, I’ve created these protein bars for you!

    Since these are require no baking, these are a quick and easy snack. They offer a good mix of protein, healthy fats, and carbs to keep you full and energized.

    How To Make These White Chocolate Protein Bars

    Mix the ingredients in a bowl, put them in a baking pan and set in the freezer for 30 minutes.  

    Unsliced in a pan with parchment paper.Pin

    Then I drizzle a bit more white chocolate on top…

    Unsliced with white chocolate drizzle in pan with parchment paper.Pin

    Slice them into bars and enjoy.

    Sliced white chocolate bars on a pan.Pin

    I keep these vegan bars in the refrigerator for a quick snack (or sometimes breakfast!) and the kids love them too!

    Full disclosure here… I would love to say that I make homemade bars and snacks all the time for my kids, but that is simply not true. I don’t always have the time to make them (even ones as easy these!) and that’s ok.

    Moms are always feeling guilty about not doing everything for our kids, am I right?

    We need to let that go. We are all doing the best we can. And the truth is, if you are a mom that does feel guilty, that means you care an awful lot.

    At least that’s how I see it.

    Stack of Protein Bars on a pan.Pin

    Peanut Butter Chocolate Granola Bars

    Homemade Protein Bars from The Recipe Critic

    Healthy 5 Ingredient Granola Bars from The Minimalist Baker

    Please feel free to follow me on Pinterest, Facebook and Instagram! Thanks for stopping by!

    White chocolate protein bars sliced.Pin

    No Bake White Chocolate Chip Protein Bars

    These No Bake White Chocolate Chip Protein Bars are delicious and easy to make. These protein packed bars take minutes to prepare and are super convenient and healthy.

    Print
    Pin
    Rate

    Course: Breakfast, granola bar, Snack

    Cuisine: American

    Diet: Gluten Free

    Prep Time: 15 minutes

    Total Time: 45 minutes

    Servings: 12 bars

    Calories: 171kcal

    Ingredients

    • cup quick oats use gluten-free oats if needed
    • ½ cup natural peanut butter
    • cup + 1 tablespoon 100% pure maple syrup
    • 1 tablespoon hemp seeds
    • 1 tablespoon chia seeds
    • ¾ cup vegan protein powder or protein powder of choice
    • ¼ cup white chocolate chips buy the vegan variety if necessary
    • 2 tablespoons white chocolate chips for drizzle

    Instructions

    • Mix all the ingredients except chocolate chips in a medium bowl thoroughly.

    • Add ¼ cup of chocolate chips until combined.

    • Line a 8 x 8 inch baking pan with parchment paper.

    • Spread mixture into pan and smooth out evenly.

    • Melt remaining two tablespoons chocolate chips in microwave or sauce pan and drizzle over bars with a spoon.

    • Place into freezer for at least 30 minutes to set.

    • Remove from freezer.

    • Cut into 12 bars. Store in airtight container in the freezer or refrigerator.

    Notes

    To store in the refrigerator: Place in an airtight container for up to 5 days.

    To store in the freezer: Place in an airtight container for up to 3 months.

    Nutrition

    Calories: 171kcal | Carbohydrates: 17g | Protein: 11g | Fat: 9g | Saturated Fat: 2g | Polyunsaturated Fat: 2g | Monounsaturated Fat: 3g | Trans Fat: 0.002g | Cholesterol: 1mg | Sodium: 74mg | Potassium: 137mg | Fiber: 2g | Sugar: 9g | Vitamin A: 8IU | Vitamin C: 0.03mg | Calcium: 47mg | Iron: 2mg

    Read More

  • Vegan Tropical Smoothie

    Vegan Tropical Smoothie

    recipe image

    I loved how cold and refreshing this was on a hot summer day. I used unsweetened coconut and loved that a hint of coconut flavor came through with no added sweetener needed. I followed the recipe exactly except for using a frozen banana. I definitely needed my high end blender for this one, but it turned out to be a thick, sweet smoothie that I will make again.

    Read More

  • Chocolate Oatmeal Cookies- Healthified

    Chocolate Oatmeal Cookies- Healthified

    recipe image

    I’m sure you have seen the 3 ingredient cookie recipe going around. Well, of course I had  to try it and then make it my own with all the things I love. And guess what? 

    They are FANFREAKINGTASTIC!

    Super moist, super healthy and super yummy. My kid loves them! My husband loves them! And I love them! Total hit!

    My goal was to make something sweet and treat-like without adding ANY extra sugars. This was it! Look no further my friends. I did splurge on last batch and add Vegan Dark Chocolate chips. Which put them over the top!

    Recipe makes about 1.5 dozen

    Ingredients:

    • 3 ripe bananas mashed
    • 1 1/4 cup gf instant oats
    • 1/4 cups shredded unsweetened coconut flakes
    • 1/4 cup raisins
    • 1 scoop or serving of vegan chocolate protein powder (I use Shakeology well, because it’s the best!)
    • 1/4 cup unsweetened coconut milk
    • *Optional-2 oz mini vegan chocolate chips (I use Enjoy Life)
    • *Optional-2 tbs natural peanut butter


    Directions:

    • Heat oven to 350 degrees.
    • Mash bananas in large bowl. 
    • Add oats, coconut, raisins, chocolate chips, protein powder and mix well. 
    • Add coconut milk and any other options you desire like nuts, pb, or dried fruit. 
    • *(The more ingredients you add, you may need to add more coconut milk.)
    • Scoop 1 large TBS on silpat matt cookie sheet. 
    • Bake at 350 for about 12-15 minutes. 


    • Remove from oven, let cool for 5 minutes and DEVOUR!

    Refrigerate left over cookies in an air tight container for the rest of the week. These are a great treat, snack or even a quick breakfast bite! 

    ENJOY!

    *Don’t miss a recipe or post! Make sure you are on my email list. ADD EMAIL

    Read More

  • Almond-Vanilla Pudding

    Almond-Vanilla Pudding

    recipe image

    “Really easy, vegan pudding 🙂 yummy!”

    Ready In:
    15mins

    Ingredients:
    4

    Serves:
    3-4

    • 2

      cups almond milk
    • 3

      tablespoons cornstarch
    • 1

      tablespoon agave nectar (or honey if not vegan)
    • 1

      teaspoon vanilla

    directions

    • Mix a little of the milk with the cornstarch to form a paste.
    • Heat the rest of the milk gently to a simmer, then add in the cornstarch paste, agave and vanilla.
    • Stir until thickened and serve with fruit.

    Questions & Replies

    Want a Second Helping?

    Sign up for our newsletter to get recipes, easy dinner ideas, tasty treats and more delivered straight to your inbox.

    To withdraw your consent or to learn more about your rights, see the Privacy Policy.

    RECIPE SUBMITTED BY

    “>

    My name’s Fi, I’m 23 and I’m at uni atm in my final year studying Philosophy and Literature. I love reading and writing, and hope to do a postgrad course in Folklore and Creative Writing. I’m kind of obsessed with fairy tales, especially Hans Christian Andersen, and I’m a total Harry Potter geek! I love cooking, and I’m also kind of a health freak so I like adapting recipes to make them more healthy, although I love to cook food for other people too. I don’t really eat dairy (I had an intolerance when I was younger), and have recently developed a reaction to wheat so I like being creative with what I cook!

    View Full Profile

    Read More

  • Vegan mayonnaise

    Vegan mayonnaise

    recipe image

    You are here: Home / Dinner / Vegan mayonnaise

    Vegan mayonnaise? I know what you’re thinking. How is this even possible? I didn’t think this was gonna work either. But oh, how wrong was I.

    The base for this thick and creamy vegan mayonnaise is aquafaba – the liquid/brine leftover in a can of chickpeas which is blended with nutritional yeast, apple cider vinegar, mustard, salt and agave syrup for that perfect, tangy flavour, and vegetable oil for creaminess.

    Perfect for salad dressings, sandwiches and more, this vegan mayo recipe is a total game changer!

    Vegan mayonnaise

    Print Recipe

    Thick and creamy vegan mayonnaise alternative that is super easy to make

    Ingredients

    • 125 ml aquafaba
    • 1 tsp nutritional yeast
    • 2 tsp apple cider vinegar
    • ¾ tsp mustard
    • ½ tsp salt
    • ¼ tsp agave syrup
    • ¼ tsp cream of tartar
    • 1 cup vegetable oil

    Instructions

    • Place all the ingredients bar the oil in a blender and blend at highest speed for around 2-3 minutes. Slowly add the oil in a steady stream while continuing to blend on high speed until the mixture resembles mayonnaise.

    Read More

  • Walnut Bundt Cake with Vegan Chocolate Sau

    Walnut Bundt Cake with Vegan Chocolate Sau

    recipe image

    Dessert

    By: Ana /
    16 / Dessert, Vegetarian, Winter,
    Pin

    It’s been more than thirty days since we last saw sunlight in our city. It’s raining and snowing and again raining, and every day is draped in cold and gray. It’s quite difficult to keep a positive attitude these days, but with the help of yoga, meditation, and nourishing home cooking, I managed to keep us on the good path. And there is also that merry little thought that very soon the holidays will be here with their lovely atmosphere and happy gatherings. With this thought in mind, I practiced for this glorious dessert that will crown our Christmas table – the walnut bundt cake with vegan chocolate sauce.

    Chocolate-Bundt-CakePin

    I fell in love with this cake because it is so easy to make (I am not exactly a very meticulous person) and the taste is surprisingly rich and decadent. The combination of cinnamon, walnuts, and chocolate is everything you would expect from a Christmas cake and will fill your kitchen a heavenly aroma. It has a gorgeous appearance which makes the perfect choice for impressing guests at dinner. The texture is very dense and one only needs a little piece to be satisfied. Should I also mention that it only contains whole, unrefined ingredients? It actually couldn’t be any other way, being baked in my kitchen.

    Christmas-CakePin

    Besides the whole wheat flour and organic eggs, the one ingredient that gives it the intense brown color and the interesting, subtle flavor was the muscovado sugar. I don’t have sugar in my kitchen because I don’t encourage consuming it, but when it comes to baking a cake, I always go for its unrefined version – the muscovado. Muscovado sugar is made from sugarcane juice which is left to evaporate until crystallization occurs. It’s coarser and stickier than brown sugar, with a distinct, flavorful taste. I always go for muscovado made in Mauritius because over there, the sugarcane juice is drained naturally and the product keeps its nutritional values unchanged.

    Sugarcane juice is abundant in vitamins (A, C, B1, B2, B3, B5, B6), minerals (calcium, manganese, magnesium, potassium, iron, and zinc), and also chlorophyll, proteins, antioxidants, and soluble fiber. The high amount of sugar from the sugarcane juice isn’t recommended for regular consumption, but for baking a cake every now and then, it’s better to use muscovado instead of refined white sugar (which undergoes heating and bleaching stages that kill the nutritional content while adding harmful chemicals).

    Chocolate-CakePin

    Walnut Bundt Cake with Vegan Chocolate Sauce

    This lush, dark-colored cake combines Christmas flavors – cinnamon, walnuts and chocolate – making it the best choice for crowning your dinner table.

    Prep Time10 mins

    Cook Time50 mins

    Total Time1 hr

    Course: Dessert

    Cuisine: Vegetarian

    Servings: 10

    Author: The Awesome Green

    Ingredients

    • For the cake
    • 2 large organic eggs
    • Fresh juice from half a lemon
    • 1 &1/2 cups muscovado sugar
    • 1/2 cup coconut oil
    • 1 cup whole wheat flour
    • 1 cup buckwheat flour
    • 1/2 cup buttermilk
    • 1 cup toasted walnuts crushed
    • 1 tsp baking soda
    • 1 tsp baking powder
    • 2 tsp cinnamon powder
    • 1/2 tsp sea salt
    • For the vegan chocolate sauce
    • 1 cup full fat coconut milk
    • 1/4 cup muscovado sugar
    • 2 tbsp raw cacao powder
    • 1 tsp coconut oil
    • 1 cup blackberries fresh or frozen, to garnish

    Instructions

    • Heat the oven at 180°C/356°F.

    • Beat the eggs in a big bowl, then add lemon juice, buttermilk, sugar and coconut oil.

    • Add gradually the flours, baking powder, baking soda, cinnamon and walnuts, mixing well until a sticky mixture is formed.

    • Grease a bundt cake tin with coconut oil and pour the mixture into the tin.

    • Bake for 50 minutes, then remove from the oven and set aside to cool for five minutes before removing from the tin.

    • When the cake is completely cool, wrap in plastic foil and refrigerate.

    • For the vegan sauce, place all the ingredients (except the coconut oil) in a blender and process to obtain a smooth liquid.

    • Transfer the mixture in a sauce pan over low heat and stir continuous until it starts simmering.

    • Turn off the heat, whisk in the coconut oil and set aside to cool. Keep in the refrigerator in an airtight container.

    • Before serving, bath the bundt cake in chocolate sauce and decorate with blackberries.

    Notes

    Pin

    Related posts

    Reader Interactions

    Read More

  • Vegan Pesto

    Vegan Pesto

    recipe image

    by Celeste · This post may contain affiliate links · 18 Comments

    You’ll love this updated version of my Vegan Pesto. The addition of fresh lemon juice makes it bright bold and full of flavor, make it in under ten minutes, that’s including prep time.

    I’m a full-time vegetarian and sometimes I like to go vegan, and that’s easy when the recipe is this quick and easy.  I’m growing some beautiful basil and thought I would use it to make a vegan version of basil pesto because I’m trying to reduce dairy.

    Basil-Plant

    I’m guessing you want to know what I used to replace the Parmesan, I used nutritional yeast. Nutritional yeast has such a bold nutty flavor and it rocks this recipe.

    Bottle of olive oil, fresh basil, pine nuts, garlic cloves, and nutritional yeast.Vegan pesto ingredients in food processor.

    Everything goes into the food processor and you blend until smooth.

    Blended vegan pesto in food processor.

    Bowl of Vegan Pesto

    This Vegan Pesto is a staple in my home, it’s nice to have on hand, it can be used so many ways….

    on sandwiches

    veggies

    tofu

    beans

    and my all-time favorite pasta!

    Plate of pasta tossed with Vegan Pesto with tomatoes on top.

    Print

    5 Stars 4 Stars 3 Stars 2 Stars 1 Star

    5 from 4 reviews

    • Author: Celeste Meredith
    • Prep Time: 8 min
    • Total Time: 8 minutes
    • Yield: about 1 cup
    • ½ cup pine nuts
    • 4 cloves of garlic
    • 4 cups lightly packed basil leaves
    • ½ cup nutritional yeast
    • juice from half a lemon
    • ½ cup extra-virgin olive oil
    • sea salt and cracked black pepper to taste


    Instructions

    1. Clean and spin basil leaves in a salad spinner or pat dry with paper towel.
    2. Place pine nuts, garlic, basil, nutritional yeast, and lemon juice in the food processor.
    3. Process while slowly pouring olive oil through the feed tube.
    4. Process until mixture is pureed, scraping down sides as needed.
    5. Transfer mixture to a bowl and season to taste with sea salt and pepper.
    6. Use right away or store in refrigerator or spoon into an ice tray and freeze for up to 3 months.

    Notes

    Pine nuts were used, but if you need to make a nut free version hemp seed is the perfect substitute. 

    Nutrition

    • Serving Size: 1 Tablespoon
    • Calories: 101
    • Sugar: 0.3
    • Sodium: 0.4
    • Fat: 9.9
    • Saturated Fat: 1.2
    • Unsaturated Fat: 5.8
    • Trans Fat: 0
    • Carbohydrates: 2.3
    • Fiber: 0.8
    • Protein: 2.2
    • Cholesterol: 0

    Read More