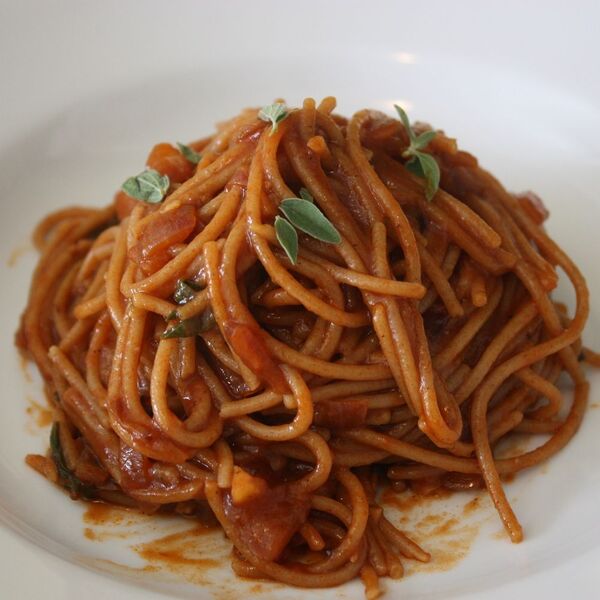
I was a chef years ago, and one dish that I crave and make often after being away from the professional kitchen after all these years is ‘Pasta Della Nonna’. I liked the Idea that you could use a couple cheap ingredients (tomato paste! red onion!) and make something pretty remarkable. The original recipe (although, as you can imagine, there are countless ‘pasta della Nonnas’) used white hand made spaghetti, tomato paste, oregano and rosemary, red onion, no garlic, and was finished with parmesan and pecorino cheeses. My version uses the same foundation that makes this dish fun and special and CHEAP – red onion and tomato paste, but I use whole spelt pasta, marjoram for my herb, I do add garlic to my dish, and I don’t eat dairy, so I omit both types of cheese, and frankly, it doesn’t need it.
Oh, just so you know, this dish will set you back about $1.47! —fo
Ingredients
4 ounces
whole spelt pasta
2 teaspoons
fresh marjoram leaves, torn
2 tablespoons
(about) tomato paste
1 tablespoon
olive oil
1/2
red onion, diced
1
clove garlic, minced
Directions
Boil and drain pasta (be sure to salt your pasta water, it should taste of the sea), reserving about 1 cup pasta water. Set the pasta aside. Whole spelt pasta only takes about 6 minutes to cook, so watch it. The dish will come together quickly, so no need to toss pasta in oil to keep from sticking.
Heat the olive oil in a pan, add your red onion and brown over medium heat. Watch the flame, you dont want to burn your cubes.
When the onion is browned, toss in your minced garlic, cook for about 30 seconds, then add your tomato paste. I add a heaping spoonful, which looks to add up to about 2 TB.
Cook your paste out until it caramelizes. Tomato paste has a lot of natural sugar, so it won’t take long to caramelize. You will know once you’re there because it will start to smell sweet and caramely and a thin film will coat the bottom of the pan. Because this happens quickly, make sure your flame is no higher than medium, you don’t want to burn your paste.
Once your paste is caramelized, get about 1/3 cup of the reserved pasta water into the pan quickly to stop the tomato from cooking, and scrape up any bits from the bottom of the pan.
Get your pasta into the pan along with the marjoram. Toss about over medium heat till the pasta absorbs some of the sauce, and the sauce gets silky. If the pan looks dry, add a little more of the reserved pasta water by the tablespoon until you get the consistency right. When you get it to where you want it to be, good and saucy, serve (yourself!).
I write. I cook. I want A&M’s job! Just kidding. No, I’m not. I used to be a professional chef, and while I no longer want to be in a professional kitchen, I could never stop cooking. How cliche that I write and cook, nonetheless, the two marry quite happily and blogging fulfills both of those passions for me with an immediacy that I crave. I would love some day to do it full-time.
I have two blogs at the moment, and I’m developing a third.
Heat the oven to 150C/130C fan/gas 2. Rinse the rice in a sieve under cold running for a few seconds, then tip into an 850ml baking dish. Mix in the maple syrup, vanilla, a strip of orange zest and almond milk. Cook, uncovered, on the middle shelf of the oven for 2 hrs until the rice is tender, most of the milk has been absorbed, and the mixture is creamy.
step 2
Meanwhile, put the pears, berries and orange juice in a small pan over a medium heat. Cook for 10-15 mins until the berries have broken down and reduced, and the pears are tender. Add a splash of water during cooking, if needed, to create a jammy compote. Leave to cool slightly. Add a splash more almond milk to the rice pudding if you prefer a looser consistency, then serve with the compote.
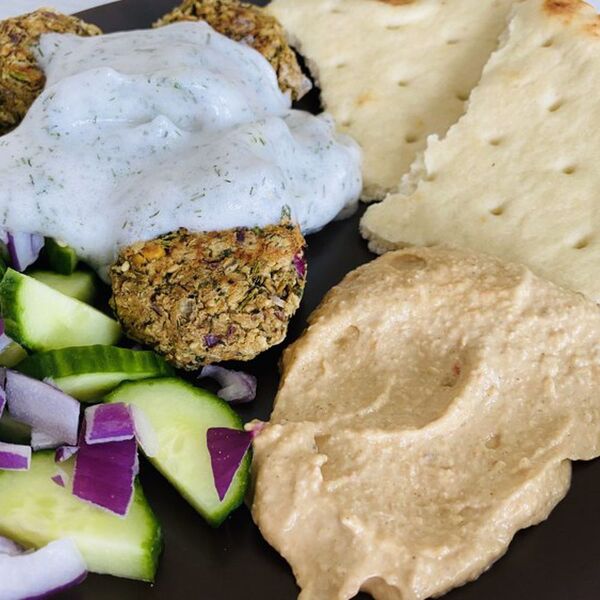
I LOVE making falafel because they are an easy way to meal prep for some vegan protein. And when you bake them, instead of frying them, they are the key to simple and healthy meal prep! Just blend, shape and bake.
Falafels are pretty versatile, depending on the spices you like. And the toppings are endless! I like my falafel with hummus and pita bread and some sort of salad, either cucumbers or tabbouleh. You can even make a falafel bowl, a falafel wrap, a falafel salad, whatever suites your fancy! —Carissa Erzen
Ingredients
2 cups
cilantro
1 cup
red onion, roughly chopped
4
cloves garlic, peeled
1 teaspoon
cumin
1 teaspoon
za’atar
¼ teaspoons
red cayenne
½ teaspoons
ground cloves
1 pinch
salt & pepper
15 ounces
chickpeas (one can)
¼ cups
panko bread crumbs
1 tablespoon
extra virgin olive oil, for brushing
Directions
Preheat the oven for 450°F.
Drain the chickpeas and give them a rinse in water.
Let the chickpeas drain in a strainer over a bowl or sink while you get the rest of the ingredients ready.
Combine everything in a food processor except the chickpeas, panko bread crumbs and olive oil. Pulse until it is all finely chopped.
Add the chickpeas and pulse until it forms a thick and chunky paste.
Scrape everything from the food processor into a mixing bowl.
Add the panko bread crumbs and stir everything to combine.
Form the mixture into balls, using about 2 Tbsp each to form 12 balls. Arrange them on a baking tray as you form them.
Use the palm of your hand to flatten each ball slightly, so the tops and bottoms of each falafel are flat.
Brush some olive oil on each patty.
Bake for ~ 20 to 25 minutes, until they are crisp. Flip them all over halfway through baking.
Enjoy!
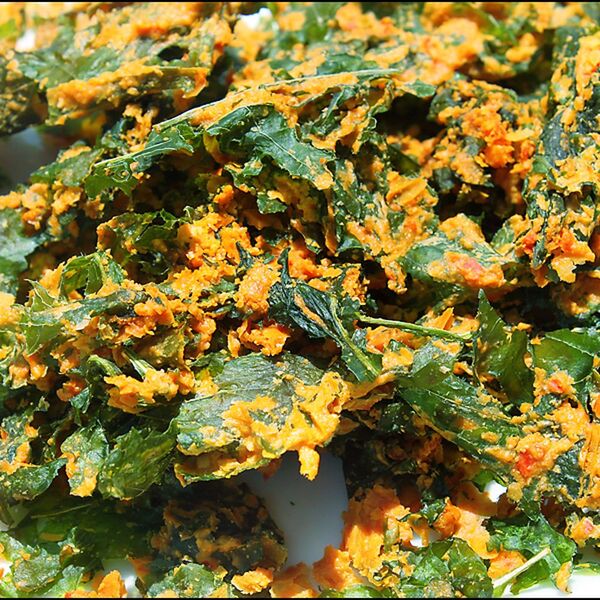
When traveling with 6 children on the road, my kids like to munch along the way. Chips are their favorite so I decided to bring a healthier alternative “chip” on the trip. Even the kids who don’t like kale in other recipes, LOVE these kale chips. —Andrea Taylor
Ingredients
1 bunch
kale, washed, large stems removed, torn into bite size pieces
1/4 teaspoon
sea salt
3 tablespoons
lemon juice, divided
1 cup
cashews, (soaked 2 hours & drained)
1
red bell pepper, seeded & chopped
2 tablespoons
nutritional yeast
1 tablespoon
water
Directions
Place kale in a large bowl. Sprinkle with salt and 1 tbsp of lemon juice. Massage the kale until they are all coated.
Put remaining ingredients into a blender or vitamix and Blend until smooth. .
Pour mixture all over the kale and massage again to cover the leaves
Lay coated kale leaves in a single layer in a dehydrator. Dehydrate at 105 for 12 hours or overnight, until coating is dry and kale is crispy.
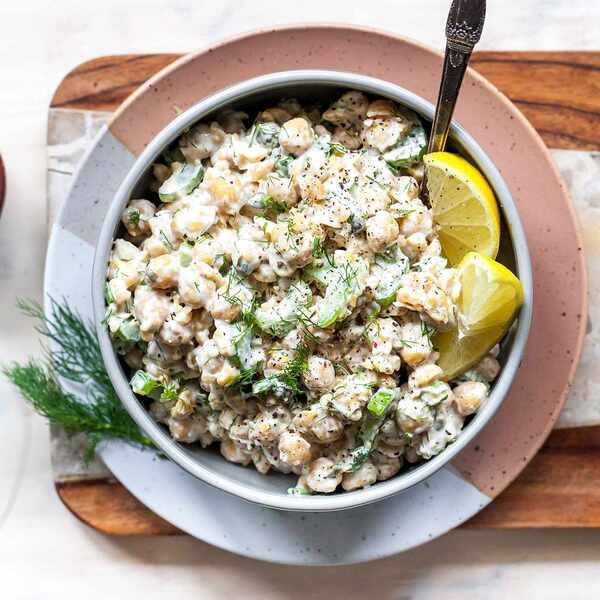
This creamy yet light vegan salad is full of bright, herby goodness. On its own, it’s great to serve alongside a sandwich or veggie burger in place of potato salad or coleslaw. You can also make it into a light lunch by adding a handful of arugula to enjoy it as a green salad. Double the recipe and refrigerate to have on hand throughout the week.
Updated on April 19, 2024
Cook Mode (Keep screen awake)
Ingredients
1(15 ounce) canlow-sodium chickpeas, rinsed
⅓cupfinely chopped celery
¼cupvegan mayonnaise
¼cupchopped fresh dill
1scallion, finely chopped
2teaspoonscapers, chopped
2teaspoonslemon juice or more to taste
¼teaspoonground pepper
Directions
Place chickpeas in a clean kitchen towel. Fold the towel over and gently rub the chickpeas to release any loose skins. Discard the skins; transfer the chickpeas to a medium bowl. Mash the chickpeas with a fork. Add celery, mayonnaise, dill, scallion, capers, lemon juice and pepper; stir until well coated.
Tips
To make ahead: Cover and refrigerate for up to 4 days.
Originally appeared: EatingWell.com, August 2020
Nutrition Facts (per serving)
186
Calories
12g
Fat
16g
Carbs
5g
Protein
Nutrition Facts
Servings Per Recipe 4
Serving Size 1/2 cup
Calories 186
% Daily Value *
Total Carbohydrate
16g
6%
Dietary Fiber
5g
16%
Total Sugars
3g
Protein
5g
10%
Total Fat
12g
15%
Saturated Fat
1g
6%
Vitamin A
93IU
2%
Vitamin C
2mg
2%
Folate
34mcg
8%
Sodium
262mg
11%
Calcium
36mg
3%
Iron
1mg
4%
Magnesium
19mg
4%
Potassium
110mg
2%
Nutrition information is calculated by a registered dietitian using an ingredient database but should be considered an estimate.
* Daily Values (DVs) are the recommended amounts of nutrients to consume each day. Percent Daily Value (%DV) found on nutrition labels tells you how much a serving of a particular food or recipe contributes to each of those total recommended amounts. Per the Food and Drug Administration (FDA), the daily value is based on a standard 2,000 calorie diet. Depending on your calorie needs or if you have a health condition, you may need more or less of particular nutrients. (For example, it’s recommended that people following a heart-healthy diet eat less sodium on a daily basis compared to those following a standard diet.)
(-) Information is not currently available for this nutrient. If you are following a special diet for medical reasons, be sure to consult with your primary care provider or a registered dietitian to better understand your personal nutrition needs.
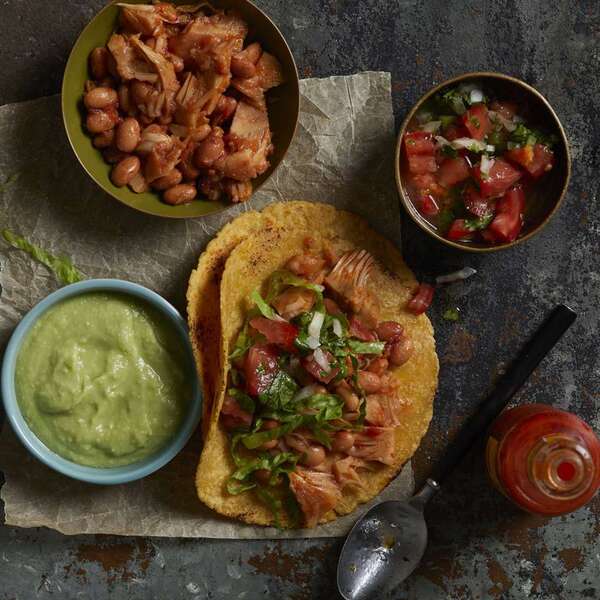
Tex-Mex-flavored jackfruit mimics the taste and texture of pulled pork carnitas in this delicious vegan taco–and it’s a lot faster to make than traditional carnitas, which are typically cooked for hours. An easy avocado crema and quick tomato salsa add bright, fresh flavors. For this recipe, you’ll want unsweetened almond milk without any vanilla–be sure to check the ingredients, as some contain vanilla flavoring even if they aren’t labeled as vanilla.
Updated on April 19, 2024
Cook Mode (Keep screen awake)
Ingredients
1ripe avocado, chopped
⅓cupplain unsweetened almond milk
3tablespoonslime juice, divided
½teaspoonsalt, divided
1mediumtomato, diced
¼cupchopped fresh cilantro
2tablespoonsdiced onion
1tablespoondiced jalapeño pepper
2tablespoonsextra-virgin olive oil, divided
1 10-ounce package jackfruit, preferably chile-lime or Tex-Mex flavored
1cupno-salt-added pinto beans, rinsed
1cupshredded romaine lettuce
8corn tortillas, warmed
Directions
Place avocado, almond milk, 2 tablespoons lime juice and 1/4 teaspoon salt in a mini food processor or blender. Process, scraping down the sides as needed, until creamy.
Combine tomato, cilantro, onion, jalapeno, 1 tablespoon oil, the remaining 1 tablespoon lime juice and the remaining 1/4 teaspoon salt in a medium bowl.
Heat the remaining 1 tablespoon oil in a large nonstick skillet over medium-high heat. Add jackfruit and pinto beans; cook, stirring, until heated through, 2 to 3 minutes. Remove from the heat.
Serve the jackfruit and pinto beans in corn tortillas topped with the avocado cream, the salsa and lettuce.
Tips
Read more: What is Jackfruit & Should You Eat It?
Originally appeared: EatingWell.com, November 2017
Nutrition Facts (per serving)
346
Calories
16g
Fat
45g
Carbs
8g
Protein
Nutrition Facts
Servings Per Recipe 4
Serving Size 2 tacos
Calories 346
% Daily Value *
Total Carbohydrate
45g
16%
Dietary Fiber
14g
50%
Total Sugars
4g
Added Sugars
2g
4%
Protein
8g
17%
Total Fat
16g
21%
Saturated Fat
2g
12%
Vitamin A
1506IU
30%
Vitamin C
20mg
22%
Folate
103mcg
26%
Sodium
722mg
31%
Calcium
157mg
12%
Iron
2mg
13%
Magnesium
73mg
17%
Potassium
722mg
15%
Nutrition information is calculated by a registered dietitian using an ingredient database but should be considered an estimate.
* Daily Values (DVs) are the recommended amounts of nutrients to consume each day. Percent Daily Value (%DV) found on nutrition labels tells you how much a serving of a particular food or recipe contributes to each of those total recommended amounts. Per the Food and Drug Administration (FDA), the daily value is based on a standard 2,000 calorie diet. Depending on your calorie needs or if you have a health condition, you may need more or less of particular nutrients. (For example, it’s recommended that people following a heart-healthy diet eat less sodium on a daily basis compared to those following a standard diet.)
(-) Information is not currently available for this nutrient. If you are following a special diet for medical reasons, be sure to consult with your primary care provider or a registered dietitian to better understand your personal nutrition needs.
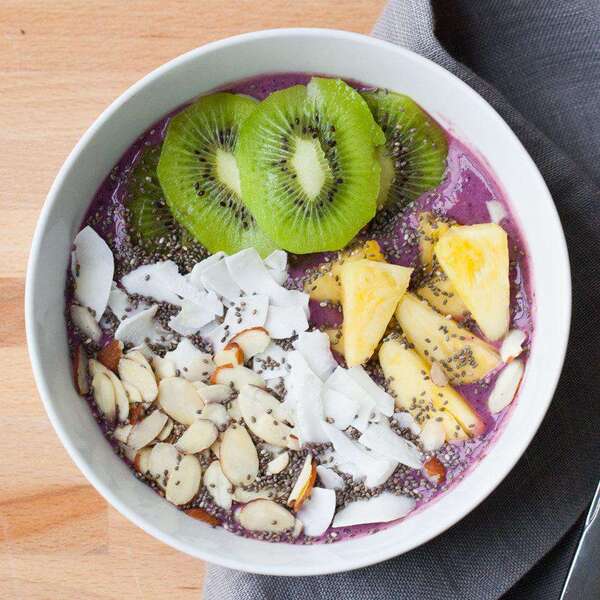
Eat this thick and creamy smoothie bowl with a spoon! Banana and frozen berries whip together with a little nut milk for a toppable vegan breakfast. We use fruit, nuts and seeds for topping, but feel free to experiment with whatever you like.
Updated on April 22, 2024
Cook Mode (Keep screen awake)
Ingredients
1largebanana
1cupfrozen mixed berries
½cupunsweetened soymilk or other unsweetened non-dairy milk
¼cuppineapple chunks
½kiwi, sliced
1tablespoonsliced almonds, toasted if desired
1tablespoonunsweetened coconut flakes, toasted if desired
1teaspoonchia seeds
Directions
Combine banana, berries and soymilk (or almond milk) in a blender. Blend until smooth.
Pour the smoothie into a bowl and top with pineapple, kiwi, almonds, coconut and chia seeds.
Originally appeared: EatingWell.com, January 2017
Nutrition Facts (per serving)
338
Calories
10g
Fat
64g
Carbs
9g
Protein
Nutrition Facts
Servings Per Recipe 1
Serving Size 1 bowl
Calories 338
% Daily Value *
Total Carbohydrate
64g
23%
Dietary Fiber
12g
43%
Total Sugars
36g
Protein
9g
17%
Total Fat
10g
12%
Saturated Fat
3g
15%
Vitamin A
393IU
8%
Vitamin C
82mg
91%
Folate
60mcg
15%
Sodium
46mg
2%
Calcium
231mg
18%
Iron
2mg
11%
Magnesium
94mg
22%
Potassium
940mg
20%
Nutrition information is calculated by a registered dietitian using an ingredient database but should be considered an estimate.
* Daily Values (DVs) are the recommended amounts of nutrients to consume each day. Percent Daily Value (%DV) found on nutrition labels tells you how much a serving of a particular food or recipe contributes to each of those total recommended amounts. Per the Food and Drug Administration (FDA), the daily value is based on a standard 2,000 calorie diet. Depending on your calorie needs or if you have a health condition, you may need more or less of particular nutrients. (For example, it’s recommended that people following a heart-healthy diet eat less sodium on a daily basis compared to those following a standard diet.)
(-) Information is not currently available for this nutrient. If you are following a special diet for medical reasons, be sure to consult with your primary care provider or a registered dietitian to better understand your personal nutrition needs.
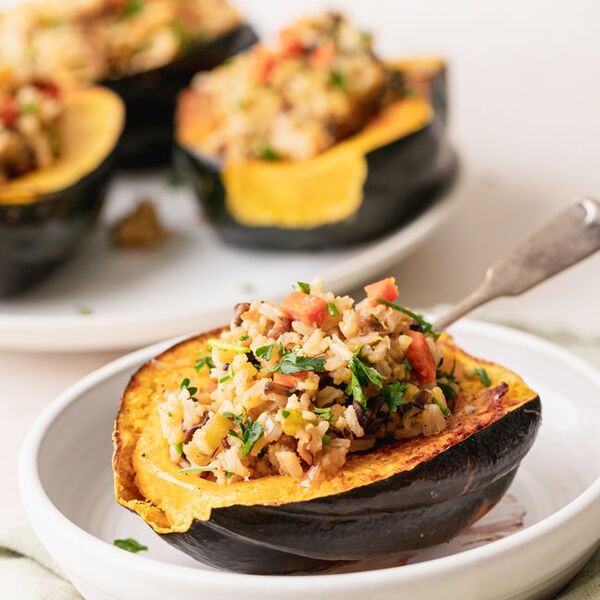
Vegan stuffed squash with brown rice and mushrooms! Use acorn squash or other winter squash. Vegan or vegetarian main course.
Cambrea Bakes
This roasted winter squash is filled with tender mushrooms and creamy brown rice.
It makes a fantastic main course for any vegans or vegetarians at your holiday table – and the leftovers are perfect for a “Meatless Monday” dinner!
Vegetarians and vegans are used to fending for themselves at holidays and social functions. I know because I was one for more than ten years!
This dish is cooked in several stages. This helps develop the flavors and textures of each ingredient. While this takes a little extra time, it’s worth it for all the rich, caramelized, vibrant flavors that make their way into the finished dish.
Aim to finish all the components at the same time so you can serve the stuffed squashes while piping hot. I’ve found that the stuffed squashes tend to dry out if you try to re-heat them in the oven.
If the squash halves have finished roasting before the rice and vegetables are ready, hold them in the warm oven until needed. Conversely, if the filling is ready before the squash halves, cover the pans to keep warm until needed. Re-warm briefly on the stovetop or in the microwave if needed before continuing with the recipe.
To break up the work, you can cook the vegetables, mushrooms, and rice ahead of time. Just warm them on the stovetop or in the microwave before mixing them with the roasted squash puree.
I believe plant-based meals like this one can be easily as exciting as their meaty counterparts. If you or your family are not used to cooking vegan or vegetarian meals, try this recipe!
Cambrea Bakes
The vegetables and rice for the filling and the roasted squash halves can be prepped a day or two ahead. Warm them on the stovetop or in the microwave before continuing with the recipe.
Note that one of the squashes is pureed and mixed into the filling. The remaining squash halves will be stuffed and served.
Depending on the size of your squash, you may have leftover rice filling. It’s great on its own, and it freezes well.
Cook Mode (Keep screen awake)
For the squash:
4smallwinter squash (about 1 1/2 pounds each), like kabocha, acorn squash, or pie pumpkins
1/2tablespoonolive oil
1/4teaspoonsalt
1/4teaspoonpepper
For the filling:
4tablespoonsolive oil, divided
2cupsbrown rice
4cupslow-sodium vegetable broth or water
1cup diced carrot
1cup diced shallots
1cup diced celery
1 1/4poundsmushrooms, diced (I used a mix of creminis and wild mushrooms)
3clovesgarlic, minced
1/2cupwhite wine
Salt and freshly ground black pepper, to taste
Pinchcinnamon
1cup chopped mixed herbs (parsley, chives, and chervil work beautifully here)
Heat the oven to 400F and prepare the squash:
Cut the squash in half and scrape out the seeds. Cut a small sliver from the bottom of each squash half to create a stable surface for the “bowl.” Rub the squash halves inside and out with olive oil, then sprinkle generously with salt and pepper.
Cambrea Bakes
Roast the squash:
Roast the squash halves cut-side down for 30 minutes, then flip them over and roast cut-side up (like a bowl) for another 15 minutes. When done, the squash should be easily pierced with a fork and toasted golden-brown on the surface. (About 45 minutes total; if the squash finishes roasting before the filling is ready, turn the oven heat to its lowest temperature and keep them warm until needed.)
Cambrea Bakes
While the squash roasts, begin preparing the rice stuffing:
In a large pot over medium heat, toast the rice with 1 tablespoon of olive oil until the rice smells fragrant and nutty, 3 to 5 minutes. Stir frequently to avoid burning.
Cambrea Bakes
Cook the rice:
Pour the vegetable broth or water over the rice and give it a quick stir. Bring to a boil over high heat. Once the water reaches boiling, turn down heat to low, cover the pot, and cook for 25 to 30 minutes until the rice is tender. If the rice isn’t done, continue checking every five minutes.
Cambrea Bakes Cambrea Bakes Cambrea Bakes
Cook the carrots, shallots, and celery:
Warm 1 tablespoon of olive oil in a 12-inch skillet over medium heat. Sauté the carrot, shallot, and celery until the shallots become translucent, about 5 minutes. Transfer the veggies to a large bowl, and set aside.
Cambrea Bakes
Cook the mushrooms in batches:
In the same 12-inch skillet, add 1 tablespoon of olive oil and turn the heat to medium-high. Add a third of the mushrooms – do not to overcrowd the pan. Sprinkle 1/8 teaspoon salt and a little pepper over the mushrooms, but do not stir.
Let the mushrooms cook without stirring for 2 to 3 minutes, until a caramelized crust forms on the bottom of the mushrooms. (Lift one up to check!) Once you see a brown crust, stir the mushrooms together. Continue cooking, stirring often, until the mushrooms have released all their liquid and look evenly browned on all sides.
Repeat with the remaining mushrooms, adding more oil to the pan as needed.
Cambrea Bakes
Finish the vegetables:
When all the mushrooms are cooked, return the cooked mushrooms, carrots, shallots, and celery to the pan over medium-high heat. Stir in the garlic and cook until fragrant, 30 seconds. Add the white wine and scrape any glazed bits from the bottom of the pan as the wine simmers. Cook for another 2 to 3 minutes, until most of the wine has evaporated. Remove from heat. Sprinkle with salt and pepper.
(If the vegetables and rice are ready before the roasted squash, cover the pans to keep warm until needed. If necessary, re-warm briefly on the stovetop or the microwave before continuing with the recipe.)
Cambrea Bakes Cambrea Bakes
Set 6 of the roasted squash halves on plates for serving; scoop the flesh from the remaining 2 squash halves:
Transfer the flesh to a food processor. Add the cinnamon and puree until very smooth.
Cambrea Bakes Cambrea Bakes
Finish the squash filling:
In a large bowl, combine the mushrooms, vegetables, cooked rice, and squash puree and mix until well-combined. Taste and add more salt, pepper, or cinnamon if you like. Finally, stir in fresh herbs, reserving some herbs for sprinkling over top. Taste the filling and season with salt and pepper to taste. (If you used water or unseasoned stock to cook the rice, you’ll need to be more heavy-handed with the salt.)
Cambrea Bakes
Stuff the squashes and serve:
Divide the filling equally between all the squash halves, mounding the filling slightly. Sprinkle with chopped herbs and serve immediately while piping hot.
Cambrea Bakes
Nutrition Facts (per serving)
430
Calories
13g
Fat
73g
Carbs
10g
Protein
×
Nutrition Facts
Servings: 6
Amount per serving
Calories
430
% Daily Value*
13g
17%
Saturated Fat 2g
10%
0mg
0%
287mg
12%
73g
27%
Dietary Fiber 19g
69%
Total Sugars 22g
10g
Vitamin C 59mg
294%
Calcium 211mg
16%
Iron 7mg
39%
Potassium 1877mg
40%
*The % Daily Value (DV) tells you how much a nutrient in a food serving contributes to a daily diet. 2,000 calories a day is used for general nutrition advice.
Nutrition information is calculated using an ingredient database and should be considered an estimate. In cases where multiple ingredient alternatives are given, the first listed is calculated for nutrition. Garnishes and optional ingredients are not included.

/c6fa89c3-0ba0-42a3-ad7f-8000dd17c145--IMG_5224a.jpg)


/8c36725b-9c1a-4351-aa69-cf7843b014f6--falafel3.jpg)

/92918365-5eb6-4222-b530-c11a558c31f9--kale_chips.jpg)


/b174d2db-af84-4de2-9710-ea95090f7972--Hemp_Milk_3_small.jpg)