Category: Uncategorized

  • Vegan Maple Banana Bread with Vegan ‘Cream

    Vegan Maple Banana Bread with Vegan ‘Cream

    recipe image

    By Crazy Vegan 2 Comments

    Here’s a simple recipe for Vegan Banana Bread with Vegan ‘Cream Cheese’ icing! Tastes better than the non-vegan stuff! This Vegan Banana Bread recipe is Dairy Free, Egg Free, and Gluten Free, but you’ll never be able to tell. Check out that fluffy vegan icing as well! The perfect finishing touch to this Vegan Banana Bread – YUM!

    Recipe for Vegan Banana Bread with Vegan 'Cream Cheese' Frosting | CrazyVeganKitchen.com

    Vegan Maple Banana Bread with Vegan ‘Cream Cheese’ Icing!

    Crazy Vegan Kitchen

    Simple recipe for Vegan Banana Bread with Vegan ‘Cream Cheese’ Frosting

    Prep Time 30 minutes

    Total Time 30 minutes

    Ingredients  

    • Wet Ingredients:
    • 2 large Bananas you want them SUPER SUPER ripe, almost black!
    • 1/4 cup + 2 tbsp Maple Sugar You can find this online or at a good supermarket/health store
    • 1/4 tsp fine Salt
    • 1 Tbsp Ground Flaxseed
    • 3 TBSP warm Water
    • 50 grams Oil
    • 1 tsp Vanilla Extract
    • 1/2 tsp Maple Extract
    • Dry Ingredients:
    • 1/4 cup Gluten Free All Purpose Flour
    • 1/4 cup Almond Meal
    • 1/4 cup Oat Flour
    • 1/2 tsp Baking Powder
    • 1/2 tsp Baking soda
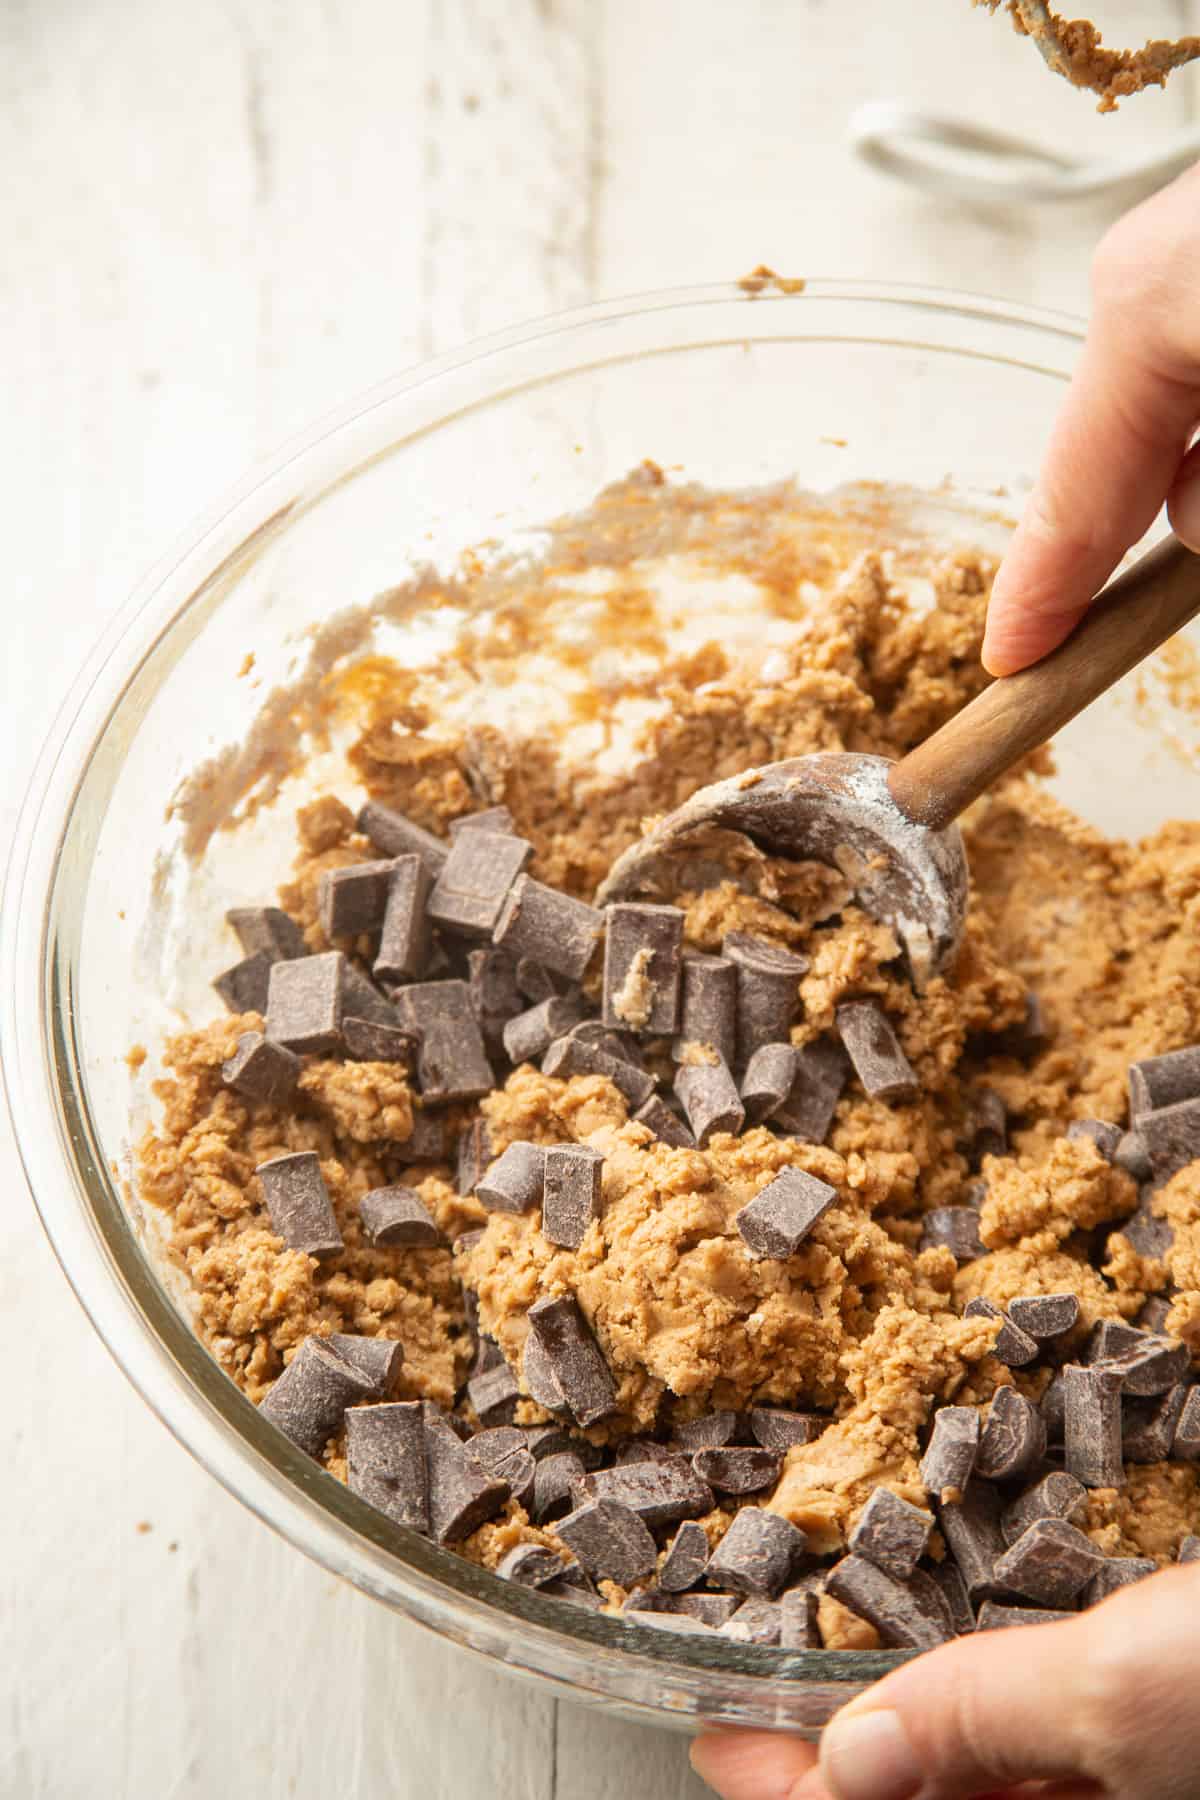
    • 1/2 cup chopped Pecans
    • 2 tablespoons Maple Syrup for after cake has cooked
    • Vegan ‘Cream Cheese’ Frosting:
    • 50 grams Nutellex Vegan spread a lot of margarine still has milk solids in it, so look for a DAIRY free variety
    • 150 grams Tofutti Better than Cream Cheese
    • 50 grams Icing Sugar
    • 1 tbsp Maple Syrup

    Instructions 

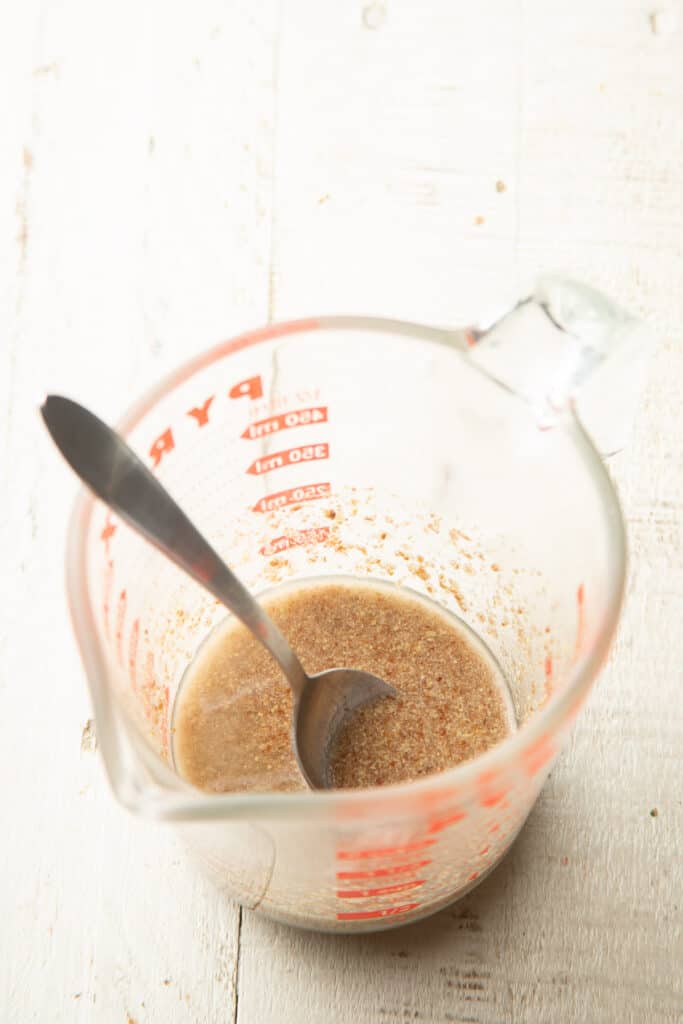
    • Wet Ingredients Instructions: Combine Flax meal with warm water and let it sit for 10 minutes.

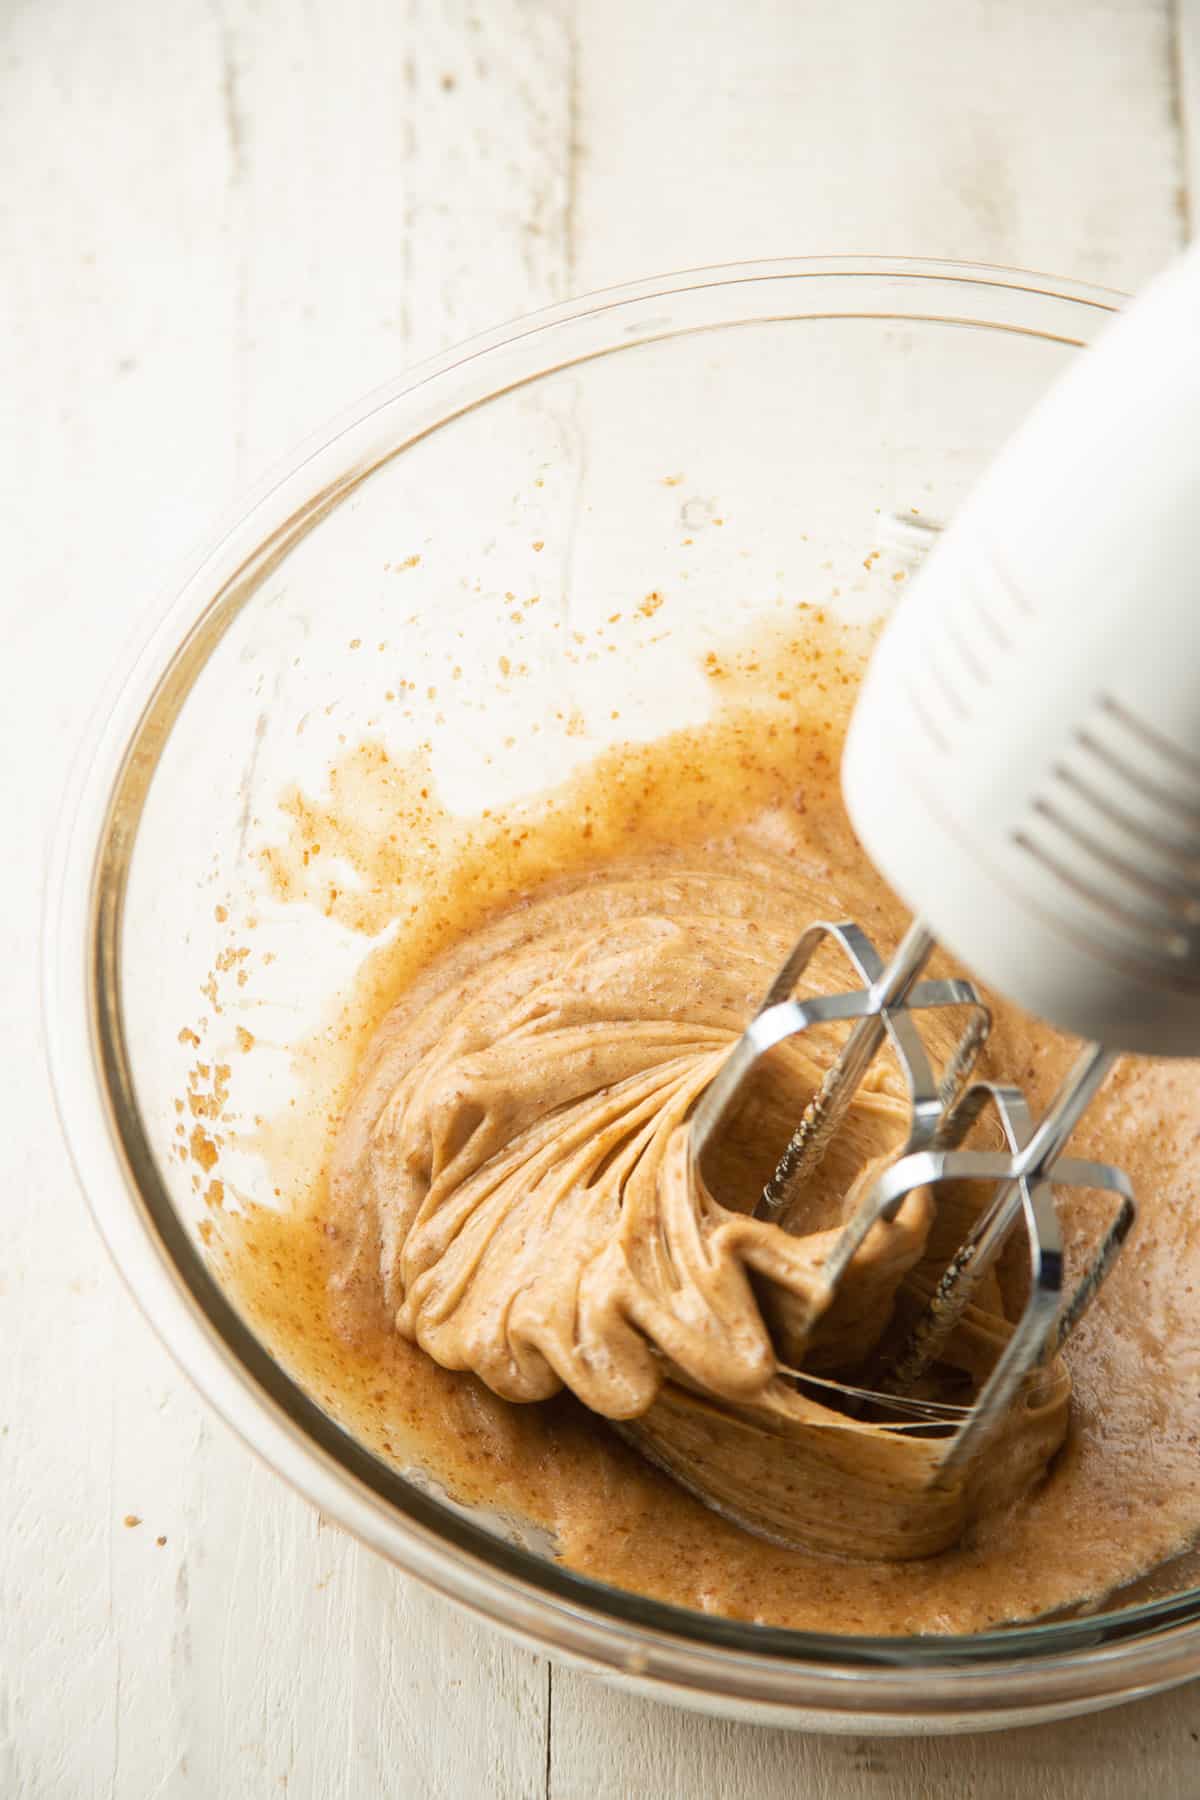
    • After it has thickened, add it to the remaining wet ingredients and blend with a hand held immersion blender till smooth.

    • Alternatively, you can mash everything by hand but I personally do not like chunks of mushy banana in the bread!

    • Set aside whilst preparing dry ingredients.

    • Wet Ingredient Instructions: Combine dry ingredients and sieve into a big bowl.

    • Make a well in dry ingredients and pour wet ingredients into it.

    • Combine well with a whisk and then pour into a greased and lined 7×4 inch loaf tin.

    • Bake at 175 degrees celsius for 45 minutes or till a skewer comes out clean.

    • Once it is taken out of the oven, immediately poke holes in the cake and drizzle with 2 tablespoons of maple syrup.

    • Leave cake to cool.

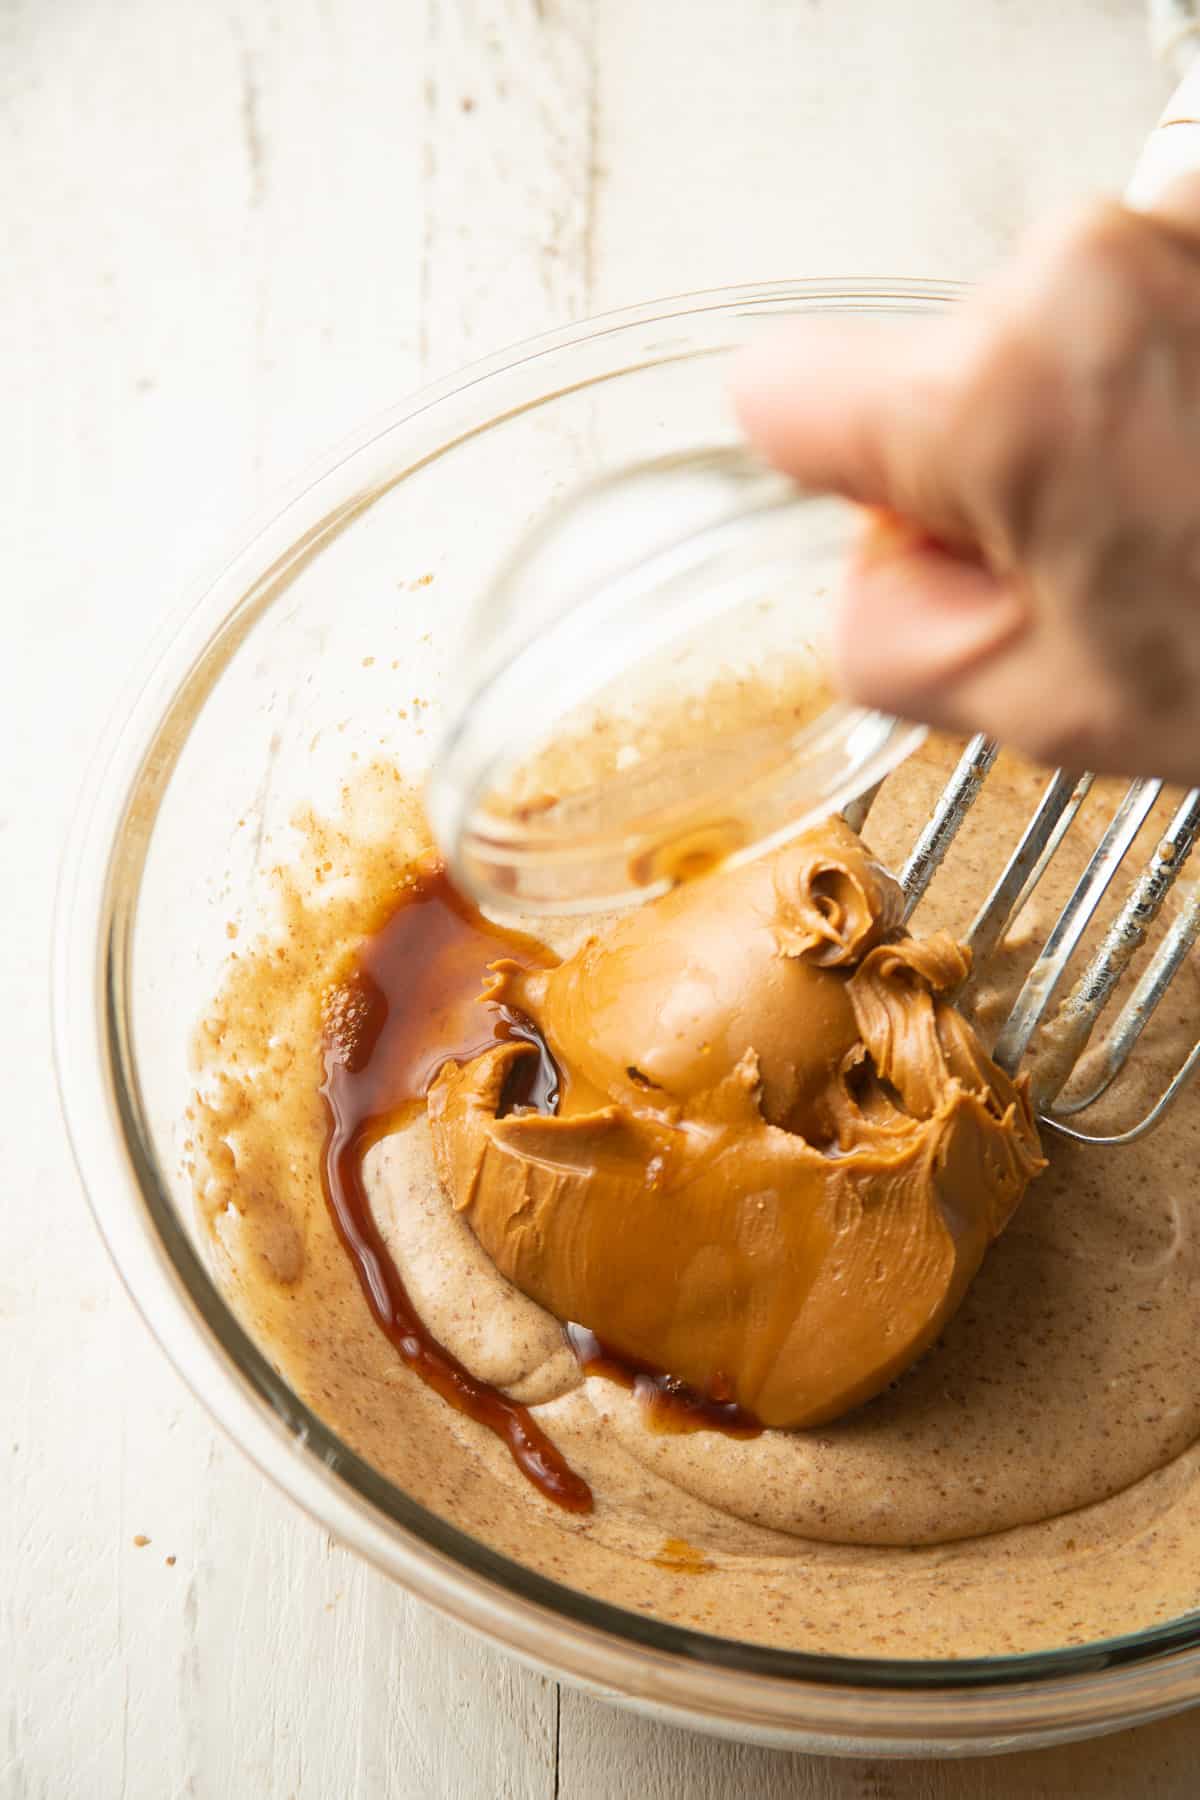
    • Vegan ‘Cream Cheese’ Frosting Instructions: Cream Tofutti and Nutellex together till smooth with an electric mixer.

    • Add icing sugar and maple syrup to the mixture and mix to combine.

    • At this point, the mixture will be a little sloppy, so leave it in the fridge for 10 minutes to firm up a little.

    • Finishing Touches: Once your bread has cooled, top with icing and sprinkle with chopped pecan nuts. Keep in the fridge, and let it sit at room temperature for 10 minutes before enjoying a slice!

    Questions? Feel free to drop us your comments if you need any clarification on this delicious vegan banana bread recipe!

    FREE EBOOK SERIES! 5 SECRETS FOR FOOLPROOF VEGAN DESERTS

    Read More

  • Flax Vegan Egg Substitute

    Flax Vegan Egg Substitute

    recipe image

    “This is a vegan substitute for eggs in baked goods. It could probably work in casseroles too, but don’t try scrambled eggs with this! ;)”

    Read More

  • Roasted Squash Stuffed with Cauliflower

    Roasted Squash Stuffed with Cauliflower

    recipe image

    Ingredients:

    • * 1 kabocha squash
    • * 1 head cauliflower
    • * 1/2 cup plain, unsweetened cashew milk
    • * *optional 1 tbsp vegan butter
    • * pinch sea salt
    • * dash of black pepper

    Instructions:

    1. Preheat oven to 450 degrees.
    2. Cut squash in half and remove seeds.
    3. Place right side up in a casserole pan roast for 40 minutes until softened. Brush with olive oil if desired.
    4. While roasting, chop and steam cauliflower.
    5. Once soft, place in a large bowl with non-dairy milk, vegan butter, salt and pepper.
    6. Mash by hand or use an electric mixer until you reach the desired consistency.
    7. Once the squash is roasted, remove from oven and stuff with cauliflower mixture.
    8. Pop back in the oven for 5 minutes to crisp up the top.
    9. For a little garnish, top with a sprinkle of your favorite herb or leafy green.
    10. **For time saving, you can always roast the squash upside down in your pan, covering the bottom of the pan with some water. This is a steam/roast method that cuts the time in half, but leaves it less “roasted” in texture and flavor.

    Read More

  • Pistachio Chocolate Chip Oatmeal Raisin Cookies

    Pistachio Chocolate Chip Oatmeal Raisin Cookies

    recipe image

    Pistachio Chocolate Chip Oatmeal Raisin Cookies (Vegan) | picklesnhoney.com

    When it comes to sweets, I’m an ice cream girl through and through. I used to crave it year round too, despite the often frigid winters that come with living in Boston.  As I get older though, my tolerance for the cold weather seems to be declining.  Instead of a thick pair of socks and a hoodie to keep me warm inside, I need to layer two pairs of thick socks plus slippers with a hoodie and a fleece. And even then, I’m still usually cold.

    Suffice it to say, ice cream this winter has not been happening. Cookies, on the other hand, are my new go-to treat. In the past, I would only ever bake them for family and friends, and now I bake them for me (and family and friends).

    Pistachio Chocolate Chip Oatmeal Raisin Cookies (Vegan) | picklesnhoney.com

    I love a classic oatmeal raisin cookie, so for my latest cookie creation, I chose my tried and true oatmeal raisin recipe as the inspiration and then took things to a whole new level with the addition of salted pistachios, golden raisins (my favorite!), and semi-sweet chocolate chips. The result is a chewy oatmeal cookie that’s crispy around the edges, but soft in the center, and loaded to the brim with add-ins. The crunchy, salted pistachios are an excellent juxtaposition to the chewy, sweet golden raisins and the rich dark chocolate chips. I prefer the texture of these cookies best straight out of the fridge, though it’s hard to go wrong with them still warm out of the oven when the chocolate is perfectly melty.

    Pistachio Chocolate Chip Oatmeal Raisin Cookies (Vegan) | picklesnhoney.com

    I kept the ingredients wholesome as far as cookies go, using whole grain spelt flour, lower-glycemic coconut sugar, and unsweetened applesauce, which make for a hearty and satisfying, just-sweet-enough dessert. As we transition into the new year and begin to swap heavier foods for lighter, more nourishing fare, these oatmeal cookies are an excellent balance of healthful and decadent, sure to make the cold winter (or any season) more enjoyable.

    Pistachio Chocolate Chip Oatmeal Raisin Cookies (Vegan) | picklesnhoney.com

    Read More

  • Double Dark Chocolate Mousse Pie

    Double Dark Chocolate Mousse Pie

    recipe image

    by Kathy Patalsky · updated: · published: · About 5 minutes to read this article. 6 Comments

    originally posted: Nov 25, 2009 | post updated:

    Chocolate Soufflé Pie

    After ten years, this is absolutely my favorite chocolate pie I have ever created. My Chocolate Soufflé Pie (formerly known as my Double Dark Chocolate Mousse Pie) bakes up fluffy and light with rich chocolate flavor in every creamy bite.

    Chocolate Soufflé Pie

    After the pie cooled, some slices were made, fresh coconut whip dolloped on top and deliciousness tasted all around! It’s hard to believe that this dessert is made with plant-based ingredients – and as decadent desserts come – it is actually pretty healthy considering it has a base of tofu.

    I changed the name because this pie is pure soufflé and I am so proud of that! I actually need to make this mixture in actual soufflé cups one day to show you guys how amazing it looks. It puffs up like a marshmallow and then settles back down a bit while keeping it’s sublime fluffiness.

    chocolate pie

    I first made this recipe in 2009 as a pie for Thanksgiving – an alternative to pumpkin. And it was a huge hit! I have been meaning to update the photos for a while and today I finally did.

    chocolate souffle pie
    chocolate souffle pie

    Make Ahead Recipe

    This recipe is best when you let it chill in the fridge for a few hours, so it is a perfect make-ahead pie. Make it the day before and serve it with ease! Bonus points if you dollop some DIY coconut cream on top.

    Chocolate Soufflé Pie

    Chocolate Soufflé Pie

    Fluffy and decadent, this chocolate soufflé pie is easy to make and made with vegan ingredients like tofu and semi-sweet chocolate.

    click the stars to rate

    Print
    Pin

    Prep: 10 minutes

    Cook: 30 minutes

    Servings: 8

    Ingredients

    • 3.9 oz chocolate pudding mix, 1 box
    • 1 cup soy milk
    • 1 tablespoon corn starch, or sub with arrowroot
    • 1 shot espresso, decaf or regular
    • 1 teaspoon vanilla extract
    • 2 oz semi-sweet chocolate
    • 14 oz tofu, silken
    • 2 tablespoon cacao powder
    • ½ teaspoon sea salt

    Topping

    • 1 oz chocolate bar, broken into chunks

    Crust

    • 1 whole pie crust, flour or graham cracker

    Instructions

    • Preheat the oven to 350 degrees.

    • Prepare your pie crust ahead of time. Or you can use a pre-made crust – flour or graham.

    • Add the soy milk, pudding packet, espresso, vanilla and corn starch (or arrow root) to a medium soup pot. Turn stove to medium and stir briskly until the mixture starts to thicken and warm. Turn heat to low and add in the 2oz chocolate. Keep stirring to melt the chocolate into the mixture. Note: Be careful to not burn this mixture. Low heat and keep stirring. The chocolate should be almost all melted when finished. this mixture will be thick and possibly a bit lumpy – that’s okay!

    • Spoon the mixture into a blender. Add in the tofu, cacao powder and salt. Blend from low to high. then blend on high for a good 2-3 minutes. Remove lid of blender and pour this silky chocolate mixture into your pie crust.

    • Add the chocolate chunks over top the pie.

    • Bake the pie at 350 degrees for 25-30 minutes. The pie will fluff up a lot while baking, so be sure to leave enough room over top the pie, in the oven.

    • Cool pie for a few hours before serving. I like this pir served fully chilled, but warmish is delicious too.

    Equipment

    • medium pot

    • blender

    recipe author: Kathy Patalsky

    nutrition estimate | per serving

    Calories: 175kcal | Carbohydrates: 21g | Protein: 7g | Fat: 7g | Saturated Fat: 3g | Cholesterol: 1mg | Sodium: 358mg | Potassium: 154mg | Fiber: 2g | Sugar: 13g | Vitamin A: 63IU | Calcium: 110mg | Iron: 2mg

    Dessert

    American

    chocolate, pie, souffle

    chocolate souffle pie from 2009

    Original Post Commentary…

    a la 2009…

    Here’s a last minute, super easy Thanksgiving dessert recipe that I felt compelled to share with you all. I made this Double Dark Chocolate Mousse Pie currently known as the Chocolate Soufflé Pie – today in honor of the pumpkin-pie haters at my Thanksgiving feast. Yes, sadly the anti-pumpkin folks do exist. I had planned on making a creamy chocolate mousse parfait, but then while perusing Whole Foods, I found an amazing chocolate pie crust from Wholly Wholesome brand and I knew what had to be done. Vegan Chocolate Pie! Get it…

    Chocolate Craving. OK, don’t judge, but I’m actually not a huge chocolate fan. I’m more a vanilla bean girl. But my husband loves chocolate. Dark chocolate. The darker, the better. Milk chocolate won’t do it for him. He likes the 80% cocoa bars. 90% is even better. For Thanksgiving he wanted a chocolate dessert. So in honor of his request for a vegan chocolate dessert, “something like a flourless cake” (you know the non-vegan totally sinful kind at fancy restaurants) – I decided to craft him a dark chocolate dessert that was ‘dark enough’ yet still fluffy and light.

    Fluffy Tofu. Silken tofu adds a nice fluffiness to pudding pies. But if you don’t want a ‘fluffy’ bite, substitute vegan cream cheese for the tofu. Or you can even blend an extra handful of raw cashews in place of the tofu. Both cashews and tofu are texture builders for vegan pies. But, I adore the souffle-like quality the healthy silken tofu gives this pie.

    Heat. Blend. Pour. Bake. This is a pretty simple pie to whip up in a under an hour (and that includes the cooking time). With a base of simple vegan chocolate pudding, you can add your own flavor accents like cinnamon or espresso, texture enhancers like cashews, and even add-ins like melted chocolate for a richness to satisfy even the deepest of chocolate cravings. Rice whip on top is the perfect touch to this decadent chocolate dessert.

    Read More

  • Cookie Butter Chocolate Chunk Blondies

    Cookie Butter Chocolate Chunk Blondies

    recipe image

    Published: by Alissa Saenz · This post may contain affiliate links · 26 Comments

    Know what’s better than blondies? BISCOFF blondies! Sweet, cinnamony cookie butter and dark chocolate chunks come together to create these decadent vegan cookie bars!

    Biscoff Blondies on a baking sheet.

    Is it just me or has the world gone crazy for cookie butter recently?

    I discovered cookie butter years ago, probably because it’s one of those amazing accidentally vegan foods that inevitably shows up on your radar when you develop vegan recipes for a living. Anyhow, if you’re not familiar with this stuff, think of peanut butter if it were made from Biscoff cookies.

    That’s right.

    The texture is a lot like peanut butter, and it even looks like peanut butter, but it tastes like sweet cinnamony cookies. Biscoff is the brand you’ll most often see, but Trader Joe’s makes a version too. And they’re both vegan.

    I used my cookie butter to make these Biscoff blondies. Cookies turned into butter turned into blondies. It’s a roundabout way of creating a seriously decadent and delicious dessert. These bars were sweet and chewy and full of delicious cookie flavor!

    Jump to:
    • Ingredients You’ll Need
    • How They’re Made
    • Shelf-Life & Storage
    • More Vegan Bars
    • Biscoff Blondies

    Ingredients You’ll Need

    • Water.
    • Ground flaxseed. Look for this in the natural foods section of your supermarket.
    • Vegan butter. This is normally sold near the regular butter at the store. Look for brands like Earth Balance and Miyoko’s.
    • Brown sugar. Use organic brown sugar to keep the recipe vegan.
    • Smooth cookie butter. Lotus Biscoff spread is sold near peanut butter at many supermarkets. Trader Joe’s also carries their own brand.
    • Vanilla extract.
    • Flour. We’re using all-purpose wheat flour. I haven’t tested the recipe with any other varieties.
    • Baking powder.
    • Salt.
    • Ground cinnamon.
    • Vegan chocolate chips. I used Enjoy Life Mega Chunks. As an alternative, you could use vegan white chocolate chips, such as King David’s brand.

    Tip: Once you get a feel for this recipe, try experimenting with additional spices, like nutmeg, ginger, and cloves.

    How They’re Made

    The following is a detailed photo tutorial on how to make this dish. Scroll all the way down if you’d like to skip right to the recipe!

    • Melt the vegan butter, either on the stove in a small saucepan or in the microwave. Let it sit until it cools.
    • Stir your water and ground flaxseed together in a small container. Let the mixture sit for a few minutes, until it gels. This is our egg substitute.
    Flaxseed and water in a liquid measuring cup with spoon.
    • While your flax egg sits, use an electric mixer to beat the melted butter and brown sugar together. Do this for about a minute, until the mixture starts to lighten in color.
    • Add the flax egg to your butter mixture and continue beating the mixture at high speed for two full minutes The mixture should be smooth and gooey and pretty light in color at this point.
    Electric mixer beating flax egg into vegan butter and brown sugar.
    • Beat in the cookie butter and vanilla.
    Hand adding cookie butter and vanilla to a mixing bowl.
    • Time to add the dry ingredients. Begin adding flour to the batter, about a third at a time. Sprinkle the baking powder, cinnamon, and salt over the flour before beating the last addition in at low speed.
    • The batter will be very thick — like cookie dough.
    • Fold the chocolate chips into the batter by hand, using a large spoon or spatula.
    Hand stirring chocolate chips into blondie batter.
    • Spread the batter in to 9 x 9 inch square baking dish that’s been lined with parchment paper.
    • Bake the blondies until the top is set and a toothpick inserted into the center comes out clean.
    • Place the pan on a cooling rack and let your blondies cool before slicing them.
    Biscoff Blondies on a baking sheet with a jar of biscoff.

    Shelf-Life & Storage

    Store your Biscoff blondies in an airtight container and they’ll last at room temperature for about 1 week, in the fridge for about 2 weeks, or in the freezer for 3 months.

    More Vegan Bars

    Like this recipe? If so, please stop back and leave me a review and rating below if you try it! Also be sure to follow me on Facebook, Pinterest or Instagram, or subscribe to my newsletter for more recipes like this one!

    Biscoff Blondies

    Know what’s better than blondies? BISCOFF blondies! Sweet, cinnamony cookie butter and dark chocolate chunks come together to create these decadent vegan cookie bars!

    Course Dessert

    Cuisine American

    Prep Time 20 minutes

    Cook Time 25 minutes

    Total Time 45 minutes

    Servings 16

    Calories 371kcal

    Author Alissa

    Ingredients

    • ¼ cup water
    • 2 tablespoons ground flaxseed
    • 10 tablespoons vegan butter, melted and cooled
    • 1 cup organic brown sugar
    • 1 cup smooth cookie butter
    • 2 teaspoons vanilla extract
    • 2 cups all-purpose flour
    • 2 teaspoons baking powder
    • 1 teaspoon ground cinnamon
    • ½ teaspoon salt
    • 1 ½ cups vegan chocolate chips or chunks

    Instructions

    • Preheat the oven to 325°F and line a 9 x 9 inch baking pan with parchment paper.

    • Stir the water and flaxseeds together in a small cup or bowl. Let the mixture sit for 5 to 10 minutes, until it gels.

    • Beat the butter and brown sugar together with an electric mixer at high-speed. Beat the mixture for about 1 minute, until it begins to lighten in color.

    • Add the flax mixture to the butter mixture. Beat the ingredients together at high speed for 2 full minutes, until it thickens and becomes and pale in color. The color should be slightly lighter in color than the cookie butter at this point. (Refer to the photo above within the post).

    • Beat the cookie butter and vanilla into the mixture, just until combined.

    • Begin beating the flour into the mixture, adding it in thirds and beating each addition in at low speed. Sprinkle the baking powder, cinnamon, and salt over the flour before beating in the last addition. The batter will be very thick, like cookie dough.

    • Fold in the chocolate chips by hand.

    • Spread the dough into the prepared baking pan, pushing it out to the edges and smoothing the top as best you can. (See Note.)

    • Bake the blondies until the top is set and a toothpick inserted into the center comes out clean, about 25 minutes.

    • Place the pan on a cooling rack and allow the blondies to cool completely before cutting.

    Notes

    To help smooth the top, I like to place a sheet of parchment paper over the batter, then use a flat object like a book to flatten the top.

    Nutrition

    Serving: 1blondie (1/16 of recipe) | Calories: 371kcal | Carbohydrates: 43.1g | Protein: 3.3g | Fat: 20.8g | Saturated Fat: 8.3g | Sodium: 152mg | Potassium: 101mg | Fiber: 2.2g | Sugar: 24.4g | Vitamin A: 450IU | Calcium: 69mg | Iron: 3mg

    About Alissa Saenz

    Hi, I’m Alissa! I’m a former attorney turned professional food blogger. I love creating vegan recipes with bold flavors! You can read more about me here.

    I’d love to connect with you on Facebook, Instagram, or Pinterest.

    Reader Interactions

    Read More

  • Vegan Agave Cornbread Muffins

    Vegan Agave Cornbread Muffins

    recipe image

    These vegan agave cornbread muffins are made with whole wheat flour and sweetened with agave syrup. My anti-vegan roommates voted them better than traditional cornbread muffins! You can also make the muffins macrobiotic by substituting maple syrup for agave.

    Submitted by
    smiithh

    Updated on December 17, 2024


    Cook Mode
    (Keep screen awake)

    Ingredients


    Original recipe (1X) yields 6 servings

    • ½ cup cornmeal

    • ½ cup whole wheat pastry flour

    • ½ teaspoon baking soda

    • ½ teaspoon salt

    • ½ cup applesauce

    • ½ cup soy milk

    • ¼ cup agave nectar

    • 2 tablespoons canola oil

    Directions

    1. Preheat the oven to 325 degrees F (165 degrees C). Lightly grease a 6-cup muffin tin.

    2. Combine cornmeal, flour, baking soda, and salt in a large bowl; stir in applesauce, soy milk, and agave nectar. Slowly stir in oil while continually stirring. Pour into the prepared muffin tin.

    3. Bake in the preheated oven until a toothpick or small knife inserted in the crown of a muffin comes out clean, 15 to 20 minutes.

    Nutrition Facts (per serving)

    177 Calories
    5g Fat
    31g Carbs
    3g Protein
    Nutrition Facts
    Servings Per Recipe
    6
    Calories
    177
    % Daily Value *
    Total Fat
    5g
    7%
    Saturated Fat
    0g
    2%
    Sodium
    310mg
    13%
    Total Carbohydrate
    31g
    11%
    Dietary Fiber
    3g
    10%
    Total Sugars
    13g
    Protein
    3g
    5%
    Vitamin C
    0mg
    0%
    Calcium
    6mg
    0%
    Iron
    1mg
    6%
    Potassium
    100mg
    2%

    * Percent Daily Values are based on a 2,000 calorie diet. Your daily values may be higher or lower depending on your calorie needs.

    ** Nutrient information is not available for all ingredients. Amount is based on available nutrient data.

    (-) Information is not currently available for this nutrient. If you are following a medically restrictive diet, please consult your doctor or registered dietitian before preparing this recipe for personal consumption.

    Read More

  • Vegan Creamed Spinach

    Vegan Creamed Spinach

    recipe image

    Published: · Updated: · Post may contain affiliate links

    Nutritional yeast lends a cheesy, creamy flavor for an easy, inexpensive, and flavorful vegan side dish

    Vegan Creamed Spinach from Living Well Kitchen

    Do you ever find a great recipe that calls for an ingredient that you aren’t very familiar with? Or maybe you get really excited about an ingredient and you buy a giant bag of this ingredient…

    That happened to me with nutritional yeast.

    Ok yes, I do actually use it often. I love making kale chips with it as well as cheezy bean dip. However, it’s something that gets shoved in the back of my pantry and I totally forget about it.

    Despite the fact that I don’t love cleaning, this year I’ve done a pretty good job with spring cleaning. I donated like 8 bags of clothes; yet my kitchen is another story.

    That is until I realized I can no longer allow my freezer to be so full.

    When you open the freezer door, you shouldn’t have to immediately jump out of the way for fear that a bag of frozen fruit or veggies or a chicken breast is going to fall on your foot (which hurts surprisingly bad fyi).

    Vegan Creamed Spinach from Living Well Kitchen

    I had nine bags of frozen spinach in my freezer yesterday. Nine. Now I’m down to eight thanks to this vegan creamed spinach.

    Can you guess what ingredient I used to make this creamy without adding cheese? Did you guess nutritional yeast since I just talked about it? ha, you’re right!

    Vegan Creamed Spinach from Living Well Kitchen

    I actually started making this for a quick side dish when I was in grad school. It is inexpensive, incredibly easy, and quite nutritious.

    Just boil the spinach, add a few spices, and then stir in your nutritional yeast. Ta da! You’re done and you have a tasty side dish that pairs well with lots of different things.

    It’s actually a really good snack too since it has a nice amount of protein.

    And there you have it. An easy, healthy side that uses up that nutritional yeast you have in your pantry that you just don’t know what to do with it.

    Vegan Creamed Spinach from Living Well Kitchen

    Oh and can someone please give me tips for how to make creamed spinach look pretty?!

    The best I could do was sprinkle it with a few sesame seeds and hope for the best.

    Vegan Creamed Spinach from Living Well Kitchen

    Vegan Creamed Spinach

    Nutritional yeast lends a cheesy, creamy flavor for an easy, inexpensive, and flavorful vegan side dish

    Print

    Rate

    Prep Time: 1 minute

    Cook Time: 10 minutes

    Total Time: 11 minutes

    Servings: 4 cups

    Author: Meme

    Ingredients

    • 16 ounce bag frozen spinach
    • 1 ½ cups water
    • ½ teaspoon garlic powder
    • ¼ teaspoon salt
    • ¼ teaspoon onion powder or onion flakes
    • teaspoon cayenne pepper
    • teaspoon nutmeg optional
    • 1 cup nutritional yeast

    Instructions

    • Put the spinach and water in a saucepan or skillet with sides. Cook over medium-high heat for 5-7 minutes, until spinach is cooked and most of the water has absorbed.

    • Stir in garlic powder, salt, onion powder, cayenne pepper, and nutmeg if using. Add nutritional yeast and stir well to completely combine. Remove from heat.

    • Serve as a side dish or as a snack. Enjoy!

    Did you try this recipe?Be sure to leave a comment & recipe rating below. Bonus points for tagging @memeinge & #livingwellkitchen on Instagram! THANK YOU! xo

    Vegan Creamed Spinach Nutrition Facts

    Nutrition Facts

    Vegan Creamed Spinach

    Amount per Serving

    % Daily Value*

    * Percent Daily Values are based on a 2000 calorie diet.

    Meme

    Here are some of my favorite nutritional yeast recipes:

    Kale Chips

    Balsamic Chickpeas and Spinach

    Cheezy Black Bean Dip

    Reader Interactions

    This site uses Akismet to reduce spam. Learn how your comment data is processed.

    Read More

  • Vegan Green Lentil Curry

    Vegan Green Lentil Curry

    recipe image

    This lentil curry without coconut milk is an easy vegetarian curry that can be tweaked to suit your personal tastes regarding spice and heat. I used green peppers, but you can experiment with other types of vegetables such as cauliflower, red pepper, or okra! Serve with basmati rice and sprinkle with fresh cilantro if you like.

    Submitted by
    missjazzcullen

    Updated on July 7, 2024


    Cook Mode
    (Keep screen awake)

    Ingredients


    Original recipe (1X) yields 3 servings

    • 1 tablespoon cooking oil

    • 1 onion, finely chopped

    • 1 green bell pepper, finely chopped

    • 1 clove garlic, finely chopped

    • 1 tablespoon garam masala

    • 1 tablespoon mild curry powder

    • 2 teaspoons ground cumin

    • 1 teaspoon ground turmeric

    • 1 (14.5 ounce) can diced tomatoes

    • 1 (15 ounce) can cooked green lentils

    Directions

    1. Heat oil in a large skillet over medium-high heat and cook onion, bell pepper, and garlic until soft, about 5 minutes. Stir in garam masala, curry powder, cumin, and turmeric; cook until fragrant, 1 to 2 minutes. Add tomatoes, bring to a simmer, and cook for 5 minutes. Add lentils and stir well. Simmer for 10 minutes, but do not bring to a boil.

    Cook’s Note

    If you want to add meat, I suggest either chicken breast or diced beef. Brown while frying the vegetables before adding the spices.

    Nutrition Facts (per serving)

    273 Calories
    7g Fat
    43g Carbs
    15g Protein
    Nutrition Facts
    Servings Per Recipe
    3
    Calories
    273
    % Daily Value *
    Total Fat
    7g
    8%
    Saturated Fat
    1g
    6%
    Sodium
    28mg
    1%
    Total Carbohydrate
    43g
    16%
    Dietary Fiber
    16g
    56%
    Total Sugars
    8g
    Protein
    15g
    31%
    Vitamin C
    52mg
    58%
    Calcium
    122mg
    9%
    Iron
    8mg
    46%
    Potassium
    1004mg
    21%

    * Percent Daily Values are based on a 2,000 calorie diet. Your daily values may be higher or lower depending on your calorie needs.

    ** Nutrient information is not available for all ingredients. Amount is based on available nutrient data.

    (-) Information is not currently available for this nutrient. If you are following a medically restrictive diet, please consult your doctor or registered dietitian before preparing this recipe for personal consumption.

    Read More

  • Vegan Parmesan Cheese

    Vegan Parmesan Cheese

    recipe image

    How to make vegan parmesan cheese by Pasta-based. Nutty, crumbly, vegan parmesan cheese in a small bowl.

    This recipe for vegan parmesan cheese makes a flavorful non-dairy parmesan that goes well topped on SO many different dishes. Mainly, I’m talking about Italian recipes like pastas, pizzas, and soups, but it can work well for a variety of cuisines.

    It’s awesome to keep stored in the refrigerator for whenever you need a little extra sprinkle of flavor and cheesiness. It’s so easy to make, requires minimal, simple, and healthy ingredients like:

    • CASHEWS + ALMONDS. ♡ Did you know? Our life span may be increased by an extra two years by eating nuts regularly.
    • NUTRITIONAL YEAST. ♡ Cheesy, flaky, vegan fairy dust!
    • GARLIC. ♡ So savory and warm! Also, good for your heart 🙂

    Make this recipe for vegan parmesan cheese in minutes. Store in your refrigerator and sprinkle away!

    Easy, simple, healthy homemade vegan grated parmesan recipe created with cashews, almond, nutritional yeast, spices, and coconut oil.

    Course:

    Ingredient

    Cuisine:

    Italian

    Keyword:

    almonds, cashews, cheese, coconut oil, parmesan, spices, topping, vegan, vegetarian

    Servings: 16 tablespoons

    Calories per Serving: 46 kcal

    • 2/3
      cup
      whole cashews – raw
    • 1/4
      cup
      almond meal
    • 3
      tablespoons
      nutritional yeast
    • 1/2
      teaspoon
      coconut oil
    • 1/4
      teaspoon
      garlic powder
    • 1/8
      teaspoon
      onion powder
    • 1/8
      teaspoon
      salt

    1. Place all ingredients in food processor. Pulse until combined and a fine meal has formed.

    Read More