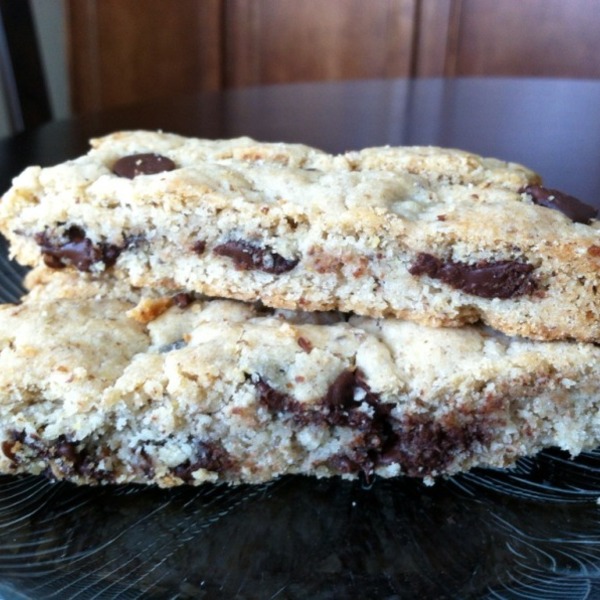
“Simple and delicious, perfect for gift giving, dipping in coffee or tea, and munching on for breakfast. Loved by all and easily adaptable to your likings.”
Ready In:
1hr 15mins
Ingredients:
10
Serves:
20
1⁄3
cup soymilk
2
tablespoons ground flax seeds
3⁄4
cup sugar
1⁄2
cup canola oil
1⁄2
teaspoon vanilla extract
1 2⁄3
cups all-purpose flour
2
teaspoons baking powder
1⁄2
teaspoon salt
cinnamon
nutmeg
directions
preheat oven to 350.
whisk together wet ingredients in a bowl. dry in another.
fold wet into dry and knead until dough if firm. Shape into a log and bake 28 minutes until slightly puffy or cracked. Remove and cool. Cut and rebake at 375 degrees for 12 to 15 minutes.
Cool and enjoy!
Questions & Replies
Got a question?
Share it with the community!
Want a Second Helping?
Sign up for our newsletter to get recipes, easy dinner ideas, tasty treats and more delivered straight to your inbox.
To withdraw your consent or to learn more about your rights, see the Privacy Policy.
This recipe is pretty good. My biscotti came out a little more chewy than crispy (like other biscotti I’ve had), but it had a good flavor. I added chocolate chips and dipped it in my soy vanilla latte.
By Susan Voisin79 Comments Disclosure: This post may contain affiliate links. As an Amazon Associate I earn from qualifying purchases. Privacy Policy.
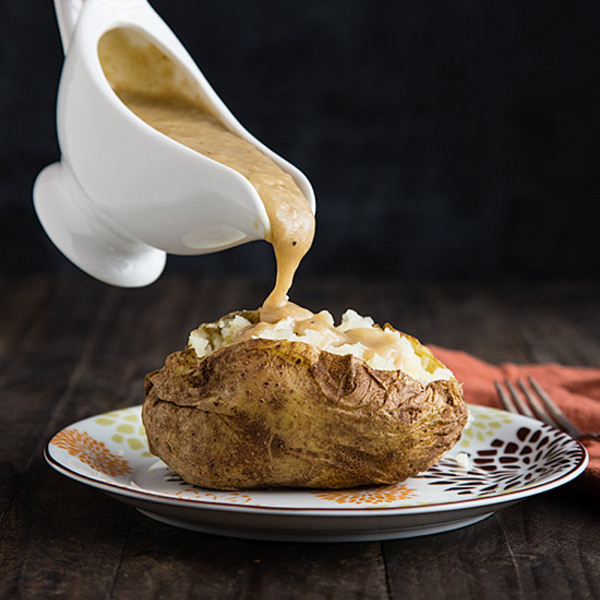
9-1-1 is an easy formula for a delicious fat-free, gluten-free vegan gravy that you can make in about 15 minutes using only 5 ingredients.
People new to oil-free vegan diets often ask what they can put on baked potatoes. If you’re used to using margarine or butter, it can be intimidating to be told that you need to either (a) get used to potatoes plain or with new toppings such as salsa or (b) make a cheesy sauce or gravy from scratch.
I’ve been eating a lot of potatoes lately while following my personal version of the McDougall Maximum Weight Loss Plan, and I can tell you from experience that (a) I don’t care for salsa on baked potatoes and (b) if I had to make a difficult sauce in order to eat them I never would.
Instead, I make a gravy that’s so ridiculously easy that I wasn’t going to write about it here. After all, I already have a mushroom gravy that is very popular, though a little more time-consuming to make. But then I posted the following photo of my breakfast on my Instagram account, and a couple of people wanted the recipe:
911 Vegan Gravy with Mushrooms and Chickpeas
It’s practically not a recipe, just a proportion of ingredients: 9 stands for 9 parts liquid, 1 stands for 1 part brown rice flour, and the other 1 stands for 1 teaspoon of seasoning (or 1 tablespoon if you’re really into seasonings.)
But 911 is also the code for emergencies, and when you need gravy but you don’t have any mushrooms or onions or other fresh vegetables, this recipe will save you and your baked potatoes. Of course, if you have fresh ingredients to add, so much the better, but this recipe is perfect for all of you mushroom haters out there. And it’s gluten-free, so it’s safe to serve to any gluten-sensitive guests at your holiday table.
Tastes great on Biscuits.
Try it on Fat-Free Vegan Biscuits!
I hope you don’t have a gravy emergency this holiday season, but if you do, just remember 9-1-1.
Please pin and share!
911 Vegan Gravy
This basic gravy is endlessly adaptable. The only limit is your imagination. See the notes below for some seasoning suggestions.
Prep Time 1 minuteminute
Cook Time 15 minutesminutes
Total Time 16 minutesminutes
Servings 8
Ingredients
2 1/4cupsvegetable broth or a combination of broth and non-dairy milk
1/4cupbrown rice flour
1 – 2teaspoonspoultry seasoning or your choice of seasoningssee notes
generous grating of black pepper
soy sauce, tamari, or saltto taste
Instructions
Combine all ingredients in a medium-sized saucepan. Cook, stirring, over medium-high heat until gravy boils and thickens. Check seasonings and add more as needed. Reduce heat and simmer, stirring often, for about 5 minutes. If it’s too thick, add additional broth or non-dairy milk to thin.
Notes
I like No-Chicken-style broth in this and usually use either Imagine No-Chicken or Edward & Sons Not-Chick’n Bouillon.
I like to use poultry seasoning because its combination of herbs tastes like Thanksgiving to me. But feel free to use whatever seasonings you like. Thyme, sage, rosemary, onion powder, and garlic powder in various combinations will give you a similar flavor, and you can increase the flavor by adding any of them along with the poultry seasoning.
Add nutritional yeast. I often add a tablespoon or two to increase the richness and the flavor of the gravy.
Make this fancy by sautéing onions, mushrooms, and garlic (or any combination of the three) before adding the other ingredients.
Add smoked salt for a “bacon gravy” flavor.
Use more non-dairy milk for a creamier gravy. (In these photos I used 2 cups broth to 1/4 cup cashew milk. You can use up to half non-dairy milk.)
For extra flavor, add a little vegetable bouillon in addition to the broth.
Nutrition Facts
911 Vegan Gravy
Amount Per Serving (1 serving)
Calories 22 Calories from Fat 1
% Daily Value*
Fat 0.14g0%
Sodium 146mg6%
Carbohydrates 4.5g2%
Protein 0.4g1%
* Percent Daily Values are based on a 2000 calorie diet.
Nutritional info is approximate.
Sign up for our newsletter for updates on recipes and more!
Reader Interactions
This site uses Akismet to reduce spam. Learn how your comment data is processed.
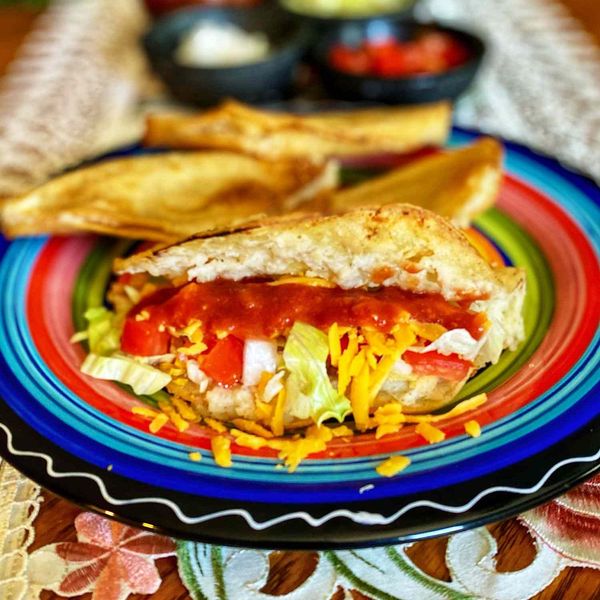
These air-fried vegan tacos taste just like the ones mom used to make. The difference is these are air fried and vegan, making them much healthier. To keep them vegan, we serve them with lettuce, tomatoes, onions, Mexican hot tomato sauce (such as El Pato®) and vegan Cheddar shreds (such as Follow Your Heart®).
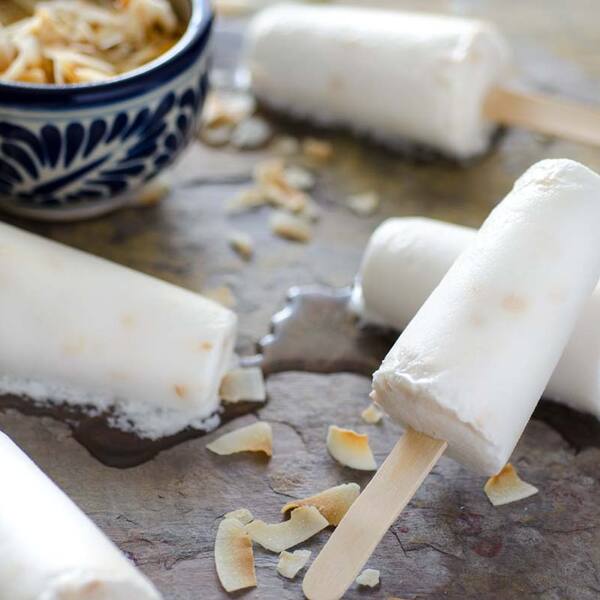
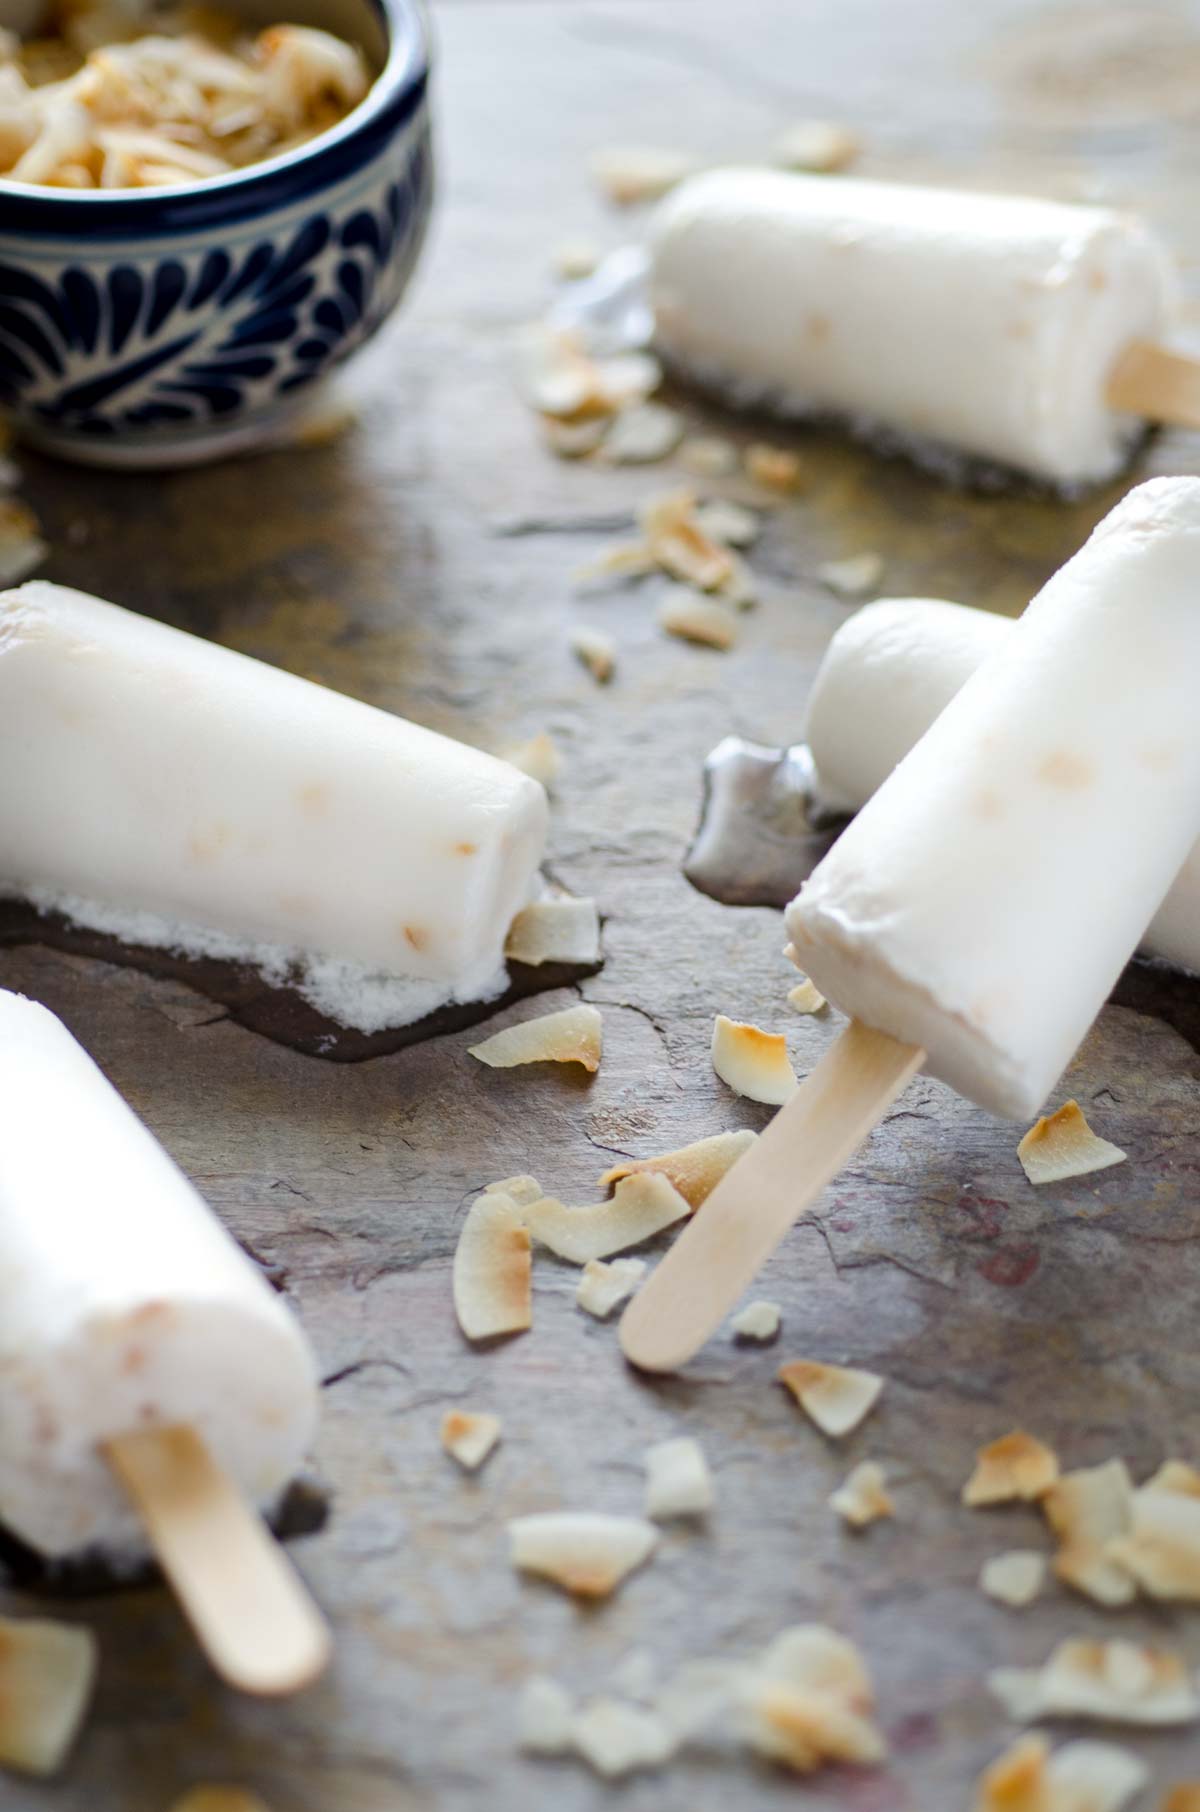
These vegan coconut paletas (paletas de coco) are super easy to make and have only 3 ingredients. They are creamy, without being too rich, and full of toasted coconut flakes. These were my favorite growing up, now I can’t decide between these and the mango-chile paletas. However, I do think this vegan version is even better than the versions made with cow’s milk. They are definitely kid approved!
I had a kitchen nightmare the other night. I hadn’t had one in years! A kitchen nightmare is common among professional cooks and chefs. They usually entail something forgotten in the oven, the ticket machine spitting out ticket after ticket, or chef yelling at you. I don’t even know what caused me to have one, but chef was yelling at me. I was trying to explain myself and only digging the whole deeper. You should know, even in dreams, your response should always be, “Yes, chef.” I woke up a little freaked out, only to realize that my sweet two year old was trying to wake me up with kisses. I cannot even explain to you the huge relief I felt.
Sometimes I miss being a cook in a restaurant, but then I see how hard and tirelessly my husband works and how much we miss him, and I forget about it. Sometimes being a mom entails many tedious and repetitive tasks, and a great exercise in patience, but those sweet kisses cannot be replaced with anything. Not even the rush of adrenaline you get from working the line on a busy night, or the first sip of beer after getting your butt kicked on a Saturday. That morning I was really grateful that I get to be a stay-at-home mom/blogger, that is until I had to wipe up some poop off the bathroom floor!
The Recipe: Vegan Coconut Paletas
I was going to go all out and buy a fresh coconut to make these, since they are so accessible here in Hawaii, but I quickly changed my mind when I imagined trying to crack a coconut with my two kids pulling at my legs. This is the easy version. I used light coconut milk to minimize the amount of fat, but feel free to use full fat coconut milk if that is what you desire. Enjoy!
Vegan Coconut Paletas
These vegan coconut paletas (paletas de coco) are super easy to make and have only 3 ingredients. They are creamy, without being too rich, and full of toasted coconut flakes.
Pin Recipe
Print Recipe
Prep Time15 minutesmins
Freeze5 hourshrs
Total Time5 hourshrs15 minutesmins
Course: Dessert
Cuisine: Mexican
Diet: Vegan
Servings: 10(3 oz) popsicles
Calories: 103kcal
2(13.4 oz) cansCoconut milk, full fat
⅔ cupLight agave syrup
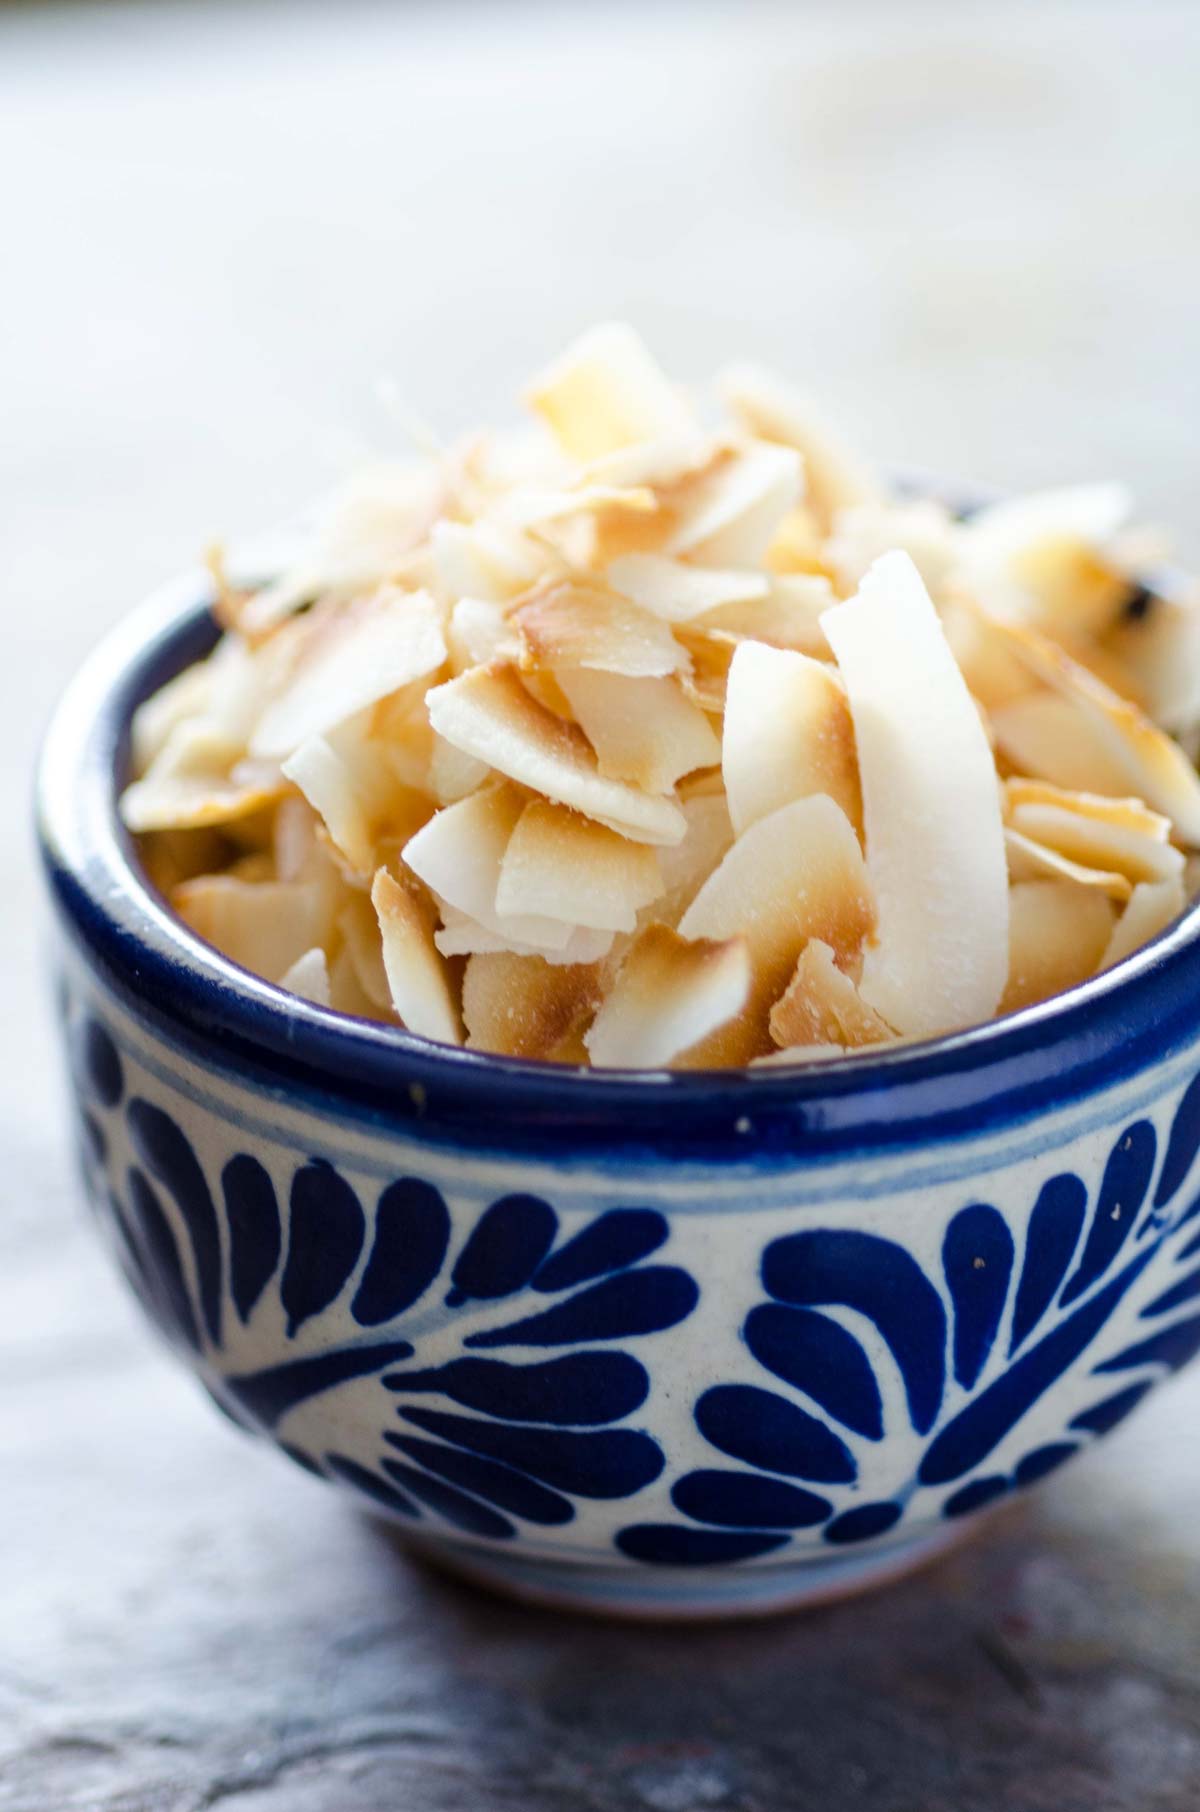
⅔cupUnsweetened shredded coconut,lightly toasted
Add the coconut milk and agave syrup to the blender and blend until smooth.
Add the coconut and pulse the blender one or two times. I like mine to still have pieces of coconut in it.
Pour into popsicle molds and freeze for at least 5 hours
If you are using popsicle molds without an insert, refrigerate popsicles for 30 min. then insert wooden popsicle sticks. Coconut can be toasted or untoasted.
Dora is the founder, recipe developer, and photographer at Dora’s Table and Mi Mero Mole. Born and raised in Mexico and a graduate of the Culinary Institute of America in New York, she adopted a vegan (plant-based) diet to take control of her health.
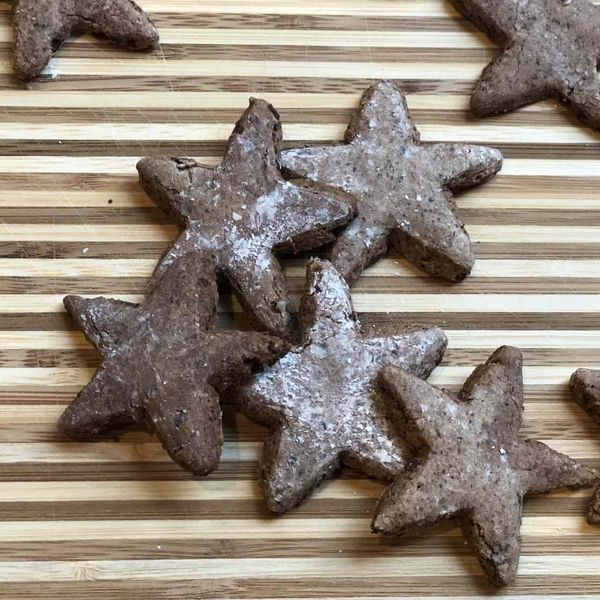
Try this vegan version of these traditional Italian Christmas cookies, with a hint of anise, and made with brown sugar and almond butter.
Submitted by Fioa
Updated on January 14, 2022
Cook Mode (Keep screen awake)
Ingredients
This recipe was developed at its original yield. Ingredient amounts are automatically adjusted, but cooking times and steps remain unchanged. Note that not all recipes scale perfectly.
Original recipe (1X) yields 24 servings
1tablespoonground flax meal
3tablespoonswater
2 ½cupsall-purpose flour
1teaspoonbaking powder
1teaspoonground anise seeds
½cupalmond butter
⅓cupbrown sugar
2teaspoonsanise extract
2tablespoonsconfectioners’ sugar
Directions
Preheat oven to 350 degrees F (175 degrees C). Line 2 baking sheets with parchment paper.
Mix ground flax and water in a bowl; let sit until thickened, about 10 minutes.
Combine flour, baking powder, and ground anise seeds in a bowl; mix until well combined. Add flax mixture, almond butter, brown sugar, and anise extract; mix well until a soft dough forms. Shape into 2-inch balls and place on the prepared baking sheets. Flatten balls lightly with your hand.
Bake in the preheated oven until bottom is lightly golden, 20 to 25 minutes. Dust with confectioners’ sugar.
Nutrition Facts (per serving)
100
Calories
4g
Fat
15g
Carbs
2g
Protein
Nutrition Facts
Servings Per Recipe 24
Calories 100
% Daily Value *
Total Fat
4g
5%
Saturated Fat
1g
3%
Sodium
45mg
2%
Total Carbohydrate
15g
5%
Dietary Fiber
1g
2%
Total Sugars
4g
Protein
2g
4%
Vitamin C
0mg
0%
Calcium
31mg
2%
Iron
1mg
5%
Potassium
61mg
1%
* Percent Daily Values are based on a 2,000 calorie diet. Your daily values may be higher or lower depending on your calorie needs.
** Nutrient information is not available for all ingredients. Amount is based on available nutrient data.
(-) Information is not currently available for this nutrient. If you are following a medically restrictive diet, please consult your doctor or registered dietitian before preparing this recipe for personal consumption.
Photos of Vegan Italian Anise Christmas Cookies
Photo by Allrecipes Member
Photo by
SappyBay4594
Vegan Italian Anise christmas Cookies= I never tried the recipe but it was a good cookie. I would recommend trying it. These are the nastiest cookies in the whole entire world they made me so sick i went to the hospital and was put on life support
My favorite part of eating at a particular Italian restaurant chain involves the bill and several Andes Mints. Since being dairy-free I have desperately longed for vegan Andes Mints so I set out to create my very own version…just in time for St. Patrick’s Day.
As quietly as I could on hardwood floor, I tip-toed my way {at one point, crawling on all fours} to leave an envelope filled with a note written by a leprechaun and 5 gold coins by the door without having my favorite little man hear me in the adjoining room. The entire time I was giggling to myself. It took everything in me not to bust up laughing and burst “It was MEEEE!! I wrote the note!!!” while he read with sheer delight. Okay, I read it to him–he cannot read.
The excitement and surprise overwhelmed *me* with happiness. He counted all his money and screamed with joy that a leprechaun came to visit and left him FIVE gold coins. This is what I love about kids. Their bright, wide eyes towards the world; their “oooohs” and “aaaaahhs” over the thought of a tiny man in green leaving them treats just because–man, makes me wish I lived in the days of innocence and belief. Oh, to be a kid again!
At least when I eat these homemade Andes Mints, they instantly take me back to those days. Remember when most restaurants would leave a few of these minty chocolates with your check? Nowadays, you can only really count on Olive Garden to do so. And since that is not my first {or any} choice when eating out, nor can I even eat these tasty chocolate mints, why not make them at home?
Print
1/2 c. nondairy chocolate chips
1/2 c. nondairy white chocolate chips or from a bar
1/2 tsp. peppermint extract
few drops of all-natural green food coloring
Instructions
Line an 8×8 baking pan with parchment paper. Cut it so it perfectly fits on the bottom and dab the corners with melted chocolate so it stays in place. Allow to set {just a few minutes.
Melt chocolate chips in a microwave safe bowl. Melt in 30 increments, stirring at each stop, repeat until smooth. Drop 1/4 tsp peppermint extract in and stir. Adjust to taste–add the remainder 1/4 tsp if it is not strong enough.
Slowly pour HALF {or less} as the bottom layer into the pan. You want a thin layer so go slowly. Using the back of a spoon or the shake method, make sure it is evenly spread. Freeze for 2 minutes. Make sure it does not freeze completely!!! You don’t want 3 separate layers that fall apart but you also don’t want the chocolate layers to blend into it each other. Watch for the color of the top–when it is no longer shiny is a good indicator you’re ready for the next layer.
While you are flash freezing the first layer, melt the white chocolate chips in the same way in the microwave. Drop food coloring in, stir until smooth.
Pour green chocolate for the thin 2nd layer. Shake until evenly spread. Freeze for 2 minutes or until no longer shiny.
Repeat with 3rd chocolate layer. If you need to reheat your chocolate because it is hardening a little, place back in the microwave for 10-20 seconds. Freeze 2-5 minutes.
Before it sets completely, using a knife, slice the shapes of your mints. I went for the classic rectangular shape. Allow to set until dry, either on the counter or in the freezer {if you are less patient like myself}.
Notes
These measurements depend on the size of your pan. You will need to have more on hand if you are using a pan bigger than 8″ x 8″
Need help choosing the right kind of dairy free white chocolate? Check out this post. It will be very helpful for you!
Want more copy cat vegan candy recipes? Bam!:
Vegan Snickers
Vegan Butterfingers
Vegan Heath Bars
About Cara
Based in Chicago with her husband and son, Cara is the creator behind the site Fork and Beans: A place where kids can have fun with their food.
Reader Interactions
Trackbacks
[…] From Fork and Beans […]
[…] MintsHomemade Twix Cookie Bars [Spabettie]Healthy Chocolate Peanut Butter Balls [Tasting Page]Vegan Andes Mints [Fork and Beans]Easy Microwave Peanut Brittle [The View from Great Island]Peanut Butter and Pretzel […]
[…] 1. Vegan Andes Mints […]
[…] PANS & TINS – This is an easy way to create shapes with the equipment you already have. Test out by using small baking pans, muffin tin pans, or even baking sheets to help you make bars and molds. My recommendation always is to have parchment paper handy to line the pans for easy removal. For recipe and technique reference on using a pan for creating a mold, check out this, this, and this. […]
[…] Cream 72. Green Pesto Pizza 73. Irish Boxty 74. Kale and Potato Hash 75. Skillet Gardeners Pie 76. Homemade Vegan Andes Mints 77. Quinoa Stuffed Cabbage 78. Pistachio Pudding 79. Colcannon Quesadillas 80. Shamrock Breakfast […]
[…] Patty’s Day, making green chocolate bark (thanks to the ever creative genius of Cara over at Fork and Beans), and enjoying the simplicity of kid friendly snacks, and a long, looooong, walk in the fresh air. […]
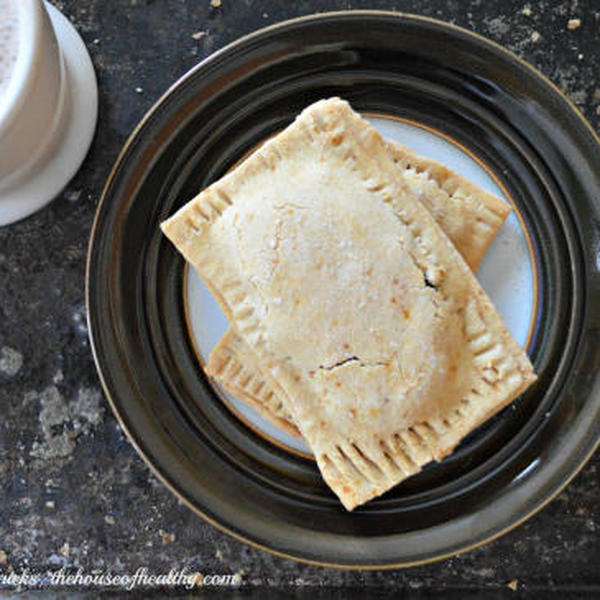
In a large bowl, add your butter and flour. Mix with hands until the butter breaks apart.
Add in your water and remaining ¼ cup sugar and continue to mix dough together.
Roll out half of dough in a floured surface (counter-top, parchment paper or aluminum foil all work). You want your dough to be very thin, but able to move.
Cut your dough into 6-7 rectangular pieces.
Transfer to a tray and pop in the freezer for 30 minutes to 1 hour.
Repeat with remaining dough.
While freezing, prepare filling and preheat oven to 350 degrees.
Add frozen blueberries and ¾ cup coconut sugar to a large pot on medium heat. Stir occasionally until the blueberries “melt” down.
Add chia seeds to your blueberries and st aside to thicken.
Remove dough from freezer. Top with filling, evenly in each rectangle.
Top with same size rectangle and pinch edges closed.
Bake for 25 minutes until slightly browned.
Store in the freezer and pop in the toaster when ready to eat.
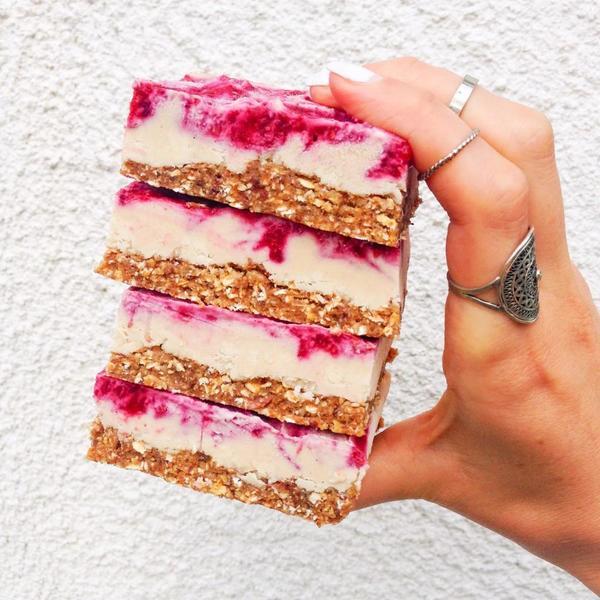
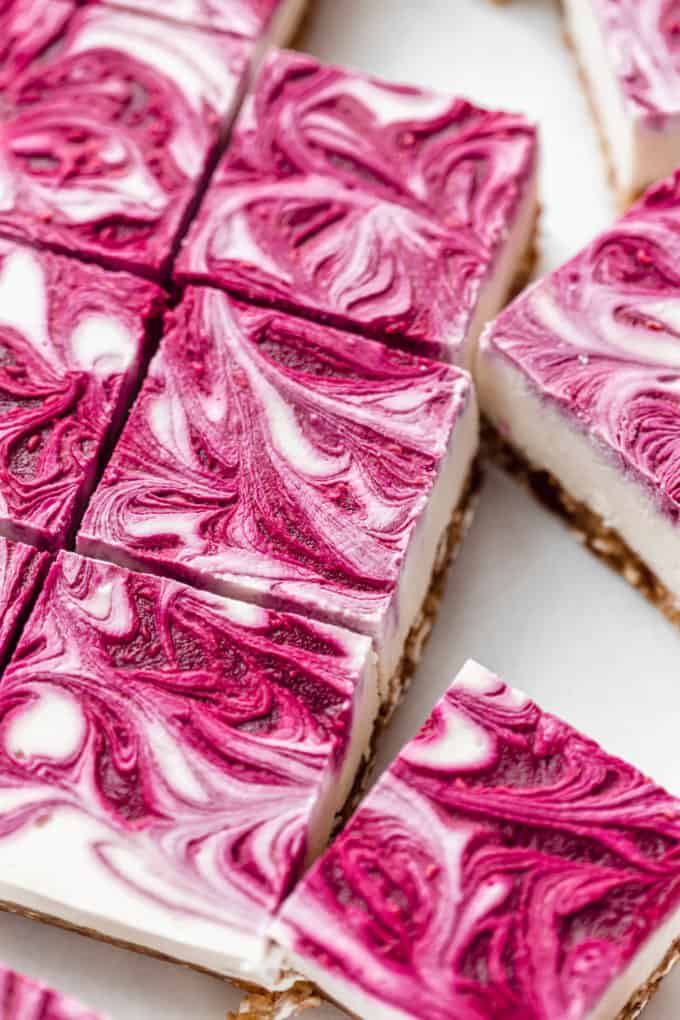
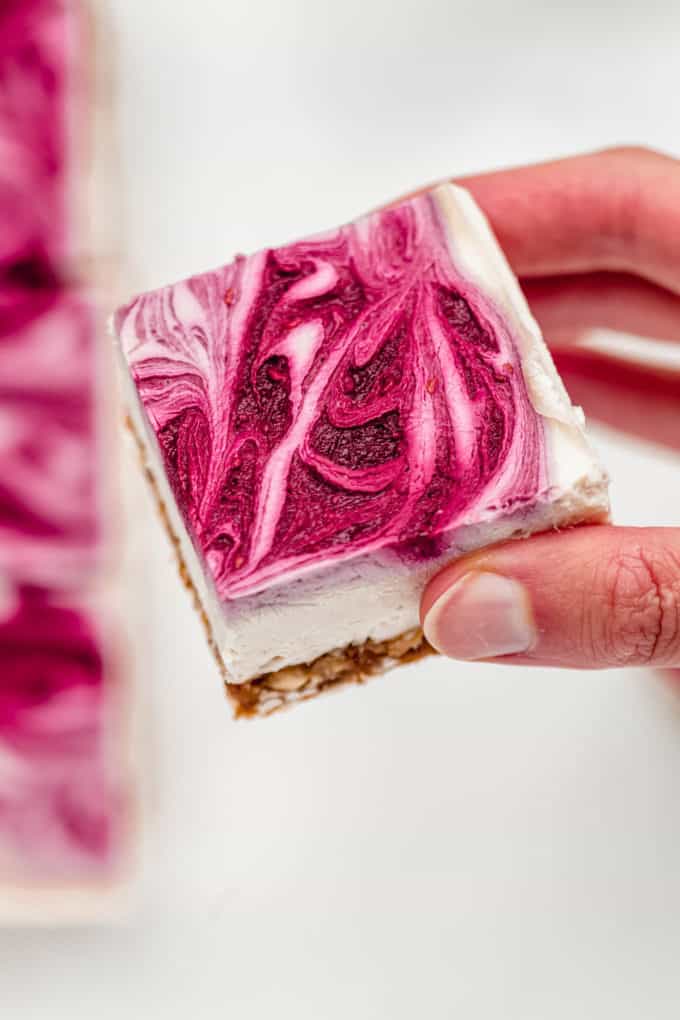
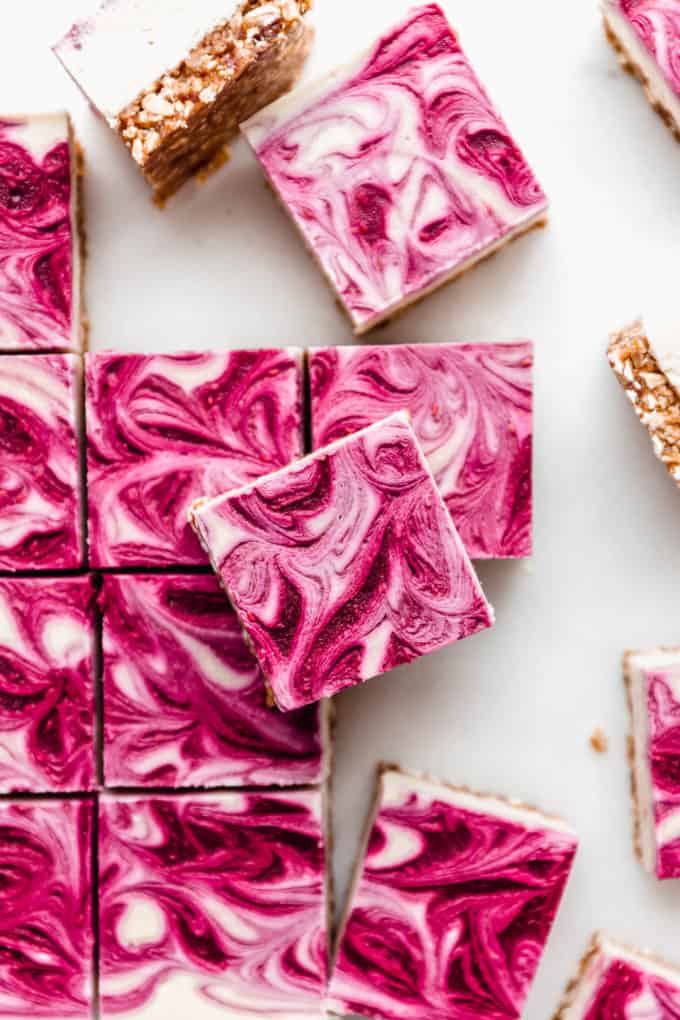
These vegan raspberry cheesecake bars will make all your dreams come true! They’re creamy, delicious, and loaded with swirls of raspberry goodness!
Today I’m sharing a revamped version of one of my oldest recipes from the blog. I present to you my completely raw Vegan Raspberry Cheesecake Bars. (*cheers*) These are similar to my little Vegan Raspberry Cheesecakes, but with slightly different ingredients. (and of course, the fact that these are bars.)
These Vegan Cheesecake bars are made with a base of raw cashews and coconut cream and topped off with a raspberry swirl. The bars then get placed in the freezer to set and can be enjoyed straight out of the freezer as more of a frozen treat, (hello vegan cheesecake ice cream) or left on the counter to thaw out for 5-10 minutes to be eaten more as a regular cheesecake.
Why you’ll love this recipe
Vegan, gluten-free, grain-free and refined sugar-free
Made with wholesome and healthy ingredients
Easy to make
Can be stored in the freezer for up to 3 months
Ingredients you’ll need
The full ingredient list and measurements are below in the recipe card! 🙂
Walnuts
Oats
Medjool dates
Cinnamon
Ssalt
Raw Cashews
Coconut cream
Coconut oil
Maple syrup
Lemon
Vanilla
Raspberries
How to make Vegan Raspberry Cheesecake Bars
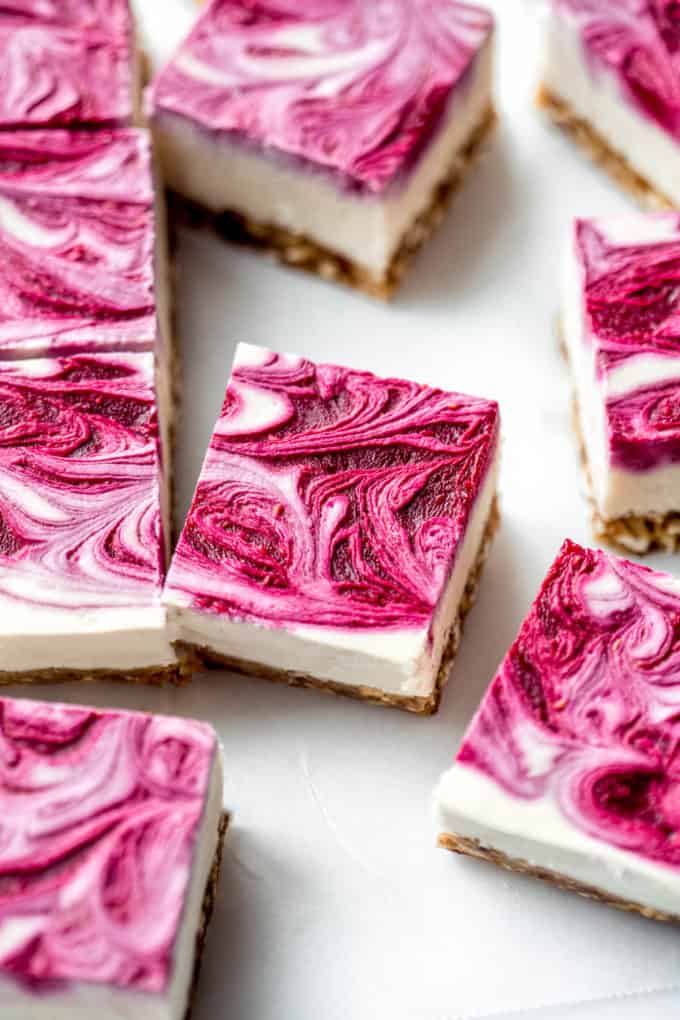
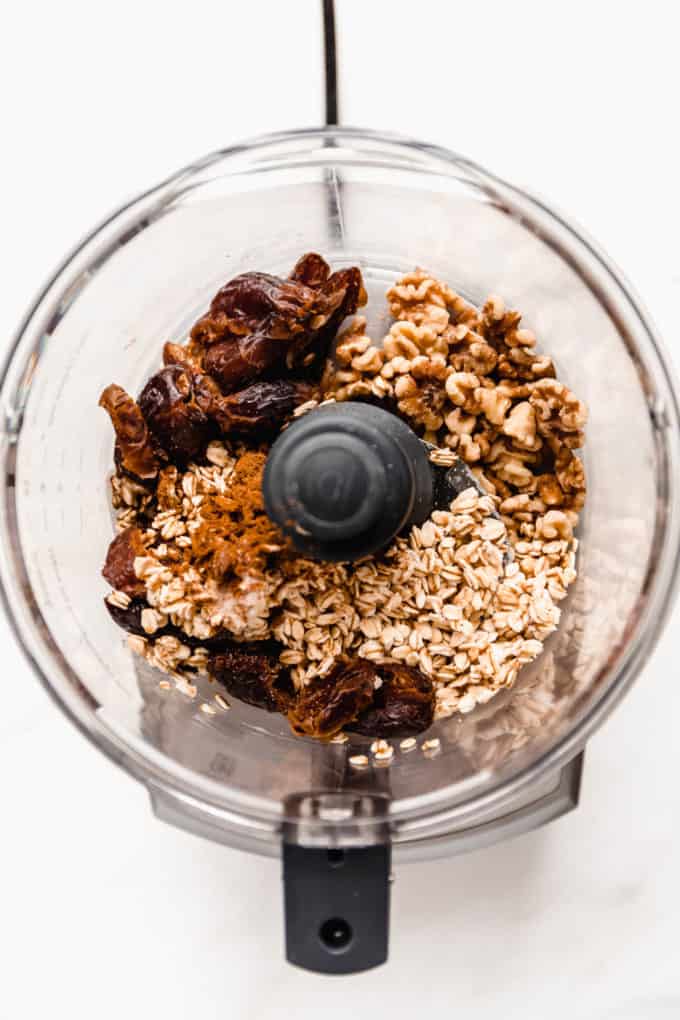
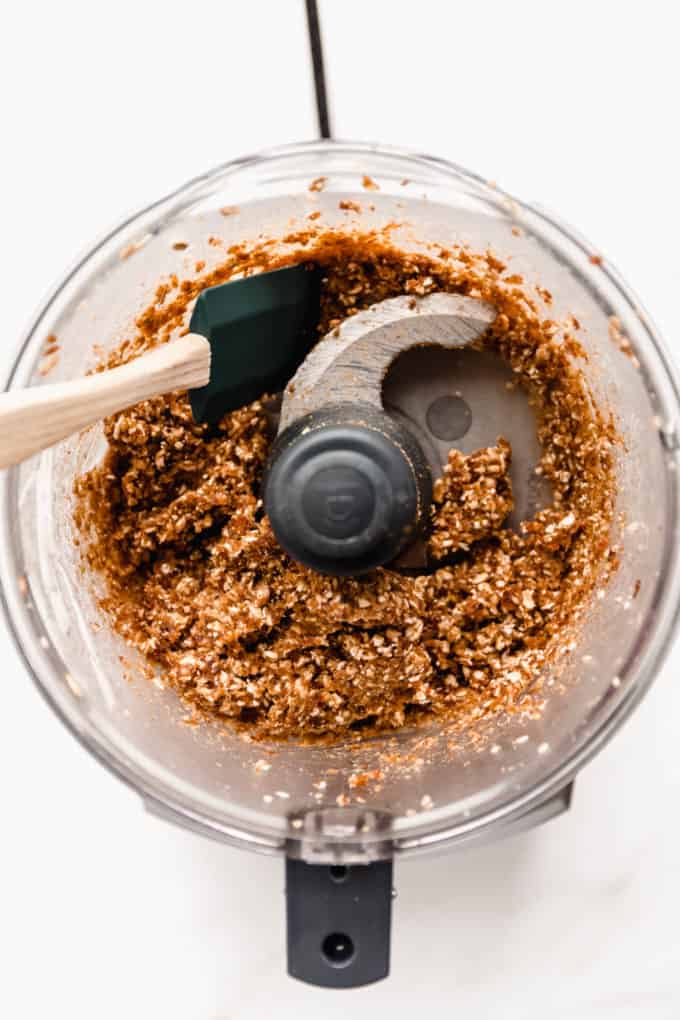
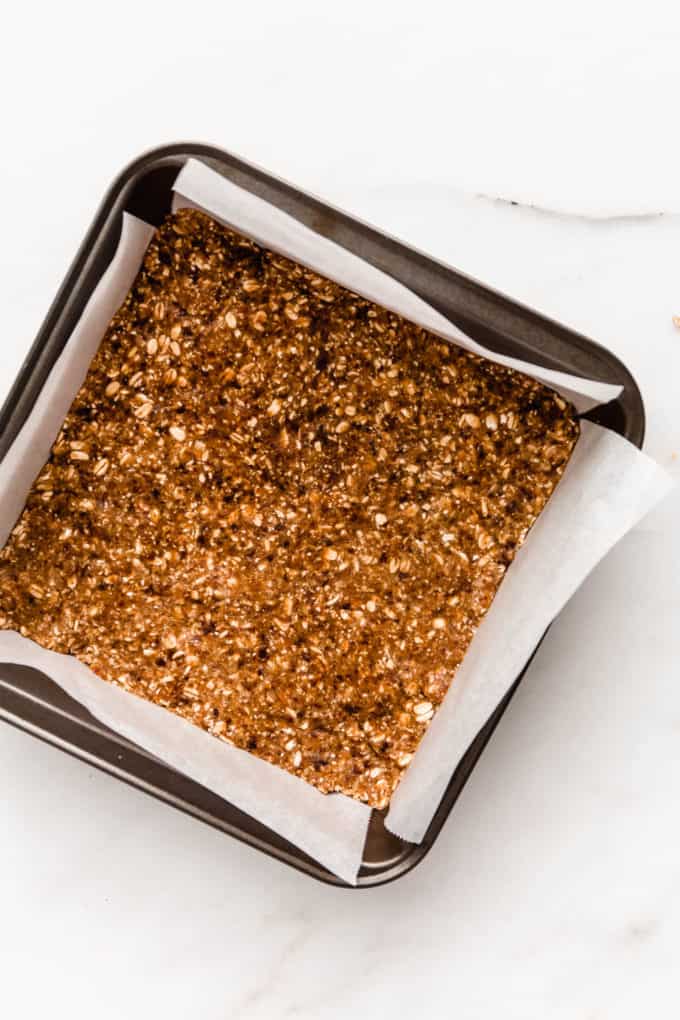
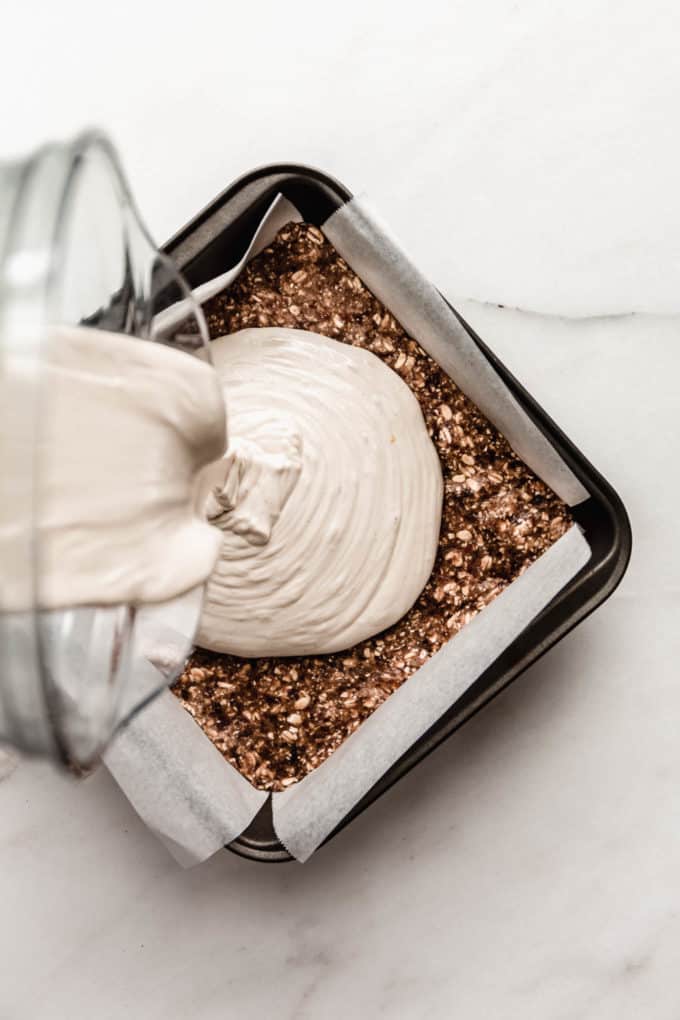
Start by making the crust by mixing the walnuts, oats, dates, cinnamon and salt together in a food processor until it forms a sticky dough. Then press the dough into an 8×8 inch pan.
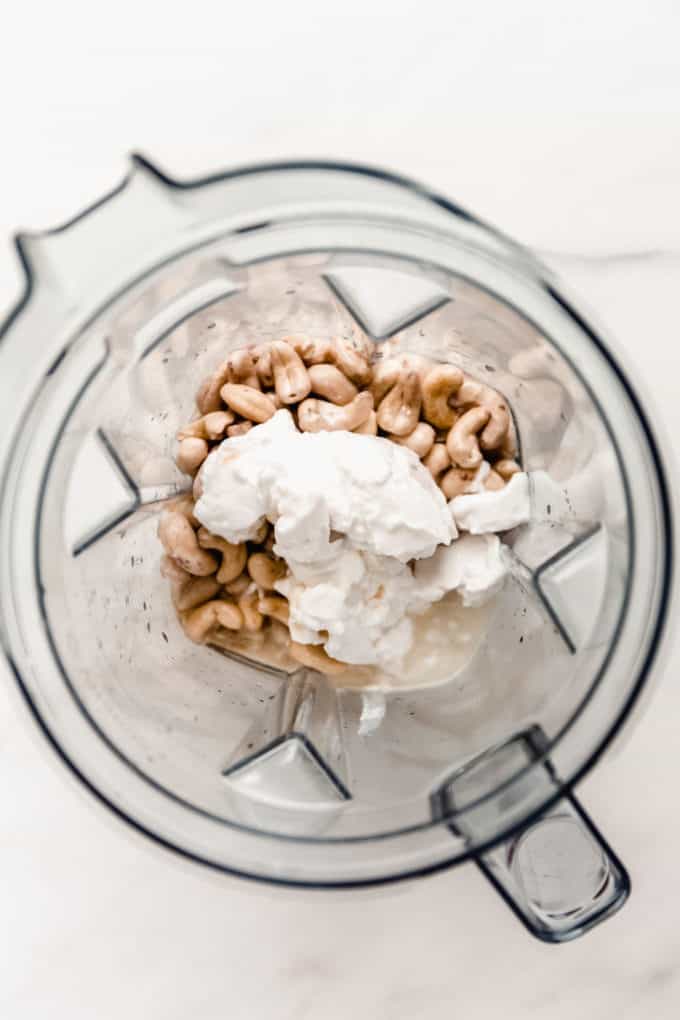
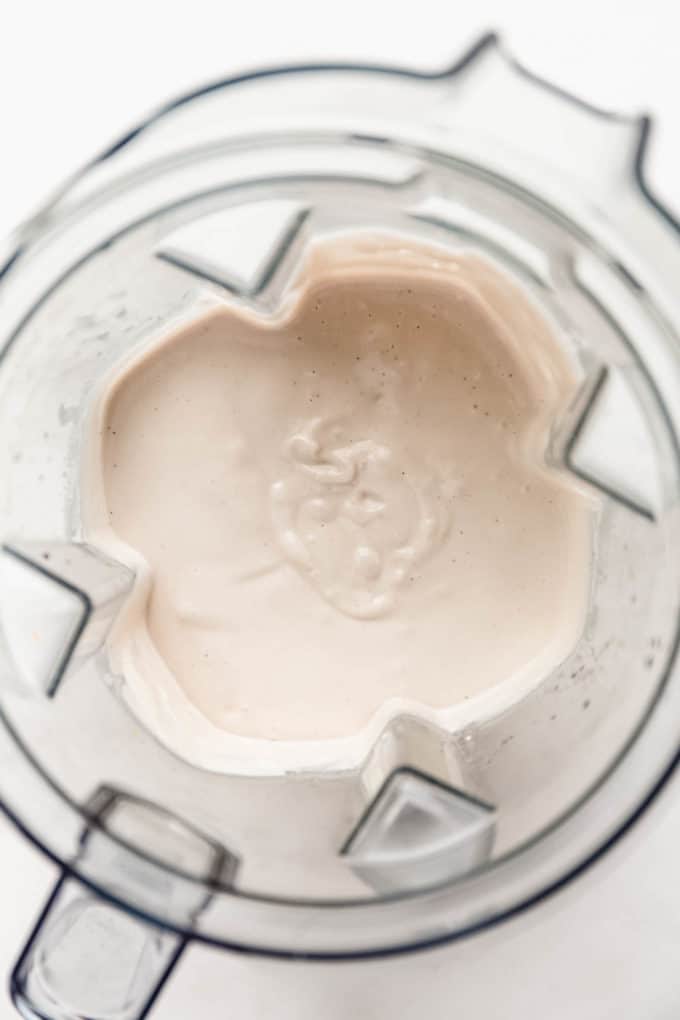
Next make the cheesecake filling by blending the cashews, coconut cream, coconut oil, maple syrup, lemon and vanilla extract together until it’s smooth and creamy.
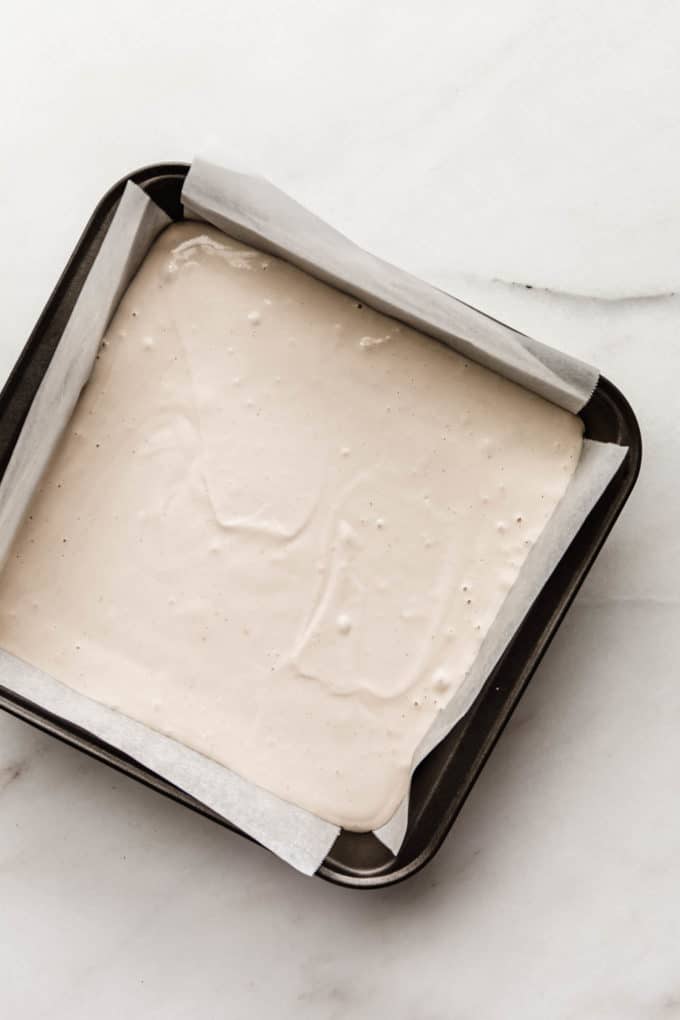
Pour the mixture into the baking pan and spread it out evenly with a spatula.
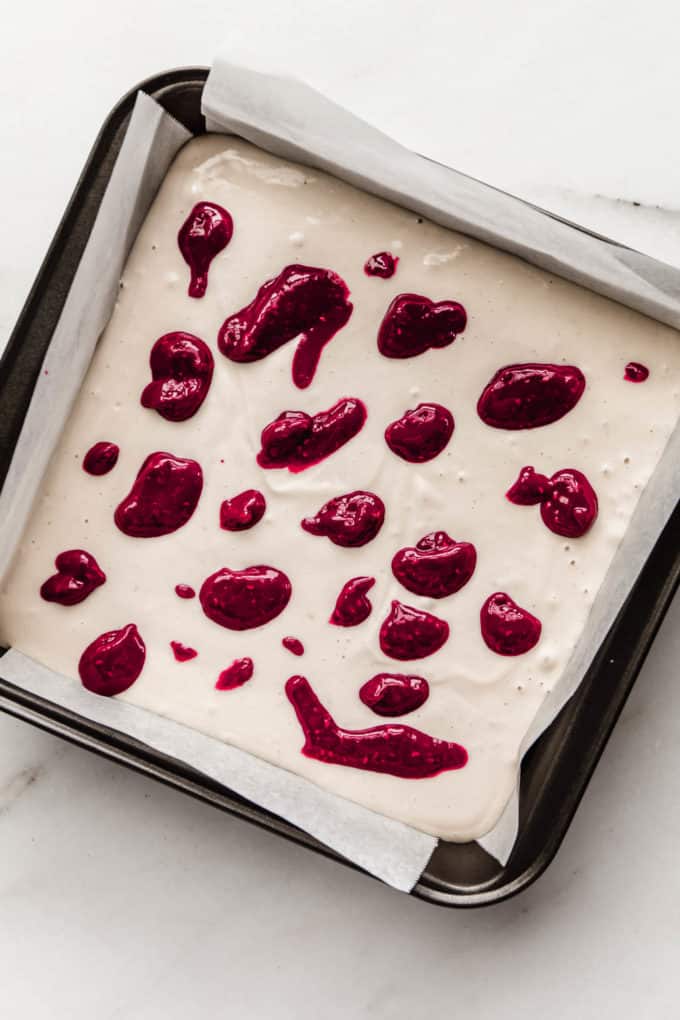
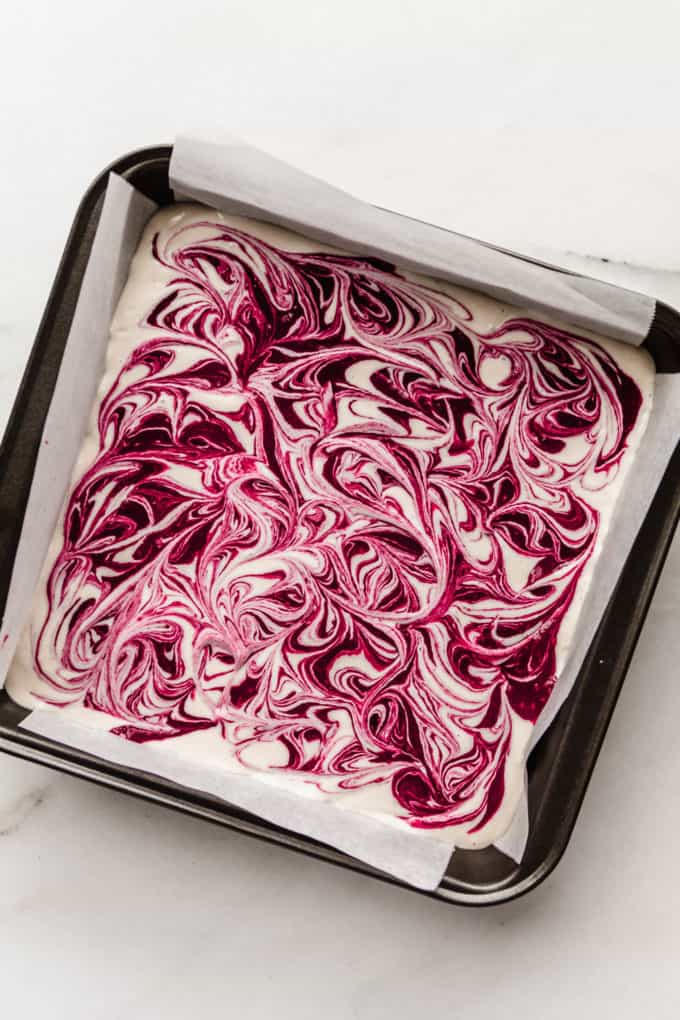
To make the raspberry topping, cook the raspberries in a pot with a splash of water and maple syrup for 5-10 minutes to thicken and reduce. Then dollop the raspberry mixture on top of the cheesecake layer and use a knife or chopstick to make swirls.
Place the bars in the freezer for at least 4 hours or overnight to set.
Expert tips
Use Medjool dates, not regular dates for the base. Medjool dates are bigger and stickier and will help the “crust” bind together. If you’re dates feel very dry, you can rehydrate them by soaking them in warm water for 2-3 minutes then draining.
Use full-fat coconut milk from a can and mostly just the cream off the top of the can. This will result in a thick and creamy vegan cheesecake. If you use light-coconut milk, or coconut milk from a carton the cheesecake bars won’t set properly.
Continue to blend or puree the cheesecake layer until smooth and creamy. You don’t want to have any little bits of cashew left. A powerful blender like a vitamix works well for this. (*This is also why it’s important to soak the cashews. This will soften them and make them much easier to blend)
Strain or blend the raspberry puree if you don’t want seeds. This is completely optional.
Let thaw on the counter top for 5 minutes before cutting. The bars will likely be very frozen when you remove them from the freezer, so let them thaw out for a few minutes before cutting.
How to store
Store leftovers in the freezer in a sealed container or freezer bag for up to 3 months. These bars cannot be stored in the fridge as they will become too soft. Remove from the freezer 5 minutes before serving.
More vegan cheesecake recipes to try
Vegan Blueberry Lemon Cheesecake Bars
Vegan Pumpkin Spice Cheesecake Bars
Vegan Mango Cheesecake Bars
Vegan Dragonfruit Cheesecake Bars
Vegan Strawberry Cheesecake Bars
If you tried these Vegan Raspberry Cheesecake Bars or any other recipe on the blog let me know how you liked it by leaving a comment/rating below! Be sure to follow along on Pinterest, Instagram and Facebook for even more deliciousness!
Print
Description
These Vegan Raspberry Cheesecake Bars are a healthy alternative to a traditional cheesecake and are seriously creamy and delish!
Line an 8×8 inch pan with parchment paper.
In a food processor, blend the walnuts, oats, dates, cinnamon and salt until it forms a dough. You should be able to press the dough together with your fingertips. If it is too dry, add a few more dates and blend again.
Press the dough down into your pan, until it coats the entire bottom of the pan. Place the pan in the freezer while you prepare the rest of your ingredients.
Add the cashews, coconut milk, coconut oil, maple syrup, lemon juice, lemon zest and vanilla extract to a blender (or food processor) and blend until completely smooth.
Pour the cheesecake layer into the pan.
Add the raspberries and maple syrup to a small saucepan on medium heat and let cook for 5-10 minutes until thickened.
Add dollops of the raspberry mixture to the pan and use a sharp knife or chopsticks to create swirls.
Place your vegan raspberry cheesecake bars into the freezer to firm up for 4 hours, or overnight.
Let thaw for 5 minutes on the counter then cut and serve!
Notes
*Refined coconut oil has the coconut taste removed from it, which will result in a less coconutty flavoured cheesecake. If you prefer more coconut flavour you can definitely use regular coconut oil.
Store in the freezer for up to 3 months. These cannot be stored in the fridge as they will become too soft.
Use Medjool dates, not regular dates for the base. Medjool dates are bigger and stickier and will help the “crust” bind together. If you’re dates feel very dry, you can rehydrate them by soaking them in warm water for 2-3 minutes then strain.
Use full-fat coconut milk from a can and mostly just the cream off the top of the can. This will result in a thick and creamy vegan cheesecake. If you use light coconut milk or coconut milk from a carton the cheesecake bars won’t set properly.
Continue to blend or puree the cheesecake layer until smooth and creamy. You don’t want to have any little bits of cashew left. A powerful blender like a Vitamix works well for this. (*This is also why it’s important to soak the cashews. This will soften them and make them much easier to blend)
Strain or blend the raspberry puree if you don’t want seeds. This is completely optional.
Let thaw on the countertop for 5 minutes before cutting. The bars will likely be very frozen when you remove them from the freezer, so let them thaw out for a few minutes before cutting.
Nutrition
Serving Size:1/15th of recipe
Calories:350
Sugar:25g
Fat:20g
Saturated Fat:7g
Carbohydrates:35g
Fiber:5g
Protein:5g
Hi, I’m Jess!
Choosing Chia is a blog all about healthy vegetarian recipes that are easy to follow, taste delicious and focus on wholesome ingredients. I started the blog after a spontaneous trip to India where I studied the practice of yoga and wellness.
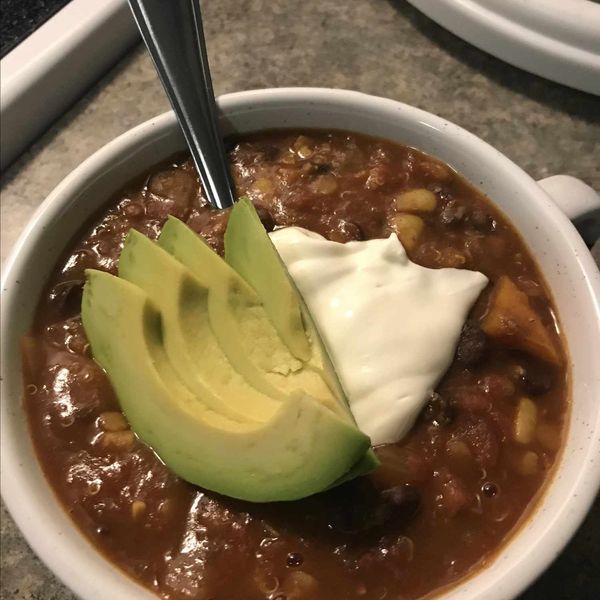
Amy’s vegan chili recipe is for a hearty, zesty chili packed so full of delicious protein, even the staunchest meat eater will love it! Try adding toppings like lime and sour cream (if you’re not vegan).
Submitted by Amy Grace
Updated on February 10, 2025
Total Time:
2 hrs 40 mins
Cook Mode (Keep screen awake)
Ingredients
This recipe was developed at its original yield. Ingredient amounts are automatically adjusted, but cooking times and steps remain unchanged. Note that not all recipes scale perfectly.
Original recipe (1X) yields 8 servings
3tablespoonsolive oil
1largeonion, chopped
1green bell pepper, chopped
1red bell pepper, chopped
4clovesgarlic, minced
1(19 ounce) canblack beans, rinsed and drained
2(28 ounce) cansdiced tomatoes
2cupswater
1(12 ounce) canwhole kernel corn, drained
¼cupdry red lentils
¼cupuncooked quinoa
¼cupchili powder
¼cupbrown sugar
1tablespoonsmoked paprika
1teaspoonkosher salt
1teaspoonground turmeric
1teaspoondried oregano
½teaspoonground cumin
½teaspoonred pepper flakes
½teaspooncracked black pepper
3tablespoonswater, or more as needed
1tablespooncornstarch
Directions
Heat oil in a medium Dutch oven over medium heat; add onion, bell peppers, and garlic. Cook and stir until vegetables have softened, about 5 minutes.
Mash 1/2 black beans in a small bowl; transfer to the Dutch oven with remaining whole black beans. Add diced tomatoes, 2 cups water, corn, lentils, quinoa, chili powder, brown sugar, paprika, salt, turmeric, oregano, cumin, red pepper flakes, and black pepper; stir to combine. Bring to a boil, then reduce heat to low, and simmer for 2 hours, stirring occasionally.
Whisk 3 tablespoons water and cornstarch together until completely dissolved, adding more water if necessary. Stir flour slurry into chili; simmer until thickened, about 15 minutes. Mash chili with a potato masher until reaches desired consistency.
Nutrition Facts (per serving)
279
Calories
7g
Fat
46g
Carbs
10g
Protein
Nutrition Facts
Servings Per Recipe 8
Calories 279
% Daily Value *
Total Fat
7g
9%
Saturated Fat
1g
5%
Sodium
953mg
41%
Total Carbohydrate
46g
17%
Dietary Fiber
11g
38%
Total Sugars
15g
Protein
10g
20%
Vitamin C
53mg
59%
Calcium
128mg
10%
Iron
8mg
43%
Potassium
782mg
17%
* Percent Daily Values are based on a 2,000 calorie diet. Your daily values may be higher or lower depending on your calorie needs.
** Nutrient information is not available for all ingredients. Amount is based on available nutrient data.
(-) Information is not currently available for this nutrient. If you are following a medically restrictive diet, please consult your doctor or registered dietitian before preparing this recipe for personal consumption.