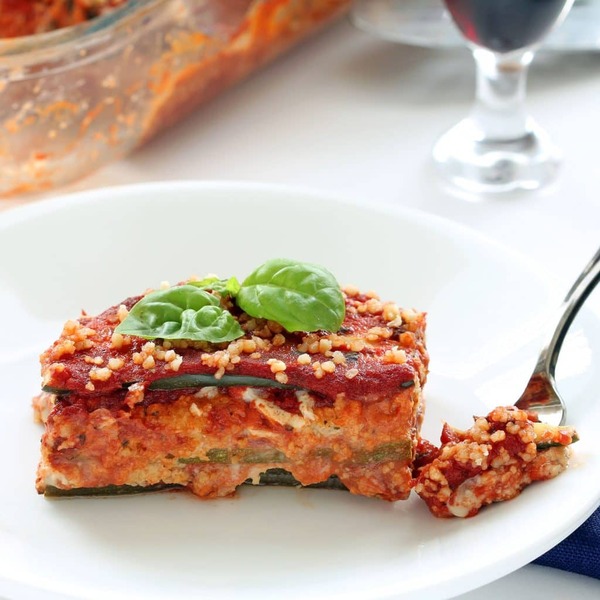
Creamy tomatillo sauce? Check. Protein packed? Check. Crazy delicious? Check.
Have you ever had enchiladas suizas? They are so scrumptious. I used to eat them often when I was just a vegetarian, most of the time you can get enchiladas filled with cheese or beans. I have been craving the sauce recently. It is a creamy tomatillo sauce, and it is EVERYTHING! I decided I would go on a mission to try to make my own vegan enchilada suizas!
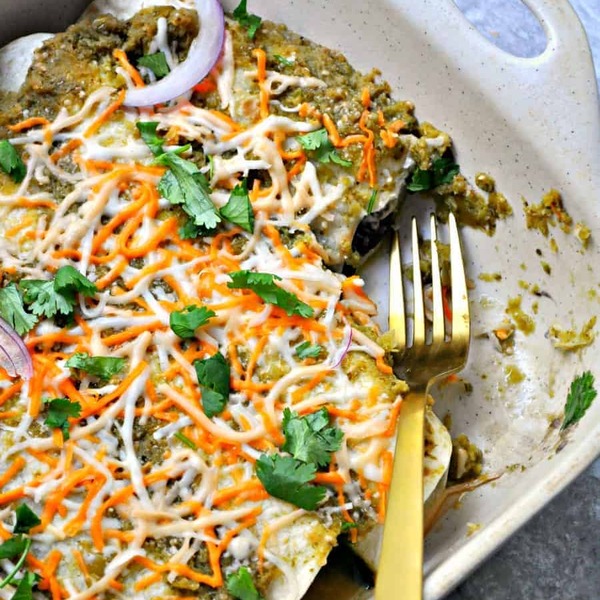
I filled them with black beans that I mashed slightly and some vegan cheese. Then I topped the enchiladas with a creamy tomatillo sauce and more vegan cheese. I used full fat coconut milk to mimic the heavy cream that is normally used. It has great flavor and doesn’t taste like coconut, it just complements all the other flavors very well!
This recipe tastes just like I remember authentic enchilada suizas tasting! It also only takes about 30 minutes to make! The sauce is super simple and one of the best sauces I have ever tasted! I am very proud of this recipe! For good reason.
The sauce is a combination of tomatillos, peppers, onion, cilantro, garlic and lime pureed really quickly. Then all you have to do is cook it down in a sauce pan for a few minutes, then add coconut cream! It is so damn good. The filling is a 60 second process of mashing some black beans adding some salt and pepper, then vegan cheese! BAM! Enchilada time!
Roll the black bean and vegan cheese mixture into tortillas of your choice. Top with the the sauce and more vegan cheese. Then just bake for about 10-15 minutes, and you are ready for your new favorite meal. I like to throw more cilantro on top and if you are feeling saucy, vegan sour cream and maybe some hot sauce! Oh yeah! This vegan enchilada suizas is: So. Damn. Good.
Print Recipe
Black bean and vegan cheese filled enchiladas topped with a creamy tomatillo sauce and more vegan cheese(of course)!
Prep Time 20 minutesmins
Cook Time 15 minutesmins
Total Time 35 minutesmins
Servings 6Enchiladas
Author Lauren Hartmann
Ingredients
Creamy Tomatillo Sauce
6SmallTomatillos(peeled), halved
1/4C.Onion, chopped
1/2aPoblano pepper, seeds removed
1Serrano pepper, seeds removed
3ClovesGarlic
1/4C.Cilantro
Juice of 1 lime
1/3C.Coconut milk, full fat
Salt and Pepper to taste
For the Enchiladas
6Tortillas
1 1/2Cans.Black beans(about 22oz.), drained
3/4C.Vegan cheese, shredded
1/2tsp.Salt
1/4tsp.Black pepper
More vegan cheese for topping(optional)
More cilantro for topping(optional)
Instructions
Make the sauce. Add all of the ingredients to a blender except the coconut cream and salt and pepper.
Blend on high for a minute or so until pretty smooth but still has a little texture. Scraping down the sides of the blender as needed. Add a pinch of salt and pepper. Blend. Once the sauce is smooth, pour into a small sauce pan.
Heat the sauce on medium high until it comes to a simmer, stirring frequently. Reduce heat to low. Now add the coconut milk. Stir to combine. Simmer for about 5 minutes until the sauce has thickened slightly. Taste and adjust seasoning. Remove from heat.
Preheat the oven to 375 degrees.
Now make the filling. In a medium sized mixing bowl, smash the black beans with a fork or potato masher. Leaving a little texture. Season with salt and pepper. Stir. Then stir in the vegan cheese.
Now divide the filling evenly between 6 tortillas, placing the filling in the center, and rolling the tortilla up. Place each enchilada seam side down into a prepared baking dish. Placing each right up against the previous one.
Now pour the sauce over the enchiladas, sprinkle with more vegan cheese and bake at 375 degrees for about 10-12 minutes or until the cheese has melted(as much as it can) and the tortillas are browned a bit and piping hot!
Serve immediately with cilantro, vegan sour cream or hot sauce!
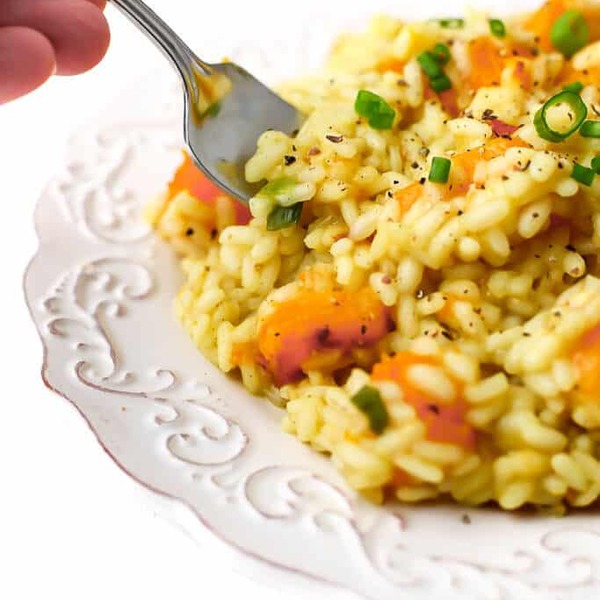
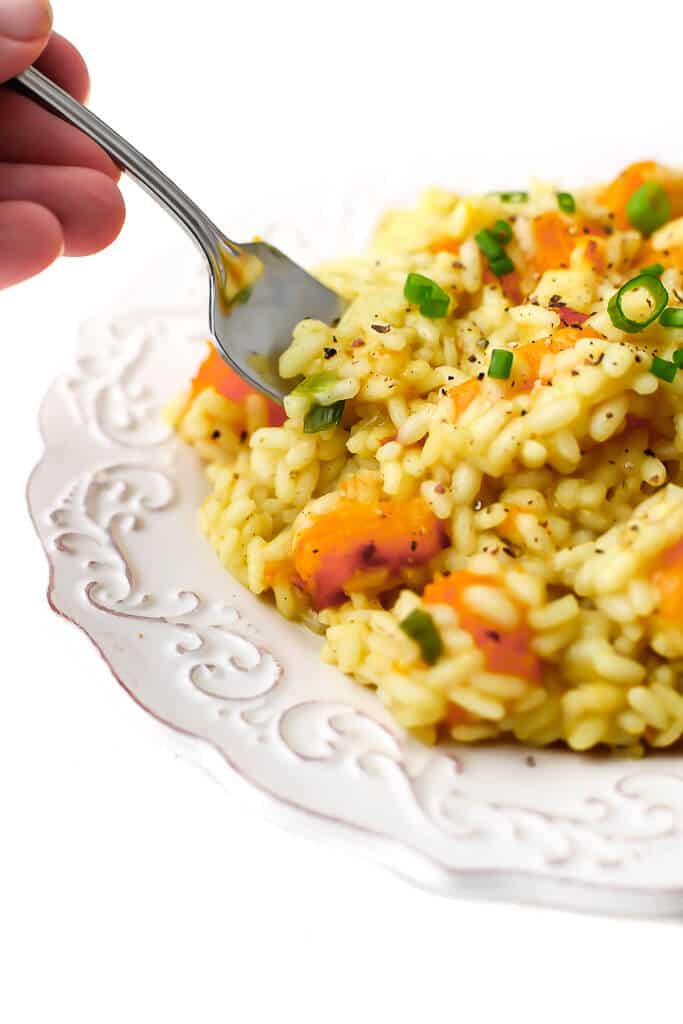
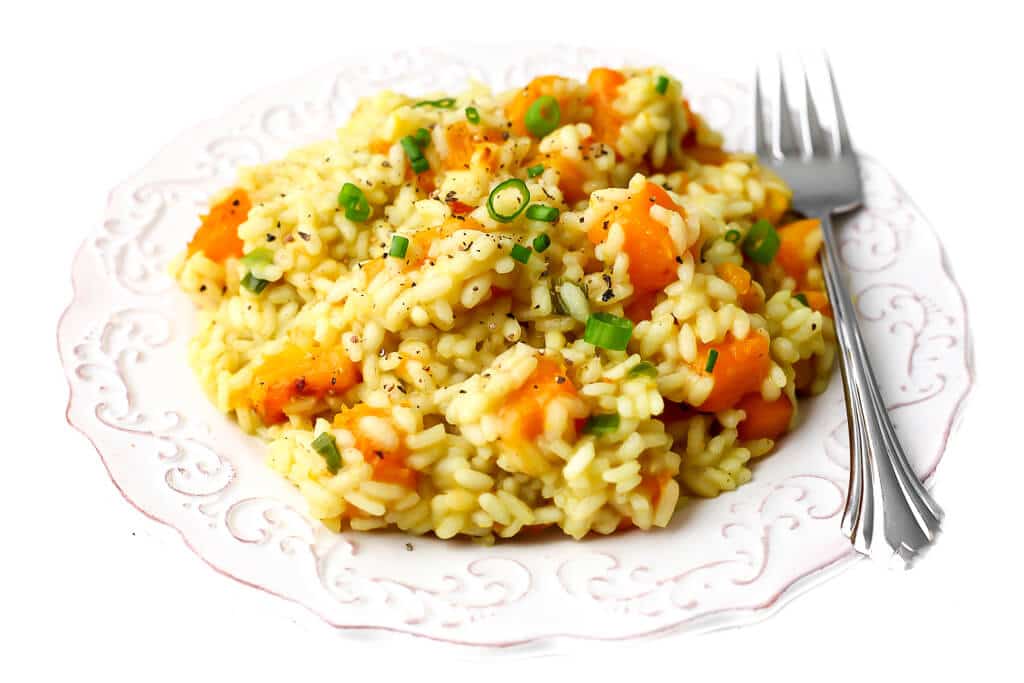
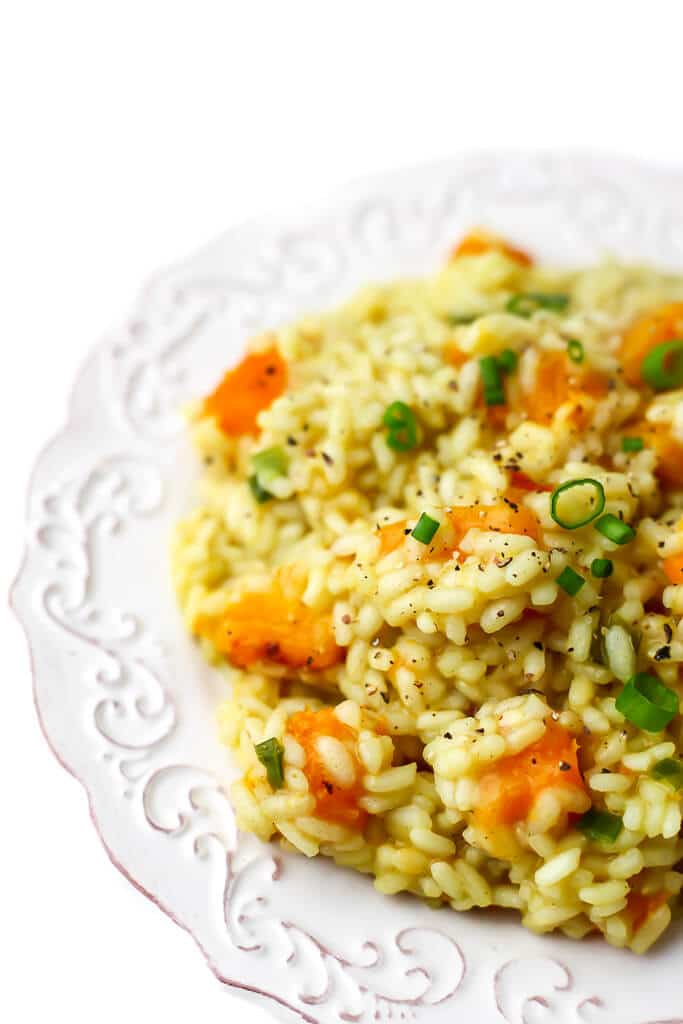
Vegan Butternut Squash Risotto is the perfect fall meal! This savory dish is gluten-free and vegan, yet it is so creamy, that you will think that it must have dairy!
Want to save this recipe?
Enter your email below and get it sent straight to your inbox. Plus, get more amazing vegan recipes that will satisfy your cravings!
Why make this recipe
This is one of my favorite dishes to make for a plant-based Thanksgiving or any fall dinner party! Everyone loves it, not just vegans, and it is free of all common allergies, so almost anyone can it!
This squash risotto is rich and creamy, hearty, and satisfying. It’s full of healthy vitamin-packed squash, plus it’s naturally gluten-free. This plant-based risotto makes a naturally creamy meal without the need for dairy or dairy substitutions.
Ingredients and substitutions
Butternut Squash – a medium squash or about 3-4 cups cubed squash. You can also use any other winter squash that you would like.
Arborio Rice – this is the only type of rice you should use to make risotto. It cooks differently than other types of rice giving it a creamy texture.
Vegan Butter – to warm the garlic and coat the rice. You can use my homemade vegan butter or extra virgin olive oil instead of butter.
Garlic – for flavor. (optional)
Green Onions – for flavor. (optional)
Dry White Wine – to give it an authentic risotto flavor. (Optional – my kids like it better without wine).
Vegan Broth – to cook the rice in. Any vegetarian broth will work, but I think that the chicken-flavored vegan broth has the best flavor with the squash and sage.
Sage or Poultry Seasoning – to give it a savory flavor. Fresh sage adds flavor and is a beautiful garnish.
Turmeric – for a beautiful color.
Olive Oil – to roast the squash.
Salt and Black Pepper – for flavor.
How to make vegan butternut squash risotto
Roast the butternut squash
Start by roasting the squash because this will take the longest.
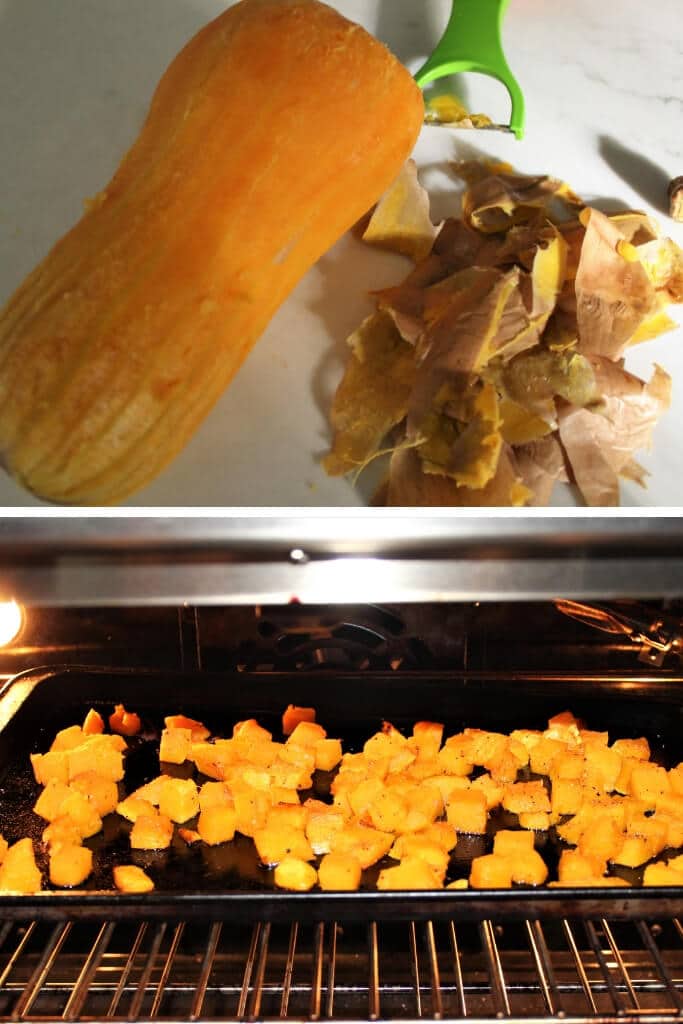
Step 1 – Just wash your squash, and put the whole thing in the oven at 300 degrees F for about ½ hour. Take it out and let it cool for about 5-10 minutes until you can hold it without getting burned.
Step 2 – Use a peeler to easily peel off all the skin. Then cube it into bite-sized pieces, making sure to throw away the seeds and stem.
Step 3 – Next, put the squash on a cookie sheet, drizzle with some olive oil, sprinkle with salt and pepper, and bake at 375° F for about another ½ hour until it is soft all the way through and a little crispy on the outside.
Step 4 – Flip the cubed squash with a spatula about every 10 minutes. (If you don’t pre-bake the squash, you will need to cook it for about 45-50 minutes).
Step 5 – Roast the squash until tender and easily pierced with a fork.
Note: You can peel and cube the butternut squash in its raw state if you are strong and have a very sharp knife, however, I prefer to bake it a little first to make it easier to peel and cut.
Cook the risotto
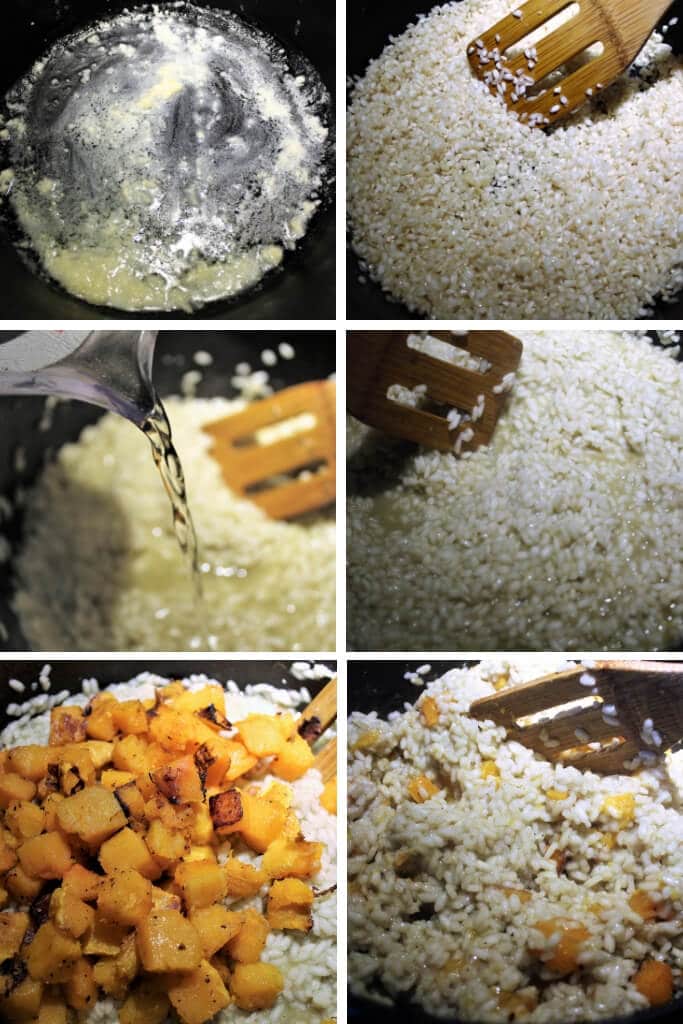
Step 1 – While the cubed squash is baking, heat vegan butter (I like to use my vegan butter recipe) or margarine in a large pan on low until it melts.
Step 2 – Add 4 cloves of minced garlic (and/or green onion optional) and allow the garlic to warm in the butter for a few minutes.
Step 3 – In a separate pot, make 6 cups of broth by pouring 6 cups of water into a pot with 3 bouillon cubes of Not chick’n and add a tablespoon of poultry seasoning and a dash of turmeric to the broth. Heat and stir until the broth cubes are dissolved.
Step 4 – Pour in the dry arborio rice and stir until the grains of rice are coated in the margarine and turn slightly translucent.
Step 5 – Turn up the stove to medium heat and add the white wine if desired, or simply the first ½ cup of broth, and stir slowly until nearly all the liquid is absorbed.
Step 6 – Add the remaining 6 cups of vegetable broth mixture ½ cup at a time, stirring frequently and adding more as soon as the liquid is absorbed.
Step 7 – Once you have used up all the broth, add the roasted butternut squash and fold the squash into the rice. Don’t stir too much or you will mash the squash.
You may want to pour yourself a glass of that white wine and talk to a friend while you make this vegan roasted squash risotto. It doesn’t take much brainpower to make, but you can’t walk away from this dish!
Be patient, cook the rice over low heat, and slowly add the broth for a creamy risotto.
If you love risotto like I do, be sure to try my vegan mushroom risotto, broccoli risotto, or low-carb cauliflower risotto too.
Pro Tips
It’s delicious with vegan Parmesan or nutritional yeast sprinkled on top! You can make your own dairy-free Parmesan cheese using my quick and easy nut-free recipe.
If you want a quicker and easier way to make risotto, you can also try my vegan orzo pasta recipe that’s made in about half the time.
You can also make vegan risotto with other vegetables, you can check out my post about the different ways to make vegan risotto for more ideas, or check out my cauliflower risotto recipe for a low-carb option.
Frequently asked questions?
What is risotto?
Risotto is a creamy dish made with a special type of rice calledArborio that gets creamy when you cook it the right way. Make sure to use the arborio rice in this recipe or it won’t be the right texture.
Do I have to use wine in risotto?
No, it’s traditionally made with white wine, but to make it more kid-friendly, I give the option to exclude the wine. My husband and I love the flavor with the wine in it, but my kids hate it. Although the alcohol cooks out, it does have a flavor that kids aren’t used to. When I omitted the wine, my kids gobbled it down!
Can I make risotto in an Instant Pot?
Yes, try this recipe for instant pot risotto with butternut squash and sage if you want to make it in your IP.
Storing and freezing
Refrigerate: This vegan squash risotto will keep well in the fridge for 3 – 5 days in a sealed container.
Freeze: Risotto also freezes well and can be stored in an airtight container in the freezer for up to 3 months. Allow the frozen risotto to thaw overnight in the fridge before reheating.
Reheating
You can reheat leftover risotto in a saucepan with a few tablespoons of extra water added. Add the extra water and stir frequently until a creamy consistency is achieved. You can also reheat it in a microwave with a little extra water stirred in.
If you love butternut squash, you have to try my creamy vegan butternut squash soup, butternut squash and chickpea curry, and my vegan squash curry recipe too!
Vegan squash risotto recipe
Vegan Butternut Squash Risotto
Yield: 8
Prep: 10 minutesmins
Cook: 1 hourhr
Total: 1 hourhr10 minutesmins
Creamy vegan risotto with butternut squash and sage for a hearty fall meal.
2tablespoonsvegan butter, or vegan margarine or olive oil
4clovesgarlic, minced
2stalksgreen onions
2cupsArborio rice
½cupdry white wine, or ½ cup additional broth or water
6cupsNot Chick’n broth, or any other vegan broth of choice
1tablespoonspoultry seasoning, or sage
1/8teaspoonsturmeric , (optional for color)
2tablespoonsolive oil
Salt and pepper to taste
1medium butternut squash, (about 3-4 cups cubed)
1tablespoonsolive oil
Wash the squash and place it in the oven at 300°F (150°C) for about 30 minutes until it becomes slightly soft.
Take it out and let it cool until you can hold it. Then peel and cube the squash.
Place cubes on a cookie sheet and sprinkle with olive oil, salt, and pepper.
Bake the cubes at 375°F (190°C) for an additional 30 minutes, flipping with a spatula every 10 minutes until slightly crisp on the outside.
Make 6 cups of broth by pouring 6 cups of water into a pot with 3 bouillon cubes of Not chick’n and add a tablespoon of poultry seasoning to the broth. Heat and stir until the broth cubes are dissolved.
While the cubed squash is baking, melt vegan margarine on low in a large pot.
Add minced garlic and thinly slice green onions and let it warm for about 3 minutes in the margarine.
Pour in 2 cups Arborio rice (dry unwashed) and coat the rice with butter and garlic. It will turn slightly translucent.
Add the wine (or ½ cup of broth) and stir until it absorbs.
Add the remaining 6 cups of broth mixture about ½ a cup or 1 ladle full at a time.
Stir slowly and constantly adding more each time the liquid is absorbed.
When all the broth has been used. Add the roasted squash to the rice and stir carefully until mixed. Serve immediately.
Sprinkle with vegan Parmesan if desired.
Make sure to add the broth slowly stirring between each scoop of broth.
You can peel and cube the squash without pre-cooking, however, it will be very hard to cut. It will also need to bake a little longer on the cookie sheet.
Squash baking time will vary depending on the size of the cubes.
Rich, creamy vegan peanut butter frosting is an indulgence that goes well with just about any vegan cake recipe or any vegan cupcakes. Make the perfect Elvis-themed vegan cupcakes by pairing this frosting with a vegan banana cake or just use it to top homemade vegan banana bread.
Making peanut butter frosting is just as simple as plain vanilla or chocolate frosting, and it’s something a little bit unexpected and different. This frosting particularly lends itself well to a vegan version, since the peanut butter brings its own flavor, and you rely a little less on the usual vegan frosting ingredients such as vegan margarine, sugar, and non-dairy milk. For best results, use store-bought brand-name creamy peanut butter, not natural peanut butter. Soy milk or coconut milk is best in this recipe, though you can try other alternatives.
Whether you call it “frosting” or “icing,” this one will have you saying “yum!” Homemade peanut butter frosting is perfect for a vegan cake or cupcakes for the kids.
Cook Mode (Keep screen awake)
1cupcreamy peanut butter, at room temperature
1/2cupvegan margarine
2cupsconfectioners’ sugar
1/2teaspoonpure vanilla extract
3tablespoons soy milk
Gather the ingredients.
The Spruce Eats / Diana Chistruga
Stick the peanut butter in the microwave for about 10 to 15 seconds or so, in order to make it easier to work with.
The Spruce Eats / Diana Chistruga
Whisk or blend together, using a mixer, all of the ingredients—peanut butter, vegan margarine, confectioners’ sugar, vanilla, and soy milk (as noted here)—until smooth and creamy, adding more or less soy milk to achieve the desired consistency. Start with 1/2 teaspoon of soy milk at a time; otherwise, you run the risk of your frosting getting too thin and runny.
The Spruce Eats / Diana Chistruga
Enjoy over cakes or cupcakes.
The Spruce Eats / Diana Chistruga
Tip
It is best to use firmer, store-bought, brand-name peanut butter in this recipe rather than one that becomes liquid at room temperature.
Nutrition Facts (per serving)
321
Calories
22g
Fat
28g
Carbs
6g
Protein
×
Nutrition Facts
Servings: 10
Amount per serving
Calories
321
% Daily Value*
22g
28%
Saturated Fat 4g
21%
0mg
0%
126mg
5%
28g
10%
Dietary Fiber 1g
5%
Total Sugars 23g
6g
Vitamin C 0mg
0%
Calcium 20mg
2%
Iron 1mg
3%
Potassium 161mg
3%
*The % Daily Value (DV) tells you how much a nutrient in a food serving contributes to a daily diet. 2,000 calories a day is used for general nutrition advice.
(Nutrition information is calculated using an ingredient database and should be considered an estimate.)
Rate This Recipe
I don’t like this at all. It’s not the worst. Sure, this will do. I’m a fan—would recommend. Amazing! I love it! Thanks for your rating!
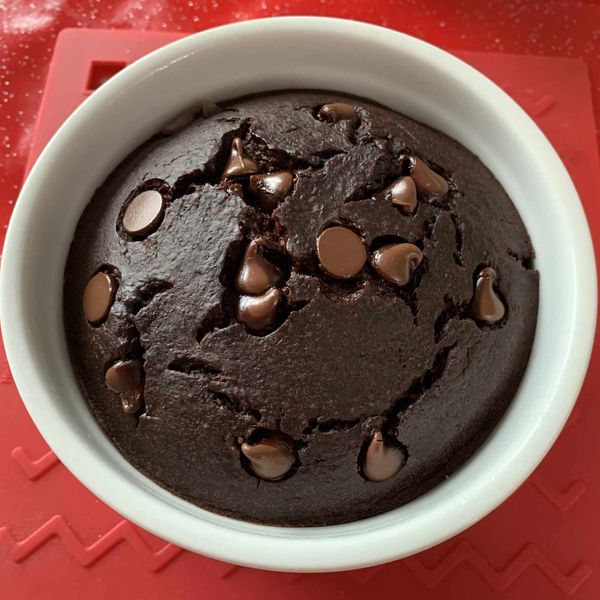
These oats are like eating a fudgy brownie for breakfast, but they are healthy for you! This vegan breakfast is made with rolled oats, banana and almond milk. They are mixed in a blender and baked in the oven. You can leave out the cocoa powder and add whatever nut butter or fruit you’d like for different flavors.
Submitted by Tammy Lynn
Updated on November 27, 2024
Cook Mode (Keep screen awake)
Ingredients
Original recipe (1X) yields 2 servings
cooking spray
1cuprolled oats
⅔cupalmond milk
1largeripe banana, mashed
2tablespoonscocoa powder
2tablespoonsmaple syrup
1teaspoonbaking powder
½teaspoonvanilla extract
⅛teaspoonsalt
2tablespoonsvegan chocolate chips
Directions
Preheat the oven to 350 degrees F (175 degrees C). Spray two 8-ounce ramekins with cooking spray on the bottom and sides.
Combine oats, almond milk, banana, cocoa powder, maple syrup, baking powder, vanilla extract, and salt in a blender. Blend until all is combined well, 30 to 60 seconds. Fill mixture into the prepared ramekins and sprinkle each with 1 tablespoon chocolate chips.
Bake in the preheated oven until firm, about 25 minutes.
Cook’s Notes:
I tried both old-fashioned oats and quick oats and thought both worked out the same.
The texture will change if these sit, and the next day they will be very dense; however, I still enjoyed mine reheated in the microwave.
You can use the same amount of coconut sugar or agave syrup in place of maple syrup.
Nutrition Facts (per serving)
379
Calories
11g
Fat
72g
Carbs
9g
Protein
Nutrition Facts
Servings Per Recipe 2
Calories 379
% Daily Value *
Total Fat
11g
14%
Saturated Fat
5g
24%
Sodium
449mg
20%
Total Carbohydrate
72g
26%
Dietary Fiber
10g
36%
Total Sugars
23g
Protein
9g
17%
Vitamin C
6mg
7%
Calcium
250mg
19%
Iron
3mg
19%
Potassium
632mg
13%
* Percent Daily Values are based on a 2,000 calorie diet. Your daily values may be higher or lower depending on your calorie needs.
** Nutrient information is not available for all ingredients. Amount is based on available nutrient data.
(-) Information is not currently available for this nutrient. If you are following a medically restrictive diet, please consult your doctor or registered dietitian before preparing this recipe for personal consumption.
Photos of Vegan Chocolate Blended Baked Oats
Photo by Allrecipes Member
Photo by
eBeth
Great recipe no eggs and ingredients that are in the house. Great for meal prep. You don’t need ramekins just small pyrex bowls. I made this with carob powder and carob chips for my 2 y.o. grandbaby to avoid caffeine and she ate this heartily. It’s not very sweet and we like that, topping with syrup may suit others better.
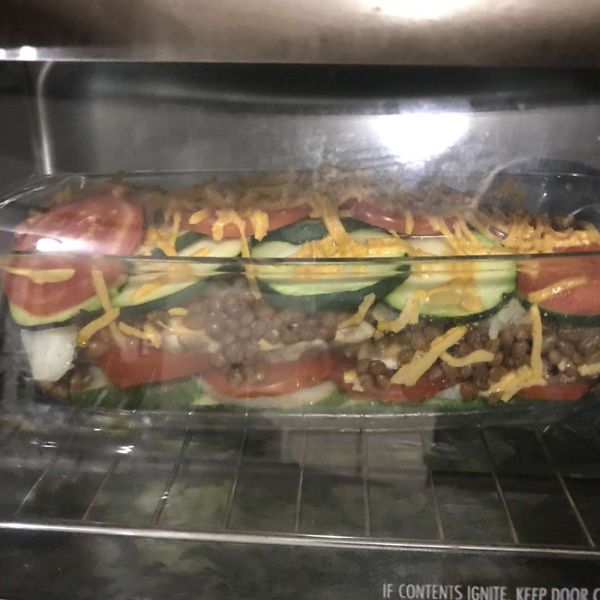
Beautiful layers of sliced vegetables, lentils, and non-dairy cheese make a unique presentation in this vegan lentil “loaf” casserole.
Submitted by Tuey
Published on October 16, 2017
Cook Mode (Keep screen awake)
Ingredients
cooking spray
1mediumzucchini, thinly sliced lengthwise
1mediumonion, thinly sliced
2mediumtomatoes, thinly sliced
1cupsliced fresh mushrooms
½cupcanned lentils, drained and rinsed
1teaspoongarlic powder, or more to taste
½cupshredded vegan Cheddar cheese
salt and ground black pepper to taste
Directions
Preheat the oven to 375 degrees F (190 degrees C). Grease a loaf pan with cooking spray.
Layer 1/2 of the zucchini in the bottom of the prepared pan, followed by 1/2 of the onion, 1/2 of the tomatoes, and all of the mushrooms. Sprinkle garlic powder over top, followed by 1/2 of the vegan cheese. Add remaining onions in a layer and spread all lentils over top. Finish layers with remaining zucchini, tomatoes, and cheese.
Bake, uncovered, in the preheated oven until veggies are tender and cheese is melted or crisp, depending on what type you use, 30 to 40 minutes. Let stand for about 15 minutes before serving.
Nutrition Facts (per serving)
93
Calories
2g
Fat
11g
Carbs
7g
Protein
Nutrition Facts
Servings Per Recipe 4
Calories 93
% Daily Value *
Total Fat
2g
3%
Saturated Fat
0g
1%
Sodium
178mg
8%
Total Carbohydrate
11g
4%
Dietary Fiber
4g
13%
Total Sugars
5g
Protein
7g
14%
Vitamin C
19mg
21%
Calcium
21mg
2%
Iron
1mg
3%
Potassium
378mg
8%
* Percent Daily Values are based on a 2,000 calorie diet. Your daily values may be higher or lower depending on your calorie needs.
** Nutrient information is not available for all ingredients. Amount is based on available nutrient data.
(-) Information is not currently available for this nutrient. If you are following a medically restrictive diet, please consult your doctor or registered dietitian before preparing this recipe for personal consumption.
Photos of Vegan Layered Lentil Casserole
Photo by Allrecipes Member
Photo by
Kleiny2
This was a super easy recipe. I followed the recipe and instructions with two small changes. I added Planko bread crumbs on the middle layer and top layer. I also added nutritional yeast along with the Daiya shreds. I didn’t get a good picture before it was put in the refrigerator.
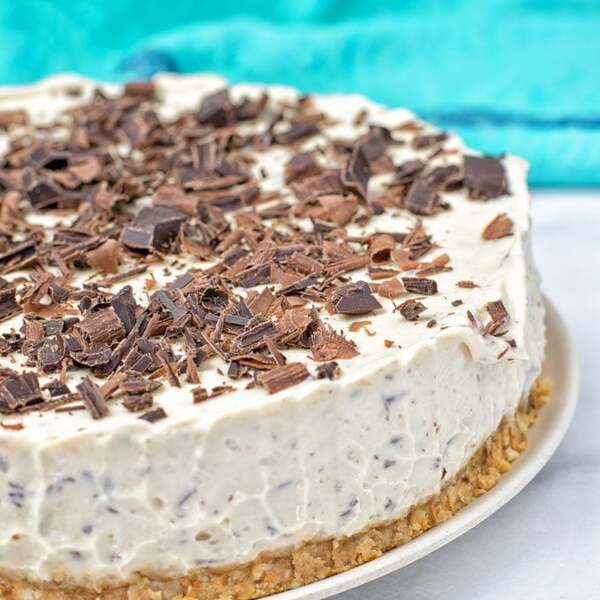
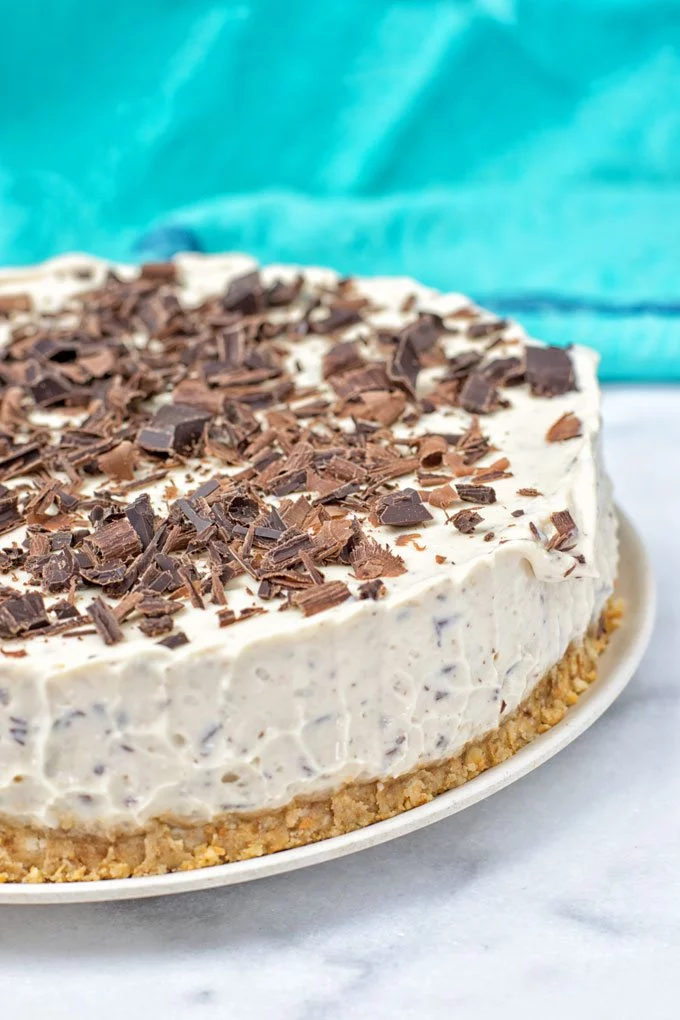
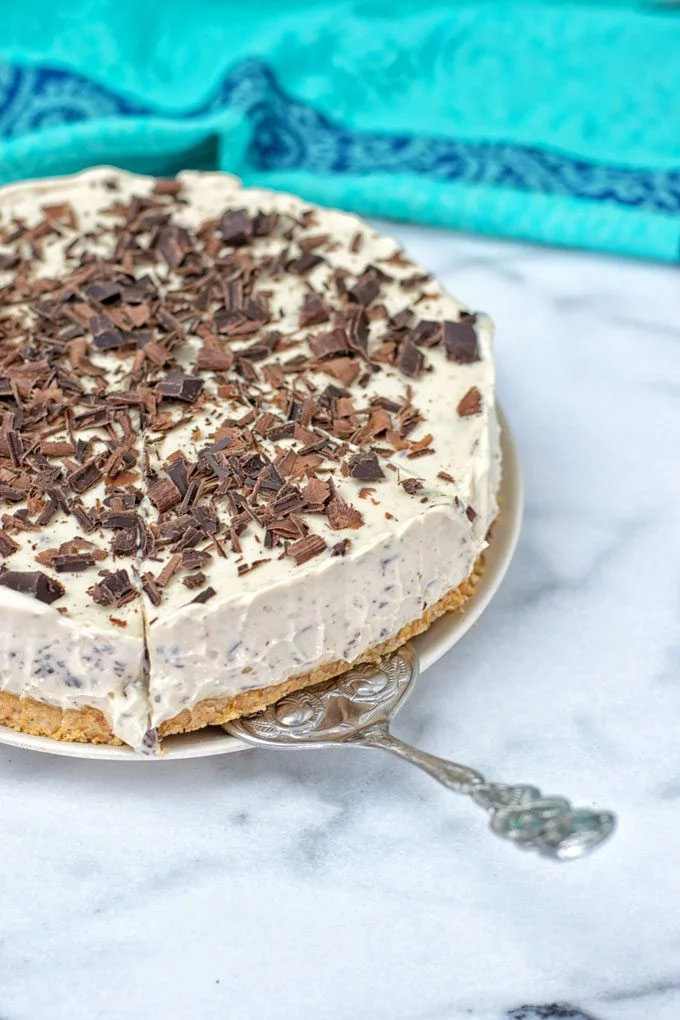
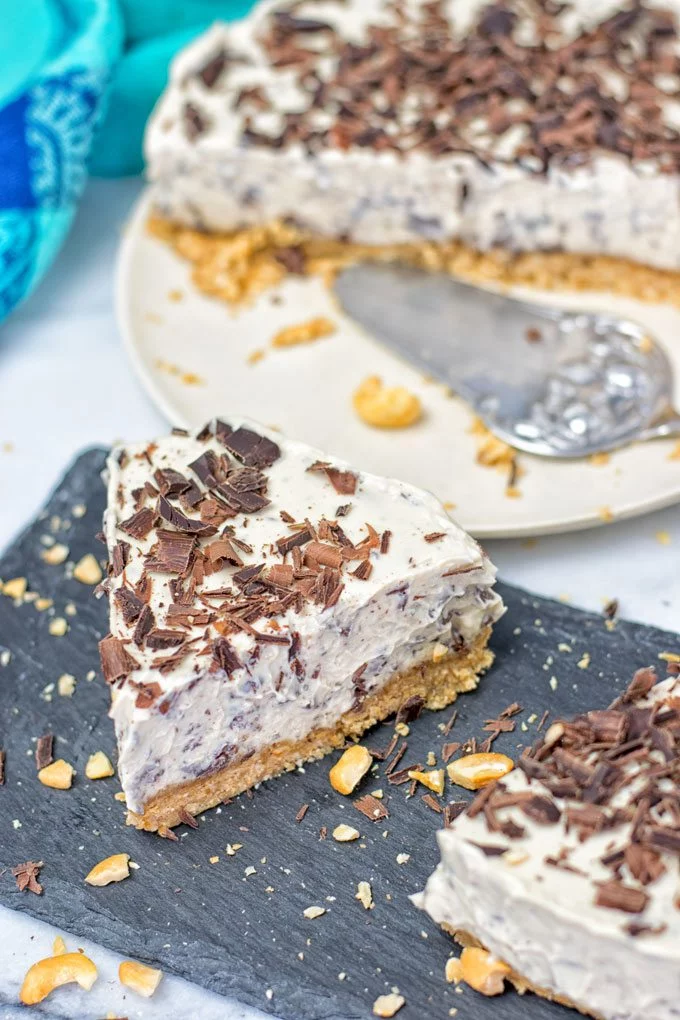
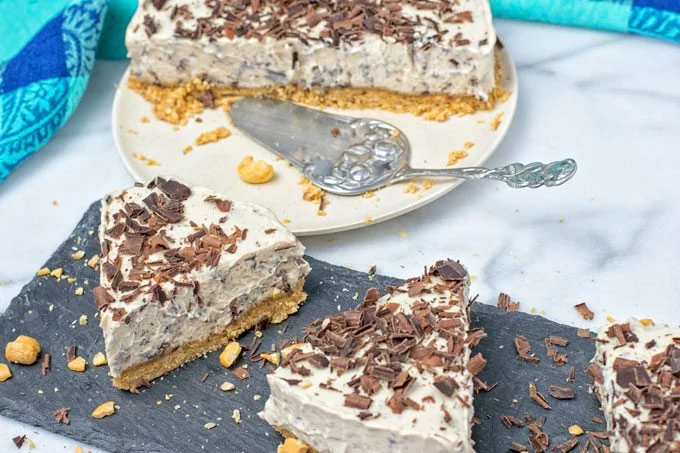
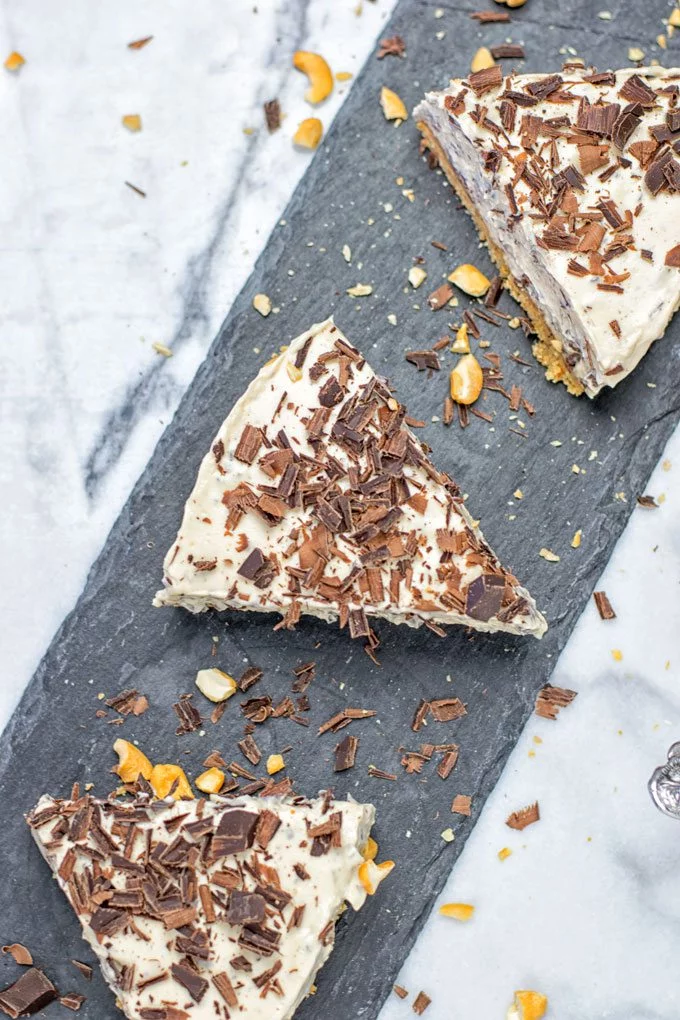
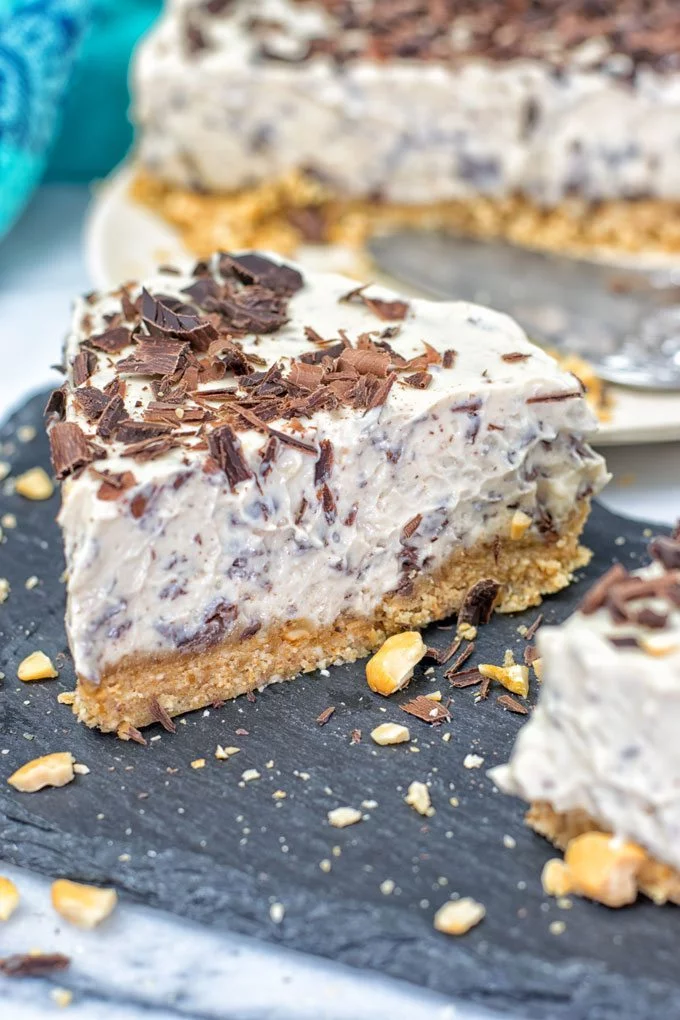
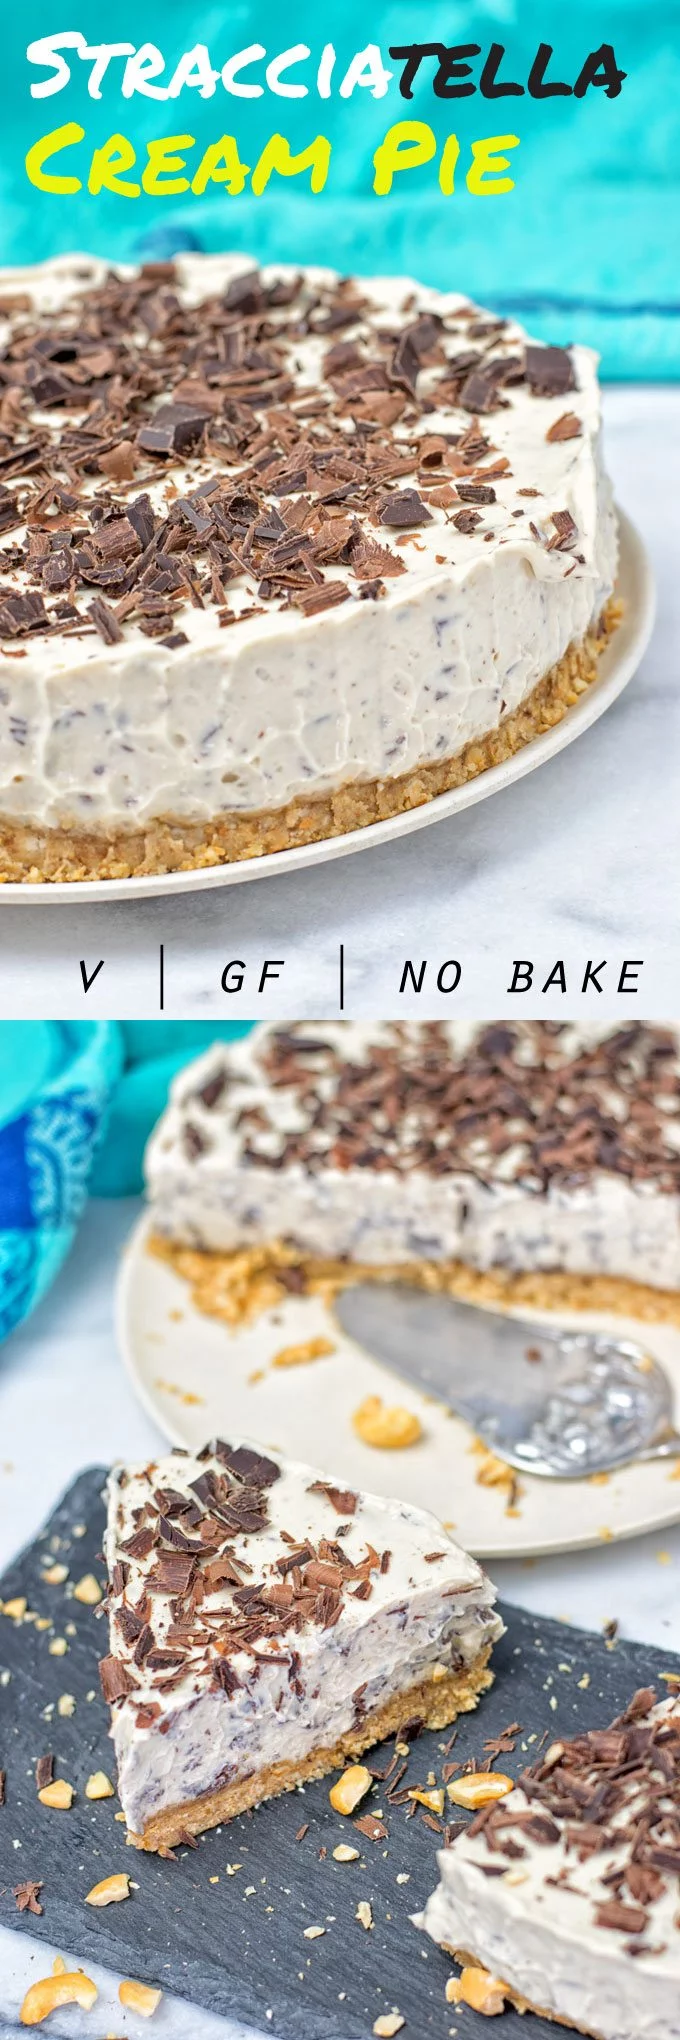
This Stracciatella Cream Pie is addictive – vegan, gluten free, and a no bake pie. Can you believe it is made from only 6 ingredients?
My favorite ice cream flavor in my childhood was stracciatella. In summer, I could eat that almost every day from the local Italian ice cafe around the corner.
What was (or is) your favorite flavor?
Me and Stracciatella were best friends ever. I was totally blown away with the combination from classic cream ice cream, thick and delicious chocolate chunks. That is, of course, until I became vegan.
You get the picture. Traditionally stracciatella is made from heavy cream, lots of sugar. And if you don’t get it from the local ice cafe that make its own but buy from a store: say hello to preservatives and other stuff that I can’t define.
Yup ,obviously not vegan and for sure not that healthy and nourishing.
But recently I came up to this point that I don’t want any longer to give up my precious favorite childhood flavor, so for now I have to help myself and make my dessert dreams happen again.
Friends, I hope you will all love this vegan Stracciatella Cream Pie. It’s a healthy, easy, no bake, creamy, chocolatey, elegant, outstanding, satisfying dessert dream – so delicious.
Let’s start making this new showstar of course I will show you how! We will play with the food processor or a blender a couple of times – it’s a no bake vegan cream pie after all.
Start with making the dough. Combine cashews and dates together at full speed. Have a bit of patience please. I know it’s hard to wait but depending on the power of the blender, it takes a little while until you have a sticky but still rough dough.
Prepare a springform with parchment paper (or grease with a tiny bit of oil) and press the dough onto the bottom.
Now it’s time for part two of the blender game. Combine silken tofu, your choice of sweetener, cashews. Blend until really smooth. Mix this in a bowl with vegan creme cheese and chocolate chunks with a beater and whisk until creamy and fluffy.
Finally put the filling on top of the dough. Garnish with chocolate, done. Chill until serving, enjoy!
This Stracciatella Cream Pie requires just 6 ingredients and as you saw it comes together in just 3 easy steps – vegan, gluten free and oil free.
Friends, I have a thing for Desserts – now feel free to discover all things for your sweet cravings among these my Vegan Snickers Bars. You will also find delicious cheesecakes, brownies, cakes, cookies and much more, friends so feel free and enjoy.
Make this incredibly delicious showstopper of a vegan Stracciatella Cream Pie and bring back your childhood memories
Get a boost from the Stracciatella Cream Pie
Many vegan no bake pies or cakes use coconut cream because of it firms up very nicely when cooled. However, sometimes the coconut flavor can be a little bit overwhelming.
Therefore, I went for a base made from silken tofu in this recipe.
I don’t know if you have any experience with silken tofu? I have used it several times in a variety of recipes. It has a somewhat pudding like texture, which makes it perfect for dressings, purees, soups – and obviously when properly sweetened – in cakes.
The Kitchn has a really enlightening interview with an expert about silken tofu – I can strongly recommend to read “All About Silken Tofu“.
If you wanna bring back your child memories back to life or just enjoy a new delicious, exciting, luscious cream pie, try it and show me your results! Tag me on Instagram and Facebook as always so I can see all your creations. Cheers, friends!
Ingredients
For the crust:
2 cups cashews
12 medjool dates
For the filling:
1 1/2 cups cashews
8 oz vegan creme cheese
1/3 cup maple syrup or dark agave
15 oz silken tofu
3 oz vegan dark chocolate cut into chunks + more for garnish
Instructions
Start with making the dough. Combine cashews and dates in a blender and process at full speed. It may take a little while until you have a sticky, but still rough, dough.
Prepare a springform with parchment paper (or grease with a tiny bit of oil) and press the dough onto the bottom.
Combine silken tofu, your choice of sweetener, cashews in a blender. Blend until really smooth. Mix this in a bowl with vegan creme cheese and chocolate chunks with a beater and whisk until creamy and fluffy. Finally put the filling on top of the dough. Garnish with chocolate. Chill until serving.
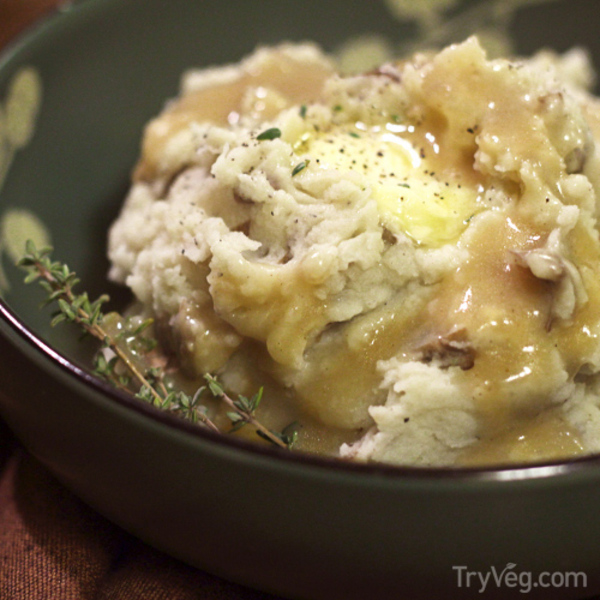
Place the potatoes in a large pot and cover with water. Bring to a boil and cook for about 20 minutes.
Drain the potatoes, reserving some of the water.
Place in a bowl with the vegan butter and spices. Add some of the dairy-free milk as you mash and mix the cooked potatoes to achieve desired creaminess. If more liquid is needed, add some of the reserved cooking water.
Adjust spices to taste, sprinkle with chives if using, and serve hot.
Vegan Zucchini Lasagna – creamy herbal ricotta blends smoothly with a robust marinara, transforming non-traditional ingredients into an Italian classic! Welcome to the family!
Vegan Zucchini Lasagna
Welcome to my taste buds! You may have noticed that my last two posts seem to be leading somewhere. First, Vegan Ricotta Cheese and then Homestyle Marinara Sauce. The ricotta can be made plain or herbed and served as a dip, spread, or even the base for several desserts.
The Marinara makes a delicious accompaniment to pizza, pasta or . . . drum roll please . . . combine them into a tour de force: Lasagna! These two ingredients complement each other so beautifully that I totally forgot that I was substituting zucchini for pasta. Not that there’s anything wrong with that. Zucchini’s neutral, mild flavor and sturdy composition (not to mention it’s flooded with vitamin C, B-6, potassium, magnesium, and fiber!) make it an excellent replacement for pasta. What I’m trying to say is that I forgot I wasn’t eating traditional lasagna!
Vegan Zucchini Lasagna – Salted Zucchini Slices
Vegan Zucchini Lasagna – Weeping Zucchini
Zucchini Noodles
Replacing traditional pasta with zucchini creates a gluten-free lasagna and lower carb dish – easy peasy! Zucchini is a water dense veggie, though, so it is critical to remove some of that fluid before it can wear its pasta hat. We are not making soup, we are making lasagna!
Cut off each end of the zucchini and lay it lengthwise on its side. Using a sharp knife, very carefully slice it into roughly 1/8 inch slices (or use a mandolin). To weep out the excess fluid some people sprinkle it with salt, place it in a colander and allow it to sit and drain in the sink (like I do with my Vegan Zucchini Cakes).
My preferred method when making lasagna noodles is to spread the zoodles out on a cooling rack set inside a baking sheet. I sprinkle them with salt on each side and set them aside to weep while prepping other ingredients (about 30 minutes). Gently rinsing the noodles while they are still flat on the cooling rack allows you to remove all of the excess salt. Then remove them from the rack and place them flat on a towel. Place a second towel on top and gently blot them dry. Now they are ready to roll!
Vegan Zucchini Lasagna – First Layer of Sauce
Vegan Zucchini Lasagna – First Layer of Zucchini and Vegan Ricotta
Vegan Zucchini Lasagna – First Layer of Vegan Mozzarella
Two Prep Options
I am happy to say that this delightful dish has shot to the top of the list in our household. No sooner had we eaten the first round than I was already getting requests to make it again! To make it exactly as I did–the version I wholly recommend–you will want to incorporate these recipes from my blog: the Vegan Parmesan Cheese, the Vegan Ricotta Cheese, and the Homestyle Marinara Sauce. Don’t be discouraged by the fact that I refer to three other recipes–all three of these can be made in advance (and will store in the refrigerator for several days). Make them when it works for your schedule and pop them in the refrigerator for an easy prep when making my plant-based zucchini lasagna.
The leftover parmesan cheese will keep in an airtight container for future use on salads or topping other dishes. The remaining sauce can be frozen for future use. And (sadly) there won’t be an leftover ricotta so you might want to make a double batch.
But if your schedule does not permit, you can certainly substitute your preferred vegan parmesan, vegan ricotta, and jarred sauce (or mix and match as you please) for a speedier delivery. Your choice! And a delicious dinner either way!
Vegan Zucchini Lasagna – Second Layer of Sauce
Vegan Zucchini Lasagna – Second Layer of Zucchini and Vegan Ricotta
Vegan Zucchini Lasagna – Second Layer of Vegan Mozzarella
Free From . . .
This vegan lasagna contains no dairy, gluten, added sugars or soy. It is packed with plant-based protein, vitamins and minerals and fiber. Pair it up with my Vegan Caesar Salad and my Rosmarino Vegan Flatbread (GF) for an awesome Italian spread! Enjoy!
Vegan Zucchini Lasagna – Baked
Vegan Zucchini Lasagna
Vegan Zucchini Lasagna (Gluten-free, Soy-free)
Vegan Zucchini Lasagna – creamy herbal ricotta blends smoothly with a robust marinara, transforming non-traditional ingredients into an Italian classic!
Ingredients
3 or 4 medium zucchini (about 18 one eighth inch slices)
2 cups herbed vegan ricotta cheese (my Vegan Ricotta Cheese recipe includes herbs, or use plain store-bought ricotta and add seasoning below)
1 cup shredded vegan mozarella (I use Daiya brand)
1/4 cup vegan parmesan cheese (my Vegan Parmesan Cheese or store-bought)
herb seasoning to add to store-bought vegan ricotta cheese
1 1/2 teaspoons dried oregano
1 1/2 teaspoons sea salt finely ground (less if purchased cheese tastes salty)
1 teaspoon dried basil
1/4 teaspoon garlic powder
pinch black pepper
Instructions
1) If using my recipes for marinara sauce, vegan ricotta and parmesan cheeses, these can all be made in advance and stored in the refrigerator for a few days until ready to assemble lasagna. Spices will blend nicely.
2) Remove refrigerated items from fridge and allow them to come to room temperature. If using store-bought ricotta gently stir in herb seasoning above and set aside.
3) Remove ends of zucchini and slice lengthwise in about one eighth inch thick slices. I like to cut six slices for the top layer a little thinner. Put cooling rack in baking sheet pan and lay zucchini flat, sprinkle with salt on each side and allow to weep for 30 minutes (see pictures in post). Alternatively, you may place the zucchini a strainer in your sink, salt it, and allow it to weep for 30 minutes.
Lasagna Assembly
1) Rinse salt from zucchini and place slices flat on a towel. Place second towel on top and lightly blot off excess water.
2) Spread a thin layer of sauce on the bottom of a casserole pan (I used a glass 12″ x 7.5″), but a 13″ x 9″ will work with a little extra of all the ingredients. Place a single layer of zucchini slices (side to side) across bottom of pan (about six slices). Place a dollop of vegan ricotta on each slice and spread evenly (about one cup for the whole layer). Sprinkle with shredded vegan mozarella cheese (about 1/2 cup for the whole layer). Top with a layer of sauce (about 3/4 cup). Repeat process: layer zucchini, vegan ricotta, vegan mozzarella and sauce. Top with a third layer of zucchini (I like to use thinner slices for this layer). Spread with another layer of sauce (about 1/2 cup) and sprinkle with vegan parmesan or shredded vegan mozzarella (about 1/4 cup).
3) Cover with foil and bake at 350 degrees Fahrenheit for about 40 minutes (remove foil after 20 minutes). Allow more or less cooking time depending on thickness of sauce. Remove from oven and cool for at least 10 minutes before serving to allow time for lasagna to set. Store in refrigerator in a covered dish for 2-3 days. After that it will still taste delicious but zucchini will get softer.
Notes
Prep Time
Includes the time for weeping the zucchini. Does not include time for making sauce and cheeses if using Nutritionicity recipes instead of store-bought.
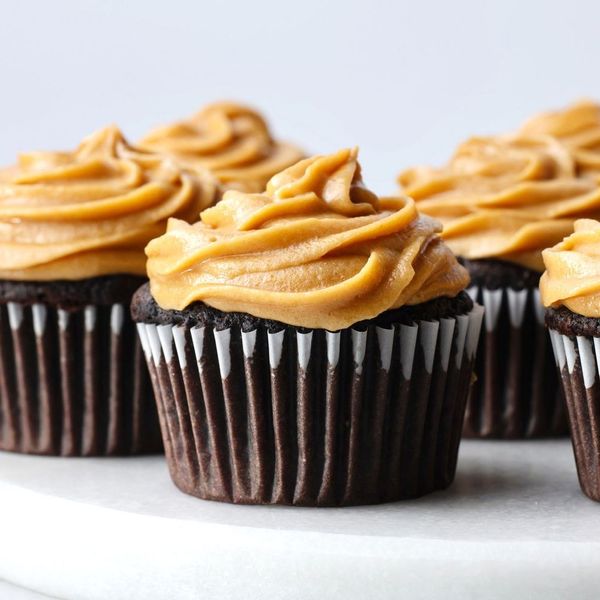
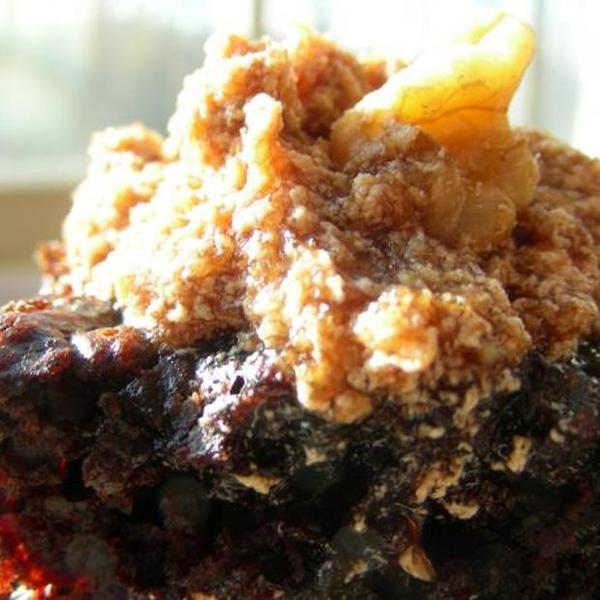
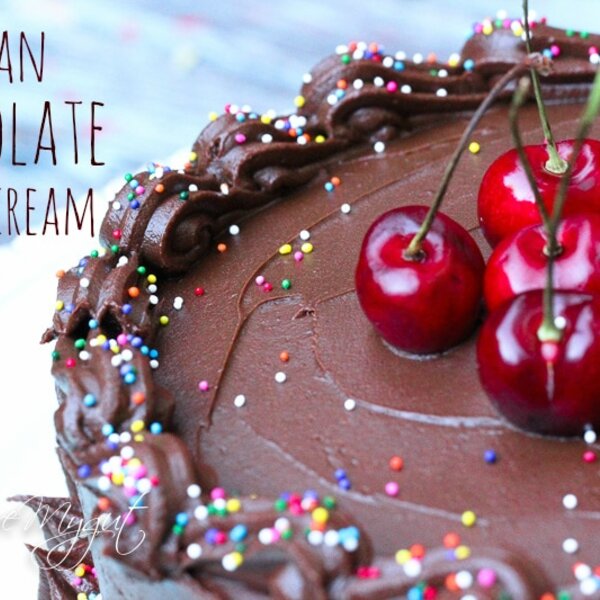
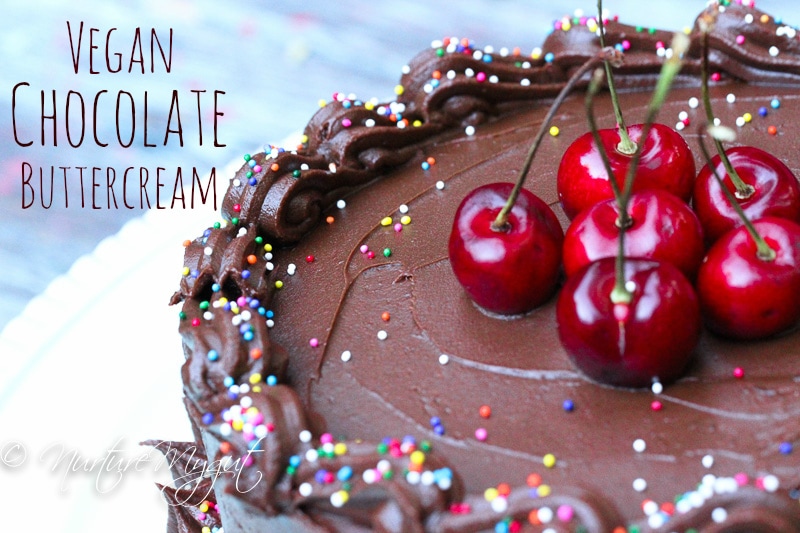
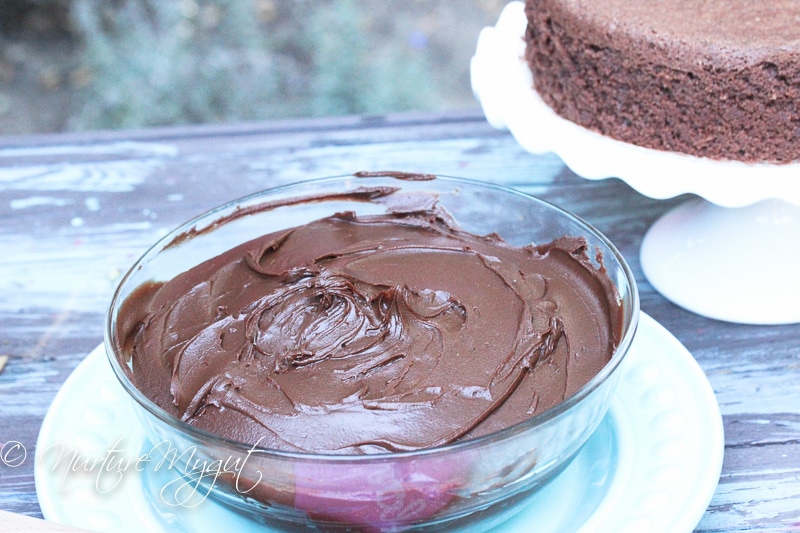
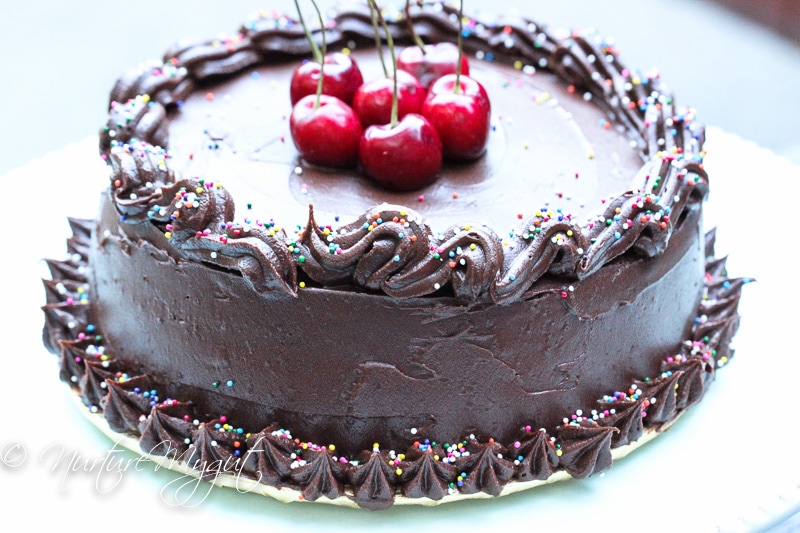
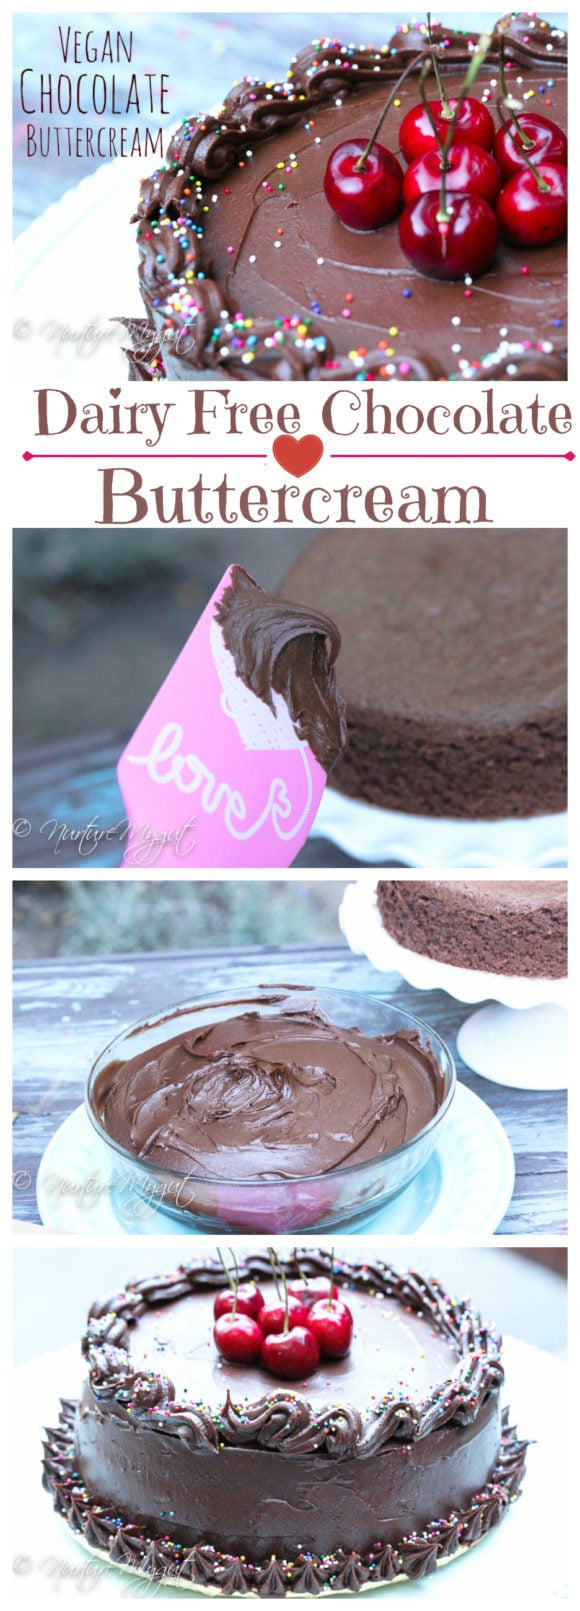
This is a recipe I have been wanting to share with you for a long time! It is my all time favorite Vegan Chocolate Buttercream Frosting that I have used at my children’s birthday parties for the last several years. It is super easy to make, using only 4 ingredients. It is decadent, pipes edges beautifully and is completely dairy and egg free. Plus, it takes 5 minutes of prep time.
Every year a make a huge gluten free cake with Vegan Chocolate Buttercream but this year, I took a short cut. I ordered a large regular chocolate cake for everyone without food allergies and made this small gluten free dairy free chocolate cake for my family and those who want a healthier cake. It turned out perfect.
Feel free to turn my “Best Gluten Free Chocolate Cupcakes” recipe into a cake.
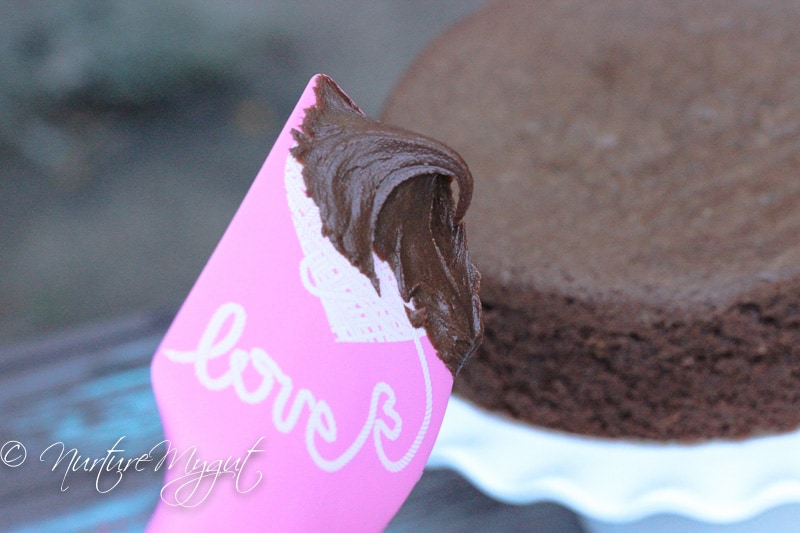
My first step in decorating this cake was to divide the cake into two layers. I piped an edge around the bottom layer so my filling doesn’t slide out the sides, then I added raspberry jam and placed the top layer on gently. Then, I frosted the cake with a crumb coat. That is a very thin layer of frosting. Next, I added a second coat of frosting to hide all the imperfections and make the cake look even.
I used a 1M tip to do the edge on the bottom and then went ahead and added a border on the top. I followed a video tutorial by Sweetapolita to pipe my border. She is a true artist on decorating cakes. (FYI, her site is not allergy free).
I put some cherries in the center and added sprinkles.
I am not fond of using dyes in my food, but on birthday parties, if my kids make the request, I make an exception. I am on the hunt for pretty dye-free sprinkles. I found some at Whole Foods but the colors are not as brilliant, let me know if you have a brand your kids like.
My son was really happy with the end result! He was having so much fun he did not even ask for cake until we got home. When he finally sat down to eat his slice of chocolate cake, he loved every bite and asked for another slice…but there was no more! Uh-oh! He handled it pretty well and went to go play, but, I will make a bigger cake next time for sure!
For more delicious healthy gluten free/Paleo-ish meals, please subscribe below. You will get my free Paleo Breakfast E-Book as my gift to you and new recipes straight to your inbox!
Check out these yummy gluten free desserts:
Best Gluten Free Chocolate Cupcakes {Dairy Free/Nut Free}
Gluten Free Chocolate Cake Pops
Vegan Chocolate Avocado Pie
Best Paleo Chocolate Chip Cookies
Vegan Peanut Butter Cups
Print
Author: Ester Perez
Total Time:1 hour 5 minutes
Yield:approximately 2 cups1x
Description
My all time favorite Vegan Chocolate Buttercream Frosting that I have used at my children’s birthday parties for the last several years. It is super easy to make, using only 4 ingredients. It is decadent, pipes edges beautifully and is completely dairy and egg free. Plus, it takes 5 minutes of prep time.
1 1/3 cups melted semi-sweet vegan chocolate chips (I use Enjoy Life)
2/3 cups organic vegetable shortening ( I use Spectrum)
1 Tablespoon vanilla extract
3 Tablespoons Maple Syrup Grade B
Instructions
Add all ingredients to a saucepan and whisk on lowest heat setting until all chocolate chips are melted. About 5 minutes.
Pour ingredients into a tupperware or glass container and allow frosting to cool at room temperature until mixture has set. Depending on the temperature of your home, this can take 1-2 hours to thicken. You can whip this up with a stand mixer or hand mixer to make this even fluffier.
You can now frost a small 6 inch cake with this. If you want to make decorations on the top and bottom edges or frost a 9 inch cake, make a double batch recipe. Use a 1M tip to make stars on the edges.
Prep Time:60 mins
Cook Time:5 mins
Category:Dessert
IF YOU LOVE THIS RECIPE TRY THESE OUT!
Author
Recent Posts
I’m a loving wife, mother of two healthy children, and I am obsessed with teaching people how to make delicious and mouth-watering gluten-free/Paleo friendly foods that nurture your gut!