In a bowl, combine flour, baking powder, salt, red chilli powder, olive oil and grated cheese. Rub between your fingers until the mixture resembles coarse sand.
To this mix, add the coconut milk and water, 1 tbsp at a time, kneading until fully incorporated before adding more. Continue kneading till you get a firm, non-sticky dough.
Preheat oven to 425°F / 220°C. Line two baking trays with foil.
Divide the dough in half. Cover one half and refrigerate. Lightly flour a work surface and knead the other half to a thin sheet (about 1/8″).
Cut into 2″ squares (or use a cookie cutter to cut out shapes) and place them on the lined baking tray. Sprinkle with sesame seeds and press them down into the dough.
Bake in the preheated oven at 425°F / 220°C for 8 mins.
In the meantime, roll out the other half of dough and cut into pieces. Any scraps leftover, roll into a ball, knead and repeat till you've run out of dough. Bake!
Once the last batch is done, turn off oven and put both trays back in and keep the door slightly open. In the residual heat, the crackers will crisp up as it cools.
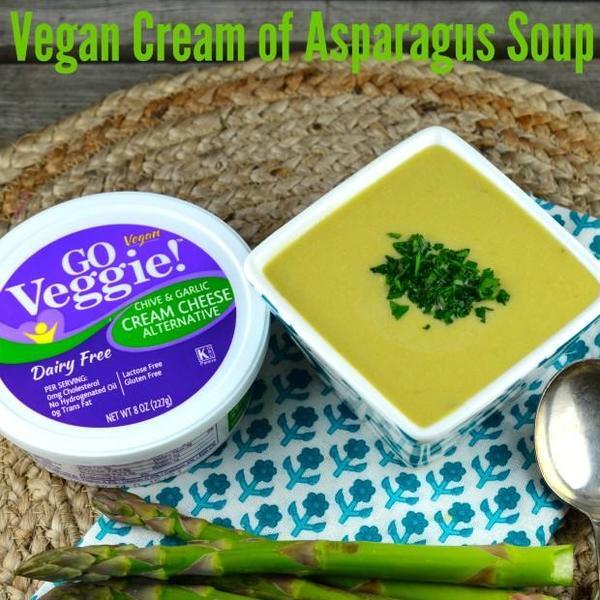
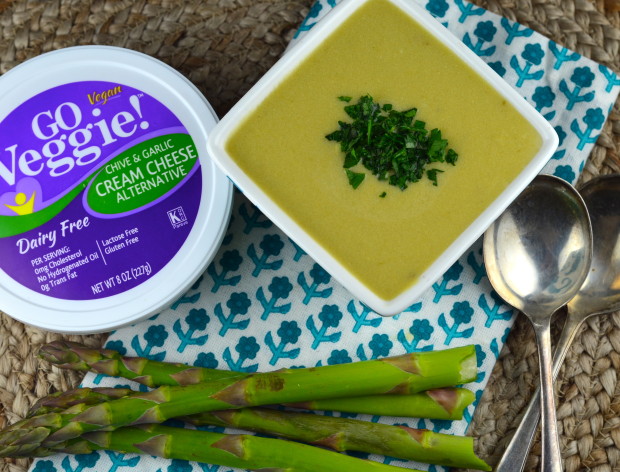
Spring is officially here. Definitely doesn’t fell like it, but it’s here! And along with it, comes a wonderful selection of delicious vegetable that we absolutely love working with. One of our very favorites? Asparagus. Growing up in Spain, our mom used to serve them very often. The white variety in particular is very popular, and in Spain it can be found all year long, jarred and preserved in water and salt. But the one thing that always comes to mind when we think of asparagus, is the soup that our mom used to serve. Probably one of the only few things she didn’t make from scratch. It came in a pouch, in powder form!! It was, however, really delicious. Almost as good as the ones they served in restaurants, believe it or not! Often, cream of asparagus soup, whether is home made, canned or in a powder, can be pretty heavy, since most of the time it’s made with cream and butter. We were able to create a lighter, dairy free version of it thanks, once again, to one of our go-to products, GO Veggie! Vegan Cream Cheese Alternative. It works beautifully here by adding great creaminess to the soup. We used the chive & garlic flavor, which adds a little extra flavor without being overpowering. And because it’s vegan, free of dairy, gluten and cholesterol; and lower in saturated fat and calories than dairy cream cheese, it’s the perfect option for anyone with dietary sensitivities or simply looking to improve their heart or overall health. For more information or to learn where yo can find GO Veggie! products, click here Enjoy!
Print
Vegan “Cream” Of Asparagus Soup
5 Stars 4 Stars 3 Stars 2 Stars 1 Star
5 from 2 reviews
2 tbsp extra virgin olive oil
1 medium size onion, chopped
1 ½ lbs asparagus
½ tsp salt (or to taste)
½ tsp lemon pepper
5 cups vegetable broth or water
1 tbsp vegetable bouillon (if you’re using water)
1–8oz pack GO Veggie! Vegan Chive & Garlic Cream Cheese Alternative
Garnish:
24 asparagus tips
¼ to ½ cup whole wheat flour (or you can use any gluten free flour)
½ cup unsweetened almond milk
½ cup Panko bread crumbs (you can use gluten free Panko)
Salt and lemon pepper to taste
2 tbsp extra virgin olive oil
Instructions
Chop asparagus in 2 inch pieces (make sure to discard the though bottom pieces and reserve 24 tips). Set aside
In a large soup post, saute onions in olive oil at medium heat for 2 minutes. Add asparagus, season with salt and lemon pepper and cook, covered, for 10 minutes.
Add broth or water, bring to a boil (at this point, you would add the bouillon, if using), cover and simmer for about 25 minutes, until the asparagus are very tender
Transfer to a blender, add GO Veggie! Vegan Cream Cheese and lemon juice, and blend until smooth (you might need to so this in a couple of batches). Note: Be very careful while blending the hot soup because it might splash!
Pour soup back into pot and simmer covered for 5-7 minutes.
For the garnish:
Place flour, almond milk and panko in 3 separate bowls. Season with some salt and lemon pepper
Coat the asparagus tips in flour. Dip in almond milk and coat with panko bread crumbs. Heat olive oil in a non stick skillet, arrange the tips in one single layer and cook at medium heat for 2-3 minute until golden brown, turning them over half way through
Prep Time:10 mins
Cook Time:45 mins
Category:Soup
Cuisine:Kosher / Vegan
This is a sponsored post. All opinions are ours and we do not promote or endorse products we do not like or use.
Reader Interactions
This site uses Akismet to reduce spam. Learn how your comment data is processed.
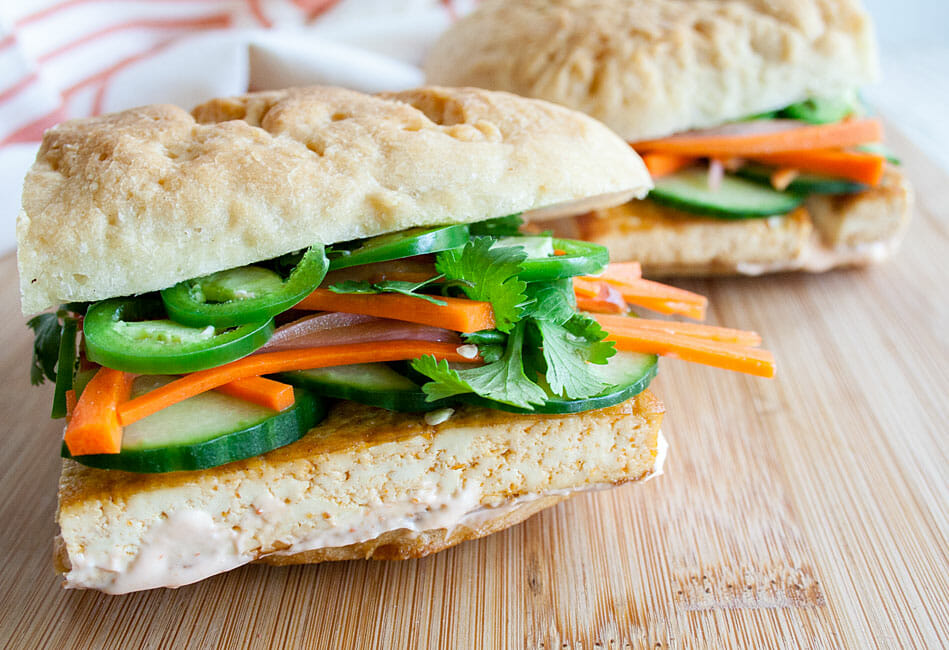
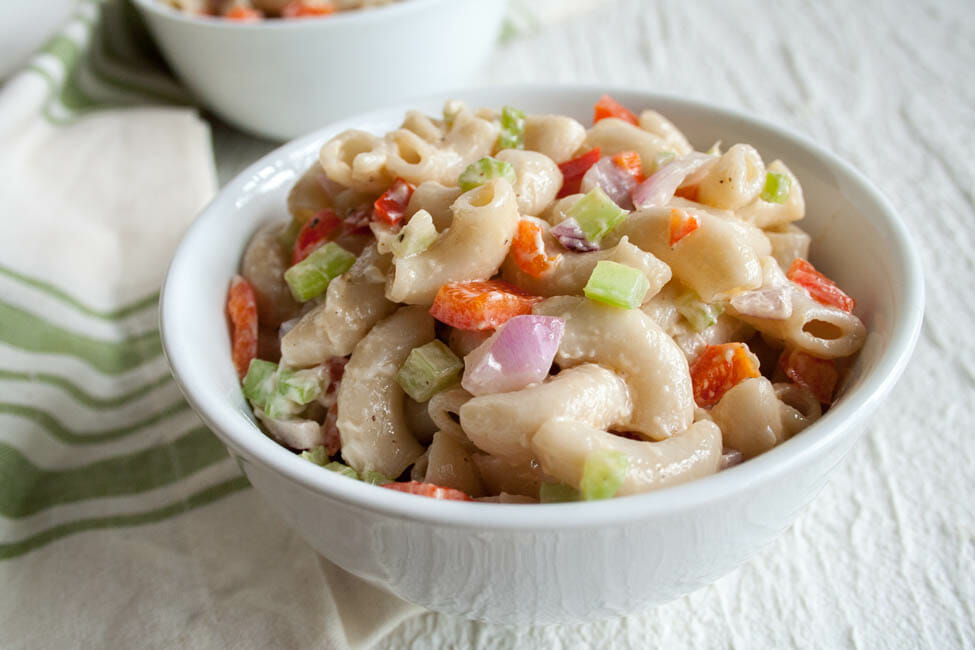
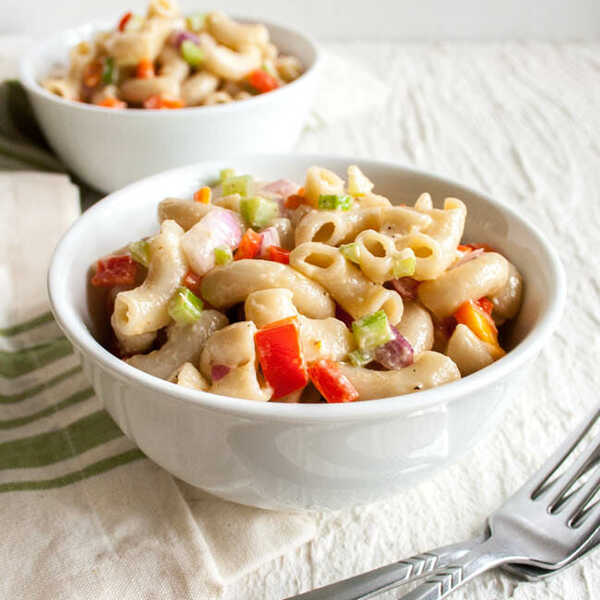
This easy classic Vegan Macaroni Salad is perfect for potlucks and parties because it can be served at room temperature.
💌 SAVE THIS
I’ll email this post to you, so you can come back to it later!
This Vegan Macaroni Salad came about because I had a major craving for it. It came out of nowhere and for no reason, and I knew I just had to make it.
I am so glad that I did. Sometimes the simplest recipes are the most satisfying.
Macaroni salad is the quintessential Summer salad. I don’t even remember the last time that I had macaroni salad. It’s probably been 10 years or more.
So before Summer is over, do yourself a favor and make this Vegan Macaroni Salad. You’ll be glad you did.
It’s perfect for a picnic, potluck, BBQ, or party. It can be served at room temperature, which is a host’s dream come true. Eat it for lunch or as a vegan side dish for dinner.
Jump to:
❤️ Why You’ll Love It
🧾 Ingredients
📖 Variations / Additions
🔪 Instructions
💭 Tips
Other Vegan Pasta Salads
📋 Recipe
💬 Comments
❤️ Why You’ll Love It
It has a balance of flavors.
It is perfect for a potluck or party because it can be served at room temperature.
It’s a great side dish for summer.
🧾 Ingredients
Vegan mayonnaise: Adds a rich creamy flavor. You could use vegan sour cream or vegan yogurt, but it won’t be as rich tasting as vegan mayo.
Apple cider vinegar: Adds a tangy flavor. You could use red wine vinegar or rice vinegar.
Sugar: Adds sweetness. You could also use maple syrup or agave syrup.
Dijon mustard: I like Dijon mustard, but you could also use yellow mustard or even a small amount of mustard powder.
Salt and pepper: Enhances flavors and adds flavor. I like to use sea salt.
Red bell pepper: Adds a sweet crunchy flavor. You could also use a green bell pepper.
Celery: Adds crunch. It’s a classic ingredient in macaroni salad.
Red onion: Adds a pungent flavor. You could also use green onion.
Elbow macaroni noodles: Hence the name of the pasta salad. I used brown rice gluten-free pasta. You could use chickpea elbow noodles or your favorite pasta. I used chickpea pasta when I updated the ingredient and process shots. Both taste great.
To see the full list of ingredients with measurements and instructions, see the recipe card at the bottom of this post.
📖 Variations / Additions
Customize this to your liking!
Sweet pickles or dill pickles
Sweet pickle relish or dill pickle relish
Parsley
Carrots
Paprika
Dill
5 Secrets to Vegan Cooking
Free 5 Part Email Series to Elevate Your Vegan Cooking
We respect your privacy. Unsubscribe at any time.
🔪 Instructions
Step 1: Add dressing ingredients to a large mixing bowl.
Step 2: Mix until smooth and creamy.
Step 3: Cook pasta according to the directions. Make sure to salt the water. I like to add a splash of olive oil when I cook brown rice pasta. Drain water.
Step 4: Add cooked pasta and chopped veggies to the dressing.
Step 5: Toss to coat.
💭 Tips
Taste as you go. Taste the dressing, taste the salad ingredients, and taste the final product. You may want more or less sugar, red onion, etc.
Salt your pasta water! I’ve noticed that most pasta products fail to mention this on their directions for cooking the pasta, but it’s very important. Pasta soaks up the salt as it cooks. It’s important to season at every step in cooking.
I also add a splash of olive oil to my pasta, because brown rice pasta loves to stick together. That’s purely optional, but I find that it helps.
Other Vegan Pasta Salads
If you tried this Vegan Macaroni Salad Recipe or any other recipe on my website, please leave a ⭐️ star rating and let me know how you like it in the 💬 comments below. I love hearing from you!
Before Summer ends, make some vegan pasta salad for that last picnic or potluck!
📋 Recipe
Vegan Macaroni Salad
This easy classic Vegan Macaroni Salad is perfect for potlucks and parties because it can be served at room temperature.
Course Side Dish
Cuisine American
Diet Gluten Free, Vegan, Vegetarian
Prep Time 15 minutesminutes
Cook Time 10 minutesminutes
Total Time 25 minutesminutes
Servings 4
Calories 399kcal
Instructions
Make pasta according to directions. Make sure to add a large pinch of salt when water is boiling. Optional: add a splash of olive oil to prevent sticking.
Mix dressing ingredients. Add cooked pasta and chopped vegetables. Add more salt and pepper as needed.
Notes
This macaroni salad will last 5 days in an airtight container in the fridge.
*If you are using gluten free noodles and have leftovers you can heat the salad in the microwave to soften the noodles up.
💌 SAVE THIS
I’ll email this post to you, so you can come back to it later!
by Aimee · Modified: · This post may contain affiliate links · 7 Comments
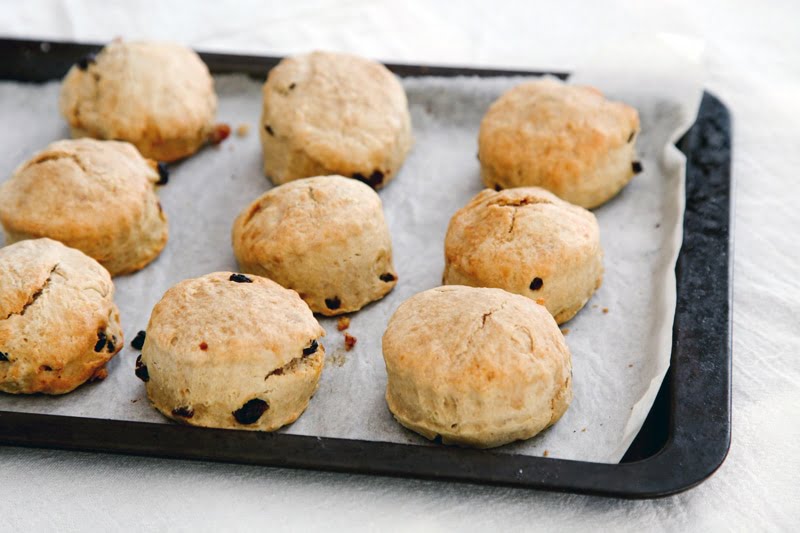
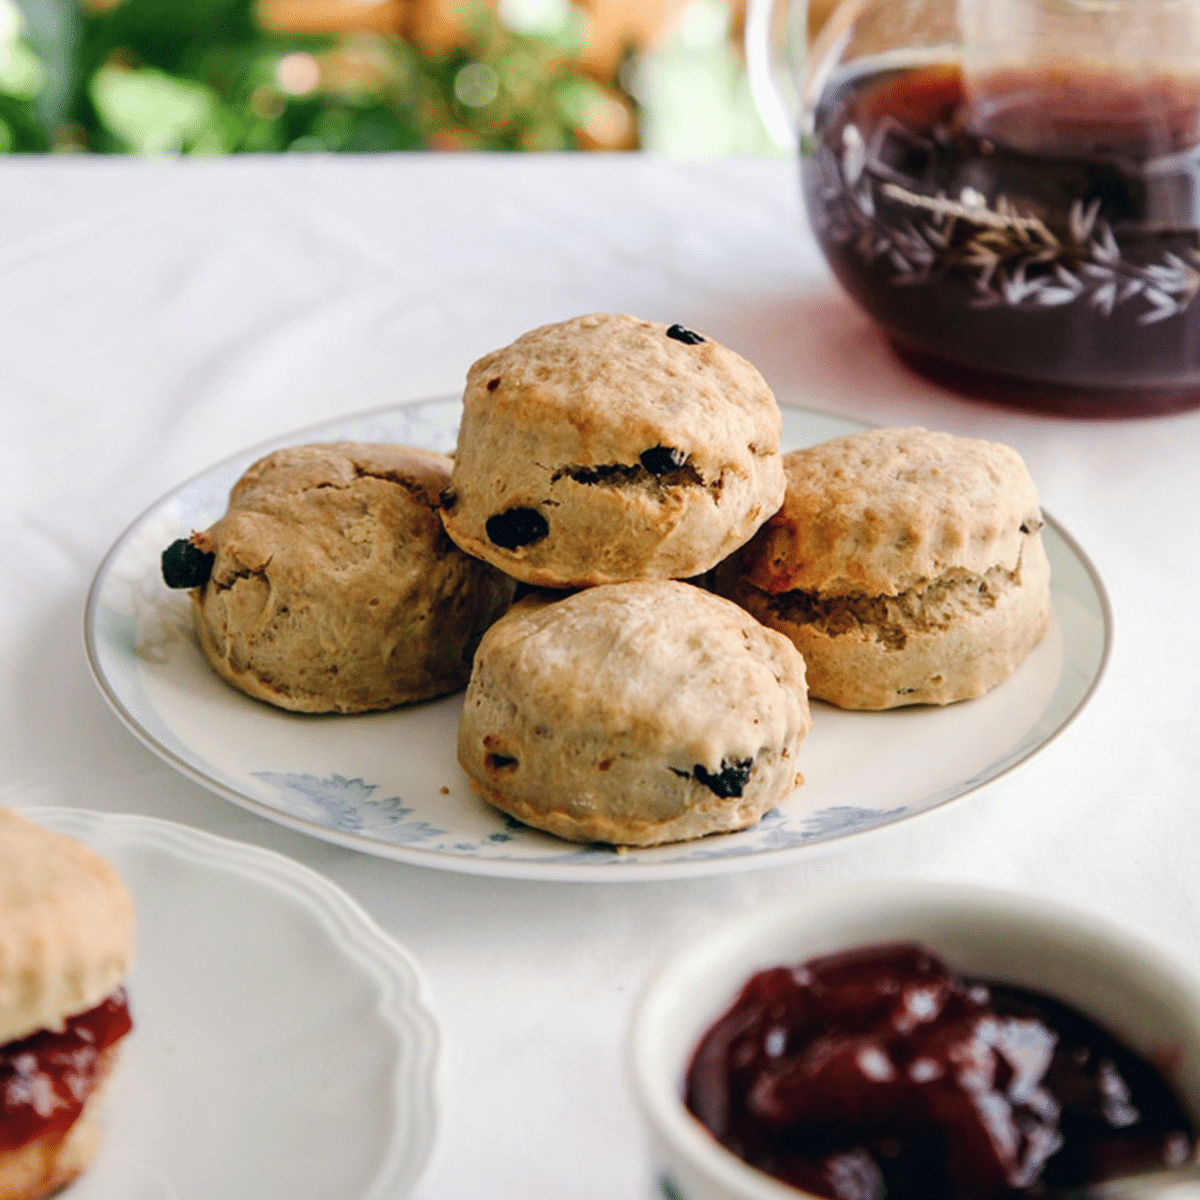
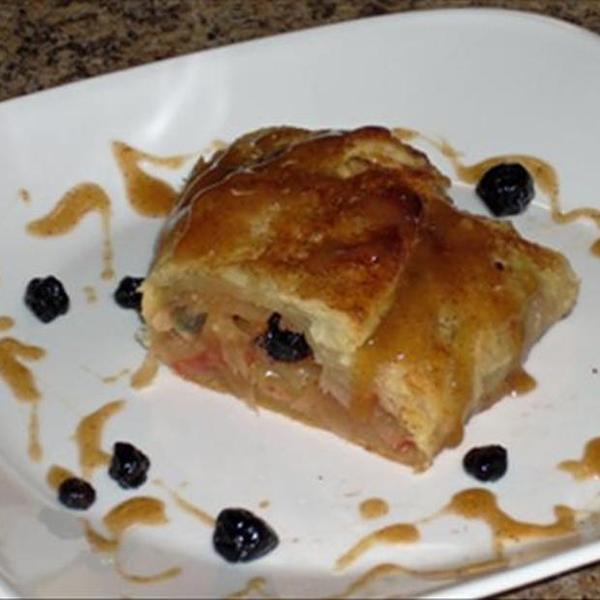
Fluffy dairy-free scones with dried fruit. Easy and therapeutic to bake and comforting to eat, especially warm from the oven with a good-tasting vegan butter or some jam.
If you’ve been following my recipes for a while, you’ll think by now that I have a scone obsession.
And you would be correct to think that. It is indeed an obsession.
As one of my all-time favourite treats and probably the thing I bake most regularly, it had to become one of the first recipes I veganized when I became vegan over two years ago.
This time, I’ve paired up with Laura Ashley to turn them into the perfect afternoon tea treat.
By baking the scones with brewed tea, spices and vine fruits, you get the most comforting, subtly sweet and moreish scone.
So if you’re taking part in Veganuary or are new to veganism or a dairy-free diet, then know that you absolutely do not have to miss out on afternoon teas. See my guide here for more details!
Serve these fruit scones with
Vegan Clotted Cream
Vegan Tea Sandwiches
Vegan Cheese Scones
📖 Recipe
Vegan Fruit Scones
Yield: 15 scones
Prep Time: 10 minutes
Cook Time: 15 minutes
Total Time: 25 minutes
Buttery (but butterless) scones with fruity sultanas! Serve with some good-tasting vegan butter (which you can find at any supermarket) or a selection of jams. Or both, as I like to do!
Ingredients
475 g self-raising flour
70 g caster sugar
A pinch of salt
1 tsp ground cinnamon
½ tsp ground mixed spice
75 g good-tasting vegan butter substitute, (I like Flora dairy-free or Vitalite)
240 ml strong brewed tea, left to cool
A large handful of mixed vine fruits or sultanas
Instructions
Preheat the oven to 190C / 370F and line a baking tray with parchment paper.
In a large mixing bowl, stir together the flour, sugar, salt and spices.
Add the vegan butter in a tsp at a time and use your fingers to rub it into the flour. Alternatively, use a food processor or stand mixer
When the butter is fully incorporated and the mixture resembles a dense sand, slowly add the cold tea and mix. You don’t need to use all the tea, just use enough until you get a soft dough.
Turn out onto a lightly floured surface and kneed briefly. Add the dried fruit at this point. Flatten into a ¾ inch thick dough and cut out the scones using a small cookie cutter or upside down glass.
Transfer the scones to the baking sheet and brush with a small amount of leftover tea. Bake for 15-18 minutes until lightly golden.
Enjoy warm from the oven with some vegan butter & jam! Serve with a pot of tea in your fanciest teapot
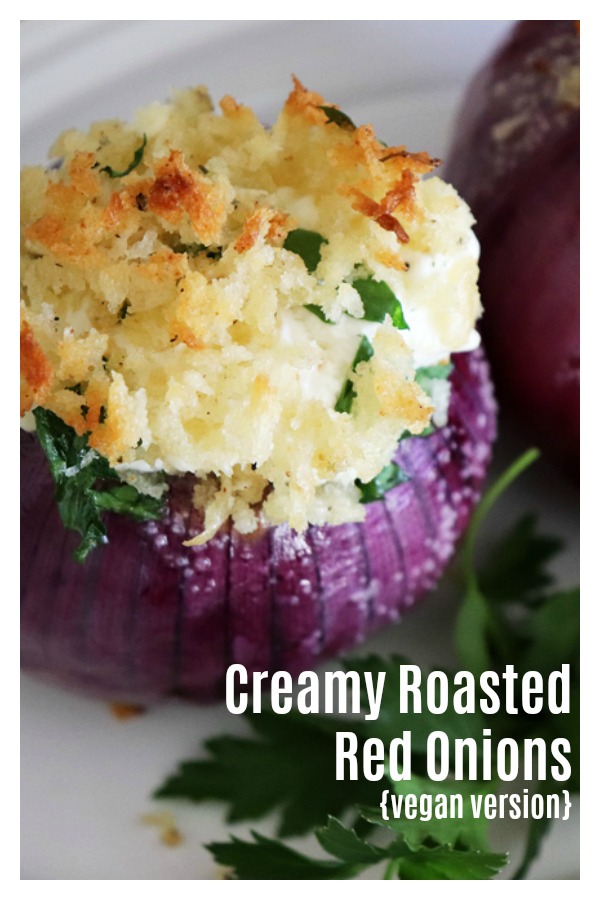
This recipe for Emeril’s Creamy Roasted Red Onions is a slight variation on the famous chef’s version, Roasted Red Onions Stuffed With Thyme Mascarpone Mousse. My version is slightly simpler AND completely vegan!
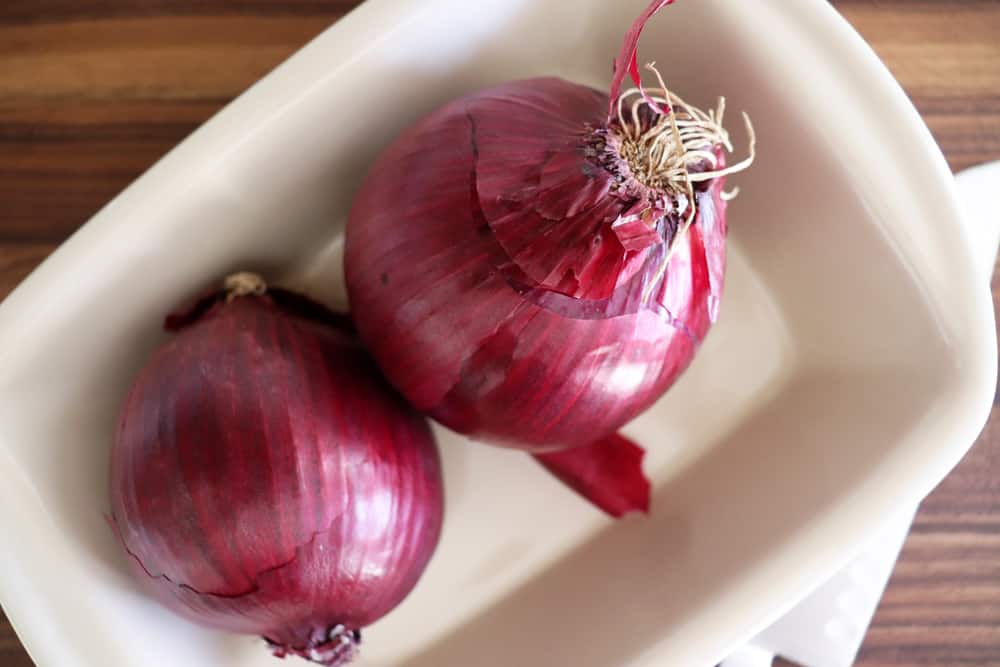
The first thing you’ll need to find are red onions roughly the same size. I just did two, but feel free to double or triple the recipe using the servings slider in the printable recipe card below. It automatically adjusts the ingredients for you 🙂
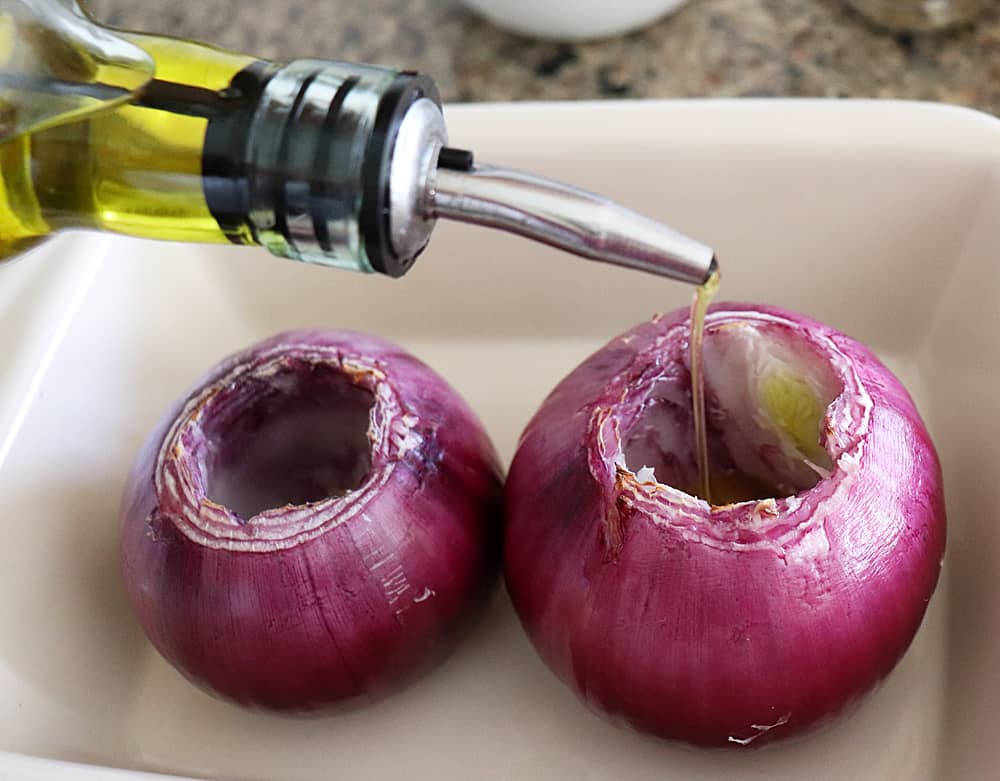
Prepare the onions…
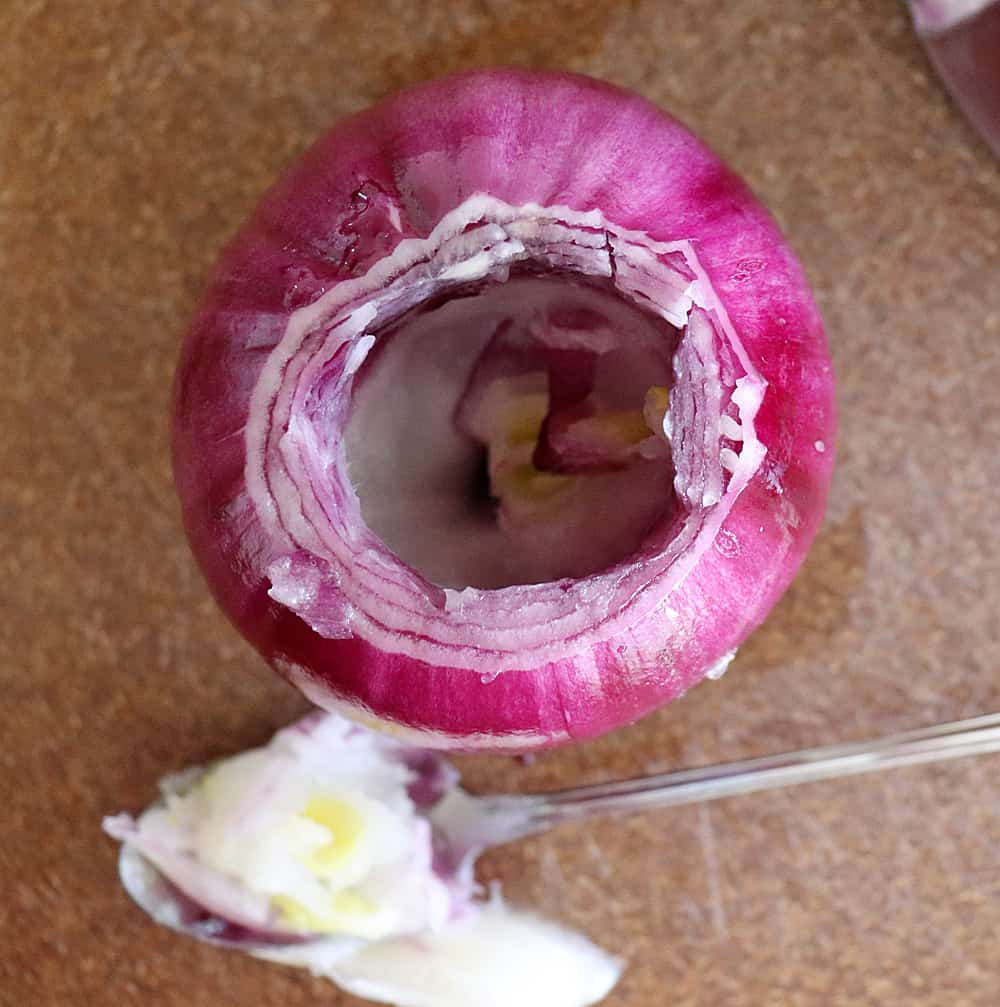
You’ll want to slice off the root end so the onion sits upright and is stable. You’ll also be trimming off the top and coring out the center to make room for the filling, taking care not to make the walls of the onion too thin.
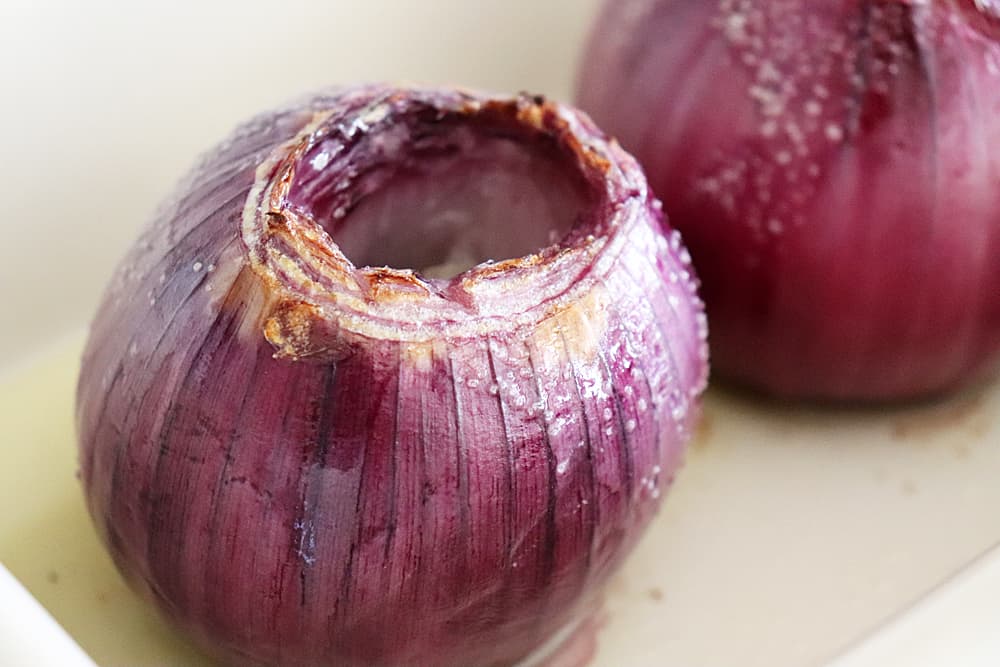
A drizzle of olive oil and a generous sprinkling of salt go onto the onion prior to roasting.
After about 30 minutes or so, they look like this.
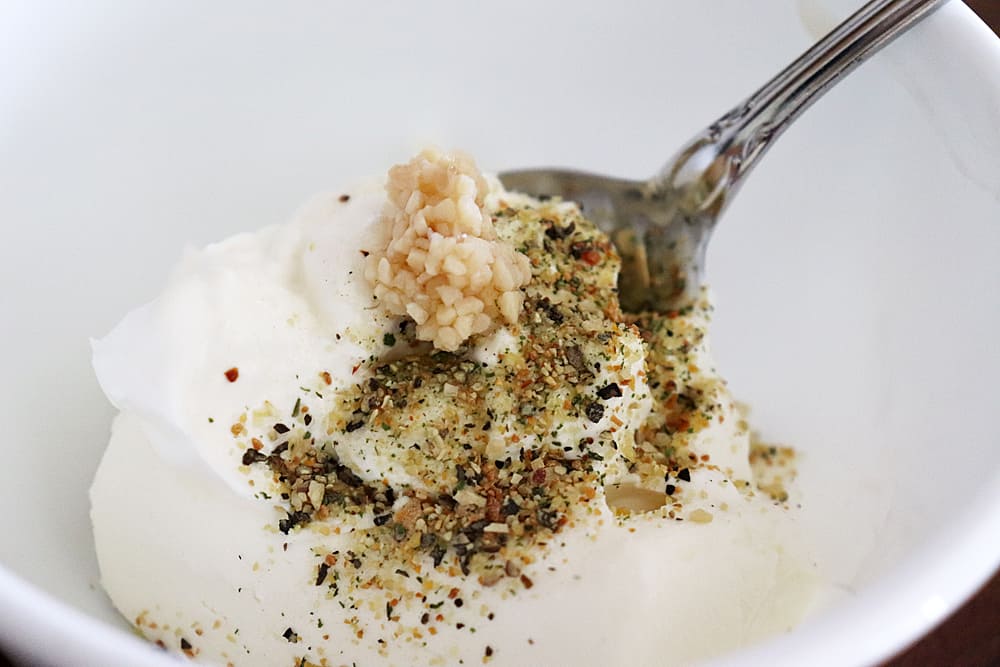
Make the filling…
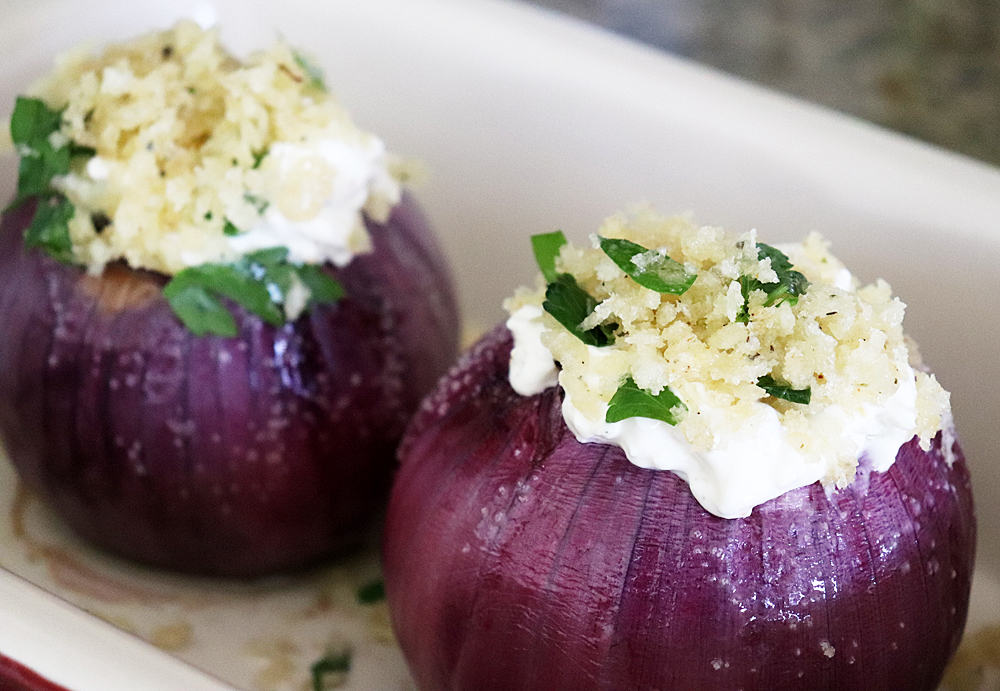
Combine all of the ingredients for the cream cheese filling. I am using a vegan cream cheese and a vegan sour cream. They work really well in a recipe such as this one! We’ve also got herbs in there, minced garlic and another pinch of salt.
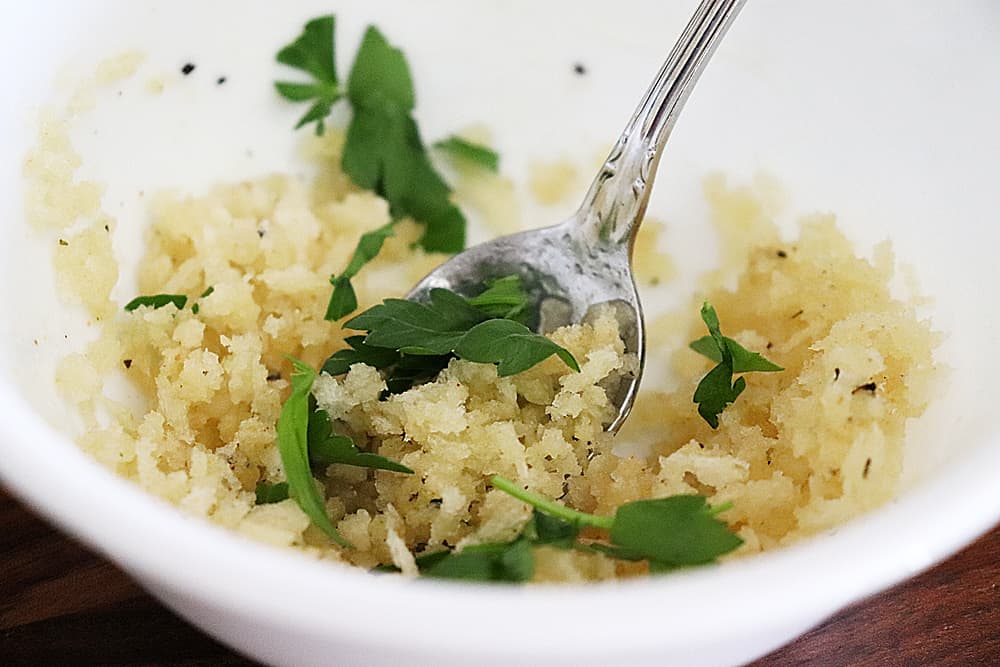
Make the topping…
At this point, I also throw together the panko topping. It is simply panko, melted vegan margarine and freshly chopped parsley. Just give everything a toss until the panko are coated in the melted vegan margarine.
Stuff the onions and bake…
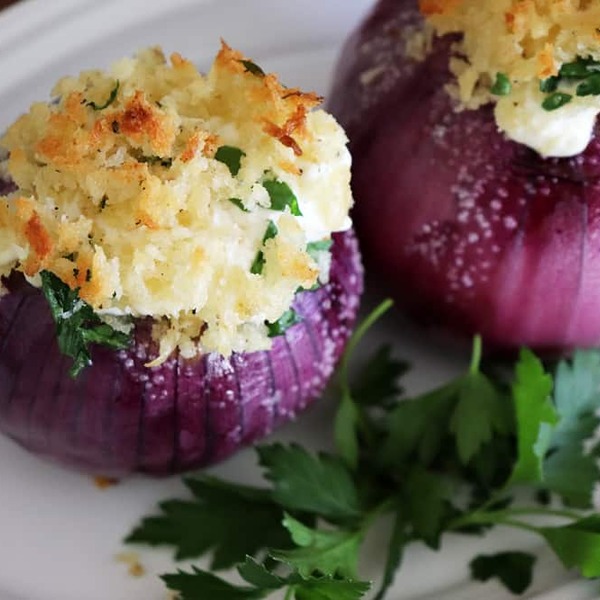
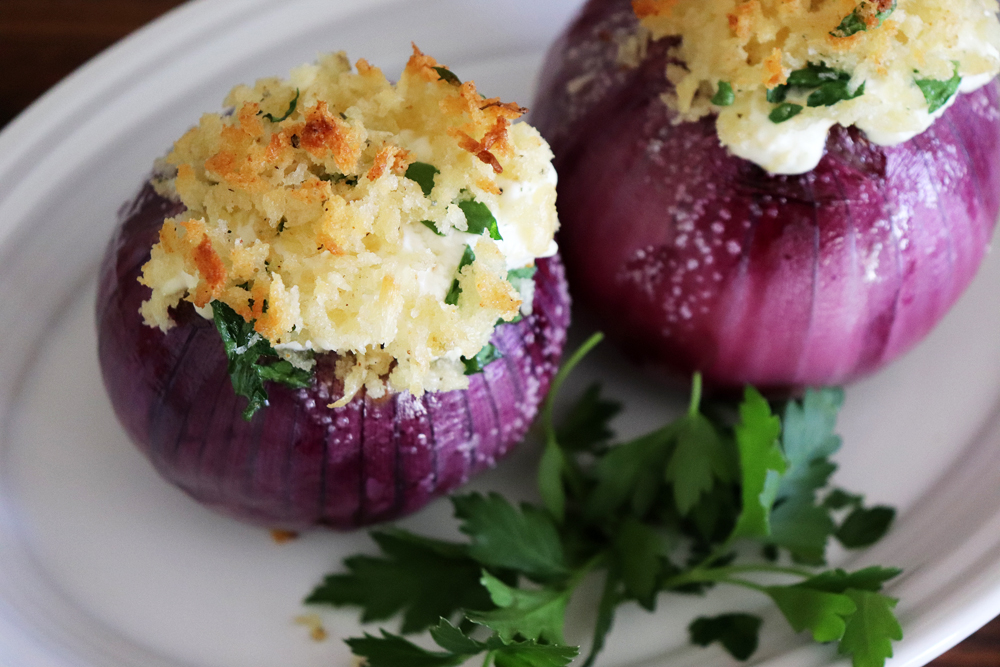
Stuff the onions and top with the panko before placing back into the oven for about another 20 minutes or until the onion is tender and topping is golden. All ovens cook at different rates of speed, so I use a knife to pierce the onion for testing.
Aren’t they pretty? The onions become nice and sweet and that creamy cheesy mixture with the crunchy panko topping is just heavenly. We loved these and what an awesome side dish this would make!
Did you try this recipe for Emeril’s Creamy Roasted Red Onions? Leave me a comment below and let me know what you thought.
And if you enjoyed the recipe, why not PIN IT FOR LATER? 🙂
Emeril’s Creamy Roasted Red Onions {vegan version}
My take on Emeril’s Creamy Roasted Red Onions, but as a vegan version using vegan cream cheese and vegan sour cream. You will absolutely LOVE this recipe!
Course Side Dish
Cuisine American
Prep Time 10minutes
Cook Time 50minutes
Total Time 1hour
Servings 2servings
Author Veg Life Staff
Ingredients
FOR THE ONIONS:
2largeRed Onionsends trimmed and center hollowed out
drizzleOlive Oil
pinchSalt
FOR THE FILLING:
2ozVegan Cream Cheese
2tbspVegan Sour Cream
1/2tspSalt
1/2tspHerbs such as Herbs de Provence or similar
1/4tspGarlicmined
FOR THE PANKO TOPPING:
1/4cPanko Breadcrumbs
2tspVegan Margarinemelted
1tspParsleychopped
Instructions
Preheat oven to 400 degrees.
Peel, trim ends and core out the center of the onions. Place in baking pan and drizzle with olive oil. Sprinkle with salt.
Bake for 40 minutes or until somewhat tender.
Meanwhile, stir together the ingredients for the vegan cream cheese filling.
Melt the vegan margarine and stir in panko and parsley.
Remove the onions from the oven and stuff with the cream cheese mixture. It’s okay to mound it up, you’ll want to use all of it! 🙂
Top with the panko mixture and return to the oven, baking until the onions are tender and the topping is golden.
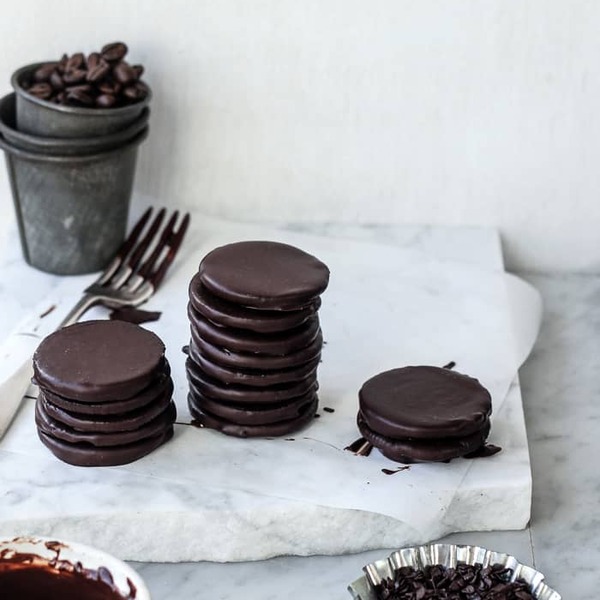
A simple DIY thin mint girl scout cookie made using only three ingredients – oreos, peppermint oil and dark chocolate!
I had seen those DIY thin mint recipes in the past which used ritz crackers as the base. I’m sure that works quite well but (A) why would you pass up the chance for more chocolate and (B) it’s much easier to get oreos than ritz here in the UK.
Separating the oreos for the thin mints
The one long part of this recipe is twisting apart the oreos and removing the filling – it works better when the oreos are slightly warm as the filling is softer then. Having them at room temp will be fine, just make sure they’re not cold. You can either twist the cookies apart or use a butterknife to slice them apart then scrape off the filling. You can either use that filling to make some double stuf oreos (just spread onto a plain oreo and hey presto), or eat the filling plain like some kind of buttercream monster. It’s up to you!
Using whole oreos for thin mints
Of course, the alternative is that you leave the oreos whole and don’t remove the filling before coating them in chocolate. You’d end up with an overall thicker and sweeter cookie but it would be faster and simpler to do.
Peppermint extract vs peppermint oil
For the chocolate coating, a simple mixture of dark chocolate and peppermint oil is all you need. Make sure that the peppermint flavouring is NOT alcohol based or water based – it must be an oil based version – otherwise it will cause the chocolate to seize.
Tempering the chocolate for the coating
To get the super shiny, firm-set chocolate you see on the cookies here, you have to do a process called tempering. This is where you heat and cool the chocolate to a series of specific temperatures in order to encourage a certain formation of cocoa butter crystal to form in the chocolate which is very stable. It isn’t essential to the recipe, you can just melt and dip as you please, but you may notice some cocoa butter bloom on your cookies. This is mostly a visual thing although you may notice that the chocolate coating sets a bit soft.
Notes:
-For optimum twist-abilitiy of the oreos, make sure they’re at room temperature (it’s really difficult to separate them without breaking them when they’re cold!)
-If you want to temper the chocolate in a food processor, I have a tutorial here
-You don’t have to scrape the filling out of the oreo if you can’t be bothered; if you leave it on one half, it’ll just taste sweeter and less chocolatey, but it saves time.
-You can decorate the chocolate dipped oreos before the chocolate sets with sprinkles, Maldon salt, chopped nuts or a drizzle of white chocolate for some contrast!
-If you’re making these vegan, make sure your chocolate is vegan friendly 🙂
– you can use Newman O’s instead of Oreos or whichever chocolate cookie you desire! In some countries, Oreos contain whey powder meaning they’re not vegan so check the label properly.
16 to 20oreo cookies(or your favourite vegan chocolate cookie)
7 to 10ozsemisweet or bittersweet chocolatefinely chopped
1tsppeppermint oil(you can’t use alcohol-based extracts)
Twist the oreos to separate them (see notes), and scrape off the cream filling (either discard the filling…or eat it, if you’re into that.)
Place 2/3 of the chocolate into a heatproof bowl set over a pan of simmering water. Stir occasionally until almost fully melted then remove the bowl from the pan. Stir in the remaining 1/3 of finely chopped chocolate, mixing until full melted, then stir in the peppermint oil well.
Dip an oreo half in the melted chocolate, turn to coat using a fork. Use the fork to remove the oreo from the chocolate, tap it on the edge of the bowl a few times (to let excess chocolate drip off).
Transfer to a baking tray lined with baking paper. Repeat with all the oreo halves.
Leave at room temperature until set.
Store in an airtight container somewhere cool and out of direct sunlight for up to 2 weeks.


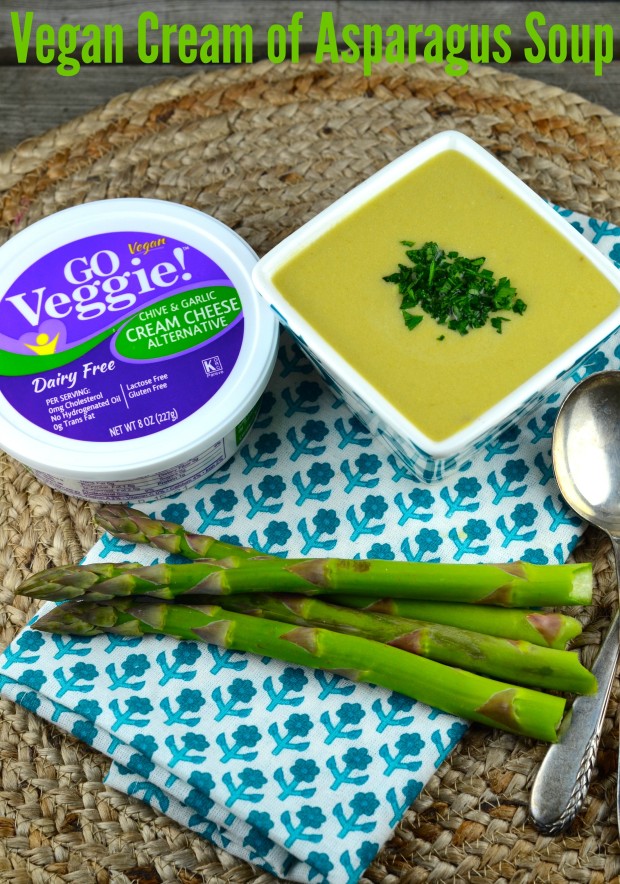 Spring is officially here. Definitely doesn’t fell like it, but it’s here! And along with it, comes a wonderful selection of delicious vegetable that we absolutely love working with. One of our very favorites? Asparagus. Growing up in Spain, our mom used to serve them very often. The white variety in particular is very popular, and in Spain it can be found all year long, jarred and preserved in water and salt. But the one thing that always comes to mind when we think of asparagus, is the soup that our mom used to serve. Probably one of the only few things she didn’t make from scratch. It came in a pouch, in powder form!! It was, however, really delicious. Almost as good as the ones they served in restaurants, believe it or not! Often, cream of asparagus soup, whether is home made, canned or in a powder, can be pretty heavy, since most of the time it’s made with cream and butter. We were able to create a lighter, dairy free version of it thanks, once again, to one of our go-to products, GO Veggie! Vegan Cream Cheese Alternative. It works beautifully here by adding great creaminess to the soup. We used the chive & garlic flavor, which adds a little extra flavor without being overpowering. And because it’s vegan, free of dairy, gluten and cholesterol; and lower in saturated fat and calories than dairy cream cheese, it’s the perfect option for anyone with dietary sensitivities or simply looking to improve their heart or overall health. For more information or to learn where yo can find GO Veggie! products, click here Enjoy!
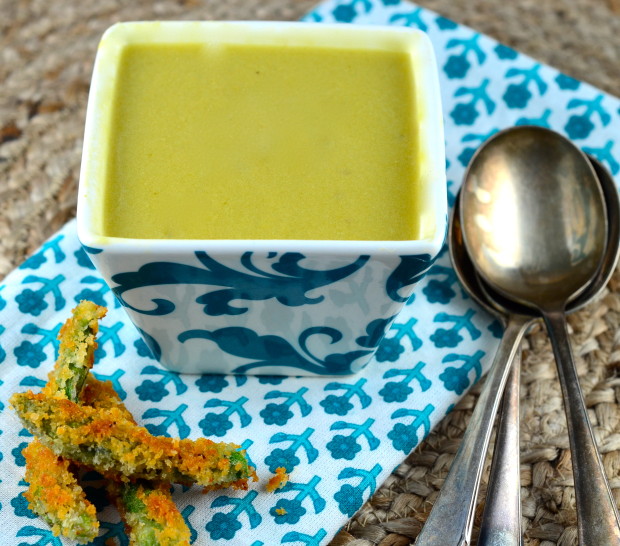


")