
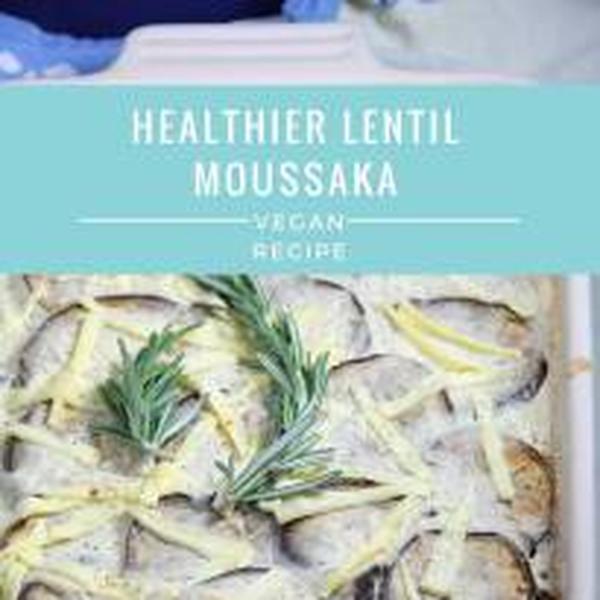
![]()
I’m Natalie Tamara and this is my little space to share the little things I love. Find out more here.
![]()
Subscribe to The Tofu Diaries!
![]()
I’m Natalie Tamara and this is my little space to share the little things I love. Find out more here.
![]()
Subscribe to The Tofu Diaries!

The Spruce / Stephanie Goldfinger
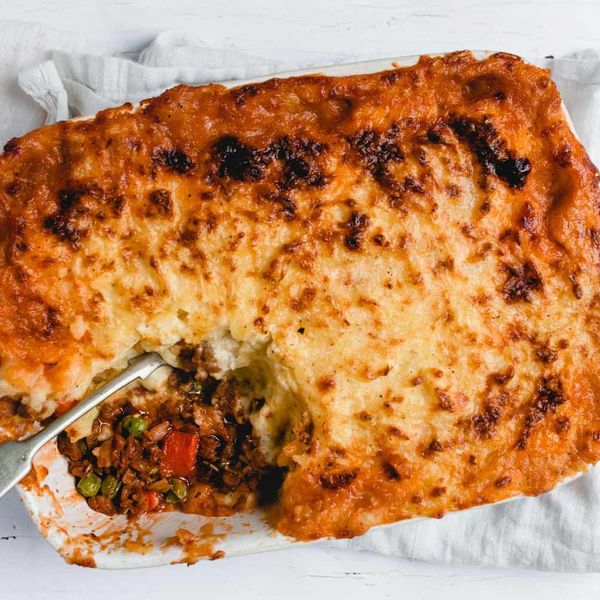
This recipe gives a classic comfort food a plant-based makeover. Shepherd’s pie is a hearty meat-and-potatoes casserole, for which a thick layer of creamy mashed potatoes are baked over a filling of ground lamb or beef, carrots, and peas in a tomato-tinged sauce.
In this version, we swap the ground meat for a plant-based meat alternative. This recipe will work best with one such as, Beyond or Impossible that are sold “raw,” looking similar to ground meat, then sauteed on the stovetop, versus those that are sold pre-cooked. By sautéing the “meat” within the moment, you’re able to incorporate the pie’s flavors, such as thyme and rosemary, more deeply than with a pre-cooked version.
Cook Mode
(Keep screen awake)
For the Mashed Potatoes:
4 cups peeled and 3/4-inch-diced potatoes
4 tablespoons vegan butter or margarine
1/4 cup vegan creamer
1 teaspoon salt
1/8 teaspoon freshly ground black pepper
1/2 cup vegan sour cream
1/4 cup grated vegan Parmesan
For the Filling:
1 tablespoon neutral oil, such as grapeseed oil or avocado oil
1 cup diced onion
1 cup diced carrot
1 pound plant-based meat, such as Beyond or Impossible
1 teaspoon dried thyme
1 teaspoon dried rosemary
2 tablespoons all-purpose flour
2 tablespoons tomato paste
1 tablespoon vegan Worcestershire sauce
1 tablespoon soy sauce
1 cup no-chicken broth
1/2 teaspoon salt
1/4 teaspoon freshly ground black pepper
3/4 cup frozen peas, thawed
Gather the ingredients.
The Spruce / Stephanie Goldfinger
Add potatoes to a large pot of cool water, cover, and bring to a boil over high heat. Once boiling, reduce to medium-low, remove the lid, and simmer until potatoes are fork-tender, about 12 minutes.
The Spruce / Stephanie Goldfinger
Drain potatoes in a colander, then return to the pot and add butter, half and half or creamer, salt, and pepper. Mash until no large lumps remain.
The Spruce / Stephanie Goldfinger
Add sour cream and parmesan, stir thoroughly to incorporate, and set aside.
The Spruce / Stephanie Goldfinger
Gather the ingredients.
The Spruce / Stephanie Goldfinger
Place a large pan over medium-high heat and add oil. Once hot, sauté the onion and carrot until the onion is translucent, about 4 minutes.
The Spruce / Stephanie Goldfinger
Add raw ground “meat,” along with thyme and rosemary, and sauté until browned and cooked through; this may vary depending on the brand, so follow the package instructions. (It will generally not take more than 10 minutes.)
The Spruce / Stephanie Goldfinger
Sprinkle flour over the mixture and sauté for 30 seconds while stirring, until all ingredients are coated.
The Spruce / Stephanie Goldfinger
Add tomato paste, Worcestershire sauce, soy sauce, broth, salt, and pepper, and stir well to combine.
The Spruce / Stephanie Goldfinger
Once boiling, reduce heat to medium-low and simmer for 3 minutes, until the sauce has thickened slightly.
The Spruce / Stephanie Goldfinger
Add frozen peas, mixing them in completely, and remove filling from heat.
The Spruce / Stephanie Goldfinger
Preheat the oven to 375 F. Place the filling mixture in a shallow 9×13-inch baking dish or deep 9×9-inch dish, then spoon the mashed potatoes over the top of the filling.
The Spruce / Stephanie Goldfinger
Spread with a spatula until they are an even layer.
The Spruce / Stephanie Goldfinger
Bake for 30 minutes, until mashed potato crust is lightly golden. For extra browning, once baked, place the pie under the broiler for 1 to 2 minutes.
The Spruce / Stephanie Goldfinger
Do not use glass bakeware when broiling or when a recipe calls to add liquid to a hot pan, as glass may explode. Even if it states oven-safe or heat resistant, tempered glass products can, and do, break occasionally.
For premade casseroles or leftovers that are in a glass baking dish and have been refrigerated, do not place directly into a hot oven as the glass can shatter. Instead, place any cold glass bakeware into a cold oven to warm up while it preheats. Or, allow the bakeware to rest outside of the fridge for 30 minutes to reach room temperature while the oven preheats.
| Nutrition Facts (per serving) | |
|---|---|
| 343 | Calories |
| 15g | Fat |
| 44g | Carbs |
| 11g | Protein |
×
| Nutrition Facts | |
|---|---|
| Servings: 8 | |
| Amount per serving | |
| Calories | 343 |
| % Daily Value* | |
| 15g | 19% |
| Saturated Fat 6g | 28% |
| 4mg | 1% |
| 958mg | 42% |
| 44g | 16% |
| Dietary Fiber 6g | 20% |
| Total Sugars 6g | |
| 11g | |
| Vitamin C 15mg | 76% |
| Calcium 120mg | 9% |
| Iron 3mg | 18% |
| Potassium 809mg | 17% |
| *The % Daily Value (DV) tells you how much a nutrient in a food serving contributes to a daily diet. 2,000 calories a day is used for general nutrition advice. | |
(Nutrition information is calculated using an ingredient database and should be considered an estimate.)
Rate This Recipe
I don’t like this at all.
It’s not the worst.
Sure, this will do.
I’m a fan—would recommend.
Amazing! I love it!
Thanks for your rating!


Ingredients:
Instructions:

Cook Mode
(Keep screen awake)
Original recipe (1X) yields 24 servings
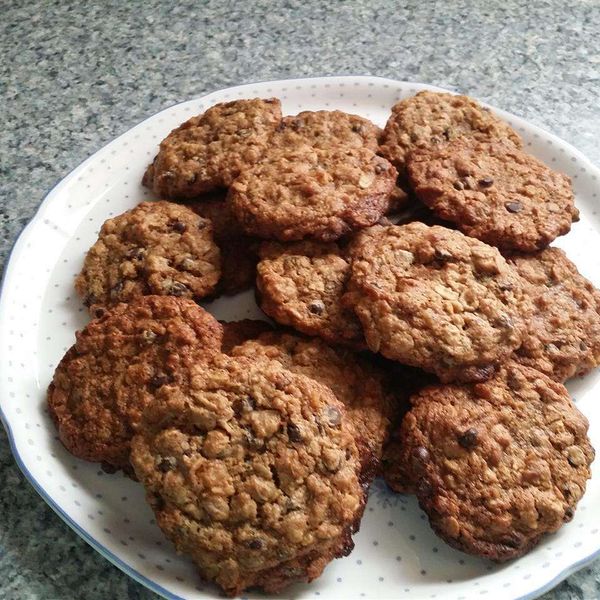
1 cup white sugar
⅓ cup soy milk
⅓ cup peanut butter
2 tablespoons canola oil
1 teaspoon pure vanilla extract
1 cup whole wheat flour
1 cup rolled oats
½ teaspoon baking soda
½ teaspoon salt
½ cup vegan semi-sweet chocolate chips
½ cup walnut pieces
Preheat oven to 425 degrees F (220 degrees C). Oil a large baking sheet.
Stir sugar, soy milk, peanut butter, canola oil, and vanilla extract together with a whisk in a large bowl until completely smooth.
Mix flour, oats, baking soda, and salt in a separate bowl; add to the peanut butter mixture and stir to combine. Fold chocolate chips and walnut pieces into the flour mixture.
Drop your batter by large spoonfuls onto prepared baking sheet.
Bake cookies in preheated oven until browned along the edges, about 10 minutes. Cool cookies on sheet for 10 minutes before removing to a cooling rack to cool completely.
| 137 | Calories |
| 7g | Fat |
| 18g | Carbs |
| 3g | Protein |
| Nutrition Facts | |
|---|---|
|
Servings Per Recipe 24 |
|
|
Calories 137 |
|
| % Daily Value * | |
|
Total Fat 7g |
9% |
|
Saturated Fat 2g |
10% |
|
Sodium 93mg |
4% |
|
Total Carbohydrate 18g |
7% |
|
Dietary Fiber 2g |
8% |
|
Total Sugars 9g |
|
|
Protein 3g |
6% |
|
Calcium 8mg |
1% |
|
Iron 1mg |
3% |
|
Potassium 71mg |
2% |
* Percent Daily Values are based on a 2,000 calorie diet. Your daily values may be higher or lower depending on your calorie needs.
** Nutrient information is not available for all ingredients. Amount is based on available nutrient data.
(-) Information is not currently available for this nutrient. If you are following a medically restrictive diet, please consult your doctor or registered dietitian before preparing this recipe for personal consumption.

by Lauren Hartmann 35 Comments
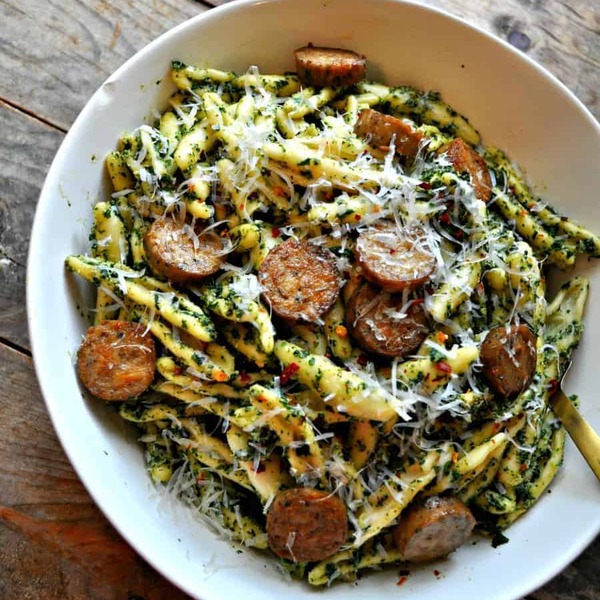
Full of nutrients and flavor!

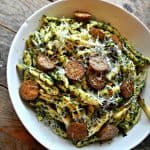
This lightened up version of pesto is definitely not light on flavor! This vegan roasted kale pesto pasta is oil free, vegan of course, and the base is all kale instead of basil giving you those extra health benefits we all need after the holidays. Kale is roasted with a ton of garlic, then blended with nutritional yeast, walnuts, veggie broth, lemon juice and salt and pepper. That’s it. Clean and beautiful!

I think roasting the kale and garlic gives this pesto pasta such a depth of flavor that is beyond compare. It is so simple and easy. You just throw the kale and garlic on a pan to roast as you cook the pasta. Then blend and done. I highly recommend serving this pesto pasta with your favorite vegan sausages.

The combination of roasted kale pesto, and spicy Italian sausage is AMAZING! I literally had to walk away from this pasta to make myself stop eating it. It is so addictive! I can’t stop thinking about it. It haunts my dreams.

This vegan roasted kale pesto pasta will definitely be on rotation this winter. I try to eat a little bit lighter in January, to balance out the 1000’s of vegan Christmas cookies I just ate. Kale has like every vitamin and mineral you need, and I absolutely need all of them right now!
Print Recipe
Roasted garlic and kale pesto tossed with pasta and vegan sausage. Oil free and delicious!
Prep Time 15 minutes
Cook Time 15 minutes
Total Time 30 minutes
Servings 4
Author Lauren Hartmann
Preheat the oven to 375 degrees.
In a large bowl, toss the chopped kale and garlic cloves with the olive oil(or if you want an all oil free option, use veggie broth) and a few pinches of salt and pepper. Rub the olive oil all over the kale and massage it in to make sure the kale is all moist.
Pour the kale and garlic on to a baking sheet and bake at 375 degrees for about 8-10 minutes. The kale should be nice and soft. Remove from the oven when done.
In the meantime, cook the pasta according to package instructions. Drain the pasta when done.
If you are adding vegan sausage, slice and brown on each side in a non stick pan while the pasta is cooking. Set aside.
Once the kale and garlic are done, add them to a blender or a food processor. Then add the nutritional yeast, the 1/4 cup of veggie broth, walnuts, lemon juice, 1/2 tsp. salt and red pepper flakes. Blend until completely smooth, scraping down sides as needed.
Return the pasta to the pot, scoop the pesto into the pot and toss to coat the pasta. Taste and adjust seasoning. Add more salt or pepper if needed. Then add the sliced sausages. Serve with vegan Parmesan on top if desired.
If the pesto is too thick for your liking, add another tablespoon or so of veggie broth.


[…] Vegan Roasted Kale Pesto Pasta […]


A hearty, slightly sweet cornbread with plenty of antioxidants from blue corn.
Ingredients:
Instructions:
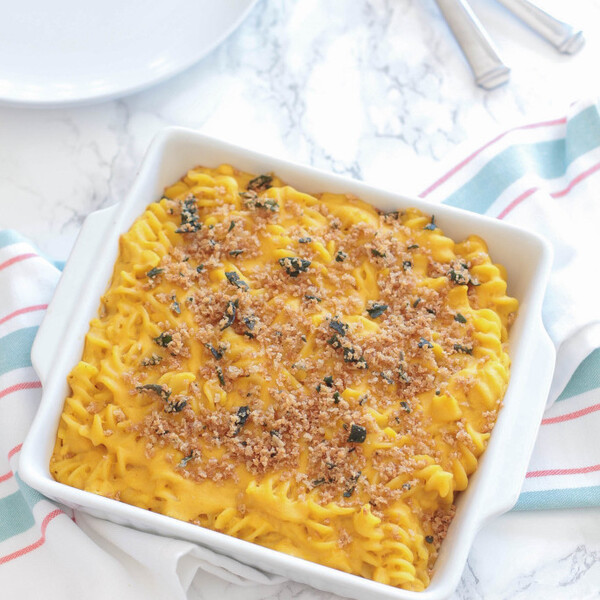

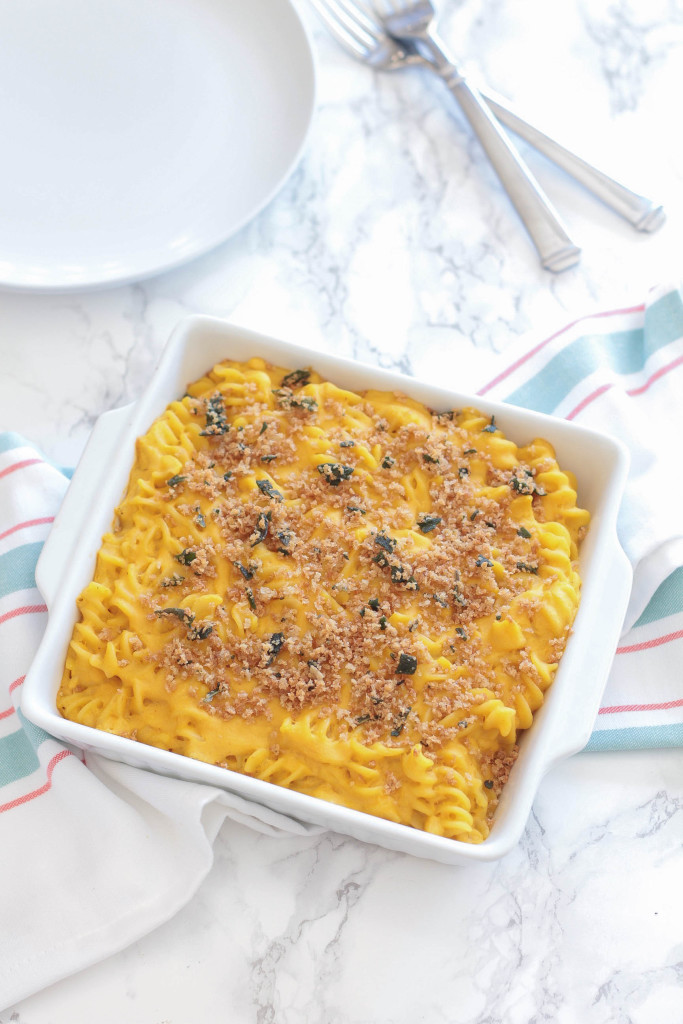
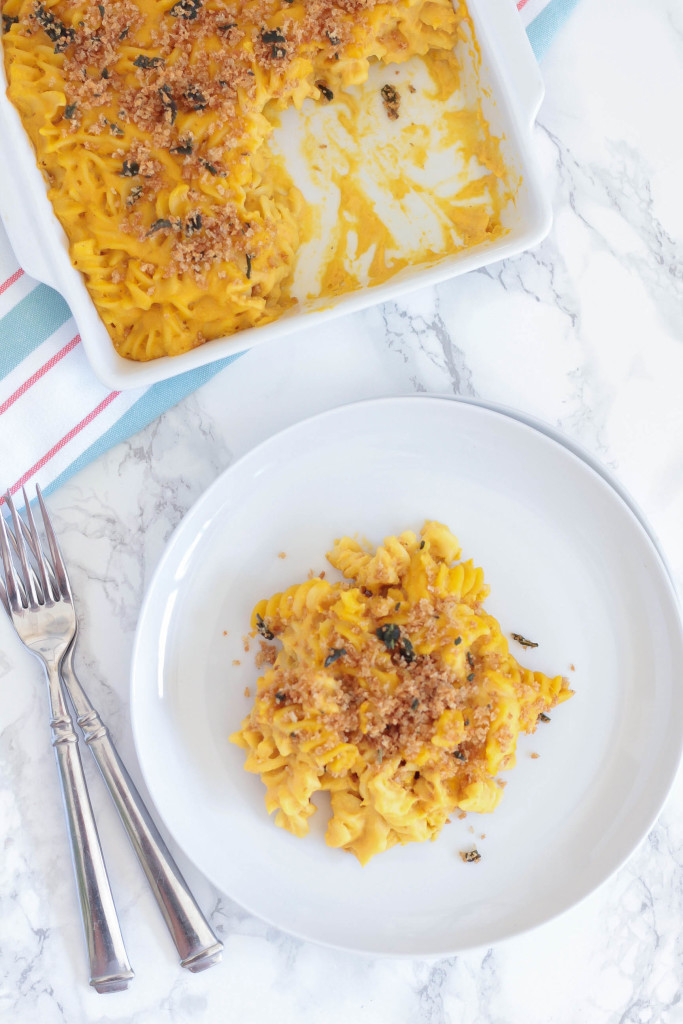
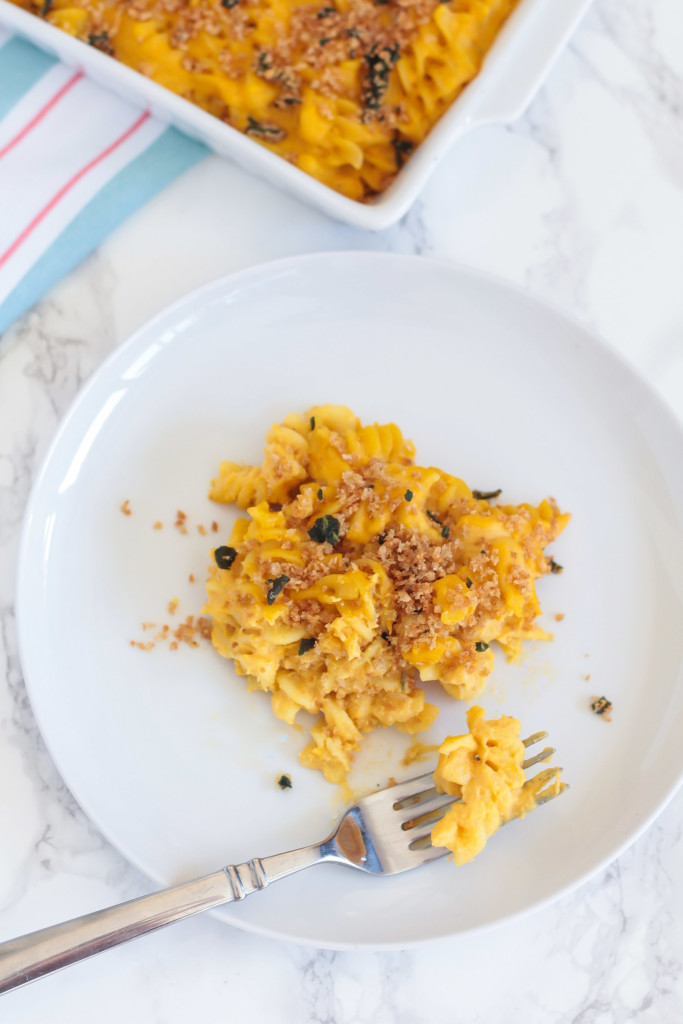
This Vegan Butternut Squash Macaroni and Cheese is made with a velvety butternut squash cashew cheese sauce and topped with crispy sage panko breadcrumbs- it’s crazy good!
 Oh..hello, super rich, insanely creamy, incredibly comforting macaroni and cheese that does not actually contain any cheese or dairy WHATSOEVER. You are officially my new best friend.
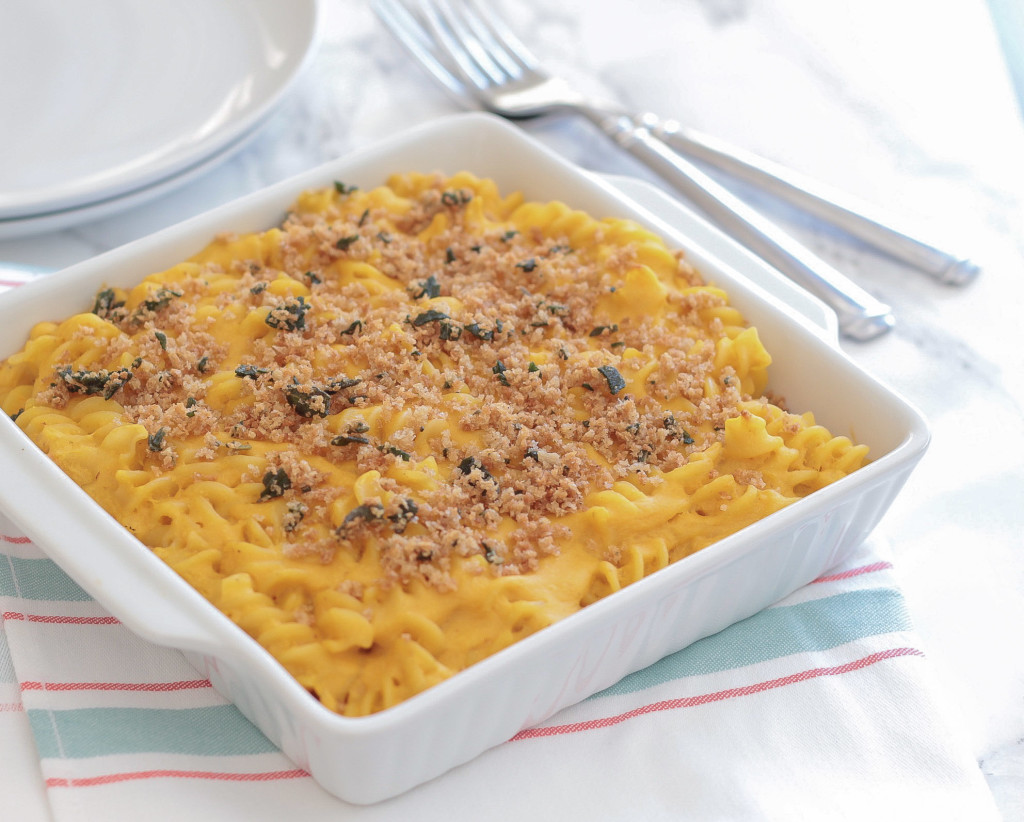 That’s right folks, this Vegan Butternut Squash Macaroni and Cheese is completely dairy free, and it doesn’t rely on a processed alternative cheese product either. Instead, this is a cashew/almond milk bechamel and butternut squash based sauce that achieves dreamy, Velveeta-like proportions (and that I would literally bathe in if it was deemed socially acceptable).
 This is actually a recipe that I’ve posted on the blog before. And it happens to be one of the most popular recipes ever on LPE ever (currently sitting pretty at #2, thankyouverymuch). You can check out that recipe here– it’s great! But because it’s been so well-received I wanted to revisit it, update it with some prettier photos and see where I could make some minor improvements to an already awesome recipe. Here’s what I did differently this time:
 I soaked the cashews for about an hour to help them blend up a bit easier, and I also strained the cashews after blending to remove any solid particles that remained. These two tiny tweaks allow for maximum smoothness factor in the sauce.
I also upped the quantity of nutritional yeast to a whopping three tablespoons. The previous recipe calls for two to three tablespoons, but this time, no wishy-washy-ing. I’m standing firm at three for ultimate cheesy flavor. Trust me, more is better in this case.
 Oh, and let us not forget about the epic-ness of the crispy sage breadcrumb topping, because butternut squash and sage are like two peas in a pod. So are mac and cheese and panko. I didn’t touch this part of the recipe because it’s perfect just the way it is. Adding a little contrast of crunch to soft noodles enrobed in a lusciously silky sauce is ALWAYS a good idea. I advise you never to skip this step lest the quality of your mac and cheese suffer!
 If you make this Vegan Butternut Squash Macaroni and Cheese, share a pic with the hashtag #LePetitEats on Instagram, so we can be vegan mac and cheese buddies forever!

This Vegan Butternut Squash Macaroni and Cheese is made with a velvety butternut squash cashew cheese sauce and topped with crispy sage panko breadcrumbs- it’s crazy good!
Prep Time 15 minutes
Cook Time 1 hour
Total Time 1 hour 15 minutes
Servings 4
Calories 700 kcal
Author Denisse
Preheat oven to 375 degrees. Boil pasta in a pot of salted water until al dente. Drain and set aside.
Place squash in a steamer basket set over boiling water and cover. Cook for about 15-20 minutes or until easily pierced with a fork. Remove from heat and allow to cool slightly, then transfer to a high speed blender or food processor and puree until completely smooth. If any lumps remain, pass through a fine mesh sieve. Set aside.
Blend cashews and ½ cup of almond milk in a food processor or high speed blender until completely smooth. Pass mixture through a fine mesh sieve to remove any solids. Melt 2 tablespoons Earth Balance in a medium saucepan and add flour. Cook over medium heat, stirring often, until flour is cooked through and mixture has turned golden brown, about 3 minutes. Gradually add the remaining cup of almond milk to saucepan, along with salt, nutritional yeast, nutmeg, ground mustard and cayenne. Stir to combine and cook until mixture has thickened, about 3-5 minutes.
Fold in reserved butternut squash puree and stir until incorporated. Add pasta to pot and combine with sauce. Spoon into greased individual ramekins or a 9×9 inch baking dish.
To make the panko sage breadcrumbs, melt 1 tablespoon of Earth Balance in a small skillet over medium-low heat. Add sage and smashed garlic, cooking until sage is crisp on both sides, about 1-2 minutes. Remove sage leaves and drain on paper towels. Add panko to skillet and stir to combine. Cook until breadcrumbs are golden and toasted, about 3 minutes. Season with salt and crumble sage leaves back into pan. Discard garlic and sprinkle over macaroni. Bake for about 20 minutes.
Leftovers should be stored in the fridge in an airtight container. It keeps for 4 days.

This post may contain affiliate links. As an Amazon Associate, I earn from qualifying purchases. Please read my disclosure.
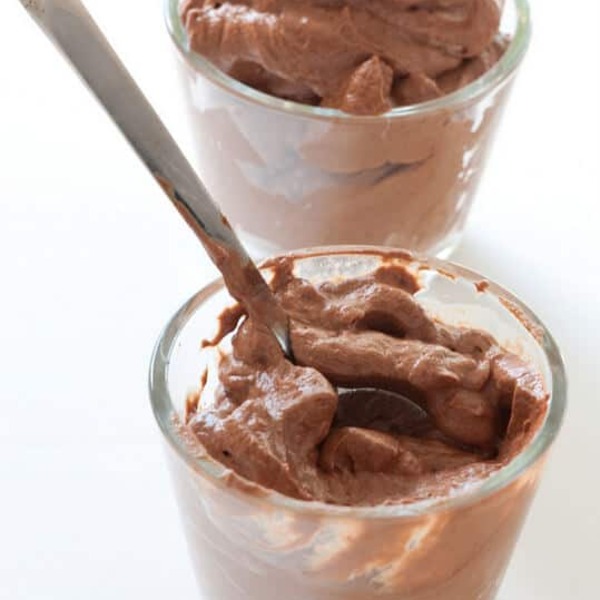
This rich, decadent, silky Tofu Chocolate Mousse is the perfect dessert. Made with silken tofu, bananas, tahini, cocoa powder, and maple syrup, it’s healthy, chocolatey, and so easy to make!
I love creating new recipes with a few, simple ingredients I keep on hand. There’s nothing like a mouthwatering vegan chocolate mousse to boost your mood!
Traditional chocolate mousse is packed with refined sugar and way too complicated! That’s why I created this decadent but easy tofu mousse. You can’t even tell this vegan chocolate treat is packed with nutrients.
It’s a super easy AND super healthy low-sugar dessert. It’s velvety, nutty and rich in chocolate flavor.
Tahini is the secret ingredient. Tahini is a condiment made from sesame seeds that have been soaked and crushed. It has a high concentration of healthy oils, and it’s filled with heart-healthy omega-3s. It gives the mousse a rich, nutty consistency that goes well with the cocoa powder!
Plus, for this sugar-free chocolate mousse, you don’t need any added sugar! The natural sweetness from the banana, plus a touch of maple syrup is all you need.
This healthy chocolate mouse is 100% raw, natural, refined sugar-free, gluten-free, vegan and totally delicious!
Silken tofu chocolate mousse requires five simple ingredients found at your local grocery store. For nutritional information and the full ingredients list / recipe method, see the recipe card below.
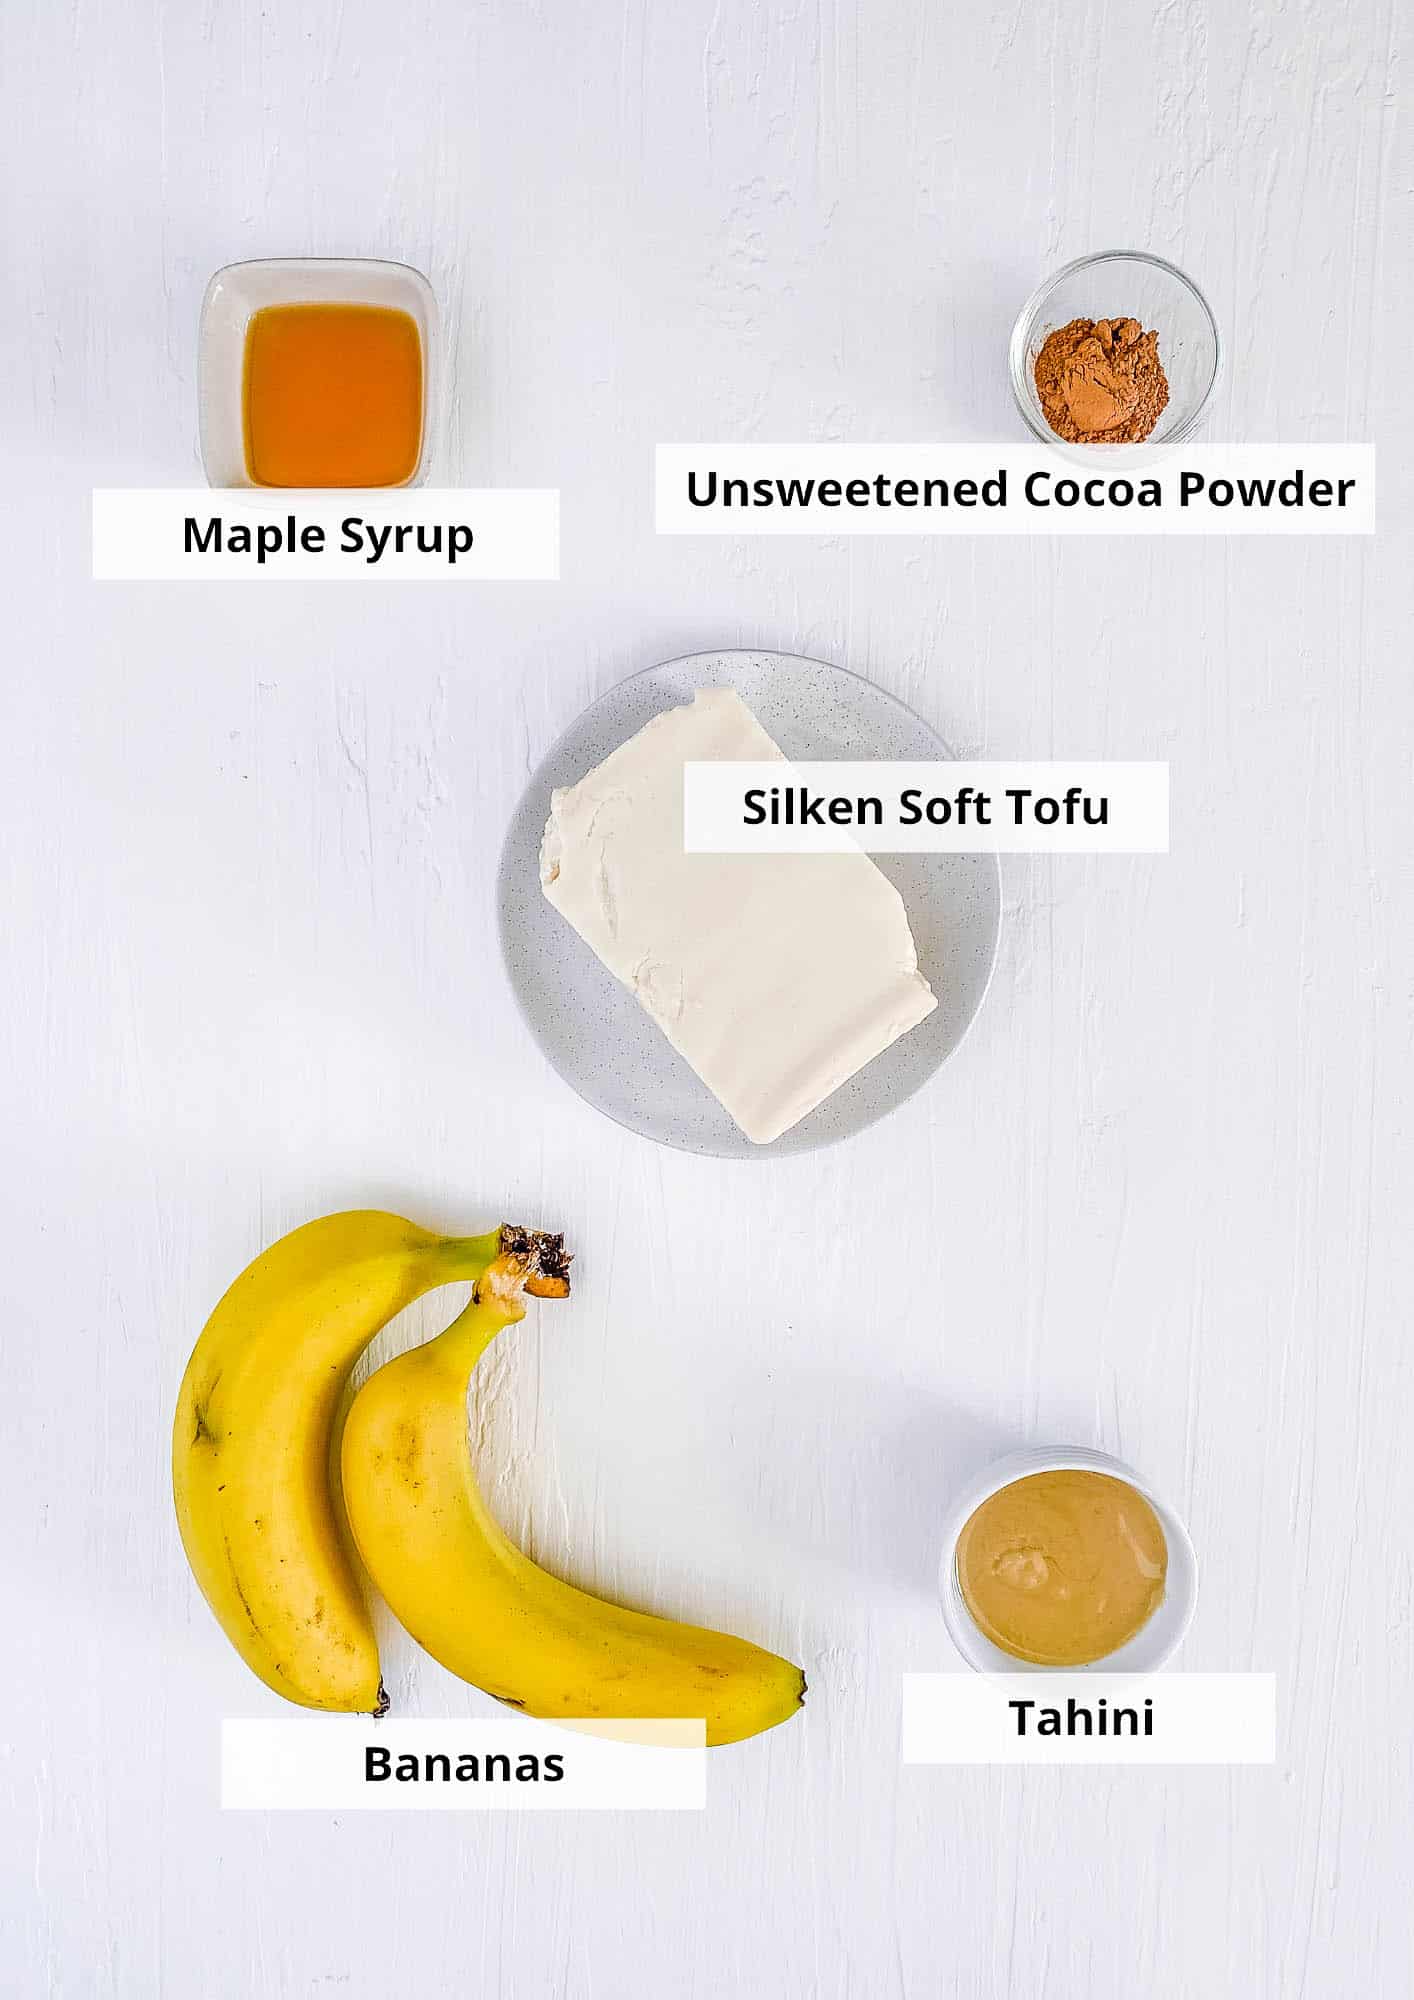
Tofu: Soft silken tofu is the perfect base for this indulgent vegan chocolate mousse. Make sure you buy silken tofu and not extra firm or firm tofu! I like using organic tofu whenever it’s available since non organic soy is typically GMO.
Bananas: The bananas along with the tofu make the creamy base! The bananas are a key ingredient in this easy vegan chocolate mousse, so don’t substitute them if possible – the riper, the better! They give this raw chocolate mousse a creamy texture and natural sweetness.
Tahini: To ensure your mousse is velvety and smooth, add in some tahini. It’s usually found in the condiment aisle or near the ethnic foods.
Cocoa Powder: This provides all the rich dark chocolate flavor. For an intense chocolate flavor, use Dutch cocoa powder.
Sweetener: I recommend using a touch of maple syrup to add just a bit more sweetness to this vegan chocolate pudding. Agave, honey, coconut sugar, white sugar, or liquid stevia are great options too.
Here are a few simple ways to customize this decadent dessert.
This vegan tofu chocolate mousse recipe is a breeze to make!
Blend Ingredients: Place the soft tofu, bananas, tahini, cocoa powder, and maple syrup into a blender. Blend the tofu mixture until smooth. A large food processor will also work.
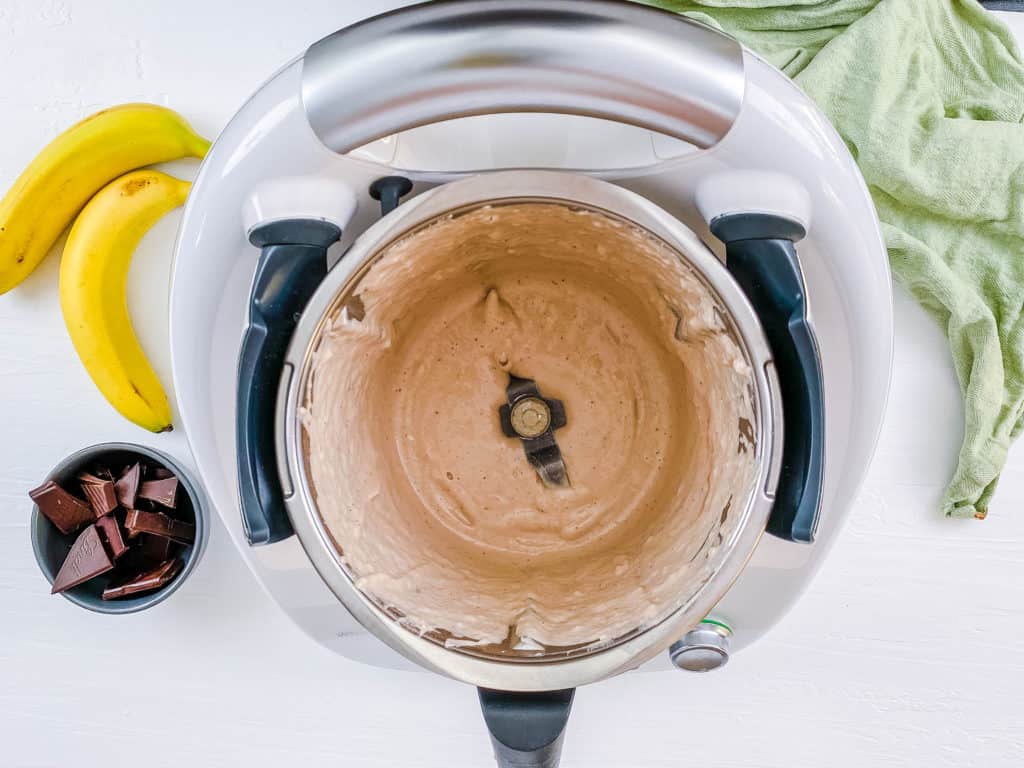
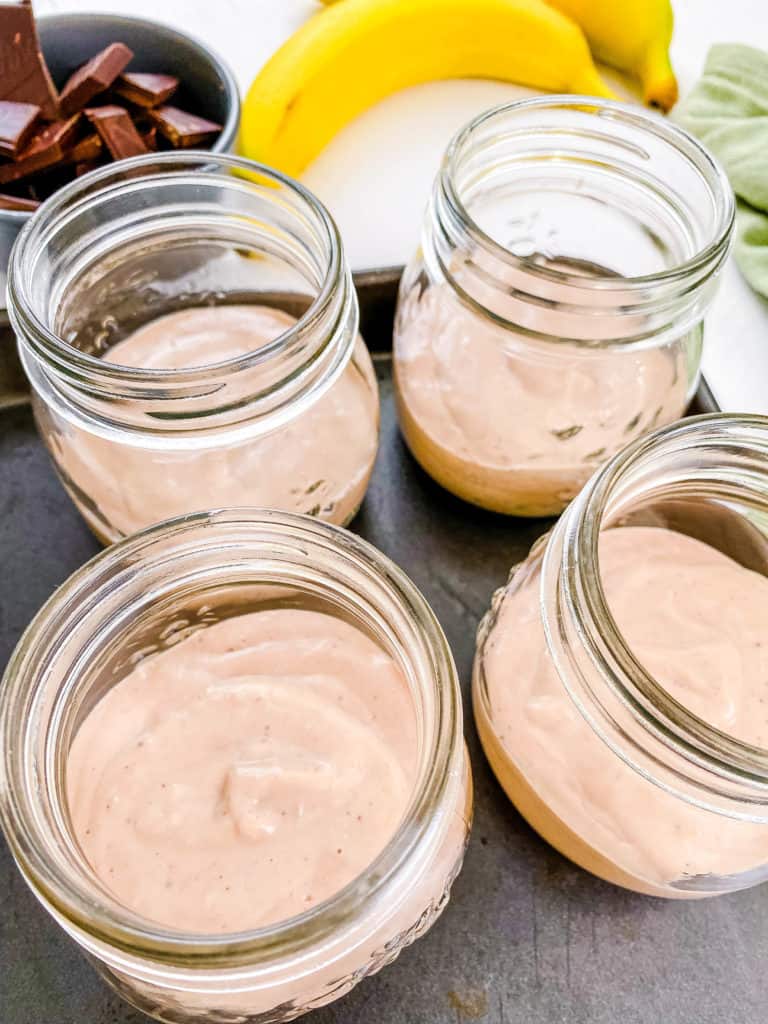
Transfer Mousse: Spoon the chocolate tofu mousse into individual cups or ramekins.
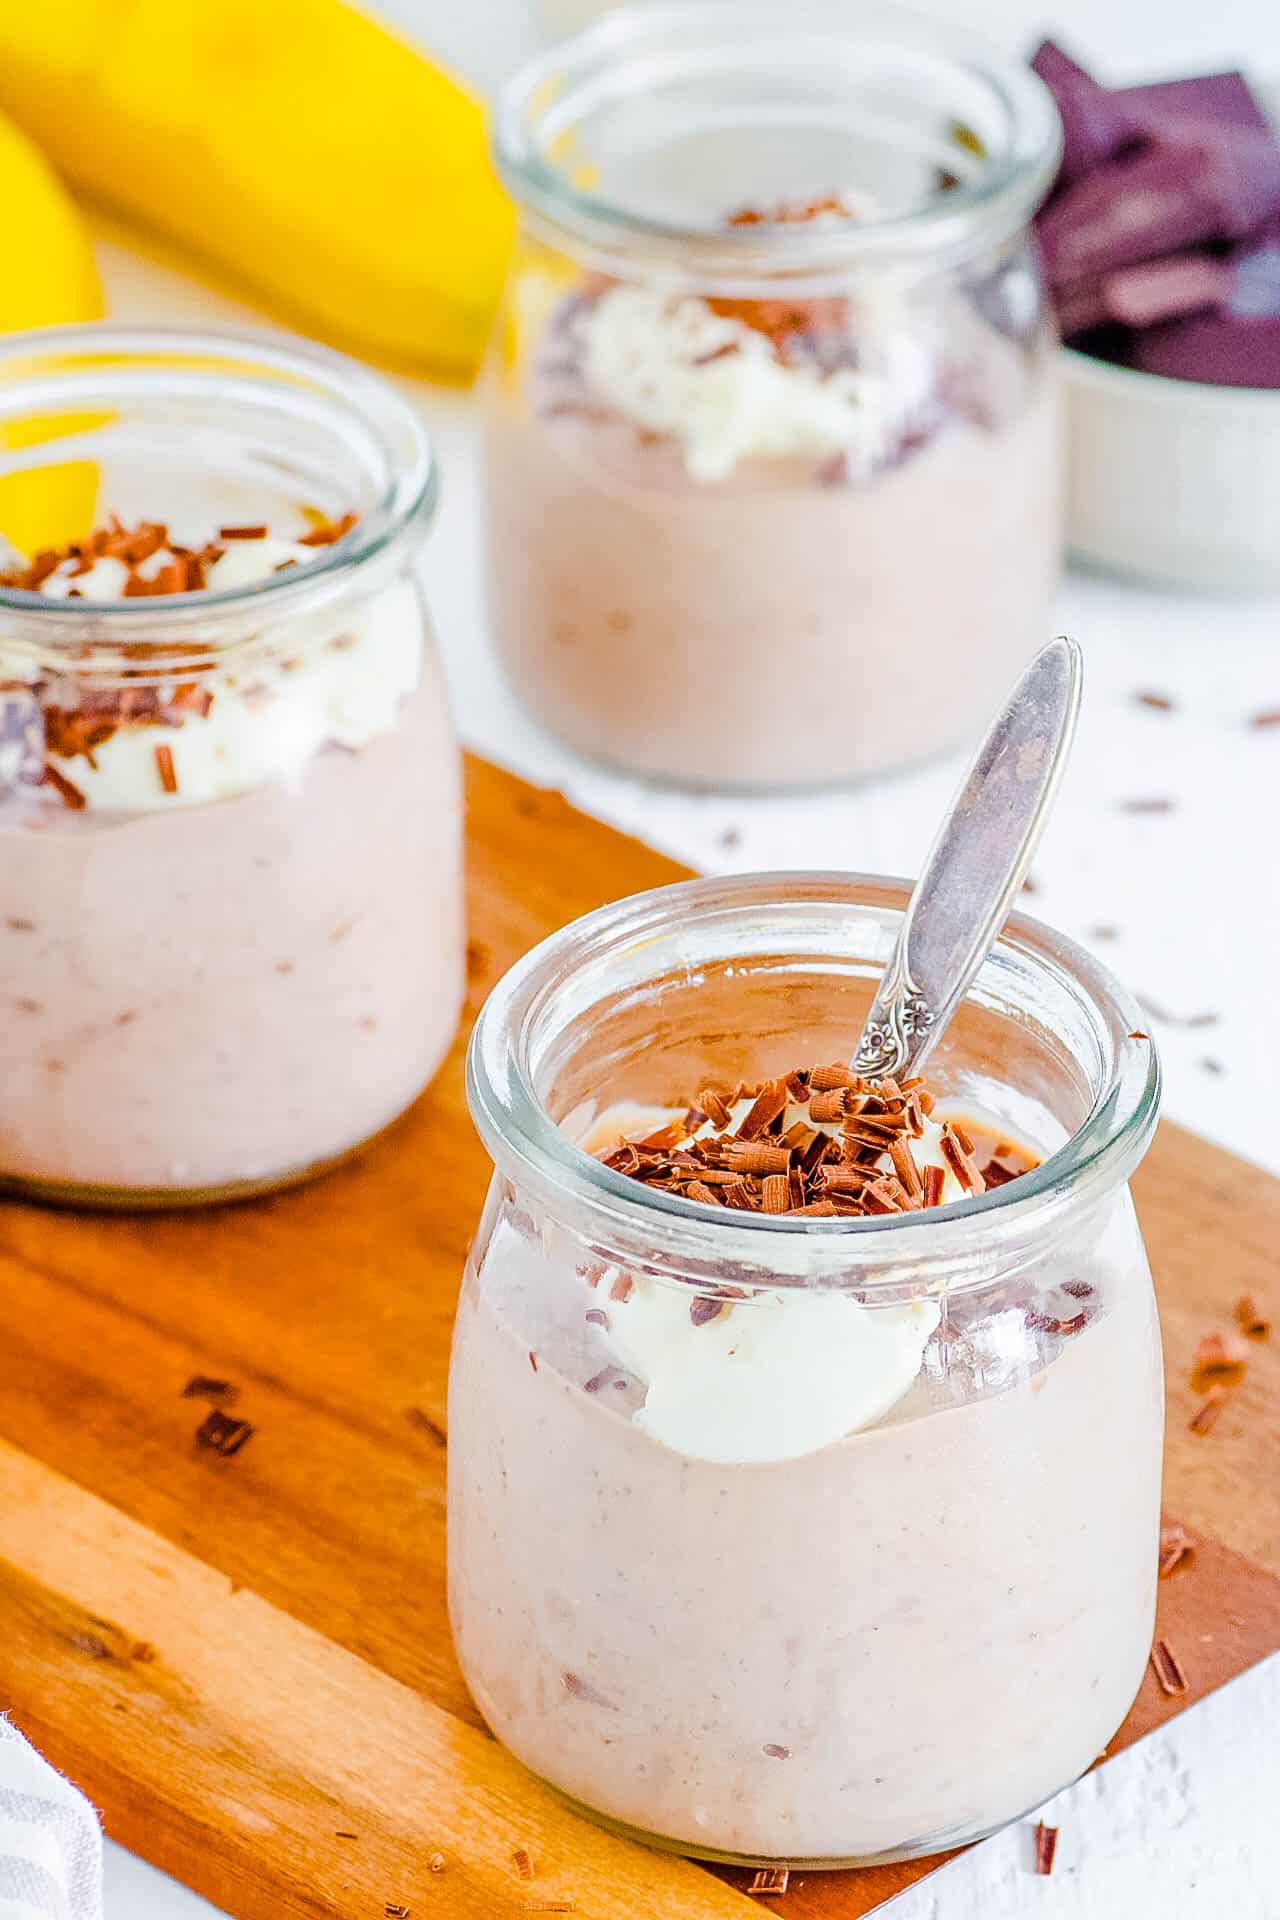
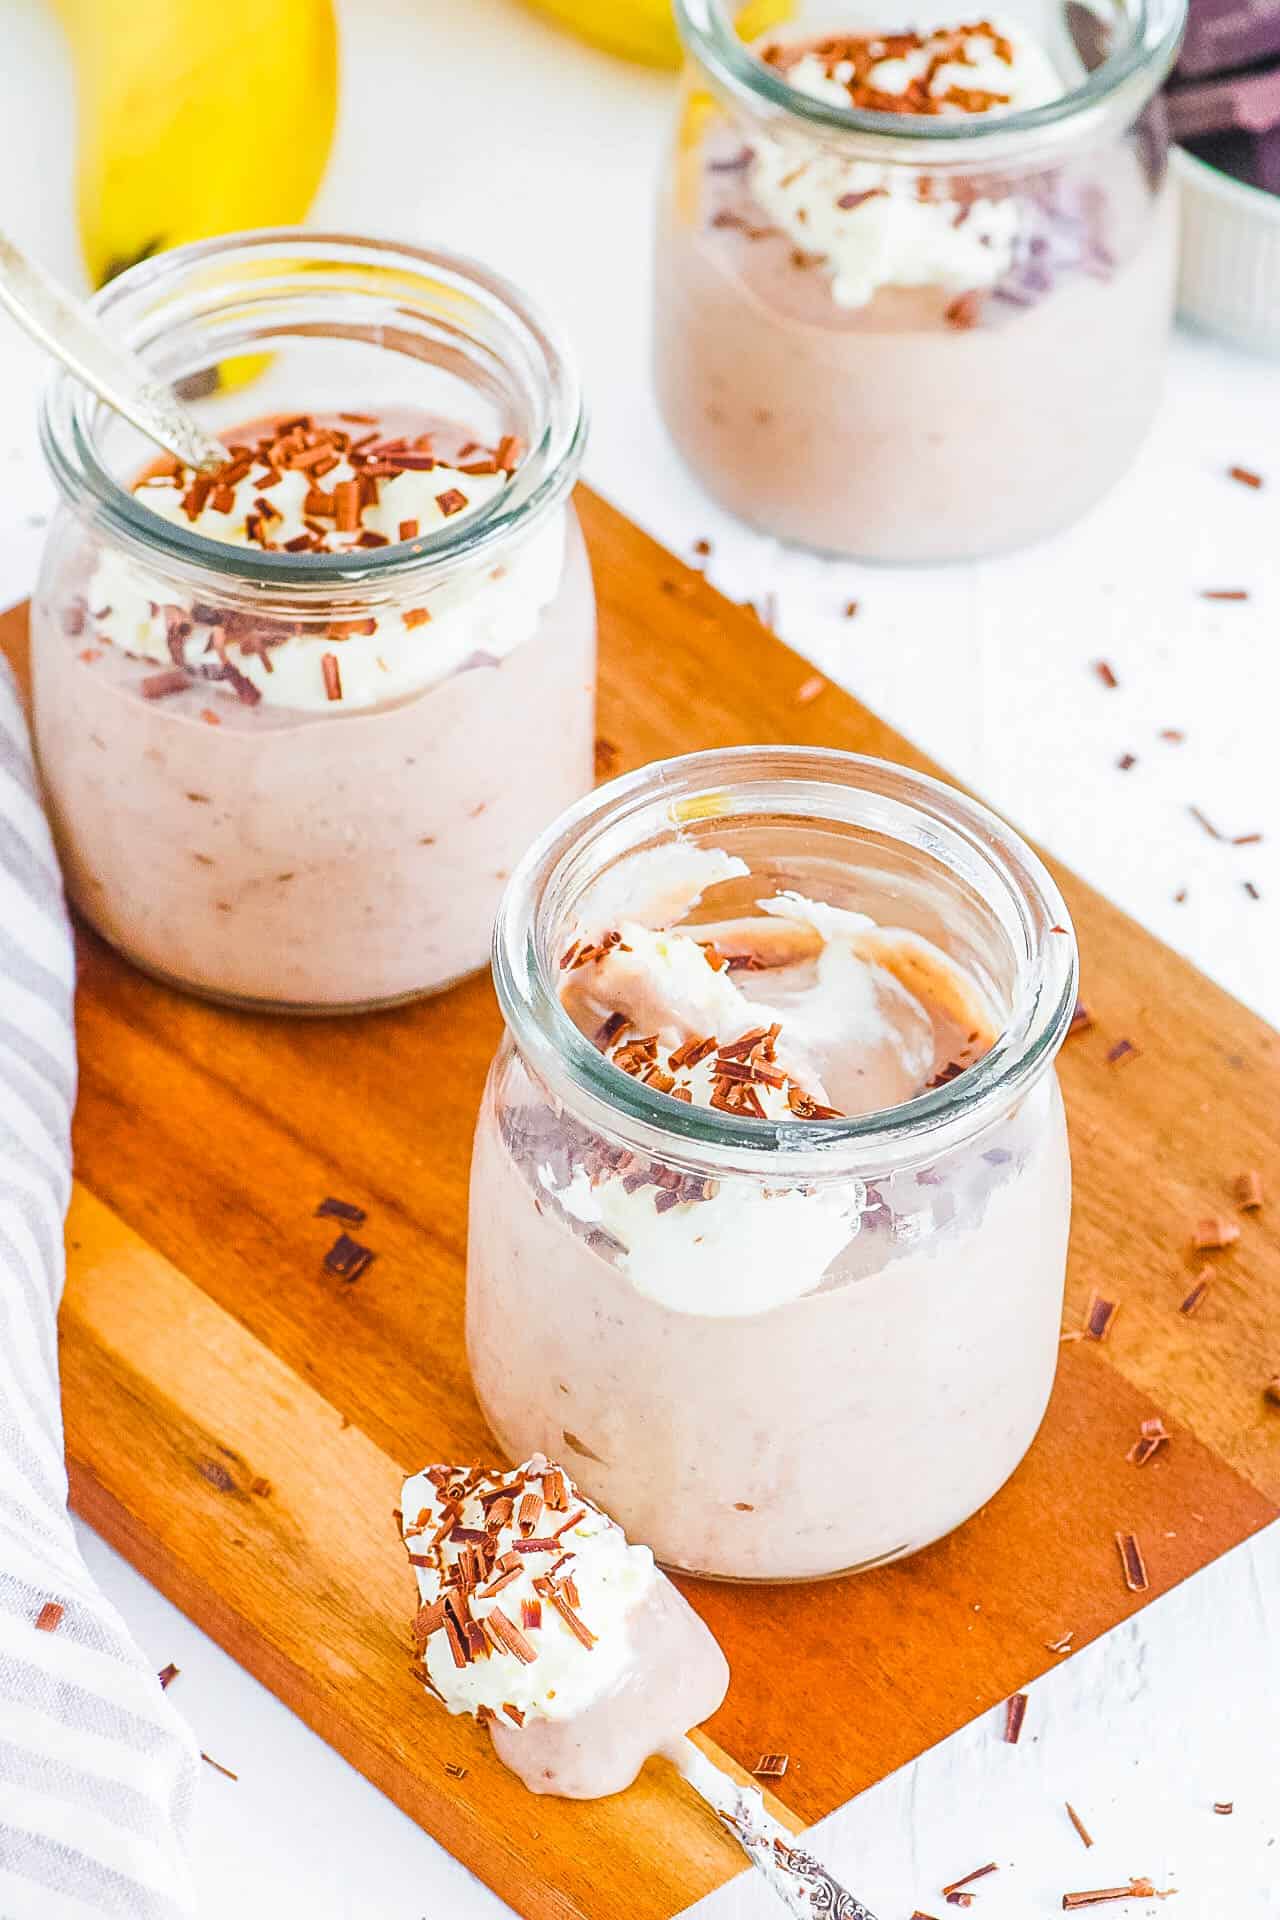
Refrigerate: Refrigerate for around 3 hours, or overnight. Top with a few dark chocolate shavings, fresh raspberries, or coconut whipped cream, and enjoy!
What is vegan mousse made of?
Vegan mousse can be made of silken tofu, avocado, or whipped coconut cream. All of these ingredients have a creamy mousse-like texture. It is then mixed with cocoa powder and a sweetener. This tofu chocolate mousse recipe is made with silken tofu, bananas, and maple syrup!
How should I store vegan chocolate mousse with silken tofu?
Store the vegan mousse in the refrigerator for up to 3 days. Cover with plastic wrap and keep away from other foods that have strong odors, or store in an airtight container.
Is silken tofu mousse healthy?
Yes! This is a much healthier way to enjoy a chocolate treat without all the added calories and fat. Here’s why this recipe is so good for you:
Refined Sugar-Free: So many mousse recipes are LOADED with processed and refined sugars. Using maple syrup and bananas is the perfect way to add sweetness without adding refined sugar.
Low Calorie: One serving of this chocolate dessert is only 115 calories!
Protein and Fiber: This mousse does provide you with some valuable protein and fiber. 4 grams of protein and 1.8 grams of fiber per serving.
This rich, decadent, silky Vegan Chocolate Mousse is the perfect dessert. Made with silken tofu, bananas, tahini, cocoa powder, and maple syrup this mousse is healthy, chocolatey, and so easy to make!
Prep Time5 minutes
Chill3 hours
Total Time5 minutes
Course: Dessert
Cuisine: American, Vegan
Diet: Gluten Free, Low Calorie, Low Lactose, Vegan, Vegetarian
Servings: 6 servings
Calories: 115kcal
Shop Ingredients on Jupiter
Blend all ingredients in a blender until smooth. Taste and adjust sweetness as needed. If using chia seeds, they can be added to the mixture before or after blending.
Refrigerate for around 3 hours, ideally overnight.
Healthy Chocolate Mousse Variations
Tips For Making Vegan Chocolate Mousse
Calories: 115kcal | Carbohydrates: 16g | Protein: 4g | Fat: 4.6g | Saturated Fat: 0.5g | Sodium: 4.1mg | Fiber: 1.8g | Sugar: 9.4g
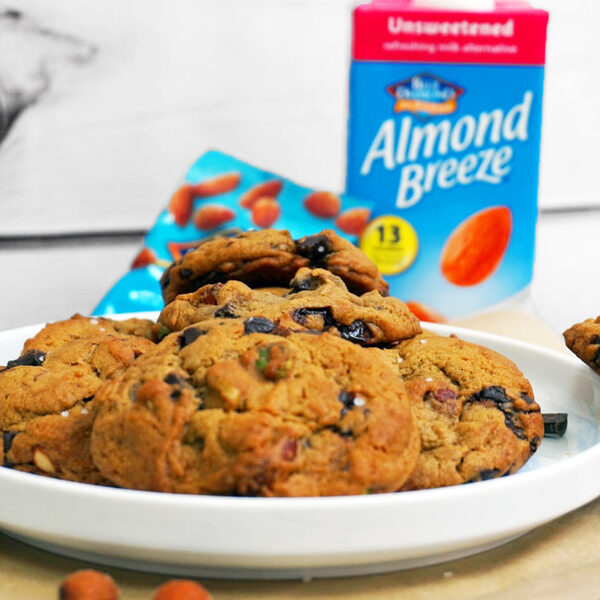

Warm. Chocolatey. Nutty. Slightly gooey in the middle. Firm on the outside. Big statement: these vegan chocolate chip pistachio cookies are the next best thing on my blog. Beside my pecan carrot cake banana bread, that is.

These vegan cookies contain no chickpeas, no chia seeds, no flax seed, no ground almonds and no other egg replacement. So how can a vegan cookie taste just like a regular chocolate chip cookie, you may ask? Simply because I’ve simply traditional cookie ingredients for vegan friendly ones. Of course, I’ve made a few other adjustments (such as using coconut sugar to make it a little healthier), but other than that, it’s your bog standard (and totally delicious) chocolate chip cookie recipe!

Believe it or not, other than my Paleo Pumpkin Spiced Macadamia Cookies and my Healthy Cookie Brownie Skillet recipe, this is my first chocolate chip cook recipe to make it to my blog. Crazy, huh? So when I was thinking about my first chocolate chip cookie recipe, I wanted it to be special. I wanted to combine all of my favourite ingredients together and to create my favourite cookie texture: gooey in the middle and slightly crispy on the outside. And guess what? This recipe does just that!

Whilst most traditional cookie recipes call for whole milk, I switched this out and instead, used my all-time-favourite Blue Diamond Unsweetened Almond Breeze – a product I’ve been buying for almost two years now. Not only is it very reasonably priced compared to other brands out there, it also only contains 13 calories per 100ml (great for macro counting) and is made with no added sugars. Bingo. I personally love both Almond Breeze flavours from Blue Diamond – unsweetened and original – however, this recipe calls for their unsweetened milk and it works perfectly against the sweet coconut sugar.

As for the taste of the cookies… they have to be one of my favourite flavour combinations in a long time. These vegan cookies are:
To create the perfect cookie, however, I do have one secret. Freeze the dough for half an hour before baking. Do it and thank me later. You see, by freezing the dough beforehand, you’re solidifying the fat in the cookies. As the cookies bake, the fat in the chilled cookie dough takes longer to melt than room-temperature fat and therefore, the longer the fat remains solid, the less the cookies spread. This way, you end up with fatter bakery-style cookies that in my

I’ve tried, tested and tasted this recipe a fair few times and every time it comes out just as good – if not better. It’s a recipe that both vegans and meat eaters will love. Trust me. These cookies are easy to make (only one bowl needed), contain basic ingredients and are hands down, one of my favourite cookie recipes to date. Give them a go!

Begin by preheating your oven to 180° (gas mark 4).
In a bowl, add together the coconut sugar and almond milk and stir. Add the butter, sea salt and vanilla extract and stir until the butter has fully combined itself with the rest of the ingredients.
Slowly add the flour and baking soda – stirring as you go. Once added, fold the chocolate chunks and nuts into the mix. Pop the mix into the freezer for half an hour to chill.
Remove from the oven and cover a baking tray with parchment paper. Using an ice-cream scoop, scoop the cookie dough mixture onto the baking tray – scoop by scoop. Do not flatten the cookie balls.
Once you’ve used up all of the mixture, place the cookies in the oven to bake for 10-11 minutes.
Once baked, remove from the oven and leave to cool. Whilst cooling, your cookies will also harden up. Do not touch.
Once the cookies are cool, serve or simply store in an air-tight container. For freshness, these cookies will only last a couple of days.


Recipe courtesy of Old El Paso
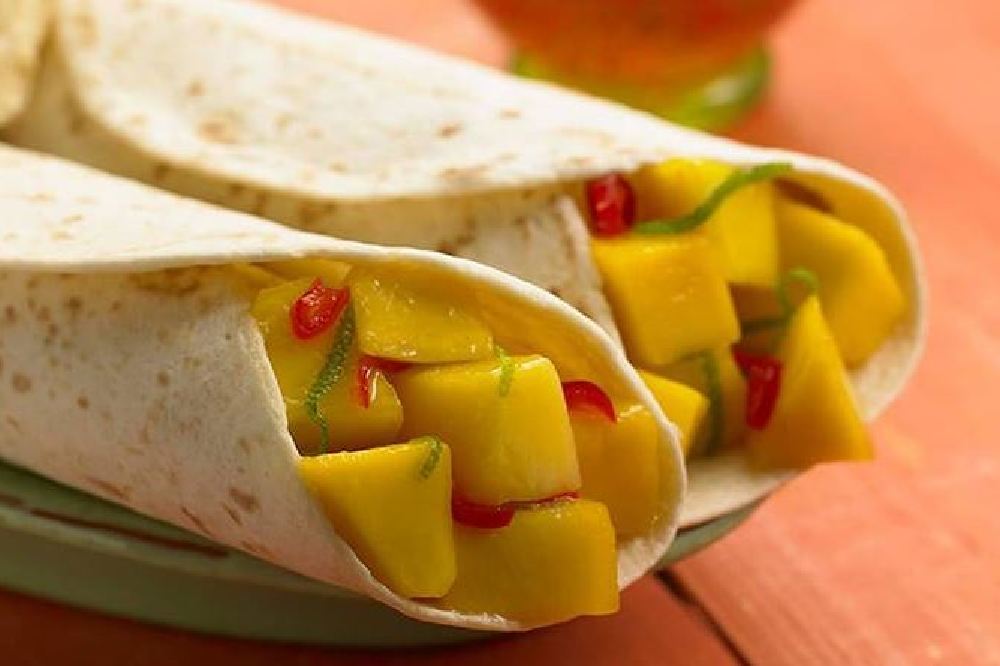
Gluten Free and vegan sweet mango fajitas