Author: PatagoniaLlami

  • Soft Pretzel Bites {Vegan}

    Soft Pretzel Bites {Vegan}

    recipe image

    full shot

    Author Veg Life Staff

    Ingredients

    • For the dough:
    • ¼ C plus 3 Tbl Warm Water
    • ¾ tsp Brown Sugar
    • ¼ Pkg of Dry Yeast
    • 1 Tbl Vegan Butter such as Earth Balance, melted
    • 1-1/8 C All-Purpose Flour
    • ¼ tsp Salt
    • Water Bath:
    • 4 C Water
    • 1/8 C of Baking Soda
    • Almond Milk to use in place of egg wash
    • Coarse Sea Salt

    Instructions

    • In the bowl of an electric mixer fitted with a dough hook, combine the warm water and brown sugar. Sprinkle the yeast on top and let stand for 5 minutes. The yeast should look frothy. Then add the melted butter, flour and salt. Mix on low speed until combined. Increase speed to medium for 3-4 minutes until the dough becomes pliable. Remove the dough, lightly grease the bowl and return the dough to the bowl. Cover and let rise in a warm place until doubled in size, about an hour.

    • Preheat oven to 425 degrees. On a lightly floured surface, divide the dough into 2 pieces and roll into a long rope. Cut into 1 inch pieces and roll into rounds to create the pretzel bites.

    • If doubling this recipe, cover the cut pieces with a cloth to avoid drying out while finishing the rest of the dough.

    • In a large pot, bring 4 cups of water to a boil. Add baking soda. Boil pretzels in small batches for 30 seconds. Remove with a spider or slotted spoon and place on a baking sheet.

    • Repeat until all have been boiled. Using a very sharp knife or bakers blade, crisscross a slit in the top of each pretzel bite. Brush tops with the almond milk and sprinkle with the coarse sea salt.

    • Bake for 13-15 minutes or until golden brown. Cool slightly and serve warm with our sweet Traditional Honey Mustard or tangy Raspberry Honey Mustard Pretzel Dip!

    • Makes approximately 30 bites. This recipe easily doubles.

    [bha size=’234×60′ variation=’05’ align=’aligncenter’]

    Read More

  • Vegan Chocolate Banana Muffins

    Vegan Chocolate Banana Muffins

    recipe image

    Krzysztof Krysiak / EyeEm / Getty Images

    If you only use your overripe bananas for banana bread, next time you have browning bananas, consider these vegan chocolate banana muffins. You won’t be sorry!

    Chocolate banana muffins are a versatile treat. They are perfect for a decadent brunch item, a tasty on-the-go snack, or even a sweet treat at dessert time. This recipe for vegan chocolate banana muffins calls for oatmeal and bananas. These are great muffins and perfect for vegan (or non-vegan) eaters alike.

    This recipe makes about 20 muffins. Make sure you have enough muffin tins before you start, otherwise you’ll be making a lot of batches of muffins.


    Cook Mode
    (Keep screen awake)

    • 1 1/4 cups flour
    • 1 cup oatmeal
    • 1/2 cup brown sugar (firmly packed)
    • 1/3 cup cocoa
    • 1 tablespoon baking powder
    • 1/4 teaspoon baking soda
    • 2 to 3 ripe bananas (mashed)
    • 1/2 cup soy milk
    • 1/3 cup vegan margarine (melted)
    • 1 teaspoon vanilla extract
    1. Gather the ingredients.

    2. Preheat oven to 400 F and line or grease a muffin pan.

    3. In a large bowl, combine the flour, oatmeal, brown sugar, cocoa, baking powder, and baking soda.

    4. In a separate bowl, whisk together the bananas, soy milk, vegan margarine, and vanilla.

    5. Combine with the dry ingredients and stir just until the ingredients are combined.

    6. Fill each muffin about 2/3 full with batter. Bake for 20 to 25 minutes, or until an inserted toothpick comes out clean.

    7. Let the muffins cool before removing the muffins from the muffin tin.

    8. Enjoy!

    Recipe Variations

    There are a number of ways to alter this recipe including:

    • If you would prefer to make mini muffins, use a mini muffin tin and reduce the baking time just slightly. Once the toothpick comes out clean, the mini muffins are ready.
    • You can also make a chocolate banana bread or loaf. Simply grease a loaf pan and follow the same recipe. You’ll need to increase the baking time up to about an hour, but use the toothpick test to check doneness. Slice and serve plain, with fruit, or vegan whipped cream.
    • If you like to add texture to your muffins (or bread), there are a wide variety of options. Add crushed walnuts, toasted coconut, raisins, or even vegan chocolate chips to the batter. You could also just sprinkle these toppings on top of the muffins just prior to baking.
    • For a fancier presentation, dust the top of the cooled muffins with powdered sugar.

    Tip

    • The muffins can be kept on a plate on the countertop for a day or two. Any longer than that, wrap them in plastic wrap or seal in a container and store them in the refrigerator.
    • Leftover muffins can also be stored in a zip-top bag and frozen for a quick grab-and-go breakfast or treat anytime. Defrost them on the counter or warm in the oven or microwave.
    Nutrition Facts (per serving)
    102 Calories
    3g Fat
    19g Carbs
    1g Protein

    ×

    Nutrition Facts
    Servings: 20
    Amount per serving
    Calories 102
    % Daily Value*
    3g 4%
    Saturated Fat 1g 3%
    0mg 0%
    206mg 9%
    19g 7%
    Dietary Fiber 1g 5%
    1g
    Calcium 67mg 5%
    *The % Daily Value (DV) tells you how much a nutrient in a food serving contributes to a daily diet. 2,000 calories a day is used for general nutrition advice.

    (Nutrition information is calculated using an ingredient database and should be considered an estimate.)

    Rate This Recipe

    I don’t like this at all.
    It’s not the worst.
    Sure, this will do.
    I’m a fan—would recommend.
    Amazing! I love it!
    Thanks for your rating!

    Read More

  • Street Style Vegan Gyros

    Street Style Vegan Gyros

    recipe image
    These street style delicious gyros are an easy win for the big game. Get messy and dig in!

    Ingredients:

    • 2, 15oz cans of chickpeas
    • 1 heaping tbsp of garlic powder
    • 1 heaping tbsp of onion powder
    • 2 tbsp taco seasoning
    • salt/pepper to taste
    • 2 tsp extra virgin olive oil
    • 2 beefy tomatoes, quartered
    • 2-3 cups romaine lettuce
    • 1 red onion sliced
    • 2-3 tbsp Super Easy Vegan Tzatziki Sauce
    • handful of black olives (optional)
    • handful of sliced cucumbers (optional)

    Instructions:

    1. Preheat oven to 350F and line baking sheet with parchment paper.
    2. Drain and rinse chickpeas. Roll them out onto prepared baking dish and pat them dry with a paper towel.
    3. Add oil and seasonings. Using a spatula, fork, or spoon, roll them around until evenly coated.
    4. Bake for 20 minutes.
    5. Grab a pita and generously put 2-3 tbsp of the Super Easy Vegan Tzatziki Sauce on one side. Take a large spoonful of the roasted chickpeas and place them on top of the sauce.
    6. Pile on all suggested toppings, lettuce, tomatoes, onion, olives, cucumbers, and a dash more of salt/pepper if desired.
    7. Fold pita and proceed to shovel the gyro into your mouth.
    8. Repeat this for each gyro…Enjoy!

    Read More

  • Vegan Bruschetta and Arugula Flatbread Pizza with a Balsamic Glaze

    Vegan Bruschetta and Arugula Flatbread Pizza with a Balsamic Glaze

    recipe image

    posted on October 11, 2018

    Vegan Bruschetta and Arugula Flatbread Pizza with a Balsamic glaze - Delicious easy recipe with immense flavor. Enjoy this homemade flatbread pizza using fresh bruschetta, arugula, vegan cheese, and a sweet balsamic glaze. NeuroticMommy.com #veganpizza

    Ahhh, this fall season is giving me all the freakin’ feels! Now that the 80 degree hot, humid weather seems to be letting up, I can whip out my boots and retire the flip flops till next year. Speaking of next year, it’s literally only like 3 months away. Can’t. Even. Deal.

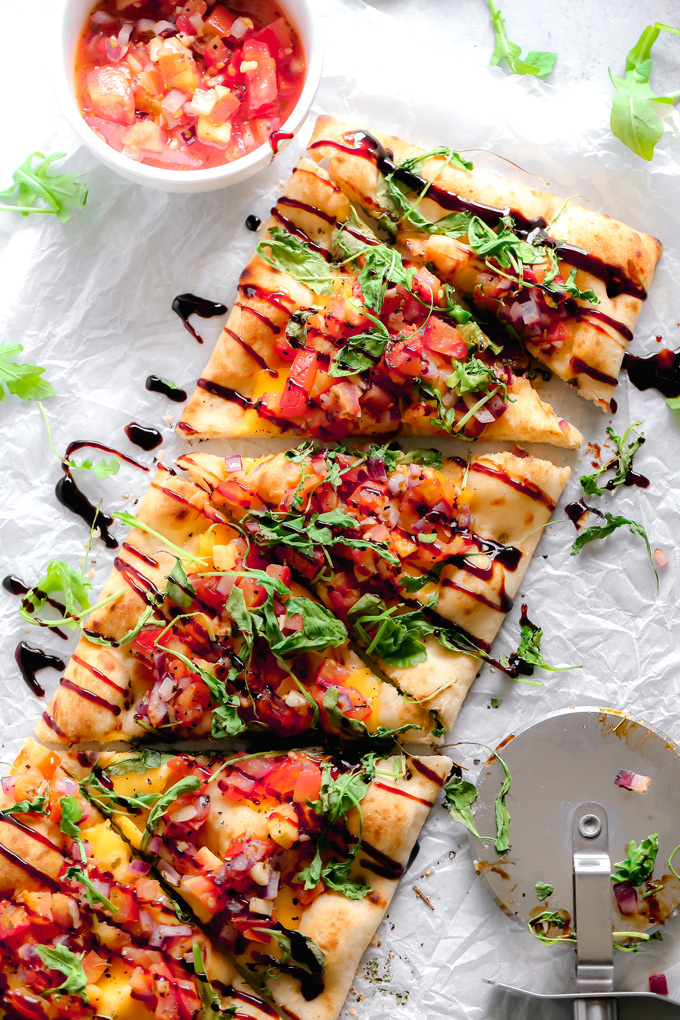
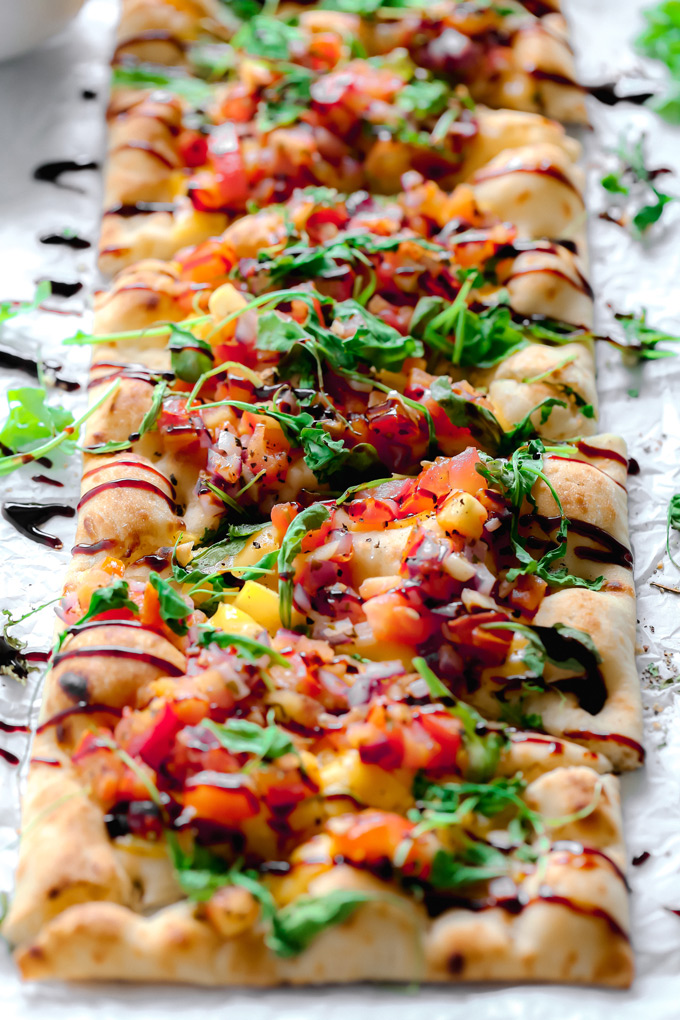
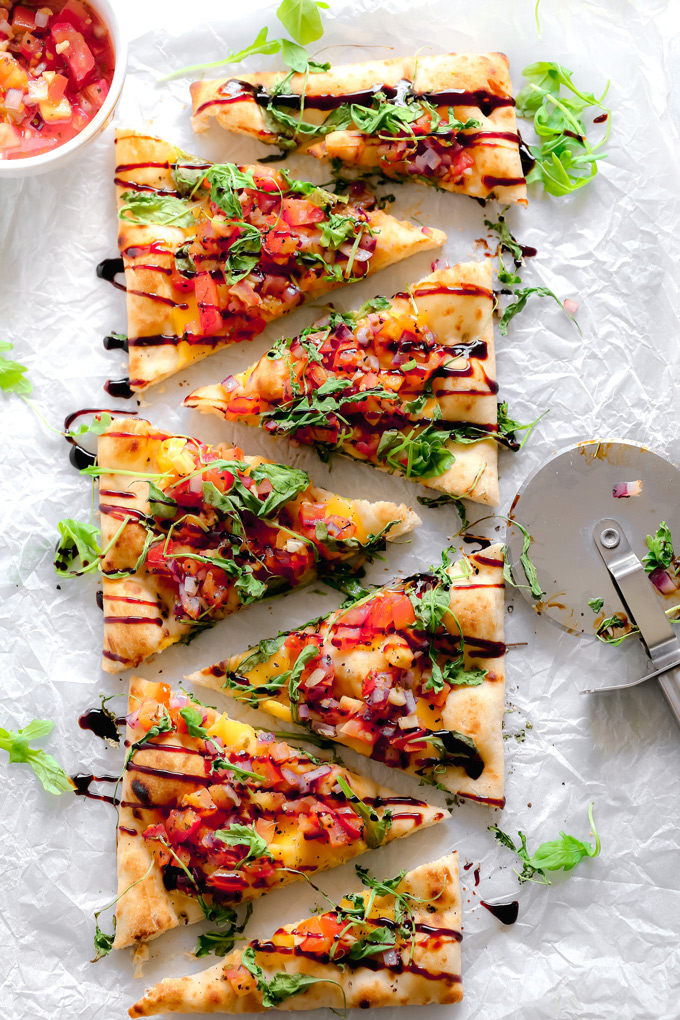
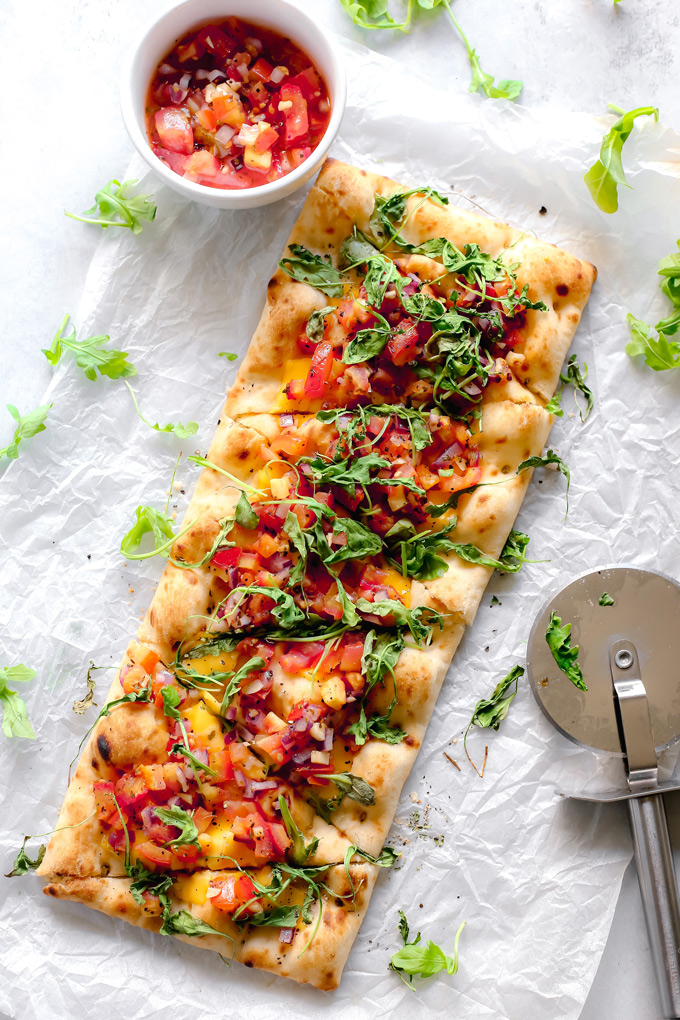
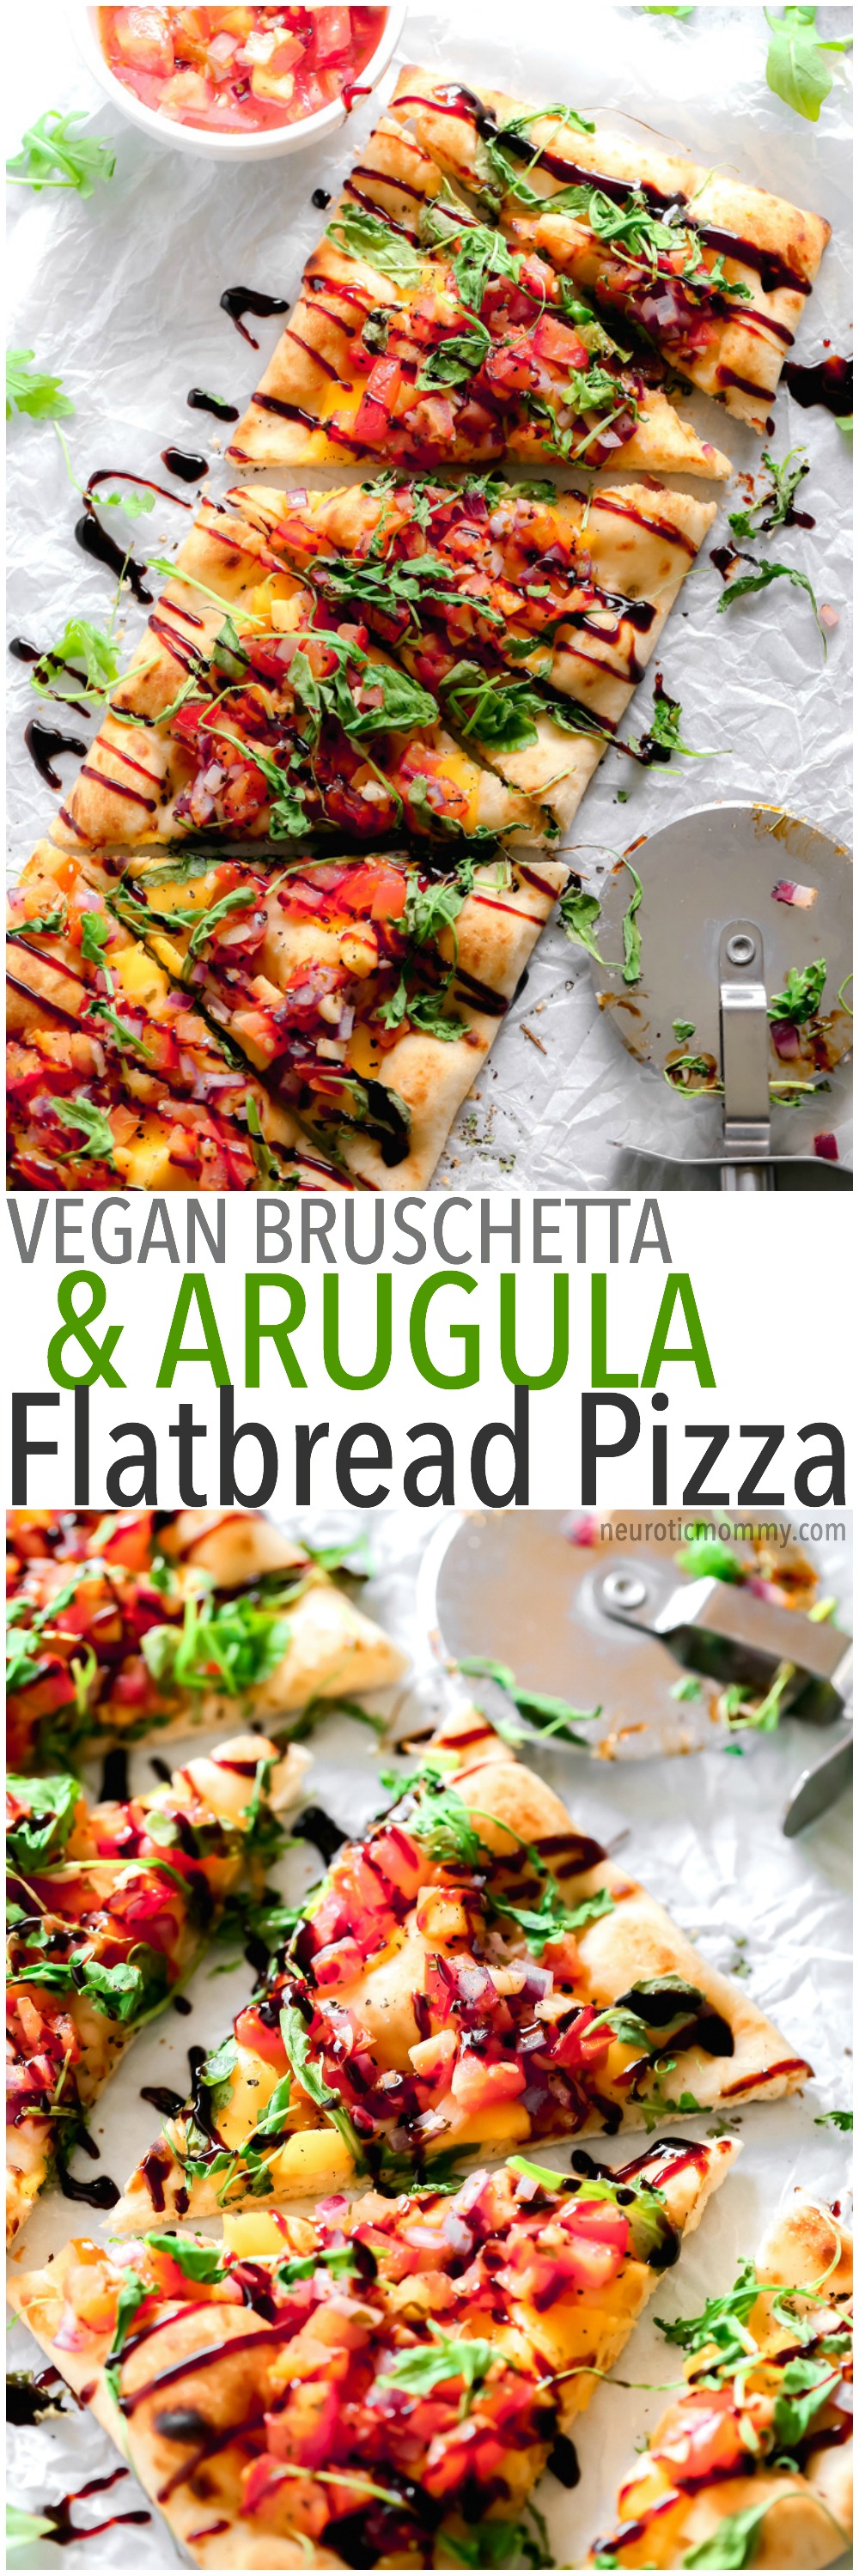
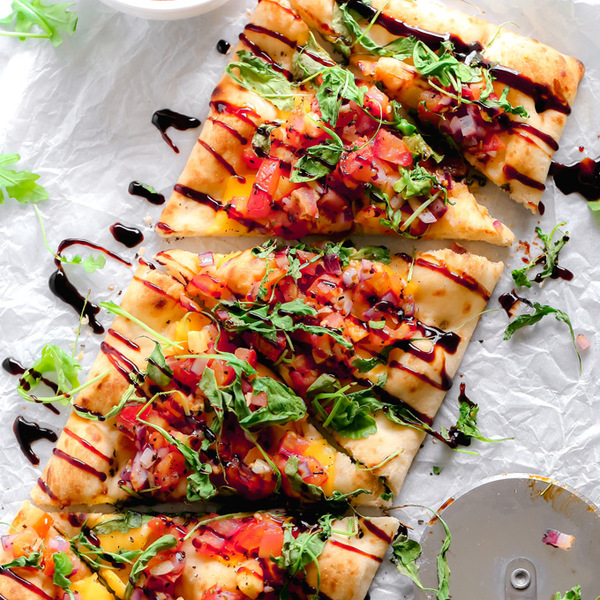
    And speaking of all the feels this Vegan Bruschetta and Arugula Flatbread Pizza with a Balsamic Glaze (say that three times fast) not only gives me all the feels but is one of our most beloved recipes here in mi casa. I honestly don’t know why I haven’t posted it sooner. It’s very simple with basic ingredients leaving you with and epic nutritious dinner set and ready to go in under 20 minutes.

    Vegan Bruschetta and Arugula Flatbread Pizza with a Balsamic glaze - Delicious easy recipe with immense flavor. Enjoy this homemade flatbread pizza using fresh bruschetta, arugula, vegan cheese, and a sweet balsamic glaze. NeuroticMommy.com #veganpizza

    We always keep ready made flatbreads on hand. I pick up organic ones from either Trader Joe’s or WholeFoods but I’m pretty sure you can find them anywhere. I also make the BEST homemade bruschetta. This is one of those things I make at the beginning of the week and use in various different recipes like hummus bites and pasta dishes. But our most favorite is to top it with this flatbread pizza. It’s one of the stars of this show I’d say.

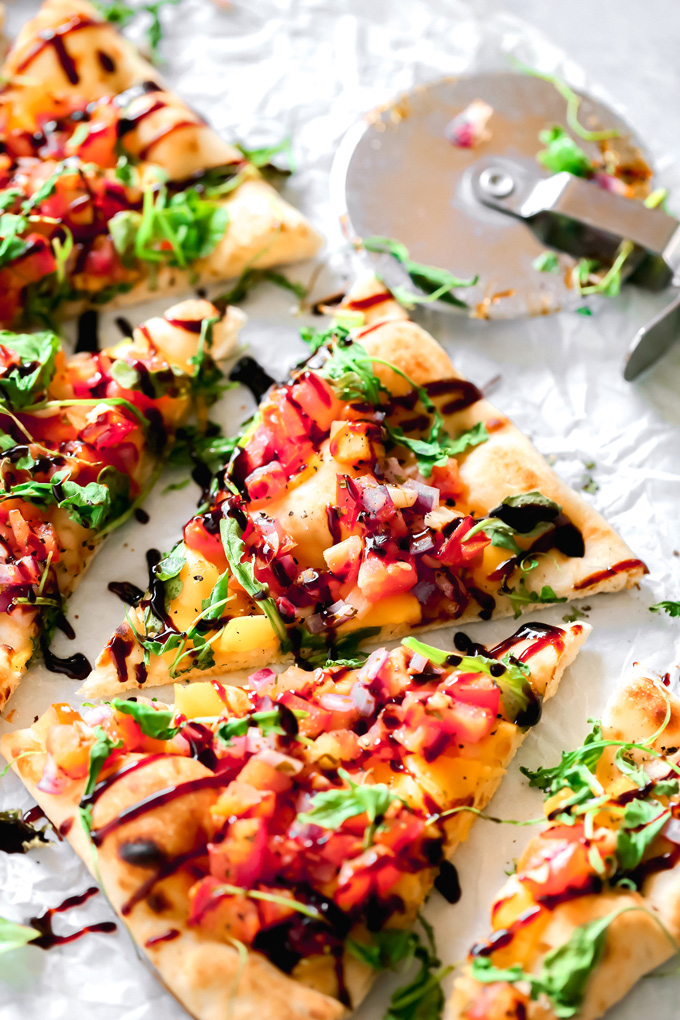
    Bruschetta with arugula and melted vegan cheese all together equals total YUUUUMS. The flavors marry so well and it’s legit like something you’d find at a restaurant. Or should find at a restaurant IMO (in my opinion). I top this with a balsamic glaze and that brings it all together. It’s that sweet, savory type thing with just a sprinkle of salt and pepper….bellisimo.

    Vegan Bruschetta and Arugula Flatbread Pizza with a Balsamic glaze - Delicious easy recipe with immense flavor. Enjoy this homemade flatbread pizza using fresh bruschetta, arugula, vegan cheese, and a sweet balsamic glaze. NeuroticMommy.com #veganpizza

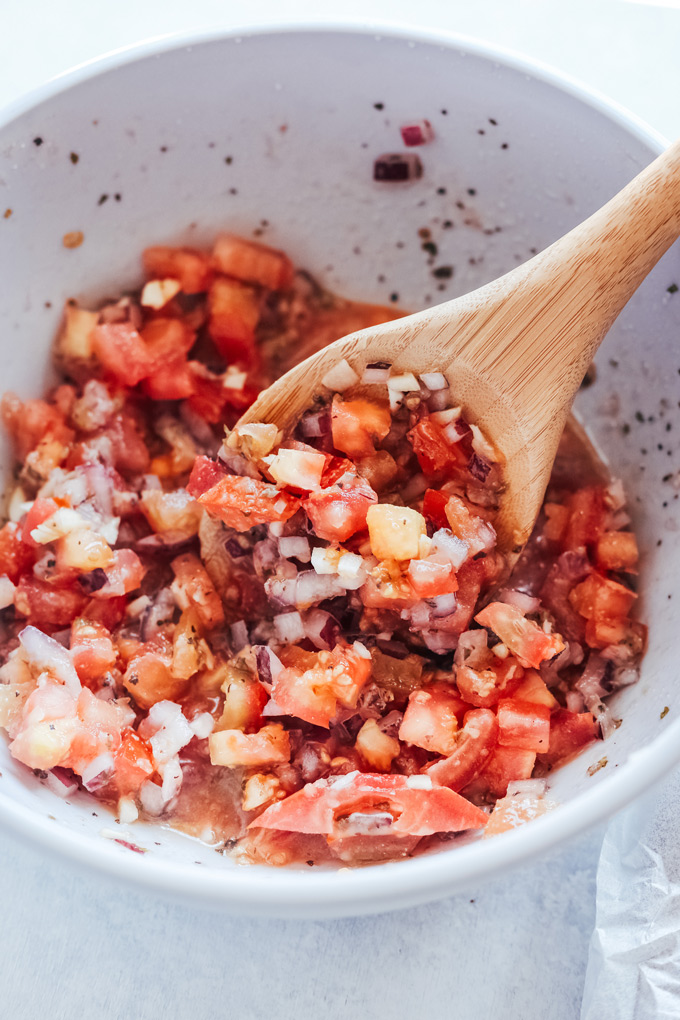
    When you make the bruschetta ahead of time it gets to sit and marinate. I love it when it’s first made too but it’s even better when it’s able to sit for a bit in the fridge that’s why I make it at the beginning of the week usually. The rest is just as easy.
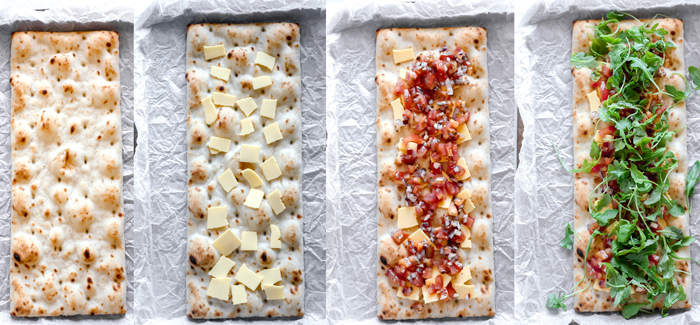
    This is the set up:

    Break up the cheese into squares and place it all over the flatbread. I always put it first because it will get super melty there as opposed to throwing it on top where it won’t melt as much. Then I add the bruschetta and you can add however much you’d like. Then I top it with fresh arugula and pop it in the oven at 350F for 15 minutes. It comes out perfection. Theeeeen drizzle on some balsamic glaze and you’ll be all set!

    Vegan Bruschetta and Arugula Flatbread Pizza with a Balsamic glaze - Delicious easy recipe with immense flavor. Enjoy this homemade flatbread pizza using fresh bruschetta, arugula, vegan cheese, and a sweet balsamic glaze. NeuroticMommy.com #veganpizza

    *THIS POST CONTAINS AFFILIATE LINKS, WHICH MEANS THAT I MAKE A SMALL COMMISSION OFF ALL ITEMS YOU PURCHASE AT NO ADDITIONAL COST TO YOU. I APPRECIATE YOUR SUPPORT IN THIS WAY AS IT HELPS KEEP NM UP AND RUNNING.*

    Vegan Bruschetta and Arugula Flatbread Pizza with a Balsamic glaze - Delicious easy recipe with immense flavor. Enjoy this homemade flatbread pizza using fresh bruschetta, arugula, vegan cheese, and a sweet balsamic glaze. NeuroticMommy.com #veganpizza

    I make two flatbreads because we love leftovers here. I will send this with my son to school for lunch. He usually eats like two slices. I’ll put in some cucumber slices, raspberries, strawberries or blueberries (or mixed berries) inside his lunchbox with a granola bar if he wants something sweet. Or sometimes I put in some Enjoy Life chocolate chips too!

    Vegan Bruschetta and Arugula Flatbread Pizza with a Balsamic glaze - Delicious easy recipe with immense flavor. Enjoy this homemade flatbread pizza using fresh bruschetta, arugula, vegan cheese, and a sweet balsamic glaze. NeuroticMommy.com #veganpizza

    And don’t stop at your kids lunches either, this could totally be your lunch as well! Use the remaining arugula as a side salad to give you even more greens…it’s totes #lunchgoals.

    Vegan Bruschetta and Arugula Flatbread Pizza with a Balsamic glaze - Delicious easy recipe with immense flavor. Enjoy this homemade flatbread pizza using fresh bruschetta, arugula, vegan cheese, and a sweet balsamic glaze. NeuroticMommy.com #veganpizza

    Truly though I could eat a whole flatbread to the face. I believe I did it when I was pregnant with Oliver (I have no shame, lol). I do need to practice more self control perhaps. Well maybe later I will. Until then you guys just need to go make this Asap so you can be on board with the bruschetta flatbread pizza train.

    This is Jennifer reporting to you live this Thursday here from NeuroticMommy headquarters where we keep them bellies full and the mouths opened (or closed)? Hmmm, still deciding, lol. Anywhoozers, make this and keep me posted. I know you’re going to Loves it!

    Vegan Bruschetta and Arugula Flatbread Pizza with a Balsamic Glaze

    Servings: 4

    Prep Time: 5 minutes

    Cook Time: 15 minutes

    Total Time: 20 minutes

    Delicious easy recipe with immense flavor. Enjoy this homemade flatbread pizza using fresh bruschetta, arugula, vegan cheese, and a sweet balsamic glaze. 

    • 1 organic flatbread pizza, (pre made)
    • 1-2 slices vegan cheese
    • 1/2-1 cup fresh bruschetta, (made ahead of time, recipe below)
    • 1 cup fresh arugula
    • 1-2 tbsp balsamic glaze, (less or more to your liking)
    • salt/pepper to taste
    • Preheat oven according to flatbread pizza instructions. Usually it’s 350F.

      2. Take vegan cheese slices and spread over flatbread by breaking it up into squares. Evenly distribute it. 

      3. Place 1/2 cup or 1 cup bruschetta on top followed by the 1 cup (or more) of arugula.

      4. Pop into the oven to bake for 15 minutes. When done remove from oven and give it a minute to set then drizzle on the balsamic glaze and sprinkle with salt and pepper. 

      5. Cut into slices, serve and enjoy immediately. Keep the leftovers in an airtight container in the fridge and enjoy for lunch the next day!

    • You can add more or less of anything in this recipe. 
    • I like to add fresh arugula on top too after it comes out of the oven. 
    • Make the bruschetta ahead of time. You can find the recipe for that here.

    Vegan Bruschetta and Arugula Flatbread Pizza with a Balsamic glaze - Delicious easy recipe with immense flavor. Enjoy this homemade flatbread pizza using fresh bruschetta, arugula, vegan cheese, and a sweet balsamic glaze. NeuroticMommy.com #veganpizza

    WE ARE A PARTICIPANT IN THE AMAZON SERVICES LLC ASSOCIATES PROGRAM, AN AFFILIATE ADVERTISING PROGRAM DESIGNED TO PROVIDE A MEANS FOR US TO EARN FEES BY LINKING TO AMAZON.COM AND AFFILIATED SITES.

    subscribe now
    10% off MotherRealm

    sign up to our newsletter and receive 10% off your first order in our crystal shop MotherRealm!

    Read More

  • Healthy Slow Cooker Sloppy Joes {Vegan}

    Healthy Slow Cooker Sloppy Joes {Vegan}

    recipe image

    This domain is pending renewal or has expired. Please contact the domain provider with questions.

    Read More

  • Vegan Baked Brie

    Vegan Baked Brie

    recipe image
    Vegan Baked Brie in Puff Pastry (Vegan Brie en Croute) – with step by step photos!

    Ingredients:

    • 1/2 pack frozen puff pastry
    • 3 tbsp jam or caramelized onions
    • 1 tbsp melted vegan butter or aquafaba
    • 1 cup cashews
    • 1 cup aquafaba (liquid from 1 can of chickpeas)
    • 1 tbsp apple cider vinegar
    • 1 clove garlic
    • 1 1/2 tbsp (also known as tapioca flour) tapioca starch
    • 1 – 2 tbsp nutritional yeast
    • 1/2 tsp sea salt

    Instructions:

    1. Soak the cashews overnight in the fridge in cold water or for 15 minutes in a pot of freshly boiled, hot water. Rinse the cashews and place in a high-speed blender.
    2. Add the aquafaba, apple cider vinegar, garlic clove, tapioca starch, nutritional yeast, and sea salt to the blender. Blend for 2 to 3 minutes until creamy smooth. Taste test and add additional nutritional yeast or sea salt to taste.
    3. Warm a medium-sized pan over medium-low heat, pour the cheese sauce into the pan and stir until the cheese thickens to a thick and stretchy consistency. The cheese should not drip from the spatula when you lift the spatula up. 
    4. Lightly oil a round dish. Add the cheese, smooth the top with the back of a spoon, and tap on the counter a couple times to get the air bubbles out. Leave to cool, cover with plastic wrap, and chill in the freezer for half an hour or in the fridge overnight.
    5. Once the cheese is set, loosen up the brie from the dish by going around the sides with a toothpick. Turn the cheese upside down in the middle of the pastry sheet
    6. Preheat oven to 350°F (177°C). Place puff pastry on a lightly floured work surface and roll to an even 1/4-inch thickness.
    7. Turn the cheese upside down in the middle of the pastry sheet.
    8. Spread jam (or caramelized onions) on top. Pull the puff pastry in to meet in the middle like you are wrapping a present.
    9. Pinch the dough together in center to seal all the pleats together. Brush with aquafaba (or vegan butter).
    10. Bake in a brie baker or pie dish until golden brown for 20 to 25 minutes. Serve warm with baguette, fresh fruit, and nuts.

    Read More

  • Vegan Elote Pasta

    Vegan Elote Pasta

    recipe image

    by Lauren Hartmann 7 Comments

    The perfect summer pasta!

    Elote or Mexican street corn is hands down my favorite way to eat corn. Grilled, slathered with vegan mayo and spices. This vegan elote pasta tastes just like a eating a big bowl of street corn and I freaking love it! Crumbled tofu marinated to taste just like Cotija cheese! That is sauteed with corn, chili powder, garlic and jalapeno. Tossed with pasta, vegan mayo and lime juice! This pasta is everything I’ve ever wanted! 

    This vegan elote pasta is really simple and easy. The perfect pasta for the summer, or anytime really. Now is the time when I start to see the amazing sweet and juicy corn on the cob in the stores. This is the time of year when they are like 6 for $2 or something. When I see those signs for cheap corn, I always end up buying way too much corn. I get really excited about it, and then try to come up with a bunch of corn recipes. Well, I’m pretty sure this pasta is my favorite corn thing!

    I like to marinate my tofu for a while, so, you can prep that ahead of time. Then when you are ready for dinner, you can just throw everything together really fast. This elote pasta has everything. It is fresh, and spicy and tart and a little sweet. It is creamy and tangy and oh so yummy! 

    Everyone seriously loves this one, even my six year old. She’s pretty down with anything involving corn, but this is slightly more daring than meals she usually likes. This pasta is different though, it is definitely for everyone!

    Hot Tip: You can make this really quick vegan Cotija cheese and sprinkle it on your grilled corn this summer, or a taco salad or anything you want!

    If you are really into street corn, try my vegan street corn nachos! Seriously, do it!

    Print Recipe

    This vegan Mexican street corn inspired pasta is the summer pasta dish of your dreams!

    Prep Time 1 hour

    Cook Time 30 minutes

    Total Time 1 hour 30 minutes

    Servings 4

    Calories 515

    Author Lauren Hartmann

    Ingredients

    • 1 Block(15oz.) Extra firm tofu, pressed
    • 1/3 Cup + 3 Tablespoons Lime juice, divided
    • 1 Teaspoon Salt
    • 2 Teaspoons Chili powder, divided
    • 4 Ears of Corn
    • 4 Cloves Garlic, chopped
    • 1 Large Jalapeno, de-seeded and chopped fine
    • 12 Ounces Pasta, gluten-free or regular
    • 2 Tablespoons Olive oil
    • 1/2 Cup Vegan mayo, I used Hellman’s
    • 1/4 Cup Cilantro, chopped
    • Salt and Pepper to taste
    • Chili lime salt for topping, optional

    Instructions

    • Press your tofu first, if you need more info on how to press tofu, check out my TOFU COOKING GUIDE.

    • After you have pressed the tofu, crumble it in to small pieces and put in a medium sized mixing bowl. Pour the 1/3 cup of lime juice, the salt and 1 teaspoon of chili powder over the tofu.

    • Toss to coat the tofu, then let sit to marinate for at least 30 minutes. The longer the better.

    • While the tofu marinates, you can slice the corn kernels off of the cob, and chop the garlic and jalapeno.

    • When you are ready to make the pasta, cook the pasta according to package directions.

    • While your pasta is cooking, heat the olive oil on medium high in a large non stick skillet.

    • Add the corn, garlic and jalapeno to the skillet. Season with a pinch of salt and pepper, then sprinkle the remaining 1 teaspoon of chili powder on top. Stir and saute to brown the corn slightly. About 5-7 minutes.

    • Then add the crumble tofu to the skillet. Toss to combine and saute to firm up the tofu a little. About 2-4 minutes. Remove from heat. Taste and season with more salt and pepper if needed.

    • When the pasta is done, drain it and put it back in the pot.

    • Add the corn and tofu to the pot with the pasta, toss to combine.

    • In a small mixing bowl, whisk together the vegan mayo and remaining 3 Tablespoons of lime juice and a pinch of salt and pepper.

    • Now pour the mayo and lime over the pasta. Then add the chopped cilantro. Toss to coat all of the pasta in the mayo and lime juice. Season with another pinch of salt and pepper.

    • Serve immediately. I like to sprinkle with chili lime salt.

    Notes

    You can chill the pasta, corn and tofu before you toss with the mayo and lime juice and serve cold if you want more of a pasta salad feel.

    If you serve hot, I recommend serving immediately, if you let it sit around hot for a while the mayo will get greasy. 

    Nutrition

    Calories: 515kcal | Carbohydrates: 69g | Protein: 12g | Fat: 20g | Saturated Fat: 2g | Sodium: 500mg | Potassium: 238mg | Fiber: 3g | Sugar: 3g | Vitamin A: 100IU | Vitamin C: 10.5mg | Calcium: 28mg | Iron: 1.2mg

    Reader Interactions

    Trackbacks

    1. […] Get the recipe here. […]

    Read More

  • Vegan Quinoa and Egg Muffins {high protein, gluten-free}

    Vegan Quinoa and Egg Muffins {high protein, gluten-free}

    recipe image

    Vegan quinoa omelet muffins, made with chickpea flour in place of eggs! Made in a muffin tin, they are gluten-free, high protein, and only 154 calories each.

    Google “quinoa egg muffin;” you’ll generate more than 4 million hits.

    It’s a wee bit popular.

    The reason is self-evident: take a super-grain (quinoa; one of the only plant sources with a complete amino acid profile, i.e. “complete protein”), couple it with beaten eggs (more protein, plus super-binding powers) and cheese (delicious), bake in a handy dandy muffin tin, and presto, multiple high-protein, portable breakfasts (or snacks, or any other meal) are ready for packing and eating. Pretty neat.

    Quinoa Omelet Muffins Made without Any Eggs

    I’ve decided to add my own take. With two significant changes:

    1. No eggs
    2.  No dairy

    With all modesty aside, they rock!

    vegan quinoa omelet muffin on a white background

    Use Chickpea Flour In Place of Eggs

    I didn’t have to use voodoo or magic to make these vegan quinoa omelet muffins, either. Just chickpea flour ( to replace the eggs) and a combination of nutritional yeast and non-dairy Cheddar cheese for the cheesey factor.

    A simple batter made with chickpea flour makes a delicious, eggy option, sans eggs. I have used it in quiches, frittatas, and other egg-free options (for example, here, here,  here, and here); it is remarkable how the flavor adn texture resembles eggs.

    Add Vegan Cheese & Nutritional Yeast for Flavor & Protein

    The cheese factor comes from a combination of

    nutritional yeast and non-dairy Cheddar cheese. If you eat dairy, you can certainly use dairy cheese here (and use Parmesan, for example, in place of the yeast). If you do not want the yeast, no problem; just leave it out. I used a no-soy cheese, but you can use any variety you like.

    Add-ins can be as minimalist or extravagant as you like (e.g., vegetables, herbs, spices). 

    Here’s to protein-packed, easy, affordable and portable breakfasts!

    More Vegan & Grain-Free Chickpea Flour Egg Dishes:

    1. 3-Ingredient Chickpea Flour Frittata
    2. Sweet Potato Kale Chickpea Flour Frittata
    3. Tortilla Espanola Muffins (made with Chickpea Flour)
    4. Chickpea Flour Pasta Broccoli Frittatas (high protein)
    5. Mini Chickpea Flour Vegetable Frittatas
    6. Tex-Mex Black Bean Frittatas (high protein)
    7. Vegan Hash Brown Omelet Muffins
    • 1 cup 237 mL nondairy milk (or dairy, if not vegan)
    • 1/3 cup 40 g chickpea flour
    • 2 tablespoons 16 g nutritional yeast
    • 2 tablespoons 30 mL olive oil
    • 1/2 teaspoon fine sea salt, or to taste
    • 1/8 teaspoon turmeric, optional
    • 1 and 1/2 cups cooked quinoa
    • 1/2 cup chopped green onions
    • 1 cup non-dairy Cheddar cheese, or dairy, if not vegan
    • Preheat oven to 375F (180C). Grease or spray 6 cups of a standard muffin tin.

    • In a large bowl, whisk the milk, chickpea flour, yeast, olive oil, salt, and (optional) turmeric until smooth.

    • Add the quinoa and all but 2 tablespoons of the green onions to the chickpea batter. Divide mixture evenly between the prepared cups. Divide cheese evenly among the cups, pressing down slightly into batter. Sprinkle with remaining green onions.

    • Bake in the preheated oven for 20 to 25 minutes until the centers are just set. Transfer to a cooling rack and cool for at least 15 minutes. Remove from tin and serve warm or cool completely.

    Quinoa: It will take 1/2 cup dry quinoa, cooked according to package directions, to yield 1 and 1/2 cups.

    Storage: Store in an airtight container in the refrigerator for up to 5 days or the freezer for up to 3 months.

    Serving: 1muffin | Calories: 154kcal | Carbohydrates: 14.9g | Protein: 6g | Fat: 8.2g | Saturated Fat: 2.2g | Cholesterol: 7mg | Sodium: 176mg | Fiber: 2.5g | Sugar: 1.9g

    Categorized as:

    Breakfast, Chickpea Flour, Gluten-Free Whole Grains, High Protein, Lunch, muffin tin, Muffins, Portable Food, quinoa, Quinoa, Savory Power Bars & More, Snacks & Appetizers

    You Might Also Like

    About Camilla

    I’m Camilla, food writer, author, runner, and spin instructor. PowerHungry® is where I share my easy, minimalist, plant-based recipes, designed for living a healthy, delicious, empowered life.

    Read More

  • VEGAN MACADAMIA CHERRY CLUSTERS

    VEGAN MACADAMIA CHERRY CLUSTERS

    recipe image
    These Vegan Macadamia Cherry Clusters are vegan and gluten free.

    Ingredients:

    • 1.5 cups dairy free chocolate chips
    • 2 tablespoons vegan butter
    • ¾ cup salted macadamia nuts (more if needed)
    • ¾ cup dried unsweetened cherries (more if needed)
    • For white chocolate drizzle (optional):
    • ¼ cup melted raw cocoa butter
    • 1 teaspoon stevia powder
    • ¼ teaspoon vanilla extract
    • ½ teaspoon cornstarch

    Instructions:

    1. Fill a deep skillet with water until it is half full and place on the stove over medium high heat. Bring water to a boil and place a glass bowl on top of the skillet. Add chocolate chips and vegan butter into the bowl and stir with a spatula until melted. Remove the bowl from the skillet and transfer to the counter.
    2. Mix in macadamia nuts and cherries and stir until the nuts and cherries are evenly coated. Line a baking sheet with parchment paper and using a tablespoon, scoop the chocolate mixture on the baking sheet. Let the clusters set at room temperature or transfer to the fridge for 30 minutes to set quicker.
    3. Once the clusters are set, melt the white chocolate drizzle by placing the cocoa butter in a microwave safe bowl. Place in the microwave for 40 seconds or until melted. Remove from microwave and mix in stevia, vanilla and cornstarch until smooth. Using a spoon or a pastry brush, drizzle the white chocolate on the clusters and let it set for about 10 minutes. Enjoy when ready.

    Read More

  • Seitan and Mushroom Stroganoff (Vegan)

    Seitan and Mushroom Stroganoff (Vegan)

    recipe image


    Photobucket
    Photobucket


    Photobucket
    Photobucket
    Photobucket


    Photobucket
    Annacia's banner for Zaar Tag
    Susie's Banner for Newest Zaar Tag


    Photobucket


    Photobucket


    Cookathon for Cool Monday (1)


    “>

    Update: We’ve moved back to the states, and are experiencing the joys of living in Wenatchee, WA for the first time! I’m spending most of my time in the kitchen canning, freezing, and drying fruit now and loving it!

    We are a couple, Jason and Mollie, that loves to cook together. We have two wonderful DD’s, Enjoli (9) and Emily (7) that make life so much more fun! I, Mollie, studied Nutrition so I try to make most of our meals healthy while still tasting great! Our girls love helping us cook…and eat! We’re vegetarian and love eating healthy without missing any flavor! We try to eat mostly vegan, so we have many vegan recipes posted. We are world traveling missionaries and students that have visited many countries and have lived in the States, South Korea, and are currently in the Philippines. So we always need to adjust our menu based on the food available. Zaar has been a tremendous help!


    Photobucket
    Photobucket


    Photobucket
    Photobucket
    Photobucket


    Photobucket
    Annacia's banner for Zaar Tag
    Susie's Banner for Newest Zaar Tag


    Photobucket


    Photobucket


    Cookathon for Cool Monday (1)


    Read More