Apple desserts are my favorite. This one is so super sweet, you won’t miss the sugar for a moment.
Ingredients:
* 6 small apple, cored, peeled and
* 1/4 cup of cold pressed corn, safflower oil or sunflower oil (corn
oil will give a sweeter result)
* 1/2 cup of brown rice malt
* ⅛ cup of apple juice concentrate
* a pinch each of sea salt and ground cinnamon
* 1 tblsp vanilla essence
* 350 gram packet of ready rolled puff pastry (look for a vegan and
Instructions:
Preheat the oven to 190.
Combine the oil, rice malt, apple juice concentrate, sea salt and cinnamon in an ovenproof pan, and put over a low heat. After around 5-10 minutes, the mixture will start to thicken and bubble, taking the consistency of toffee. Stir the apples in and cook until they just start to soften. Stir the vanilla in, and take off the heat.
Arrange the apple pieces in the pan so they lie flat (use a wooden spoon to avoid burning your fingers), and lay the pastry over the top of the apples, tucking in the sides.
Put into the oven and bake for 20 minutes, until the crust is golden.
While still hot (before the sauce cools down), place your serving dish on top of your pan, cover both forearms with tea towels (for protection, in case of spillage), and then quickly turn the pan upside down and onto the serving dish. Gently tap the bottom of the pan and voilà! your tarte tatin is served.
Vegan kimchi quesadillas are better than all other quesadillas. Don’t get me wrong I love just a plain vegan cheese quesadilla or one just stuffed with refried beans for a quick snack. However if you give me hot and crispy tortillas filled with kimchi, tofu bulgogi and vegan cheese, I will choose that every. single. time. Such a quick and amazing meal, the tofu bulgogi only takes a few minutes to make, then you just spread everything on to a tortilla, top with another and pan fry.
This is truly the ultimate comfort food, that is actually pretty darn good for you. Kimchi is really darn good for you, it has some amazing health benefits. Protein from the super tasty tofu bulgogi, then just a bit of your favorite vegan cheese. Then whatever type of tortilla you like to use. You can go gluten free if you want. All of this healthy food is disguised as the best thing ever!
I love kimchi, it is so delicious on so many things. Check out my Korean “Fried” Tofu Tacos if you want some other ideas. I just would like to note that it can be tricky to find vegan kimchi. A lot of brands have fish in them. I really like King’s Kimchi. It is always at my local grocery store. So, you should be able to find some, just check the labels.
This recipe makes 2 large kimchi quesadillas, so you will definitely be able to share. They are great for a quick weeknight meal, or to share with friends when you want an easy and delicious appetizer for a party.
Print Recipe
Filled with kimchi, tofu bulgogi and vegan cheese, these vegan kimchi quesadillas are the ultimate healthy comfort food.
Prep Time 10 minutesmins
Cook Time 20 minutesmins
Total Time 30 minutesmins
Servings 2quesadillas
Author Lauren Hartmann
Ingredients
1/2BlockExtra firm tofu
1/4C.White onion, chopped
2tsp.Sesame oil
3Tbsp.Soy sauce
1Tbsp.Brown sugar or coconut sugar
2tsp.Rice wine vinegar
1Clove Garlic, grated
3Tbsp.Apple, grated
1/2tsp.Ginger, grated
1/8tsp.Black pepper
4Tortillas
1/3C.Kimchi
1/3C.Vegan cheese shreds, I used Follow Your Heart
Oil for cooking quesadilla
Instructions
First, press the tofu. Place on some paper towels, then put more paper towels on top. Then put something heavy on top of the tofu. Press for at lest 15 minutes, but the longer the better.
When the tofu is ready, heat the sesame oil on medium high in a non stick pan.
Now, crumble the tofu into the pan. Saute for a minute or two until it starts to get brown. Then add in the chopped onion. Continue to saute until the tofu is brown and the onion is translucent. This will take a 3-4 minutes.
While the tofu is cooking, make the sauce for the tofu. Whisk together the soy sauce, sugar, rice wine vinegar, grated garlic, grated apple, grated ginger and black pepper.
Once the tofu is nice and brown, pour the sauce into the pan. Stir to coat, then cook for another minute or two until the sauce thickens and coats the tofu. Remove from heat.
Then, take two tortillas, sprinkle one side with vegan cheese, then spread half the kimchi around, then spread half the tofu around. Top with more cheese and then another tortilla.
Next, heat the oil for cooking on medium high in a non stick pan, then place the quesadilla in the pan. Brown on one side for 2-3 minutes, then flip and brown the other side. Press down and make sure the vegan cheese has melted.
When done, remove from the pan, and repeat with the remaining ingredients to make the second quesadilla. Cut and serve immediately.
Published: by Jeni · This post may contain affiliate links ·
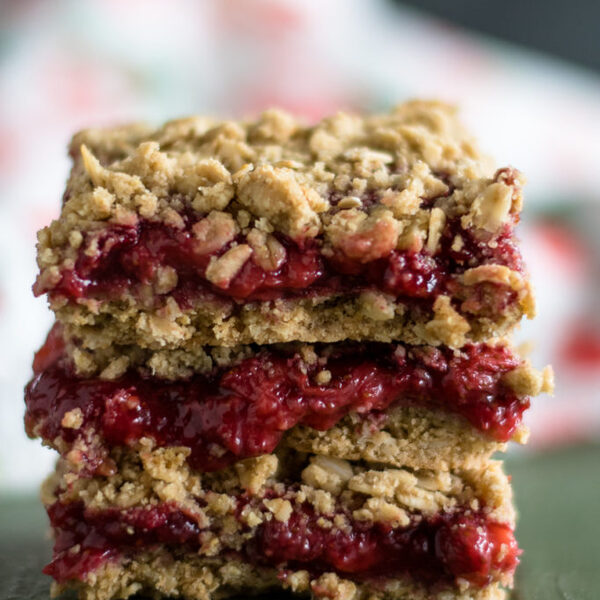
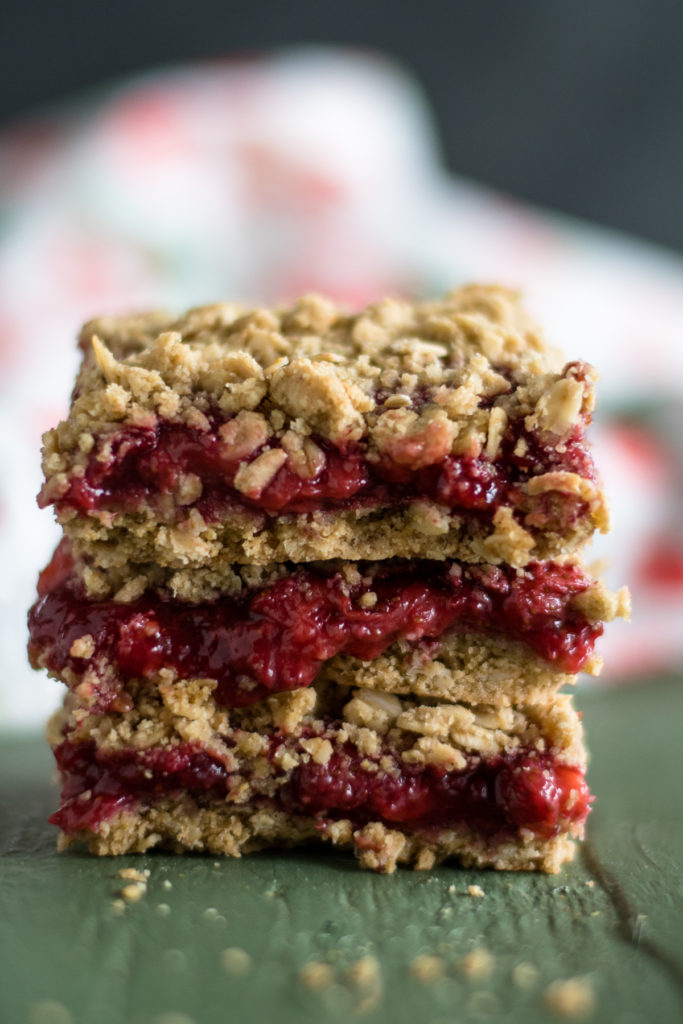
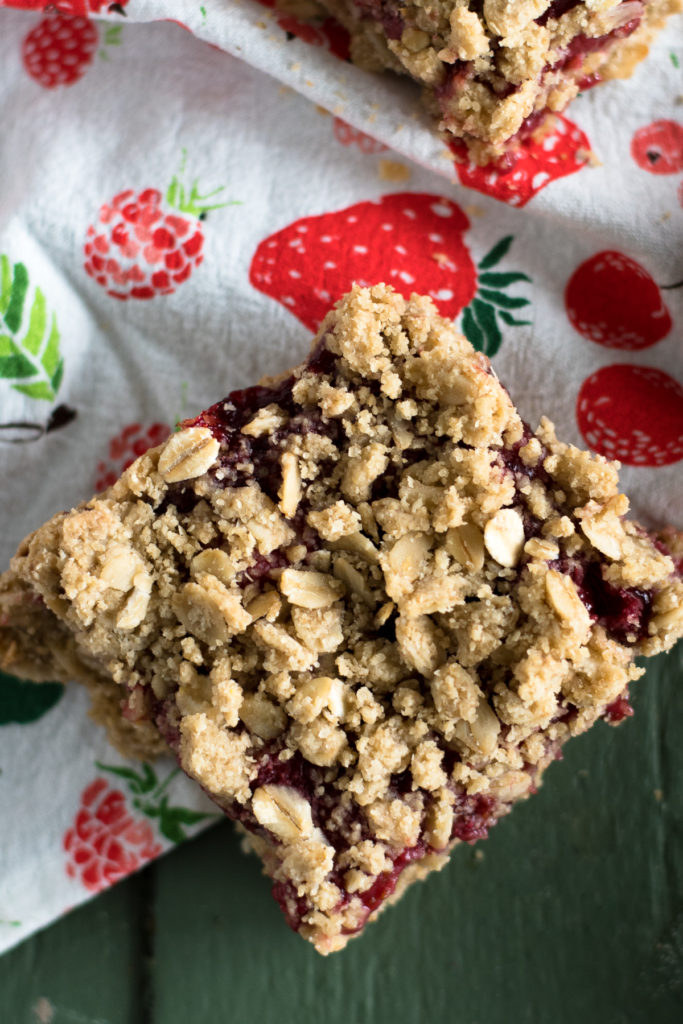
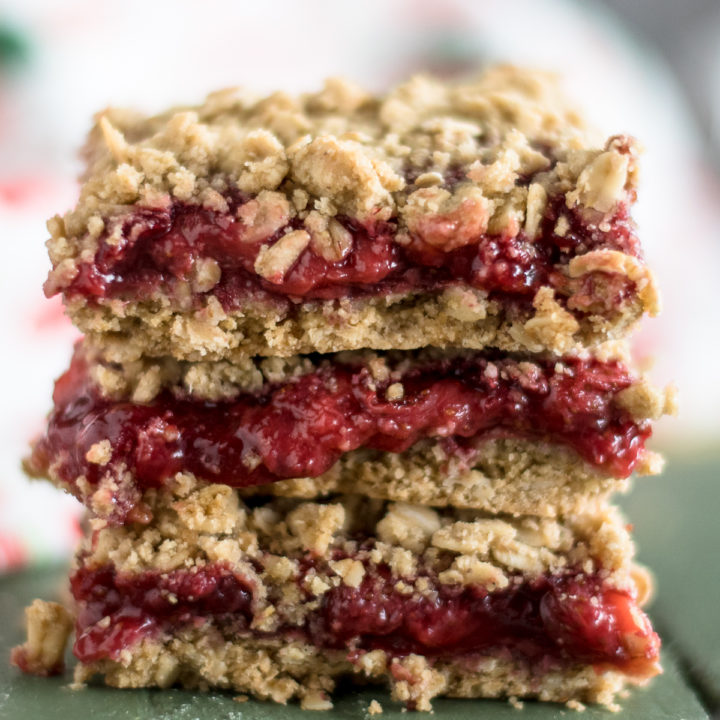
Vegan Strawberry Pie Bars are the perfect summertime treat!
Strawberry season is officially upon us and I couldn’t be more excited! Every year, I head to my local berry farm and pick a ton of fresh strawberries. I love freezing local strawberries and using them throughout the year.
With so many frozen strawberries, I am always looking for new ways to use them. These Vegan Strawberry Pie Bars are the perfect treat to make with the frozen berries. The best part is that you can make them year round too!
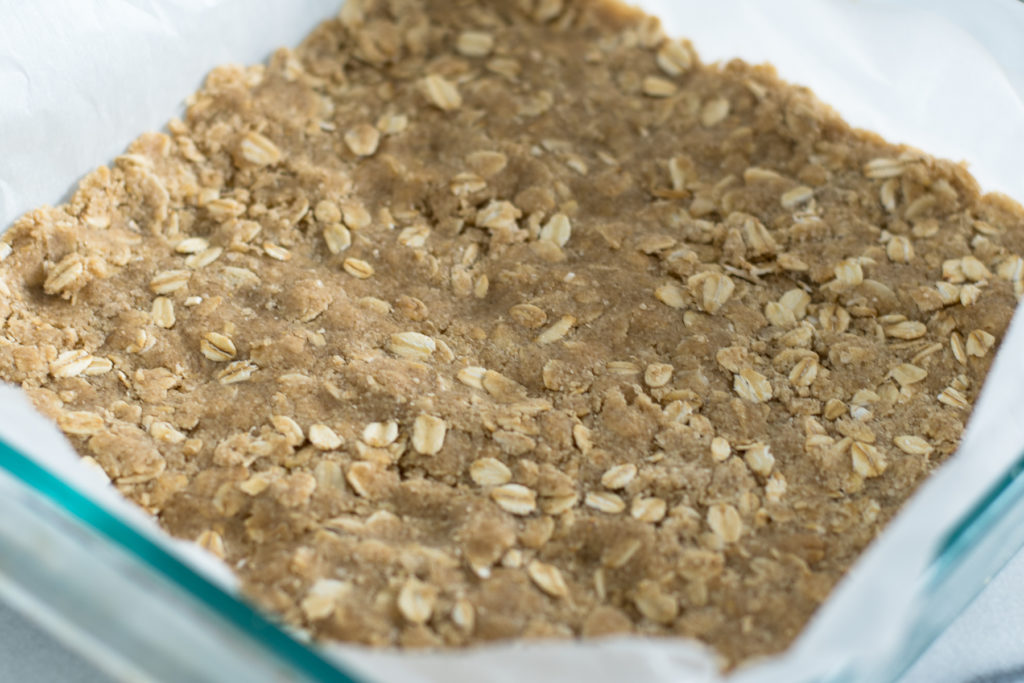
These perfectly sweet Vegan Strawberry Pie Bars are so easy to make too! The bars start by making the crust—which is naturally gluten-free too! Just be sure to use gluten-free oats! To make the crust, combine oat flour, oats, brown sugar, cinnamon, baking soda, salt, and mix it all together with melted vegan butter.
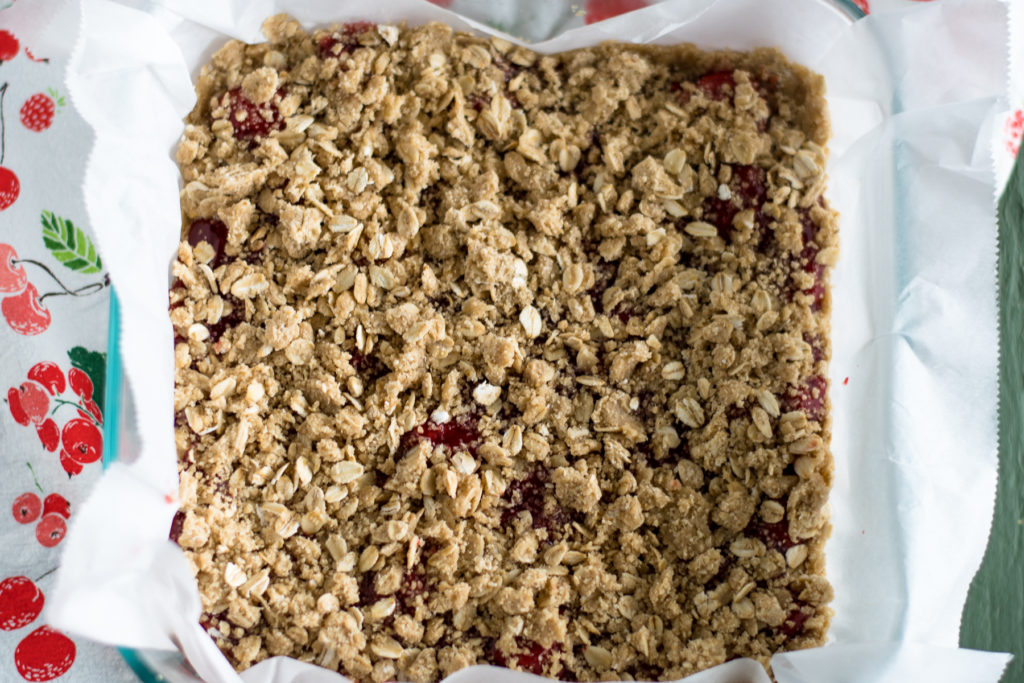
Take a little more than half of the crumb mixture and press it into an 8×8 inch pan lined with parchment paper, The rest of the crumble with go on top.
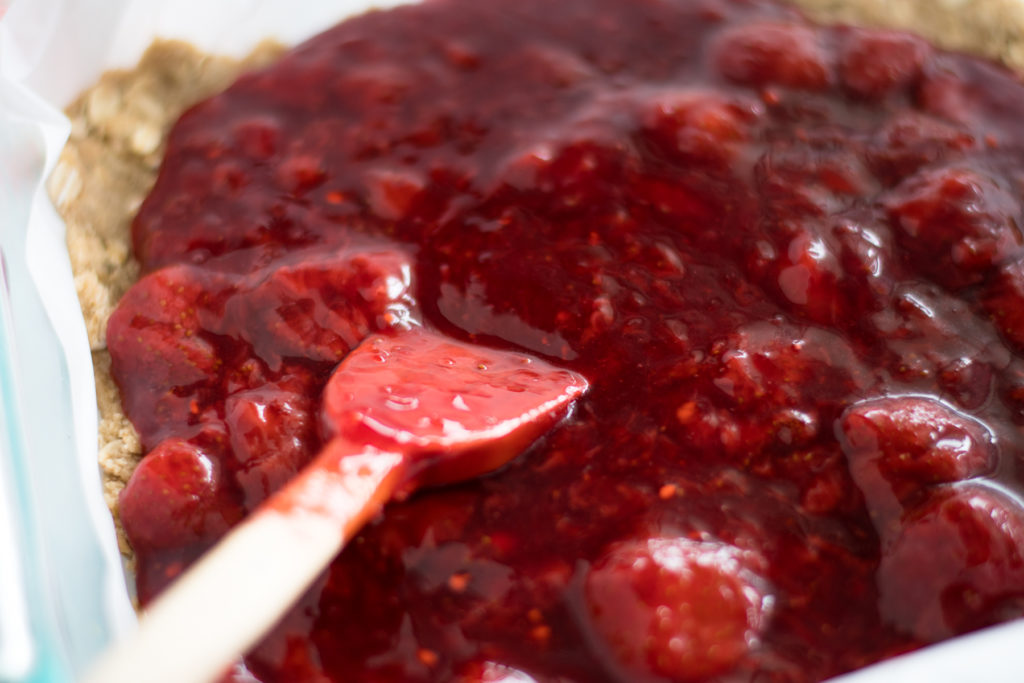
Next it’s time to make the strawberry filling. The frozen strawberries are naturally sweetened with maple syrup. The filling need to be slightly thick, so a little cornstarch is used to help thicken up the berries. The filling gets poured over the crust.
The filling gets topped with the rest of the crumble, the bakes in the oven until bubbling.
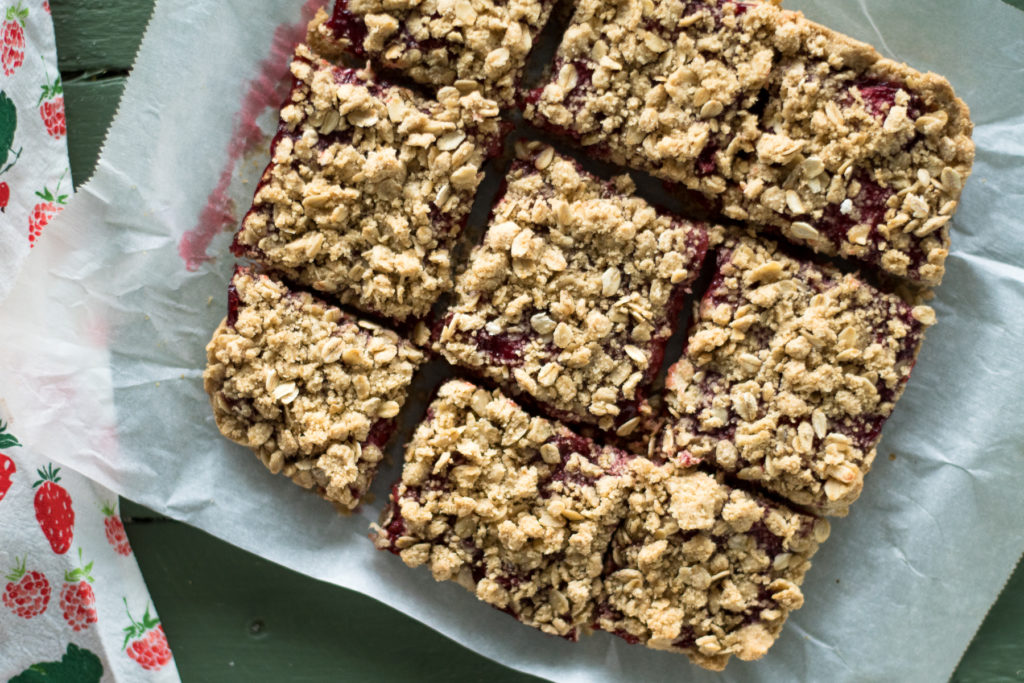
Allow the bars to completely cool before cutting. These bars are perfect for a quick and easy on the go snack or breakfast.
If you make these vegan strawberry pie bars, be sure to leave a comment below below! You can also share a picture on Instagram using the hashtag #thymeandove.
Yield: 9 Bars
Prep Time: 10 minutes
Cook Time: 40 minutes
Total Time: 50 minutes
Vegan Strawberry Pie Bars are the perfect summertime treat!
Instructions
Preheat the oven to 350 F. Line an 8 x 8 baking pan with parchment paper.
Make the crust and crumble by placing the oat flour, oats, brown sugar, cinnamon, baking soda and salt in a large mixing bowl; stir.
Pour in the melted and cooled vegan butter and mix until combined and the dough starts to clump together.
Place about ¾ of the mixture into the baking pan. Use your hands to press the dough to the bottom of the pan. Set the remaining crumble aside.
Next make your strawberry pie filling. Add the strawberries, maple syrup, cornstarch to a medium pot over medium heat. Use a wooden spoon to press down and break down the berries.
Bring to a boil, then reduce heat and cook for 5 minutes or until mixture is thick and coats the back of a spoon. Turn off the heat and add the vanilla extract.
Pour mixture over the crust and use a spoon to evenly spread over the crust.
Sprinkle the crumble on top of the berries.
Bake for 30-35 minutes or until filling is bubbly and topping is golden.
Allow bars to cool completely before serving.
Did you make this recipe?
Please leave a comment on the blog or share a photo on Instagram
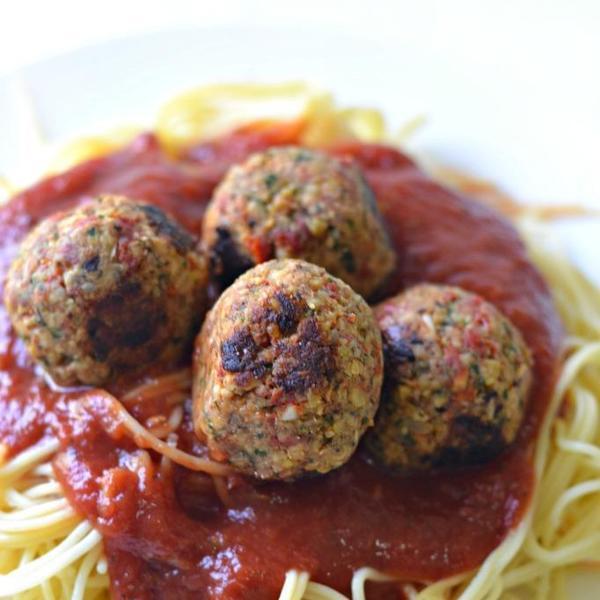
This homemade spaghetti and vegan meatballs is oh-so comparable to the real thing and a sure knock-out-of-the-park for the people at your dinner table. With a softer bite then actual meatballs, these tempeh-filled meaties are still packed with flavor and deliciousness. Your guests might even put you on their shoulders and start singing, “For she’s a jolly good lady…” And even if they don’t, I bet you that they are thinking about doing it…
It’s definitely one of my favorite meals to eat and I love how similar these tempeh balls are to the real thing. They taste really good the next day, in fact, they might even taste better than straight from the pan! Which, if you can find a recipe that can tout that then you know you are in for a good meal.
Print
Spaghetti and Vegan Meatballs
Author:Fork & Beans
Prep Time:10 mins
Cook Time:20 mins
Total Time:30 mins
Yield:10–12 tempeh balls 1x
8 oz. tempeh
3/4 c. gluten-free breadcrumbs
1/2 c. onion, thinly chopped
1 Tbsp. flaxseed meal + 3 Tbsp. warm water
2 garlic cloves, minced
2 Tbsp. vegan Worcestershire sauce
2 Tbsp. fresh basil, thinly chopped
1 tsp. dried oregano
1 tsp. fresh thyme, chopped
½ tsp. sea salt
Other ingredients:
Jar of favorite spaghetti sauce
cooked gluten-free pasta for 4
Instructions
Heat enough oil to fully coat the bottom of a nonstick skillet on medium heat.
In a food processor, mix all the ingredients together with the exception of 1/4 c. of the breadcrumbs.
Form into 1″ balls. Roll into remainder breadcrumbs until fully coated. Brown in skillet until all sides nicely browned. Do in batches if needed. Remove from the pan.
On low heat, warm up the spaghetti sauce. Place the cooked noodles in to fully immerse into the sauce. Plate and top with meatballs.
Nutrition
Serving Size:1 tempeh ball
Calories:72
Sugar:1.2g
Sodium:120mg
Fat:5g
Carbohydrates:7g
Fiber:1g
Protein:5g
About Cara
Based in Chicago with her husband and son, Cara is the creator behind the site Fork and Beans: A place where kids can have fun with their food.
How do you substitute the butter and eggs in a vegan baking recipe?
Instead of butter you can use a flavourless or lightly-flavoured oil, such as vegetable oil. If you look through a few muffin recipes, you’ll be sure to come across some using oil. You can also use dairy-free margarine in place of butter, this is what I usually do and it produces the same results as using butter.
The eggs are a bit more tricky. After a Google search I found something called a flax egg. Basically it’s flax seeds (also known as linseeds), which you grind into a powder, then add water, whisk and pop into the fridge for at least ½ hour, but preferably 1 hour. The mixture goes gloopy and this is what binds the brownies in place of eggs.
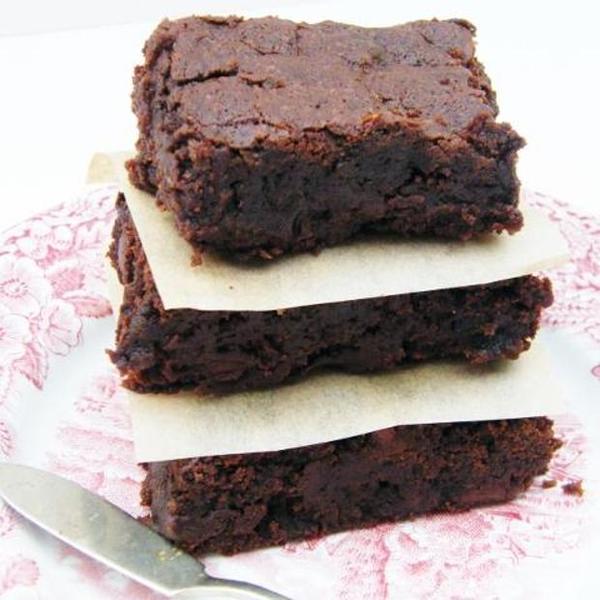
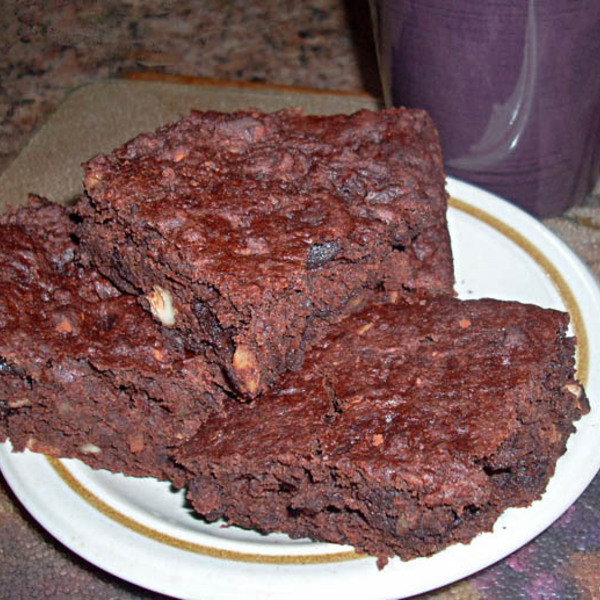
These vegan brownies are fudge-y and exude the flavour of dark chocolate with little sticky, chewy bites of sweet prune. I use Californian Prunes, which are a favourite of mine, but to be honest any prunes would do.
The brownies are a little more crumbly than traditional brownies, but this could be due to the fact I used flax seeds mixed with goji berries.
For more information, here’s a guide to staple alternative ingredients for a vegan diet.
This post may contain affiliate links. Please see our disclosure policy.
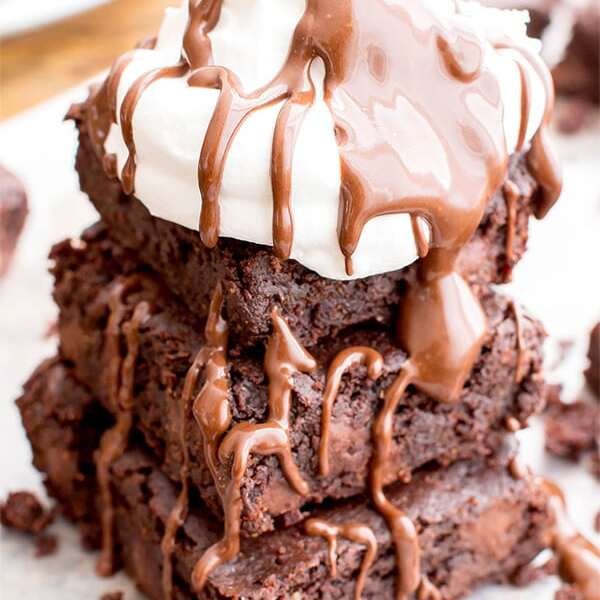
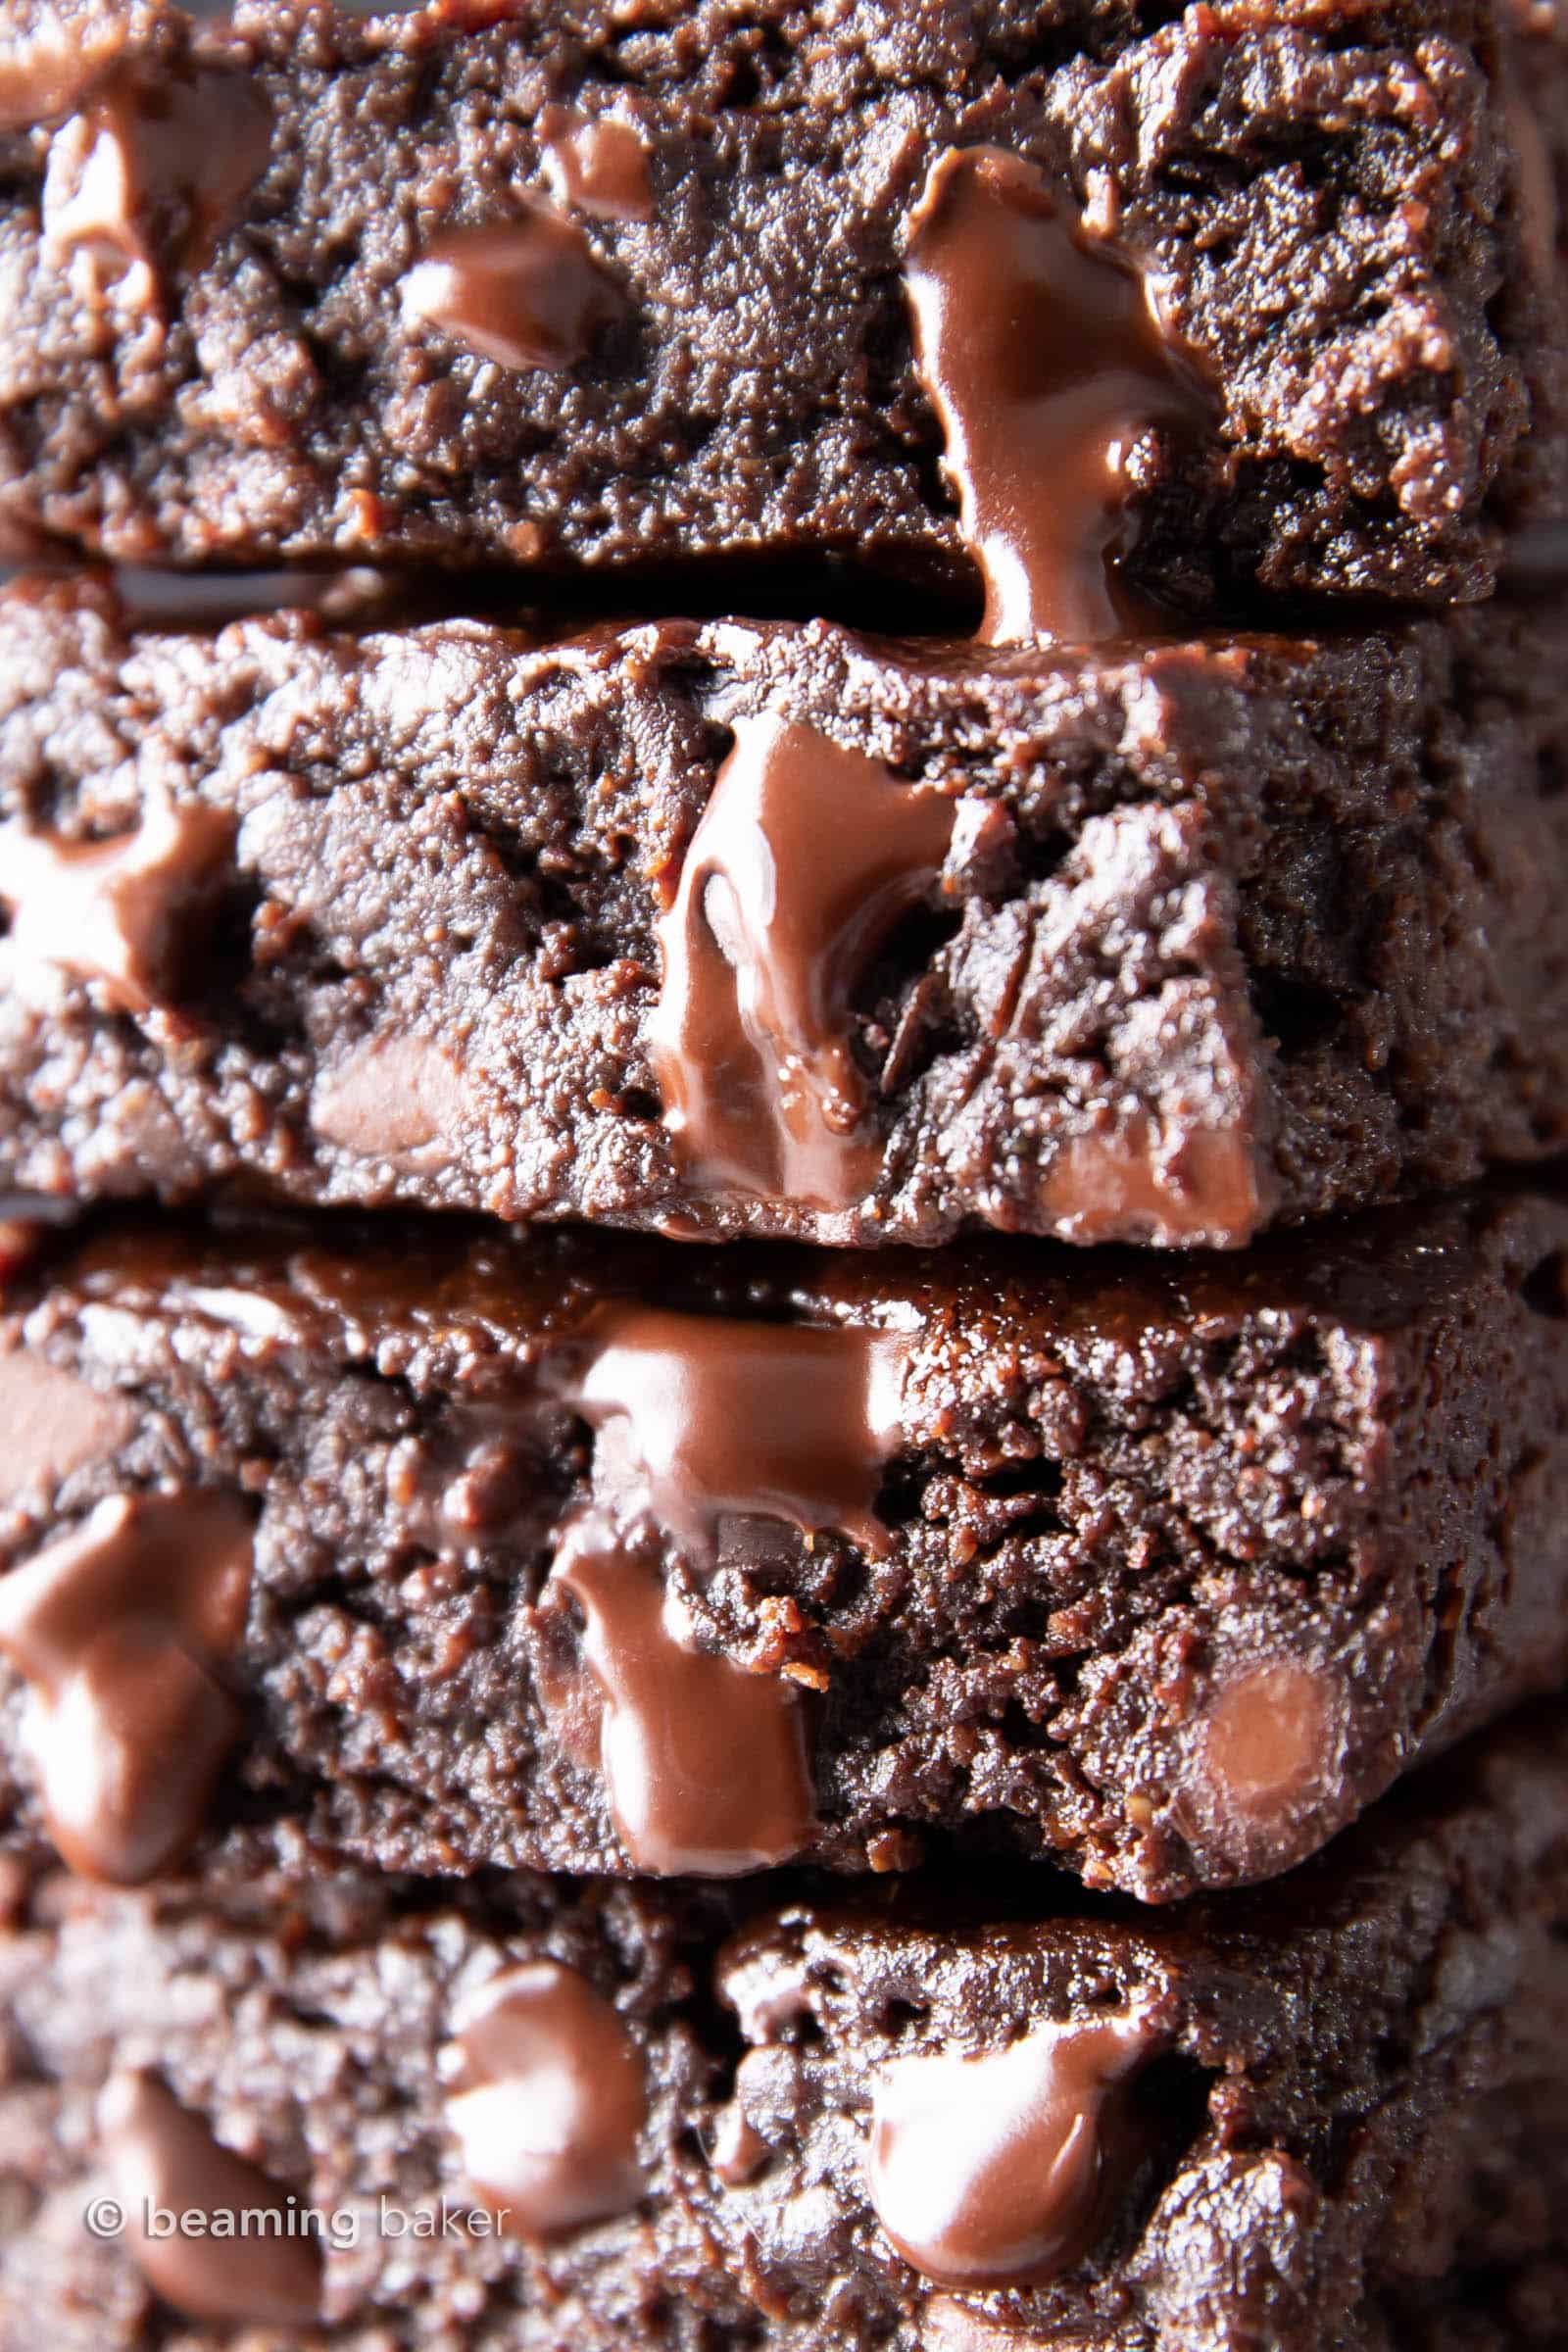
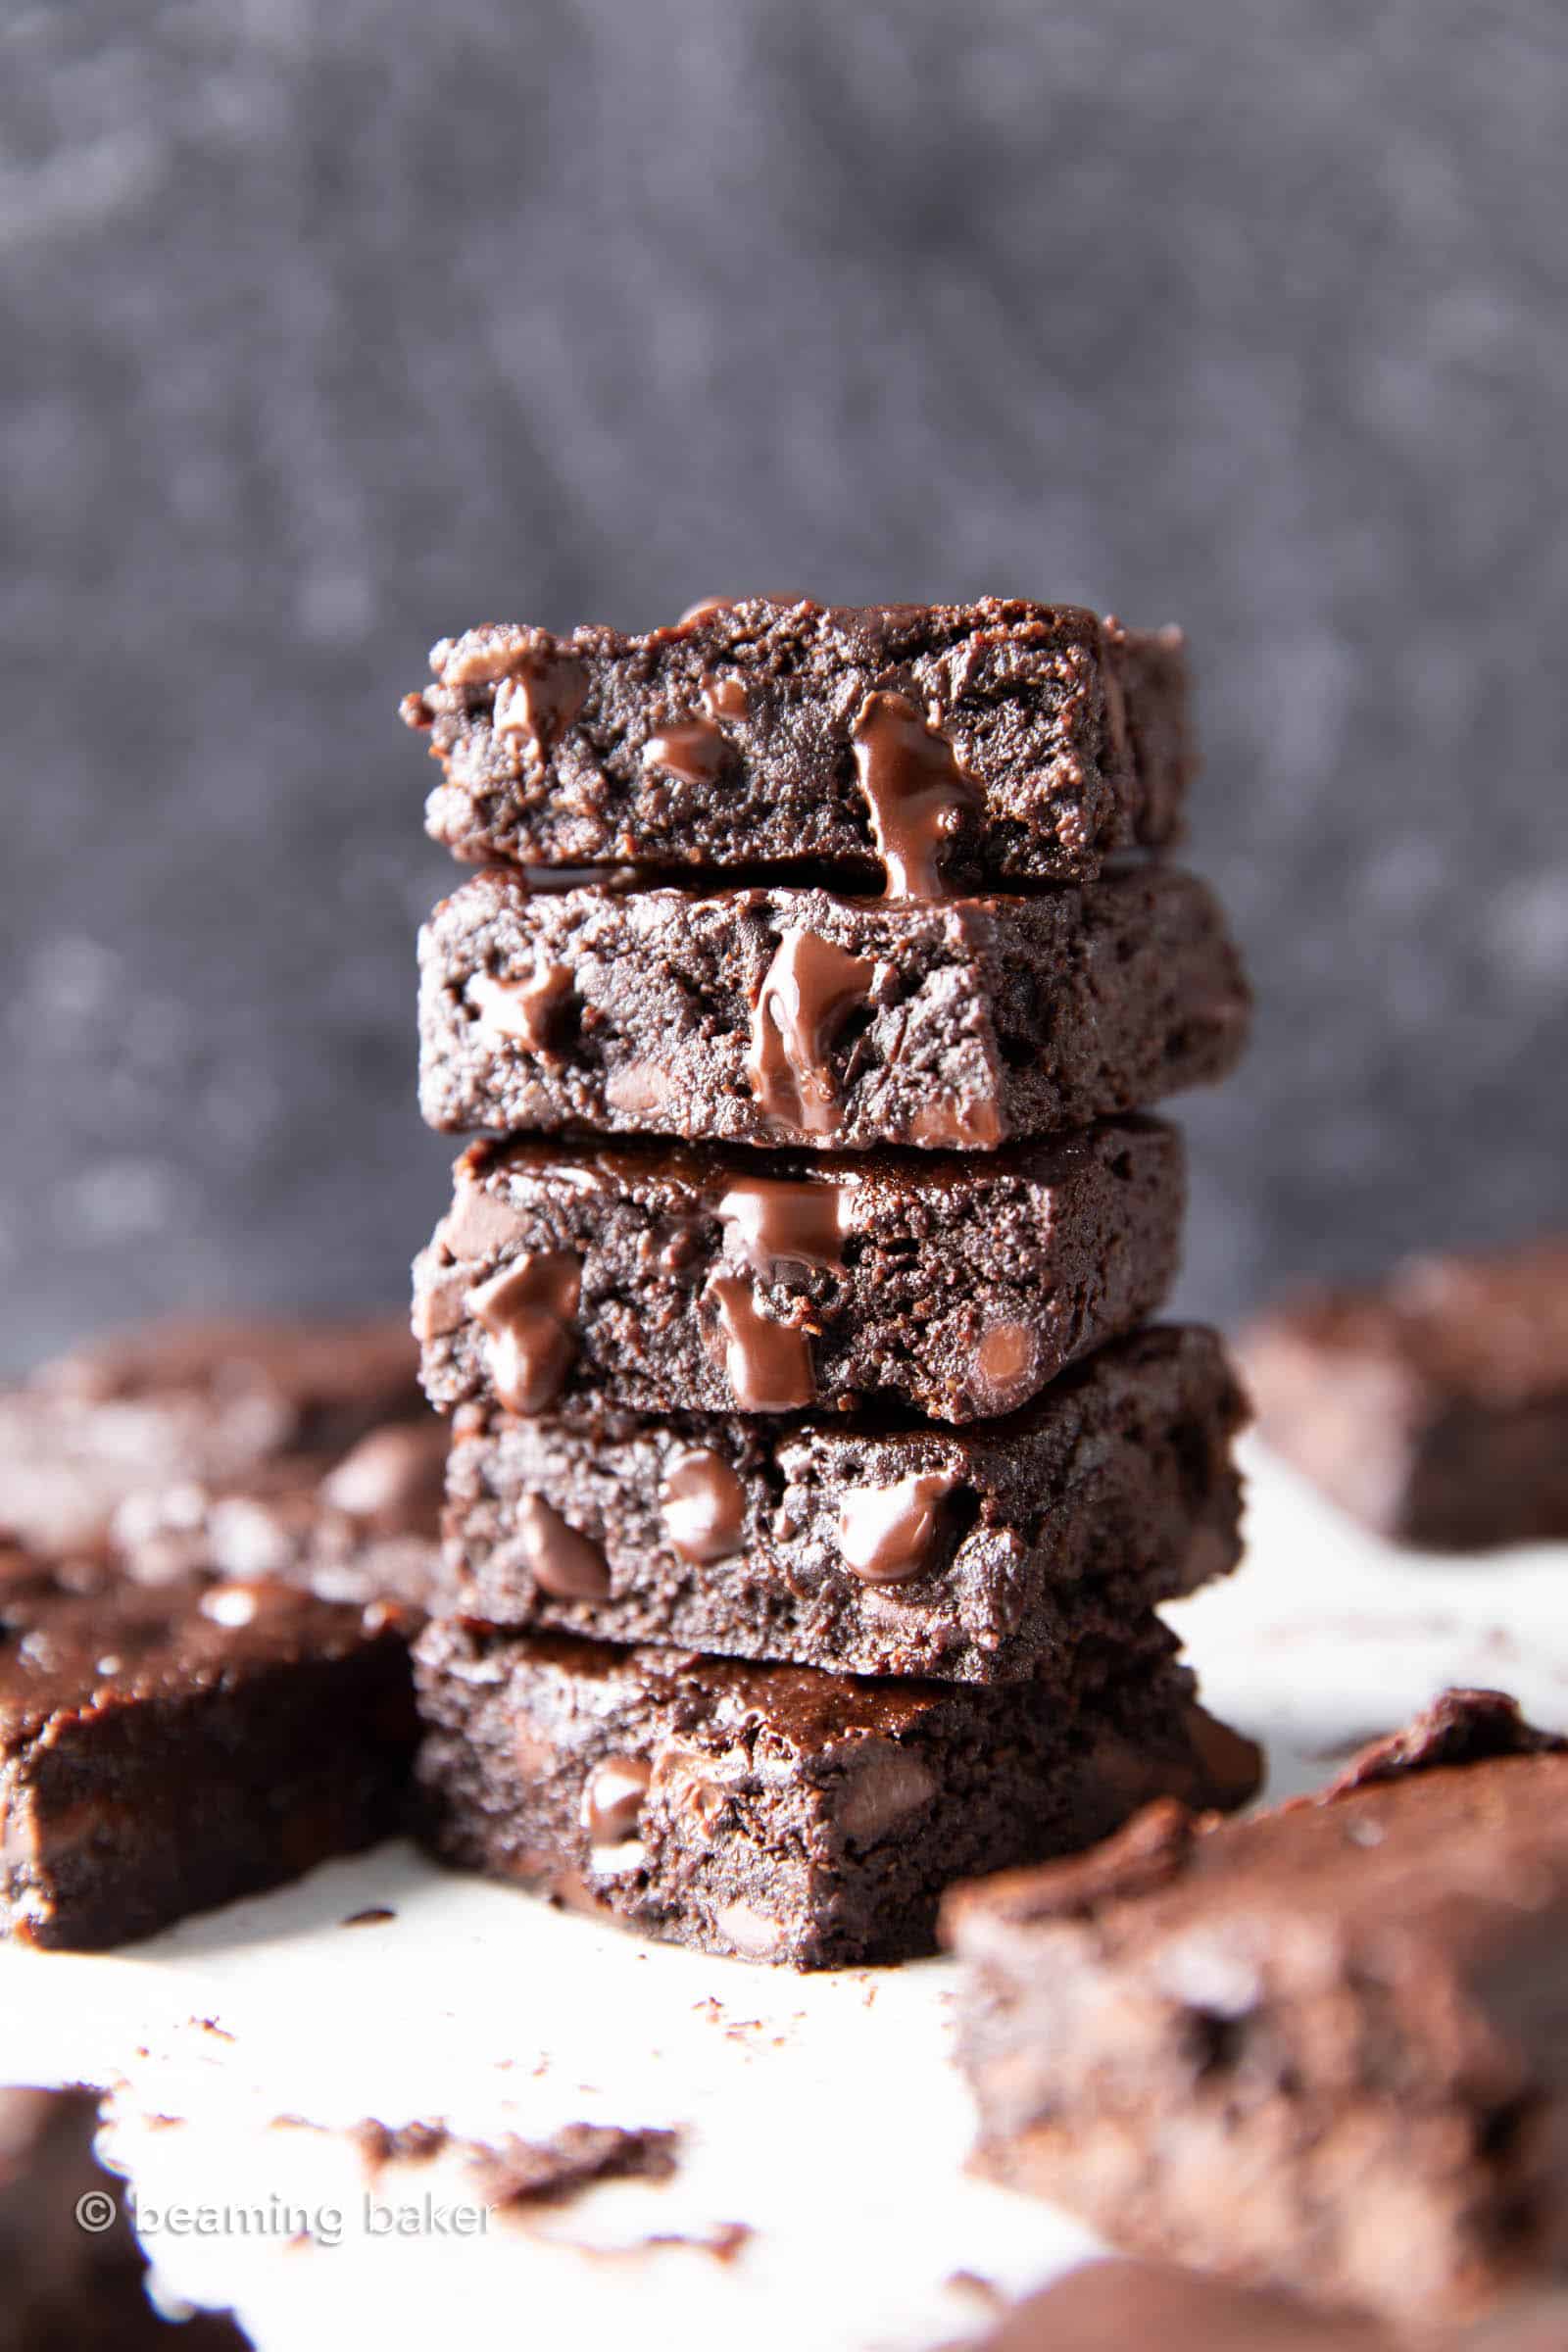
Vegan Gluten Free Brownies (GF): super rich & moist FUDGY vegan gf brownies! The best vegan gluten free brownie recipe—easy to make, mouthwateringly good, Gluten Free & Dairy Free!
What’s your favorite texture of vegan gluten free brownies? Is it fudgy and moist with deep chocolate flavor? Or is it cakey and a little fluffy with chocolate undertones? (Okay, admittedly, if chocolate is under, I can’t say what would be over it. Lol).
I think the best vegan gluten free brownies would be seriously chocolatey, with rich, moist chocolate flavor and unbelievably fudgy texture that’s just this side of baked. It would be a little light, but mostly dense and very satisfying. And chocolate would be the whole dang point of it!
*Gets off my soapbox*
So the age-old brownie debate rages on: moist & fudgy or light & cakey? If you said moist & fudgy, you’re in the right place. If you said the other thing, you know where to door is. … J/k! To that, I say, stick around, try these vegan gluten free brownies and see if you like ‘em. 😉
An easy recipe for soft, super-moist Vegan Gluten Free Brownies bursting with rich, fudgy texture.
Back in 2016, I shared these vegan gluten free brownies as “Gluten Free Vegan Brownies”. As it turns out, no one really searches for “gluten free vegan brownies,” but actually search for “Vegan Gluten Free Brownies.” Oh, the things you learn!
>>RELATED: The BEST Gluten Free Oatmeal Chocolate Chip Cookies | Soft Baked Chocolate Vegan Donuts Recipe (Gluten Free) | 35+ Best Vegan Gluten Free Desserts
Since then, these gluten free dairy brownies have been made 1,000s of times, instagrammed over and over, commented on a bajillion times and well-loved the world over. So what’s the fuss about? Let’s just say it all starts with the taste and texture…
Taste & Texture: Vegan Gluten Free Brownies
These vegan gluten free brownies have the most incredible texture. Imagine: soft & moist squares of brownie goodness with fudgy, rich texture. Then, enjoy double the chocolate flavor from cocoa powder and vegan chocolate chips that bake up into the most satisfying, deep chocolate flavors that hit that sweet spot like no other.
How to Make Vegan Gluten Free Brownies
When I first started baking vegan gluten free desserts, I was truly overwhelmed by all the hoops one needs to jump through in order to make such a treat… well, edible. There’s a reason why vegan gluten free desserts have a reputation for being gummy, oddly chewy when not needed, and totally crumbly when, again, not needed. So my mission in making these vegan gf brownies was to deliver a truly magnificent brownie dessert that no one would believe was gluten free and vegan.
I amped up the moist ‘n fudgy factor of these brownies by including two different kinds of vegan- and gluten free-friendly, healthy fats. I also chose to use gluten free oat flour because I find it’s the best ingredient for highlighting the main flavor in a recipe. Here, you’ll find that it’s chocolate (spoiler alert!).
Preheat
Before starting on any baking adventure, I head straight to the oven and preheat that bad boy. It’s a habit I picked up when I started baking and ran into so many forgetful moments of not remembering to preheat the oven! Next, prepare your flax eggs–this is a good thing to do at the start of any vegan recipe that calls for it. Flax eggs need about 15 minutes to set, so you want it to be ready when you are. 😉
Whisk
Whisk together almond butter, coconut sugar, maple syrup and coconut oil in a medium bowl. Then, whisk in cocoa powder until shiny and smooth. Whisk in vanilla, salt and flax eggs.
Fold
Fold in gluten free oat flour until no flour patches remain in your brownie batter. Fold in vegan chocolate chips.
Pour & Bake
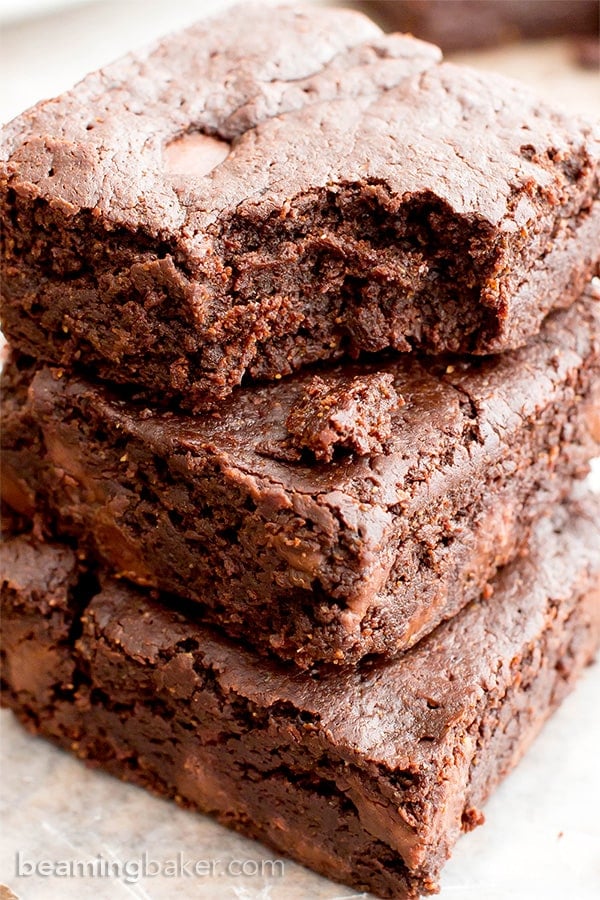
Pour vegan gf brownie batter into a lined pan. Bake for about 30 minutes.
Cool, Slice & Enjoy
Cool, slice and enjoy the best vegan gluten free brownies ever!
Gluten Free Vegan Pantry Essentials: Gluten Free Rolled Oats for making Homemade Oat Flour | Coconut Sugar | Organic Extra Virgin Coconut Oil
Raw Cacao Powder & Golden Ground Flaxseed – two super-essential ingredients in my vegan gluten free baking pantry. The raw cacao powder is nutrient-rich and boasts deep chocolate flavor while the golden ground flaxseed is so finely milled that you won’t detect it at all in your baked goods! Perfect flax eggs, here we come! 😉
Vegan Chocolate Chips or Allergy-Friendly Chocolate Chips – the vegan chocolate chips are my fave, while the allergy-friendly chocolate chips are a super popular choice.
Easy Brownie Slicer – hint: this is also a pizza cutter! 😉 I love using this baby to easily slice the entire tray of gluten free brownies in just a few motions.
Gluten Free Dairy Free Brownies (Vegan) & More
Vegan Peanut Butter Cup Brownies
Ultimate Fudgy Paleo Vegan Brownies Recipe
Healthy Zucchini Brownies (Vegan, GF)
Best Vegan Brownies Recipe – Easy ‘n Moist!
My Favorite Gluten Free Brownies Recipe From Scratch!
50+ Gluten Free Dairy Free Desserts!
Vivaciously Vibrant Vegan Gluten Free V…Brownies!
Alright, so I didn’t have another V under my sleeve. Send one over, will ya? 😉 I can’t wait to hear what you think of today’s vegan gluten free brownie recipe. Be sure to leave a comment & let me know what you think of my recipe! I truly love hearing from you. I’m so grateful you’re here, sharing in these baking adventures with me and your loved ones. ‘Til the next one…
Sending you all my love and maybe even a dove, xo Demeter ❤️
Preheat oven to 325°F. Line an 8-inch square baking pan with parchment paper or greased foil. Set aside.
In a medium bowl, whisk together almond butter, coconut sugar, maple syrup and melted coconut oil. Whisk until it resembles caramel.
Add cocoa powder in ¼ cup increments, whisking until shiny and smooth. Scrape down the sides of the bowl as necessary. Whisk in vanilla, salt and flax eggs.
In thirds, fold in in the oat flour using a rubber spatula. Fold until batter resembles a very soft dough, with no flour patches remaining. Fold in chocolate chips.
Pour batter into pan. Using a rubber spatula, smooth batter into an even layer.
Bake for 26-34 mins. Mine took about 30 minutes. Cool for 1 hour, or until completely cool. Slice into 9-16 brownies. Enjoy!
More Gluten Free Dairy Free Brownies (Vegan)
Where to Buy Ingredients: Raw Cacao Powder & Golden Ground Flaxseed | Gluten Free Rolled Oats for making Homemade Oat Flour | Coconut Sugar | Organic Extra Virgin Coconut Oil
*Do not use tahini (a seed butter)—the oil content is not consistent with nut butters and will make your brownies too oily.
A Note on Homemade Oat Flour: **If using homemade oat flour, make sure to blend the flour until very fine and sift the flour to remove coarse bits of oats that could create less than ideal results. Store until needed, then measure the amount required for the recipe.
Storing Instructions: Store in an airtight container for up to a week at room temperature, out of direct sunlight and away from heat sources.
Freezing Instructions: These brownies freeze well. Store in an airtight freezer-friendly, airtight container in the freezer for up to a month. Thaw at room temperature for 30 minutes before enjoying. Or, heat in the microwave for 10 second increments until just warm.
This post may contain affiliate links, which allow me to make a small commission for my referral, at no additional cost to you. Thank you for supporting Beaming Baker.
Hi there!
I’m Demeter, it’s nice to meet you! Here, you’ll find easy recipes that are fun & approachable. I love cozy movies, a good mystery, and chocolate. Welcome!
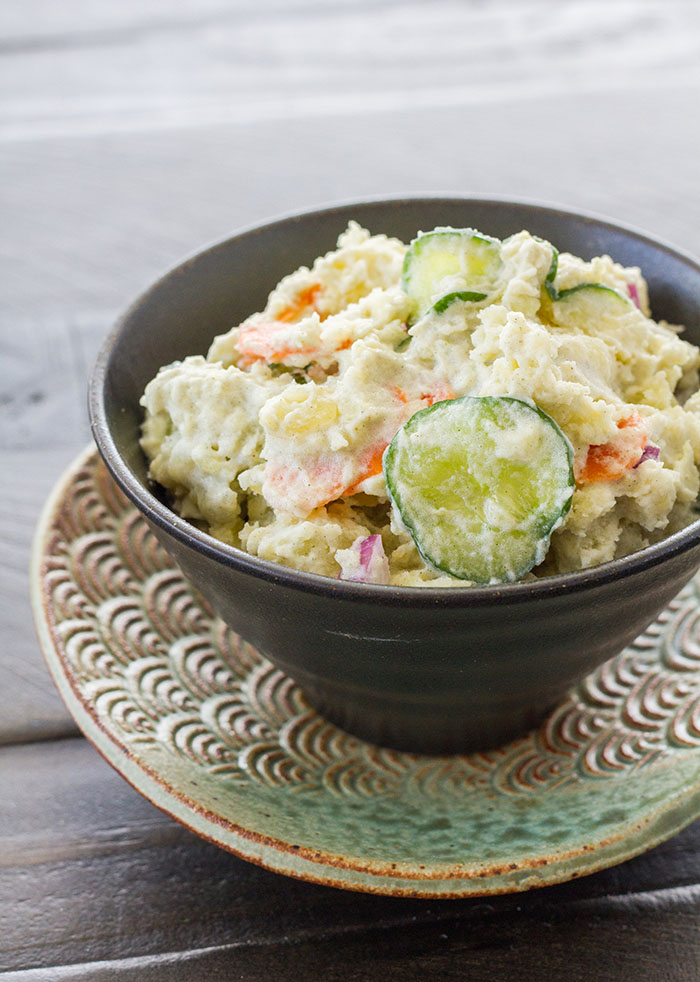
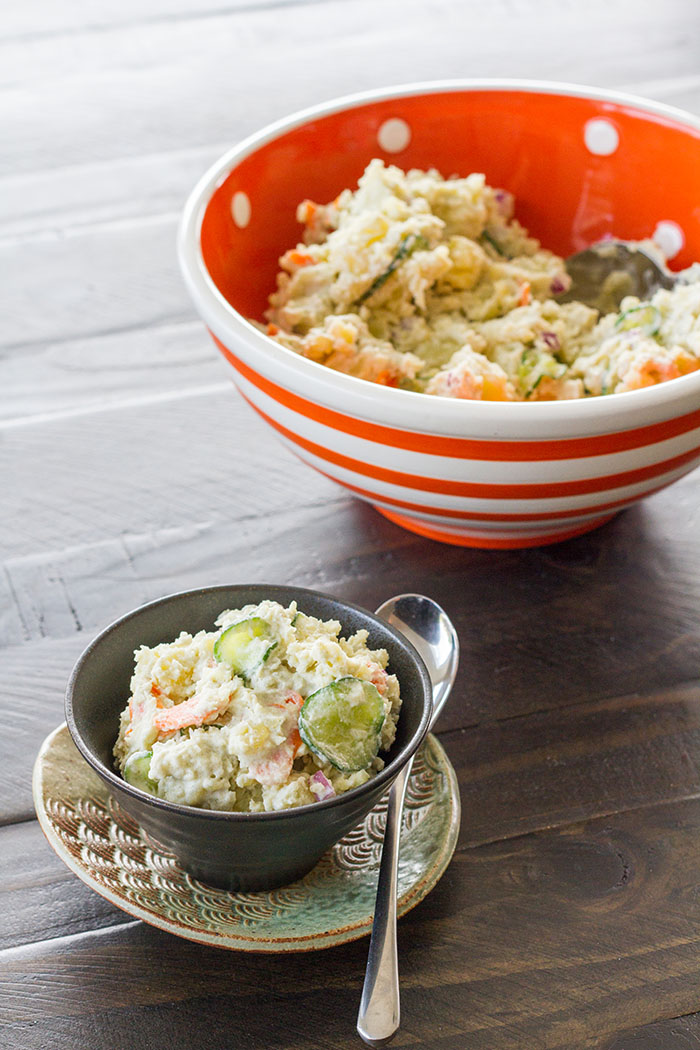
Potato salad is a classic summer food in my mind. It goes so perfectly with other picnic foods or foods that you might cook on the grill. My FAVORITE style of potato salad is Japanese potato salad, which I’ve written about before.
As I previously wrote, Japanese-style potato salad is bit different because you roughly mash the potatoes before adding the other ingredients. You also use Japanese mayonnaise, which I loooooooove, and add sliced cucumbers and carrots. It’s made with Japanese-style mayonnaise, which is a bit tangier, sweeter, and creamier than American mayonnaise, which also influences the final flavor of the potato salad. Veganizing my Japanese potato salad recipe is super easy. Just replace the mayo with a veganized mayo (and hey, I just shared a recipe for a vegan Japanese-style mayonnaise…how convenient!), and do not add the egg. In place of the egg you can always add a bit of Indian black salat (kala namak), which has a distinct egg smell and flavor. (I buy mine at either an Indian market or Asian market.)
This is a veganized version of my Japanese potato salad recipe. Japanese-style potato salad is bit different because you roughly mash the potatoes before adding the other ingredients. You also use Japanese mayonnaise and add sliced cucumbers and carrots.
Servings6
AuthorRachael Hutchings, www.LaFujiMama.com
2 pounds Yukon Gold potatoes, peeled and cut into large 2-inch chunks
1 small carrot, peeled
5 inches Japanese cucumber, thinly sliced
1 teaspoon fine grain sea salt, plus more to taste
1/8 small red onion, finely chopped
3/4 cup vegan Japanese-style mayonnaise
1 tablespoon unseasoned rice wine vinegar
1/2 teaspoon Indian black salt (kala namak), plus more to taste, optional
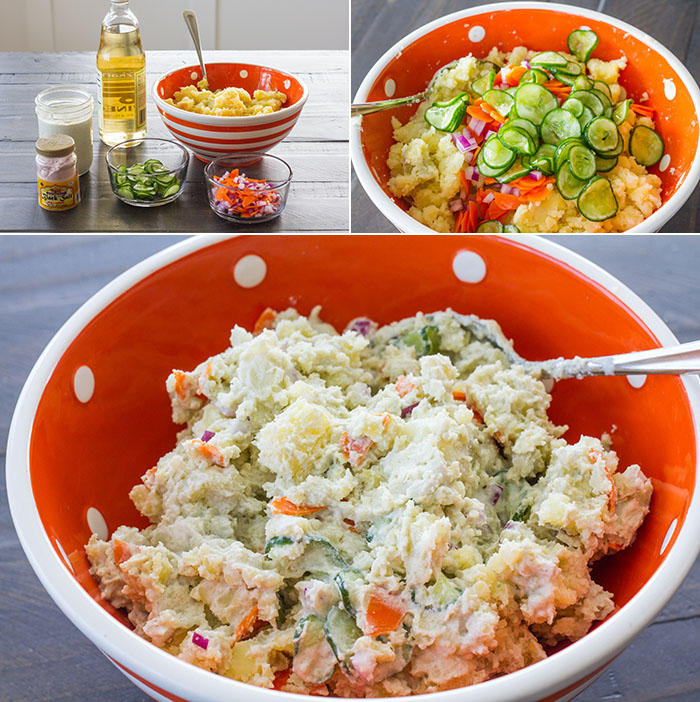
Put the potatoes, carrot, and a large pinch of fine grain sea salt in a large pot and cover them with cold water. Bring the water to a boil over medium heat and let the potatoes simmer until they are fork tender. Remove the carrot when it is starting to soften, but before it can be pierced through with a bamboo skewer. Start checking the carrot and potatoes after they’ve been simmering for about 8 minutes. When the potatoes are done, drain them well.
While the potatoes are cooking, sprinkle the cucumber slices with 1 teaspoon of fine grain sea salt, toss, and let them sit for 5 to 10 minutes, then gently squeeze them and drain out the excess cucumber water.
Slice the cooled carrots in half lengthwise, then slice each half into thin half-moons. Coarsely mash the potatoes so some small chunks of potato still remain, then let the mash cool.
After the potato mash has cooled, stir in the cucumbers, carrots, red onion, and hard-boiled eggs. Gently stir in the mayonnaise and rice wine vinegar. Add additional mayonnaise, if desired. Cover the potato salad with plastic wrap, or place it in an airtight container and let it chill in the refrigerator for at least 1 hour.
If you don’t have access to Japanese cucumbers, use a thin-skinned cucumber like a Persian cucumber or small snacking cucumbers. If you only have regular cucumbers, peel them, slice them in half lengthwise and remove the seeds, then thinly slice them.
Japanese mayonnaise is typically made with rice vinegar, which gives it a different flavor from American mayonnaise which is made from distilled vinegar or lemon juice and is a bit sweeter and creamier than American mayonnaise. The most well-known Japanese brand of mayonnaise is Kewpie, sold in plastic squeeze bottles in many Asian markets here in the US. Since Kewpie mayonnaise is not vegan, you can make your own! Or you can just substitute your favorite vegan mayo.
This potato salad is also delicious with other veggies thrown in, like fresh peas or corn. Get creative!
Tagged as:
gluten-free,
Japanese food,
Japanese Potato Salad,
plant-based,
potato salad,
vegan,
vegan potato salad
“That’s right, vegan brownies that actually taste GOOD. What’s more, they don’t involve a bunch of ridiculous health food store ingredients and they’re super quick to make. Mmmm…tasty easy moist healthy brownies. I don’t know about you, but I’m sold! (And I’m not even vegan)”
Ready In:
40mins
Ingredients:
11
Serves:
9
1
cup unsweetened applesauce
1⁄2
cup raw sugar
1
teaspoon vanilla
3⁄4
cup unbleached white flour
1⁄3
cup cocoa powder
2
teaspoons baking powder
1⁄2
teaspoon baking soda
1⁄2
teaspoon salt
1⁄2
cup semisweet vegan chocolate chips
1⁄3
cup walnuts (optional)
1
dash cinnamon (optional)
directions
Preheat oven to 350 and lightly spray or oil an 8 x 8 baking pan.
Mix applesauce, sugar, and vanilla in a medium bowl. In another bowl, whisk flour, cocoa, baking powder, baking soda, and salt (and cinnamon if using) together.
Make a well in the center of the dry ingredients and add the applesauce mixture. Mix until just combined. Gently fold in chocolate chips (and walnuts if using).
Spread in prepared pan and bake 25-30 min, until center is firm and not sticky. Cool completely before slicing.
Questions & Replies
Want a Second Helping?
Sign up for our newsletter to get recipes, easy dinner ideas, tasty treats and more delivered straight to your inbox.
To withdraw your consent or to learn more about your rights, see the Privacy Policy.
RECIPE SUBMITTED BY
Books and cooking are my passions…I love cookbooks by default. I will begin working on a Masters in English this coming fall…hopefully I’ll still have time to cook! Someday I’d like to be able to publish my own cookbook from my family’s recipes, but for now I’m just going to concentrate on getting my degree and becoming a better cook. I have an amazing boyfriend who, at 30, is just learning how to like vegetables and two rad, stripey cats.
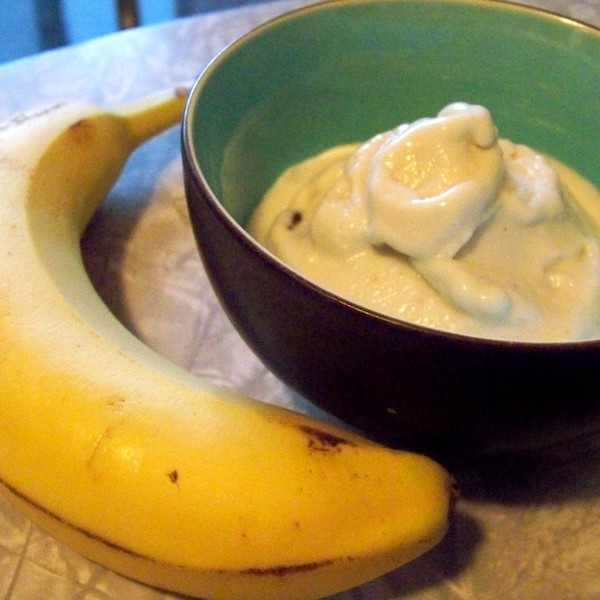
“This is modified from an Alton Brown recipe on the Banana episode of Good Eats. I replaced the cream with coconut milk and the corn syrup with agave nectar to make it vegan and healthier. I also added the optional carob chips and coconut flakes, which my friends agreed really worked well with the banana flavor. Despite its healthiness, this recipe is still luxuriously thick, “creamy,” and rich. Instead of chilling the mixture before putting it in the ice cream maker, you can use frozen bananas. Be sure to use regular (not light) coconut milk. Cooking time is freezing time in ice cream maker.”
Ready In:
30mins
Ingredients:
7
3
bananas (frozen or not)
1⁄2
tablespoon fresh lemon juice
1
teaspoon vanilla extract
1
cup coconut milk
1⁄4
cup agave nectar
1⁄2
cup unsweetened dried shredded coconut (optional)
1⁄2
cup carob chips (optional) or 1/2 cup semisweet vegan chocolate chips (optional)
directions
Place all ingredients except shredded coconut and carob chips in blender or food processor. Puree, scraping sides occasionally, until uniform.
If you used frozen bananas, pour the mixture directly into the frozen cannister of a 1-quart ice cream maker and freeze according to the manufacturer’s directions.
If you used room-temperature bananas, chill the mixture in your refrigerator for at least a few hours before pouring into the frozen cannister.
If you don’t have an ice cream maker, you can freeze the mixture and then puree it again in your food processor, but it won’t be as creamy.
If using shredded coconut and/or carob/chocolate chips, add them to the ice cream maker in the last 5-10 minutes.
Enjoy, and store leftovers in the freezer.
Questions & Replies
Got a question?
Share it with the community!
Want a Second Helping?
Sign up for our newsletter to get recipes, easy dinner ideas, tasty treats and more delivered straight to your inbox.
To withdraw your consent or to learn more about your rights, see the Privacy Policy.
I’m a grad student and also teach at two different schools, so I need some fast/easy recipes. I try to eat vegan, and most of my creations are also gluten-free because my husband is Diabetic/Celiac. I don’t post any recipes I have not personally tried and liked.