Author: PatagoniaLlami

  • Vegan Mayo

    Vegan Mayo

    recipe image

    This vegan mayo recipe is made without milk or eggs. It tastes great as a dip with veggies or on bread. Store in a closed container in the fridge for up to 2 weeks.

    Submitted by
    Rita

    Updated on February 9, 2023


    Cook Mode
    (Keep screen awake)

    Ingredients


    Original recipe (1X) yields 35 servings

    • 1 cup soy milk

    • 1 tablespoon apple cider vinegar

    • ½ tablespoon Dijon mustard

    • 1 teaspoon sea salt, or to taste

    • 1 ½ cups sunflower oil, or more as needed

    Directions

    1. Combine soy milk, apple cider vinegar, Dijon mustard, and sea salt in a blender; blend until smooth. Slowly add oil in a thin steady stream while the blender is running until mayonnaise is thick, but still runny.

    Nutrition Facts (per serving)

    87 Calories
    10g Fat
    1g Carbs
    0g Protein
    Nutrition Facts
    Servings Per Recipe
    35
    Calories
    87
    % Daily Value *
    Total Fat
    10g
    12%
    Saturated Fat
    1g
    5%
    Sodium
    75mg
    3%
    Total Carbohydrate
    1g
    0%
    Total Sugars
    0g
    Protein
    0g
    0%
    Calcium
    2mg
    0%
    Potassium
    9mg
    0%

    * Percent Daily Values are based on a 2,000 calorie diet. Your daily values may be higher or lower depending on your calorie needs.

    ** Nutrient information is not available for all ingredients. Amount is based on available nutrient data.

    (-) Information is not currently available for this nutrient. If you are following a medically restrictive diet, please consult your doctor or registered dietitian before preparing this recipe for personal consumption.

    Read More

  • Cranberry Orange Muffins {Vegan}

    Cranberry Orange Muffins {Vegan}

    recipe image

    These Vegan Cranberry Orange Muffins are one of our most popular recipes to date! Tis the season and I was getting a lot of requests to bring this one back. So updated photos & text with the same great recipes. Enjoy! 🙂

    Close up of stacked muffins

    I’ve made a slight adjustment to the original recipe in that I now try to avoid using silken tofu as an egg replacer in my baking. Rather, I almost exclusively use either unsweetened applesauce, or my current ‘go to’ replacer…1 Tbl of ground flax seed + 3 Tbl of water allowed to sit in the refrigerator for about 15 (preferably 30) minutes to thicken. It becomes very gelatinous and perfect for baking.  For breads and muffins however, applesauce will work just fine.

    muffins

    This simple recipe is my mom’s personal favorite holiday sweet treat and we sometimes make it into a loaf. It’s awesome toasted in the morning if you choose to make it this way.

    The first step is to combine the dry ingredients, starting with flour. I use all purpose. If you’d like to try making this recipe gluten free, the only flour I have any experience with is Bob’s Red Mill 1 to 1 Gluten Free Blend.

    Adding flour to the bowl of an electric mixer

    Sugar is next. This is your everyday table sugar. We use a coarse sugar for decorating the top, but you can also use this for decorating as well. It just looks prettier, but if you don’t have it on hand or can’t find it, we’ve used table sugar for years and it’s just as delicious.

    Adding sugar to the bowl of an electric mixer

    Baking powder…

    Adding baking powder to the flour

    Baking soda…

    Adding baking soda to flour mixture

    and salt round up our dry ingredients. I give them a good mix before proceeding.

    Adding salt to the flour mixture

    Freshly grated orange zest really give this muffin a lot of flavor.

    Adding orange zest to the flour mixture

    Additionally, to drive home that orange flavor, we use orange juice as part of the liquid in this recipe.

    Not shown, today we used applesauce as the “egg replacer”. I often use ground flax mixed with water as well. Either work well for baked goods.

    Adding orange juice to the flour mixture

    A neutral flavored oil rounds out the liquid ingredients.

    Adding oil to the flour mixture

    So here’s our batter. You’ll want to fold in the nuts and cranberries.

    Photo of batter in mixing bowl

    I just used a food processor with the chopping blade and fresh cranberries here. I buy them when they are in season and freeze the entire bag until I am ready to use them.

    Chopped cranberries in a food processor

    I also processed up some walnuts.

    Ground walnuts in a food processor

    The walnuts are added to the batter first as we don’t want the cranberries to give our batter too much of that pink color.

    Adding chopped nuts to batter

    A gentle folding is all that’s required.

    Adding chopped cranberries to batter

    They do get a bit pink, but aren’t they pretty?

    Using a large ice cream scoop, place the finished batter into muffin (or cupcake) papers and bake in a preheated oven.

    Scooping batter into muffin cups

    The final step is to sprinkle the tops with sugar. Again, use coarse sugar if you have it or plain table sugar if you don’t.

    Sprinkling sugar on muffins before baking

    Allow them to rest in the pan for just a few minutes to firm up, then remove to a cooling rack to cool completely before storing.

    Baked cranberry orange muffins in pan

    They are best enjoyed fresh and covered, will tend to soften a bit. We like to warm them up and serve with a bit of vegan margarine and a hot cup of tea.

    Close up from top of muffins

    If you’ve tried this recipe, let us know in the comments below.  It’s always fun to see how readers make it their own 🙂 Enjoy!

    Author Veg Life Staff

    Ingredients

    • 2 C All-Purpose Flour
    • 1 Cup vegan Sugar plus 1 Tbl more for the topping
    • 1-1/2 tsp Baking Powder
    • 1 tsp Salt
    • 1/2 tsp Baking Soda
    • 2 tsp Grated Orange Peel
    • 3/4 C Juice from 1 large Orange
    • 1/4 C Vegetable Oil
    • 1 Tbl Ground Flax Seeds + 3 Tbl of water allowed to sit in the refrigerator for 15 minutes OR 1/4 C Applesauce
    • 2 C frozen Cranberries thawed
    • 1/3 C chopped Walnuts plus about 2 Tbl more for the topping

    Instructions

    • Preheat oven to 400 degrees.

    • Prepare a muffin or cupcake pan with cupcake liners.

    • Combine flour, sugar, baking powder, salt and baking soda.

    • Add orange zest, orange juice, oil and flax mixture (or applesauce if using that as your egg replacer).

    • Blend just until moist. Fold in cranberries and walnuts by hand.

    • Using an ice cream scoop, divide batter evenly between 16 cupcake liners.

    • Combine the reserved sugar and walnuts and sprinkle the tops of each muffin.

    • Bake for 15 minutes and then cool on a wire rack for 10 minutes. Remove and cool completely.

    • Store in an airtight container or freeze in freezer bags.

    Read More

  • Creamy Vegan Potatoes Au Gratin

    Creamy Vegan Potatoes Au Gratin

    recipe image

    posted on October 2, 2018

    Creamy Vegan Potatoes Au Gratin - the perfect side dish to go with just about anything and you would never know it was vegan. The rich

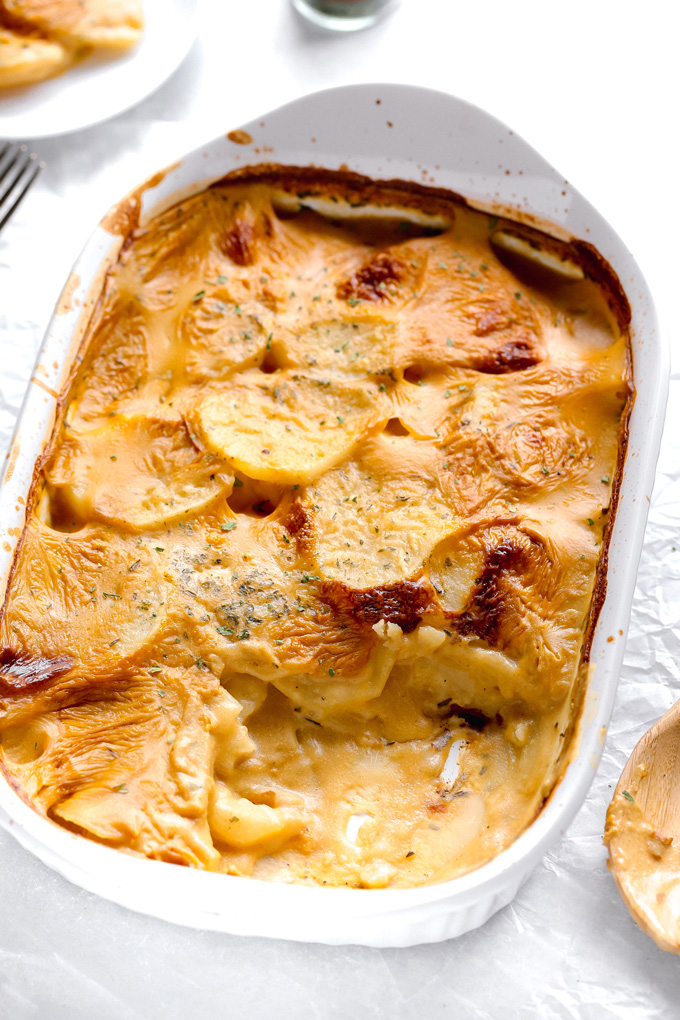
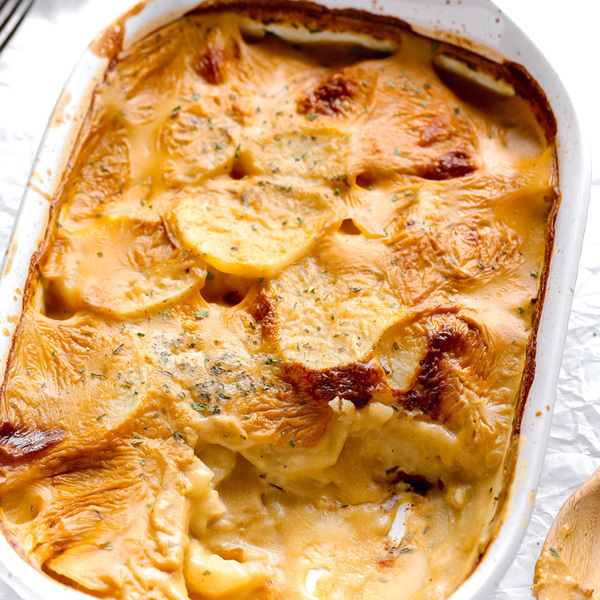
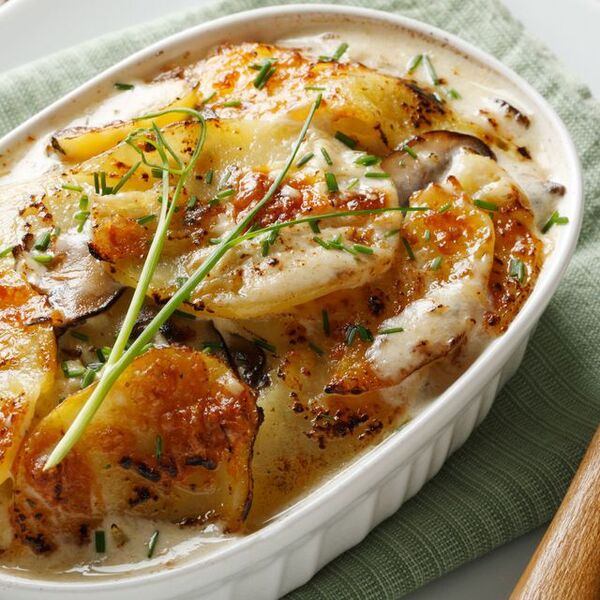
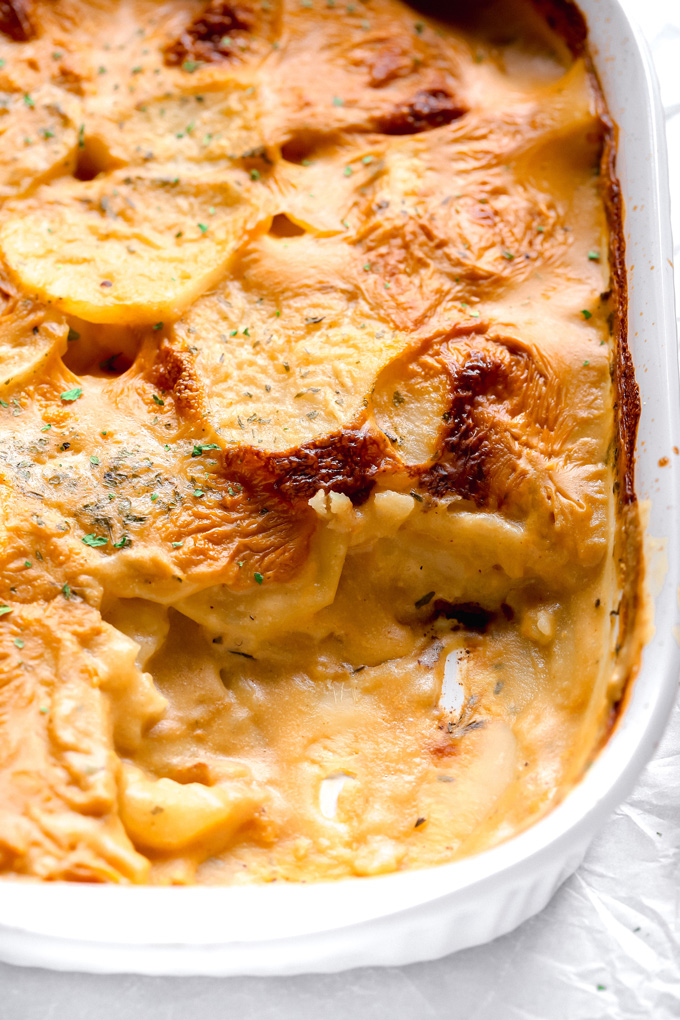
    Does it get any more classic than with Creamy Vegan Potatoes Au Gratin? I loved this stuff growing up. At times I thought if I ate any more potato au gratin I would lose my mind or just become a potato for real.

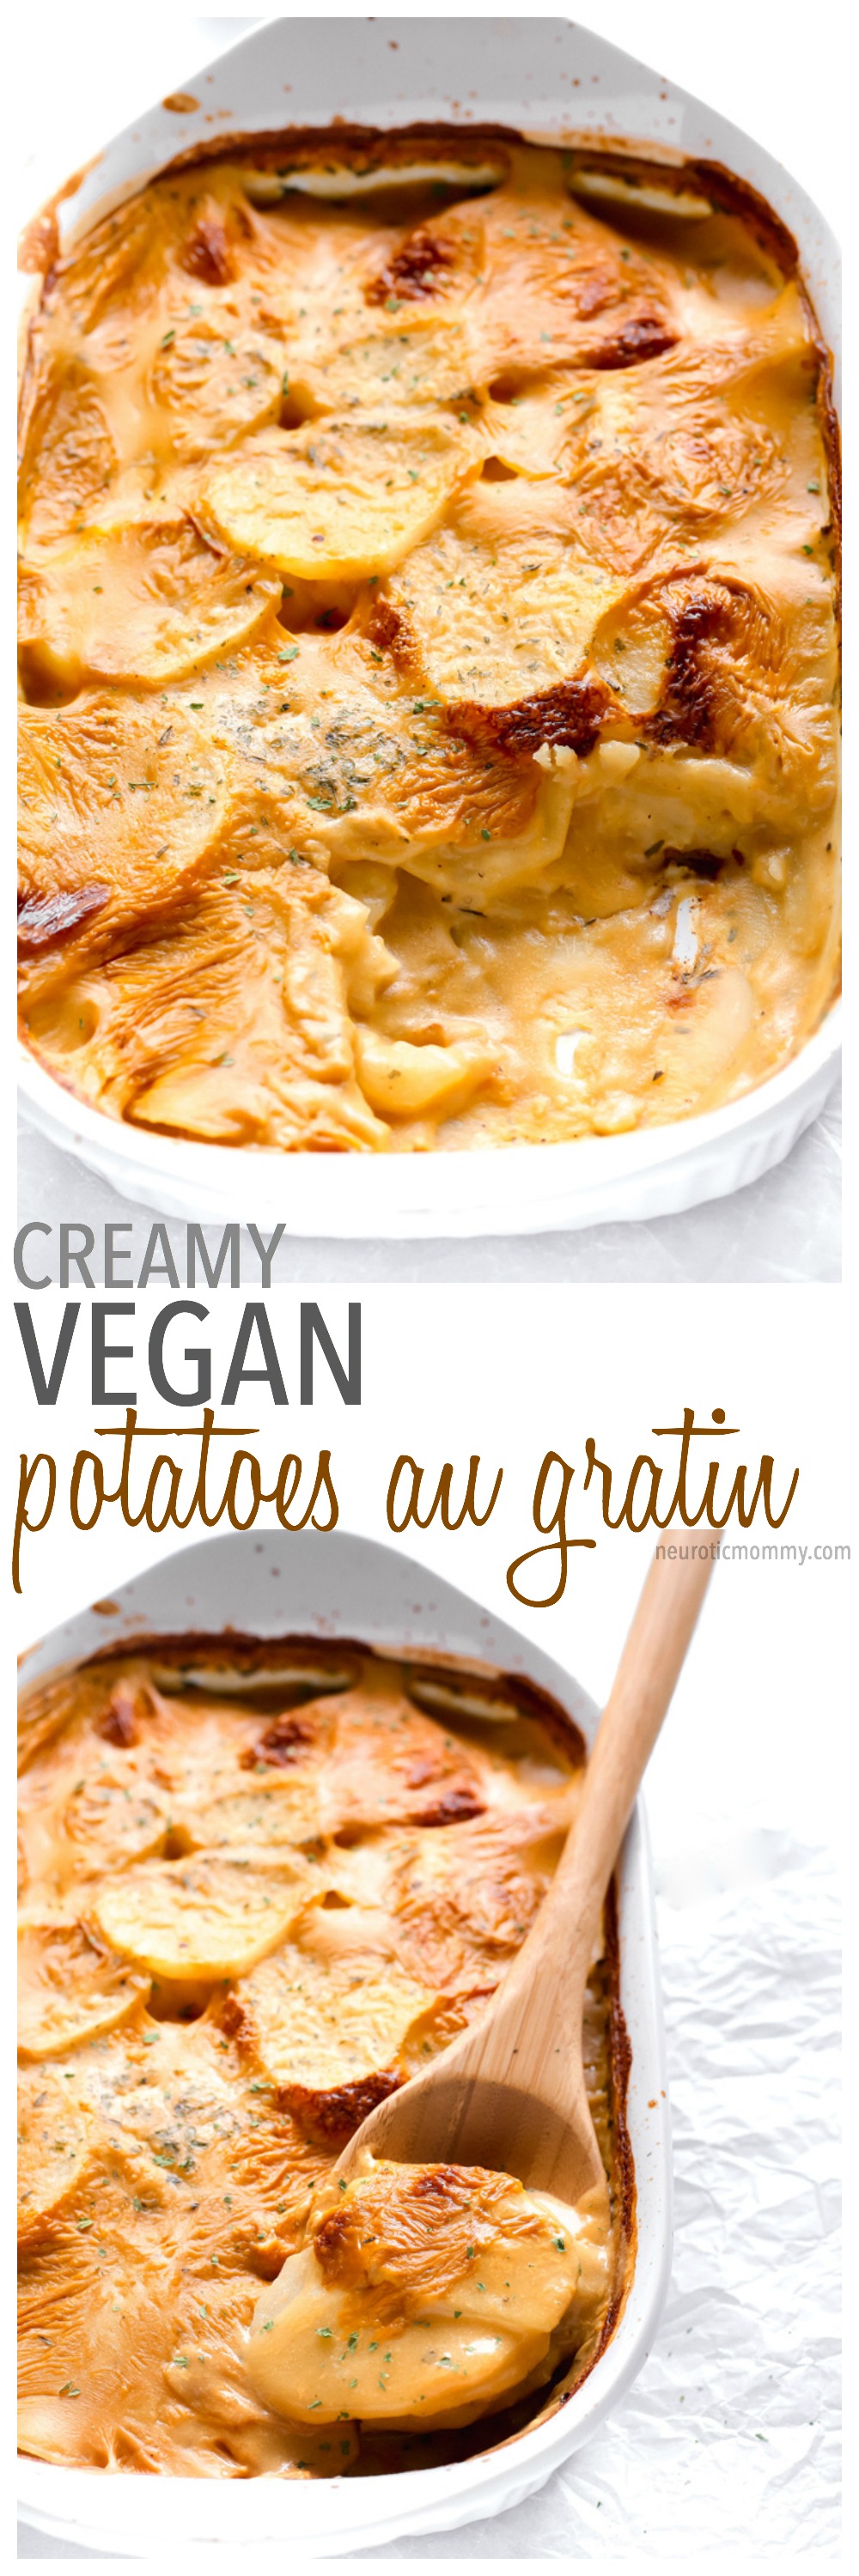
    This vegan version is so thick and “cheesy” you would never know for one second it wasn’t “the real thing”. And it’s made from wholesome ingredients everyone can get down with. When I make this, even the big big batch, there are no leftovers, it’s that good.

    Creamy Vegan Potatoes Au Gratin - the perfect side dish to go with just about anything and you would never know it was vegan. The rich

    Scalloping potatoes is no easy task. You can cut them by hand but you won’t get them evenly sphered and thin as they should be for a recipe like this. But by all means give it a go if you’re a skilled chef who knows their way around a knife, but for me I used my trusty food processor with the exact slice system. It cuts them perfectly and the only thing I need to do on my end is wash and peel the potatoes. It’s also super safe so you don’t really have to worry about cutting yourself while it’s slicing. Alternatively, you can use a mandolin slicer.

    *THIS POST CONTAINS AFFILIATE LINKS, WHICH MEANS THAT I MAKE A SMALL COMMISSION OFF ALL ITEMS YOU PURCHASE AT NO ADDITIONAL COST TO YOU. I APPRECIATE YOUR SUPPORT IN THIS WAY AS IT HELPS KEEP NM UP AND RUNNING.*

    Creamy Vegan Potatoes Au Gratin - the perfect side dish to go with just about anything and you would never know it was vegan. The rich

    After you’ve sliced the potatoes, place them in ice cold water so they don’t oxidize and turn brown. That happens rather quickly so I usually have my ice water ready. As soon as the potatoes are done being sliced (in minutes) I throw them in the ice bath. Keeps the potatoes nice and fresh. However, a little oxidation never hurt anyone so don’t worry if it happens.

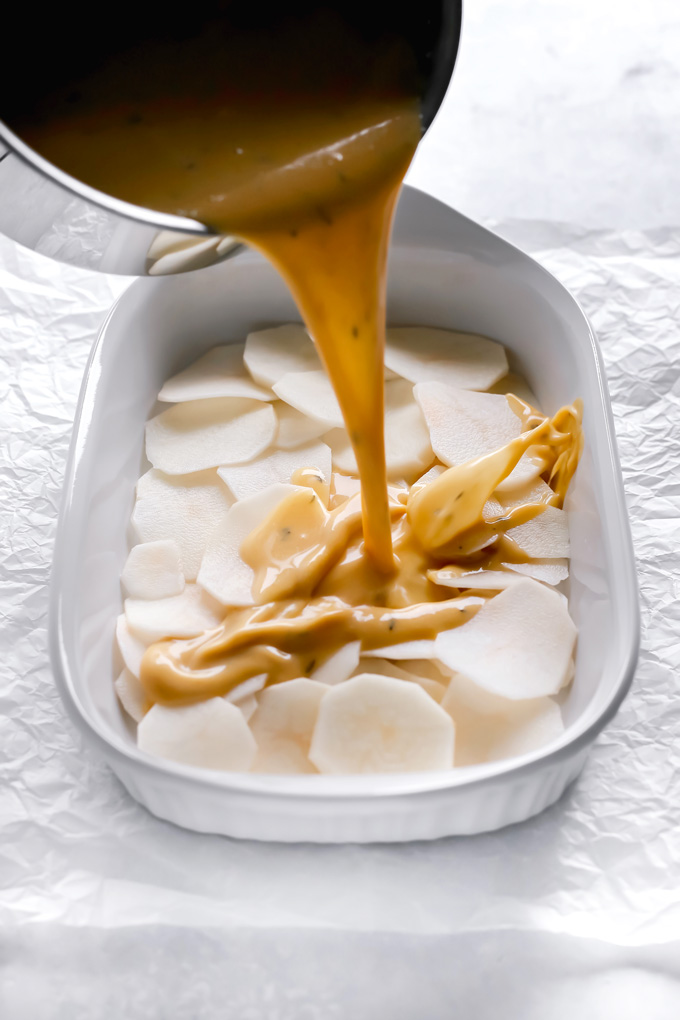
    For this amount I used a 2qt baking dish. You layer the bottom with scalloped potatoes and pour the cheese mix to cover them and repeat with a second layer of potatoes and pouring the rest of the cheese sauce over it. It will cover it completely. Give it a good shake or whirl to ensure maximum coverage. Then comes the fun part.

    Creamy Vegan Potatoes Au Gratin - the perfect side dish to go with just about anything and you would never know it was vegan. The rich

    Creamy Vegan Potatoes Au Gratin - the perfect side dish to go with just about anything and you would never know it was vegan. The rich

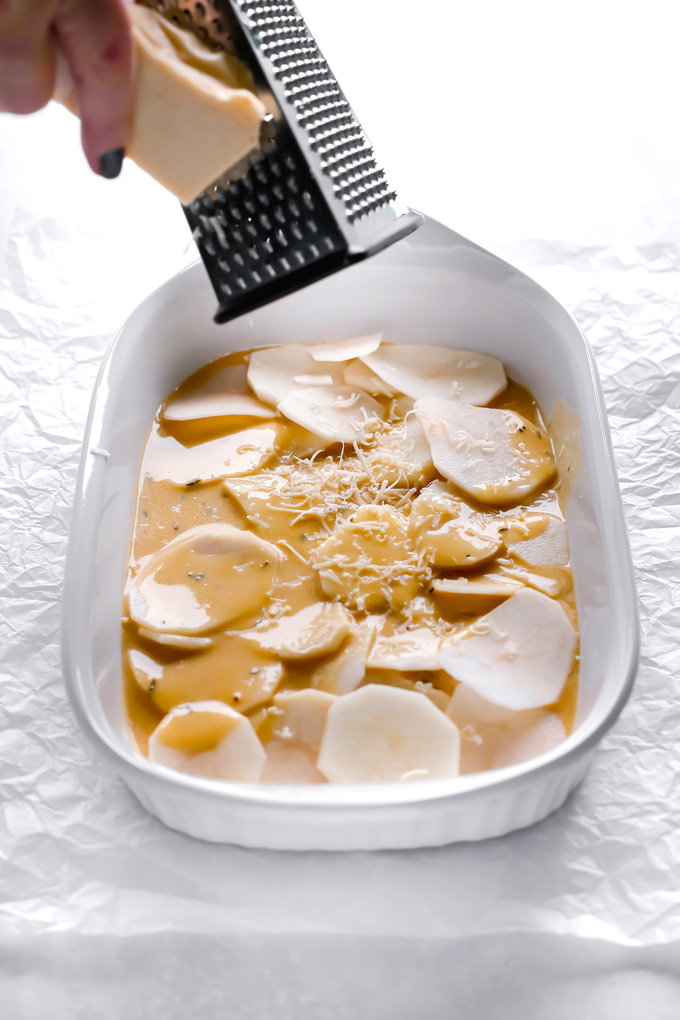
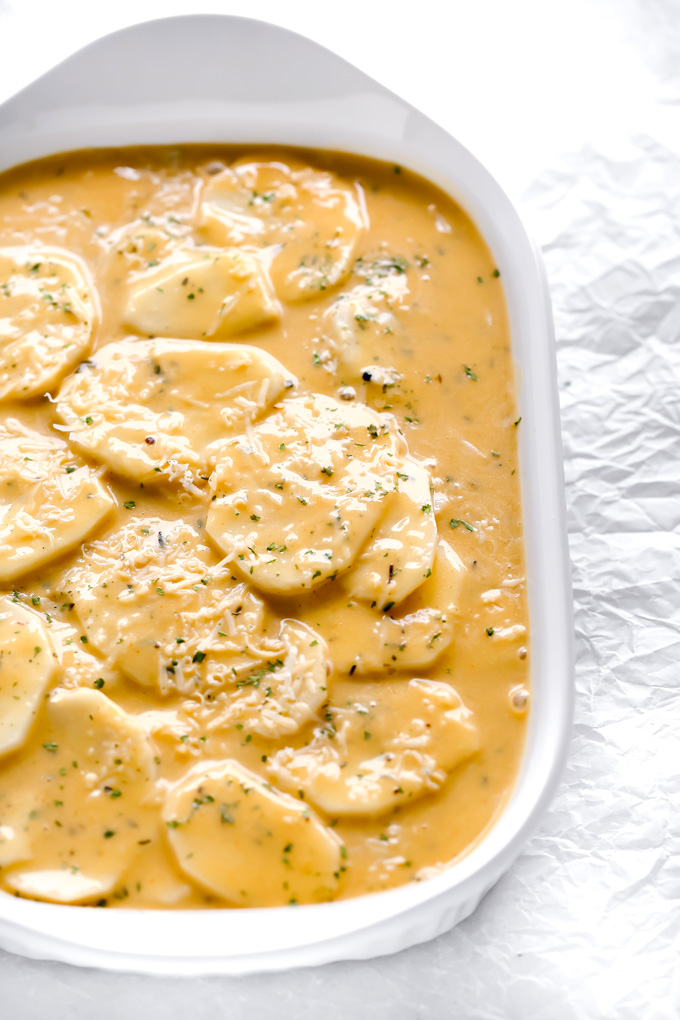
    You can dazzle it up with some delicious vegan parmesan cheese. Either homemade or store-bought, both will work just fine. It adds on to the cheesy deliciousness. I sprinkled on some extra parsley too because I love parsley and almost put it in everything. I just like the way it makes my meals taste and it’s nice to have in that added herb. It looks so pretty too!

    Creamy Vegan Potatoes Au Gratin - the perfect side dish to go with just about anything and you would never know it was vegan. The rich

    Once you have it ready to go it’s time to pop it in the oven. This is probs the hardest part…the waiting. That’s usually the most difficult for me because I’m so hungry I just want it right now! Hellooooo….someone needs to practice their patience.

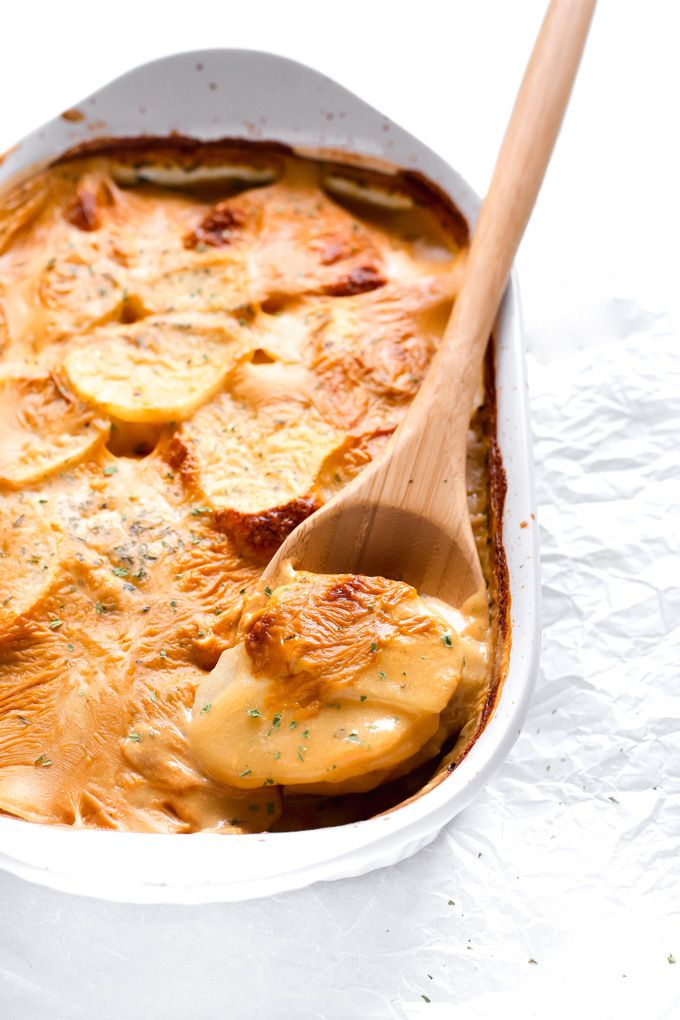
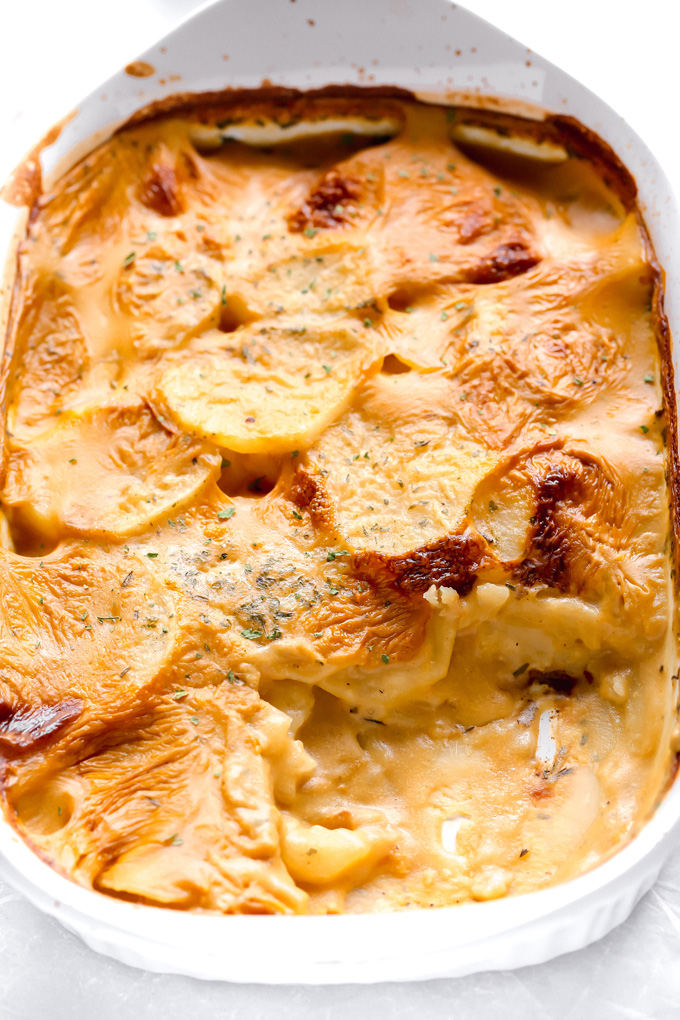
    For the first 20 minutes of baking you can cover it with foil (or not if you’re totally against foil which is fine). Then for the remainder of the 20 minutes uncover it and let the top get crispy and brown. That is my absolute favorite part! I love the extra crunchy parts on top.

    When it’s done baking, remove it from the oven and let it sit for 5 minutes before you cut into it (I know, again, super hard, lol).

    Creamy Vegan Potatoes Au Gratin - the perfect side dish to go with just about anything and you would never know it was vegan. The rich

    Serve it up alone or as a side dish to your main meal. I like to eat vegan turkey cutlets, broccoli, and these creamy vegan potatoes au gratin on the side. They are just too damn good, I promise.
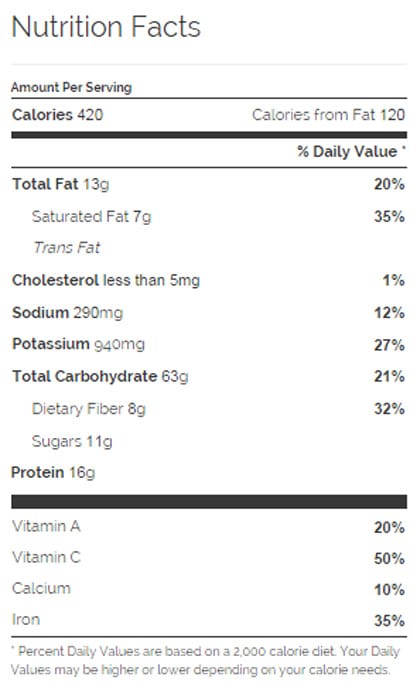
    Creamy Vegan Potatoes Au Gratin - the perfect side dish to go with just about anything and you would never know it was vegan. The rich

    Servings: 6

    Prep Time: 10 minutes

    Cook Time: 40 minutes

    Total Time: 50 minutes

    The perfect side dish to go with just about anything and you would never know it was vegan. The rich “cheesiness” is even better than the original.

    • 5 russet potatoes, (washed, peeled, and scalloped)
    • 2 cups almond milk, (unsweetened)
    • 1/2 cups low sodium vegetable broth
    • 1 tbsp vegan butter
    • 1/2 yellow onion, diced
    • 1 tsp vegetable bouillon
    • 1/3 cup nutritional yeast
    • 1 tsp onion powder
    • 1 tsp garlic powder
    • 1 tbsp parsley, (and extra to top)
    • 1/2 tsp dried thyme
    • 1/4 tsp turmeric
    • 1/4 tsp paprika
    • salt/pepper to taste
    • 3 tbsp cornstarch
    • 1/4 cup cold water
    •  Preheat your oven to 425F.

      2. Wash and peel your potatoes before slicing. Use either a food processor with the slicing attachment or a mandolin for evenness. Once potatoes are sliced put them in an ice bath. Cold water and ice so they don’t oxidize and turn brown. Leave them in there while you make the cheese sauce.

      3. In a small to medium sauce pan, on medium heat, whisk almond milk, vegetable broth, nutritional yeast, veggie bouillon, butter, diced onion, and all spices. Lower heat down to a simmer and stir frequently. 

      4. In a separate bowl mix together the corn starch and water until no clumps are left. Pour that into the cheese mixture and mix well. Stir for 5-6 minutes or until the sauce thickens up. It won’t be super duper thick just thicker.

      5. Layer the bottom of a 2qt baking or casserole dish with potatoes. Pour half the cheese mixture and whirl it around to ensure coverage. Top with second layer of potatoes and remaining cheese sauce. Give it another whirl or shake to ensure coverage.

      6. Sprinkle top with vegan parmesan cheese for extra cheesiness. 

      7. Cover with foil and bake for 20 minutes. After 20 minutes remove foil and bake another 20 minutes uncovered. If you want the top extra extra crispy leave it in for another 10 minutes.

      8. Remove from oven and let sit for 5 minutes before cutting into it. Serve it up with anything you’d like and Enjoy!

    Creamy Vegan Potatoes Au Gratin - the perfect side dish to go with just about anything and you would never know it was vegan. The rich

    WE ARE A PARTICIPANT IN THE AMAZON SERVICES LLC ASSOCIATES PROGRAM, AN AFFILIATE ADVERTISING PROGRAM DESIGNED TO PROVIDE A MEANS FOR US TO EARN FEES BY LINKING TO AMAZON.COM AND AFFILIATED SITES.

    subscribe now
    10% off MotherRealm

    sign up to our newsletter and receive 10% off your first order in our crystal shop MotherRealm!

    Read More

  • Meatless Monday: Pasta Primavera {Vegan}

    Meatless Monday: Pasta Primavera {Vegan}

    recipe image

    This Meatless Monday recipe features a creamy, vegan Pasta Primavera.  Pasta Primavera is defined as a dish that contains pasta and fresh vegetables – with the main focus being on the vegetables.  It is usually highlighted by light flavors, aromatic herbs and bright colors – (“primavera” meaning “spring”).

    When I went to my local grocery store, the produce manager saw me looking at mushrooms and asked me to wait a moment.  He then brought out a carton of the freshest, most pristine white button mushrooms I had ever seen.  Sold! Freshly steamed asparagus, corn straight from the cob, spring peas and my favorite in-season, sweet Vidalia onions round out the vegetables. For the pasta, I chose Farfalle (also known as “bow-tie” pasta).  I like a more substantial pasta for this particular dish.

    Pasta Primavera

    Pasta Primavera

    I steamed the asparagus while working on sauteeing the onions, mushrooms, peas and corn in a vegetable broth.  I really love Imagine brand because they not only offer a low-sodium version, but it has a deep, rich flavor and color.

    To create the light cream sauce, I used about a half a cup of canned coconut milk, a tablespoon of lemon juice and a vegan parmesan.  Now, if you don’t want to use the commercially available vegan parm (or can’t find it), another great and tasty option are grated walnuts.  You can take it one step further and mix the walnuts with nutritional yeast, a  pinch of salt and perhaps, garlic powder.

    Combine everything in the pan, taste for seasoning and garnish with fresh parsley, a squeeze of lemon juice and a sprinkle of vegan parmesan.  What you end up with is this amazing, light and yet extremely flavorful Pasta Primavera.  I hope you enjoy!

    Pasta Primavera

    Pasta Primavera

    Before you go, why not check out some of our recent videos and be sure to subscribe to the YouTube Channel! 🙂

    Author Veg Life Staff

    Ingredients

    • 1 Tbl Oil for sauteeing
    • 1 medium Vidalia or yellow Onion sliced thinly
    • 1 Clove Garlic optional, minced
    • 16 oz . Mushrooms any variety, or 1″ pieces, cut into quarters
    • 1 bunch of Asparagus steamed and cut into 1″ pieces
    • 1/4-1/2 C Low-Sodium Vegetable Broth
    • 1/4 C Fresh Corn
    • 1/2 C Peas
    • 1/2 Lb Pasta such as Farfalle
    • 1/2 C Coconut Milk canned
    • 1 Tbl Lemon Juice
    • 1/4 C Vegan Parmesan
    • Salt & Pepper to taste
    • Parsley Parmesan and/or Lemon Zest for garnish

    Instructions

    • Prepare pasta to package instructions and drain (do not rinse).

    • Meanwhile, steam the asparagus spears until tender. Cut into 1″ pieces.

    • In a large saute pan over medium-high heat, add the oil and onion slices. Saute for about 3-5 minutes before adding the mushrooms.

    • Saute the mushrooms for an additional 5 minutes and if using garlic, add now. Saute for 30 seconds and then add the vegetable broth.

    • Allow to reduce slightly. Add the corn and peas.

    • When the broth has reduced and the vegetables have cooked through, add the drained pasta (a little residual pasta water will actually help thicken the sauce) and asparagus pieces.

    • Add the coconut milk, lemon juice and vegan parmesan stirring to combine. If necessary, add a splash more vegetable broth. The pasta will continue to absorb the liquids as it sits.

    • Season with salt and pepper, to taste.

    • To serve, divide between four bowls and top with additional vegan parmesan.

    • Garnish with parsley and/or lemon zest.

    Pasta Primavera

    Pasta Primavera

    Read More

  • Vegan Brown Rice Pumpkin Risotto

    Vegan Brown Rice Pumpkin Risotto

    recipe image

    ZodiakSlot situs slot gacor gampang menang dengan permainan slot online dari provider slot88 terbaru situs judi slot terpercaya mudah maxwin. Situs slot gacor menawarkan sensasi pengalaman bermain slot gacor yang menyenangkan dan menguntungkan dengan provider slot terlengkap dan terakbar di Indonesia serta dilengkapi dengan server terbaik yang pastinya dapat menampung ribuan hingga jutaan member agar dapat bermain setiap harinya untun mendapatkan maxwin. Melakukan pendaftaran di situs slot gacor akan memberikan keuntungan yang berlipat ganda kepada semua pemain dikarenakan setiap pemain akan diberikan pola khusus untuk bermain yang tentunya akan menambah keuntungan secara signifikan. Pola yang diberikan merupakan bocoran khusus dari provider yang hanya diberikan kepada situs terpercaya yang adalah partner bersertifikat resmi. Para pemain cukup hanya bermodalkan receh bisa mendapatkan jackpot perkalian x1000 x500 x250 yang tentunya akan membuat kalian menjadi jutawan dalam kurun waktu yang singkat bersama situs slot gacor hari ini zodiakslot.

    Permainan judi slot gampang menang dan maxwin ini juga dapat dirasakan oleh kalian semua dan pemain sekelas John Juanda yang pernah menyandang predikat juara kompetisi poker dunia juga sudah pernah merasakan kemenangan maxwinnyn ketika bergabung bersama situs slot88 terbaru gacor gampang menang hari ini. Taruhan kecil 200 perak juga akan mendapatkan pola khusus dari admin website dan pastinya akan menghasilkan hingga puluhan juta rupiah. Kemenangan besar ini dapat para pemain rasakan apabila mengikuti rtp live slot online yang sudah disediakan di halaman utama situs. Segera daftar slot online disini dan raih kesempatan emas untuk menjadi jutawan bahkan miliarder serta dapatkan jackpot progressive maxwin terbesar di tahun 2025 ini.

    Sebagai opsi pilihan utama situs slot gacor gampang menang yang menjalin hubungan kerjasama baik dengan SLOT88, SLOT DANA, SLOT QRIS dan SLOT THAILAND yang terkenal memberikan kemenangan maxwin pada saat melakukan pendaftaran pertama. Dengan adanya jackpot maxwin ini setiap harinya di semua provider slot yang terkenal. Terlebih lagi para pemain akan diberikan pelayanan dan servis yang memuaskan dalam melakukan proses transaksi dan tidak perlu tunggu lama agar dapat merasakan maxwin super. Tunggu apalagi? segera daftarkan diri anda dan raup semua keuntungannya di situs slot gacor jangan sampai ketinggalan agar bisa menjadi kaya raya seperti Timothy Ronald di usia yang masih sangat muda.

    APK Resmi ZodiakSlot RTP ZodiakSlot

    Read More

  • Spicy Vegan Scalloped Potatoes Recipe

    Spicy Vegan Scalloped Potatoes Recipe

    recipe image

    15 mins 35 mins 10 mins 25 mins 18 mins 30 mins 65 mins 45 mins 40 mins 50 mins 68 mins 20 mins 3 mins 55 mins 60 mins 34 mins 3 hrs 48 mins 110 mins 2 hrs 38 mins 29 mins 24 mins 22 mins 8 mins Recipes By Region Ingredients Occasions
    Read More

  • Vegan pumpkin ice cream is packed with fall flavor

    Vegan pumpkin ice cream is packed with fall flavor

    recipe image

    Ingredients:

    • 2 (15 ounce) cans full-fat unsweetened coconut milk
    • 1 cup canned pumpkin puree (not pumpkin pie mix)
    • 1/2 cup dark brown sugar
    • 1 teaspoon cinnamon
    • 1/4 teaspoon ground ginger
    • 1/4 teaspoon ground cloves
    • 1/4 teaspoon ground allspice
    • 1/4 teaspoon ground nutmeg
    • 2 drops orange food coloring (if desired)
    • 1/2 cup crushed vegan gingersnaps, plus more for garnish

    Instructions:

    1. To a blender, add all the ingredients except for the crushed cookies. Blend until smooth and combined.2. Add the mixture to your ice cream maker, and freeze according to the ice cream maker directions.3. Once the mixture is the texture of soft serve, add it to a freezer-safe container, and stir in the crushed gingersnaps.4. Freeze overnight (about 12 hours), and serve with a sprinkling of crushed gingersnaps

    Read More

  • Vegan Chickpea Salad Sandwiches + Picnic T

    Vegan Chickpea Salad Sandwiches + Picnic T

    recipe image

    by 19 Comments

    Vegan Chickpea Salad Sandwiches

    Do you ever have those days? The kind of day where you mess up dinner (and cooking is literally your job.) And the pipe busts underneath the sink while you’re angry-washing the dishes. And your camera battery dies when you’re in the middle of shooting a recipe. And you’re working on a deadline and you have a severe case of writer’s block. One of those days.

    Really, it was one of those days on top of one of those months. We helped Clark’s brother and girlfriend move into a new place the first weekend of April. Clark’s parents stayed with us the following week. My parents arrived the following weekend. Clark traveled home for a funeral. And all of the sudden, April was gone. Life is like that sometimes. A blur. 

    My remedy? Take a step back, get out of the house, do something out of the ordinary. Something like a picnic. I’m ashamed to think about how many times one of us has said “we should go on a picnic soon.” It’s been years since we’ve actually followed through with it. Back in high school, to be exact. Why is that? Life. Weather. Busy. Excuses.

    There’s really no good excuse, though. We live in one of the most beautiful cities in the US (my humble opinion.) Pike’s Peak is visible from anywhere in town and there are plenty of grassy parks with million dollar views. I’ve got a super fun dude to picnic with. I know how to pack a mean picnic lunch. Spring is the perfect time to picnic. And the other day, I just so happened to have my favorite Voveti prosecco chilling in the fridge and a recipe idea for chickpea salad sandwiches. Picnic mode: ON

    Vegan Chickpea Salad Sandwich

    Prosecco Bottle Olives Pepper Crackers

    Prosecco in Bucket Picnic

    Five Must-Haves for a Relaxing Picnic

    1. Choose good company. Whether that’s your love, or your bestie, your mom, or just good ol’ you. 
    2. Proper beverages. You know, like prosecco. Bonus points for finding individual-size Voveti bottles. But if not, that’s ok because real talk –– Is there anything sexier than watching your man open a bottle of bubbly? I think not. Could I open it for myself? Sure. But it’s just so much better to watch Clark do it instead. Side note: I like to keep things simple, but you could always step it up and make a batch of cocktails if the inspiration strikes.
    3. SNACKS. We packed berries, apples, celery, radishes, bell pepper, hummus, crackers, and mini chickpea salad sandwiches. I picked flavors that I knew would pair well with that bottle of Voveti I was talking about. It’s a brut prosecco with fine bubbles – the perfect balance of dry and fresh sweetness. You’ll pick up on notes of subtle green apple, pear, and ripe peach in each sip. The best part? You don’t have to be a wino or break the bank to enjoy their prosecco. 
    4. A blanket! Duh. Preferably a thick one to keep the grass from poking through and tickling you. I speak from experience. 
    5. Tunes. We flipped Pandora to The Grateful Dead Radio because it’s perfect for relaxing on a warm, sunny day.

    Man Opening Wine


    That’s it. Just a few simple necessities are all you need to escape for a few hours. Throw down a blanket, soak up the sunshine, sip prosecco, appreciate your picnic-mate, and laugh the afternoon away. If you let your mind wander, you might even forget you’re not on a European vacation. 

    I’m starting to realize that “those days” happen when I’m too busy, rushing around, and stressed out. Everything piles up and problems compound and then I’m standing in a puddle in my kitchen. “Those days” happen when I’m not taking the time I need to breathe.

    Cheers to listening to yourself. Cheers to balancing hectic schedules with simple pleasures. Cheers to mid-week picnics, just because you deserve a break. Cheers to vegan chickpea salad sandwiches, music, good conversation and fine prosecco.

    I was selected for this opportunity as a member of CLEVER and the content and opinions expressed here are all my own.

    Print

    Vegan Chickpea Salad Sandwiches + Picnic Tips


    5 Stars 4 Stars 3 Stars 2 Stars 1 Star

    4.3 from 3 reviews


    • Author:
      Jordan Cord


    • Total Time:
      5 minutes


    • Yield:
      4 1x

    Description

    This chickpea salad recipe is light, delicious, and healthy. It’s flavored with lemon, olive oil, and parsley for a Mediterranean vibe.


    • 115 oz. can chickpeas, drained, rinsed, and dried
    • 2 Tablespoons olive oil
    • 2 Tablespoons vegan mayonnaise
    • 2 Tablespoons red bell pepper, finely chopped
    • 2 Tablespoons lemon juice
    • 2 Tablespoons parsley, finely chopped
    • 2 scallions, sliced thin
    • 1 teaspoon sea salt
    • ½ teaspoon black pepper
    • ⅛ teaspoon cayenne
    • ½ teaspoon turmeric powder (optional, for color)


    Instructions

    1. In a large bowl, mash chickpeas using a fork or a potato ricer. Mash thoroughly, but leave the consistency chunky. We’re not going for hummus, here!
    2. Add all other ingredients and stir to combine, mixing well.
    3. Serve on your favorite sandwich bread, on crackers, or on baguette slices!

    Notes

    This recipe makes enough to create 3-4 sandwiches.

    • Prep Time: 5 mins
    • Category: Main

    Nutrition

    • Serving Size: 1
    • Calories: 248
    • Sugar: 3.2g
    • Sodium: 299.3mg
    • Fat: 9.3g
    • Saturated Fat: 1.2g
    • Unsaturated Fat: 8.1g
    • Trans Fat: 0g
    • Carbohydrates: 22.7g
    • Fiber: 7.3g
    • Protein: 8.2g
    • Cholesterol: 0g

    Voveti Prosecco Bottle

    Prosecco Bottles

    Vegan Chickpea Salad Sandwiches

    Reader Interactions

    Read More

  • Quinoa Protein Bars: Vegan and Gluten Free

    Quinoa Protein Bars: Vegan and Gluten Free

    recipe image
    Quinoa Protein Bars: Vegan and Gluten Free; made without added sugars

    Ingredients:

    • 2 cups cooked quinoa (we used red)*
    • 5 dates, pitted, and soaked in hot water until softened
    • 2 tbsp ground flaxseed
    • ½ tsp almond extract
    • 1/8 tsp salt
    • ½ cup protein powder (use your favorite brand, we used Trader Joe’s Hemp protein)
    • ½ cup almond flour
    • ¼ cup reduced fat, unsweetened, shredded coconut
    • ¼ cup vegan chocolate chips

    Instructions:

    1. Preheat oven to 350 degrees F.
    2. Spray an 8×8 baking dish lightly with baking spray or use parchment paper to line (we did this, and then lifted it out easily).
    3. If you don't have left over quinoa, you should begin prepping this the night before. We like to soak ours for 4-8 hours (can go longer). Rinse it, then bring 2 cups of water and 1 cup of quinoa to a boil. If you'd like to make a larger quantity it's a 2:1 ratio (2 parts water, to 1 part quinoa). Cover, and reduce heat to simmer until water is absorbed, about 15 minutes. Let cool enough to handle.
    4. Using a food processor, combine all ingredients except chocolate chips.
    5. Fold in chips. The dough is very thick, like cookie dough, so use the spatula to press into pan
    6. Bake for about 25 minutes until knife inserted comes out clean, set to touch. Let cool and remove from pan. Cut into 16 squares.

    Read More

  • Creamy Coconut Rice Pudding (vegan or not)

    Creamy Coconut Rice Pudding (vegan or not)

    recipe image

    Creamy Coconut Rice Pudding ~ this quick and easy dessert is a twist on everybody’s favorite comfort food ~ this rice pudding recipe can easily be made vegan, too.


    Photo of coconut rice pudding served in glasses on a tile tray.

    Rice pudding is the mac and cheese of the dessert world.

    Everybody loves it, everybody has a favorite recipe for it, and it can be changed up in a million ways, but why would you want to? Normally I’d say that I like my rice pudding creamy and straight up, with loads of vanilla bean specks and that’s it. But this recipe for a fresh coconut variation is a good example of why you should never get too cozy with the status quo.

    When you make rice pudding with rich coconut milk, fresh coconut meat, and a splash of dark rum along with that vanilla bean, and then sneak it warm from the pan, it defies description. I feel like this is a just reward for all my efforts battling the whole coconut the other day.

    Photo of a pot of creamy coconut rice pudding next to a tile tray with an empty glass.

    For this creamy coconut rice pudding I use arborio rice

    It’s the short grain Italian rice used for risotto. It’s got such great chewy texture and so much natural starch that I think it makes the creamiest pudding. It’s a perfect choice because I always have a half box left in the cupboard after one risotto. or another.

    Photo of glasses of creamy coconut rice pudding on a tile tray.

    This is a great time to use up those leftover vanilla beans.

    After I scrape out the seeds for a recipe, I always put the used pod back in the jar for later use. Those things keep on giving, let me tell you. Just dust them off and put them away for another day, there are so many gazillions of vanilla seeds in each pod, and you want to get your money’s worth! I keep one jar for the used and one for the fresh.

    Overhead photo of glasses of creamy coconut rice pudding topped with toasted coconut, on a tile tray with napkins and spoons.

    The toasted coconut on top add a nice sweetness and crunch.

    It gives it some visual appeal, too, if you’re serving this to guests. I like this recipe because it can all be done on the stove. That just makes it seems like quick and easy project when I don’t have to mess with the oven. It can be eaten hot or cold, so it’s a dessert for all seasons, and if you’re a rice pudding lover I don’t have to tell you that it makes the best midnight snack and an even better breakfast.

    Overhead photo of two glasses of creamy coconut rice pudding topped with toasted coconut on a tile tray.

    My recipe calls for fresh grated coconut meat, and that is best for this pudding, but you could use packaged coconut, just make sure to get unsweetened. If you use sweetened, you will need to cut down on the amount of sugar.

    Recipe adapted from Serious Eats.

    Creamy Coconut Rice Pudding (vegan or not)

    Creamy Coconut Rice Pudding ~ this quick and easy dessert is a twist on everybody’s favorite comfort food ~ this rice pudding recipe can easily be made vegan, too.

    Prep Time:5 minutes

    Cook Time:35 minutes

    Total Time:40 minutes

    Ingredients 

    • 1 cup arborio rice
    • a couple of recycled vanilla beans
    • 13.5 oz can of coconut milk
    • 1/3 cup sugar
    • 1/2 cup fresh grated coconut meat
    • 1 tsp vanilla bean paste
    • 1 tsp coconut extract
    • 1 Tbsp dark rum, or 1 tsp rum extract
    • 1/2 cup heavy cream, or more coconut milk for a vegan version
    • 1/3 cup sweetened shredded coconut, toasted *

    Instructions

    • Cook the rice in 4 cups water for 15 minutes.

    • Drain and return the rice to the pan and add the coconut milk, vanilla bean pods, sugar, coconut meat, rum, vanilla paste and coconut extract.

    • Bring up to a simmer and cook on low for about 15 to 20 minutes, stirring constantly, until thick and the rice is tender.

    • Stir in the heavy cream, remove the vanilla pods, and ladle the pudding into serving dishes.

    • Top with toasted coconut and enjoy hot, or refrigerate until chilled.

    • * To toast the coconut, spread it out in a small saute pan and cook over medium low heat, stirring constantly, until it turns a golden brown.  It can burn in an instant, so watch it very carefully.

    Course: Dessert

    Cuisine: American

    Keyword: dessert, pudding, rice

    Nutrition

    Calories: 415 kcal · Carbohydrates: 44 g · Protein: 4 g · Fat: 25 g · Saturated Fat: 20 g · Polyunsaturated Fat: 1 g · Monounsaturated Fat: 3 g · Cholesterol: 22 mg · Sodium: 29 mg · Potassium: 227 mg · Fiber: 2 g · Sugar: 15 g · Vitamin A: 292 IU · Vitamin C: 1 mg · Calcium: 27 mg · Iron: 4 mg

    Nutritional information is provided as a courtesy and is an estimate only. This information comes from online calculators. Although The View from Great Island attempts to provide accurate nutritional information, these figures are only estimates.

    Did You Make This?We love seeing what you’ve made! Tag us on social media at @theviewfromgreatisland for a chance to be featured.

    e book


    Read More