Author: PatagoniaLlami

  • Classic Vegan Peanut Butter Cookies (1 Bowl)

    Classic Vegan Peanut Butter Cookies (1 Bowl)

    recipe image

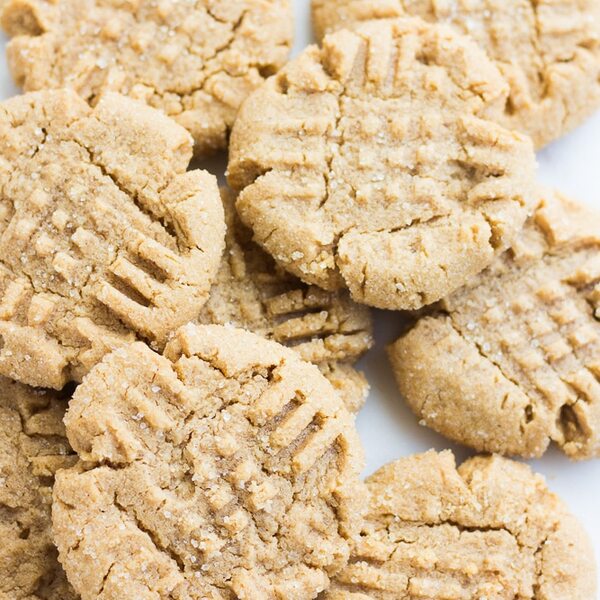
    Soft, chewy, and melt in your mouth Vegan Peanut Butter Cookies that are easy to make in one bowl! They’re a perfect sweet treat you can bake in under 30 minutes or freeze for later.

    Looking for more classic vegan cookies? Try my Vegan Sugar Cookies, Vegan Snickerdoodles, and Perfect Vegan Chocolate Chip Cookies, too!

    stack of 4 cookies, a bite taken out of the top one

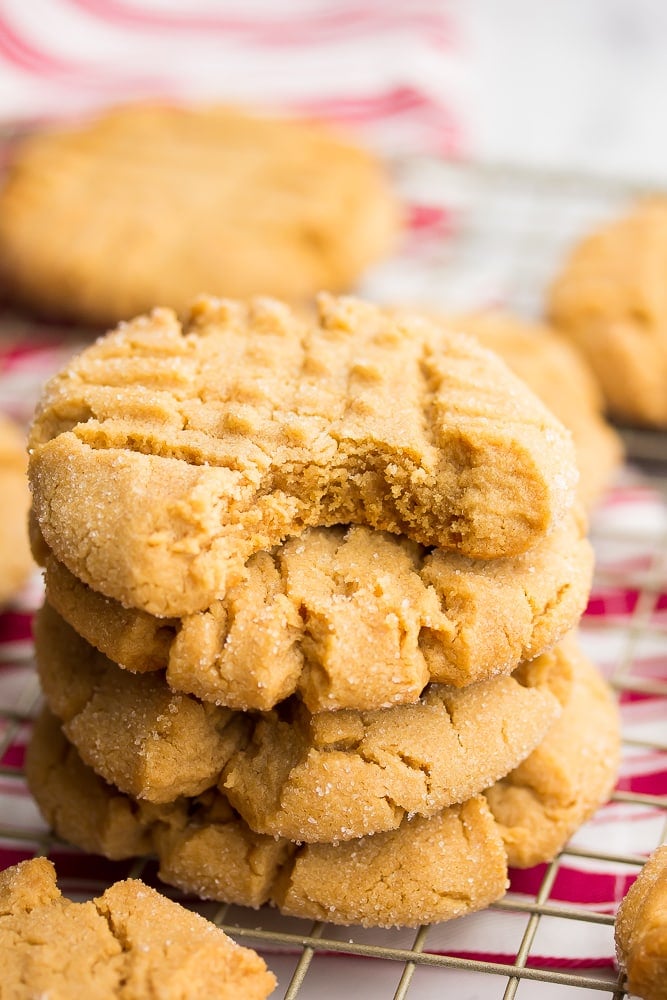
    This is the only vegan peanut butter cookie recipe you’ll ever need! Thick, chewy, and with the perfect balance of salty and sweet flavors, each bite will have you running back for more.

    Just like the classic recipe, these vegan peanut butter cookies are easy to make with baking staples, like peanut butter, flour, and sugar, in just one bowl. You can even make the cookie dough a few days ahead of time if you’re in a rush! They’re dipped in sugar for a little extra sweetness, then baked in less than 15 minutes.

    Make a batch for a “just because” sweet treat or to share with family and friends!

    Why these are the best vegan peanut butter cookies ever

    • One of the best classic cookies! Who can say no to a peanut butter cookie? A little crispy on the outside and perfectly soft and chewy on the inside, every bite melts in your mouth.
    • A no-nonsense, one-bowl dessert – There’s a reason why these easy vegan peanut butter cookies are the best beginner-friendly treat: the dough is a breeze to make in one bowl with simple baking staples and they take less than 15 minutes to bake.
    • A 5-star sweet treat – This recipe has been racking up 5-star reviews since I first posted it on my blog! Here’s what readers are saying…

    “My 9 year old made this recipe last night as her first cookie recipe baking on her own. They were absolutely fantastic. We were amazed.” – Amy

    “These cookies were super easy to make and absolutely delicious! You seriously would never know that they were vegan.” – Christine

    “I’m super picky about peanut butter cookies and these are absolutely perfect! Crunchy on the outside, chewy on the inside, and super peanut buttery. I made a batch for Christmas and can’t wait to make them again!” – Emily

    close up of vegan peanut butter cookies on a cookie sheet

    How to make vegan peanut butter cookies

    Find the complete recipe with measurements in the recipe card below.

    Line a baking sheet with parchment paper and add 1/4 cup of granulated sugar to a small bowl. Set aside.

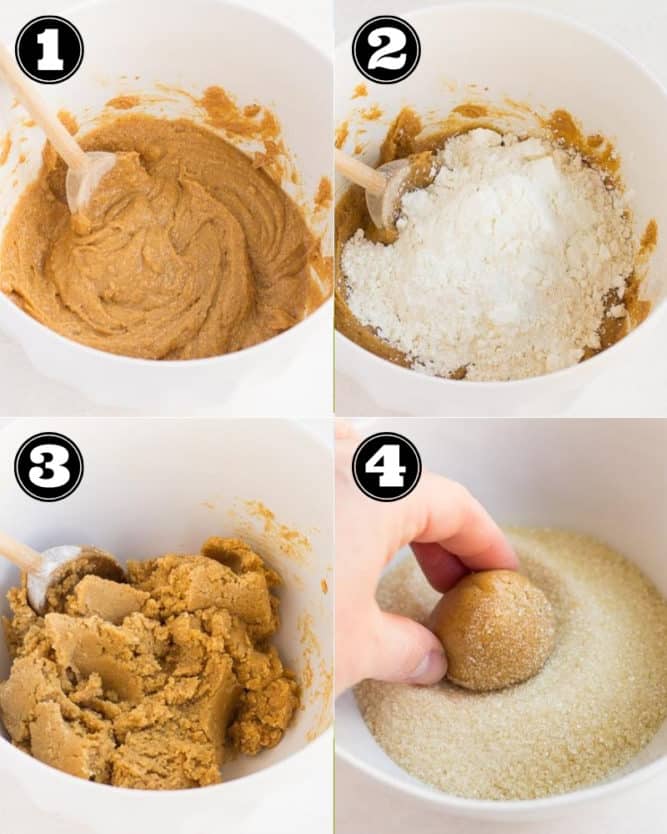
    In a large bowl, cream the vegan butter, peanut butter, and sugars together until light and fluffy. Stir in the milk and vanilla until well combined.

    Add the flour, baking soda, baking powder, cornstarch, and salt to the bowl and gently mix until just combined. The dough should be thick but still sticky.

    Optional: Fold 1/3 cup of vegan chocolate chips into the cookie dough at this point if you’re craving chocolate chip peanut butter cookies!

    Roll about 1.5 tablespoons of cookie dough in your hands, dip it in the bowl of sugar to coat the outside, and place it on the baking sheet.

    collage of how to make cookies with peanut butter

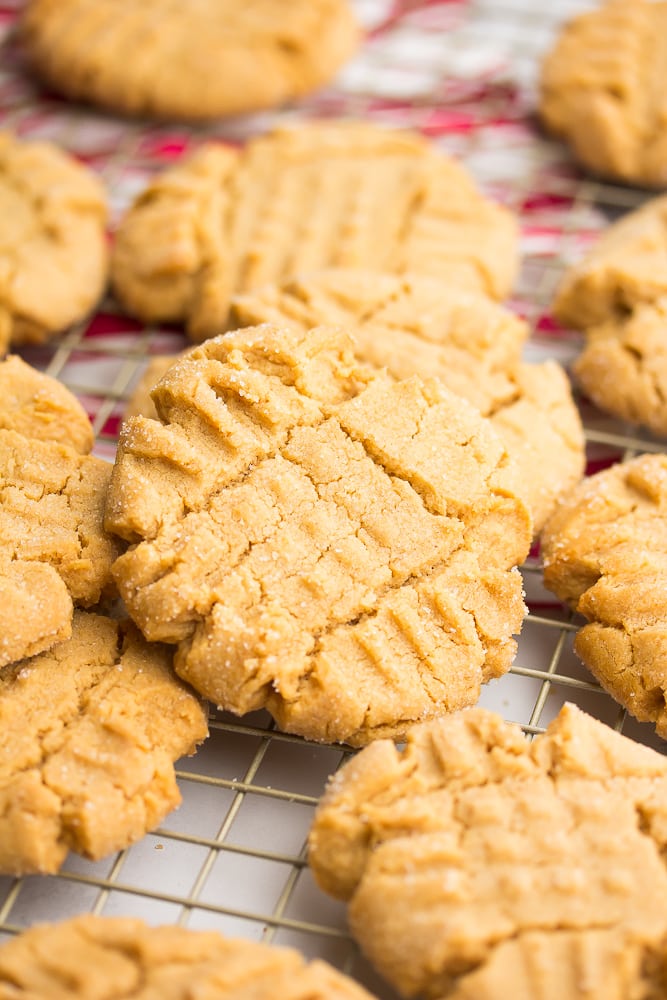
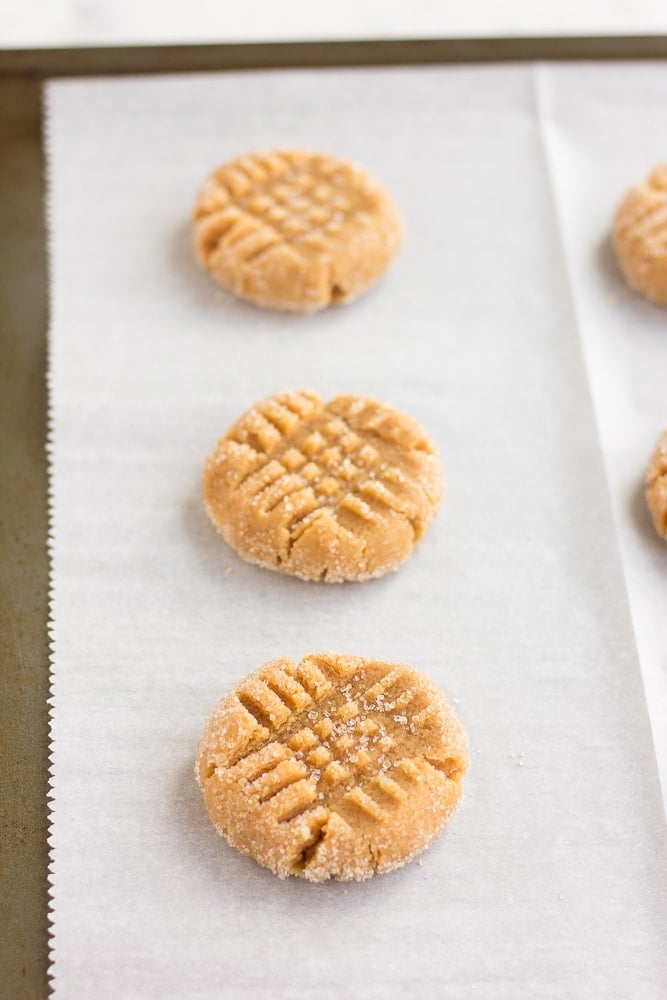
    Gently press on the tops with a fork to make the criss-cross pattern. Repeat until you run out of cookie dough.

    Note: If the fork sticks to the cookie dough, dip it in flour before pressing it on the cookies. 

    Bake the peanut butter cookies until they’re very lightly golden brown and look a bit firm around the edges. They may look a bit soft or underdone coming out of the oven, but they’ll continue to set as they cool.

    Let the cookies cool on the baking tray before transferring them to a cooling rack. Enjoy!

    Do you like extra crunchy cookies? Simply bake them for 2 to 3 minutes longer.

    vegan peanut butter cookies on parchment paper, before baking with a criss cross in them.

    Frequently asked questions

    Are peanut butter cookies vegan?

    Most peanut butter cookie recipes aren’t inherently vegan since they’re made with butter and eggs. Luckily, peanut butter IS naturally vegan and it’s easy to make just as delectable vegan peanut butter cookies with plant-based ingredients!

    What kind of peanut butter should I use?

    This recipe works best with regular creamy peanut butter but you can use crunchy peanut butter if you like some crunch in your cookies. Natural peanut butter works, too, but give it a good stir before adding it to the mixing bowl.

    Do I have to use peanut butter?

    Not if you don’t want to! Almond butter will also work, or you can use sunflower seed butter if you need a nut-free alternative. The flavor will be different but the cookies will still be tasty.

    Do I need to chill the cookie dough before baking?

    Chilling the cookie dough isn’t a necessary step for this recipe unless your kitchen is very warm or if the dough is too soft to roll into balls. In those cases, pop the dough in the fridge for 30 minutes to prevent the cookies from spreading in the oven.

    Can I make peanut butter cookie dough ahead of time?

    Absolutely! You can make the cookie dough in a bowl as normal, cover the bowl, and keep it in the fridge for 1 to 2 days before baking.

    To freeze the dough, roll it into cookie dough balls (without the sugar coating), place them on a lined baking sheet, and freeze until solid. Place them in a freezer-safe bag or container and freeze for up to 2 months. They can be baked from frozen with an extra 1 to 2 minutes added to the baking time.

    How long do they last?

    Store the baked and cooled cookies in an airtight container on the kitchen counter for up to 5 days or in the fridge for up to 2 weeks.

    You can also freeze the peanut butter cookies in a freezer-safe container or bag for up to 2 months. Let them thaw in the fridge or on the counter before serving.

    a cookie sheet with a lot of peanut butter cookies and red towel in background
    • 1/2 cup vegan butter, softened
    • 3/4 cup creamy peanut butter
    • 1/2 cup granulated sugar
    • 1/2 cup brown sugar
    • 2 tablespoons almond milk
    • 1 teaspoon vanilla
    • 1 1/4 cups all purpose flour
    • 3/4 teaspoon baking soda
    • 1/2 teaspoon baking powder
    • 2 tablespoons cornstarch
    • 1/4 teaspoon salt
    • 1/4 cup granulated sugar, optional for rolling
    • Preheat the oven to 350 degrees F and line a baking sheet with parchment paper. Add 1/4 cup sugar to a small bowl and set aside (for rolling the cookies in).

    • In a large bowl, cream together the vegan butter, peanut butter and sugars. Stir in the almond milk and vanilla until well combined. You can use a hand mixer, stand mixer or just a large wooden spoon.

    • Now add the flour to the bowl, and sprinkle the baking soda, baking powder, cornstarch and salt on top of the flour. Stir (or use the mixer) until just combined and a dough is formed. The dough will be thick, yet sticky.

    • Roll balls of dough (about 1.5 tablespoons) and then roll in the sugar until coated. Place each one on the prepared baking sheet, then press the tops to create the classic criss-cross pattern. 

    • Bake for 10-12 minutes until the cookies are very lightly golden brown; they will appear a bit underdone and soft but they continue to set as they cool. 

    • Let the cookies cool on the baking sheet for about 5 minutes before transferring to a wire rack. These cookies will stay good at room temperature for about a week.

    1. Makes about 20-24 cookies.
    2. Gluten free? Substitute a gluten free all purpose flour instead.
    3. May sub coconut oil, softened, for the vegan butter. I’ve tried both and they both work well. For oil free, sub applesauce.
    4. For crunchy peanut butter cookies, simply bake 2-3 minutes longer. I prefer them soft, but I know some people like crunchier cookies.
    5. You can use crunchy peanut butter if you’d like. This recipe works better using regular creamy peanut butter, not the natural stuff. I like Trader Joe’s creamy peanut butter because the palm oil added is sustainable.
    6. To store: Leftover cookies will keep for up to 5 days in a covered container at room temperature, and they can also be frozen.

    Serving: 1cookie | Calories: 148kcal | Carbohydrates: 17g | Protein: 3g | Fat: 8g | Saturated Fat: 2g | Sodium: 141mg | Potassium: 81mg | Fiber: 1g | Sugar: 10g | Vitamin A: 196IU | Calcium: 15mg | Iron: 1mg

    Course: Dessert

    Cuisine: American

    *Last updated October 2024 with better writing. Was first published March 2019.

    Read More

  • Oven Risotto (basic recipe with vegan option) — Steemit

    Oven Risotto (basic recipe with vegan option) — Steemit

    recipe image

    Hey foodies!

    A few weeks ago, I wondered if there exists a method for risotto that isn’t that time consuming. I came across this „oven method“ for risotto and immediately had to try it out. Guys, trust me, it’s so simple and easy but yet so delicious. You have to try it out! Use any watery vegetable of your choice. If you want to cook e.g. starchy vegetables like pumpkin or beets you will have to adjust the cooking time. You can also cook the risotto without the vegetables in the oven for approximately 30 minutes and prepare your vegetables or other ingredients of choice separately and bring it all together at the end. This works perfectly fine as well.

    939256_10213005472481388_531909_o.jpg

    Ingredients (for 2 servings):

    • 1 c (200 g) risotto rice (e.g. Arborio)
    • 2 c (500 ml) vegetable stock
    • Juice of 1 lemon
    • 1 tbsp canola oil
    • 2 shallots
    • 2 gloves of garlic
    • Vegetables of your choice equivalent to approximately 2 cups (I used leek and mushrooms)
    • 1/4 c (25 g) parmesan cheese (substitute with nutritional yeast for vegan option)
    • Salt & pepper

    Directions:

    1. Preheat the oven to 400°F (200°C).
    2. Add the risotto rice, vegetable broth, lemon juice, canola oil, chopped shallots, pressed garlic and vegetables of choice to an ovenproof form and cover with aluminum foil or other form of coverage.
    3. Place into the preheated oven for 50-60 minutes until it turns into a creamy risotto.
    4. As soon as the oven risotto is ready, stir in the parmesan. Season with salt and pepper to taste. Enjoy!

    Nutritional value (per serving [with leek and mushrooms]):

    549 calories


    15.6 g fat


    16.8 g protein


    85.5 g carbs

    I hope you enjoyed this recipe!

    If so, please don’t forget to resteem, upvote and follow me! 😊

    Unbenannt.png

    Read More

  • Baked Greek Vegan Chicken-Free Strip Salad

    Baked Greek Vegan Chicken-Free Strip Salad

    recipe image

    “My takes on Dienia B.’s Baked Greek Chicken Salad for the Make Mine Vegan Challenge on ZWT9. Hope you enjoy!”

    Ready In:
    1hr 30mins

    Ingredients:
    13

    • 1

      (12 ounce) package vegan chicken, free strips
    • 2

      teaspoons all purpose Greek seasoning, Greek Seasoning Mix
    • 1

      lemon, juice of
    • 14

      cup olive oil
    • 16

      ounces lettuce
    • 1

      tomatoes, diced
    • 1

      cucumber, peeled and diced
    • 1

      onion, diced
    • 2

      ounces extra firm tofu, crumbled
    • 14

      cup black olives
    • 16

      ounces fresh Baby Spinach
    • DRESSING

    • 1

      lemon, juice of
    • 2

      tablespoons olive oil

    directions

    • Place Chicken-Free Strips in a baking dish.
    • Sprinkle with spice mixture, Recipe #425441.
    • Mix together lemon juice and melted butter; pour over chicken.
    • Bake as directed on the Chicken-Free Strips package, basting occasionally, until done.
    • Toss lettuce, tomato, cucumber, onion, firm tofu, black olives, and fresh spinach. Cover with the cooked Chicken-Free Strips.
    • Mix lemon juice and oil and pour over salad.

    Questions & Replies


    Got a question?


    Share it with the community!

    Want a Second Helping?

    Sign up for our newsletter to get recipes, easy dinner ideas, tasty treats and more delivered straight to your inbox.

    To withdraw your consent or to learn more about your rights, see the Privacy Policy.


    Have any thoughts about this recipe?


    Share it with the community!

    RECIPE SUBMITTED BY

    29 year old wife and mother of 3 who is obsessed with meal planning.

    View Full Profile

    Read More

  • Creamy Mango Lassi Overnight Oats (Gluten-Free, Vegan Option)

    Creamy Mango Lassi Overnight Oats (Gluten-Free, Vegan Option)

    recipe image

    These healthy and flavorful Creamy Mango Lassi Overnight Oats make for one delicious and filling gluten-free breakfast reminiscent of the famous Indian beverage.

     These healthy and flavorful Creamy Mango Lassi Overnight Oats make for one delicious and filling gluten-free breakfast reminiscent of the famous Indian beverage. #mangolassi #overnightoats #breakfast #glutenfree #oatmeal #mango #indian #healthy

    Firstly, let me just establish the fact that this overnight oatmeal is ridiculously delicious (because it is).

    With an incredibly creamy texture, and a flavor perfectly reminiscent of the beloved mango lassi Indian yogurt drink, this nutritious breakfast will both nourish and refresh.

    If you are looking to transport your taste buds to an exotic wonderland, and soak up a hearty bowl of health — this is it!

     These healthy and flavorful Creamy Mango Lassi Overnight Oats make for one delicious and filling gluten-free breakfast reminiscent of the famous Indian beverage. #mangolassi #overnightoats #breakfast #glutenfree #oatmeal #mango #indian #healthy

    Mango Lassi Overnight Oats

    • Easy to make.
    • Rich, creamy and flavorful.
    • Great for meal prepping ahead of time.
    • Nutrient-dense.
    • Gluten-free, with vegan and dairy-free options, and refined sugar-free.

     These healthy and flavorful Creamy Mango Lassi Overnight Oats make for one delicious and filling gluten-free breakfast reminiscent of the famous Indian beverage. #mangolassi #overnightoats #breakfast #glutenfree #oatmeal #mango #indian #healthy

    More Fruity Breakfast Recipes

    Blackberry Vanilla-Coconut Chai Spiced Overnight Oats (Gluten-Free, Vegan)

    Orange Creamsicle Chia Seed Breakfast Pudding (Vegan, Gluten-Free)

    If you try this recipe please let me know! Leave a comment, rate it, share this post, use Pinterest’s “tried it” feature, or take a photo, & tag me on Instagram and I’ll share it! Thank you so much! <3

    • 1 cup rolled oats
    • 1 cup plain yogurt *use coconut milk yogurt for Vegan Option
    • 1/2 cup unsweetened almond milk or any milk of choice
    • 2 tbs maple syrup
    • 1 tsp vanilla extract
    • 1/2 cardamom pod freshly ground (approx. 1/4 tsp)
    • 1/2 cup mango fresh or frozen, chopped (+ extra for garnishing)
    • In a bowl or jar (with lid), combine oats, yogurt, milk, maple syrup, vanilla & cardamom. Shake or stir thoroughly to combine.

    • In a blender or food processor, add chopped mango & blend until pureed.

    • Add pureed mango to your oatmeal mix, and stir until evenly combined.

    • Cover your oats & place in the refrigerator overnight.

    • Remove from fridge & top with diced mango before serving.

    • Enjoy!

    Serving: 1bowl | Calories: 323kcal | Carbohydrates: 54g | Protein: 10g | Fat: 8g | Saturated Fat: 3g | Cholesterol: 16mg | Sodium: 143mg | Potassium: 451mg | Fiber: 5g | Sugar: 24g | Vitamin A: 568IU | Vitamin C: 16mg | Calcium: 266mg | Iron: 2mg

    The Vegetarian Family Cookbook

    Please Rate + Comment Below!

    Kristen Wood

    Kristen is a writer, photographer, recipe developer, and certified functional nutrition expert. She is also the author of Fermented Hot Sauce Cookbook, Vegetarian Family Cookbook, and Hot Sauce Cookbook for Beginners. Her work has been featured in various print and online publications including Elle, NBC, Chicago Sun-Times, Martha Stewart, MSN, New York Daily News, Healthline, and many more. Kristen is also a syndicated writer for The Associated Press.

    Read More

  • Vegan Mushroom and Eggplant Sloppy Joes

    Vegan Mushroom and Eggplant Sloppy Joes

    recipe image

    Published: · Modified: by Jeni · This post may contain affiliate links ·

    Vegan Mushroom and Eggplant Sloppy Joes are a spin on traditional sloppy joes.

    Vegan Mushroom and Eggplant Sloppy Joes are a spin on traditional sloppy joes. #vegan


    Did you grow up eating sloppy joes? We had sloppy joes pretty often. They were a quick and easy meal that the whole family loved. To make a really quick dinner, my mom used the manwich sloppy joe sauce.

    Vegan Mushroom and Eggplant Sloppy Joes are a spin on traditional sloppy joes.


    When I started cooking, I learned how easy it is to make your own homemade sauces. Whether you are making a pasta marina sauce or sloppy joes, I like taking a few extra minutes and make the sauce from scratch. The sauce for these Vegan Mushroom and Eggplant Sloppy Joes is easy to make.

    To add depth of flavor to the sauce, I use a vegan worcestershire  sauce. Many worcestershire sauces aren’t vegan; however there are a few vegan-friendly options. My top two are Annie’s and Edward and Sons.

    I love cooking with beer and it adds a really nice flavor to the sauce. If you don’t drink alochol or don’t keep beer on hand, simply sub vegetable broth instead.

    Vegan Mushroom and Eggplant Sloppy Joes are a spin on traditional sloppy joes.


    I usually make lentil based sloppy joes, but I wanted to create a vegetable heavy sloppy joe filling. I have been loving the combinations of mushrooms and eggplant together. Two of my favorite vegetables!

    Vegan Mushroom and Eggplant Sloppy Joes are a spin on traditional sloppy joes.


    These Vegan Mushroom and Eggplant Sloppy Joes are a vegetarian spin on the classic sloppy joe.

    Vegan Mushroom and Eggplant Sloppy Joes are a spin on traditional sloppy joes. #vegan

    Yield:
    4 to 8 Servings

    Prep Time:
    15 minutes

    Cook Time:
    1 hour

    Total Time:
    1 hour 15 minutes

    These Vegan Mushroom and Eggplant Sloppy Joes are a vegetarian spin on the classic sloppy joe. Vegan Mushroom and Eggplant Sloppy Joes Recipe Type: Entree Cuisine: Vegan Author: Jeni Hernandez Ingredients Instructions

    Ingredients

    • 2 Tablespoon Avocado Oil
    • 1 Large Yellow Onion, diced
    • 2 Garlic Cloves, minced
    • 1 Red Bell Pepper, seeded and finely diced
    • 1 Pound Cremini Mushrooms, finely diced
    • 1 Small Globe Eggplant, diced
    • 2 Tablespoons Tomato Paste
    • 1 Tablespoon Chili Powder
    • 1 teaspoon Cumin
    • 1 teaspoon Smoked Paprika
    • Salt and Pepper to taste
    • ½ Cup Lager Beer
    • 1 15 ounce Can Crushed Tomatoes or Tomato Sauce
    • 2 teaspoon Maple Syrup, or to taste
    • 1 Tablespoon Vegan Worcestershire Sauce
    • Buns for serving

    Instructions

    1. Prep all the vegetables.
    2. Heat the oil in a large deep sided skillet over medium high heat. Add the onion and cook 5 minutes, or until softened.
    3. Add the garlic and cook for 1 minute.
    4. Add the red bell pepper, diced mushrooms and eggplant. Cook for 10-12 minutes, or until the vegetables are caramelized. Season with salt and pepper.
    5. Add the tomato paste, chili powder, cumin, and smoked paprika and stir. Cook for 1 minute
    6. Add the beer, crushed tomatoes, maple syrup and Vegan Worcestershire Sauce.
    7. Stir and bring to a simmer.
    8. Once simmering, lower heat to low and cover. Cook 30-35 minutes.
    9. Taste and adjust seasonings if needed.
    10. Serve on a bun.

    Did you make this recipe?

    Please leave a comment on the blog or share a photo on Instagram


    Vegan Mushroom and Eggplant Sloppy Joes are a spin on traditional sloppy joes. #vegan #dinner

    Reader Interactions

    Read More

  • Vegan Chocolate Chip Cheesecake Dip

    Vegan Chocolate Chip Cheesecake Dip

    recipe image

    1 · ·

    We’ve shared a few plant-based cheesecake options here on Hello Veggie, but now it’s time for a vegan cheesecake dip. Because sometimes you don’t want to bother with a crust!

    This dip is the easiest way to get your cheesecake fix–whip up a batch and use it for dipping fresh fruit, spreading onto waffles or toast, and smearing onto cookies. Yes!

    Vegan Cheesecake Dip with Chocolate Chips


    As with most vegan cheesecake recipes, the secret to this recipe is cashews. When soaked in filtered water and blended until smooth, cashews take on a creamy texture reminiscent of dairy. Because cheesecake has a little bit of a tang, we add some lemon juice. A tablespoon of coconut oil gives this vegan cheesecake dip just the right amount of richness too.

    Vegan Chocolate Chip Cheesecake Dip


    I like to keep a container of this dip in the fridge for my daughter to snack on–she especially loves it on toast or waffles with banana slices. But you can totally dress it up and make it for your next get-together too.

    A swirl of raspberry or strawberry sauce, chopped dark chocolate, or even a drizzle of homemade vegan caramel will transform an everyday spread into something worthy of a party. Serve it alongside a tray of fruit and cookies for dipping as a light dessert option.

    Photos by Ana Stanciu

    Vegan Chocolate Chip Cheesecake Dip

    A cashew-based dip and spread that tastes just like cheesecake – but healthier!

    Prep Time 10 minutes

    Total Time 3 hours 10 minutes

    Servings 1 cup

    Author Hello Veggie

    Ingredients

    • 1
      cup
      raw cashews
      soaked in water for at least 3 hours and rinsed
    • 3
      tablespoons
      water
    • 2
      tablespoons
      lemon juice
    • 1
      tablespoon
      virgin coconut oil
    • 1-2
      tablespoons
      maple syrup
    • 1/2
      teaspoon
      ground cinnamon
    • Pinch
      of salt
    • 1/4
      cup
      chopped dark chocolate
    • For garnish: Extra dark chocolate
      a swirl of strawberry or raspberry sauce, a drizzle of vegan caramel sauce, and/or chopped nuts
    • For serving: Fresh fruit
      graham crackers, biscotti, and wafer cookies for dipping; toast, waffles and fresh fruit if you’re using as a spread

    Instructions

    1. Combine the cashews, water, lemon juice, coconut oil, 1 tablespoon of maple syrup, cinnamon and salt in the small bowl of a food processor. Process until completely smooth, scraping down the sides as needed. Taste and add more maple syrup if desired, then stir in the chopped dark chocolate.

    2. Transfer the dip to a serving bowl and garnish. Serve with fruit and other dippers or use as a spread for toast and waffles.

    1

    Read More

  • Chocolate Swirl Raspberry Cheesecake

    Chocolate Swirl Raspberry Cheesecake

    recipe image

    by Kathy Patalsky · updated: · published: · About 3 minutes to read this article. Leave a Comment


    My Chocolate Swirl Raspberry Vegan Cheesecake is a last minute no bake Valentine’s Day dessert for you to make your sweetie! Just five base ingredients for this cheesecake make it an easy last minute treat. Desserts don’t have to be super fancy – they just have to be made with love. And this easy dessert can be made and chilled ready to serve in just under an hour. Plus these vegan flavors like fresh raspberry, vegan dark chocolate and creamy tofu-based cream cheese are super yummy. Happy Valentine’s Day to all!..

    fully chilled..


    This is my first Valentine’s Day in Los Angeles with my husband – so even though we don’t have the best record of VDay (something at the restaurant always seems to go wrong!) I am super excited about going out to one of my fave vegan spots.

    How are you guys spending Valentine’s Day? Dinner in? Fancy meal out? Or more of a casual meal at a fave spot?

    Well staying in or not – there is always room for dessert – or more dessert on VDay. Made with love. So this easy delicious pink vegan cheesecake is my pick. Chocolate covered berries on top. And that cool pink color is made from fresh raspberries – no fake color needed.

    Nelly decided to climb into her food bin for Valentine’s Day. so cute!..


    Enjoy!..

    Chocolate Swirl Raspberry Cheesecake


    vegan, makes one pie dish

    15 ounces vegan cream cheese (about 1 ½ tubs)


    ½ cup agave syrup (or to taste)


    ¼ cup fresh raspberries


    ½ teaspoon salt (or to taste)


    ⅓ cup virgin coconut oil, melted

    cookie crust (2 cups vegan vanilla cookies + 2 tablespoon vegan butter OR pre-made vegan graham shell)

    chocolate swirl:


    ½ cup dark chocolate chips


    2 tablespoon coconut oil

    dark chocolate covered berries as garnish (see link for instructions)

    Directions:

    1. Dip your berries and chill in the fridge until needed. Full info here.

    2. Add filling ingredients to mixing bowl and beat until creamy – or blend in a Vitamix.

    3. If making your own crust, grind the cookies into a fine powder. Then heavily grease a pie shell with the butter. You can also fold vegan butter right into crumbs. Bake at 400 degrees for ten minutes. Remove from oven and set aside.

    4. Pour filling into crust.

    5. Melt the chocolate swirl ingredients in microwave – be careful not to burn. Swirl over top filling.

    6. Chill pie in freezer for 30 minutes – this should chill to a soft-serve slice-able texture. Transfer to fridge. Chill until ready to serve.

    Garnish with the chocolate dipped berries.

    Easy – so delicious!! Happy Valentine’s Day!

    StumbleUpon it! If you like this post – please show your love by StumblingUpon it!

    Read More

  • Vegan caponata with grilled garlic ciabatta

    Vegan caponata with grilled garlic ciabatta

    recipe image

    You might have been detected and blocked as a crawler bot!

    News Corp Australia uses software that manages crawler bot traffic on our websites. If you receive this message and are not a crawler bot (and are just a reader or subscriber), please try these steps first:

    1. Temporarily disable any AdBlockers / pop-up blockers / script blockers you have enabled
    2. Add this site in to the allowed list for any AdBlockers / pop-up blockers / script blockers you have enabled
    3. Ensure your browser supports JavaScript (this can be done via accessing https://www.whatismybrowser.com/detect/is-javascript-enabled in your browser)
    4. Ensure you are using the latest version of your web browser

    If you still need to be unlocked as a reader, subscriber or crawler bot, please e-mail us at accessissues@news.com.au and provide the IP address and reference number shown here along with why you require access.

    Your IP address is: 35.239.153.170 | Your reference number is: 0.85293417.1749779224.226799c3

    News Corp Australia.

    Read More

  • Orange Turmeric Granola (gluten-free, refined sugar-free, vegan)

    Orange Turmeric Granola (gluten-free, refined sugar-free, vegan)

    recipe image

    · 8 Comments

    A bowl of granola

    Healthy, crunchy and gluten-free Orange Turmeric Granola is the perfect breakfast or snack to fuel your day with. Filled with orange juice and zest, this granola packs a flavor punch that’ll keep you going back for more!

    Healthy, gluten-free granola is one of my favorite snacks.

    This gluten-free Orange Turmeric Granola is no exception! Filled with bright orange flavor and an earthy undertone from the turmeric, this fruity granola is a bowl of sunshine.

    Crazy easy to make yourself, granola is one of my favorite things to make from scratch. Rather than buying expensive granola from the store that may have a few bizarre ingredients, I prefer to make my own.

    Have you ever made homemade granola before?

    I like to think once you make it yourself you’ll never go back! There’s endless flavor options, the ability to make it more chunky or less, and the comfort of knowing exactly what’s in your food.

    Let’s roll our sleeves up and get to some granola making!

    To begin, line a large pan with parchment paper and preheat your oven to 300.

    Next, put all your dry ingredients in a medium sized mixing bowl and stir them together (gluten-free oats, coconut, walnuts, turmeric and cinnamon).

    top down view of a bowl of Orange Turmeric Granola with granola scattered around it

    Depending on how much you like turmeric, you can add more or less.

    I’m not a huge fan of the taste of turmeric, but I know that turmeric has great anti-inflammatory and antioxidant benefits, so I’m always looking for more ways to incorporate a little turmeric into my diet.

    I’d recommend starting with 1 teaspoon of turmeric if you’re new to turmeric, and 2 teaspoons if you’re a turmeric LOVER! The more turmeric the more earthy this granola will taste.

    By the way, you know that BRIGHT color turmeric has? IT STAINS.

    So please, don’t use any white mixing bowls, utensils, or white counter tops. I put the turmeric into the bowl over my black oven, because turmeric can stain my laminate counter tops. You can easily put a dark dish towel under your bowl too, for quick clean up and no stain paranoia!

    Next, in a small pot, add your coconut oil, honey (or maple syrup) and orange zest and put it on a medium heat. Bring the mixture to a simmer, and let it simmer for about 1 minute, stirring occasionally.

    Remove your pot from the heat and slowly pour in your orange juice (I like this squeezer) and vanilla.

    Pour your wet ingredients from your pot over the dry ingredients in your mixing bowl and stir them all together.

    Spread the granola mixture out in a thin, even layer on your pan and bake in the oven for about 30 minutes.

    Orange Turmeric Granola on parchment paper

    Granola doesn’t look crunchy yet?

    Don’t worry. The granola will get crunchy as it dries and hardens. You want a thin layer of granola that’s been cooked through, and maybe that’s browning a touch around the edges (but not burning!).

    After about 30 minutes of cooling your granola should be nice and hard. At this point you can break it into however big or small pieces of granola that you prefer. We like big, chunky pieces of granola here – it’s easier for my 3 year old to grab this way! 🙂

    Interested in other granola flavors? Check out my Cinnamon Sugar Roasted Nut Granola or my Lemon Honey Granola. Maybe you love orange? I’d highly recommend baking my gluten-free Orange Carrot Oat Muffins too! 🙂

    A bowl of granola

    Orange Turmeric Granola (gluten-free, refined sugar-free, vegan)

    Servings: 16

    Calories: 154 kcal

    Ingredients

    • 2
      cups
      oats (certified gluten-free, if necessary)
    • 1
      cup
      shredded coconut
    • 1
      cup
      walnuts, chopped
    • 1-2
      tsp
      turmeric
    • 1/2
      tsp
      cinnamon
    • 1/4
      cup
      coconut oil
    • 1/3
      cup
      honey (or maple syrup, if vegan)
    • Zest of 2 oranges
    • 1
      tsp
      vanilla
    • 1/4
      cup
      orange juice

    Instructions

    1. To begin, preheat your oven to 300 and line a baking pan with parchment paper. 

    2. In a small mixing bowl, add your oats, coconut, walnuts, turmeric and cinnamon and stir them together. 

    3. In a small pot, over medium heat, add your coconut oil, honey and orange zest. Bring to a simmer and simmer for 1 minute, stirring occasionally.

    4. Take your pot OFF the heat and slowly add in your vanilla and orange juice. 

    5. Pour your wet ingredients from your pot over the dry ingredients in your bowl and stir to combine. Pour your granola mixture onto your pan, and spread out in a thin, even layer. 

    6. Bake in the oven for about 25-30 minutes, or till the edges are just starting to gain color (but not burning!).

    7. While the granola cools it will get crunchy; let cool for 30 minutes. 

    8. After cooling, crumble your granola up as much or as little as you like, depending on how small or big of granola clusters you prefer.

    9. Devour!

    Recipe Notes

    Stored in an airtight container, homemade granola should last about a couple months. 

    Orange Turmeric Granola in a bowl with more granola sprinkled around

    Read More

  • Vegan Zuppa Toscana

    Vegan Zuppa Toscana

    recipe image

    Easy stovetop vegan zuppa toscana! This copycat version of the Olive Garden recipe is light, healthy and packed with flavor. Made with coconut milk, kale and yukon potatoes, it’s dairy free and only one pot required.

    Two bowls of Vegan Zuppa Toscana with a small plate of bread and two spoons.

    Today we talk creamy, dreamy vegan zuppa toscana!

    Because we are officially in the thick of soup season and if you are anything like me, you can absolutely use another recipe to add into your rotation. Says the girl who eats soup ALL YEAR ROUND.

    So. Today I bring you a delicious option in the form of this copycat version of the famous Olive Garden dish.

    Made with coconut milk, kale and yukon gold potatoes, this dreamy dish is easy, simple and only requires one pot.

    And while there’s no sausage, bacon or heavy cream involved, it is still jam packed with flavor.

    From a few simple ingredients – fennel seeds, soy sauce and vegan worcestershire – that help to impart that sort of meaty, umami flavor found in the classic dish.

    And between the combination of the three, I promise you that this really does taste like the original. Yesssss.

    Now, this soup just borders on what I consider a weeknight meal – it takes a touch over one hour to make. BUT it’s largely hands off once you get it going on the stovetop. I’ll count that as a win.

    A side angle photo of three bowls filled with Vegan Zuppa Toscana.

    Tips & Tricks For This Vegan Zuppa Toscana

    1. First up, let’s talk about the potatoes. Make sure that you cut them into ½ inch chunks – this ensures that they cook quickly and in the allotted time.
    2. Wait to prep the kale until after you get the rest of the soup simmering on the stovetop. This will shave about 5 minutes off the overall recipe time.
    3. While kale is typically used in the classic version of this soup, I think collard greens would make an excellent substitute, especially if you happen to have them on hand!
    4. To keep this soup gluten free, be sure to use gluten free tamari (and not regular soy sauce) and check the ingredients on your worcestershire sauce, as many brands contain wheat.

    How To Store

    Let the soup cool completely then transfer to an airtight container. It will keep in the fridge for up to 4 days.

    One bowl of Vegan Zuppa Toscana with a spoon and a small plate of torn up bread.

    Additional Vegan Soups You Might Enjoy:

    • Dairy Free Tomato Soup
    • Dairy Free Corn Chowder
    • Creamy Sweet Potato and Black Bean Soup
    • Slow Cooker Thai Sweet Potato Soup
    • Roasted Garlic Butternut Squash Soup
    • Roasted Cherry Tomato Soup
    • Dairy Free Broccoli Soup

    Did you make this recipe? Rate and review it down below! I’d love to hear from you.

    Ingredients

    • 2 tablespoons olive oil
    • 1 medium onion, chopped
    • 3 cloves garlic, minced
    • ¾ teaspoon fennel seeds
    • 1 (8 ounce) package baby bella mushrooms, stemmed and sliced
    • 1 pound yukon potatoes, cut into ½ inch chunks
    • 4 cups low-sodium vegetable broth
    • ½ teaspoon dried oregano
    • ¼ teaspoon dried thyme
    • ½ teaspoon fine sea salt
    • ¼ teaspoon pepper
    • pinch of red pepper flakes, or to taste
    • 1 (13.5 ounce) can full-fat coconut milk
    • 4 cups stemmed and thinly sliced curly kale
    • 2 teaspoons low-sodium soy sauce or tamari
    • 1 teaspoon vegan worcestershire sauce*

    Instructions

    1. Add the olive oil to a large stockpot or dutch oven set over medium heat. When hot, add in the onion and cook for about 2 to 3 minutes, until it starts to soften. Add in the garlic and fennel seeds and cook for 30 seconds, until fragrant.
    2. Add in the mushrooms and cook for about 5 minutes, until softened.
    3. Stir in the potatoes, broth, oregano, thyme, salt, pepper and red pepper flakes. Increase the heat and bring just barely to a boil.
    4. Turn down the heat and simmer for about 15 minutes, or until the potatoes are fork tender.
    5. Stir in the coconut milk, kale, soy sauce and worcestershire sauce. Continue to simmer, adjusting the heat as needed, for about 10 minutes, until the kale is nice and tender. Remove from the heat.
    6. Taste and adjust the salt / pepper to taste, if needed (I usually add a touch more salt to really make the flavors sing!).

    Notes

    *Be sure to check the ingredients on your worcestershire sauce if you are gluten free – many brands contain wheat.

    Nutrition Information:

    Yield: 5

    Serving Size: 1


    Amount Per Serving:

    Calories: 347Total Fat: 23gSaturated Fat: 16gTrans Fat: 0gUnsaturated Fat: 6gCholesterol: 0mgSodium: 658mgCarbohydrates: 34gFiber: 5gSugar: 5gProtein: 7g

    Nutrition data shown is an estimate provided by an online calculator and is for informational purposes only. It should not be considered a substitute for a medical professional’s advice.

    Read More