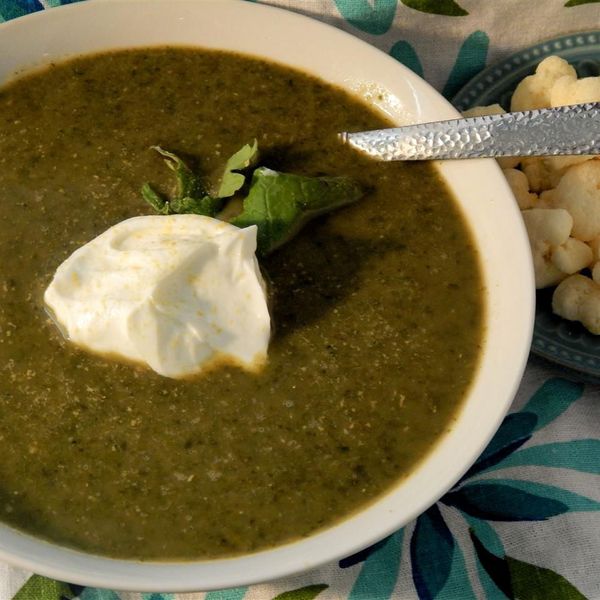
Heat olive oil in a large pot over medium heat. Cook and stir onion until soft, about 3 minutes. Pour in vegetable broth. Increase heat to high and bring broth to a boil. Add lentils. Reduce heat to medium and cook until soft, about 45 minutes.
Stir kale, Swiss chard, and mustard greens into the broth; simmer until tender, 5 to 10 minutes. Stir in nutritional yeast, garlic powder, thyme, pepper, and salt. Let soup cool, about 10 minutes.
Transfer soup to a blender; puree until smooth. Pour back into the pot and reheat, about 5 minutes.
Cook’s Note:
It would be interesting to try this recipe with various mixtures of greens. This was an interesting combination; I made it with fingers crossed, but it turned out great!
Substitute water for the vegetable broth if desired.
Use an immersion blender to puree the soup if preferred.
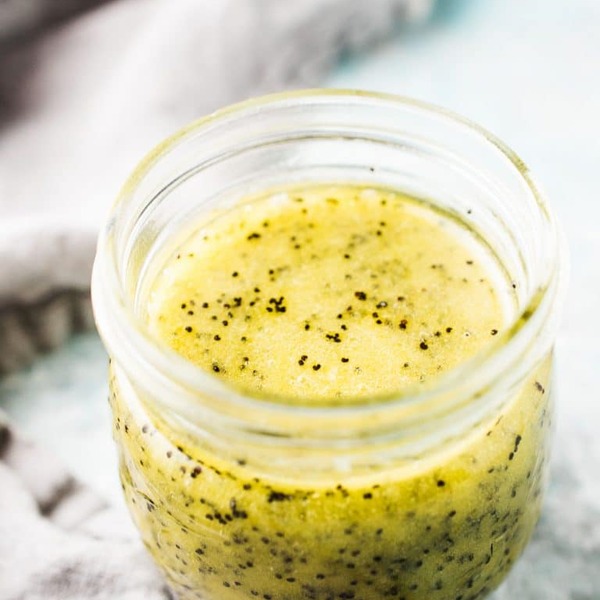
Have I got a vibrant and delicious salad dressing for you! This 6-ingredient lemon poppy seed dressing is one of my go-to recipes for a fresh and tangy salad. You’ll love that it comes together in minutes. Read on, and I’ll share my four tips and ideas with you!
Friends, I did it! I found a way to bottle up sunshine, and I’m here to share it with you today! I’ve been making this lemon poppy seed dressing every time spring rolls around, and it keeps my family and me feeling bright and zesty all summer, too. It’s so simple, yet full of zest and tag, with little pops of satisfying seeds. Let’s get into it!
Homemade salad dressings are always a breeze to make, and this one is no exception! I feel like it’s barely a recipe. These are the instructions:
Frequently Asked Questions
If you don’t find the answer you’re looking for here, you can ask it in the comments below, and we’ll get back to you as soon as possible!
How do I store lemon poppy seed dressing?
I like storing it in mason jars – they’re airtight! But you can use any airtight jar or container in the refrigerator, where it will stay fresh for up to 5 days. Before using, give the jar a quick shake to recombine the ingredients for the best flavor and consistency.
Where do I find poppy seeds?
Most supermarkets carry them! Sometimes they’re in the baking section, near the vanilla extract. Sometimes they’ll be with the spices and seasonings, or in the bulk food section. If you’re having trouble, check with one of the staff members. Health food stores often carry them, or you can get them online.
Can I customize the flavor?
You sure can! Add a clove of minced garlic for more savory depth, a pinch of cayenne or chili flakes for heat, or use avocado oil to lighten things up.
Can I make this lemon poppy seed dressing vegan?
You sure can! Simply swap the honey for maple syrup, and you’re good to go!
Lemon Poppy Seed Dressing Recipe
Prep: 5 minutesmins
Cook: 0 minutesmins
Total: 5 minutesmins
This lemon poppy seed dressing is a versatile recipe. While I usually use it as a salad dressing, I’ve also drizzled it over roasted veggies and grain bowls, and it’s wonderful served that way, too.
The trick to making it creamy is to pour the oil in slowly while whisking constantly. It emulsifies the oil, making the dressing creamy without adding mayo or dairy.
Instructions
In a medium-sized bowl, whisk the lemon juice, dijon, honey, and sea salt.
Juice of 1 ½ lemons, 2 teaspoons dijon mustard, 2 teaspoons honey, ¼ teaspoon sea salt, 1 tablespoon poppy seeds
Continue to whisk while slowly adding the oil. The dressing will turn creamy. Whisk in the poppy seeds.
½ cup olive oil
This dressing will keep well in your fridge for at least a week. Store it in a jar and shake before using.
An error was encountered while processing your request. Typically this is a temporary condition. Please contact the web site owner for further assistance.
An error was encountered while processing your request. Typically this is a temporary condition. Please contact the web site owner for further assistance.
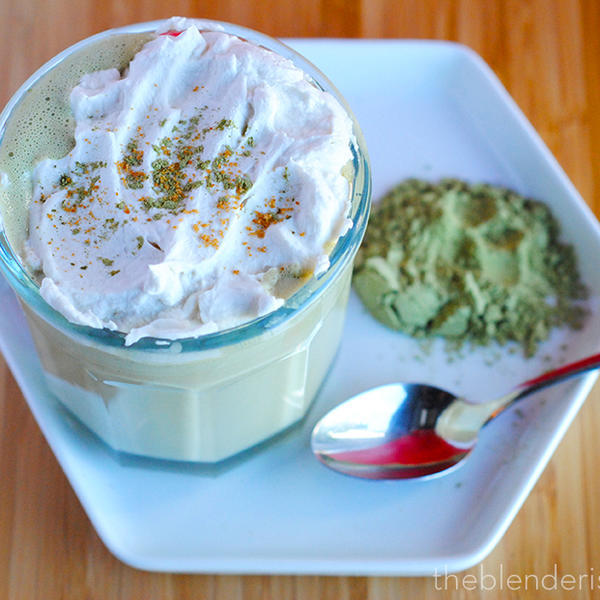
This is the second entry in my hot beverage series. I previously shared a recipe for ‘The World’s Best Vegan Pumpkin Spice Latte’. This week, were are going green with ‘The World’s Best Vegan Matcha Latte’.
I have a confession. I hated matcha the first 10 times I tried it. I’m not sure when or why it “clicked” for me, but now I can’t get enough of it! If you haven’t had it before, you might want to ease yourself in to this recipe by using a smaller amount of matcha powder. Before you know it, you will be inhaling the stuff. Just kidding, don’t do that.
The creamy mouthfeel of this warm beverage comes from homemade cashew milk. I teach you to make homemade cashew milk in this previous post. It’s super easy. If you don’t want to make cashew milk, you can use the milk of your choosing. It won’t be ‘The World’s Best Vegan Matcha Latte’, but it will be good.
If you want to make it very special, top it with some whipped coconut cream and sprinkle with matcha and coconut sugar. That is some next level deliciousness! This recipe is enough for 2 small cups or one big mug!
Print
Ingredients
1.5 cups cashew milk
1/2 cup water
2 tsp matcha powder
Maple syrup or coconut sugar to taste
Instructions
Put all ingredients in a high-speed blender on high until warm.
If you don’t have a high-speed blender, you can whisk in a pot over medium heat until warm.
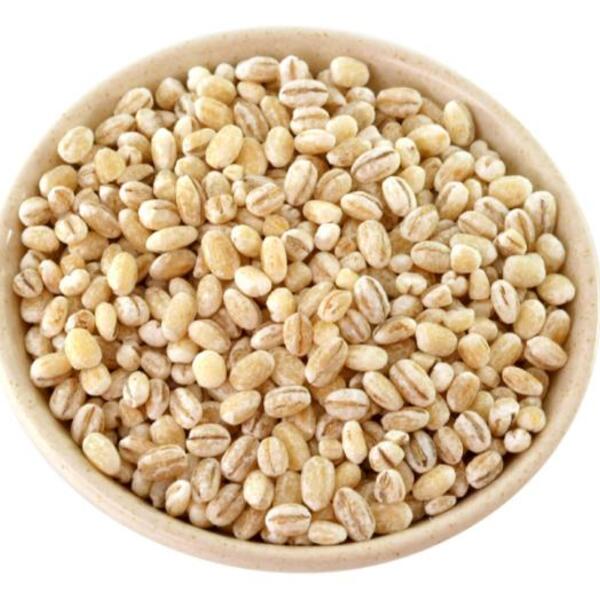
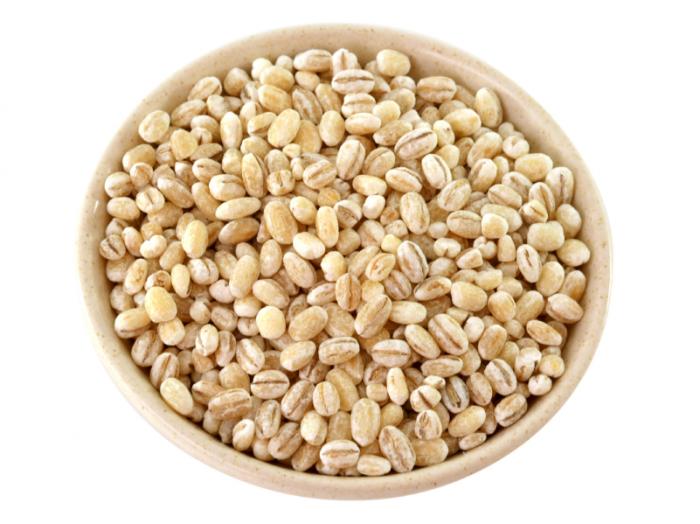
Barley is a great grain with lots of nutty flavor and a nice bite. We often see barley in soup but it can be used for many dishes. This risotto takes advantage of this grain’s great taste and creamy texture when cooked using this method. Risotto is often thought of as a dish made with rice but it is actually a cooking method. It seems hard at first but is not too difficult. Just get a glass of your favorite beverage, stand and stir and contemplate life for a few minutes. The extra effort is worth the trouble. This dish is a great example of adding lots of vegetables in a grain dish to decrease calories and boost fiber. This recipe is compliments of my friend Chef Ellen Clevenger-Firley – thanks Ellen!
Wild Mushroom and Barley Risotto
Serves 6
Serving Size: 1/6th of the recipe
Prep Time: 45 minutes to 1 hour
Cook Time: 45 minutes to 1 hour
Total Time: 45 minutes to 1 hour
Ingredients:
6 cups mushroom, vegetable or chicken stock
1 ½ cups water
3 T olive oil
1 cup minced onion
3 cups sliced or coarsely chopped mushrooms, any variety of a combination
1 ½ cups barley rinsed (do not use quick cooking)
½ cup red wine
6 cups baby spinach
½ cup grated parmesan cheese (omit to make this dish vegan)
1 tablespoon butter (omit to make this dish vegan)
2 teaspoons balsamic vinegar
Freshly ground pepper to taste
Directions:
In a medium sauce pan, bring broth and water to a simmer.
Heat oil in a large Dutch oven or large chef’s pan. Add onion and cook for 2 minutes.
Add red wine and cook until almost evaporated.
Add the mushrooms and cook stirring often until they begin to release their juices.
Add barley and cook for 1 minute.
Add 1 cup of warm broth and stir continuously until almost all of the liquid is absorbed.
Continue adding broth 1 cup at a time while stirring. Keep adding broth until barley is cooked through and tender (about 35-45 min). Add a bit more broth. Dish should be a bit loose at this point as it will continue to thicken.
Stir in spinach and allow to wilt.
Add more broth if the dish is too stiff.
Stir in cheese and butter if using.
Taste and add pepper and adjust seasoning if needed.
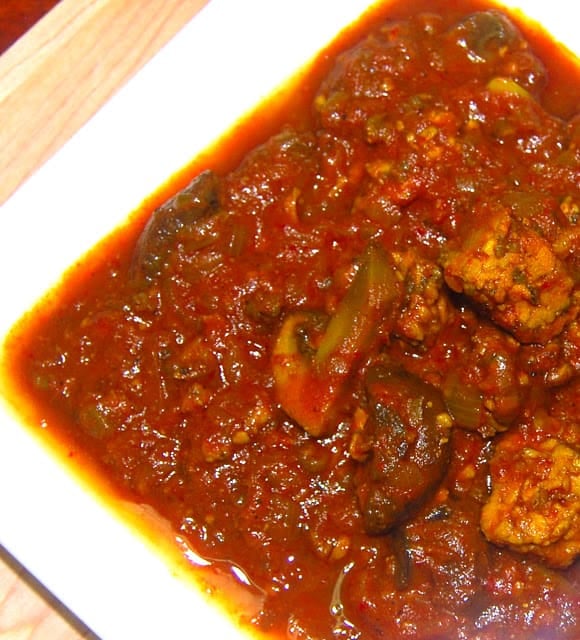
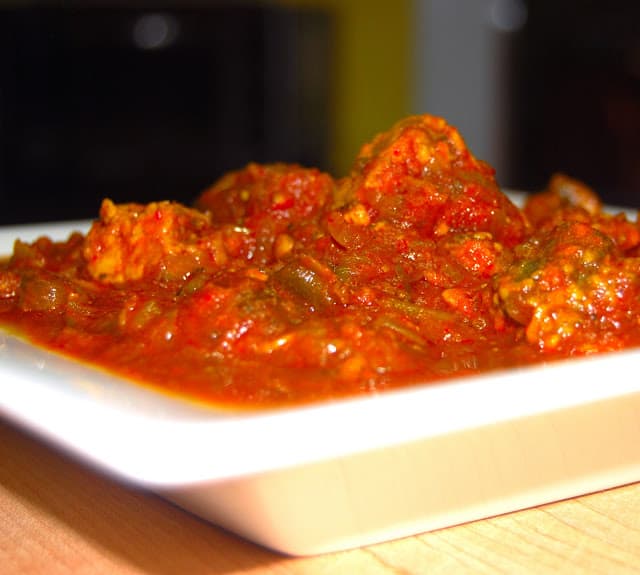
Doro Wat is a spicy, highly aromatic stew from Ethiopia. For my vegan version, I stick with tradition to use the two flavor bases — berbere spice mix and niter kibbeh — but use “meaty” vegetables instead of the traditional meat. Vegan, nut-free, gluten-free.
You might also like Ethiopian shiro wat and misir wat.
My vegan version of the classic Ethiopian favorite Doro Wat is a labor of love. It took me upwards of two hours to put together which, to a speed-seeking cook like me, is an eternity and an indulgence.
But this is an indulgence I had long craved. There’s something about the very look of this ravishing, flaming-red dish that stokes my appetite, not to mention the aroma. Doro Wat is often called Ethiopia’s national dish and just inhaling that spice-rich aroma reveals just why it’s so popular. Traditionally it’s made with chicken, but it’s not a hard dish to veganize because all those spices and flavors in there are perfect with “meaty” vegetables like mushrooms or eggplants.
Cooking Ethiopian dishes is always a pleasant revelation to me, both as a cook and as someone who cooks a lot of Indian food. That’s because Ethiopian cuisine couldn’t be more similar to Indian cuisine in its use of spices, yet it couldn’t be more different in technique, and the end results are worlds apart. To put it more simply, an Indian curry contains a lot of the same spices and ingredients that a Doro Wat does, but because you cook them so differently they taste vastly different.
Doro Wat has two flavor building blocks: niter kibbeh, which is butter spiced with garlic, cloves, cardamom and cinnamon, and berbere, a powdered mix of chillies and more spices (there are paste versions of this too). For this recipe I use my wonderful vegan niter kibbeh, made with heart-healthy olive oil. Don’t try to take a short cut and leave out either the niter kibbeh or the berbere because your Doro Wat will then taste like its missing something, which is never a kind thing to do to your tastebuds.
The most tedious part of this recipe was, to me, roasting a pile of onions to a rich brown color with the help of nothing but a little water– it took over an hour. I toned down the heat in this dish because Desi, despite his Indian tastebuds, cannot tolerate too much chilli. If you are a heat-seeker, go ahead and use more red chillies.
Here’s the recipe, just in time for your weekend. Enjoy, all!
More aromatic vegan stew recipes
Recipe card
Vegan Doro Wat
Vaishali · Holy Cow Vegan
Doro Wat is a spicy, highly aromatic stew from Ethiopia. For my vegan version, I stick with tradition to use the two flavor bases — berbere spice mix and niter kibbeh — but use “meaty” vegetables instead of the traditional meat. Vegan, nut-free, gluten-free.
Prep Time 15 minutesmins
Cook Time 1 hourhr30 minutesmins
Total Time 1 hourhr45 minutesmins
Course Main
Cuisine Ethiopian
Servings 10servings
Calories 214kcal
Ingredients
2tablespoonsberbere
¼cupvegan niter kibbeh
8oztempeh
Juice of ½ lemon
1 ½poundscremini mushrooms or button mushroomscrimini or portobello, halved or quartered if large
3mediumonions, finely chopped
6oztomato paste
1cupdry white wine(optional)
2tablespoonginger garlic paste
Salt to taste
Instructions
Sprinkle the juice of the lemon on the tempeh cubes and mix.
Heat a large saucepan. Add the onions and stir. When the onions start looking dry, add ¼ cup of water and cook until the mixture dries up. Keep adding a couple of tablespoons of water each time the onions dry and start to stick, stirring at frequent intervals, until the onions become golden-brown. Like I said earlier, this took me more than an hour on medium heat, but don’t skip this step and hurry to add other ingredients because the roasted onions add a lot of flavor.
Now add the tomato paste, ginger and garlic and cook, stirring frequently, about 2-3 minutes.
Add the berbere, ½ cup of water, and the Niter Kibbeh. Stir to mix and bring the mixture to a boil.
Add the mushrooms and tempeh and stir well. Bring the sauce to a boil (add more water if the mixture is very dry), slap a lid on, lower the heat to simmer, and let the mixture cook about 15-20 minutes.
Add the white wine, if you’re using it, and simmer for another 10 minutes. If you’re not adding wine, skip this step. Check and add salt as needed.
Serve hot over rice or with some crusty bread. Tip: This tastes even better when you’ve allowed it to stand for a few hours, or overnight, to let the flavors meld together.
To print recipe card without images, uncheck “instruction images” after clicking the “print recipe” button.
Tried this recipe?Let us know in the comments below!
About Vaishali
Hi! I’m Vaishali, a journalist turned food blogger. At Holy Cow Vegan I share easy, tasty recipes made with clean, wholesome ingredients that the entire family can enjoy.
Reese’s Peanut Butter Cups were always my favorite candy as a kid. Classic case of nostalgia.
During Halloween, I’d go through my bag and pick out all Reese’s and set them aside for extra special treat days. I had to savor them because Mom didn’t buy Reese’s often. When Easter came along and Reese’s eggs were popular, I was allowed to have exactly one and damn did I cherish that Reese’s egg with my entire soul.
To be honest, Tony and I love white chocolate Reese’s eggs, especially when they’re kept in the fridge. I realize they’re probably not the best, but every once in a while we buy them as a special treat for our movie nights.
That was until I decided to make my own healthy peanut butter eggs back in 2016 (yes, 8 years ago!) without any refined sweeteners, dairy or junk I couldn’t pronounce. Now we have these beautiful vegan Reese’s eggs almost every week, keeping them in the freezer for when we’re craving something sweet. Bonus points: they’re the perfect sweet treat for Easter that kiddos will LOVE.
” title=”Easy healthy Reese’s eggs made with only 4 simple ingredients! These homemade vegan peanut butter eggs are low carb, gluten free, low sugar and have a glorious peanut butter middle for the perfect no bake treat that everyone loves.” width=”1067″>
Everything you need to make healthy Reese’s eggs
These vegan Reese’s peanut butter eggs are EVERYTHING and so simple to make! If you love Reese’s in any way shape or form, I can guarantee that you will fall in love with this recipe. These low carb peanut butter eggs are also grain free, gluten free, dairy free, which means that anyone and everyone will absolutely adore these. Here are the 4 ingredients you’ll need:
Peanut butter: please use a creamy peanut butter with just peanuts + salt, or just peanuts. That’s what works best for this recipe. If you use a Trader Joe’s brand, you may need to add extra coconut flour, because their brand is incredibly runny. If you have a peanut allergy you could also try cashew, almond or sunflower seed butter!
Pure maple syrup: many homemade peanut butter eggs are made with powdered sugar, but we’re naturally sweetening these Reese’s eggs with pure maple syrup. You can also use honey if you’re not vegan.
Coconut flour: a little coconut flour adds fiber and helps thicken the peanut butter eggs to bind everything together. It works like magic.
Dark chocolate: I love using dark chocolate chips or dairy free & vegan chocolate. There are many wonderful brands out there to choose from.
” title=”Easy healthy Reese’s eggs made with only 4 simple ingredients! These homemade vegan peanut butter eggs are low carb, gluten free, low sugar and have a glorious peanut butter middle for the perfect no bake treat that everyone loves.” width=”1067″>
Can I use a different flour?
If you don’t have coconut flour, almond flour would be a good substitute in these peanut butter eggs. Please note that you’d likely need at least 1/4 – 1/3 cup of almond flour until you achieve the right consistency. I would not recommend other flours. For example, all purpose flour is not intended to be eaten raw so do not sub that in.
” title=”Easy healthy Reese’s eggs made with only 4 simple ingredients! These homemade vegan peanut butter eggs are low carb, gluten free, low sugar and have a glorious peanut butter middle for the perfect no bake treat that everyone loves.” width=”1600″>
Make them paleo
Yes, these healthy Reese’s eggs can also be made paleo by simply using almond butter or cashew butter! Be sure their ingredients are just nuts and salt.
Try a white chocolate version
As I mentioned, Tony and I love storing the white chocolate Reese’s eggs in our freezer when they hit the shelves over Easter. Feel free to make these peanut butter eggs with white chocolate by simply swapping the dark chocolate to white chocolate chips or a white chocolate bar!
” title=”Easy healthy Reese’s eggs made with only 4 simple ingredients! These homemade vegan peanut butter eggs are low carb, gluten free, low sugar and have a glorious peanut butter middle for the perfect no bake treat that everyone loves.” width=”1067″>
How to make peanut butter eggs
Make the batter. In a medium bowl, mix together peanut butter, maple syrup and 1 tablespoon of coconut flour. Add another tablespoon or two of coconut flour if the batter is super runny. The peanut butter mixture should be sticky like a wet cookie dough.
Shape the eggs. Use a cookie scoop to drop peanut butter mixture by the tablespoonful onto a parchment lined small baking sheet. Slightly flatten the top of each with your fingertips and shape into an ‘egg shape’ if you want. Place on a baking sheet lined with parchment paper and put in the freezer for 20 minutes to 1 hour. The longer the eggs stay in the freezer, the easier it will be to dip them.
Dip the eggs. After about 30 minutes, melt the chocolate bar in a small saucepan over very low heat, stirring frequently. Transfer melted chocolate to a small warm bowl, allow chocolate to cool for 5 minutes before dunking the eggs. Quickly use a fork to dip each peanut butter egg into chocolate. Make sure to coat evenly.
Freeze & serve. Transfer back to parchment lined baking sheet and sprinkle with a little coarse sea salt if desired. Immediately place baking sheet back in freezer for 30 minutes to 1 hour. Makes 8 large vegan Reese’s eggs.
” title=”Easy healthy Reese’s eggs made with only 4 simple ingredients! These homemade vegan peanut butter eggs are low carb, gluten free, low sugar and have a glorious peanut butter middle for the perfect no bake treat that everyone loves.” width=”1067″>
Tips for homemade Reese’s eggs
Adjust the flour. Depending on your peanut butter, you may need to use more coconut flour. Anywhere from 1-3 tablespoons is usually perfect. I normally never need more than 2 tablespoons for these eggs.
Utilize your refrigerator. If your peanut butter dough looks too runny or soft, feel free to pop it in the fridge for 10-20 minutes before forming the eggs.
Keep the chocolate room temp. Melt the chocolate 10 minutes before you are ready to coat your eggs. Room temperature melted chocolate is better than hot melted chocolate; if the chocolate is too hot, it can melt the peanut butter.
Soften before eating. Feel free to pop them in the fridge for a couple of minutes before you eat them so that they soften up just a bit.
” title=”Easy healthy Reese’s eggs made with only 4 simple ingredients! These homemade vegan peanut butter eggs are low carb, gluten free, low sugar and have a glorious peanut butter middle for the perfect no bake treat that everyone loves.” width=”1067″>
Storing tips
Be sure to store these vegan Reese’s eggs in your freezer. I recommend a freezer-friendly bag or container to keep these treats frozen. These low carb Reese’s eggs can stay in your freezer for up to 3 months, so go ahead and make a double batch if you’d like!
” title=”Easy healthy Reese’s eggs made with only 4 simple ingredients! These homemade vegan peanut butter eggs are low carb, gluten free, low sugar and have a glorious peanut butter middle for the perfect no bake treat that everyone loves.” width=”1067″>
More no bake desserts to try
Peanut Butter Cup Freezer Fudge
No Bake Superfood Brownies
No Bake Salted Tahini Cookie Dough Fudge
Birthday Cake Rice Krispie Treats
No Bake Chocolate Peanut Butter Protein Bars
Get all of our delicious vegan dessert recipes here!
I hope you love these 4-ingredient healthy Reese’s eggs! If you make them, I’d love for you to leave a comment and a rating letting me know how you liked them. I really appreciate it, xo!
” width=”274″>
The Ambitious Kitchen Cookbook
125 Ridiculously Good For You, Sometimes Indulgent, and Absolutely Never Boring Recipes for Every Meal of the Day
Easy healthy Reese’s eggs made with only 4 simple ingredients! These homemade vegan Reese’s eggs are low carb, gluten free, low sugar and have a glorious peanut butter middle for the perfect no bake treat that everyone loves.
2-3tablespoonscoconut flour (start with 2 and add another if necessary)
3.5ounces72% dark chocolate bar, vegan if desired
Optional: Coarse sea salt, for sprinkling on top
Instructions
In a medium bowl, mix together peanut butter, maple syrup and 2 tablespoons coconut flour until smooth. The peanut butter mixture should be sticky like a wet cookie dough. If your peanut butter dough looks too runny or soft, feel free to add 1 more tablespoon of coconut flour and/or pop the dough in the fridge for 10-20 minutes before forming the eggs. Usually after about 5-10 minutes of sitting the coconut flour absorbs some of the liquid.
Use a cookie scoop to drop peanut butter mixture by the tablespoonful onto a parchment lined small baking sheet — you should get 8 eggs total. Slightly flatten the top of each with your fingertips and form into an egg shape if you’d like. Place baking sheet in the freezer for 20 minutes-1 hour. The longer the eggs sit in the freezer, the easier they will be to dip in chocolate.
Once you are ready to coat the eggs, melt the chocolate bar in a small saucepan over very low heat, stirring frequently. Transfer melted chocolate to a small warm bowl. Room temperature or slightly warm melted chocolate is better than ‘hot’ melted chocolate; if the chocolate is too hot, it can melt the peanut butter.
Quickly use a fork to dip each peanut butter egg into chocolate. Make sure to coat evenly. Transfer back to parchment-lined baking sheet and sprinkle with a little coarse sea salt if desired. If there’s extra chocolate at the end, you can drizzle it vigorously over each egg for a pretty easter egg look. Immediately place baking sheet back in freezer for 30 minutes to 1 hour or as long as you’d like until hardened. Once hardened completely store in an airtight container in the fridge or freezer until ready to eat. Makes 8 large peanut butter eggs.
Recipe Notes
How to make these paleo: Use cashew butter or almond butter, just make sure they are all natural with no added ingredients. I like making my own!
How to store: Be sure to store these vegan Reese’s eggs in your freezer. I recommend a freezer-friendly bag or container to keep these treats frozen. These low carb Reese’s eggs can stay in your freezer for up to 3 months, so go ahead and make a double batch if you’d like.
If you don’t have coconut flour, almond flour would be a good substitute, although, you’d likely need at least 1/4-1/3 cup of almond flour until you achieve the right consistency. I would not recommend other flours.
Feel free to pop them in the fridge or let them sit at room temperature for a couple of minutes before you eat them so that they soften up just a bit.
This post was originally published in 2016, republished on March 15h, 2021, republished on April 12th, 2022, republished on April 3rd, 2023, and republished on March 17th, 2024.
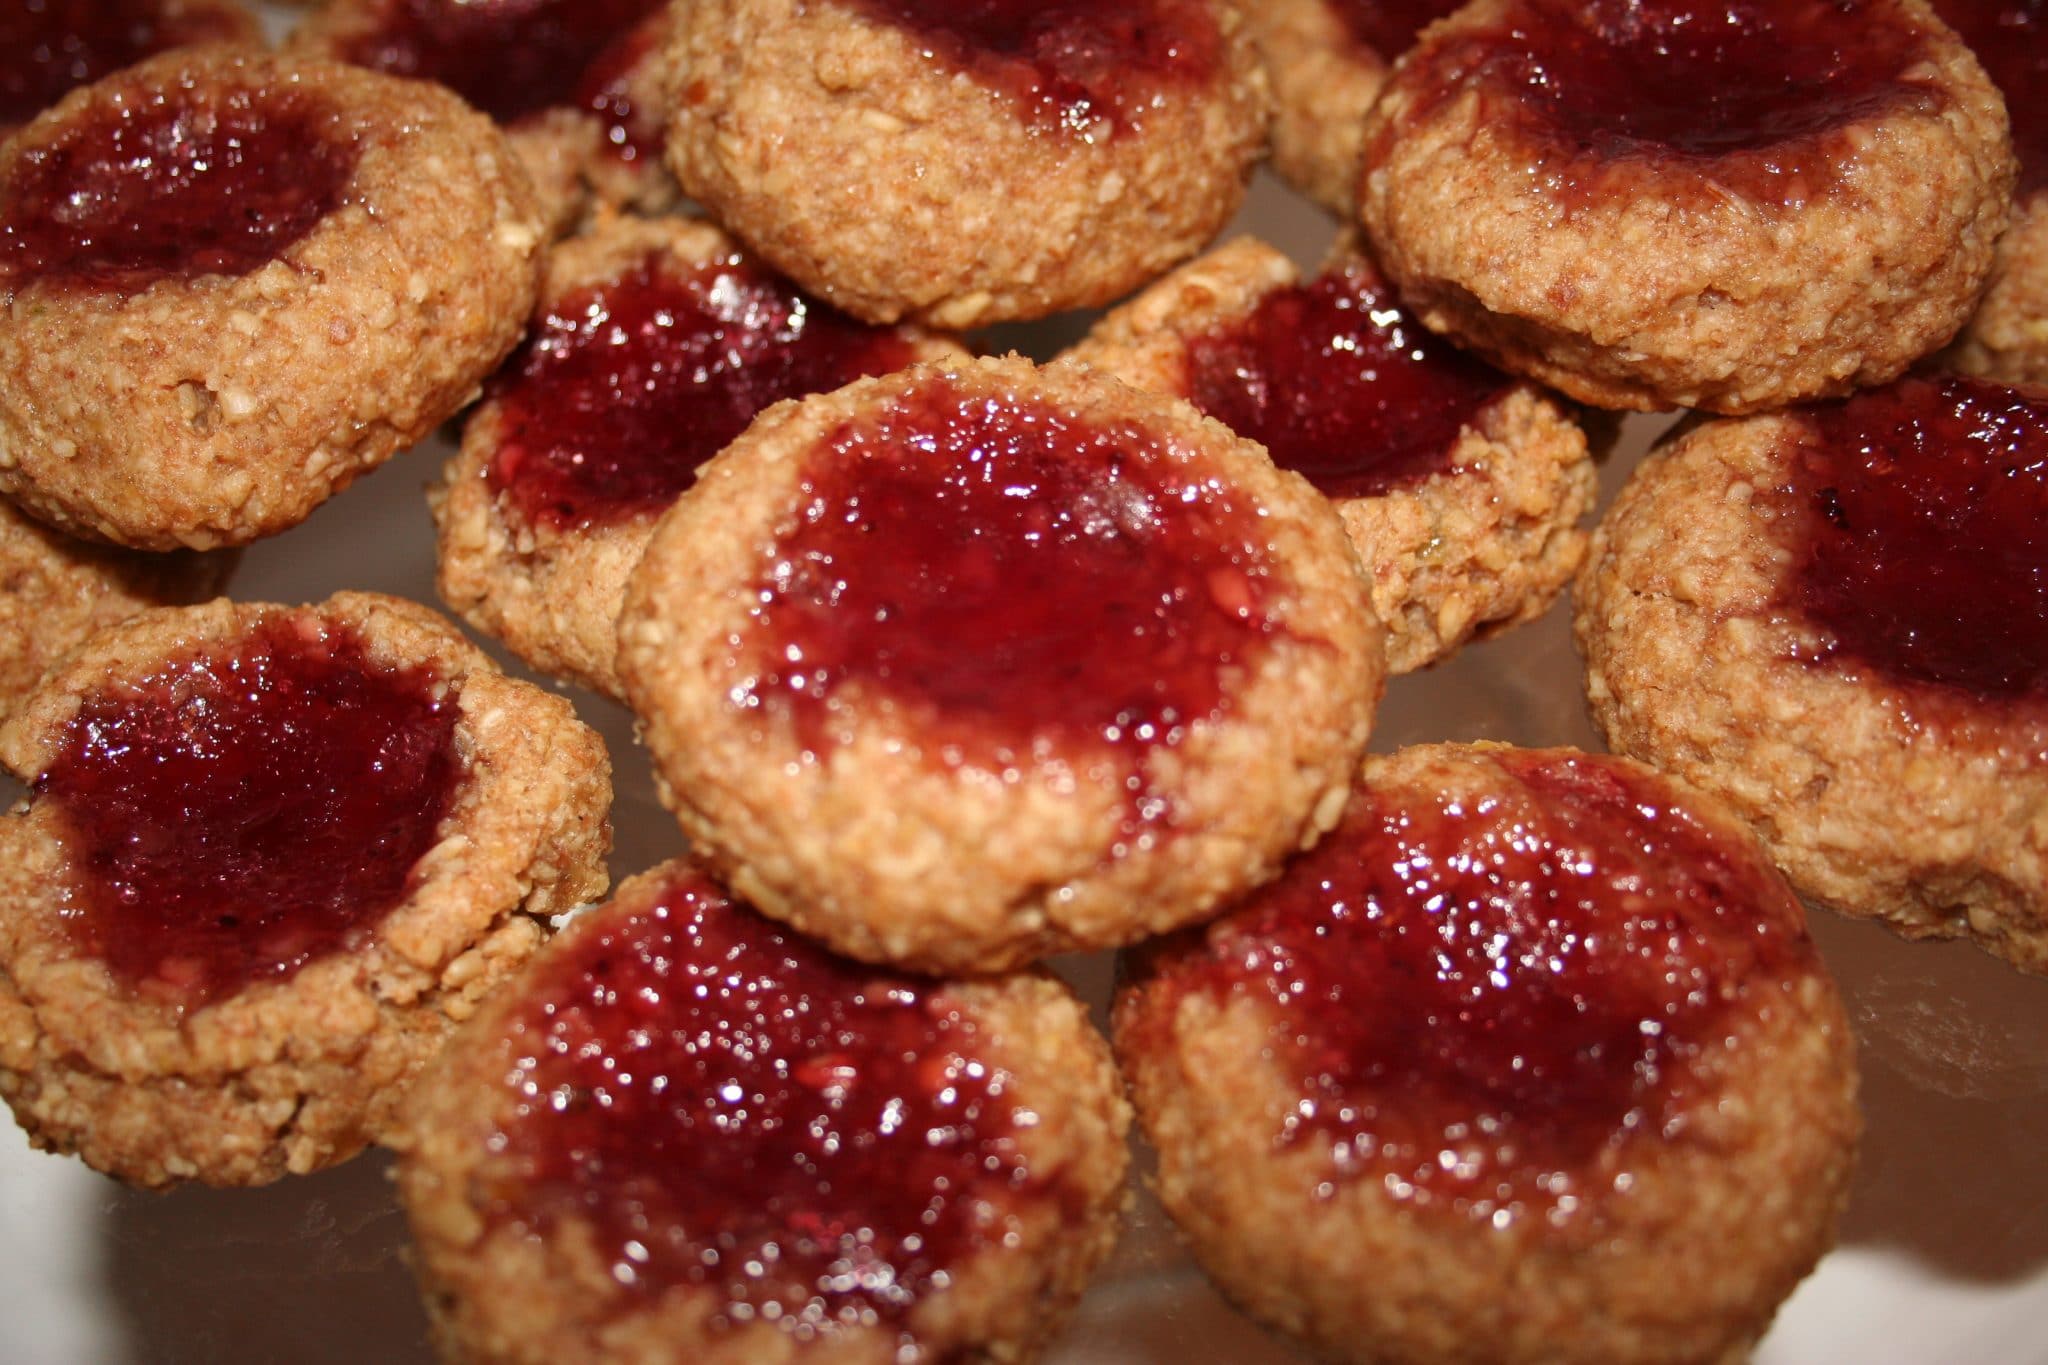
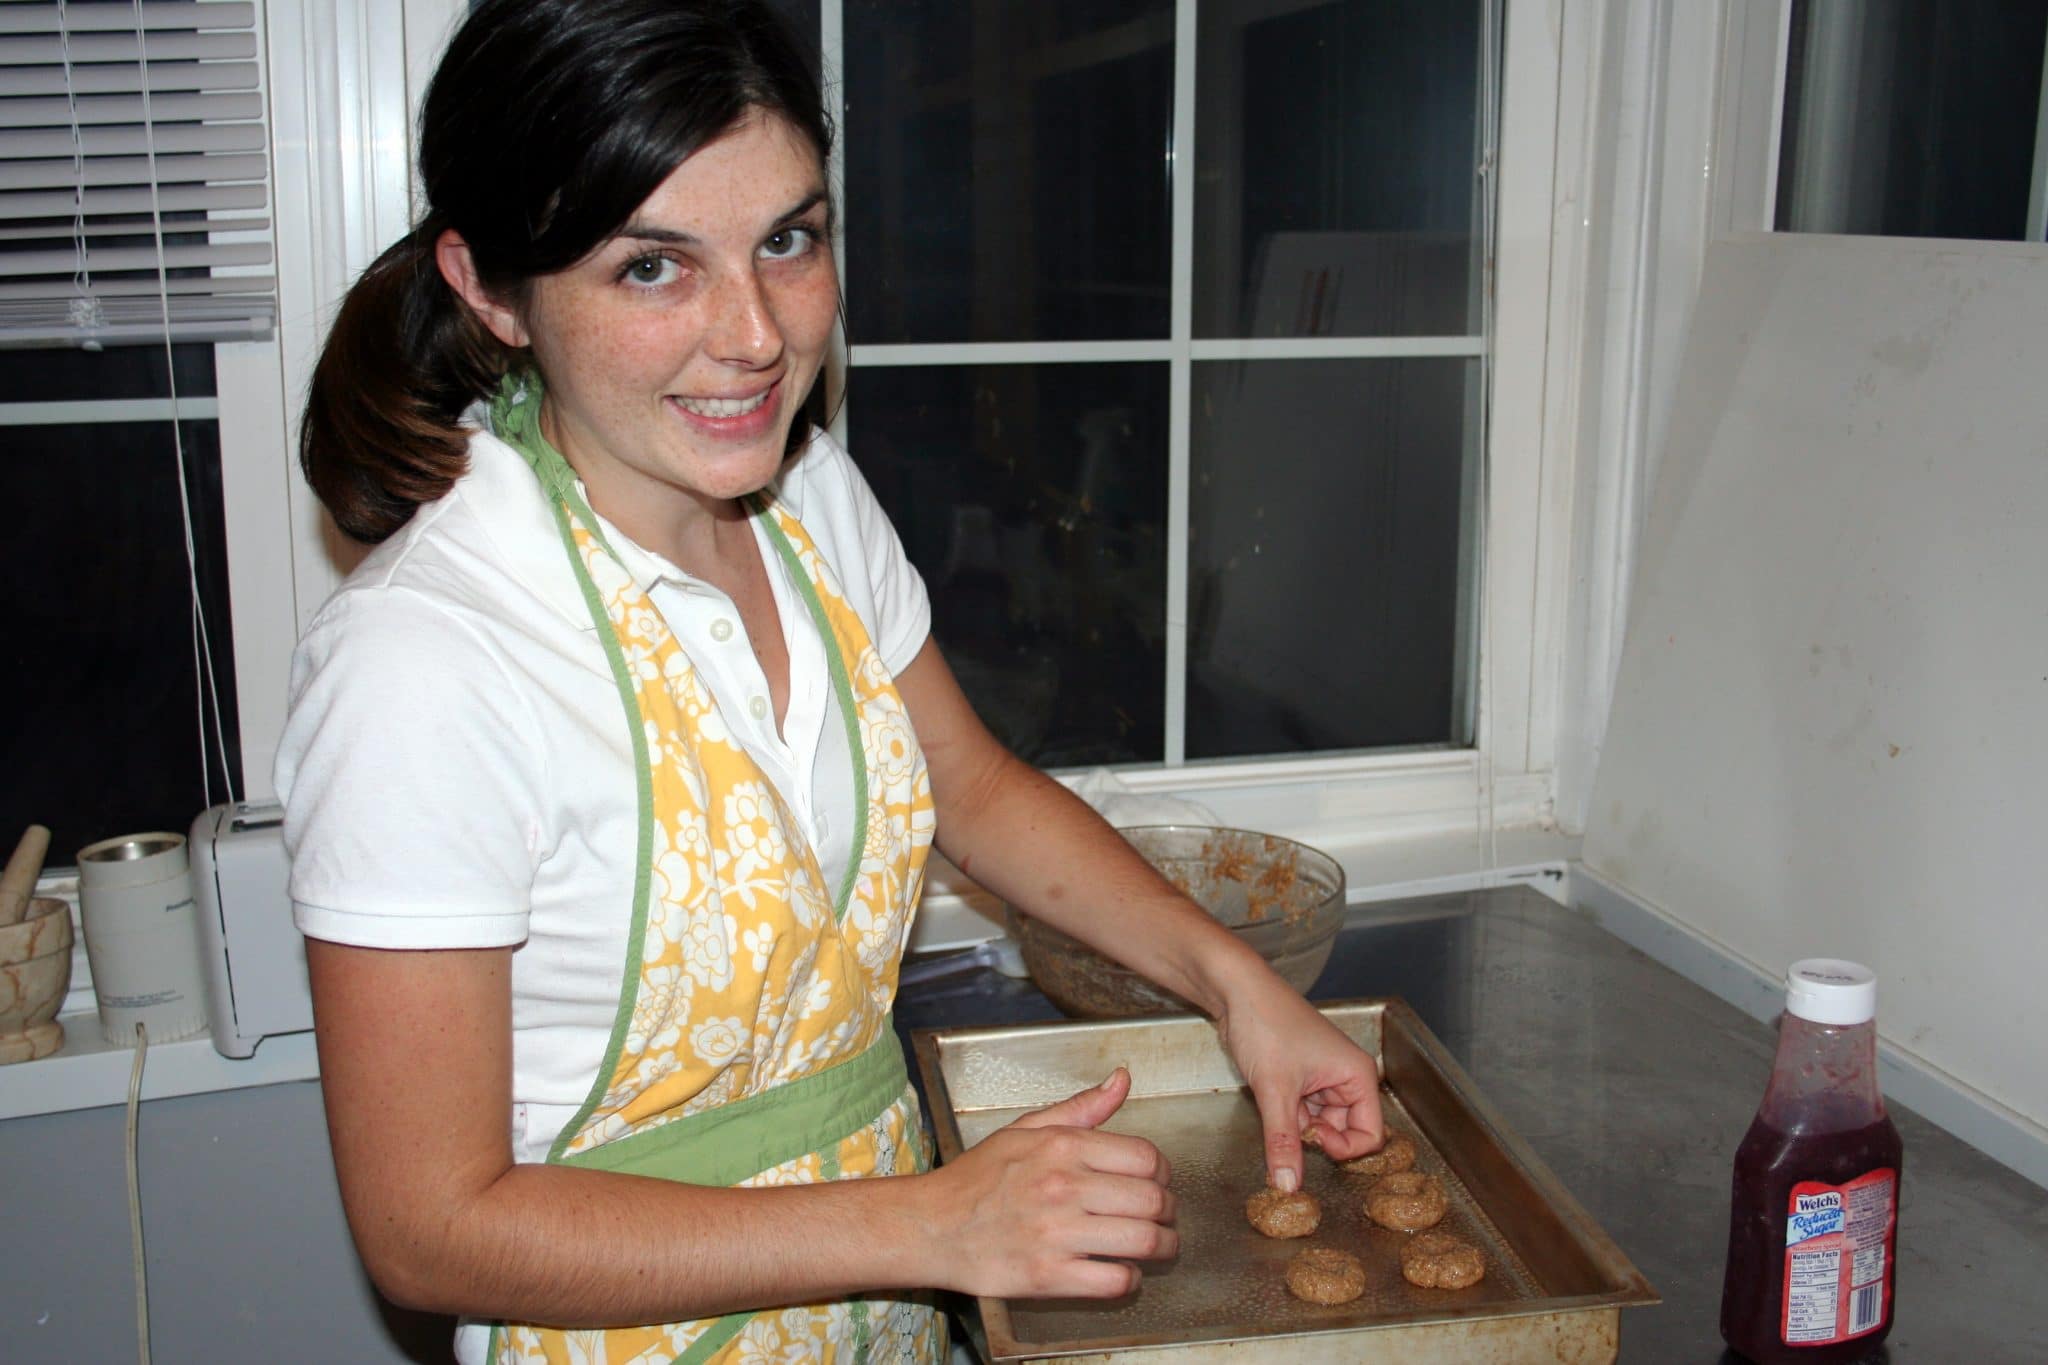
Yippee, it’s Sweet-Tooth Friday! This is Christine with your weekly healthy dessert recipe. Today I’ve got a batch of incredibly addictive vegan thumbprint cookies! These are yummy enough to satisfy the most discriminating of palates…like my dad’s! Just don’t tell him the secret ingredient this week is CAULIFLOWER! The inspiration for these amazing little gems came from a comment last week about my Gluten-Free Carrot Macaroons. The comment is from my stepmom, and she wrote:
“These look great to me but I don’t think your dear ‘ol dad will eat them (but I’m going to try anyway). I’d be grateful if you could come up with some recipes for cookies (or other easy treats) I can make (and freeze) for him so he’ll forever ditch the “Little Debbie” cakes! It would need to be close to a “regular” kind of cookie or dessert. He doesn’t like muffins, biscuits, coconut, almond flavor or nuts! I’ve not been able to come up with a healthy sweet treat he really liked and I’ve always considered myself a good baker. Any ideas you can pass to me are appreciated!”
As soon as I read this, the challenge was on! I’ve met many dessert fans in my career and they always seem to fall into two groups: those that passionately love almond flavor, coconut and nuts, and those that passionately don’t. My dad falls into the latter category so it was time to find a healthy dessert that didn’t lean on those elements as a flavor crutch.
The challenge doesn’t stop there — no, these healthy cookies don’t just have to be any regular kind of yummy — they have to hold their own next to the ultimate yumminess of my stepmom’s famous cookies. Let me tell you, when Christmas rolls around there is no better place to be than Margaret’s kitchen. All season she pumps out every kind of cookie from jubilee bars to walnut swirls to lemon shortbread. Her sugar cookies are so perfectly thin with just the right amount of sugar crunch that they are impossible to replicate. (Believe me, I’ve tried!)
While she works, my dad sits perched by the counter eating the jam diagonals as fast as they come out of the oven. Ahhh, the jam diagonals. Rich buttery short bread, sweet raspberry jam, and a drizzle of lemon icing, all baked together in a sort of flat loaf, then elegantly cut on the diagonal like an Italian biscotti. The combination of salty, sweet, and sour comes together in beautiful cookie harmony. Could I really attempt to give the jam diagonal a NMA makeover? I decided to give it a shot!
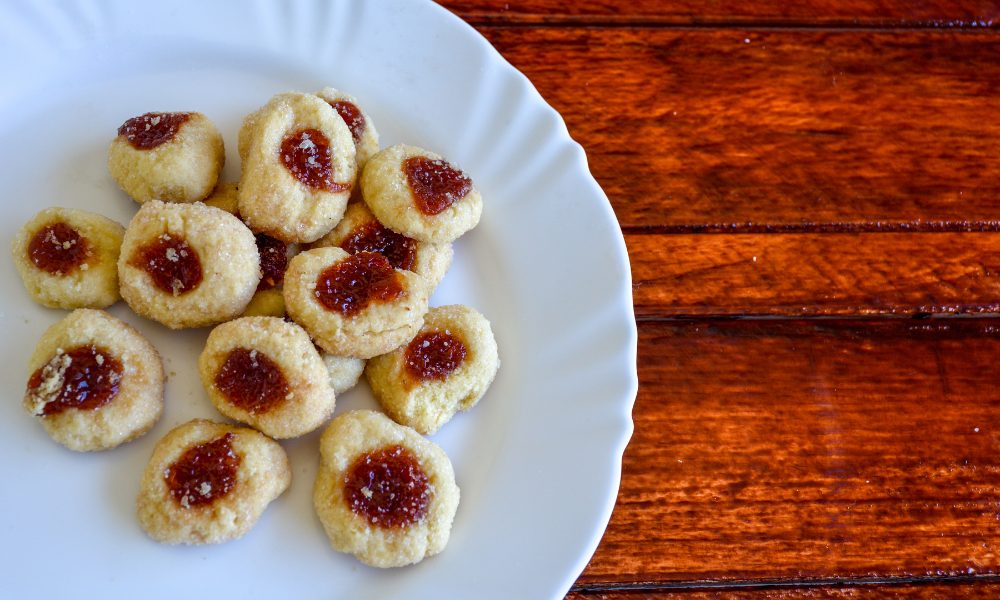
I started by shifting the jam diagonal into a more approachable shape — the thumbprint cookie. Though humble, a thumbprint cookie has the same shortbread and jam elements without the rolling and slicing. My next step was to imagine a healthier shortbread: canola oil for the butter, agave nectar for the sugar, and spelt and oats for the white flour!
It seemed way too good to be true, and I was right. As I stirred the ingredients together I realized I was lacking the structure that comes from whipping butter together with granulated sugar. I had a “batter” on my hands instead of a “dough.” I took a gamble and stirred in some cauliflower puree- ta da! Not only did I get all the structure without added fat, but also got in some extra fiber and vitamins! Plus cauliflower’s mild taste is undetectable.
For the jam, I used Welch’s Reduced Sugar Strawberry Spread. It is reasonably priced and doesn’t use corn syrup or artificial sweeteners. Instead of adding more sugar by drizzling the cookies with lemon icing, I stuck the lemon flavor into the cookie itself with lots of fresh zest. Finally I added a tablespoon of flax seed just to sneak my dad some extra omega 3’s.
Vegan Thumbprint Cookies
1 ¼ cups spelt flour
1 cup ground oats
1 tsp baking powder
½ tsp salt
1 tbs ground flaxseed
¼ cup canola oil
½ cup agave nectar
½ cup cauliflower puree
Zest of 1 lemon
Low-sugar jam
Mix together the spelt, oats, baking powder, salt, and flaxseed. Set aside. For the cauliflower puree, put 3/4 – 1 cup fresh or frozen cauliflower with 1 tbs of water into a microwave safe bowl. Cover and microwave 3-5 minutes til soft. Puree with an additional tablespoon of water. It’s ok if it doesn’t get perfectly smooth.
Stir together the cauliflower, canola oil, agave nectar, and lemon zest. Stir the wet ingredients into the dry ingredients. Refrigerate the dough for at least 30 minutes. Preheat the oven to 350 degrees. Shape the dough into half dollar-sized balls, then press onto greased pan with deep thumbprint. Fill the thumbprints with jam.
Bake 16-18 minutes, checking to make sure bottoms are brown but not overdone. Makes about 30 cookies.
That’s it for this Sweet-Tooth Friday! Good luck rationing these cookies- I devoured mine! Oh if you noticed my cookies look a bit textured, it’s just because I didn’t do the greatest job grinding my steel cut oats. Using rolled oats is easier in my dinky processor.
Dad, I hope these healthy vegan thumbprint cookies can hold you over until Christmas!
Until next time, Stay sweet and keep those requests rollin’ in!
xoxo, Christine
these look delicious, and they are so cute! i need to heed all your fabulous friday recipes and concoct one one of these days!
Thanks for the compliments! You’re “sweet” (ha!ha!) to say such nice things about my Christmas cookies. I used to make thumbprint cookies as part of my regular repertoire. These look very much like them except the dough in my thumbprint recipe was rolled in ground nuts (and you-know-who won’t eat that) and they were full of fat and sugar. I’m eager to whip up a batch of this healthy version this weekend and let you know how it goes. Maybe Christine’s Cauliflower Christmas Cookies (sorry, I couldn’t resist) will become a regular! Thanks for the recipe!!
hmm. i might give these a try.
bookmarked! thanks!
.-= janetha´s last blog ..jarred. =-.
Yum. My body can’t afford for me to be eating dessert every weekend, but your recipes are very tempting. I wonder if I can get my mom to eat these, she claims to not be able to eat any veggies.
Yay, I have a huge jar of strawberry jam that I’ve been wanting to use up and these cookies look delicious 🙂 I love these baking posts, keep up the great work Christine!
.-= Megan (The Runner’s Kitchen)´s last blog ..Running in the Dark =-.
Okay Chrissy, you’ve challenged yourself here. If this cookie concoction of yours is even close, it will be GREAT! Margaret is going to make them tomorrow. I’ll get back to you about your success. Thanks much for the effort! Hopefully I won’t be the only beneficiary.
In the words of my grandfather- those look good enough to eat!;)
WOW! Those look so beautiful and the recipe is so simple! I love quick, easy and delicious desserts, can’t wait to make these. Thanks!
.-= The Voracious Vegan´s last blog ..Curried Cauliflower Soup =-.
I am so excited to have found this website! I am recently vegan and training for my first half marathon in October. The vegan diet has allowed my training to go injury-free and I have more energy than I’ve had in years!
Can’t wait to read more, and thanks for the recipes!
Enjoy the runnning, the baking and the eating!
Love the use of oats, spelt and flax in these! I usually make thumbprints around the holidays and this year I want to work on eliminating the processed ingredients. Now I know where to start! Thanks for the tip on the jam too. Glad to know it doesn’t use HFCS or the fake stuff.
.-= Lori´s last blog ..Links to a Healthy Weekend =-.
I just stumbled upon this site and I must say your recipes have me intrigued. This one especially. I can’t wait to make these! Thanks for sharing! 🙂
I just made these! I followed the directions exactly (but now I have leftover cauliflower puree– any ideas?) Overall the consistency is really chewy– more like the consistency of a nutrigrain bar than a cookie. If you use full sugar jam, as I did, it does not need powdered sugar. They were a tad bit messy, as the jam would bubble over onto the cookie sheet (but the cookie was still not done, so they had to stay in the oven). Not a big deal, just perhaps for easy clean up, you might want to line the tray with aluminum. I liked them, and I’m giving some to the bf tonight– hopefully he will too!
Delish! Ground my oats in a ‘coffee grinder’ I use for my flax – oh, and I didn’t have any cauliflower so I made it with frozen mango pureed with rice milk and I just used whole wheat flour – and they turned out super:) Thanks!
Just made these and they turned out great! I didn’t have jam on me so instead I added chopped crystalized ginger (~1/2 cup) and a splash of ginger syrup. A great cookie – crunchy on the outside, a bit softer on the inside. I’m definitely going to be subbing cauliflower puree into future recipes!
Hiya
Sorry to burst your bubble but no way is canola oil healthier than butter. Natural saturated fats such as butter, coconut oil and yes even lard are much healthier than vegetable oils which are highly processed and and very unstable, particularly when cooked. It is unfortunate that there is a misconception amongst many people that they are good for you.
Congrats on you inventiveness though, just switch back to butter if you want them to be healthy. 🙂
This post may contain affiliate links, please see our privacy policy for details.
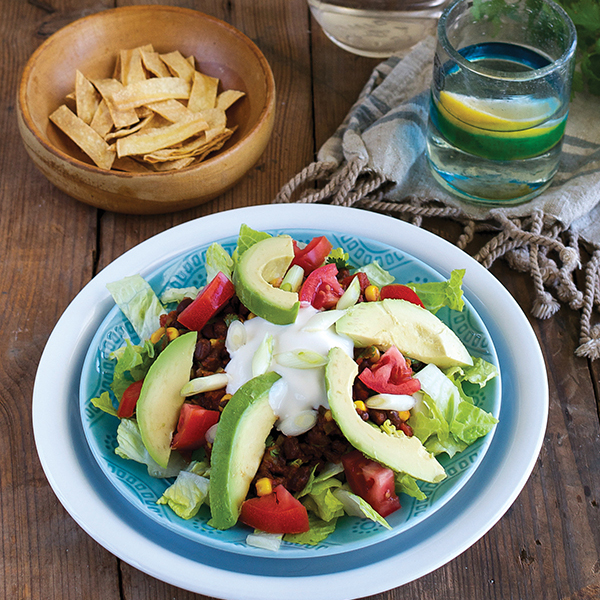
These Loaded Vegan Nachos are packed with healthy ingredients and are the perfect snack to share. Everything is made on one tray and takes less than 10 minutes. Can you say easy weeknight dinner?
I love when I can cook a meal with minimal effort.
And these are also great for game days. Put the whole tray on the table and let everyone share. Total crowd pleaser.
Feel free to add vegan cheese if you’re into it. I’ve mentioned before that it’s not really my thing, so do you boo boo.
Need more game day inspo? Check out Vegan Corn Dog Bites, Potato Wedges with Vegan Avocado Dip or Spicy Habanero Salsa.
Preheat oven to 450 degrees.
Line a baking sheet with foil and spread out chips. Top with black beans and corn. Place in the oven for 5-7 minutes, or until warmed through.
Remove from the oven and top with red onion, jalapeño, avocado, cilantro, cumin and paprika. Serve immediately with salsa on the side.


 ” title=”Easy healthy Reese’s eggs made with only 4 simple ingredients! These homemade vegan peanut butter eggs are low carb, gluten free, low sugar and have a glorious peanut butter middle for the perfect no bake treat that everyone loves.” width=”1067″>
 ” title=”Easy healthy Reese’s eggs made with only 4 simple ingredients! These homemade vegan peanut butter eggs are low carb, gluten free, low sugar and have a glorious peanut butter middle for the perfect no bake treat that everyone loves.” width=”1067″>
 ” title=”Easy healthy Reese’s eggs made with only 4 simple ingredients! These homemade vegan peanut butter eggs are low carb, gluten free, low sugar and have a glorious peanut butter middle for the perfect no bake treat that everyone loves.” width=”1600″>
 ” title=”Easy healthy Reese’s eggs made with only 4 simple ingredients! These homemade vegan peanut butter eggs are low carb, gluten free, low sugar and have a glorious peanut butter middle for the perfect no bake treat that everyone loves.” width=”1067″>
 ” title=”Easy healthy Reese’s eggs made with only 4 simple ingredients! These homemade vegan peanut butter eggs are low carb, gluten free, low sugar and have a glorious peanut butter middle for the perfect no bake treat that everyone loves.” width=”1067″>
 ” title=”Easy healthy Reese’s eggs made with only 4 simple ingredients! These homemade vegan peanut butter eggs are low carb, gluten free, low sugar and have a glorious peanut butter middle for the perfect no bake treat that everyone loves.” width=”1067″>
 ” title=”Easy healthy Reese’s eggs made with only 4 simple ingredients! These homemade vegan peanut butter eggs are low carb, gluten free, low sugar and have a glorious peanut butter middle for the perfect no bake treat that everyone loves.” width=”1067″>
 ” width=”274″>
  ” width=”170″>

 Yippee, it’s Sweet-Tooth Friday! This is Christine with your weekly healthy dessert recipe. Today I’ve got a batch of incredibly addictive vegan thumbprint cookies! These are yummy enough to satisfy the most discriminating of palates…like my dad’s! Just don’t tell him the secret ingredient this week is CAULIFLOWER! The inspiration for these amazing little gems came from a comment last week about my Gluten-Free Carrot Macaroons. The comment is from my stepmom, and she wrote: