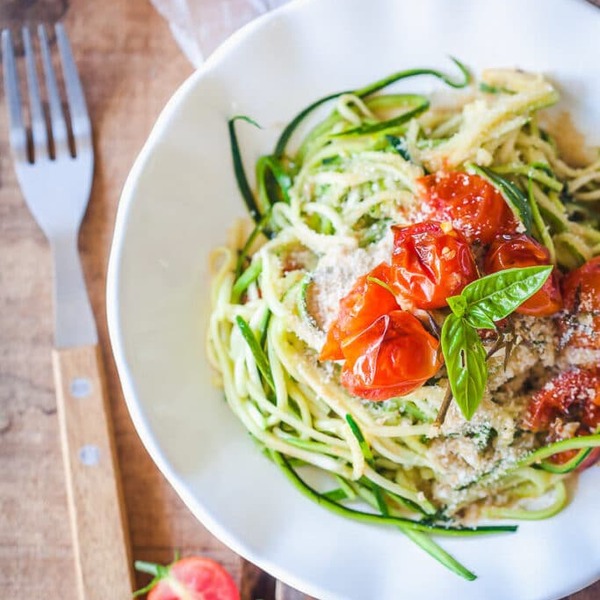
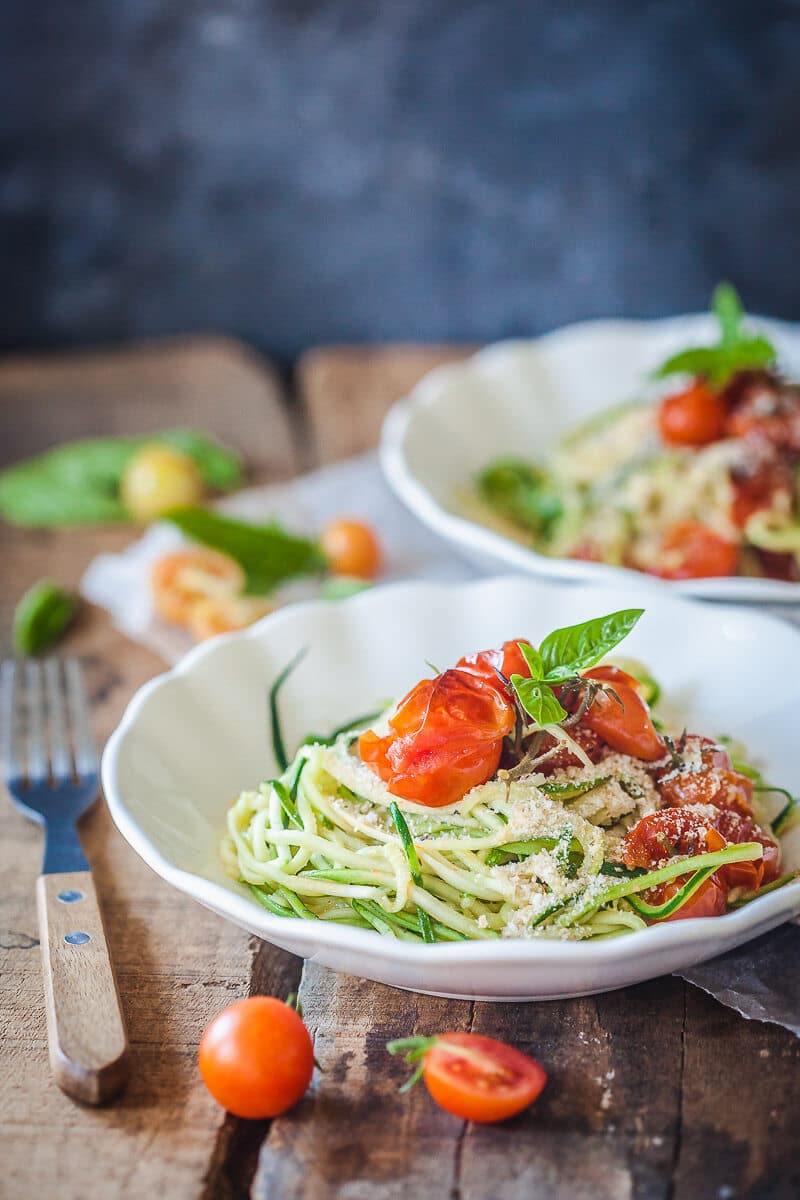
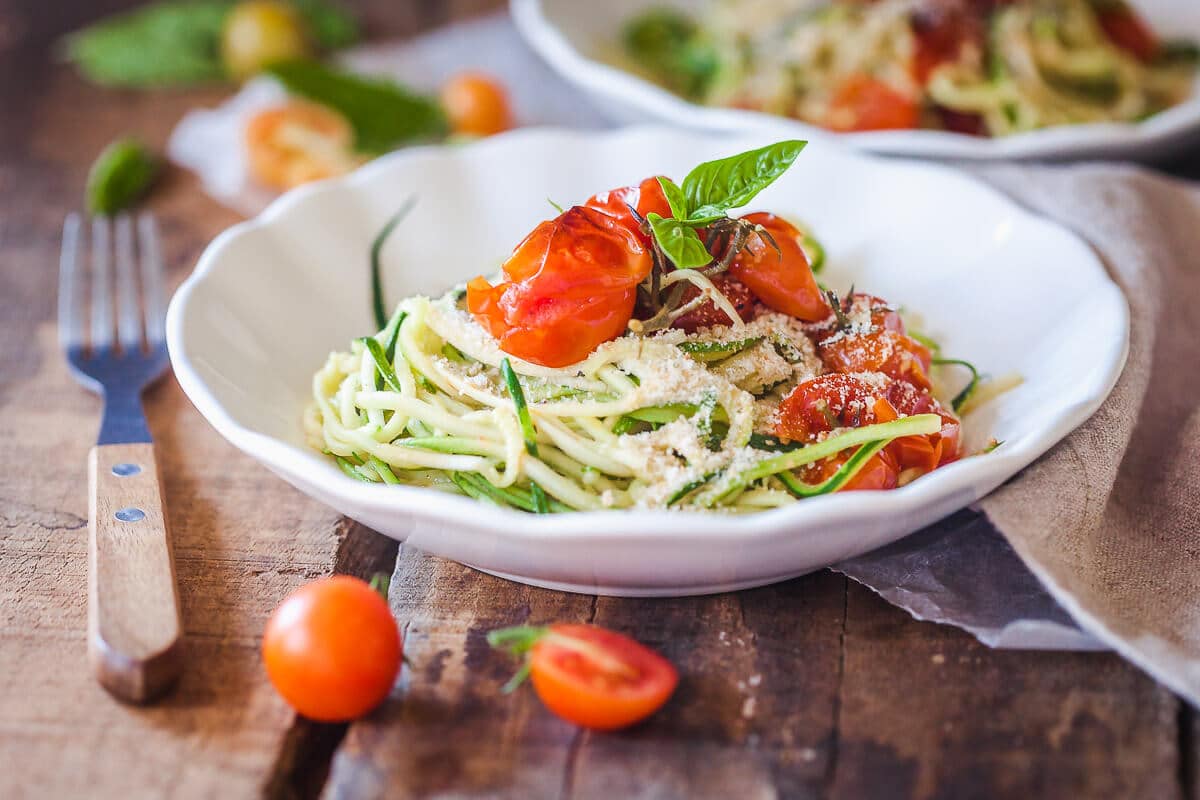
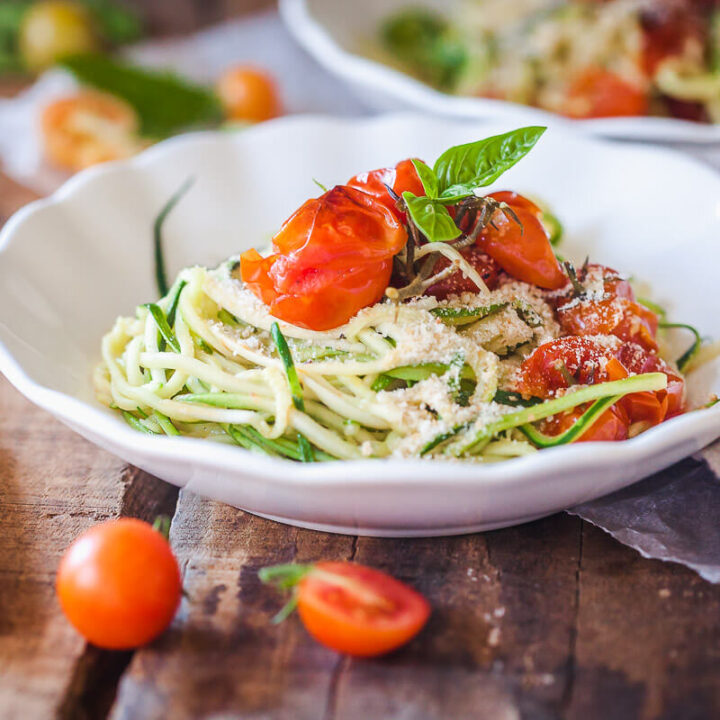
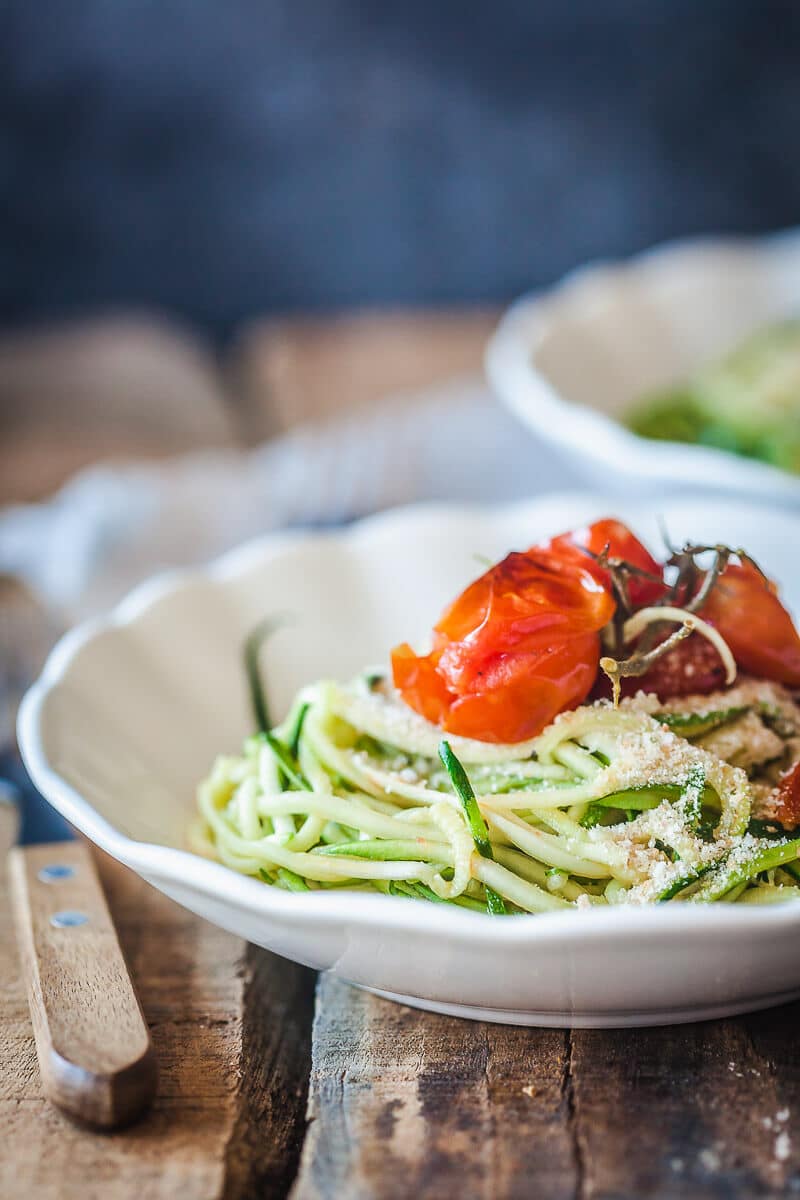
Cherry Tomato Zucchini Noodles are a light & delicious Low-Carb Vegan meal with tons of flavor.
We are emptying our fridge and garden this week of summer produce to make room for fall produce. Once the first cold morning arrives (it’s 8°C / 46.4°F outside this morning!) it’s time to start thinking soups, stews and freshly baked loaves of sourdough bread. Am I right?
My garden is still producing, though I suspect with the arrival of cold I will soon need to say bye-bye to my summer vegetables and hope for a decent fall harvest of endive, radicchio, and kale. Then, once the tree leaves turn yellow and the first frost arrives, I’ll need to put the garden to rest (though I have plans to enlarge it next year and maybe put up a little green house, hehe).
I have a feeling this summer was gone in a heartbeat. I mean, it feels like it has only just begun and yet here I am, shivering, with socks on my feet, long sleeves and today I even made myself a cup of tea to warm me up. It seems absurd, given that we haven’t even gone on holidays yet. Here I am, shivering and thinking about that bikini I need to pack.
And though I am excited about cooking warmer dishes with fall ingredients (hello, apple crisp and roasted chestnuts!), I dread the long, cold, dark winter months ahead. Especially if I think back on the winter past, when we had -14°C (6.8°F) for about a month and even stores were lacking vegetables due to the harsh winter.
But alas, while I can still see the sun shining outside, let’s talk about these Low-Carb Cherry Tomato Zucchini Noodles (or Zoodles) recipe. This is a great vegan summer dish, but really, it can be enjoyed through the year, as you can always find zucchinis and cherry tomatoes in store these days.
To make these Cherry Tomato Zucchini Noodles you only need a couple of ingredients, about 10 minutes prep time and 20 minutes to roast the tomatoes and infuse them with olive oil and garlic. Then you toss the tomatoes and zucchinis together to combine and voilà! A healthy lunch is served!
Yield: 2
Prep Time: 10 minutes
Cook Time: 20 minutes
Total Time: 30 minutes
Cherry Tomato Zucchini Noodles are a light & delicious low-carb vegan meal with tons of flavor.
Preheat the oven to 200˚C/ 392˚F. Place cherry tomatoes in a small baking tray, then add grated garlic cloves. Drizzle with olive oil and season with salt and pepper to taste. Combine well, then place baking tray in oven and roast for about 20 minutes, until the cherry tomatoes burst. Remove from oven.
Using a spiralizer or vegetable julienne peeler, cut the zucchini into thin strips resembling noodles. Add zucchini noodles to the cherry tomatoes and combine well, so that the noodles get well coated.
Transfer zucchini noodles and cherry tomatoes to plates and top with a bit of breadcrumbs and fresh basil leaves and serve. You can replace breadcrumbs with parmesan or a vegan subsitute.
Let us know in the comments below or on social media using #vibrantplate and tag us @vibrantplate.
New in! We made a special FREE cookbook with 15 our favorite recipes, including a delicious Vegan Pasta Salad in a Jar exclusive recipe that you can get when you sign for our newsletter. How cool is that? Just find the signup form on the page and get your free copy now 😉
Like this recipe? Let us know in the comments below or on social media using #vibrantplate and tag us @vibrantplate.
You can connect with us on our Instagram and Facebook or on Pinterest. We share many behind-the-scene photos in our Instagram Stories, so be sure to check it out!
This “Best Vegan/Gluten Free Eggplant Spread Recipe Ever” has been a family recipe, that I grew up with. It’s been a long time that I had it, and one day I craved it so much that I called my mom and asked her for the recipe.
When I was little, we (my brother and I) often ate spreads on homemade bread as a mid-day snack, this spread was one of my favorite and the best part it’s so nutritious.
So, I figured it was time to transform my mom’s Eggplant Spread Recipe into a Vegan & Gluten-free version.
Ever since we started our Vegan lifestyle, I’ve been collecting bread spreads to try out. This little gem made it into my folder and we try to make it at least once every other week.
You can find more Vegan recipes here:
VEGAN SNICKERDOODLE COOKIES
VEGAN COOKIE DOUGH & BROWNIE FREAK SHAKE
PUMPKIN SPICE DOUGHNUT WITH CREAM CHEESE GLAZE RECIPE
In case you never had eggplant, I looked up a few facts about Eggplants for you. Let’s see if you knew some of these:
Why You Shouldn’t Use Metal on Eggplants?
When cutting an eggplant, use stainless steel, wooden or a plastic knife as carbon steel will react with its phytonutrients and cause it to turn black.
Can you eat the EggPlants Skin?
Most eggplants can be eaten either with or without their skin. However, the larger ones and those that are white in color generally have tough skins that may not be palatable. To remove the skin, you can peel it before cutting or if you are baking it, you can peel off the skin once cooled down.
How to tenderize the Eggplants flesh?
To tenderize the flesh’s texture and reduce some of its naturally occurring bitter taste, you can sweat the eggplant by salting it. After cutting the eggplant into the desired size and shape, sprinkle it with salt and allow it to rest for about 30 minutes. This process will pull out some of its water content and make it less permeable to absorbing any oil used in cooking.
How to prepare an Eggplant?
Eggplant can be baked, roasted in the oven, or steamed. If baking it whole, pierce the eggplant several times with a fork to make small holes for the steam to escape. Bake at 350 degrees Fahrenheit (about 177 degrees Celsius) for 15 to 25 minutes, depending upon size. You can test for its readiness by gently inserting a toothpick to see if it passes through easily.
Eggplant is a very good source of dietary fiber, vitamin B1 and copper. It is a good source of manganese, vitamin B6, niacin, potassium, folate and vitamin K. Eggplant also contains phytonutrients such as nasunin and chlorogenic acid.
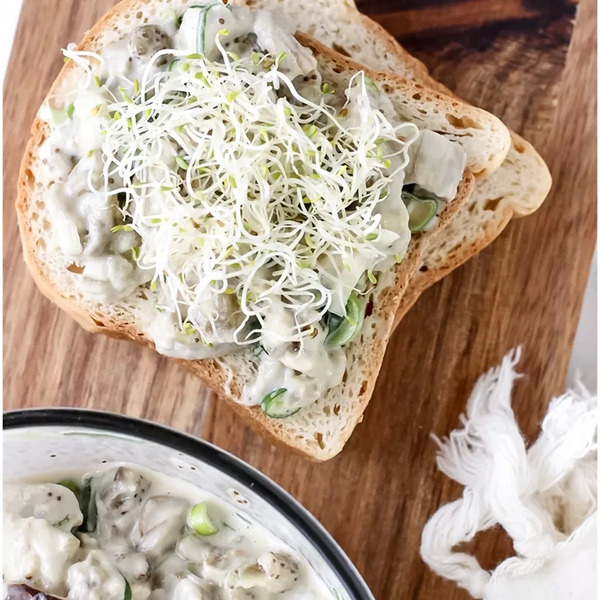
Best Vegan/Gluten Free Eggplant Spread Recipe Ever
Ingredients
5 organic eggplants
1 green onion, chopped
4 cloves garlic, peeled and minced
1 tbsp vegan mayonnaise
1 tsp dijon mustard
pinch salt & pepper
alfalfa sprouts (optional)
Instructions
Preheat the oven to 400 degrees Fahrenheit. Place the eggplants on a foil-lined baking sheet and prick a few times with a fork. Roast in the pre-heated oven for 50 to 60 minutes, turning every 15 minutes, until charred and soft.
Allow the eggplant to rest until cool enough to handle. Peel the skin away from the flesh. Roughly chop the flesh and place in a colander to drain for 15 minutes.
Transfer the eggplant to a cutting board and cut into small pieces. Place in a medium glass bowl, add the garlic, mayo, mustard, salt, and pepper. Stir well, taste, and add salt and pepper to taste. Chill for one hour; serve on gluten free bread topped with alfalfa sprouts (optional). Enjoy!
This recipe was developed at its original yield. Ingredient amounts are automatically adjusted, but cooking times and steps remain unchanged. Note that not all recipes scale perfectly.
Original recipe (1X) yields 8 servings
2tablespoonsolive oil
1cupdiced onion
1cupdiced carrot
1cupdiced celery
3clovesgarlic, minced
4russet potatoes, peeled and cut into 1-inch pieces
4cupswater
4teaspoonssalt, divided
2cupsalmond milk
1teaspoonground black pepper
Directions
Heat olive oil in a large pot over medium heat. Add onion, carrot, celery, and garlic; cook and stir until soft, about 10 minutes. Add potatoes, water, and 2 teaspoons salt. Bring to a boil; reduce heat and simmer until potatoes are very tender, 10 to 15 minutes.
Remove pot from the heat and puree soup with an immersion blender. Stir in almond milk.
Return soup to the heat and cook until heated through, about 5 minutes. Season with remaining 2 teaspoons salt and pepper.
Cook’s Note
You can use vegetable broth instead of water if you choose.
Mash soup with a potato masher if preferred.
This soup adapts well to any flavors you might like to add – curry, cumin, basil, cardamom, whatever you like.
Nutrition Facts (per serving)
147
Calories
4g
Fat
25g
Carbs
3g
Protein
Nutrition Facts
Servings Per Recipe 8
Calories 147
% Daily Value *
Total Fat
4g
5%
Saturated Fat
1g
3%
Sodium
1237mg
54%
Total Carbohydrate
25g
9%
Dietary Fiber
4g
13%
Total Sugars
5g
Protein
3g
6%
Vitamin C
24mg
27%
Calcium
89mg
7%
Iron
1mg
7%
Potassium
625mg
13%
* Percent Daily Values are based on a 2,000 calorie diet. Your daily values may be higher or lower depending on your calorie needs.
** Nutrient information is not available for all ingredients. Amount is based on available nutrient data.
(-) Information is not currently available for this nutrient. If you are following a medically restrictive diet, please consult your doctor or registered dietitian before preparing this recipe for personal consumption.
Chocolate chip cookies are great. Soft ones, crunchy ones, big ones, and small ones. I can’t deny that I love them all. But deep down, I really love cookies more before they’re cooked. If there are cookies being made, I am going to be sneaking my fair share of the batter before they ever hit the baking sheet. Luckily, I have plenty of room for both baked and unbaked cookies in my life.
Especially these unbaked cookies.
We first made this “cookie dough” over a year ago, on a whim. After reading about chickpea cookie dough, we skeptically decided to experiment with the idea on our own. So, into the blender went all of the ingredients. And out came something that surprised us both.
You can’t taste the chickpeas at all, in fact, no one who has tried these cookie dough balls has been able to guess what they’re made of. They’re perfectly sweetened with honey and chocolate chips, and balanced with a hint of peanut butter.
Every time I eat a ball (or a secret spoonful) of this stuff, I’m always perplexed “How can a dessert made from beans taste so good?” I still don’t know the answer to that.
Whether in chocolate-covered form or folded into ice cream, these are such a good treat to keep on hand. If you store them in the freezer, just let them thaw out for 8-10 minutes and they’ll have the perfect crunchy chocolate shell and doughy center.
Print
6 Ingredient Chocolate Covered Cookie Dough Bites
5 Stars 4 Stars 3 Stars 2 Stars 1 Star
No reviews
Author:The Fitchen
Total Time:1 hour 40 minutes
Yield:15 1x
Description
Chocolate chip cookie dough made healthy and gluten-free, with a crunchy chocolate shell. Easy bite-sized treats to keep on-hand for sweet cravings.
1 – 15 oz. can garbanzo beans
1 t. stevia
3 T. agave or raw honey
1 T. maple syrup
¼ c. creamy peanut butter
1 t. vanilla extract
pinch of sea salt
¼ c. chopped vegan chocolate or chocolate chips
Chocolate Shell:
about 1 c. vegan chocolate or chocolate chips
Instructions
Combine all ingredients, except chocolate, for “dough” into a high speed blender and blend until smooth.
Empty “dough” into a bowl and fold in chopped chocolate or chocolate chips. We were fresh out of chocolate chips so we chopped up a bar of dark chocolate instead. Chocolate chips work just fine, if you have some on hand!
Line a baking sheet or large plate with wax paper or foil. Use a cookie dough scoop or a spoon to create 1 ½” balls and place them onto the sheet. Freeze for 1 hour.
Melt about 1 c. of chocolate or chocolate chips in a double boiler.
After cookie dough balls are chilled, plop them into the melted chocolate and roll them around, coating each them well.
Repeat the dipping process until all of the balls are coated, setting each one back onto the baking sheet.
Return to freezer or fridge to solidify the chocolate.
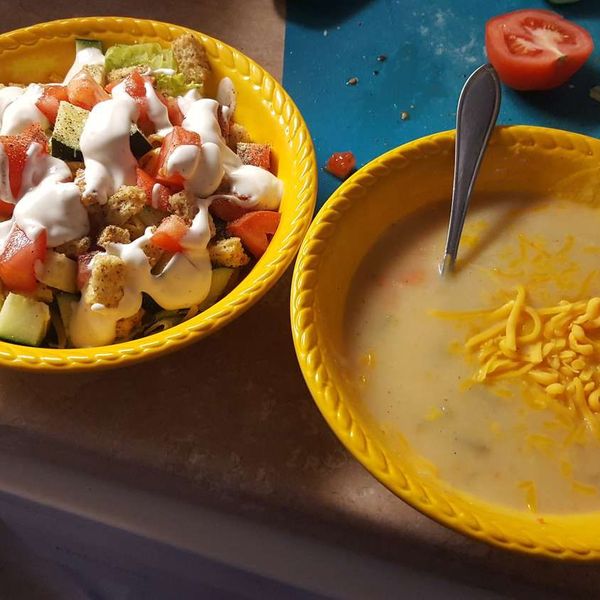
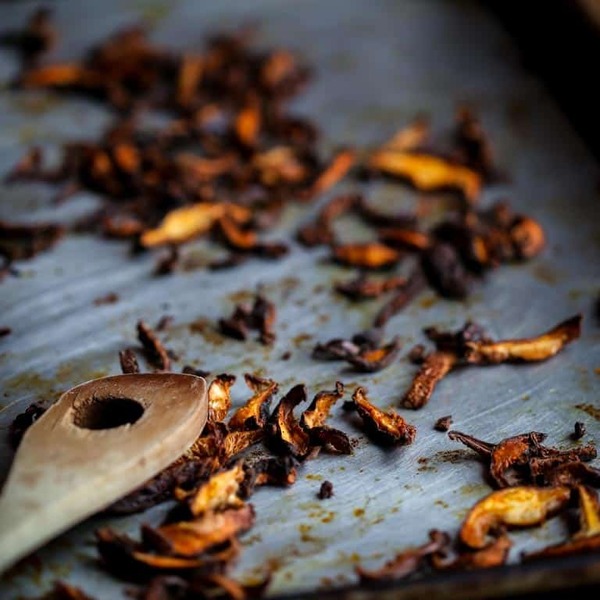
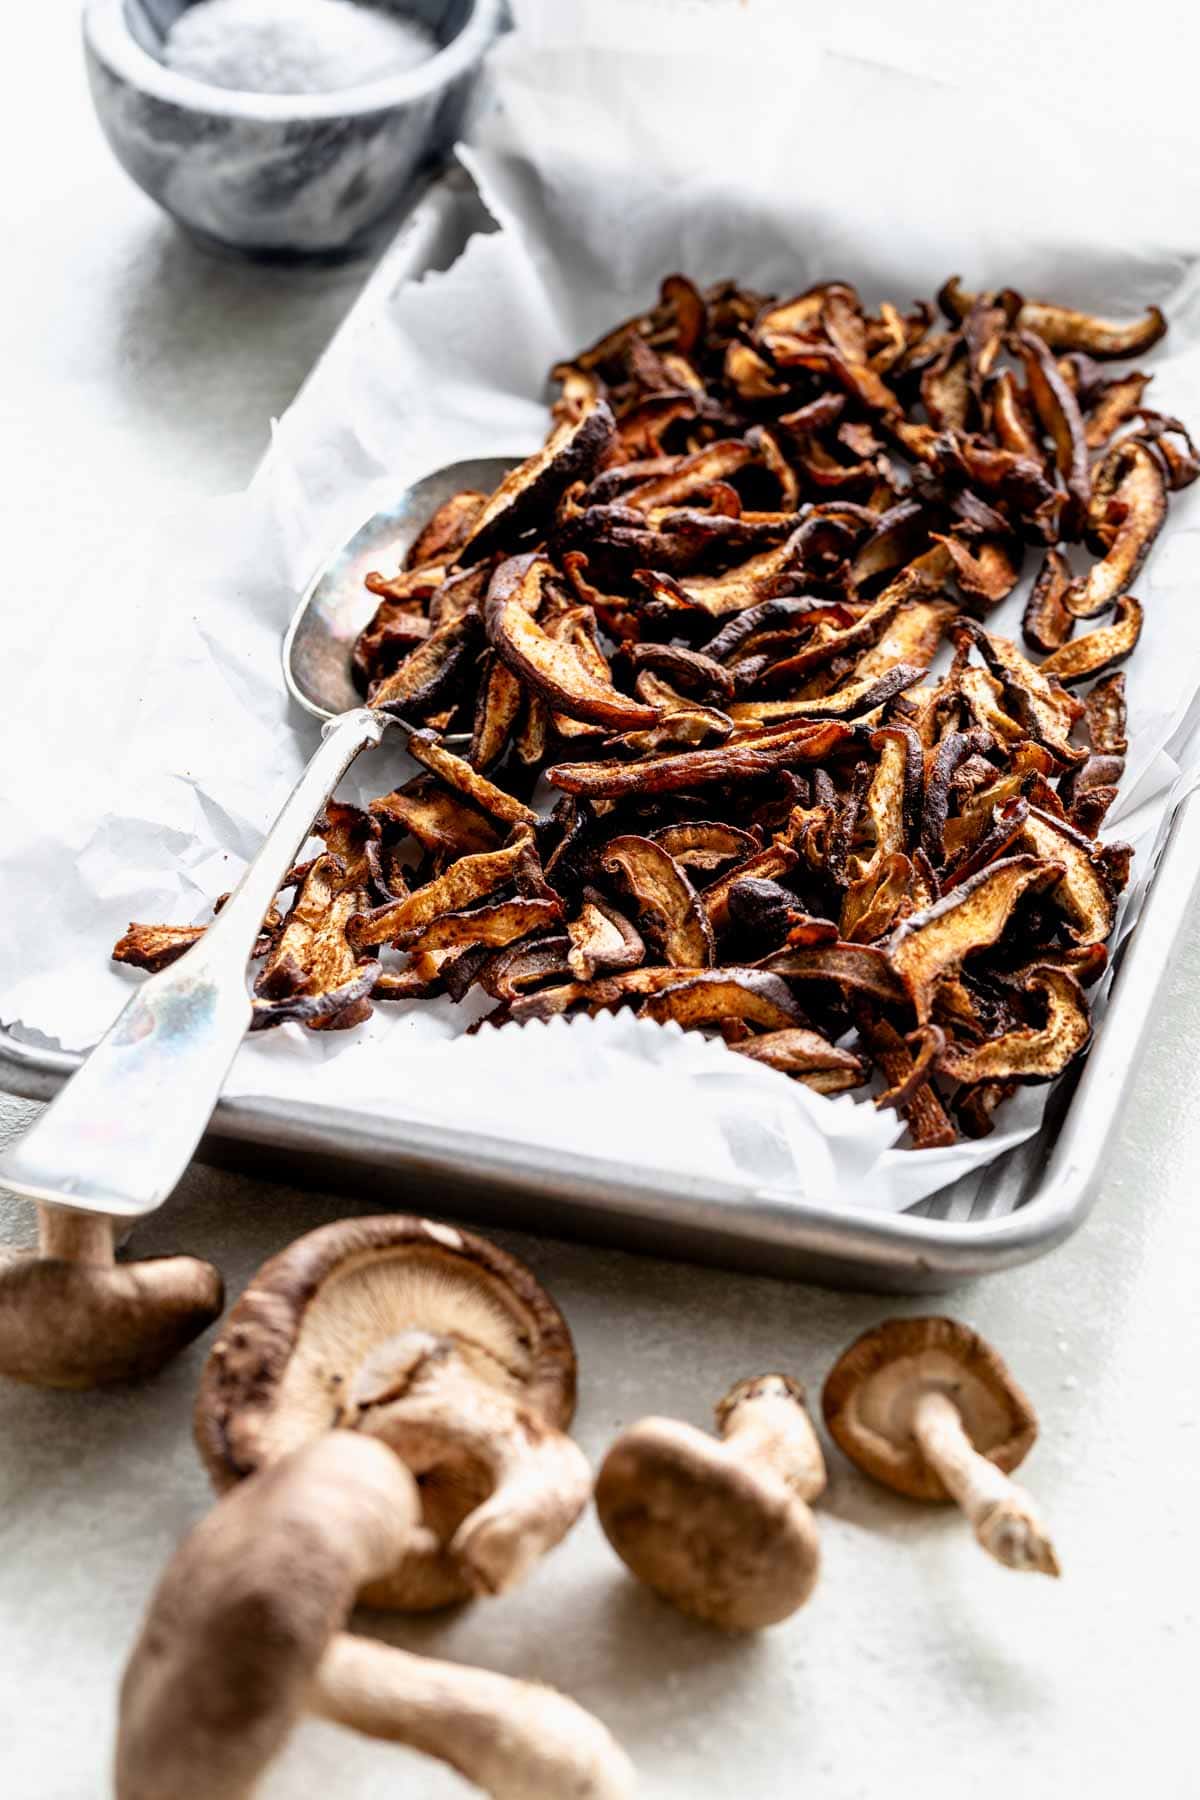
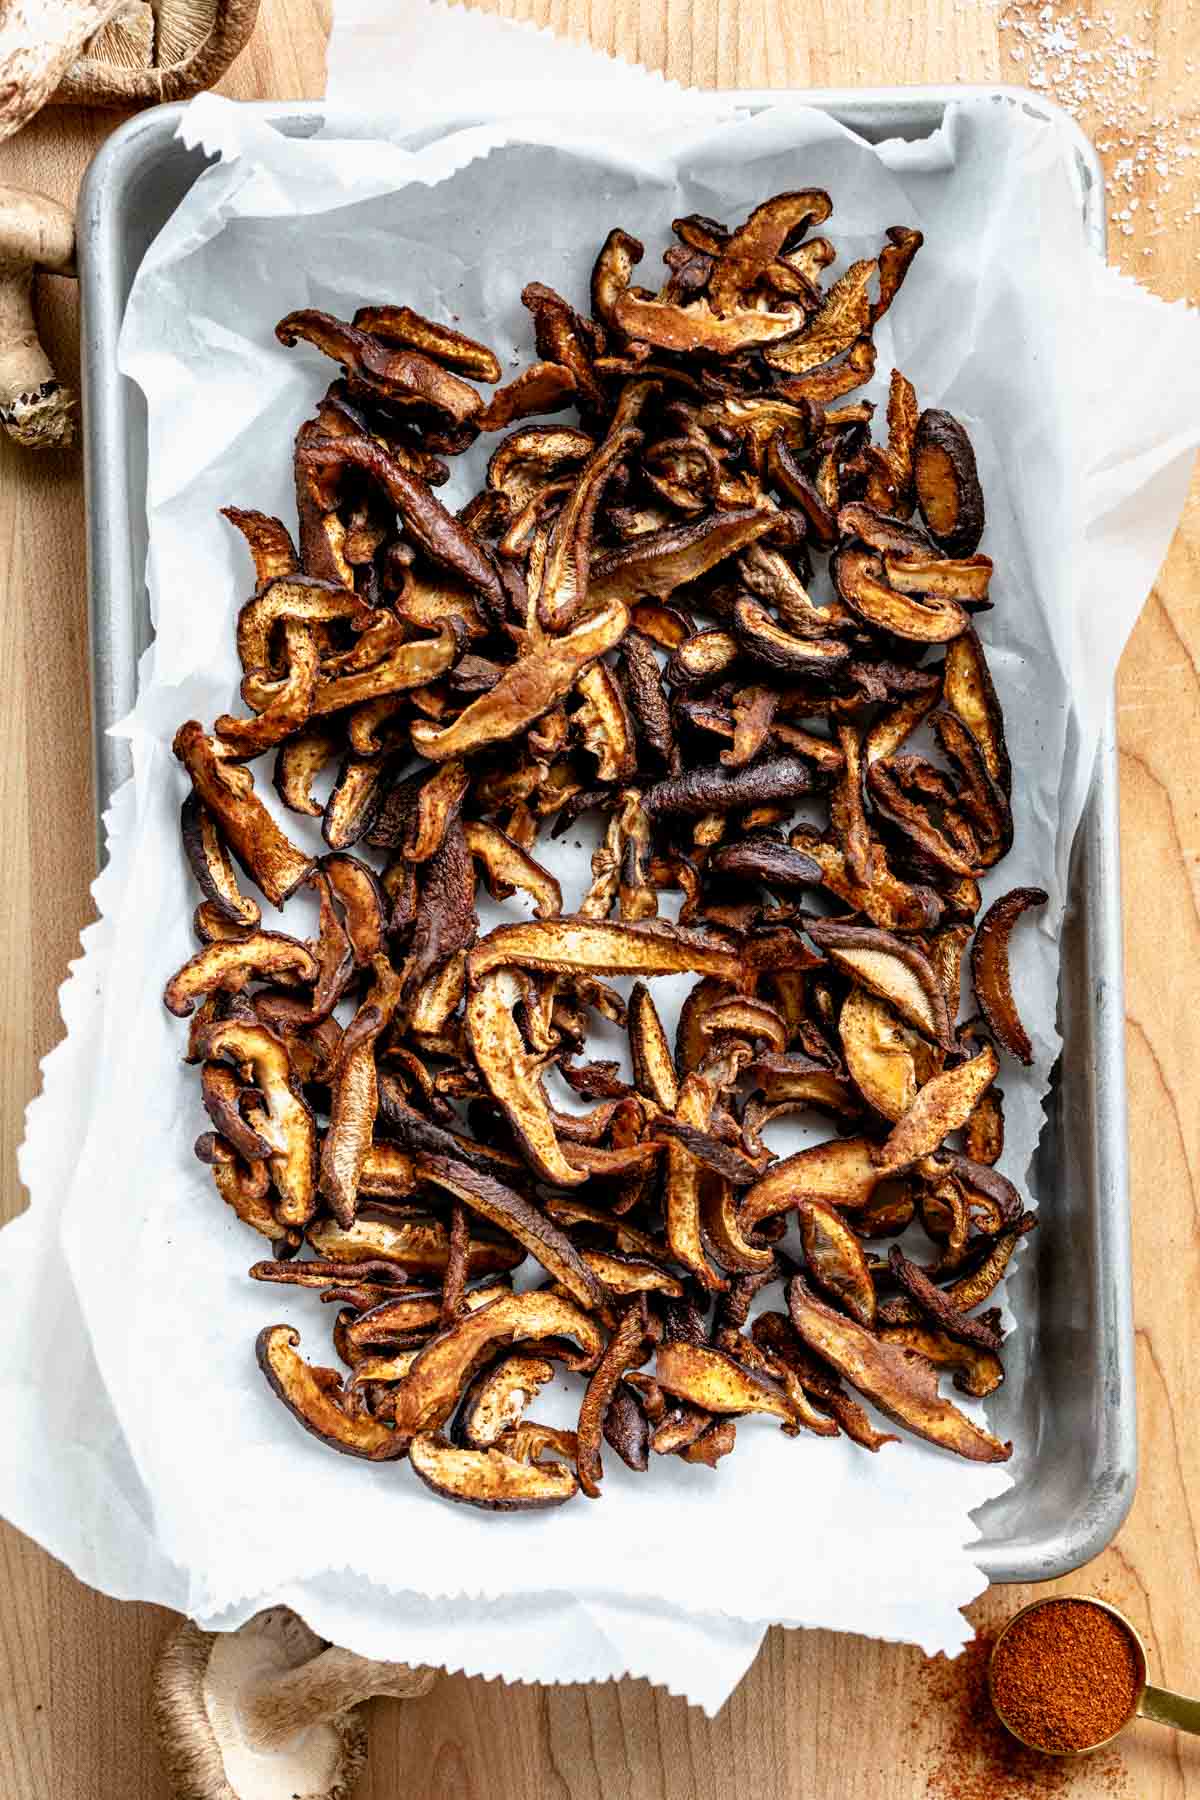
This Vegan Shiitake Mushroom Bacon is the perfect savory salad topping! It is super flavorful and satisfying but 100% meatless so everyone can enjoy it. This recipe is super quick and easy, made with only mushrooms, oil, paprika and salt, but it tastes amazing! I love to add it to the top of a big salad or stir it into a side salad.
I originally shared this recipe on May 5th, 2017. I have updated the images and text to share it with you again today.
Key Ingredients For This Recipe
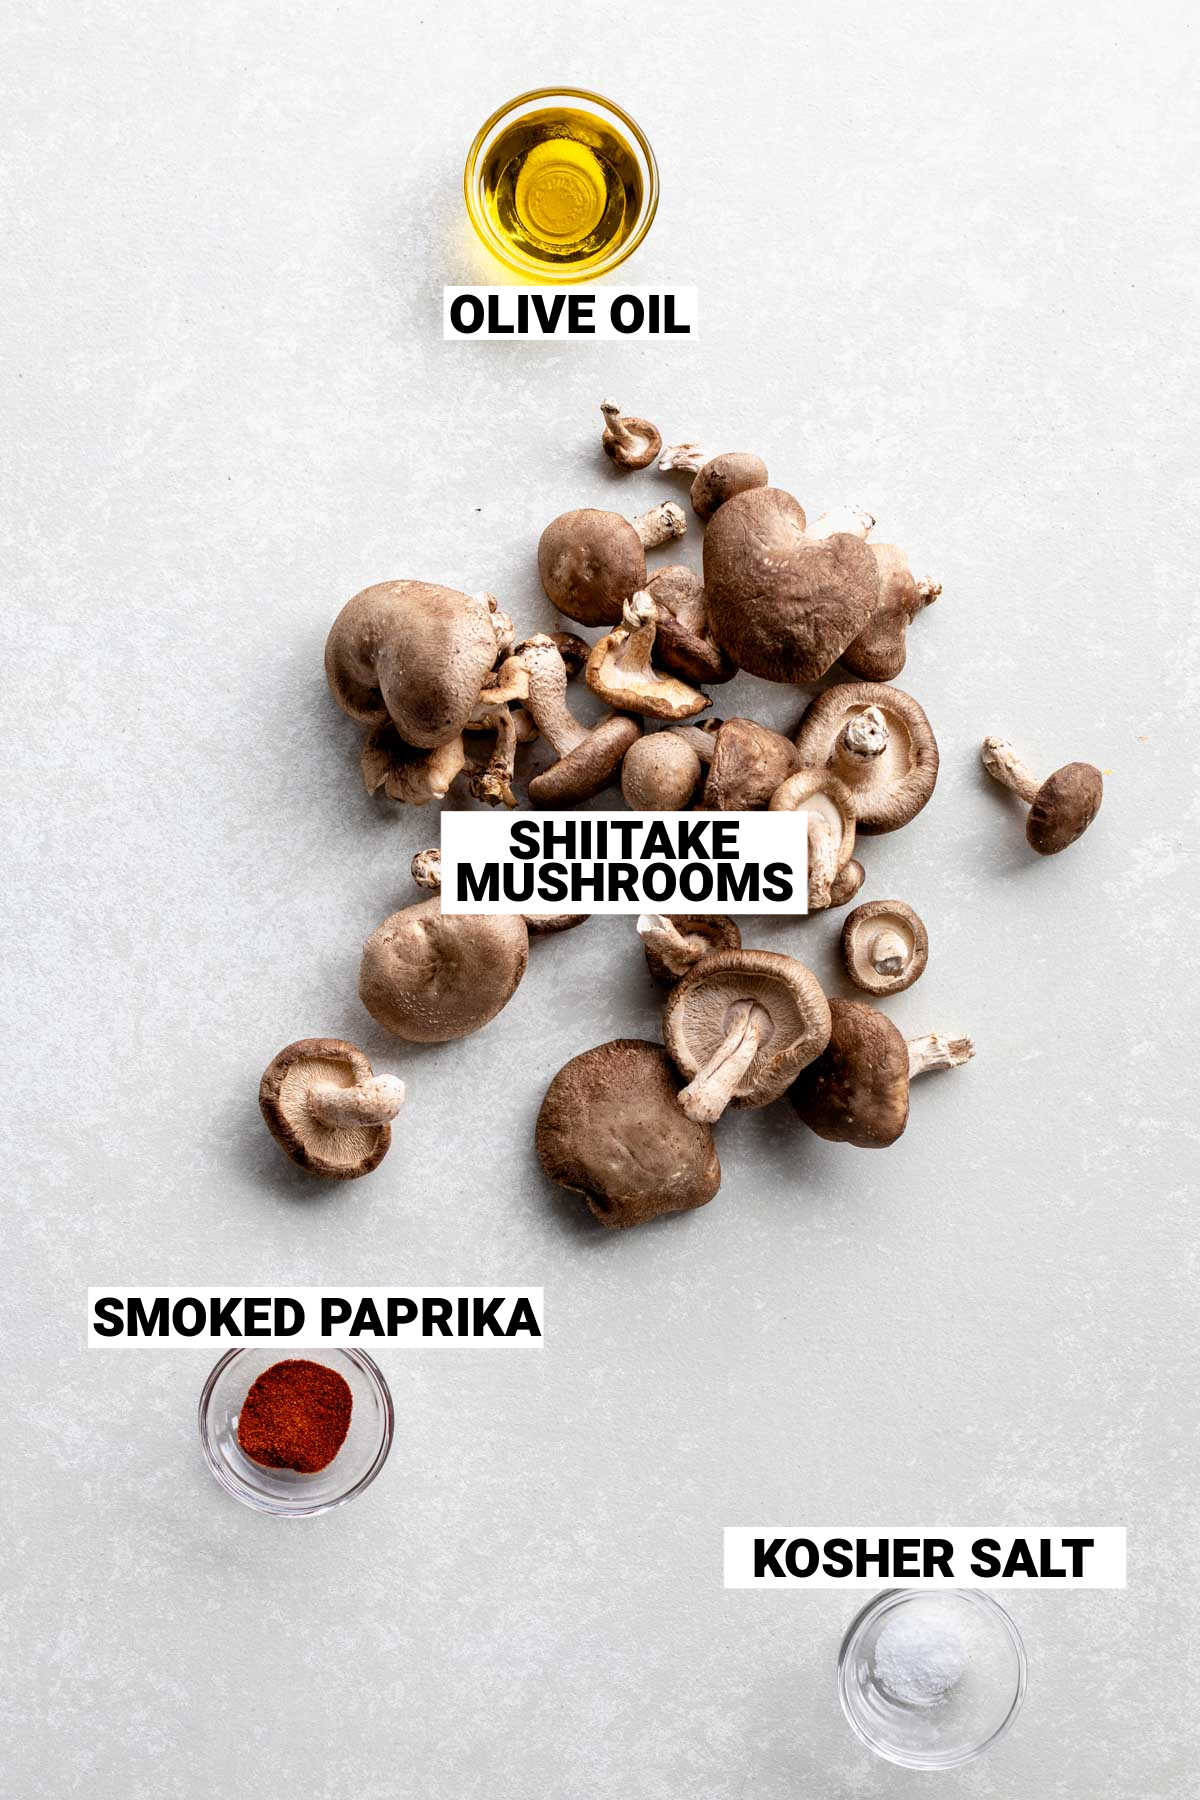
Shiitake Mushrooms
I’ll always advise that you purchase mushrooms from the bulk bin if you can—that way you can choose the freshest ones. We also recommend washing shiitake mushrooms by wiping the cap with a damp paper towel. Mushrooms are so absorbent that if you wash them under the tap they will retain some of the water. If this happens, place on a paper towel to dry for a few minutes.
Cooking Oil
Avocado oil or organic canola oil work best for this recipe but you can use olive oil as well.
Smoked Paprika
Smoked Paprika is the essence of the bacon flavor in this shiitake bacon. Look for it in the spice isle at large supermarkets. I only use 3/4 teaspoon, but you can add more to taste if you like a stronger smoke flavor.
Salt
Kosher salt is great for cooking but sea salt will work too, just make sure to use half as much as you would with kosher salt because it is higher in sodium.
Step-By-Step Instructions To Make Vegan Shiitake Mushroom Bacon
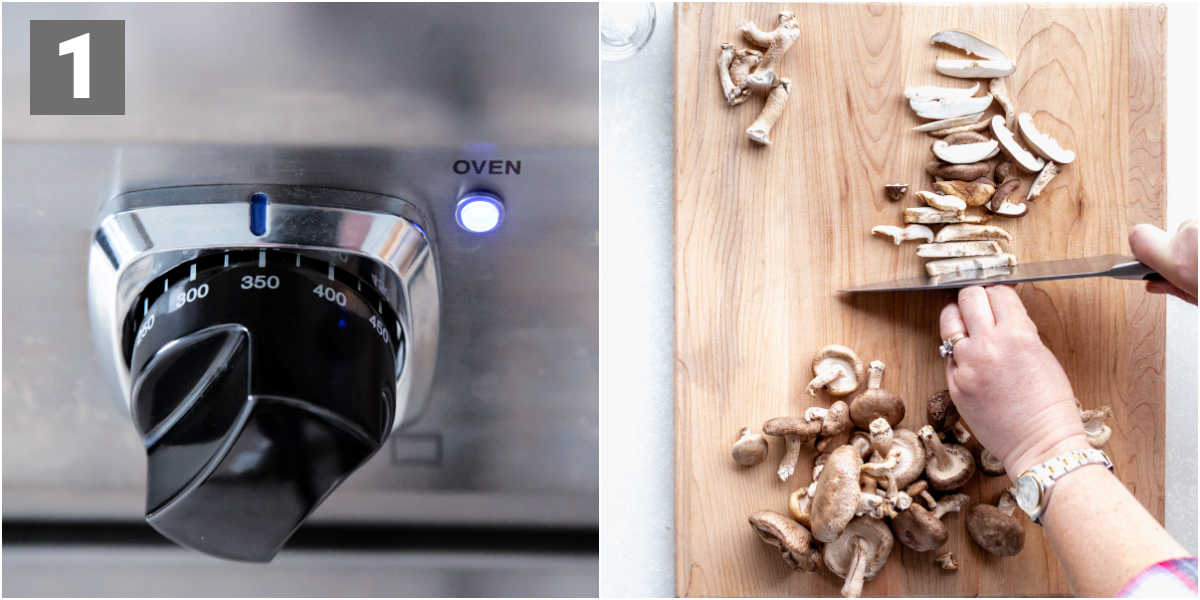
Step 1: Prepare the oven and mushrooms.
Preheat oven to 350 degrees F.
Remove the stems from the shiitake mushrooms. Just pull them off by hand. The stems are tough and pithy so they’re really not good for eating. You can add them to vegetable stock or homemade chicken stock if you like. Next cut the caps into thin strips (a quarter-inch thick is perfect.) They shrink considerably while they are roasting, so you don’t have to make them paper-thin.
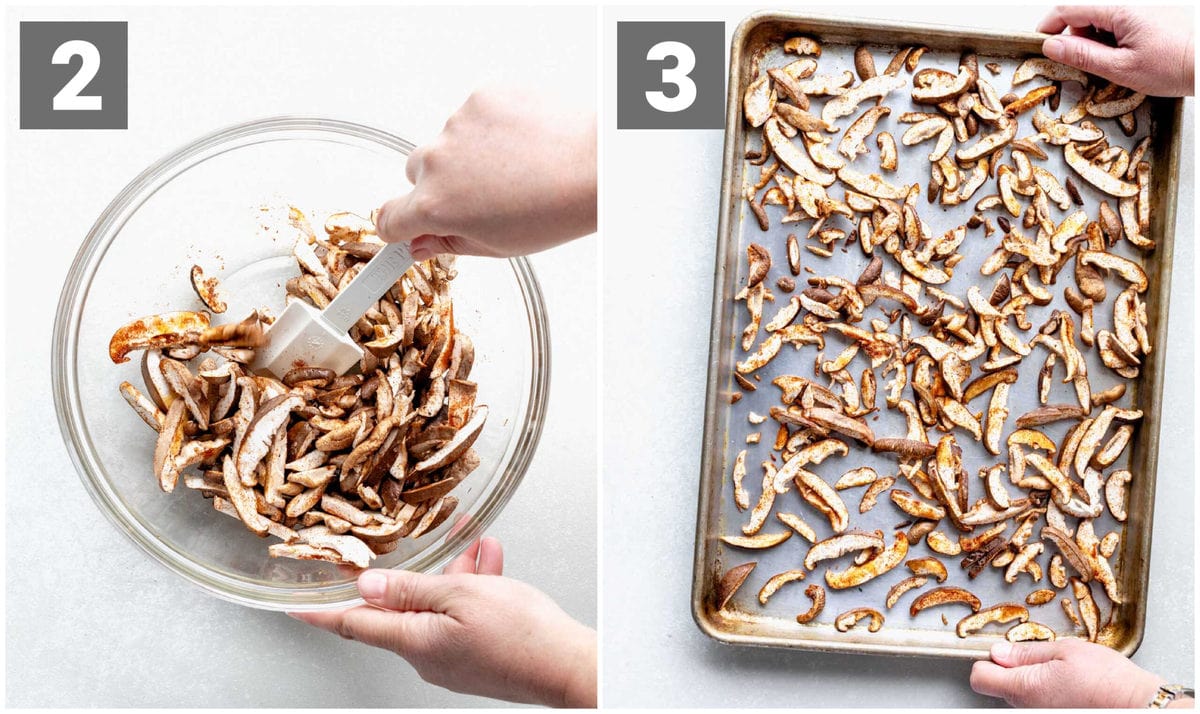
Step 2: Season Mushrooms
After they are sliced, toss them with oil. I like to use a neutral oil like avocado oil because I want the smoke to be the real starring flavor here. Because shiitake mushrooms are really absorbent, it is helpful to drizzle the oil along with the bowl (intentionally), then toss the shiitakes. The oil will be more evenly dispersed. For flavoring, all you need is a little salt and smoked paprika. The smoky paprika will taste just like bacon! Add the seasoning in and toss again to coat as evenly as possible.
Step 3: Spread on a Sheet Pan
Next comes the roasting. Spread the mushrooms out over a large rimmed baking sheet. Try not to let them overlap too much.
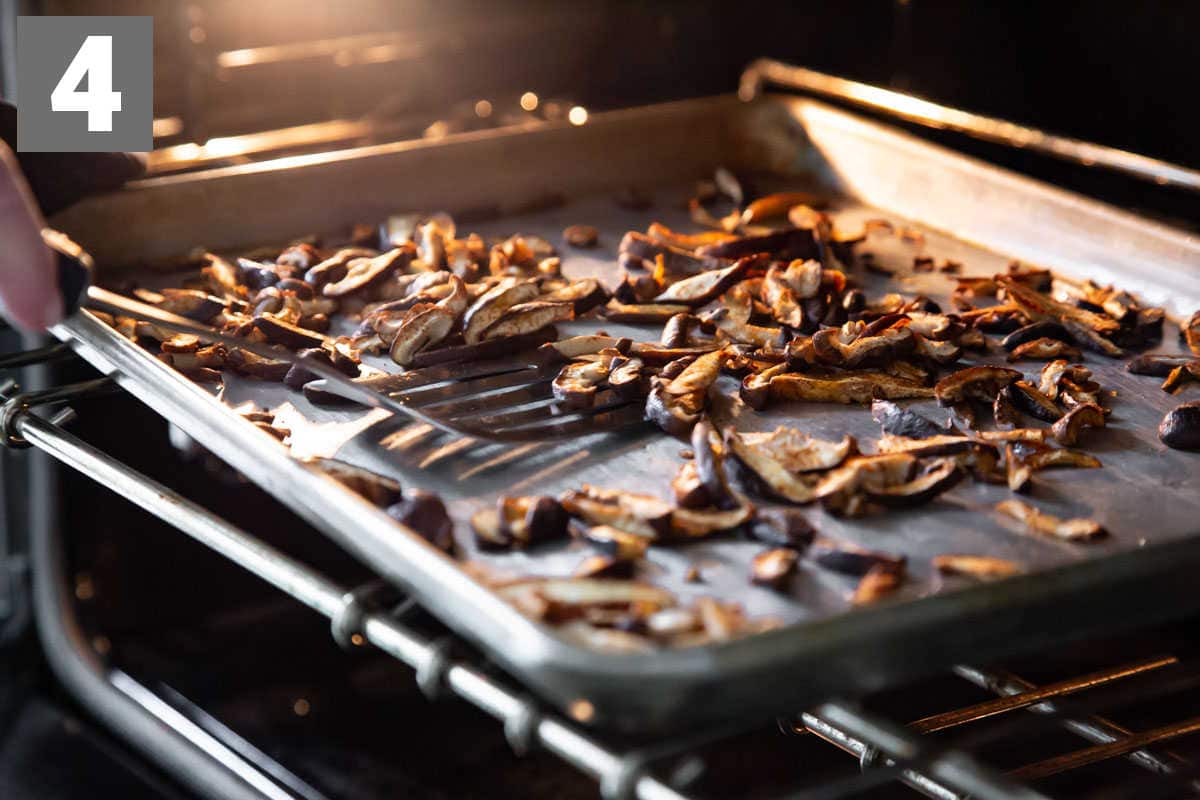
Step 4: Stir To Bake Evenly
Transfer the baking sheet to the oven. Make sure to stir the shiitake bacon with a spatula a few times while it roasts, so that it crisps up evenly. Otherwise, the pieces on the edge of the pan may overcook and burn.
You’ll know the shiitake bacon is done when it is browning but not burnt. That means that most of the moisture is roasted out of it and the small amount of natural sugars are caramelizing a bit. You can read more about the interaction of moisture and caramelization of sugar here.
Let the “bacon” cool completely. It will become crisp as it cools.
FAQs and Expert Tips For This Recipe
What is shiitake bacon made of?
Shiitake bacon isn’t made from pork like normal bacon. It is a vegan meatless alternative made with shiitake mushrooms, seasoned with smoked paprika to give it a smoky flavoring. It is roasted to dehydrate it and crisp it up to give it a texture similar to bacon.
What does shiitake taste like?
They have a rich, nutty, toasty buttery, and woodsy flavor, and a meaty texture when cooked. You can eat shiitake mushrooms raw, but their flavor is much more enhanced when they’re cooked.
What is shiitake?
Shiitake is an edible mushroom native to East Asia, though they are grown all over the world for consumption.
What is shiitake good for?
The shiitake mushroom is a good source of Vitamin B6, zinc and magnesium too, and in some traditional medicines, has been considered to have medicinal qualities. They are commonly used in Asian recipes like Tom Kha Gai (try our Slow Cooker Thai Chicken Coconut Soup) or as a meat alternative like Mock Eel.
Can these be made ahead of time?
This vegan bacon is best used within a day of baking, but it can be made ahead of time and stored in the refrigerator for 3-5 days.
How do I store them?
It will lose its crispy texture if you seal it into a container when it is not completely crispy and cool. Store at room temperature in a paper bag or a plastic bag that is not sealed shut. Re-crisp if necessary in the oven at 350 degrees or air fryer for 4 to 5 minutes or until sizzling hot. Then let it cool before serving.
Does Shiitake Bacon really taste like bacon?
Yes! It seems a bit too simple, but all you need is a little salt and smoked paprika to turn these mushrooms into little perfect pieces of vegan bacon perfection!
What to do with your Vegan Shiitake Bacon
Substitute the regular bacon in this French Bistro Brunch Salad to make this recipe vegetarian.
Add it to pasta. If you’re a fan of amatriciana sauce, but you want to make it meatless, skip the bacon and stir this vegan shiitake bacon in just before serving for best texture.
At Healthy Seasonal Recipes, we specialize in cooking with fresh veggies and creating weeknight meals. Sign up HERE to get more produce-forward dinner ideas for FREE! If you make this recipe, please come back and leave a star rating and review. I would love to hear what you thought! Happy Cooking! ~Katie
Print
Description
This Vegan Shiitake Bacon is the perfect savory salad topping! It is super flavorful and satisfying but 100% meatless so everyone can enjoy it. And it’s ready in just 30 minutes!
Toss shiitake mushrooms, 1 tablespoon oil, smoked paprika and salt in a medium bowl.
Spread out on a large rimmed baking sheet and transfer to the oven.
Bake, stirring and turning occasionally until the mushrooms are dried out and browned, 20 to 30 minutes. Cool on the baking sheet.
Notes
You’ll know the shiitake bacon is done when it is browning but not burnt. That means that most of the moisture is roasted out of it and the small amount of natural sugars are caramelizing a bit.
This shiitake bacon will lose its crispy texture if you seal it into a container when it is not completely crispy and cool. It is best used within a day of baking. Store at room temperature in a paper bag or a plastic bag that is not sealed shut.
Re-crisp if necessary in the oven at 350 degrees or air fryer for 4 to 5 minutes or until sizzling hot. Let cool before serving.
You can substitute some smoked paprika for liquid smoke, but only do a small amount. If you chose to do this, use half the amount of liquid smoke that you’re removing from the paprika.
Prep Time:15 minutes
Cook Time:30 minutes
Category:salad topping
Method:oven
Cuisine:American
Nutrition
Serving Size:5 tablespoons
Calories:41
Sugar:0 g
Sodium:70 mg
Fat:4 g
Saturated Fat:0 g
Carbohydrates:0 g
Fiber:0 g
Protein:0 g
About the Author
Katie Webster
Katie Webster studied art and photography at Skidmore College and is a graduate of the New England Culinary Institute. She has been a professional recipe developer since 2001 when she first started working in the test kitchen at EatingWell magazine. Her recipes have been featured in numerous magazines including Shape, Fitness, Parents and several Edible Communities publications among others. Her cookbook, Maple {Quirk Books} was published in 2015. She launched Healthy Seasonal Recipes in 2009. She lives in Vermont with her husband, two teenage daughters and two yellow labs. In her free time, you can find her at the gym, cooking, stacking firewood, making maple syrup, and tending to her overgrown perennial garden.
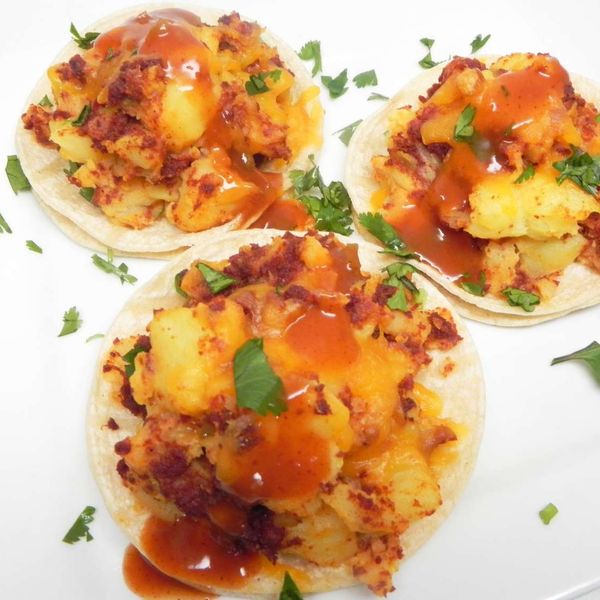
This is a vegan version of popular Mexican tacos made are traditionally made with potatoes and pork chorizo that are deep fried, but I prefer this healthier version where you just heat the tortillas on the griddle with a very small amount of oil until they are crispy. [Recipe originally submitted to Allrecipes.com.mx]
Submitted by gem
Updated on March 27, 2025
Cook Mode (Keep screen awake)
Ingredients
This recipe was developed at its original yield. Ingredient amounts are automatically adjusted, but cooking times and steps remain unchanged. Note that not all recipes scale perfectly.
Original recipe (1X) yields 4 servings
2poundsYukon Gold potatoes, peeled
salt and ground black pepper to taste
2tablespoonsvegetable oil, divided
12ouncessoy chorizo, crumbled
12(6 inch)corn tortillas
Directions
Place potatoes in a large pot and cover with salted water; bring to a boil. Cook, covered, until potatoes are easily pierced with a knife, about 30 minutes. Drain, reserving 1 cup cooking water.
Transfer boiled potatoes to a bowl and season with salt and pepper. Mash with a potato masher, adding reserved cooking water to reach desired consistency.
Heat 1 tablespoon oil in a large skillet. Cook soy chorizo for 5 minutes. Add mashed potatoes and mix well.
Heat tortillas on a hot griddle over medium heat to soften them. Fill them with equal amounts of potato-chorizo mixture. Fold them in half and brush the outside of the tortillas with the remaining 1 tablespoon oil. Place tacos on the hot griddle and cook, turning once, until crisp, 3 to 5 minutes.
Nutrition Facts (per serving)
597
Calories
21g
Fat
85g
Carbs
22g
Protein
Nutrition Facts
Servings Per Recipe 4
Calories 597
% Daily Value *
Total Fat
21g
27%
Saturated Fat
4g
20%
Sodium
962mg
42%
Total Carbohydrate
85g
31%
Dietary Fiber
12g
44%
Total Sugars
3g
Protein
22g
44%
Vitamin C
45mg
50%
Calcium
90mg
7%
Iron
3mg
15%
Potassium
1100mg
23%
* Percent Daily Values are based on a 2,000 calorie diet. Your daily values may be higher or lower depending on your calorie needs.
** Nutrient information is not available for all ingredients. Amount is based on available nutrient data.
(-) Information is not currently available for this nutrient. If you are following a medically restrictive diet, please consult your doctor or registered dietitian before preparing this recipe for personal consumption.
Heat a non-stick skillet over medium heat until a drop of water gently sizzles and pops.
Mix together the dry ingredients in a large bowl. Whisk in the wet ingredients, being careful not to over-mix. If there are lumps, allow the batter to sit for a minute so they can break down.
Fill a quarter cup and pour batter onto the skillet. Cook over medium heat. Flip when the edges begin to dry and bubbles on the top start to pop.
Cook for another 1-2 minutes and serve with vegan butter, such as Earth Balance, maple syrup, agave syrup, or fresh fruit.