Author: PatagoniaLlami

  • Easy Tomato Refrigerator Jam

    Easy Tomato Refrigerator Jam

    recipe image

    Published: · Modified: by Kristina Sloggett · This post may contain affiliate links · 4 Comments

    This easy tomato refrigerator jam recipe is a quick and easy effort for some flavor packed summertime goodness! another way to enjoy fresh garden tomatoes.

    recipe originally published July 9, 2012

    two small glass jars of tomato jam on dark grey marble surface, fresh tomatoes in background

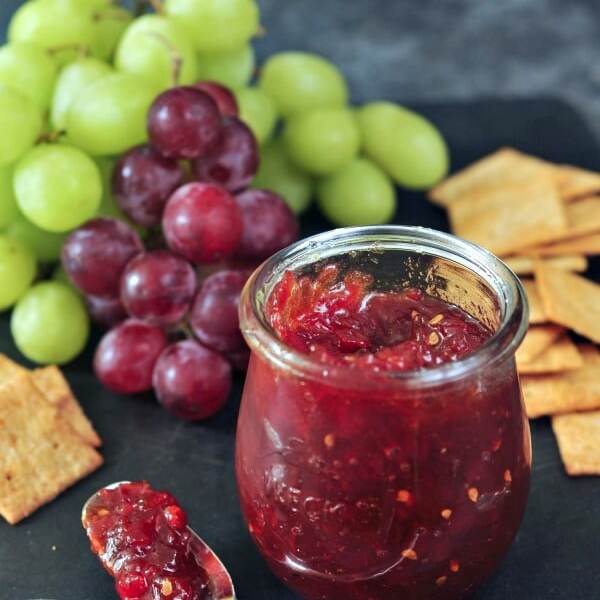
    Refrigerator Jam Recipe

    There really is no comparison to a fresh tomato picked from the vine. Standing in the middle of my garden, biting into that warm juicy flavor.

    This year, I have two in my garden – Roma and Celebrity. Both are great to slice thick and put in a sandwich, on toast, just on a fork with salt.

    I have used each variety in separate batches of this jam – both taste great.

    Refrigerator Jam Versus Canned

    Part of the appeal of this Easy Tomato Refrigerator Jam is the lack of canning. Please make no mistake – I love to spend a weekend canning, and have to acknowledge that a large part of the work is the sanitation and prep, right?

    two jars of refrigerator jam, one with a spoon sticking out

    How To Make Refrigerator Jam

    With this recipe, I wake up one Saturday and decide I want jam. I head out to the back yard (or to the farmers market down the street) and pick the juiciest tomatoes I can find. Still warm from the sun. I probably eat one straight from the vine.

    Clean up the tomatoes, chop them up and add a couple pantry staple ingredients, and within an hour? You have jam. This one just needs to be refrigerated and enjoyed within a couple weeks.

    jar of easy tomato refrigerator jam on a snack tray with grapes, crackers

    This jam has never lasted more than a few days at our house.

    This Easy Tomato Refrigerator Jam takes little time to produce a deliciously flavorful result. As nice as it is to have a small batch of summertime jam in an hour, this recipe is easily doubled, or tripled!

    Make some for gifts, as long as you tell the recipient that this is a fridge jam! It will disappear quickly.

    So good on Avocado Toast:

    tomato jam on avocado toast, half avocado and jar of jam in background

    two jars of tomato jam, fresh tomatoes in background

    spoonful of refrigerator jam from the jar

    fresh summertime tomatoes are my jam.

    Yield: two 7 ounce jars

    Easy Tomato Refrigerator Jam

    Easy Tomato Refrigerator Jam @spabettie #vegan #glutenfree #oilfree #jam

    a quick and easy recipe for some flavor packed jam! another way to enjoy fresh garden tomatoes.

    Prep Time
    5 minutes

    Cook Time
    45 minutes

    Total Time
    50 minutes

    Instructions

    1. In large saucepan, combine fresh diced tomatoes, sugar, vinegar, and salt.
    2. Bring to a boil, stirring constantly for a few minutes. Reduce to simmer.
    3. Simmer for 45 minutes, stirring occasionally, until liquid reduces to a thick jam consistency. (Pull a spoon through the middle, the jam should be thick enough to remain separated.)
    4. Remove from heat, allow to cool completely before transferring to an airtight jar.
    5. Store in refrigerator up to two weeks.

    Nutrition Information:

    Yield:

    32

    Serving Size:

    1 tablespoon


    Amount Per Serving:

    Calories: 27Total Fat: 0gSaturated Fat: 0gTrans Fat: 0gUnsaturated Fat: 0gCholesterol: 0mgSodium: 69mgCarbohydrates: 7gFiber: 0gSugar: 6gProtein: 0g

    nutrition calculations results vary by calculator, are for informational purposes only, and are not intended to replace medical advice or treatment.

    about Kristina:

    spabettieKristina is spabettie! She found cooking at an early age, and created spabettie in 2010 to share vegan recipes. Kristina turned her culinary training into sharing vibrant vegan food!  Read more…

    spabettie / Kristina Sloggett is a participant in the Amazon Services LLC Associates Program, an affiliate advertising program designed to provide a means for sites to earn advertising fees by advertising and linking to Amazon.com.

    Reader Interactions

    Read More

  • FUDGY DOUBLE CHOCOLATE BROWNIES

    FUDGY DOUBLE CHOCOLATE BROWNIES

    recipe image

    Sam, the popular vegan blogger and artist of the blog, It’ Doesn’t Taste Like Chicken has recently released her new cookbook Fuss Free Vegan! I am so excited to share this book with you!

     Let’s dive in!

    Vegan Comfort Food Please!

    What I love most about this book is that it celebrates the basic ingredients. There are no exotic hard to pronounce ingredients in any of her recipes. I was able to make a few dishes without ever once going to the store because I already had the ingredients on hand. Also the recipes are things you recognize just vegan versions of them. I am talking mac and cheese, nachos, pizza, cookies, brownies, grill cheese sandwiches, pancakes, waffles and yes even bacon! This cookbook makes a great book for those transitioning and it’s budget friendly!


    Other reasons why I love this cook book….

    1. Every single recipe has a drool worthy photo. Every single recipe! Not only that, Sam being that she is an artist, did all the graphics and font for the book as well. She clearly a has a natural born talent for art and photography. This is the first cook book I ever owned where there is a picture for every single recipe (I am so happy about that.  Can’t you tell>? lol). A lot of time and care went into the creation of this cookbook so you know you’ll get your money’s worth.
    2. There are NO faux meats or faux cheeses! Now I am not anti any of those things (I use them in my recipes, some brands I refuse to live without). But I do believe they should be eaten in moderation. Besides the fact that convenient package products can be pretty hard on your pocket, they lack essential nutrients you can only get from whole plant based foods. Fuss Free Vegan Cookbook is exactly what the name suggest…it’s fuss free, simple, and delicious!
    3. Recipes for different events and occasions. The book contains a section at the end where it gives you meals suggestions based on the event and occasion. Having a game party? There are recipes for that. Thanksgiving gathering? There are recipes for that; sure to convert your omnivore friends and family.
    4. It inspired me! As I mentioned above, Sam did all of the cooking, photography and font herself! I talked about in my food blogging income reports how I had reached burn out and it’s been a journey coming back from that. But when I received this book in the mail with Sam’s personal note I started to get my spark back. I am truly forever grateful. I bet she had no idea that her writing a cookbook would help bring someone out of burn out. By her doing her purpose it helped me continue to want to do mine!

    OK so are getting hungry yet from all these recipes? You should! I decided to feature a holiday treat for you to make this year. Take a look at these Fudgy Double Chocolate Brownies below.

    FUDGY DOUBLE CHOCOLATE BROWNIES

    These brownies are every bit as fudgy and chocolatey as a good brownie should be.  The edges are lightly crisp and the center is chewy and full of rich choclatey goodness.

    Print
    Pin
    Rate

    Course: Dessert

    Cuisine: American, Baking, Vegan

    Keyword: Fudgy Double Chocolate Brownies

    Prep Time: 10 minutes

    Cook Time: 30 minutes

    Total Time: 40 minutes

    Servings: 12 brownies

    Calories: 255kcal

    Author: Sam Turnbull

    Ingredients

    • 1 cup vegan chocolate chips
    • ½ cup vegan butter
    • 1 cup white sugar
    • ½ cup non-dairy milk such as soy or almond
    • 1 teaspoon vanilla extract
    • ½ cup all purpose flour
    • ¼ cup cocoa powder
    • 1 ½ teaspoon baking powder
    • ¼ teaspoon salt
    • ½ cup chopped walnuts optional

    Instructions

    • Preheat your oven to 350 degrees Fahrenheit. Grease an 8- x 8 inch baking pan.

    • In a small saucepan, melt together the chocolate chips and butter, making sure to remove the saucepan from the heat just as it’s finished melting to ensure you don’t burn the chocolate.

    • Pour the melted chocolate into a mixing bowl. Add the sugar, non-dairy milk, and vanilla and mix well. Now add the flour, cocoa, baking powder, and salt and mix until combined. Finally, add the walnuts (if using).

    • Pour the batter into the prepared baking pan and bake for 30-35 minutes, until the brownies are pulling away from the sides of the pan and a toothpick inserted the center comes out with just at a few moist crumbs on it. Let the brownies cool and set overnight. This is the key to perfect gooey brownies.

    • To store, let the brownies cool completely, then cover with foil or plastic wrap and keep at room temperature for the best texture. For longer storage put in an airtight container and store in the fridge.

    Nutrition

    Nutrition Facts

    FUDGY DOUBLE CHOCOLATE BROWNIES

    Amount Per Serving

    Calories 255
    Calories from Fat 126

    % Daily Value*

    Fat 14g22%

    Saturated Fat 5g31%

    Sodium 115mg5%

    Potassium 118mg3%

    Carbohydrates 32g11%

    Fiber 2g8%

    Sugar 24g27%

    Protein 2g4%

    Vitamin A 400IU8%

    Vitamin C 0.7mg1%

    Calcium 62mg6%

    Iron 1.8mg10%

    * Percent Daily Values are based on a 2000 calorie diet.

    DID YOU MAKE THIS RECIPE?Be sure to PIN IT on Pinterest, leave a comment below, rate it, and mention @_VeganWithCurves using #veganwithcurves hashtag on Instagram so I can see it!

    Excerpted from Fuss Free Vegan: 101 Everyday Comfort Food Favorites, Veganized.

    Copyright ©2017 Samantha Turnbull. Published by Appetite by Random House®,a division of Penguin Random House Canada Limited. Reproduced by arrangement with the Publisher. All rights reserved.

    Read More

  • Fluffiest Vegan Black Bean Brownies (Gluten Free, Nut Free, Dairy Free)

    Fluffiest Vegan Black Bean Brownies (Gluten Free, Nut Free, Dairy Free)

    recipe image

    Last Updated . Published Danielle Fahrenkrug, Certified Health & Nutrition Life Coach | This post may contain affiliate links which won’t change your price but will share some commission.

     Celebrate your chocolate cravings with the healthiest and fluffiest vegan black bean brownies around! These are dreamy and cake-like and packed with fiber rich beans, pumpkin puree and minimal amounts of non processed sugars. Chocolate you can feel good about eating!

    Vegan Black Bean Brownie Recipe
    Jump to:
    • Why make these bean brownies
    • Video Tutorial
    • Ingredients
    • Tips for the perfect vegan brownie
    • How to make this recipe
    • Nutrition elements in black bean brownies
    • Related Recipes
    • Vegan Black Bean Brownies (Gluten Free, Nut Free, Dairy Free)

    Why make these bean brownies

    You work hard and have earned it! The most delectable chocolate sweet treat that is super guilt-free!

    Don’t worry guilt-free does not mean taste-free by all means! In fact you may have to hold yourself back from eating the whole pan of brownies (don’t say I did not warn you)!

    I promise your body will love and thrive off these egg-less brownies more than any other healthy brownie! These brownies are healthier, gluten-free, guilt-free, full of fiber, plant-based, and quite tasty! But if you want a more decadent chocolate brownie try these coconut oil brownies which are super fudgy!

    Video Tutorial

    You can also view to video here.

    heart shaped brownies

    The kids love them, the hubby loves them and I love to enjoy these brownies as a guilt-free (almost) fat free dessert! At first I thought about making just an egg-free brownie, then changed it to mix it with the trending black bean version.

    As we prepare for Valentine’s Day are enjoying cutting them into cute hearts! You can spread frosting on top, drizzle chocolate ganache, or melt vegan chocolate morsels (or milk chocolate if dairy is not an issue) on top after the vegan black bean brownies are cooled.

    The kids could not get their hands off them and I had to refrain them big time from eating the whole batch of my healthy brownies. I am saving the rest to surprise them on Valentine’s Day!

    The tricky tactic with working with gluten free flours is that most baked goods turn out dry and hard but adding pumpkin puree and beans to replace the egg provides moisture. In addition the combination of tapioca flour with a basic gluten free flour mix provides a baked good that is not dried out!

    Side of decadent chocolate brownies

    Ingredients

    • gluten free flour mix
    • tapioca flour
    • coconut sugar
    • cocoa powder
    • baking powder
    • baking soda
    • Himalayan salt
    • cinnamon
    • black beans or pinto beans canned, drained and rinsed or use 1 cup of homemade black beans that are drained
    • pumpkin puree (not pumpkin pie mix)
    • vanilla extract
    • almond milk or coconut milk
    • maple syrup
    • vegan and allergy friendly chocolate chips

    Tips for the perfect vegan brownie

    1. Find a binding agent that works such as pumpkin puree, mashed banana, flax paste or chia seeds. I love using chia seeds in my egg-less banana bread which is super moist and keeps baked goods together. If working with pumpkin, banana, flax paste or chia seeds, use about the same amount as you would an egg which is ¼ cup per egg. For these vegan bean brownies, I went with pumpkin puree for the recipe.
    2. Mix like you do regular brownies and separate the wet ingredients from the dry ones first before combining all the ingredients together. This prevents lumping in the batter.

    How to make this recipe

    1. Mix together all the dry ingredients such as flours, baking powder, baking soda, salt, sugar, cocoa powder and any spices.
    2. Blend all the wet ingredients together in a blender for the perfect texture. If you are making black bean brownies it is required to add the beans in this step. Blending is the fastest and quickest way to get the job done and is easier than mixing:-) Certain muffins and baked goods are different though as over-mixing can produce a flat cake or cookie but with these brownies, it works great to blend.
    3. Fold together both wet and dry ingredients. Add chocolate chips now or melt them and drizzle on the top in the end. For these brownies, it calls for the maple syrup to be left last and separate from the blender process. I have made it both ways and adding the syrup last makes the brownies more moist.
    4. It is fine to over-bake these vegan black bean brownies slightly but with other brownies it can dry out. Make sure to use a toothpick or knife to test if the recipe is done baking. It is done when the knife comes out clean from the center.
    5. Bake at a temperature of 350 degrees for about 30 minutes or until a knife inserted in the center comes out clean.

    Nutrition elements in black bean brownies

    1. Black beans or Pinto beans are packed with fiber, high in antioxidants, protein, B vitamins, iron, magnesium, potassium. May reduce the risk of diabetes, heart disease and certain cancers.
    2. Pumpkin is packed with fiber, vitamin  A, cooper, potassium and mono-unsaturated fatty acids. Mono-unsaturated fatty acids are beneficial in aiding to prevent heart disease.
    3. Cocoa Powder is packed with minerals such as calcium and potassium. Cocoa powder is known to help lower LDL cholesterol, reduces the chances of blood clots, is packed with antioxidants, increases blood flow to the arteries, and assists in cognitive memory.
    4. Cinnamon lowers bad cholesterol and aids in balancing blood pressure.
    Fluffiest VEGAN black bean brownies! Perfect for Valentine's Day and they are gluten free!

    Who can resist the fact that these vegan gluten free brownies are:

    • chocolaty
    • fluffy
    • moist
    • light
    • flavorful
    • delectable
    • tantalizing
    • mouthwatering

    These vegan black bean brownies really are incredibly fluffy and moist! Make them with either black beans, pinto beans or a combination of both!

    Happy Valentine’s Day, loves!

    If you make these vegan black bean brownies from Delightful Mom Food I would love to see your creations and share it! Follow along with me on INSTAGRAM, PINTEREST, FACEBOOK, YOUTUBE and TWITTER to be featured and for more recipe inspiration! And don’t forget to rate the recipe in the recipe area and leave a comment below.

    vegan black bean brownies

    Vegan Black Bean Brownies (Gluten Free, Nut Free, Dairy Free)

    Danielle Fahrenkrug

    Celebrate your chocolate cravings with the healthiest and fluffiest vegan black bean brownies around! These are dreamy and cake-like and packed with fiber rich black beans, pumpkin puree and minimal amounts of non processed sugars. Chocolate you feel good about eating!

    Prep Time 10 minutes

    Cook Time 30 minutes

    Total Time 40 minutes

    Course Dessert

    Cuisine American

    Servings 16

    Calories 109 kcal

    vegan black bean browniesGet Recipe Ingredients

    Instructions 

    • Preheat the oven to 350 degrees F. Spray with cooking spray a 9×6 inch baking pan or 8×8 inch pan and set aside.

    • In a large mixing bowl stir together the gluten free flour, tapioca flour, coconut sugar, cocoa powder, baking powder, baking soda, Himalayan salt and cinnamon.

    • In a blender add the beans, pumpkin puree, vanilla extract and almond milk. Blend on high to combine. Stir the wet ingredients into the dry ingredients slightly and add the maple syrup. Mix well to combined.

    • Add chocolate chips into the batter or save them to melt and drizzle on top after the brownies are finished cooking. Once cooked, let them cool completely before removing from the pan.

    • Bake for 30-35 minutes or until a knife inserted into the center comes out clean.

    Nutrition

    Calories: 109kcalCarbohydrates: 22gProtein: 2gFat: 3gSaturated Fat: 1gPolyunsaturated Fat: 0.2gMonounsaturated Fat: 0.3gSodium: 180mgPotassium: 149mgFiber: 3gSugar: 10gVitamin A: 596IUVitamin C: 0.5mgCalcium: 67mgIron: 1mg

    More Gluten-Free Dessert Recipes

    About Danielle Fahrenkrug, Certified Health & Nutrition Life Coach

    Danielle Fahrenkrug is an entrepreneur, self taught chef, and food photographer turned 3x cookbook author. Her passions of helping others with healthy eating led her to becoming a certified health and nutrition life coach. She is also a wife, mother of four, and loves the beach, animals, and fitness.

    This site uses Akismet to reduce spam. Learn how your comment data is processed.

    Read More

  • No Beef Manhattan

    No Beef Manhattan

    recipe image

    Published: · Modified: by Chuck Underwood · 10 Comments

    Ahhhh….Beef Manhattans ….. or simply call it – Hoosier comfort food at its best!  

    I know…. it’s an Indiana thing.  

    nobeef manhattan 3

    But I can’t tell you how many of these I ate as a kid growing up in Indianapolis.

    Never heard of it?

    A Beef Manhattan is basically a roast beef sandwich, cut corner to corner with a big scoop of mashed potatoes in the middle, and then completely smothered in brown gravy.

    Uh…..yum!?

    Wikipedia even has an entry for it:

    The dish was first served under the name “Beef Manhattan” in a now defunct Indianapolis deli in the late 1940s where it gained traction as a Hoosier staple. In Indiana, it is served on bread. The roast beef is sliced and put on bread like a sandwich, then cut corner to corner and plated in a V shape. Mashed potatoes are served between the two halves, and the whole is covered in gravy.

    Yumminess on a plate, that’s what Beef Manhattans were, and a big part of my childhood.

    Hmmm….I sense a recipe coming.

    No Beef Manhattan

    nobeef manhattan 2
    Nobeef Manhattan | Brand New Vegan

    Yesterday as I was rummaging around in my fridge looking for something yummy to eat, I spied a container of my awesome Vegan Gravy, and some leftover mashed potatoes and I instantly thought of beef manhattans.

    But now that I’m a brand new vegan – what would I use to replace the roast beef?

    All I had to do was open up the freezer, and there it was.  A bag of frozen vegetables, specifically another Hoosier favorite, a bag of peas, corn, and carrots.

    I whipped those bad boys into the microwave, made myself a ‘veggie sandwich’, scooped in the mashed taters, and smothered the whole thing in gravy.

    Bam.

    I just created a No Beef Manhattan.

    And it was AWESOME!!!

    (Note:  You can use any sandwich filling you like, not just veggies.   My Meatlovers Seitan Metaloaf, for example, would be really good on a sandwich.  Anything that tastes good covered in gravy will do. )

    Warm, starchy, filling, and full of creamy gravy goodness.  That’s what I’m talking about.  And I never missed the roast beef – at all.

    This is a great recipe for using up leftovers, so give it a try.

    You can find that recipe for my amazing Vegan Gravy right here!

    You don’t have to be from Indiana to enjoy it, but if you DO find yourself humming “Back Home Again in Indiana”….well……..Jim Nabors would be proud.  🙂

    brandnewvegan

    nobeef manhattan pin

    Print

    nobeef manhattan 2

    No Beef Manhattan

    5 Stars 4 Stars 3 Stars 2 Stars 1 Star
    No reviews


    • Author:
      Chuck Underwood


    • Prep Time:
      10 minutes


    • Cook Time:
      5 minutes


    • Total Time:
      15 minutes


    • Category:
      Main


    • Cuisine:
      American


    Description

    A No Beef Manhattan is my version of an Indiana favorite. A veggie sandwich cut V-shaped, with a big scoop of potatoes in the center, smothered in gravy. Hoosier yumminess!


    • 1 bag Frozen Vegetables (OR…)
    • 2 slices Seitan Meatloaf ((optional))
    • 2 slices Your Favorite Bread
    • 1 scoop Mashed Potatoes
    • 1 cup My Fat-Free Vegan Gravy recipe. ((recipe below))


    Instructions

    1. Prepare your mashed potatoes
    2. Cook your frozen vegetables according to the instructions on bag
    3. Using the veggies, make a ‘veggie sandwich’.
    4. Cut it corner to corner and separate.
    5. Scoop your mashed potatoes in between
    6. Smother the whole thing in gravy


    Reader Interactions

    This site uses Akismet to reduce spam. Learn how your comment data is processed.

    Read More

  • Vegan Carrot Soup

    Vegan Carrot Soup

    recipe image


    Cook Mode
    (Keep screen awake)

    Ingredients


    Original recipe (1X) yields 4 servings

    • 1 tablespoon vegetable oil

    • 1 large onion, diced

    • 3 cloves garlic, minced

    • 4 large carrots, sliced

    • 5 new potatoes, quartered

    • 2 cups vegetable broth

    • 2 teaspoons grated fresh ginger

    • 1 teaspoon curry powder

    • salt and pepper to taste

    Directions

    1. Heat oil in a soup pot over medium heat. Add onion and garlic, and cook stirring often until onion is translucent. Add carrots and potatoes, and cook for just a few minutes to allow the carrots to sweat out some of their juices.

    2. Pour the vegetable broth into the pot, and season with ginger, curry powder, salt and pepper. Bring to a boil, then reduce heat to low. Simmer for 15 to 20 minutes, until carrots are tender.

    3. Puree soup in small batches using a food processor or blender, or if you have an immersion blender, it can be done in the soup pot. Reheat soup if necessary, and serve.

    Nutrition Facts (per serving)

    185 Calories
    4g Fat
    35g Carbs
    4g Protein
    Nutrition Facts
    Servings Per Recipe
    4
    Calories
    185
    % Daily Value *
    Total Fat
    4g
    5%
    Saturated Fat
    1g
    3%
    Sodium
    434mg
    19%
    Total Carbohydrate
    35g
    13%
    Dietary Fiber
    6g
    21%
    Total Sugars
    8g
    Protein
    4g
    8%
    Vitamin C
    30mg
    33%
    Calcium
    63mg
    5%
    Iron
    2mg
    9%
    Potassium
    797mg
    17%

    * Percent Daily Values are based on a 2,000 calorie diet. Your daily values may be higher or lower depending on your calorie needs.

    ** Nutrient information is not available for all ingredients. Amount is based on available nutrient data.

    (-) Information is not currently available for this nutrient. If you are following a medically restrictive diet, please consult your doctor or registered dietitian before preparing this recipe for personal consumption.

    Read More

  • Vegan Chili

    Vegan Chili

    recipe image

    “my almost famous vegan chili, everyone loves it a tin”

    Ready In:
    1hr

    Ingredients:
    12

    Serves:
    8

    • 16

      ounces tomato sauce
    • 8

      ounces black beans
    • 8

      ounces dark red kidney beans
    • 8

      ounces light kidney beans
    • 8

      ounces dieced tomatoes
    • 1 12

      cups onions
    • 1

      cup corn
    • 2

      tablespoons chili powder
    • 2

      teaspoons cumin
    • 1

      garlic clove
    • 1

      teaspoon cayenne pepper
    • 1

      teaspoon paprika

    directions

    • satue onions and corn together, add seasoning, deglaze pan with tomato sauce, add remaining ingredients and simmer.

    Questions & Replies


    Got a question?


    Share it with the community!

    Want a Second Helping?

    Sign up for our newsletter to get recipes, easy dinner ideas, tasty treats and more delivered straight to your inbox.

    To withdraw your consent or to learn more about your rights, see the Privacy Policy.

    RECIPE SUBMITTED BY

    I am looking for recipes and foods for my brother. He has been diagnosed with ‘Leaky Gut’ caused by an overgrowth of candida yeast.The foods are getting harder and harder to find as the diet goes on because we want to give some vareity. He can’t eat soy, eggs, dairy, gluten or sugar. To top it all off this has to be low carb. I hope to find some recipes, make substitutions when I have to so that I can find something for him to eat. I’ll be sure to post any new recipes here and a few other sites for people with leaky gut.

    View Full Profile

    Read More

  • Quinoa Pizza Muffins

    Quinoa Pizza Muffins

    recipe image

    Entrees

    Originally posted March 31, 2016

    Packed with protein and fiber, these little muffins are perfect for lunch, dinner, snacks and parties.  Kid and adult approved!

    Packed with protein and fiber, these little muffins are perfect for lunch, dinner, snacks and parties.  Kid and adult approved!

    Did any of you eat pizza pockets or pizza bites as a kid? Gooey, cheesy little pockets of pizza perfection. Oh, how I loved to open up my lunch box and see them in there!

    Now when I see those pizza snacks on the shelves in a grocery store, they don’t look as appealing to me.  They are packed with preservatives, calories, sugar and sodium.  

    Next time you are at the store, take my advice and keep walking past the pizza bites and make these lighter, healthier Quinoa Pizza Muffins.  They have all the flavors you love about pizza, but with less calories and fat.  

    Packed with protein and fiber, these little muffins are perfect for lunch, dinner, snacks and parties.  Kid and adult approved!

    WHAT INGREDIENTS DO I NEED?

    • 2 cups cooked quinoa
    • 1 cup mozzarella cheese
    • ½ cup preferred type of pepperoni (turkey, vegan, etc)
    • 1 teaspoon Italian seasoning
    • 1 teaspoon dried oregano
    • 1 teaspoon minced garlic
    • ½ cup fresh basil
    • 2 tablespoon gluten free flour
    • 2 eggs
    • dash of salt/pepper
    Packed with protein and fiber, these little muffins are perfect for lunch, dinner, snacks and parties.  Kid and adult approved!

    Living without gluten and dairy can be difficult at times.  Especially times when I am craving pizza.  Luckily, I happened to make a big batch of quinoa last night.  I love to make large quantities of things like quinoa, rice, and cucumber salad for the week.  I can just pull it out at dinner and have a side dish already made.   Keeping stress to a minimum is super important!

    Since I already had some quinoa already made, I decided to create these pizza muffins to help feed my craving for pizza.  

    Packed with protein and fiber, these little muffins are perfect for lunch, dinner, snacks and parties.  Kid and adult approved!

    HOW DO I MAKE QUINOA PIZZA MUFFINS?

    Start by, combining 2 cups of cooked quinoa, with 1 cup mozzarella cheese in a large bowl.  

    Next, chop ½ cup of pepperoni into smaller pieces and add to bowl.  Stir in 1 teaspoon Italian seasoning, 1 teaspoon dried oregano, 1 teaspoon minced garlic, and a dash of salt & pepper.  Chop ½ cup of fresh basil and add to bowl.  

    Lastly, mix in 2 eggs and 2 tablespoon of gluten free flour.  Make sure to combine all the ingredients well.  Scoop the pizza mixture into 12 prepared muffin tins, packing them down.  Bake for approximately 20-25 minutes at 350 degrees.  

    When the muffins are done baking, remove from oven and let cool.  Serve with a side of your favorite marinara sauce for dipping.

    Packed with protein and fiber, these little muffins are perfect for lunch, dinner, snacks and parties.  Kid and adult approved!

    The last thing you will be thinking when eating these Quinoa Pizza Muffins is how guilty you feel.  There is no reason! They are light, fluffy and a great alternative to the usual bites in the frozen food section.   I love being able to eat foods that I am craving and not feel bad about it!

    STILL CRAVING MORE PIZZA RECIPES? CHECK OUT MORE BELOW:

    • Mini Breakfast Pizza
    • Gluten Free Bbq Garden Pizza
    • Vegetable Curry Pizza with Basmati Rice Crust
    • Pesto Pizza with Chickpea Crust
    Packed with protein and fiber, these little muffins are perfect for lunch, dinner, snacks and parties.  Kid and adult approved!

    Quinoa Pizza Muffins

    Ingredients

    • 2 cups cooked quinoa
    • 1 cup mozzarella cheese
    • ½ cup preferred type of pepperoni (turkey, vegan, etc)
    • 1 teaspoon Italian seasoning
    • 1 teaspoon dried oregano
    • 1 teaspoon minced garlic
    • ½ cup fresh basil
    • 2 tablespoon gluten free flour
    • 2 eggs
    • dash of salt/pepper

    Instructions

      1. In a large bowl combine 2 cups cooked quinoa, with 1 cup mozzarella cheese.
      2. Chop ½ cup of pepperoni into smaller pieces and add to bowl.
      3. Stir in 1 teaspoon Italian seasoning, 1 teaspoon dried oregano, 1 teaspoon minced garlic, and a dash of salt & pepper.
      4. Chop ½ cup of fresh basil and add to bowl.
      5. Mix in 2 eggs and 2 tablespoon of gluten free flour.
      6. Combine all the ingredients well.
      7. Scoop mixture into 12 prepared muffin tins. Make sure to pack the mixture into each tin.
      8. Bake for approximately 20-25 minutes at 350 degrees.

      Reader Interactions

      This site uses Akismet to reduce spam. Learn how your comment data is processed.

      Read More

    1. Easy Whole Wheat Pie Crust

      Easy Whole Wheat Pie Crust

      recipe image

      “So quick to make, and the brown sugar adds a little extra sweetness to the crust. Good workout for your arms too!
      FYI: One reviewer said to use “soft wheat” instead of “hard wheat”…I have only ever used the flour that is labeled “whole wheat flour” or “white whole wheat flour,” no mention of hard or soft, so I’m not sure what that’s about. It seems none of my other reviewers have had that problem.”

      Ready In:
      10mins

      Ingredients:
      5

      • 2 12

        cups whole wheat flour
      • 2

        tablespoons light brown sugar
      • 1

        cup vegan shortening
      • 12

        cup cold water
      • 18

        teaspoon sea salt

      directions

      • Place flour, sugar, salt, sugar, and shortening in large tupperware or other plastic container with lid. (If all else fails, use a really strong large slide lock plastic bag). Seal tightly.
      • Shake 3 minutes. Open & make sure mixture is uniform.
      • Add water.
      • Shake 3 more minutes & open to see if mixture is large dough ball of uniform consistency.
      • Roll out on floured surface. Can be frozen for later use.

      Questions & Replies


      Got a question?


      Share it with the community!

      Want a Second Helping?

      Sign up for our newsletter to get recipes, easy dinner ideas, tasty treats and more delivered straight to your inbox.

      To withdraw your consent or to learn more about your rights, see the Privacy Policy.

      1. Really enjoyed the taste! Only made half the recipe for pumpkin pie. I’ll only do whole wheat from now on! Thank you!

      2. I’m sorry but you need to state to use SOFT wheat. AND this was way to wet. It was sticky and wouldn’t hold together. Might be my fault as I don’t have soft wheat, only hard. If I get soft wheat, I will try again. Sorry

      3. Really easy and it made a lot. I think I will add a little more sugar and some vanilla next time:)

      4. This was fantastic! I made it using white whole wheat flour 1/3 cup shortening and 3/4 cup light butter and it came out fantastically. For handling, I did roll out the dough in plastic wrap and refrigerate for 30 minutes to make it easier to work with. This was a great crust for Recipe #24521. Thanks!

      5. This was a very good recipe for pie crust and held together very well in addition to being easy to make. Not quite as light, buttery and flaky as a white flour crust, but it made up for that in its healthiness. Thanks for sharing. ~Sue

      see 1 more reviews


      Read More

    2. Vegan + Gluten Free Sweet Potato Tacos + Spicy Cream Sauce

      Vegan + Gluten Free Sweet Potato Tacos + Spicy Cream Sauce

      recipe image

      by

      Gluten Free Vegan Tacos with Sweet Potatoes and Spicy Tofu Cream Sauce

      I live in San Francisco, so someone is always going on a cleanse. I hear of people drinking nothing but lemonade for ten to 40 days. Juice cleanses are super popular and admittedly delicious. I even watched a video of a woman who did three back to back 40-day water fasts. Well, she called it a cleanse, I call it starvation. Poor thing looked like she was about to die at the end.

      Everyone has their own reasons for doing a cleanse. Some people site health, fitness goals, or the hope of relieving a particular ailment.  My story is a little different. A couple of months ago, I was browsing through some photos on my computer, and a picture came up from when I was on tour with my band. I noticed that my skin looked fabulous. Now, mind you, I’d been in an RV with four boys and two pit bulls for a number of days. I’d been staying up late and doing my share of drinking. The only difference was that I’d been eating incredibly healthy foods and had cut out meat entirely. I thought to myself, “It’s time for another little bout of veggie time.” The very next day, Groupon had a great deal on a vegan cleanse with a nutritionist at the helm, and I bit.

      Now, some people may be content to eat plain lentils and quinoa with steamed kale, but not this tart. I can cleanse and still enjoy it. If I’m cutting out meat, eggs, dairy, gluten, alcohol, caffeine, refined sugar (uh, yes lard and butter and anything from Marin Sun Farms are included in that group) my food is going to be amazing. So far, even my red-blooded husband has been truly satisfied. (Well, we won’t talk about the gluten-free vegan mac-n-cheese I tried to concoct when he was craving comfort food)

      This is one of the first meals I made when I started the cleanse. These tacos are hearty- even a meat lover won’t leave the table feeling hungry or wanting.   The recipe is easily doubled for a crowd, and it’s just plain easy to make. The real key to success is patience while you’re cooking the sweet potatoes and carrots- this is how you’ll get that sweet caramelized flavor and satisfying crispy exterior. Be patient, and you’re golden. Literally!

      Just as a note: I recommend always using organic non GMO (genetically modified organisms) soy products and corn. Organic veggies are a plus too.

      Gluten Free Vegan Tacos with Sweet Potatoes and Spicy Tofu Cream Sauce

      • INGREDIENTS FOR VEGGIE TACOS
      • 4 Corn Tortillas
      • 1 large sweet potato peeled and cut into 1/4 inch cubes
      • 2 carrots peeled and cut into 1/4 inch cubes
      • 1 can of black beans (drained and rinsed)
      • 1 yellow onion peeled and cut into ½ inch pieces
      • 2 cloves of garlic chopped very finely
      • 2 tablespoons grapeseed oil + small amount for coating tortillas
      • 4 tablespoons coarsely chopped cilantro
      • 1 tbsp vegan butter
      • 1 teaspoon smoked paprika
      • 1teaspoon ground cumin
      • salt and pepper to taste
      • small bowl filled with water
      • INGREDIENTS FOR SPICY TOFU CREAM SAUCE
      • 1 serrano Chile
      • 1 cup silken tofu
      • 1 tablespoon smoked paprika
      • 1 teaspoon cumin seed
      • 3 tablespoons unsweetened rice milk (soy will work here too)
      • salt and pepper to taste
      • small amount of oil to coat Serrano chile
      • INSTRUCTIONS
      • Before chopping your veggies, rub serrano chile with grapeseed oil and place on a piece of tinfoil under the broiler. When the skin bubbles and gets black, turn the chile one quarter turn, until all sides are roasted.
      • Remove from the oven, place in a paper lunch bag and allow to steam for about 10 minutes so it will be easier to peel.
      • In the mean time, heat a large skillet on medium high flame. You’ll know the pan is hot enough when you can drop a droplet of water into the pan and it skitters like a little ball moving across the pan before evaporating. If the droplet pools before evaporating, the pan is not hot enough.
      • Once your pan is hot, add the two tablespoons of grapeseed oil and tilt your pan from side to make sure the oil is evenly covering the whole pan.
      • Add the carrots, sweet potato, onions, and garlic to the hot skillet- do not disturb for about 3-5 minutes. Now, gently, lift a couple of pieces of the veggies to see if they come up easily and have a nice golden brown color. If so, they are ready to turn. If not, let them cook on that side a minute longer before checking again- this time in a couple of different spots in the pan.
      • Once golden, turn all of the veggies over gently, and repeat the process until cooked through- resisting the urge to turn them too often BUT… keeping a watchful eye so they don’t burn. You’ll do this on all sides (process takes about 15-20 minutes)
      • Preheat oven to 350º
      • In another small pot set to medium flame, melt vegan butter. Once melted, add black beans and smoked paprika and ground cumin. Mash about 2/3 of the beans with a potato masher, a fork, or a wooden spoon. Give them a try then add salt and pepper to taste. Once beans are heated through, turn the flame to very low and cover.
      • Quickly dunk corn tortillas in the bowl of water then rub with a little grapeseed oil. Put each one directly onto the oven rack and cook for 30 seconds to one minute or until tortilla is soft and heated through. The timing will depend on the thickness of your tortilla.
      • Build tacos with tortillas on bottom, top with some beans, then some veggies, then some tofu cream sauce, and sprinkle with cilantro
      • INSTRUCTIONS FOR THE SPICY TOFU CREAM SAUCE
      • Peel and seed the roasted serrano chile (if you like a lot of heat, you can leave some of the seeds in, if you like less heat, add only a little of the chile, You can always add more if you like.)
      • Add silken tofu, serrano chile, smoked paprika, cumin seed, and unsweetened rice milk to the bowl of a food processor or to a blender and process until smooth and delightfully creamy.
      • Season to your taste with salt and pepper.

      Makes 4 tacos

      Read More

    3. Vegan Strawberry Oatmeal Breakfast Smoothie

      Vegan Strawberry Oatmeal Breakfast Smoothie

      recipe image

      This recipe is for a fast and filling vegan strawberry oatmeal breakfast smoothie with a deep pink color and a rich, creamy texture.

      Submitted by
      Sara

      Updated on April 15, 2025


      Cook Mode
      (Keep screen awake)

      Ingredients


      Original recipe (1X) yields 2 servings

      • 1 cup almond milk

      • 14 frozen strawberries

      • 1 banana, broken into chunks

      • ½ cup rolled oats

      • 1 ½ teaspoons agave nectar (Optional)

      • ½ teaspoon vanilla extract (Optional)

      Directions

      1. Combine almond milk, strawberries, banana, oats, agave nectar, and vanilla extract in a blender; blend until smooth.

      Cook’s Notes:

      Rice milk can be used in place of almond milk.

      Two packets of stevia sweetener can replace agave syrup, if preferred.

      Nutrition Facts (per serving)

      205 Calories
      3g Fat
      42g Carbs
      4g Protein
      Nutrition Facts
      Servings Per Recipe
      2
      Calories
      205
      % Daily Value *
      Total Fat
      3g
      4%
      Saturated Fat
      0g
      2%
      Sodium
      83mg
      4%
      Total Carbohydrate
      42g
      15%
      Dietary Fiber
      6g
      21%
      Total Sugars
      18g
      Protein
      4g
      8%
      Vitamin C
      36mg
      40%
      Calcium
      132mg
      10%
      Iron
      2mg
      10%
      Potassium
      492mg
      10%

      * Percent Daily Values are based on a 2,000 calorie diet. Your daily values may be higher or lower depending on your calorie needs.

      ** Nutrient information is not available for all ingredients. Amount is based on available nutrient data.

      (-) Information is not currently available for this nutrient. If you are following a medically restrictive diet, please consult your doctor or registered dietitian before preparing this recipe for personal consumption.

      Read More