Author: PatagoniaLlami

  • Vegan Stuffed Mushrooms

    Vegan Stuffed Mushrooms

    recipe image

    Be the first to rate & review!

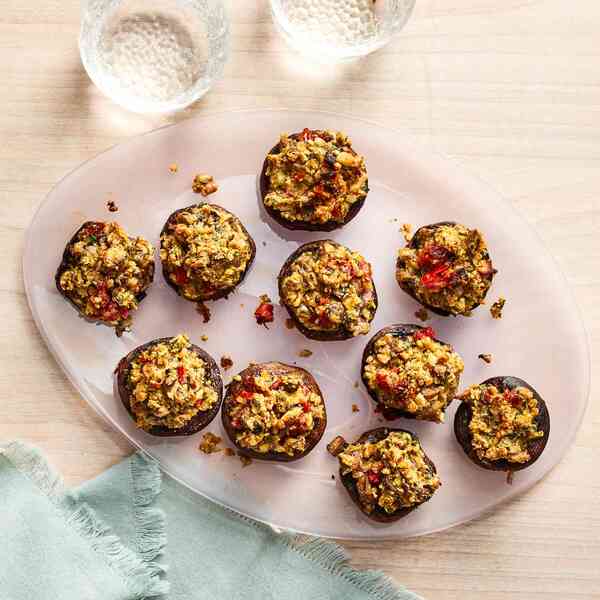
    These vegan stuffed mushrooms are flavor-packed. Vegan cream cheese holds together the filling, which features hints of tomato and fresh sage. Walnuts add texture and a light, nutty flavor.

    Updated on September 20, 2023

    Photo:

    Photographer: Victor Protasio, Food Stylist: Ruth Blackburn, Prop Stylist: Christina Dailey


    Cook Mode
    (Keep screen awake)

    Ingredients

    • 16 large fresh button mushrooms or cremini mushrooms (about 16 ounces)

    • 2 tablespoons extra-virgin olive oil, divided

    • ¼ cup chopped drained oil-packed sun-dried tomatoes

    • 1 medium shallot, finely chopped

    • 2 large cloves garlic, finely chopped

    • 3 sage leaves, finely chopped

    • ¼ teaspoon salt

    • 4 ounces vegan cream cheese

    • ¼ cup chopped walnuts

    • ¼ cup chopped fresh parsley

    • ¼ cup nutritional yeast

    • 3 tablespoons whole-wheat panko breadcrumbs

    Directions

    1. Preheat oven to 350°F. Clean mushrooms with a clean kitchen towel. Remove stems and roughly chop; transfer to a medium bowl. Add 1 tablespoon oil: toss to combine. Set aside. Using a spoon, scrape and discard gills from the mushroom caps. Arrange the caps, stem-side up, in a 9-by-13-inch baking dish.

      Photographer: Victor Protasio, Food Stylist: Ruth Blackburn, Prop Stylist: Christina Dailey


    2. Heat the remaining 1 tablespoon oil in a large skillet over medium-high heat. Add the chopped mushroom stems; cook, stirring occasionally, until tender, about 2 minutes. Add sun-dried tomatoes, shallot, garlic, sage and salt; cook, stirring, until fragrant, about 1 minute. Remove from heat; stir in cream cheese, walnuts, parsley, yeast and panko, stirring until well incorporated.

      Photographer: Victor Protasio, Food Stylist: Ruth Blackburn, Prop Stylist: Christina Dailey


    3. Stuff each mushroom cap with about 1 heaping tablespoon of cream cheese mixture, mounding slightly (you should use all the filling); bake until the tops are browned and the mushrooms are tender, about 25 minutes.

      Photographer: Victor Protasio, Food Stylist: Ruth Blackburn, Prop Stylist: Christina Dailey


    Originally appeared: EatingWell.com, July 2022

    Nutrition Facts (per serving)

    145 Calories
    11g Fat
    8g Carbs
    5g Protein
    Nutrition Facts
    Servings Per Recipe
    8
    Serving Size
    2 stuffed mushrooms
    Calories
    145
    % Daily Value *
    Total Carbohydrate
    8g
    3%
    Dietary Fiber
    2g
    7%
    Total Sugars
    2g
    Protein
    5g
    10%
    Total Fat
    11g
    14%
    Saturated Fat
    3g
    15%
    Vitamin A
    206IU
    4%
    Vitamin C
    7mg
    8%
    Vitamin D
    2IU
    1%
    Vitamin E
    1mg
    4%
    Folate
    23mcg
    6%
    Vitamin K
    31mcg
    26%
    Sodium
    147mg
    6%
    Calcium
    40mg
    3%
    Iron
    1mg
    6%
    Magnesium
    16mg
    4%
    Potassium
    428mg
    9%
    Zinc
    1mg
    9%
    Vitamin B12
    6mcg
    250%

    Nutrition information is calculated by a registered dietitian using an ingredient database but should be considered an estimate.

    * Daily Values (DVs) are the recommended amounts of nutrients to consume each day. Percent Daily Value (%DV) found on nutrition labels tells you how much a serving of a particular food or recipe contributes to each of those total recommended amounts. Per the Food and Drug Administration (FDA), the daily value is based on a standard 2,000 calorie diet. Depending on your calorie needs or if you have a health condition, you may need more or less of particular nutrients. (For example, it’s recommended that people following a heart-healthy diet eat less sodium on a daily basis compared to those following a standard diet.)

    (-) Information is not currently available for this nutrient. If you are following a special diet for medical reasons, be sure to consult with your primary care provider or a registered dietitian to better understand your personal nutrition needs.

    Read More

  • Vegan Stroganoff

    Vegan Stroganoff

    recipe image

    vegan stroganoff

    vegan stroganoff

    by Marc Matsumoto on
    Feb 28, 2017

    Stroganoff that is as satisfying as it looks. Creamy, savory and flavorful, even carnivores will be going back for seconds! (Recipe Credit: Marc Matsumoto of Fresh Tastes.)

    Servings
    Makes 4 servings

    Ingredients

    • 1 cup vegetable stock
    • 1.4 ounces raw cashew nuts (about ¼ cup)
    • 1 tablespoon nutritional yeast
    • 1 teaspoon porcini mushroom powder
    • 2 teaspoons lemon juice
    • 1 tablespoon coconut oil
    • 7 ounces cremini mushrooms (about 12 mushrooms)
    • 4.6 ounces onions (about ½ medium onion, diced)
    • 0.25 ounces garlic (about 1 large clove)
    • ¼ teaspoon salt
    • 5.3 ounces vegan meat
    • ¼ cup dry white wine

    Instructions

    1. 1

      Put the vegetable stock, raw cashews, nutritional yeast, porcini powder, and lemon in a high-speed blender, and blend until smooth.

    2. 2

      Add the coconut oil to a frying pan and saute the mushrooms over medium-high heat until well browned (about 7 minutes).

    3. 3

      Add the onions, garlic and salt and saute until the onions are browned and tender (an additional 7 minutes).

    4. 4

      Add the vegan meat and and white wine and cook until there is no liquid left.

    5. 5

      Add the cashew nut mixture and cook until the sauce thickens.

    6. 6

      Adjust salt and pepper to taste. Serve over your favorite vegan pasta.

    Leave a Comment

    Read More

  • Vegan Chocolate-Covered Digestive Biscuits Recipe

    Vegan Chocolate-Covered Digestive Biscuits Recipe

    recipe image

    The crunchy texture and grainy flavor of these vegan McVities copycats are perfectly offset by a thick layer of your favorite vegan chocolate.

    Updated November 16, 2023

    Serious Eats / Vicky Wasik


    Why It Works

    • A mix of whole wheat and all-purpose flour creates the perfect blend of flavor, crunch, and tenderness.
    • Using coconut oil instead of a liquid oil makes the dough easier to handle.
    • Toasted sugar helps deepen the biscuit’s flavor in place of lactose.
    • Baking powder helps the biscuits rise without the excess browning and alkaline flavor of baking soda alone.

    For the uninitiated, McVities are a type of digestive biscuit, a pseudo-healthy cookie/cracker hybrid made with a portion of whole grains, which makes them a close cousin to the American graham cracker. As I noted in my recipe for McVitie’s-style chocolate covered digestive biscuits, though they’re sold plain, the arguably more delicious type comes coated in chocolate. While I’ve long thought the milk chocolate variety tastes like Kit Kats in cookie form, dark chocolate McVities will always be my OTP.

    In this vegan variation, which uses coconut oil instead of butter, a boost of flavor comes from toasted sugar, which helps evoke some of the toasted notes that lactose (a milk sugar) can develop through browning. For my non-vegan variation, I knew I could go straight to the source, via fresh or powdered milk.

    Since few home cooks have access to malic acid, which reacts with baking soda to produce the carbon dioxide that leavens the original biscuits, my vegan recipe uses cream of tartar instead, with a splash of water to moisten the eggless dough. (This is what real McVities use as well, but it isn’t listed on the box because it bakes out in the end.) For the non-vegan recipe, buttermilk provides both acidity and lactose in one fell swoop.

    These vegan biscuits won’t brown very much at all, while the buttery ones will take on a golden hue. Thanks to the already brownish color of the dough, that subtle change may be difficult to gauge through an oven window, so be sure to open the door to get a better look. It may also help to rotate the pan about halfway through to ensure the biscuits bake evenly.

    March 2017

    Vegan Chocolate-Covered Digestive Biscuits Recipe


    Cook Mode
    (Keep screen awake)

    • 4 1/2 ounces all-purpose flour (about 1 cup, spooned; 125g)

    • 2 ounces whole wheat flour (about 1/3 cup; 55g), plus more for dusting

    • 2 1/4 ounces quick-toasted sugar (about 1/3 cup; 60g)

    • 1/2 teaspoon cream of tartar

    • 1/4 teaspoon baking powder

    • 1/4 teaspoon baking soda

    • 1/8 teaspoon (0.5g) Diamond Crystal kosher salt; for table salt, use about half as much by volume or use the same weight

    • 4 ounces refined coconut oil (about 2/3 cup; 113g), solid and cool

    • 3/4 ounce water (about 5 1/4 teaspoons; 20g)

    • 9 ounces roughly chopped vegan chocolate (about 1 1/2 cups; 285g) (see note)

    1. Make the Dough: Adjust oven rack to lower-middle position and preheat to 350°F (175°C). Combine all-purpose flour, whole wheat flour, toasted sugar, cream of tartar, baking powder, baking soda, salt, and solid coconut oil in the bowl of a food processor. Process until oil virtually disappears into a fine, floury meal. Add water and pulse to form a damp and crumbly dough. Turn onto an unfloured surface and knead into a ball.

    2. Roll and Bake the Biscuits: On a generously floured surface, roll dough until just shy of 1/4 inch (4.7mm), using as much flour as needed along the way to prevent sticking. Dust away excess flour with a pastry brush and decorate with a docking tool if you like. Cut into 2 3/4–inch rounds and transfer to a parchment-lined half sheet pan. Gather up scraps, knead, roll, and cut as before.

      Serious Eats / Vicky Wasik


    3. Bake until firm and dry to the touch but quite pale, about 22 minutes. Cool directly on sheet pan and continue with next step, or store in an airtight container up to 3 days at room temperature.

    4. Temper the Chocolate: Temper chocolate according to one of the methods described here.

    5. Coat the Biscuits: Working with just 2 or 3 biscuits at a time, dollop a generous 1/2 tablespoon, or just over 1/4 ounce, chocolate over each. Spread into an even layer over biscuit and, as chocolate starts to thicken, bounce the tines of a fork across the surface to create a wavy pattern. Repeat with remaining biscuits and chocolate. (Before it hardens, store excess chocolate according to the directions here.) Serve biscuits immediately, preferably with hot tea, and transfer to an airtight container for up to 3 weeks at room temperature.

    Special Equipment

    Food processor fitted with a metal blade, half sheet pan, rolling pin, pastry brush, docking tool (optional), 2 3/4–inch round cutter or wine glass

    Notes

    If you want dark chocolate, Theo 70% is a solid vegan offering. Or, try the coconut milk chocolate from Charm School Chocolate for something mellower.

    Read More

    • Vegan Chocolate Chip Cookies
    • Vegan Oatmeal Chocolate Chip Cookies
    Nutrition Facts (per serving)
    166 Calories
    9g Fat
    20g Carbs
    3g Protein

    ×

    Nutrition Facts
    Servings: 16
    Amount per serving
    Calories 166
    % Daily Value*
    9g 11%
    Saturated Fat 5g 27%
    0mg 0%
    43mg 2%
    20g 7%
    Dietary Fiber 2g 8%
    Total Sugars 8g
    3g
    Vitamin C 0mg 0%
    Calcium 18mg 1%
    Iron 2mg 13%
    Potassium 150mg 3%
    *The % Daily Value (DV) tells you how much a nutrient in a food serving contributes to a daily diet. 2,000 calories a day is used for general nutrition advice.

    (Nutrition information is calculated using an ingredient database and should be considered an estimate.)

    Read More

  • Classic Vegan Date Bars

    Classic Vegan Date Bars

    recipe image

    Classic Vegan Date Bars

    Photo by The Italian In Me
    • Prep time
      45 minutes
    • Cook time
      30 minutes
    • Makes
      24 Bars
    Author Notes

    My Italian, grandma Manocchio (God Rest Her Soul), being the amazing cook and baker that she was for 93 years, use to make delicious date bars for my mom when she was a child (and my aunt, my grandpa…and anyone she could seat at her table!). They were just one of the many sweet baked treats in her repertoire she whipped up regularly for family and friends to enjoy! And, enjoy they did, but usually without my grandma seated at the table with them as she almost never ate any of her baked goods. She just wasn’t one for sweets as she would remind us in her Italian accent. Her joy was in serving them to those she loved and deriving pleasure from watching them be devoured.

    This vegan version of my grandma Manocchio’s date bars is classic in nature, like hers were, and every bit as indulgent but with a slightly healthy twist. Even so, I think they would make her quite proud, and my loved ones enjoy them with as much enthusiasm as those who enjoyed her date bars (Seriously, just ask my mom who is an expert extraordinaire on my grandma’s original date bars!) Unlike my grandma Manocchio, however, I find myself seated at the table, devouring these delicious bars right along side my loved ones. Enjoy! —The Italian In Me

    Ingredients

    • 1 pound

      Medjool dates, pitted and chopped


    • 1 cup

      distilled or filtered water


    • 3/4 to 1 cups

      organic cane sugar (less or more depending on sweetness desired)


    • 1 tablespoon

      fresh squeezed lemon juice


    • 3 cups

      organic rolled oats (not quick cooking)


    • 2 1/2 cups

      organic whole wheat pastry flour


    • 1 3/4 cups

      organic brown sugar, dark or light (your preference)


    • 1 teaspoon

      organic ground cinnamon


    • 3/4 teaspoon

      baking soda


    • 1 3/4 cups

      vegan butter alternative (such as Earth Balance), melted

    Directions
    1. Preheat the oven to 350.
    2. Butter a 9 x 13 baking pan (I use a straight sided one) and set aside.
    3. Add the chopped dates and water to a sauce pan over medium heat and bring to a simmer.
    4. Once simmering, turn heat down to low and cook for 5 minutes (until dates are softened).
    5. Stir the cane sugar and lemon juice in with the dates and bring the mixture back to a simmer. Cook for one minute (sugar should be completely dissolved).
    6. Set date mixture aside and allow to cool.
    7. In a large mixing bowl, gently combine the remaining dry ingredients.
    8. Drizzle the melted vegan butter in to the dry ingredients and gently stir to evenly combine.
    9. Place half of the crumb mixture in the bottom of the pan and gently press down on it until it is evenly spread out to the edges of the pan.
    10. Place the cooled date mixture on top and gently spread it out evenly.
    11. Add the remaining half of the crumb mixture to the top of the date mixture and spread it out evenly, to the edges of the pan, while gently pressing down on it.
    12. Bake for 30 – 35 minutes. The top should be just slightly golden brown and the edges a bit caramelized.
    13. Cool on a wire rack to room temperature before cutting in to 24 bars for finger desserts or 12 bars for individual desserts served with vanilla, vegan “ice cream”.

    Read More

  • Gluten Free & Vegan Chocolate Chip Biscotti

    Gluten Free & Vegan Chocolate Chip Biscotti

    recipe image

    Gluten Free & Vegan Chocolate Chip Biscotti

    Photo by AnnieCate
    • Makes
      32-48
    Author Notes

    Gluten Free & Vegan Chocolate Chip Biscotti —AnnieCate

    Ingredients

    • 3

      flax eggs


    • 1/3 cup

      melted coconut oil


    • 1 1/2 tablespoons

      vanilla


    • 1 teaspoon

      cinnamon


    • 1 teaspoon

      kosher salt


    • 2/3 cup

      brown sugar


    • 3 tablespoons

      white sugar


    • 3 tablespoons

      maple syrup


    • 2 cups

      sifted gluten free flour


    • 1 cup

      rolled oats


    • 1 teaspoon

      baking powder


    • 1 1/4 cups

      mini vegan chocolate chips, divided

    Directions
    1. Preheat the oven to 350
    2. Combine the flax eggs, the coconut oil, the vanilla, the cinnamon, the kosher salt, the dark sugar, the white and the maple syrup. Stir till an even consistency is reached.
    3. Stir in the oats, followed by the flour and the baking powder.
    4. Add 1 cup of the mini chocolate chips and blend till evenly distributed

    5. Line two 8×4 loaf pans with parchment paper. Divide the dough in two parts and pat gently and evenly into the loaf pans. Sprinkle the remaining chocolate chips over top of the dough.
    6. Bake for 20 minutes at 350. Allow to cool completely (if you’re busy, you can even walk away and just do the next part the following day).

    7. Once cooled, gently slice the loafs into 1/4-1/2 inch slices. Lay the slices out on a baking sheet.
    8. Bake the slices for 15 minutes at 350, until toasty golden.
    9. Dunk your heart out.

    Read More

  • Vegan Chocolate Cheesecake

    Vegan Chocolate Cheesecake

    recipe image

    Combining bittersweet chocolate and cocoa powder intensifies the chocolaty essence of this cheesecake to the nth degree. Silken tofu brings a delicate creaminess to the filling while also taking the place of eggs by acting as a binding agent.

    Recipe information

    • Total Time

      10 hr (includes chilling)

    Ingredients

    For graham cracker crust:

    1 1/4 cups chocolate or regular graham cracker crumbs (from nine 5-by 2 1/2-inch graham crackers)

    3 tablespoons sugar

    4 tablespoons Earth Balance vegan buttery spread, melted and cooled, plus additional for greasing pan

    For chocolate tofu filling:

    2 1/4 cups sugar, divided

    1/3 cup water

    8 ounces bittersweet chocolate (no more than 60% cacao), chopped

    2 (1-pound packages silken tofu, drained

    1/4 cup unsweetened cocoa powder (not Dutch-process)

    2 (8-ounces) containers soy cream cheese at room temperature

    1 teaspoon pure vanilla extract

    Rounded 1/4 teaspoon salt

    Equipment: a 9-inch springform pan

    Preparation

    1. Make graham cracker crust:

      Step 1

      Preheat oven to 350°F with racks in middle and lower third and put a baking sheet on lower rack. Flip bottom of springform pan so lip is facing down, then lock in place. Grease bottom and side of pan.

      Step 2

      Stir together all crust ingredients, then press onto bottom and 1 inch up side of pan. Bake until set, 10 to 12 minutes, then cool completely, about 45 minutes.

    2. Make chocolate tofu filling:

      Step 3

      Heat 1 cup sugar in a 1 1/2-to 2-quart heavy saucepan over medium heat, stirring with a fork to heat sugar evenly, until it starts to melt, then stop stirring and cook, swirling pan occasionally so sugar melts evenly, until it is dark amber. Remove from heat and carefully stir in water (mixture will bubble up and steam and caramel will harden), then cook over medium-low heat, stirring, until caramel has dissolved. Remove from heat and whisk in chopped chocolate until smooth. Cool fudge sauce slightly.

      Step 4

      Purée tofu and cocoa in a food processor until smooth.

      Step 5

      Beat soy cream cheese and remaining 1 1/4 cups sugar with an electric mixer at medium-high speed until fluffy. At low speed, beat in tofu purée, vanilla, salt, and fudge sauce until incorporated.

      Step 6

      Pour filling into crust and bake on middle rack until top of cake is shiny but center is still slightly wobbly when pan is gently shaken, about 1 hour. Turn oven off and leave cake in oven 1 hour more.

      Step 7

      Run a knife around top edge of cake to loosen, then cool completely in pan on rack (cake will continue to set as it cools). Chill cake, loosely covered, at least 6 hours. Remove side of pan and transfer cake to a plate. Bring to room temperature before serving if desired.

    Cooks’s note:

    Cheesecake can be made 3 days ahead and chilled.

    Read More

  • Soft Vegan Ginger Cookies

    Soft Vegan Ginger Cookies

    recipe image

    I couldn’t stop eating Nutella by the spoonful so… in my haste, I threw my giant Nutella jar in the trash can, put on a major cleavage shirt and went to empty the trash.  That’s just real life.  Sometimes you have to throw out your chocolate and haul out the cleavage.

    After that!… I found my new favorite cookie.  It’s gingery without being a spice cookie.  It’s soft and chewy and wholesome… and vegan!

    These ginger cookies are also full of whole wheat flour, apple sauce, ground flaxseeds and lemon juice.

    I love love love them.

    They come from the cookbook Organic and Chic.  Lovely recipe and lovely book.

    Oh!  I made milk too… from cashews and oats.  I love it.  I’ll show you how to make that in two days.  Promise.

    Soft Vegan Double Ginger Cookies

    Makes about 2 dozen cookies

    Recipe from Organic and Chic (I really love this cookbook)

    Print this Recipe!

    1 1/2 cups all-purpose flour

    1 1/2 whole wheat flour

    1 teaspoon baking powder

    1/2 teaspoon baking soda

    1/2 teaspoon salt

    1 teaspoon ground ginger

    1 cup minced candied ginger

    1 cup vegan granulated sugar (if you’re hardcore… or just go for regular granulated sugar)

    2 tablespoons ground flaxseed

    1/2 cup unsweetened applesauce

    1/4 cup canola oil

    1 teaspoon lemon zest

    1 tablespoon fresh lemon juice

    1/4 cup vegan granulated sugar, for rolling the cookies balls

    In a large bowl, whisk together flours, baking powder, baking soda, salt, ground ginger, and minced candied ginger.  Set aside.

    In a medium bowl, whisk together sugar, ground flaxseed, applesauce, oil, and lemon zest and juice.

    Add the wet ingredients, all at once, to the dry ingredients and carefully mix together with a wooden spoon.  Make sure all the flour bits are moistened and well incorporated.  Form dough into a disk shape and wrap well in plastic wrap.  Refrigerate for an hour, or overnight.

    Place a rack in the center and upper third of the oven and preheat 350 degrees F.  Line two baking sheets with parchment paper.

    Remove the dough from the fridge and use your hands to roll dough into walnut sized balls.  Rolls balls in granulated sugar and place of baking sheet.  Use the palm of your hand to slightly flatten the dough ball.  Bake for 15 to 18 minutes, until just slightly browned but still slightly soft in the center.  Remove from the oven and allow to cool on the baking sheet for 5 minutes before removing.

    Store cookies in an airtight container at room temperature for up to 4 days.

    Read More

  • step 1

    Tip the onions, carrots, celery and olive oil into a large saucepan. Cook over a medium heat for 8-10 mins until softened, add the garlic and fry for another minute. Pour in the wine to deglaze the pan (scraping up any bits stuck on the bottom), and simmer for 2 mins until most of the wine has evaporated.

  • step 2

    Add the thyme, tomato purée, soy sauce, caster sugar and vinegar to the pan and stir to combine. Tip in the lentils, tomatoes and 100ml water and simmer for 10-12 mins until reduced and thick enough to coat the back of a spoon.

  • step 3

    Meanwhile, make the mash topping. Bring a large pan of water to the boil, add the sweet potatoes and simmer for 10-15 mins until cooked all the way through. Drain, then add the dairy-free margarine, mustard powder and milk, and mash until smooth along with plenty of salt and pepper.

  • step 4

    Heat the oven to 200C/180C fan/gas 6. Season the filling and pour it into a 25cm x 20cm x 7cm casserole dish. Top with the mash, starting with spoonfuls on the outside corners and working your way inwards so the filling doesn’t spill out. Sprinkle the pumpkin seeds on top and bake for 30-35 mins until golden and bubbling. Once baked and left to cool, the pie will keep frozen for up to three months. Defrost thoroughly overnight, then reheat in the oven until piping hot.

Read More

  • Vegan Coffee Cake with Cinnamon Streusel

    Vegan Coffee Cake with Cinnamon Streusel

    recipe image

    Be the first to rate & review!

    This vegan coffee cake with cinnamon streusel is subtly sweet, with a nutty streusel spiked with just enough spice and walnuts. Whip up this dairy- and egg-free cake for your next brunch to satisfy vegans and non-vegans alike!

    Updated on April 19, 2024

    Photo: Photographer / Antonis Achilleos, Prop Stylist / Christine Kelly, Food Stylist / Karen Rankin


    Cook Mode
    (Keep screen awake)

    Ingredients

    • 1 cup chopped walnuts

    • 1 teaspoon ground cinnamon

    • 2 ¼ cups whole-wheat pastry flour, divided

    • 1 ¼ cups packed light brown sugar, divided

    • 3 tablespoons vegan butter (such as Miyoko’s Cultured Vegan Butter), plus 1/2 cup, melted and divided

    • teaspoon salt plus 1/2 teaspoon, divided

    • 1 teaspoon baking powder

    • 1 teaspoon baking soda

    • 1 cup unsweetened plain almond milk

    • 1 tablespoon cider vinegar

    • 1 teaspoon vanilla extract

    Directions

    1. Preheat oven to 350°F. Coat a 9-inch-square baking pan with baking spray. Stir walnuts, cinnamon, 1/4 cup flour, 1/2 cup brown sugar, 3 tablespoons melted vegan butter and 1/8 teaspoon salt together in a small bowl. Set aside in the refrigerator.

    2. Whisk the remaining 2 cups flour and 3/4 cup brown sugar, baking powder, baking soda and the remaining 1/2 teaspoon salt in a medium bowl.

    3. Whisk almond milk, vinegar, vanilla and the remaining 1/2 cup melted vegan butter together in a small bowl. Pour the milk mixture into the flour mixture and whisk until just combined. Pour the batter into the prepared pan.

    4. Sprinkle the batter with the walnut mixture and bake until a wooden pick inserted in the center comes out clean, 30 to 35 minutes, covering with foil during the last 5 to 10 minutes to prevent overbrowning, if desired. Remove to a wire rack and let stand for 15 minutes before serving.

    To make ahead:

    Store cake in an airtight container at room temperature for up to 2 days.

    Originally appeared: EatingWell.com, February 2022

    Nutrition Facts (per serving)

    293 Calories
    16g Fat
    36g Carbs
    3g Protein
    Nutrition Facts
    Servings Per Recipe
    12
    Serving Size
    1 slice
    Calories
    293
    % Daily Value *
    Total Carbohydrate
    36g
    13%
    Dietary Fiber
    3g
    11%
    Total Sugars
    23g
    Protein
    3g
    6%
    Total Fat
    16g
    21%
    Saturated Fat
    9g
    45%
    Vitamin A
    44IU
    1%
    Vitamin D
    8IU
    2%
    Vitamin E
    1mg
    4%
    Folate
    10mcg
    3%
    Sodium
    347mg
    15%
    Calcium
    77mg
    6%
    Iron
    1mg
    6%
    Magnesium
    16mg
    4%
    Potassium
    48mg
    1%
    Omega 3
    1g

    Nutrition information is calculated by a registered dietitian using an ingredient database but should be considered an estimate.

    * Daily Values (DVs) are the recommended amounts of nutrients to consume each day. Percent Daily Value (%DV) found on nutrition labels tells you how much a serving of a particular food or recipe contributes to each of those total recommended amounts. Per the Food and Drug Administration (FDA), the daily value is based on a standard 2,000 calorie diet. Depending on your calorie needs or if you have a health condition, you may need more or less of particular nutrients. (For example, it’s recommended that people following a heart-healthy diet eat less sodium on a daily basis compared to those following a standard diet.)

    (-) Information is not currently available for this nutrient. If you are following a special diet for medical reasons, be sure to consult with your primary care provider or a registered dietitian to better understand your personal nutrition needs.

    Read More

  • Vegan Magic Cookie Bars

    Vegan Magic Cookie Bars

    recipe image

    Alexandra Bornozis|

    Vegan Magic Cookie Bars

    Magic cookie bars have always been a Christmas-cookie tradition in my household. After becoming vegan, I thought I would never be able to have these again. That is when I decided to make a vegan version to bring to the Christmas table! These cookies taste exactly as I remember, and family and friends devoured the bars before I had the chance to have one myself.

    Vegan Magic Cookie Bars

    • ½ cup earth balance (unsalted), or other vegan butter
    • 1½ cup graham cracker crumbs
    • 2 7-ounce cans of sweetened condensed coconut milk*
    • 2 cup dark chocolate chips
    • 1 1/3 cup unsweetened coconut shreds
    • 1 cup walnuts or pecans, chopped
    1. Preheat the oven to 350°F.
    2. Coat a 13×9-inch baking pan with a non-stick cooking spray. To be safe, place parchment paper at the bottom of the pan to make sure the bars do not stick.
    3. Combine graham cracker crumbs and vegan butter together in a bowl.
    4. Press the graham cracker mixture in the prepared the pan. Make sure the entire pan is evenly coated with the graham cracker mixture.
    5. Pour sweetened condensed coconut milk evenly over the graham cracker crumb mixture.
    6. Layer evenly with chocolate chips, coconut shreds, and nuts. Press down firmly with a fork, so everything holds together.
    7. Bake 30 minutes or until lightly browned, cool the bars completely before removing from the pan. Once cooled, cut into bars.
    8. Serve immediately, or place in an airtight container. These can be frozen.

    Read More