cup plus 2 tablespoons organic or granulated sugar
½
teaspoon kosher salt
1
vanilla bean, split lengthwise
¾
cup refined coconut oil, melted, cooled slightly
Special Equipment
An ice cream maker
Preparation
Step 1
Place tofu, sugar, and salt in a blender. Scrape in seeds from vanilla bean; reserve pod for another use. Purée until smooth, about 15 seconds. With the motor running on medium speed, slowly stream in oil and purée until thick and creamy, being careful not to overblend or mixture will curdle.
Step 2
Immediately process tofu mixture in ice cream maker according to manufacturer’s directions. (Head’s up: this will take longer than a traditional dairy-based custard to reach soft-serve consistency.) Do not chill before processing or oil will harden into tiny bits and texture will be grainy.
Step 3
Transfer to an airtight container and press plastic wrap directly onto surface. Freeze until firm, at least 4 hours.
Step 4
Do Ahead: Ice cream can be made 1 month ahead; keep frozen.
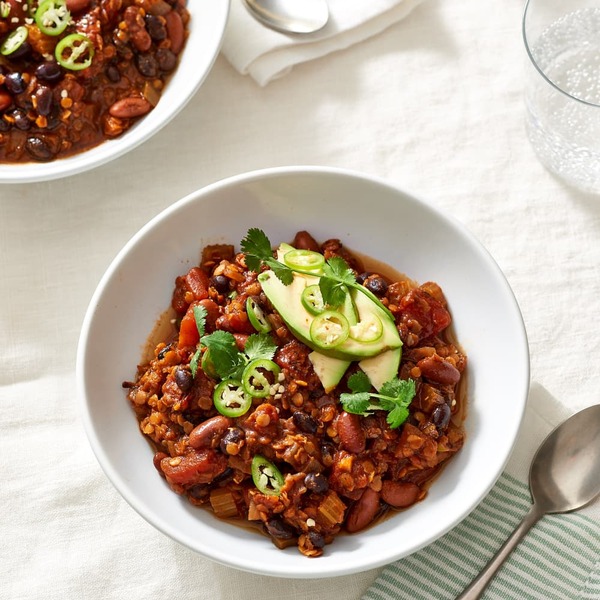
So good you’ll be licking the plate. You won’t miss the meat!
Nick Evans
If you grew up in the 90’s, you probably remember Adam Sandler’s ode to lunch ladies around the world. I’ve been unable to eat or make sloppy joes ever since without singing that refrain, and my kids actually think I’m pretty funny for once!
Traditional sloppy joes aren’t hard to make, but it turns out it’s even easier to make a good vegetarian sloppy joe than it is to make one with beef! And it’s all thanks to one secret ingredient…
The Secret to Vegan Sloppy Joes
Green lentils!
Besides being super healthy, green lentils (also known as French lentils, or Puy lentils) are a great substitute for beef in sloppy joes. They cook up beautifully and have just the right texture and structure to be piled high on a bun. They also won’t turn mushy like the red lentils used for dal.
If you don’t have green lentils, you can use brown lentils as well.
A Few Tips for Making Lentil Sloppy Joes
Here are a few tips for successful plant-based sloppy joes:
Don’t cook the lentils in the skillet with the sauce. If you do, they’ll soak up too much liquid. Cook the lentils separately, and then stir them into the simmering base sauce.
Dice everything small. Be sure to dice the onions, peppers, and carrots fairly small so they almost dissolve in the sauce. Then cook those for a few minutes in olive oil before adding the standard yet delicious spices for the “sloppy” sauce—ketchup, tomato sauce, vinegar, and sugar. How can you go wrong with those flavors?
Add water until the consistency is right. After you stir the cooked lentils into the mix, add some water to combine the flavors. If at any point the mixture seems too dry, add more water to thin it out.
Nick Evans
How To Serve Lentil Sloppy Joes
I’m not going to lie—I could just eat a bowl of the lentil sloppy joe filling like it was soup. It’s that good! But that aside, serving these in traditional sloppy joe fashion is the way to go. Toast some buns, and add sliced red onion to the bottom bun, so it doesn’t get too soggy. Then pile on the sloppy joe mixture, pickles, and top bun. Bring napkins!
How To Store Leftovers
Sloppy joe leftovers can be stored in the fridge for a few days. Reheat in a skillet over low heat. Add a splash of water as they reheat to make the mix nice and saucy again.
You can also freeze leftovers for up to three months.
The Dad Add: Sloppy Sweet Potato
Instead of adding something to this sandwich, I decided to think about lunch. The next day I microwaved a sweet potato, split it open, and spooned in some of the sloppy joe mixture for a delicious Dad lunch.
Nick Evans
The Kid Report Card
I was skeptical that my kids would eat vegan sloppy joes (it has lentils in it, a definite “weird” food for them), but sometimes the ignorance of youth is your friend at the dinner table. My kids haven’t had much exposure to sloppy joes, so they had no expectations as to what is in them normally. Beef? Veggies? It all seems like a slightly sweet and tangy mix in a sauce.
Once I got them to try a tiny bite, they were all in on it.
The one issue, which I should’ve predicted, wasn’t with the ingredients so much as the sloppiness of the sloppy joes. Neither of my kids are big on messy meals. They want their food to be very separated. This was kind of tough, but I ended up spooning some sloppy joe filling beside the buns and that did the trick: bite of bun, bite of filling, same deal.
Lentil slop, sloppy joes for the win!
More Plant-Based Dinner Recipes
Vegan Minestrone
Smoky Lentil Stew
Stuffed Squash with Brown Rice and Mushrooms
Mushroom Barley Soup
Creamy Polenta with White Beans and Roasted Broccoli
Cook Mode (Keep screen awake)
1cup green lentils
1/4teaspoon kosher salt
2tablespoonsolive oil
1mediumyellow onion, diced small
1peppergreen pepper, diced small
2smallcarrots, diced small
3clovesgarlic, minced
1tablespoon mild chili powder
2teaspoonspaprika
1/2cupketchup
1 (8-ounce) can (1 cup)tomato sauce
2tablespoonsapple cider vinegar
2tablespoonsbrown sugar
1/2cupwater
Kosher salt and freshly ground black pepper, to taste
8buns, for serving
Sliced red onion, for serving
Pickles, for serving
Cook the lentils:
Rinse the lentils well and add them to a pot along with 4 cups of water and 1/4 teaspoon of salt. Bring to a simmer, cover, and continue simmering over low heat until lentils are tender but not mushy, about 20 to 25 minutes. Drain lentils and set aside.
Nick Evans
Make the sloppy joe filling:
Heat olive oil in a large skillet over medium heat. Add onion, green pepper, carrots, and garlic. Sprinkle with a pinch of salt and pepper. Cook until vegetables soften, 5-6 minutes. Stir in spices, ketchup, tomato sauce, vinegar, brown sugar, 1/2 cup of water, and the reserved lentils. Stir well.
Nick Evans
Simmer the sloppy joe mixture:
Simmer the mixture for a few minutes to combine flavors. Taste and adjust seasonings to your liking. It will probably need a pinch of salt and pepper. Add an extra tablespoon of brown sugar to make it sweeter or a dash of apple cider vinegar to make it a bit more tart.
Nick Evans
Make the sandwiches:
Toast your buns and add thinly sliced red onions to the bottom half of the bun. Top with 1/3 to 1/2 cup of the sloppy joe filling. Add pickles and eat immediately.
Nick Evans
LEFTOVERS: Leftover sloppy joe mixture will store well in the fridge for a few days or it can be frozen in an airtight container for up to 3 months. Reheat sloppy joe mixture gently over the stove with a splash of water. Spoon it atop a baked sweet potato for lunch the next day if desired!
Nick Evans
Nutrition Facts (per serving)
264
Calories
6g
Fat
46g
Carbs
9g
Protein
×
Nutrition Facts
Servings: 8
Amount per serving
Calories
264
% Daily Value*
6g
8%
Saturated Fat 1g
5%
0mg
0%
721mg
31%
46g
17%
Dietary Fiber 5g
19%
Total Sugars 13g
9g
Vitamin C 17mg
84%
Calcium 126mg
10%
Iron 4mg
20%
Potassium 446mg
9%
*The % Daily Value (DV) tells you how much a nutrient in a food serving contributes to a daily diet. 2,000 calories a day is used for general nutrition advice.
Nutrition information is calculated using an ingredient database and should be considered an estimate. In cases where multiple ingredient alternatives are given, the first listed is calculated for nutrition. Garnishes and optional ingredients are not included.
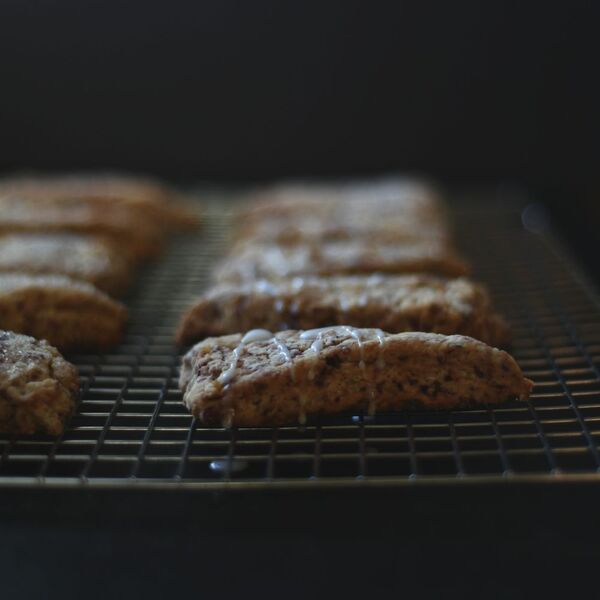
i’ve made these with organic and conventional cranberries. i’ve used 1 package of ocean spray which was 12oz, and i’ve used organic which came in a 6 oz package. it made no difference in the end result, though the batch with the lesser amount was less tart. basically, use as little as 6 oz, or as much as 12 oz. how’s that for not exact science baking? —Lan | MoreStomach
Ingredients
1
package fresh cranberries, 6 – 12oz
1/3 cup
brown sugar, not packed
2 1/4 cups
AP flour
3 teaspoons
baking powder
1/2 teaspoon
salt
zest
2 organic oranges
1/4 cup
chopped candied ginger
10 tablespoons
chilled coconut oil, cut into pieces
1/3 cup
nut based milk
Directions
preheat oven 350ºF and line baking sheet with parchment paper.
in food processor, pulse the cranberries with the brown sugar and orange zest. go for chunky. put in large mixing bowl, set aside.
in food processor, pulse the AP flower, baking powder and salt. add in the coconut oil and pulse until pea-sized crumbles appear.
mix the flour mixture with the cranberries in the mixing bowl. add the milk and stir until it just comes together.
dust counter with a bit of flour, dump dough onto it. form a disk/thick circle. cut into quarters, and within those quarters cut 3 wedges.
carefully transfer wedges on prepared baking sheet and bake for 40-45 minutes, rotating the baking sheet half way through.
the edges and bottom will darken a smidge, but the interior will be tender and crumbly.
serve warm, as is, or drizzled with icing (you can make a quick icing slurry of 2 tsp the milk used + enough powdered sugar to get a thickened but drizzly consistency, anywhere from 10-15 TBL)
Put the dried mushrooms in a heatproof bowl and pour over 500ml boiling water from the kettle. Stir and press them down so they’re well covered, then leave to soak.
step 2
Heat the olive oil in a wide frying pan over a medium heat, and fry the onion and chestnut mushrooms until the veg is very soft and the mushrooms look wilted and reduced, about 20 mins.
step 3
Stir in the garlic and sweet potatoes, then the rehydrated mushrooms and their soaking liquid, leaving the last dregs of the liquid in the bowl (this may contain grit from the mushrooms). Cover and cook for 15 mins until the sweet potatoes are just softened, and most of the liquid has evaporated. Add a splash more water halfway through if the liquid evaporates too quickly.
step 4
Remove the lid and stir in the chopped herbs, breadcrumbs, molasses, nuts and cranberries. Season well and sprinkle in the nutmeg. The mixture should be stiff enough to resemble stuffing, but not dry – all the breadcrumbs should be coated and have absorbed some of the liquid. Remove from the heat and leave to cool in the pan.
step 5
Once cool, unroll one of the puff pastry sheets onto a lightly floured non-stick baking sheet or baking tray lined with baking parchment. Whisk the milk and mustard together with a pinch of salt and set aside.
step 6
Spoon the cooled filling down the middle of the pastry sheet in a neat line, leaving a 5cm border around the edges. Use the mustard-milk mix to brush the borders, then top with the second pastry sheet. Press the pastry around the filling to remove any air pockets, then crimp to seal the sides. Trim off any excess pastry with a sharp knife and use a fork or your fingers to make a pattern around the edge of the wellington.
step 7
Cut a small steam hole in the top of the middle, then brush the top with the mustard-milk mix. Chill on the sheet or tray for 30 mins. Will keep in the fridge for up to two days.
step 8
Heat the oven to 200C/180C fan/gas 6. Remove the wellington from the fridge and brush with more of the mustard-milk mix. Score a pattern into the top of the pastry with a cutlery knife or fork, if you like, then bake for 35-40 mins until golden, puffed up and crisp – cover with foil if it’s browning too quickly. Arrange the whole sage leaves on top of the wellington and stick them down with the mustard-milk mix, then return to the oven for 10 mins more.
step 9
Leave to rest on a board or platter for 10 mins before cutting into chunky slices to serve.
Use leftover brown rice and roasted veggies for this easy vegan lunch idea to pack for work. To serve this wrap warm, simply pop in the microwave for about a minute to warm through.
Updated on April 19, 2024
Cook Mode (Keep screen awake)
Ingredients
16-inch whole-wheat tortilla
¼cupcooked brown rice (see associated recipes)
½cuproasted vegetables (see associated recipes)
¼avocado, diced
2tablespoonsCreamy Vegan Cashew Sauce (see associated recipes)
2tablespoonssliced scallions
2tablespoonschopped fresh cilantro
Directions
Place tortilla on work surface. Spoon rice onto the center of the tortilla. Top with veggies, avocado, sauce, scallions and cilantro. Roll up the wrap, cut in half and place in a sealable container. Refrigerate until ready to eat. To serve, microwave for 45 seconds to 1 minute to warm through, if desired.
To make ahead
Refrigerate in a sealable container for up to 1 day.
Associated Recipes
Easy Brown Rice
Colorful Roasted Sheet-Pan Veggies
Creamy Vegan Cashew Sauce
Originally appeared: EatingWell.com, December 2017
Nutrition Facts (per serving)
367
Calories
19g
Fat
45g
Carbs
8g
Protein
Nutrition Facts
Servings Per Recipe 1
Serving Size 1 wrap
Calories 367
% Daily Value *
Total Carbohydrate
45g
16%
Dietary Fiber
8g
29%
Total Sugars
6g
Protein
8g
16%
Total Fat
19g
24%
Saturated Fat
3g
17%
Vitamin A
4020IU
80%
Vitamin C
50mg
55%
Folate
78mcg
20%
Sodium
293mg
13%
Calcium
90mg
7%
Iron
3mg
14%
Magnesium
81mg
19%
Potassium
564mg
12%
Nutrition information is calculated by a registered dietitian using an ingredient database but should be considered an estimate.
* Daily Values (DVs) are the recommended amounts of nutrients to consume each day. Percent Daily Value (%DV) found on nutrition labels tells you how much a serving of a particular food or recipe contributes to each of those total recommended amounts. Per the Food and Drug Administration (FDA), the daily value is based on a standard 2,000 calorie diet. Depending on your calorie needs or if you have a health condition, you may need more or less of particular nutrients. (For example, it’s recommended that people following a heart-healthy diet eat less sodium on a daily basis compared to those following a standard diet.)
(-) Information is not currently available for this nutrient. If you are following a special diet for medical reasons, be sure to consult with your primary care provider or a registered dietitian to better understand your personal nutrition needs.
A delicious gluten-free and vegan soup based on some lovely seasonal greens.
By Amie Valpone
Print
Vegan Asparagus Avocado Soup
5 Stars 4 Stars 3 Stars 2 Stars 1 Star
No reviews
Total Time:10 minutes
Yield:41x
Description
Gluten-Free and Vegan
3 ripe avocado, peeled, pitted and chopped
2 cups plain dairy-free yogurt
1/3 cup cashews
1/3 cup fresh basil
1/3 cup vidalia onion, chopped
1 Tbsp. agave nectar
1 cup green tea, brewed and chilled
1 tsp. sea salt
1/4 tsp. freshly ground white pepper
2 chives, finely chopped
6 steamed asparagus, cut into 1/2 inch pieces and ends removed
Instructions
In a food processor, combine avocado, yogurt almonds, fresh basil, onion, agave nectar, green tea, sea salt and pepper; pulse until smooth.
Remove from blender; transfer to a bowl and cover. Place in the refrigerator for 2 hours.
Ladle soup into four bowls; serve chilled. Garnish with chives.
BUY HONEST COOKING’S NEW COOKBOOK TODAY
NØRTH – Scandinavianish Cooking by Kalle Bergman
★★★★★
About the Book
Step into the world of Scandinavianish with NØRTH. From Swedish comfort classics to Danish smørrebrød and new twists on Nordic flavors, this cookbook invites you to explore the rich taste of the North in your own kitchen.
All recipes are presented with both imperial and metric measurements. Available in premium paperback, and for instant download for tablets, phones and computers.
Digital Version
$9.99
Works on all devices and screens
Buy Now
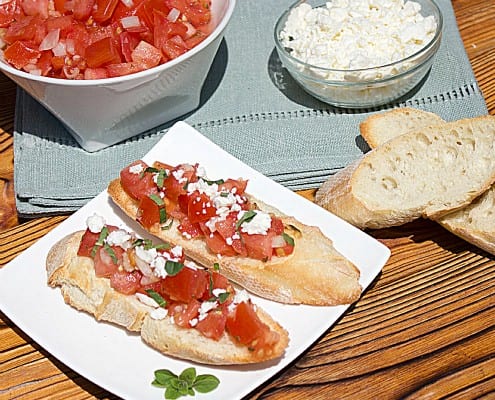
Previous Post
Tomato and Feta Bruschetta Bread
Next Post
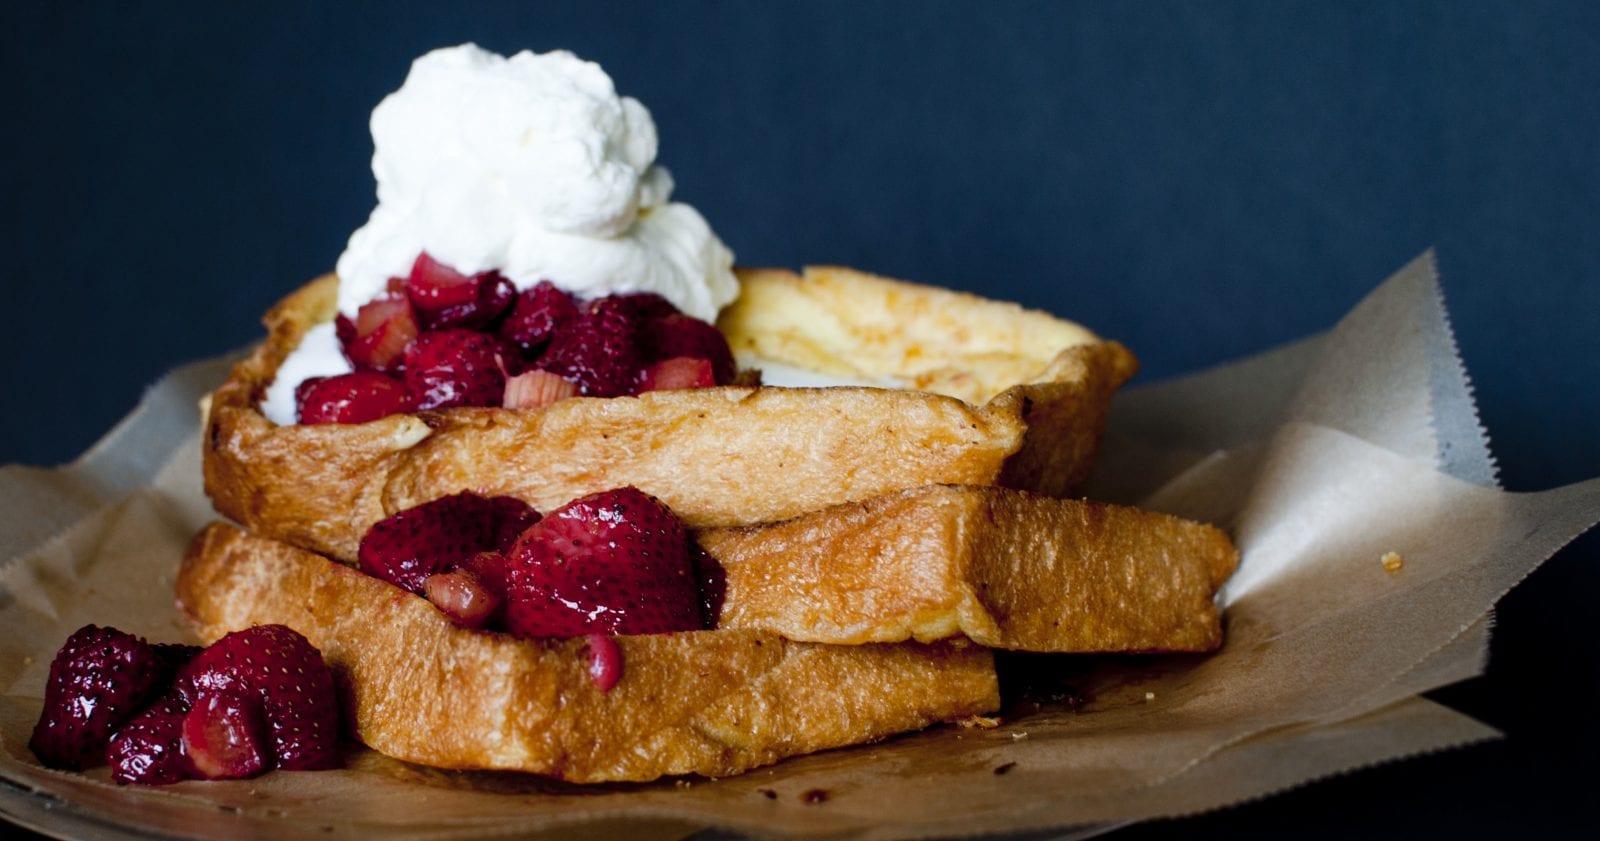
Roasted Strawberries and Rhubarb with Cardamom Whipped Cream
1/3 cup finely chopped vegan dark chocolate (most dark chocolate IS vegan, but always double check!!)
Frosting:
1 cup vegan butter substitute
1/2 cup vegan shortening
1/2 cup peanut butter, plus more as needed (to keep this vegan, avoid ones that have honey in them!)
4 cups confectioners’ sugar
1 tablespoon soy milk
2 teaspoons vanilla
Ganache:
1/3 cup soy milk
2/3 cup chopped vegan dark chocolate
Banana chips, for topping
Popping sugar, for topping
Special equipment:
a piping bag fitted with tip
For the cake batter: Preheat the oven to 350 degrees F; line a cupcake pan with 12 paper liners.
Mash the bananas in a bowl with a fork until a few small lumps are left. Fold in 1 teaspoon of the baking soda. Measure out 1/2 cup of this mixture and set aside.
Sift the flour, granulated sugar, baking powder, salt and remaining 1/4 teaspoon baking soda into a large bowl and mix well. In a smaller bowl, whisk together the soy milk, vegetable oil, vanilla and mashed bananas. Gently fold the wet ingredients into the dry; don’t over-mix or you’ll get tough cupcakes (small lumps are fine). Fold in the dark chocolate.
Divide the batter among the cupcake liners and bake until an inserted toothpick comes out clean, 18 to 20 minutes. Let the cupcakes cool completely before frosting.
For the frosting: Using an electric mixer with a whisk attachment, mix together the vegan butter and shortening until well combined, about 3 minutes. Scrape down the sides of the bowl, add the peanut butter and mix for another minute. With the mixer on low, slowly add the confectioners’ sugar. Add the soy milk and vanilla and mix on medium for 2 minutes. If the peanut butter flavor is too subtle, add 2 more tablespoons to the frosting and rewhip; you want to try to avoid a heavy, dense or gritty frosting, so adding a little at a time and then whipping it into the frosting will avoid that!
For the ganache: Using a double boiler (or in the microwave), heat up the soy milk until it reaches a boil. Pour over the dark chocolate and wait a minute before stirring.
To assemble: Put the frosting in a piping bag and apply to the top of each cupcake. Drizzle with the ganache. Dip the banana chips in the ganache, and then dip into the popping sugar. Top each cupcake with some of the banana chips.
This recipe was created by a contestant during a cooking competition. It has not been tested for home use.
For an even deeper, nutty flavor, toast the cashews first (or buy them that way, but make sure they’re unsalted). Skeptical? Think hazelnut coffee, but with cashews instead.
Ingredients
1
vanilla bean, split lengthwise
1
cup raw cashews
½
cup plus 2 tablespoons organic or granulated sugar
4
tablespoons instant espresso powder
½
teaspoon kosher salt
1
cup refined coconut oil, melted, cooled slightly
Special Equipment
An ice cream maker
Preparation
Step 1
Place vanilla bean and cashews in a large bowl and add 2 cups boiling water. Cover and let sit at room temperature at least 12 hours (hydrating the cashews thoroughly is key for a silky, smooth ice cream).
Step 2
Transfer cashews and their soaking liquid to a blender. Scrape in seeds from vanilla bean; discard pod. Add sugar, espresso powder, and salt. Purée until smooth, about 30 seconds. With the motor running on medium speed, slowly stream in oil and purée until thick and creamy.
Step 3
Immediately process cashew mixture in ice cream maker according to manufacturer’s directions. (Head’s up: this will take longer than a traditional dairy-based custard to reach soft-serve consistency.) Do not chill before processing or oil will harden into tiny bits and texture will be grainy.
Step 4
Transfer to an airtight container and press plastic wrap directly onto surface. Freeze until firm, at least 4 hours.
Step 5
Do Ahead: Cashews can be soaked 3 days ahead; cover and chill. Ice cream can be made 1 month ahead; keep frozen.
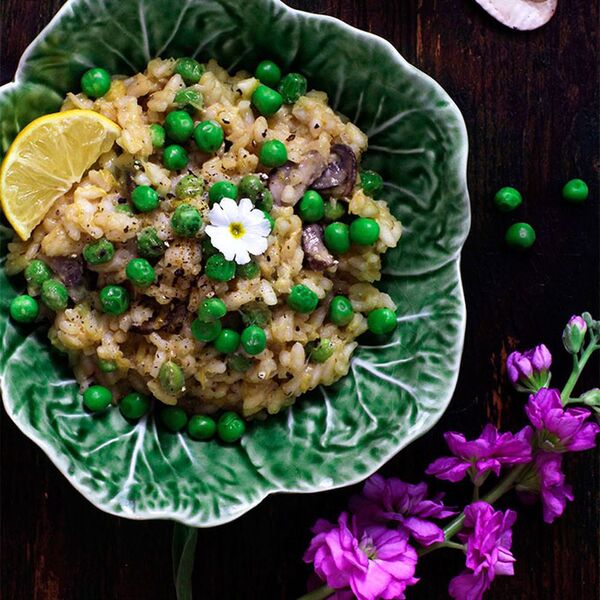
Warm, comforting, and decadent. A beautiful and elegant risotto made with leeks, mushrooms, white wine, and finished with cashew cheese. —Madeline
Ingredients
4 cups
vegetable stock
1 tablespoon
coconut oil
2
leeks-sliced and rinsed
4
cloves of garlic-minced
2 cups
cremini mushrooms-sliced
2 cups
arborio rice
1 cup
Dry vegan white wine
4 tablespoons
Nary Dairy Herbed Cream Qi’Z Cashew Cheese
1 cup
frozen peas-thawed
1
lemon
Directions
Bring the stock to a simmer in a small sauce pan. Set aside and keep warm over very low heat.
Heat the coconut oil over medium-high heat in a large saucepan. When hot, add the leek, garlic, 1 teaspoon salt, and lots of freshly cracked pepper. Cook until translucent–about 2-3 minutes. Add the mushrooms and cook until browned–another minute or so. Add the rice and toast, stirring constantly, until it smells nutty-about 2-3 minutes.
Add the wine, stirring continuously until the liquid is absorbed. Add one ladle of the warm stock, and stir the risotto until the rice has absorbed the liquid. Continue the process one ladle at a time until all of the stock has been absorbed, stirring often–a total of about 20 minutes.
Remove the saucepan from the heat, and stir in the Nary Dairy cheese until fully incorporated. Top with peas, add salt and pepper to taste, and serve immediately, adding a squeeze of lemon over each serving to finish the dish.


/137383a5-d6bd-4590-b2f5-cea6eb2d87d5--cranberry_scones_3.jpg)


/2bee6133-2665-4257-ac72-a39c08c35c49--Mushroom_and_Leek_Risotto_plantaful_1.jpeg)