
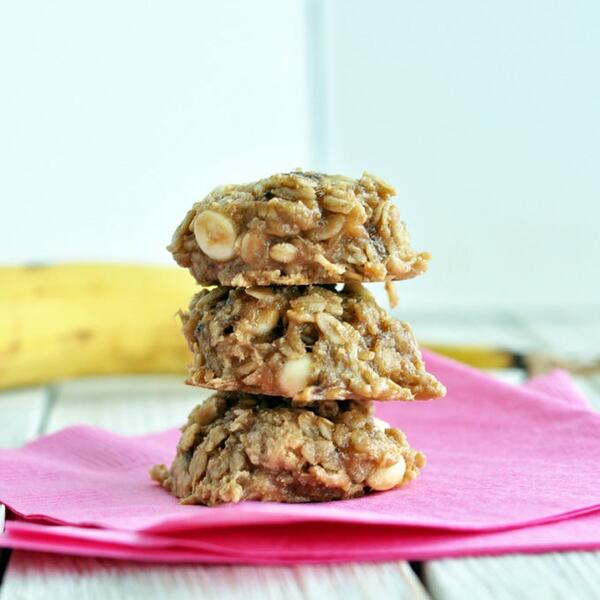
Ingredients:
- 2 cups gluten free rolled oats
- 1 cup cashew butter
- 2 T maple syrup
- 2 ripe bananas
- 1/3 cup vegan white chocolate chips
Ingredients:


This post contains affiliate links. Read my disclosure policy here.
This Vegan Miso Soup can be enjoyed all year long as a starter or a complete meal. It’s light, healthy, and packed with umami flavors. It requires 5 ingredients and will be on your table in 15 minutes!

If you’re looking for fast, simple and delicious, then you need to make this Vegan Miso Soup tonight! You might even have all the ingredients in your kitchen now. You’ll need Water, Nori, Tofu, Green Onions, and Miso Paste. That’s it!
It’s a traditional Japanese soup with a briny broth made from fish flakes and kombu (seaweed) as a base. Then miso paste is dissolved into the broth for a rich umami flavor. Typically, it contains cubed tofu and green onions too.
There are three common varieties to choose from – Red Miso, Yellow Miso, and White Miso. The red miso is fermented the longest and has a deep flavor, but personally, I think it’s a little overpowering and salty tasting.
Yellow miso is fermented for about a year and has a milder flavor. It’s slightly sweeter than the red miso and less salty.
The white miso is the lightest and sweetest of them all, and it’s fermented for just a few weeks. I usually stick with white or yellow for miso soup, but I used white for the soup in the photos.
Miso is great to have on hand and it can be used for a variety of recipes like Dressing, Marinades, Sauces, Broths, Casseroles, and more. You can bring out the ‘cheesy” flavor in Vegan Mac n Cheese, or amp up a Veggie Stir Fry Recipe in a flash. A little bit goes a long way.
The most commonly used seaweed is Kombu and Wakame, but I use Nori because I usually have it on hand. You can use any type of seaweed that you prefer.
If you don’t like the taste of seaweed, you can omit it altogether. For extra broth flavor, you can substitute ½ the water with low-sodium vegetable broth or add a dash of tamari.

(Full ingredient amounts in recipe card below)


Absolutely! You can use Chickpea Miso Instead of soy-based paste and replace the tofu with chickpeas, sautéed mushrooms, or fresh-chopped spinach.
For a starter or a light meal, you can enjoy the soup on its own, or serve it with rice and steamed edamame pods for a filling meal. It goes really well with vegan sushi too!

If you make this recipe, let me know what you think by ★ star rating it and leaving a comment below. It would really make my day. You can also follow me on Instagram and share your creation with me. Just tag me @veganhuggs and hashtag #veganhuggs so I don’t miss it.
This Vegan Miso Soup can be enjoyed all year long as a starter or a complete meal. It’s light, healthy and packed with umami flavors. It requires 5 ingredients and will be on your table in 15 minutes!
Prep Time10 minutes
Cook Time5 minutes
Total Time15 minutes
Course: Soup
Cuisine: Japanese, Vegan
Servings: 4 People
Calories: 85kcal
In a large pot, bring water to a boil over high heat. Now reduce heat to maintain a gentle simmer. Break up nori into 3-4 pieces and add to water. Simmer for 1-2 minutes until it breaks down.
Remove from heat and pour broth through a Mesh Strainer into another pot or large heat-safe bowl. Return strained broth to the pot and return to the stovetop over medium heat. Discard nori.
Add tofu and green onions. Bring to a gentle simmer for 1-2 minutes to warm tofu throughout. Remove from heat.
Place a mesh strainer over the pot and add the miso paste. Dissolve using a spoon or spatula (see note for alternative method). Serve and enjoy!
SOY-FREE OPTION: Instead of soy-based miso paste, you can use Chickpea Miso. You can replace the tofu with chickpeas, sautéd mushrooms, or fresh-chopped spinach.
SEAWEED: You can use any seaweed to make the broth. If you don’t like the taste of seaweed, you can omit that step altogether. Instead, you can substitute ½ the water with vegetable broth.
Alternative method to dissolve miso paste: add paste to a medium bowl with about ½-1 cup of prepared broth. Whisk well to combine and then add the soup.
If you want to amp up the umami flavor, you can add a few splashes of low-sodium tamari or vegan fish sauce.
Serving: 1(1.5 cups) | Calories: 85kcal | Carbohydrates: 11g | Protein: 2g | Fat: 1g | Sodium: 636mg | Potassium: 60mg | Fiber: 1g | Sugar: 1g | Vitamin A: 135IU | Vitamin C: 1.9mg | Calcium: 26mg | Iron: 0.6mg

· Natalie 28 Comments
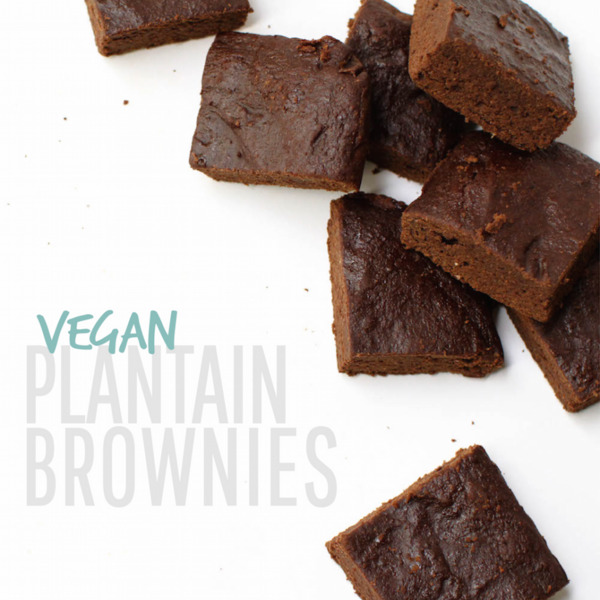
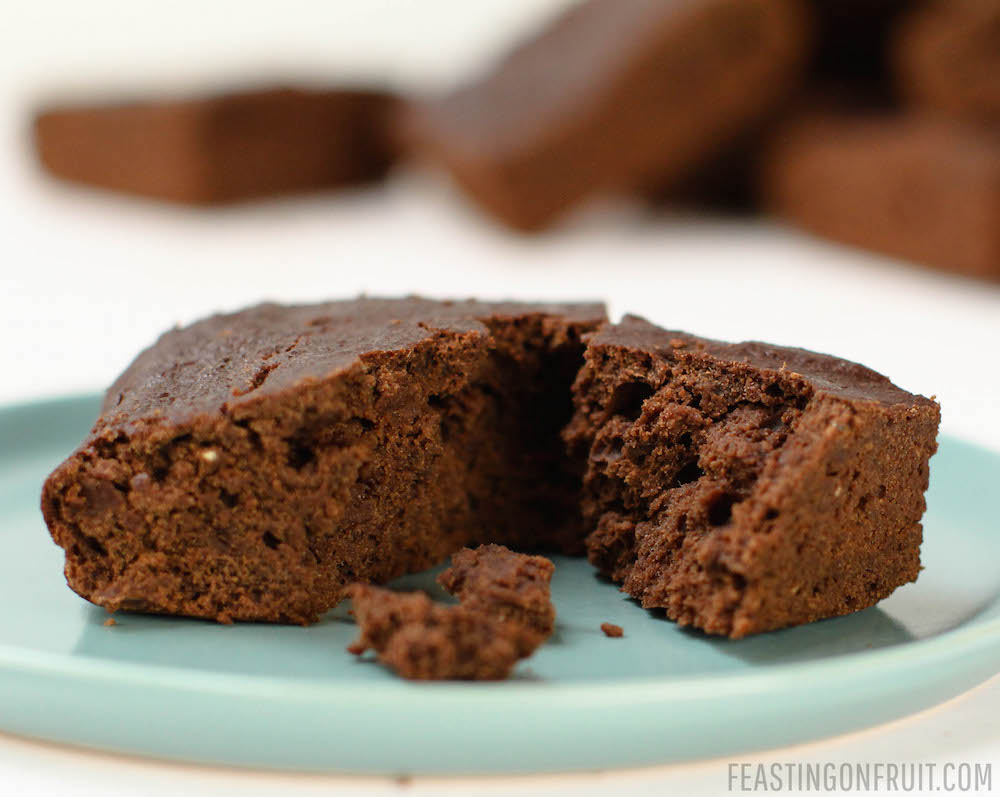
 I have posted many brownie recipes around here. In fact, I even had a Brownie Week last summer with 5 brownie recipes back-to-back. But those were all raw brownies. This is the first baked brownie recipe, and it is delectably different! Different because of the plantains. Delectable because of the chocolate.
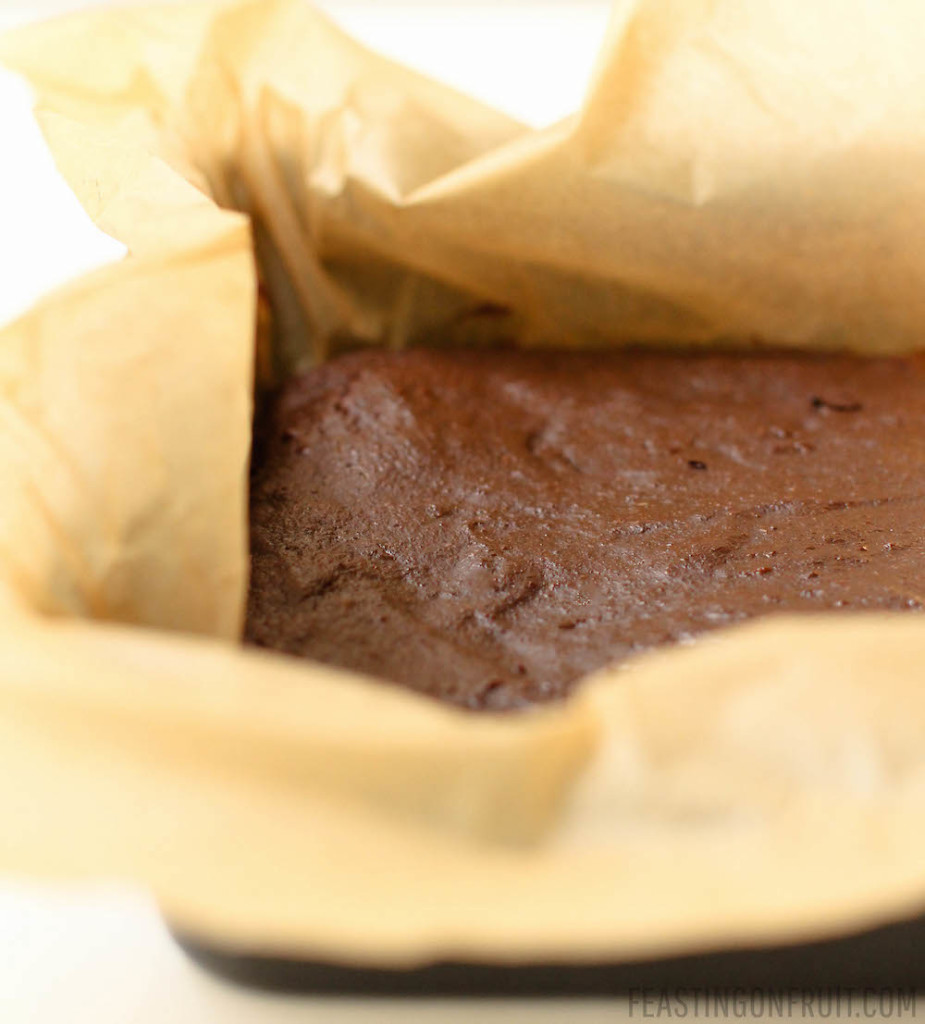
 Why plantains? They are unexpected in a brownie recipe. They are underutilized. They add moisture and binding power. They don’t affect the flavor very much. They are fiber-filled. They are cheap. Have I convinced you yet?

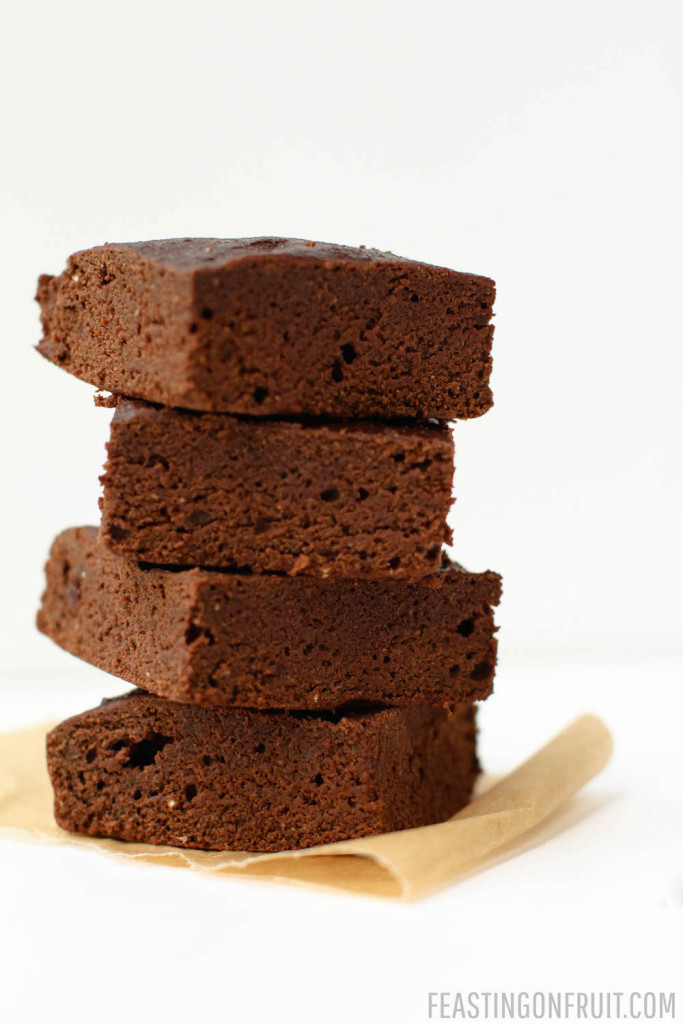
The plantains must be ripe. Very ripe. Squishy, mushy, almost-black ripe.
And because I know someone is bound to ask, yes you can substitute bananas for the plantains. You will need to use about 3 bananas to take the place of the 2 plantains. I also suggest reducing the amount of non-dairy milk to 1/4 cup. The brownies will taste a little banana-y though.
 These little chocolate squares are somewhere in between cakey and fudgey. Moist but not too dense or gooey. Rich but not too chocolatey (because that’s nearly impossible). With a a light texture and a fine crumb. Delicious to nibble warm from the oven. Or perfect under a scoop of frosty ice cream.


This site uses Akismet to reduce spam. Learn how your comment data is processed.
[…] 18. Vegan Plantain Brownies […]
[…] 4. Plantain Brownies […]


Kohlrabi And Potato Bake With Basil Sauce is a very healthy and delicious way of incorporating this beautiful vegetable into your diet. Since I moved to Ireland I hadn’t noticed it being sold in any of the big shops across Dublin, therefore, I was even more delighted to find them on sale in one of the Asian markets. So far I used to believe that this vegetable was only consumed in Germanic countries, consequently, I was surprised to learn that it’s also popular in North India and Bangladesh.
The word kohlrabi is German for “cabbage turnip” (kohl as in coleslaw, and rübe for turnip) though kohlrabi is not a root vegetable at all. It’s a brassica—like cabbage, broccoli, and cauliflower—and those cute bulbous shapes grow above ground, not below.
If you can’t find kohlrabi or just like a good bake as much as I do, you might want to check out this Vegan Shepherd Pie Recipe, too.
Kohlrabi tastes somewhat like a broccoli stem, although a bit more palatable and often softer, it can even take the consistency of an apple at times. While the roots/stems are often used in salads in a similar way as carrots or broccoli, the leaves are typically interchanged for kale or spinach. You can consume Kohlrabi raw, cooked or baked, whichever you fancy most, my favourite recipe is definitely this Kohlrabi And Potato Bake With Basil Sauce.
Some countries even use kohlrabi as food for their livestock, as it is packed with beneficial nutrients and grows relatively easily in certain climates.
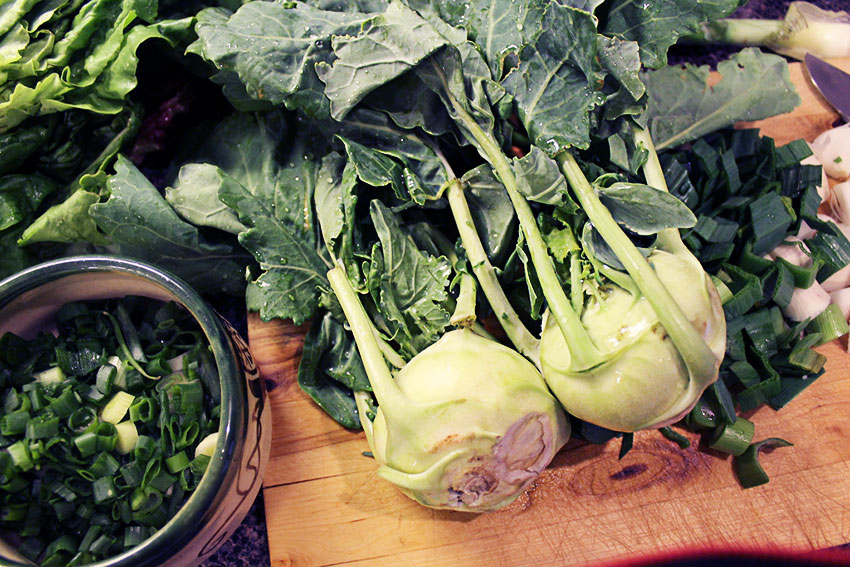
Photo: Flickr by ironypoisoning
Kohlrabi is full of nutrients and minerals like copper, potassium, manganese, iron and calcium, as well as vitamins, such as vitamin C, B-complex vitamins, vitamin A and vitamin K.
Along with that, kohlrabi is high in dietary fibre and antioxidant compounds which aid digestive health and weight loss.
It is low in calories and the fibre makes us feel full, so even if the volume of food consumed isn’t that great, we resist the urge to snack between meals or overeat.
What about you, have you ever had kohlrabi before and how do you like to prepare them? I’m looking forward to finding out in the comments. 🙂
Sign up to our Newsletter to get healthy recipes and my eBook “10 Easy Dessert Recipes ” for FREE.
Follow us on Facebook, Twitter, Instagram or Pinterest for more updates.
Enjoy 🙂
Kohlrabi And Potato Bake With Basil Sauce is a very healthy and delicious way of incorporating this beautiful vegetable into your diet.
Prep Time15 minutes
Cook Time35 minutes
Total Time50 minutes
Course: Main Course
Cuisine: German, Vegan, Vegetarian
Keyword: comfort food, gluten-free
Servings: 4
Calories: 542kcal
Finely chop the onions and blanch them with a bit of oil in a medium-sized saucepan for about 2 minutes.
Peel and chop the potatoes into bite-sized chunks and the kohlrabies into sticks.
Add water and vegetable stock cube to the saucepan and bring to boil.
Layer the potatoes and kohlrabi in 2-3 bamboo steam baskets on top. It is also possible to simply boil them instead, but steaming will preserve more nutrients.
Sprinkle a little salt over the potatoes and kohlrabi and steam them at high heat for about 20 min.
Meantime grease an oven prove dish and layer the steamed vegetable in it once finished.
Make sure to keep the vegetable stock you might need to add a little water to gain a total amount of liquid of approximately 1 2/3 cups.
Preheat the oven to 425 °F/220 °C.
Add the soy cream, butter or vegetable spread and flour to the vegetable stock and boil for 4 minutes.
Roughly chop the basil leaves, and add them to the sauce, mix carefully with an immersion blender.
Salt, pepper, nutmeg and lemon juice can be added to taste.
Pour the basil sauce over the steamed vegetable in your oven prove dish and cover with your choice of grated cheese.
Bake for 15 minutes.
Calories: 542kcal | Carbohydrates: 52g | Protein: 23g | Fat: 29g | Saturated Fat: 13g | Cholesterol: 59mg | Sodium: 596mg | Potassium: 1854mg | Fiber: 15g | Sugar: 10g | Vitamin A: 675IU | Vitamin C: 178.7mg | Calcium: 490mg | Iron: 8mg


These dairy-free biscuits have layers of flaky goodness with so much flavor. They go great with butter and jam, sorghum, or sausage gravy.
Submitted by
Erin Mataj
Updated on November 2, 2022
Cook Mode
(Keep screen awake)
Original recipe (1X) yields 12 servings
2 cups all-purpose flour
1 tablespoon baking powder
1 tablespoon sugar
1 teaspoon salt
3 tablespoons vegan butter (such as Earth Balance®)
3 tablespoons coconut oil
1 cup cold unsweetened almond milk, or as needed
Preheat the oven to 425 degrees F (220 degrees C). Line a baking pan with parchment paper or a nonstick silicone baking mat.
Whisk together flour, baking powder, sugar, and salt in a large bowl. Cut in vegan butter and coconut oil with a pastry blender or a fork until the mixture resembles coarse crumbs.
Slowly stir in cold almond milk, adding just enough for a wet and sticky dough to come together.
Turn dough out onto a lightly floured surface and knead (fold over) 15 times. Gently roll or pat dough to a thickness of 1 to 1 1/2 inches. Cut biscuits with a small biscuit cutter or a small bourbon glass. Gently re-roll dough scraps and cut remaining biscuits for a total of 12.
Place biscuits onto the prepared baking sheet so they are touching each other. Don’t be afraid to squish them together as this helps them to rise even higher.
Bake in the preheated oven until the tops are golden brown, 12 to 15 minutes.
If you’d like to use original (sweetened) almond milk, omit the sugar.
| 140 | Calories |
| 7g | Fat |
| 18g | Carbs |
| 2g | Protein |
| Nutrition Facts | |
|---|---|
|
Servings Per Recipe 12 |
|
|
Calories 140 |
|
| % Daily Value * | |
|
Total Fat 7g |
8% |
|
Saturated Fat 4g |
19% |
|
Sodium 357mg |
16% |
|
Total Carbohydrate 18g |
7% |
|
Dietary Fiber 1g |
3% |
|
Total Sugars 2g |
|
|
Protein 2g |
4% |
|
Calcium 89mg |
7% |
|
Iron 1mg |
6% |
|
Potassium 39mg |
1% |
* Percent Daily Values are based on a 2,000 calorie diet. Your daily values may be higher or lower depending on your calorie needs.
** Nutrient information is not available for all ingredients. Amount is based on available nutrient data.
(-) Information is not currently available for this nutrient. If you are following a medically restrictive diet, please consult your doctor or registered dietitian before preparing this recipe for personal consumption.


“Super simple and super good! Feel free to experiment with veggie combinations. Use about 4 cups total between veggies and/or vegan chicken.”

Got a question?
Share it with the community!
I’m a recipe junkie and collect way too many cookbooks. But when it’s time to actually make something, I quickly turn to the internet… I started avoiding meat more than 20 years ago for environmental reasons. (It takes so many resources and the pollution risks of confinement operations are huge.) I’ve been vegan for years now and can report that the health benefits are also real. I really don’t understand why people insist on eating meat
View Full Profile


This simple Vegan Strawberry Shortcake is made with cream biscuits, fresh strawberries, and coconut whipped cream for an easy springtime dessert.

Growing up strawberry shortcake was among my favorite desserts, just behind angel food cake (and friends, I am working on veganizing that recipe as we speak) and fruit pizza (yeah, and I’ll get on that too). The sweet and the creamy and the buttery biscuit flavors. So good! As an adult, however, I don’t often think about this delightful dessert.
And then the strawberries start peaking out of the ground.
In case you don’t know, Oregon makes some of the best strawberries. Every year in mid-June, I pack the kids up in the car and head to Sauvie Island where we spend several hours out in the fields strawberry picking. I should say, I spend several hours out in the fields strawberry picking. The kids spend several hours out in the fields eating strawberries. But strawberry-stained and all, it’s one of my favorite early summer traditions. Fresh strawberries everywhere!
And what is the first thing I do with my fresh batch of strawberries?
Make vegan Strawberry Shortcake, of course!
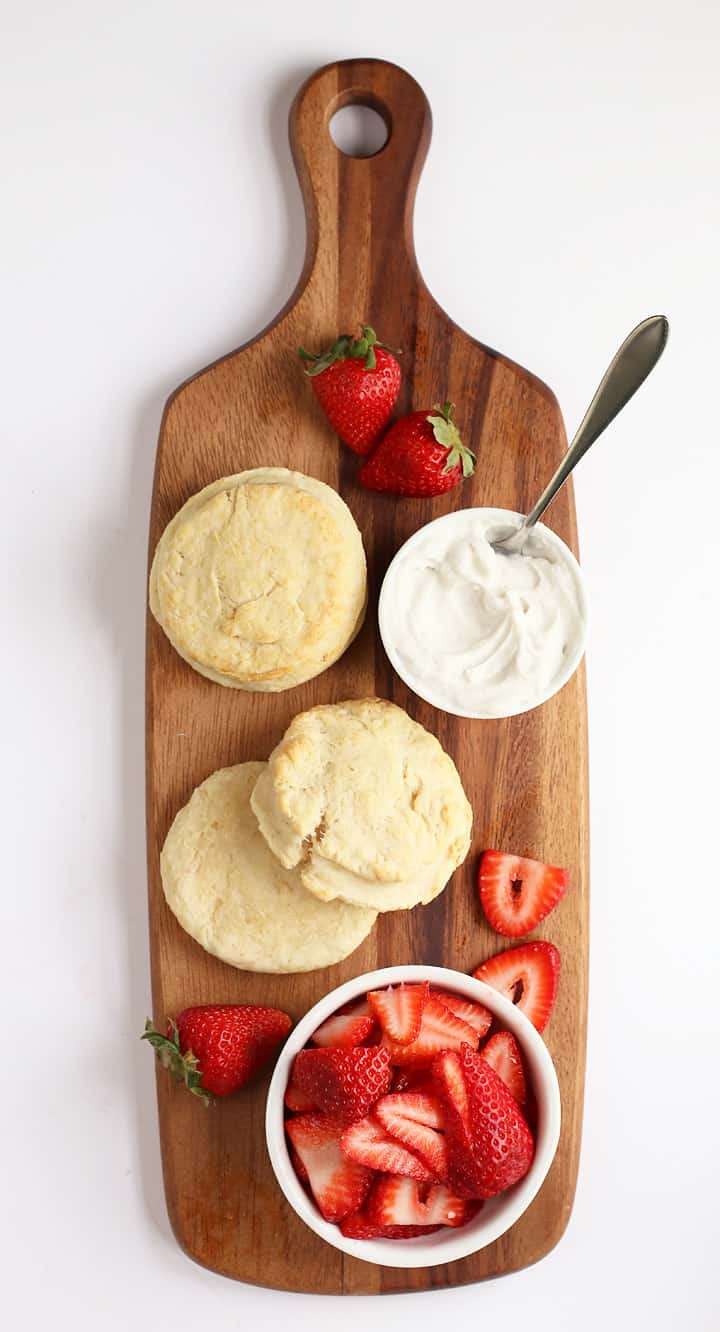
This vegan strawberry shortcake is made with a simple coconut cream biscuit then filled with fresh Oregon strawberries, and coconut whipped cream for a refreshing and delightful late spring/early summer dessert that satisfies the tastebuds and warms the spirit as it brings another reminder that spring has sprung.
Here is everything you need.
For this recipe, you will need a rolling pin, 4″ circle cutter, a baking sheet, mixing bowls, handheld mixer, and basic kitchen utensils.
You may also find a pastry cutter to be helpful for your biscuit. (<
Check out the full list of my recommended kitchen tools and gadgets.
Good news, friends. Strawberry Shortcakes are among the easiest desserts to make. It’s a matter of throwing together a buttery biscuit, macerating the strawberries, and whipping up a batch of coconut whipped cream.
Macerating strawberries is a method of letting the berries sit in a fine coating of granulated sugar. The process of adding sugar enhances their natural sweetness and flavor as well as creates a thin berry syrup that, when cooked, becomes thick and compote-like. This method is used in most fruit pies, crisps, and cobblers.

Disclosure: This post may contain affiliate links.
To macerate the berries, simply sprinkle ¼ cup of sugar over the top. Gently toss to coat and let the berries sit for at least 30 minutes (longer is fine) until the juices have been released into a light berry syrup. For this recipe, I also add cornstarch along with the sugar to help thicken the syrup when baking.
To make the biscuit, stir together flour, baking powder, sugar, and salt in a bowl. Fold in the coconut milk until the dough is evenly hydrated. Turn the dough out onto a floured surface, sprinkled a little more flour on top, then roll dough to about ½” thick.
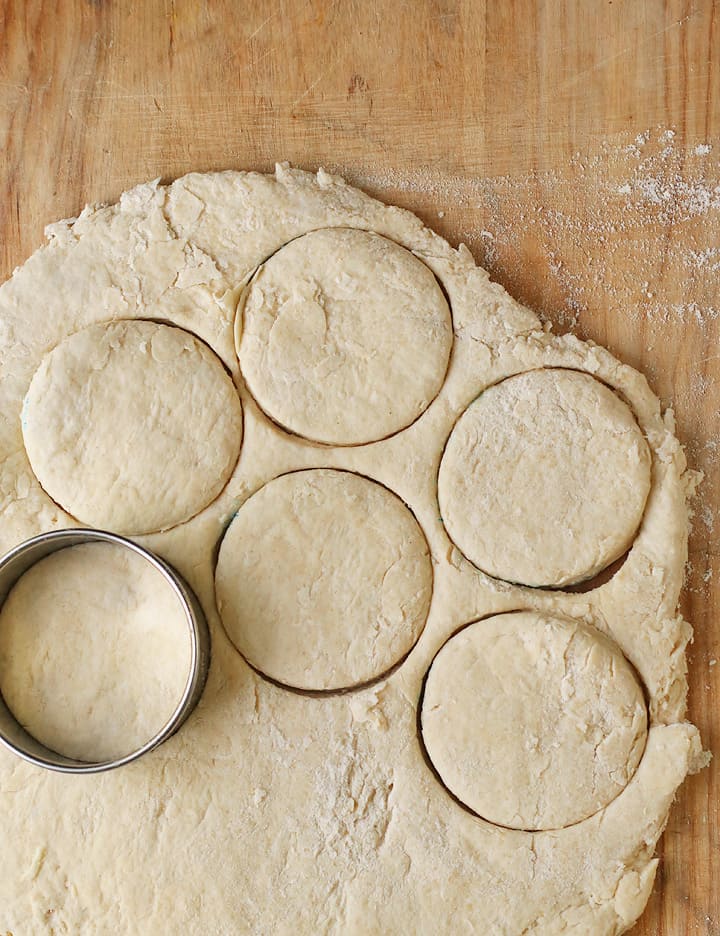
Using a 4″ circle cutter, cut out 12 circles. Place 6 biscuits on parchment paper and brush with nondairy milk. Stack the remaining 6 biscuits on top so that each biscuit is two-high. Bake the biscuits for 20-25 minutes until golden brown. Remove from oven, remove tops, and let cool.
To make coconut whipped cream, whip up coconut solids with a handheld mixer. Add powdered sugar and vanilla extract and whipped until the coconut cream is similar in texture to whipped cream.
With all your components made, you can now assemble the shortcakes. Start by layering a spoonful of coconut whipped cream and sliced strawberries on the bottom layer of each biscuit. Top with 2nd biscuit and a dollop of whipped cream and a few strawberry slices. Serve immediately.

Once assembled, this vegan dessert should be served immediately.
Store leftovers separately. Leftover biscuits can be stored in an airtight container at room temperature for up to 4 days. Store strawberries and coconut whipped cream in the refrigerator for 2 days.
If you want to prepare this strawberry shortcake in advance but don’t want soggy biscuits, you can prepare the strawberries and biscuits separately.
Once out of the oven, let the biscuit cool completely before storing them at room temperature. The fruit can be covered and stored in the refrigerator. This can be done up to 1 day in advance.
When ready to serve, whip up the whipped cream and assemble the shortbread according to the instructions below.


This simple Vegan Strawberry Shortcake is made with cream biscuits, fresh strawberries, and coconut whipped cream for an easy springtime dessert.
Print
Pin
Rate
Prep Time: 20 minutes
Cook Time: 20 minutes
Total Time: 40 minutes
Servings: 6
Calories: 249kcal
Preheat the oven to 425 degrees F. Line a baking sheet with parchment paper and set aside.
Stir together the strawberries with 2 tablespoons granulated sugar and refrigerate for at least 1 hour to let the strawberries release some of their juices.
Meanwhile, make the cream biscuits. Stir together flour, baking powder, sugar, and salt in a bowl. Fold in the coconut milk until the dough is evenly hydrated. Turn the dough out onto a floured surface, sprinkled a little more flour on top, then roll dough to about ½” thick.
Using a 4″ circle cutter, cut out 12 circles. You can combine scraps and re-roll if needed.
Place 6 biscuits on parchment paper, brush with nondairy milk. Stack the remaining 6 biscuits on top so that each biscuit is two-high. Bake biscuits for 20-25 minutes until golden brown. Remove from oven, remove tops, and let cool.
To make coconut whipped cream, whip up coconut solids with a handheld mixer. Add powdered sugar and vanilla extract and whipped until the coconut cream is similar in texture to whipped cream.
Assemble the shortcakes by layering a spoonful of coconut whipped cream and sliced strawberries on the bottom layer of each biscuit. Top with 2nd biscuit and a dollop of whipped cream and a few strawberry slices.
Serve immediately.
Serving and Storing – Once assembled, this vegan dessert should be served immediately. Store leftovers separately. Leftover biscuits can be stored in an airtight container at room temperature for up to 4 days. Store strawberries and coconut whipped cream in the refrigerator for 2 days.
Make in Advance- If you want to prepare this strawberry shortcake in advance but don’t want soggy biscuits, you can prepare the strawberries and biscuits separately. Once out of the oven, let the biscuit cool completely before storing them at room temperature. The fruit can be covered and stored in the refrigerator. This can be done up to 1 day in advance. When ready to serve, whip up the whipped cream and assemble the shortbread according to the instructions below.
Calories: 249kcal | Carbohydrates: 56g | Protein: 4g | Sodium: 197mg | Potassium: 320mg | Fiber: 2g | Sugar: 22g | Vitamin C: 28.2mg | Calcium: 101mg | Iron: 2.3mg
If you give this recipe recipe a try, snap a photo and share it on Instagram. Make sure to tag @mydarlingvegan so I can see your creations!

Ingredients:
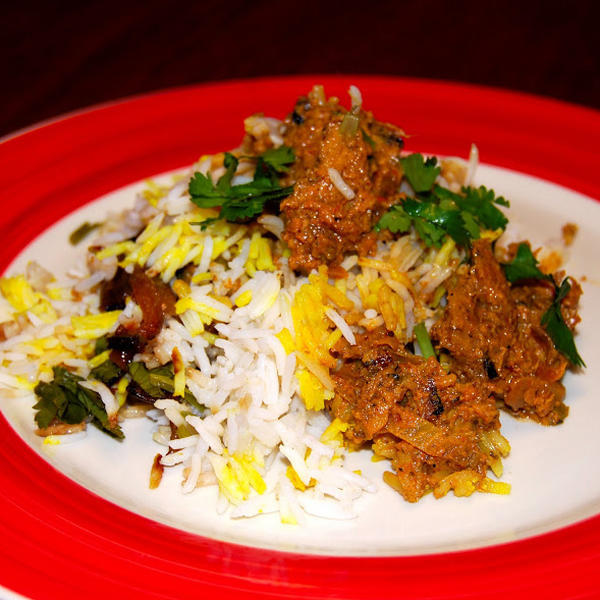

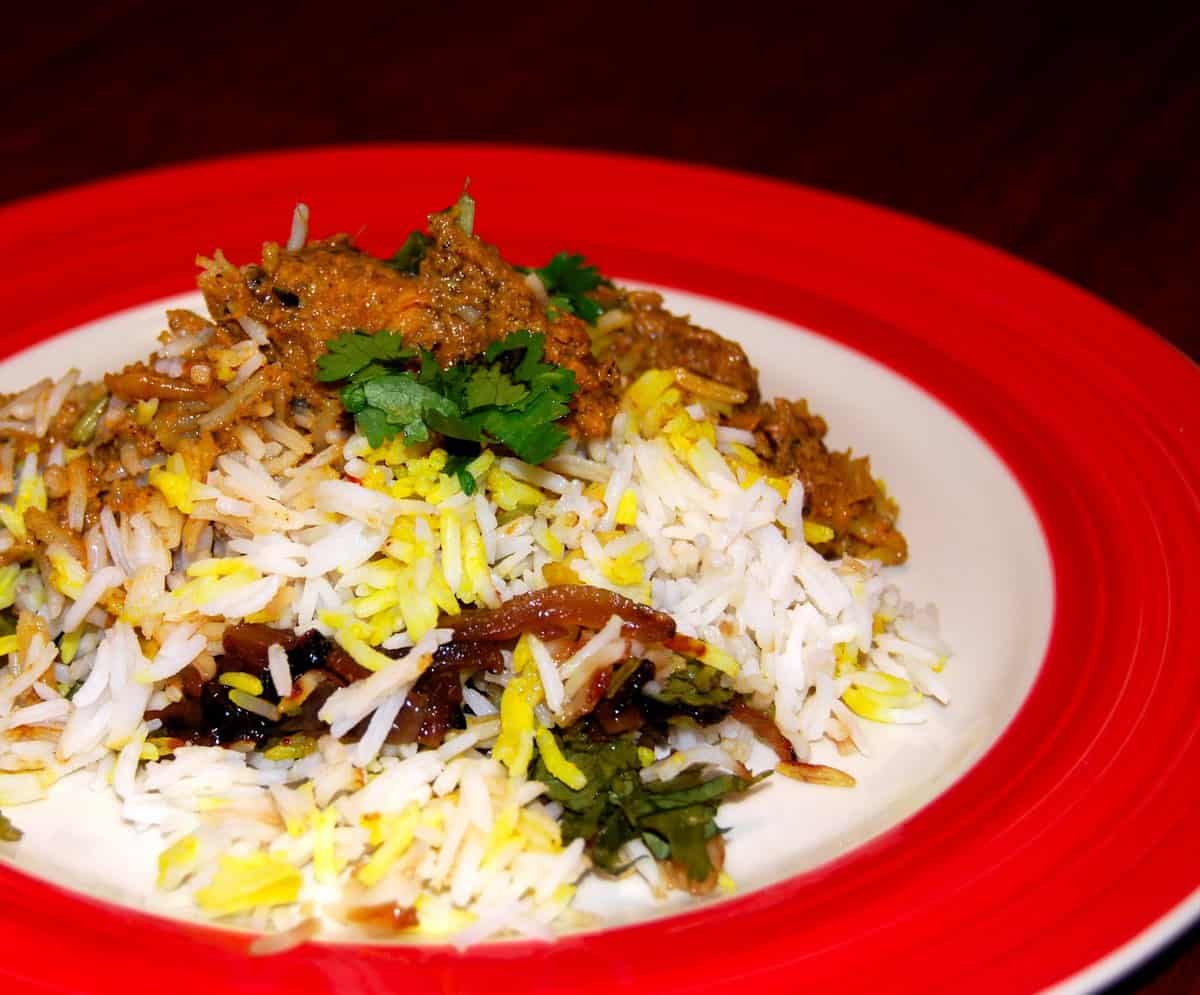
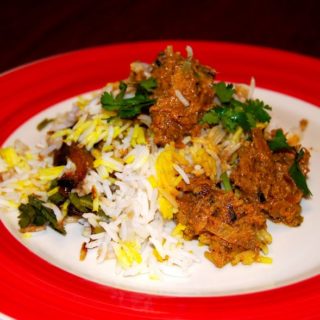
A spicy, tasty Indian vegan “chicken” biryani made with seitan chicken. It’s the perfect comfort food.
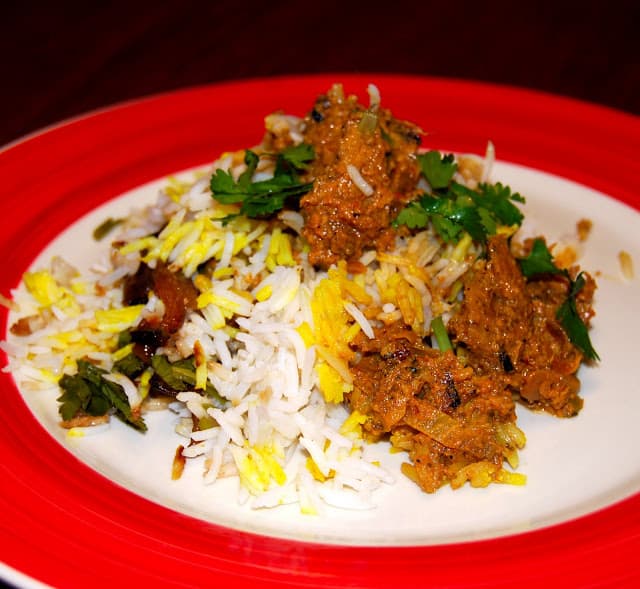
I don’t cook with meat substitutes often but sometimes I like to experiment because I know many vegans do enjoy them. Both because they offer tons of healthy protein without the fat usually found in meat, and because they simulate the texture of meat.
The secret to cooking with meat substitutes is to infuse them with tons of flavor– or else they end up tasting like, well, substitutes for the real thing and that defeats the purpose of it all.
For my Vegan Chicken Biryani I used seitan, a wheat-based protein that’s got a really chewy texture and that’s quite popular even with some lacto-vegetarians I know. My memory of seitan was for a long time tainted by a dish I once had at a popular vegetarian restaurant here in the DC area. The dish was called “Kale Infinity” and as the name suggests it was packed with an infinite amount of almost-raw kale and flavorless slices of seitan.
Despite my adamant refusal to waste food, I am ashamed to say I did end up throwing most of that mess into my compost heap.
So when I decided to try my biryani with seitan, I wanted to make sure I put into it as much of a punch as I could pack. Which was not difficult because there are so many dashing and brilliant flavors you can add to a biryani.
It was perfect, and for the first time I can stomach seitan again. Joyfully.
Here’s the recipe. Enjoy!
Vaishali · Holy Cow Vegan
A very authentic tasting vegan chicken biryani with seitan as a meat substitute.
Prep Time 20 minutes
Cook Time 30 minutes
Total Time 50 minutes
Course Main
Cuisine Indian
Servings 8 servings
Calories 253 kcal
Make the rice by placing the water in a pot along with the cardamom and bay leaves. Bring it to a boil, then turn the heat down to a simmer. Cover and let the rice cook 10 minutes. Turn off and let stand.
Place the tofu, lemon juice, ginger, garlic, green chili peppers, chopped onion and coriander leaves in a blender and grind to a fairly smooth paste.
Drain the seitan and place it in a bowl. Pour the tofu-ginger-garlic marinade over it and toss with a spoon till all the pieces are thoroughly coated. Set aside for at least an hour.
Heat the oil in a skillet. Add the sliced onions and cook over medium-high heat, stirring frequently, until they are golden-brown and caramelized, about 10 minutes.
Remove half the onions to a bowl and reserve. To the remaining onions, add the garam masala, turmeric and chilli powders and stir well for a few seconds. Add the tomato puree.
Saute until the tomato turns darker and begins to express oil.
Add the seitan along with the marinade, stir together well, bring to a boil. Then lower the heat to low and allow the mixture to simmer for about 15 minutes or until the flavors have merged well. Add salt to taste.
Take the cooked rice and gently spread it on top of the gravy in an even layer.
Close the skillet with a tight-fitting lid, ensure the heat is still turned to low, and allow the biryani to cook another 10 minutes. If you like some additional color in your biryani, mix 2 tablespoon of soymilk with a few strands of saffron or a generous pinch of turmeric and sprinkle on top of the rice before putting on the lid.
Turn off the heat and allow the biryani to stand at least 10 minutes before opening. Garnish with the fried onions you had reserved and the coriander leaves. I also love sauteing a few cashew nuts and raisins in a smidgen of oil until the raisins are plumped up and the nuts golden, and then sprinkling them on top of the biryani for a fabulous final touch.
Calories: 253kcalCarbohydrates: 37gProtein: 18gFat: 4gSaturated Fat: 2gPotassium: 285mgFiber: 3gSugar: 3gVitamin A: 302IUVitamin C: 7mgCalcium: 36mgIron: 2mg
To print recipe card without images, uncheck “instruction images” after clicking the “print recipe” button.
Tried this recipe?Let us know in the comments below!

Hi! I’m Vaishali, a journalist turned food blogger. At Holy Cow Vegan I share easy, tasty recipes made with clean, wholesome ingredients that the entire family can enjoy.


This vegan Japanese salad is a great substitute for an Asian seaweed salad. Spinach should be bright green, not overcooked.
Submitted by
chefcs
Published on June 19, 2020
Cook Mode
(Keep screen awake)
Original recipe (1X) yields 2 servings
2 tablespoons toasted sesame seeds, divided
2 tablespoons water
1 ½ tablespoons soy sauce
½ teaspoon white sugar
½ (8 ounce) package fresh spinach
1 pinch salt
Place 1 1/2 tablespoons sesame seeds on a plate; use the bottom of a pot or heavy measuring cup to crush the seeds. Transfer to a bowl. Add water, soy sauce, and sugar; stir dressing.
Bring a small pot of water to a boil; add salt. Add spinach and cook until wilted, no more than 1 minute. Drain spinach into a colander and rinse with cool water to stop the cooking process. Squeeze spinach with hands to remove moisture. Cut into strips.
Place cooked spinach in serving bowls. Drizzle dressing on top and add remaining sesame seeds as garnish.
| 75 | Calories |
| 5g | Fat |
| 6g | Carbs |
| 4g | Protein |
| Nutrition Facts | |
|---|---|
|
Servings Per Recipe 2 |
|
|
Calories 75 |
|
| % Daily Value * | |
|
Total Fat 5g |
6% |
|
Saturated Fat 1g |
4% |
|
Sodium 800mg |
35% |
|
Total Carbohydrate 6g |
2% |
|
Dietary Fiber 2g |
9% |
|
Total Sugars 2g |
|
|
Protein 4g |
8% |
|
Vitamin C 16mg |
18% |
|
Calcium 147mg |
11% |
|
Iron 3mg |
17% |
|
Potassium 385mg |
8% |
* Percent Daily Values are based on a 2,000 calorie diet. Your daily values may be higher or lower depending on your calorie needs.
** Nutrient information is not available for all ingredients. Amount is based on available nutrient data.
(-) Information is not currently available for this nutrient. If you are following a medically restrictive diet, please consult your doctor or registered dietitian before preparing this recipe for personal consumption.


