Author: PatagoniaLlami

  • Air Fryer Cauliflower Tacos

    Air Fryer Cauliflower Tacos

    recipe image

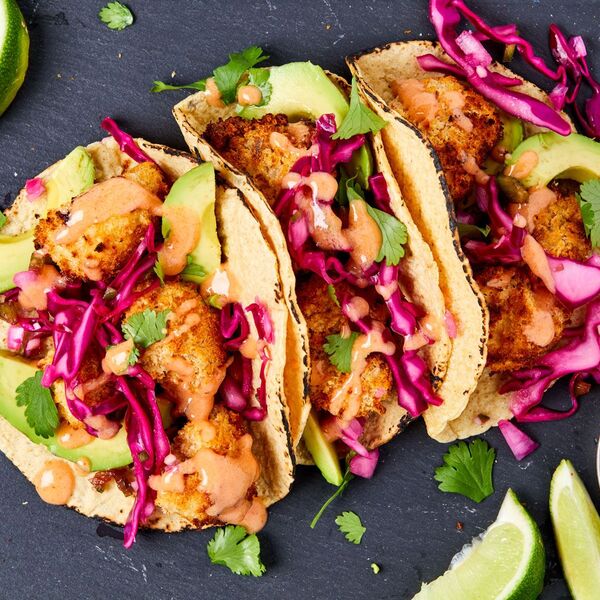
    To get extra crispy “fried” cauliflower, you gotta use your air fryer. This recipe is basically the vegan version of our favorite fish tacos. For the coating, you’ll need to make a milk and flour slurry first so that the panko bread crumbs stick to the florets. It’s a slightly tedious process, but while one batch of cauliflower is cooking in the air fryer you can be breading the next round. 

    The finishing touches? A quick and easy pickled slaw for a bite of freshness and a spicy mayo for a touch of heat. 

    Have you made these yet? Let us know how it went in the comments below! 

    Advertisement – Continue Reading Below

    For the slaw

    • 1 cup

      thinly sliced red cabbage

    • 1/2

      small red onion, diced

    • 1

      jalapeño, minced

    • 1

      clove garlic, minced

    • Juice of 1 lime

    • 2 Tbsp.

      apple cider vinegar 

    • Pinch kosher salt

    For the cauliflower

    • 1 1/2 cups

      all-purpose flour 

    • 1 tsp.

      chili powder

    • 1 tsp.

      cumin

    • 1/2 tsp.

      garlic powder

    • 1/2 tsp.

      cayenne pepper 

    • Kosher salt

    • Freshly ground black pepper 

    • 1 1/2 cups

      almond milk or other non-dairy milk

    • 1 1/2 cups

      panko bread crumbs 

    • 1

      medium head cauliflower, cut into bite-size florets

    • Cooking spray

    For serving

    • 1/2 cup

      vegan mayonnaise 

    • 2 Tbsp.

      sriracha

    • 1 tsp.

      maple syrup

    • Corn tortillas

    • Sliced avocado

    • Freshly chopped cilantro

    • Lime wedges

      1. Step 1In a medium bowl, combine slaw ingredients. Let sit while prepping tacos, stirring every so often. 
      2. Step 2In a medium bowl, combine flour and spices and season well with salt and pepper. Add almond milk and stir to combine. Mixture should be thick, but still easy to dip cauliflower into. Add a little more milk if needed. Place panko into small bowl. 
      3. Step 3Dip florets into milk mixture, wiping any excess off, then toss in panko.
      4. Step 4Working in batches, place coated cauliflower into basket of air fryer and spray with cooking spray. Cook at 400° for 15 minutes, stopping about halfway through to toss and spray with more cooking spray.
      5. Step 5In a small bowl, combine vegan mayonnaise, sriracha, and maple syrup. 
      6. Step 6Assemble tacos: On a tortilla top with cooked cauliflower, avocado, pickled slaw, cilantro, and a drizzle of sriracha mayo. Serve with lime wedges.

    air fryer cauliflower tacospinterest

    Lucy schaeffer

    Read More

  • ‘Maroon Shrooms’ From Ghetto Gastro

    ‘Maroon Shrooms’ From Ghetto Gastro

    recipe image

    'Maroon Shrooms' From Ghetto Gastro

    Photo by Nayquan Shuler
    • Prep time
      2 hours 15 minutes
    • Cook time
      40 minutes
    • Serves
      4
    Author Notes

    “We pay homage to the OG freedom fighters. The Africans who escaped Spanish and British bondage in Jamaica, fleeing to remote areas or the island where they formed their own communities and evaded recapture, were called Maroons, from the Spanish word “cimarrónes.” Maroons existed all over the Americas. Wherever there has been slavery, there have always been people finding ways to claim their freedom.

    The Maroon’s self-emancipation in Jamaica preceded the Haitian Revolution and state-approved emancipation in the United States. They gained legendary status for themselves. reliance, their ability to resist recapture, their success using guerrilla strategies to win multiple armed conflicts against colonial entities, and their ingenuity in not only surviving but also in building communities that thrived. Today, several Maroon villages—Charles Town, Accompong Town, Scotts Hall, and Moore Town—still exist.

    This dish is a plant-based hat tip to Jamaican jerk, using marinated then grilled mushrooms doused with a barbecue miso glaze. The work here is in the prep, but the cooking is a breeze. Use a grill, an acknowledgment to open-flame cooking that will set off your shrooms with a deep, smoky flavor.

    Pull up to the Asian market to get kombu (dried kelp), shiro shoyu (white soy sauce), and gochujang (a Korean chile paste).” —Excerpted from Ghetto Gastro Presents Black Power Kitchen by Jon Gray, Pierre Serrao, and Lester Walker, with Osayi Endolyn (Artisan Books). Copyright © 2022. —Food52

    • Test Kitchen-Approved

    Watch This Recipe

    ‘Maroon Shrooms’ From Ghetto Gastro

    Ingredients

    • Marinade


    • 2

      sheets kombu (½ ounce/15 grams)


    • 1/4

      (60 ml) grapeseed oil


    • 1 tablespoon

      plus 1 teaspoon coconut nectar


    • 1/2

      Scotch bonnet pepper, seeded


    • 1 tablespoon

      smoked paprika


    • 2

      dried chipotle peppers


    • 4

      garlic cloves


    • 1 3/4 ounces

      (35 grams) black garlic


    • 2 teaspoons

      whole allspice berries


    • 1 teaspoon

      whole black peppercorns


    • 1 1/2 tablespoons

      grated fresh ginger


    • 5 tablespoons

      (75 ml) shiro shoyu


    • 2

      Asian pears, peeled and cored


    • 1

      Gala apple, peeled and cored


    • 1/3 cup

      (80 ml) filtered water, plus more as needed


    • 1 pound

      (455 grams) oyster mushrooms or hen of the woods (maitake) mushrooms


    • Barbecue Miso Glaze


    • 1 cup

      (240 ml) fresh orange juice


    • 1 cup

      (240 ml) water


    • 4

      garlic cloves


    • 6

      black garlic cloves (about 30 grams)


    • 1/4 cup

      (100 grams) honey


    • 2 tablespoons

      gochujang


    • 2 1/2 tablespoons

      red miso paste


    • To Serve


    • 2

      heads Little Gem lettuce, gently torn


    • Vegan aioli, for serving


    • Assorted fresh herbs (like cilantro, mint, or scallion greens), for garnish

    Directions
    1. Make the marinade: Heat the oven to 350°F (175°C). Place the kombu on a sheet pan and toast in the oven for 5 to 10 minutes, until the color becomes brown and the kombu looks visibly drier.
    2. In a food processor or blender, combine the grapeseed oil, coconut nectar, roasted kombu, Scotch bonnet, paprika, chipotles, garlic, black garlic, allspice, peppercorns, ginger, shoyu, pears, and apple. Add the filtered water and blitz the ingredients, adding more water as needed, until the mixture has a smooth consistency.
    3. Put the mushrooms in a bowl, liberally rub the marinade over them, and set aside to marinate for at least 2 hours and up to 24 hours.
    4. Make the barbecue miso glaze: In a blender, combine the orange juice, water, garlic, and black garlic. Blend on high speed for 2 minutes. Pour the mixture into a large pot. Using a whisk, mix in the honey, gochujang, and miso.
    5. Bring the sauce to a boil over medium-high heat, then reduce the heat to maintain a simmer. Allow the mixture to reduce by half, 20 to 30 minutes, until you have a beautiful glaze.
    6. Heat a charcoal or gas grill to medium-high. Place the mushrooms on the grill (if using a charcoal grill, offset the mushrooms away from direct flame) and grill for up to 10 minutes, until they develop a thorough char. Liberally brush the mushrooms with the miso glaze as they’re cooking. Don’t be afraid of the blackened char; it adds great flavor.
    7. Serve the shrooms with the lettuce, aioli, and fresh herbs. For an extra pop, you can fry up sweet plantain and add it to this dish.

    Read More

  • Southwestern Crispy Fish Taco Salad

    Southwestern Crispy Fish Taco Salad

    recipe image

    You don’t have permission to access “http://www.foodnetwork.com/recipes/tregaye-fraser/southwestern-crispy-fish-taco-salad-4701149” on this server.

    Reference #18.871c2117.1738523135.4c80f183

    https://errors.edgesuite.net/18.871c2117.1738523135.4c80f183

    Read More

  • Karina’s Pumpkin Cupcakes With Maple Cream Cheese Icing

    Karina’s Pumpkin Cupcakes With Maple Cream Cheese Icing

    recipe image


    Did someone say… cupcakes?

    And better yet, pumpkin cupcakes? My favorite, hands down. Warm spicy fall flavors in a sweet morsel of cakey confection topped with a creamy icing. What’s not to love?

    These tender gluten-free cupcake beauties have just the right balance of pumpkin and sweetness, ginger and cinnamon. They’re not overly spicy. And as written, they’re dairy-free (the cream cheese we used to make the icing is vegan and it worked beautifully). Note that vegan or lactose free cream cheese is typically less stiff than dairy cream cheese. If you are using dairy based cream cheese, soften it first.

    Have a safe and beautiful week!

    Karina xo

    I used some almond flour in this particular recipe, but it is easy to replace. To make this recipe nut-free replace the almond flour with a medium weight flour, such as sorghum, millet, or even buckwheat.

    Ingredients:

    1 cup sorghum flour (GF oat flour or brown rice flour)

    1 cup organic light brown sugar

    3/4 cup potato starch or tapioca starch

    1/2 cup organic cane sugar

    1/4 cup almond flour or hazelnut flour

    1 teaspoon gelatin or xanthan gum

    1 teaspoon baking powder

    1 teaspoon baking soda

    1 teaspoon ground ginger

    1 teaspoon ground cinnamon

    1/2 teaspoon fine sea salt

    1/4 teaspoon ground nutmeg

    1/2 cup organic coconut oil

    1 cup canned organic pumpkin

    2 organic free-range eggs, beaten or egg replacer*

    2 teaspoons Madagascar Bourbon Vanilla Extract (or your favorite vanilla extract)


    For the icing:

    2 cups powdered sugar, more if needed

    1/4 cup chilled vegan cream cheese (or soft dairy cream cheese)

    2-4 tablespoons pure maple syrup, as needed

    Instructions:

    1. Preheat oven to 350º F. Line a 12-muffin pan with cupcake liners. In a large mixing bowl, whisk together the dry ingredients: sorghum flour, light brown sugar, tapioca starch, white cane sugar, almond flour, xanthan gum, baking powder, baking soda, ginger, cinnamon, sea salt, and nutmeg.

    2. Add in the coconut oil by pieces, cutting in with a pastry cutter or your mixer’s whisk/whip attachment, until the mixture is sandy. Add in the pumpkin, eggs, and vanilla, and beat on medium high for 1-2 minutes until the cake batter is smooth and stretchy.Spoon the cake batter into the 12 cupcake liners and smooth out the tops.

    3. Bake in the center of a pre-heated oven for 22 to 25 minutes or so, until the tops are firm but springy. Ovens vary widely, so watch these babies and check with a cake tester if you need to.Cool in the pan only briefly, until the cupcakes are cool enough to handle. Then remove them from the baking pan and cool on a wire rack for one hour before frosting. Meanwhile, make your icing.

    4. Pour the powdered sugar into a clean mixing bowl and add the cream cheese. Start beating to combine the cream cheese and sugar. Add pure maple syrup a tablespoon at a time, just until the frosting is soft and smooth. I only needed 2 tablespoons. Beat on medium-high for a minute or two until the frosting is glossy, fluffy and smooth. Cover and chill as the cupcakes cool.

    5. Use a clean icing knife to frost the cupcakes. Chill in the fridge briefly to set the frosting. To store your extras: top each chilled/set cupcake with a square of parchment paper, then wrap, bag and freeze.Makes 12 cupcakes.

    Notes:

    To replace the eggs in cupcakes I have had excellent luck using Ener-G Egg Replacer; in this recipe, replace with 1/4 cup liquid equivalent.

    If you prefer a buttery frosting, replace the vegan cream cheese with a good tasting vegan butter, such as Organic Earth Balance, or use organic coconut oil. Add vanilla or maple extract.

    Recipe Source: glutenfreegoddessrecipes.com

    All images & content are copyright protected, all rights reserved. Please do not use our images or content without prior permission from Gluten-Free Goddess Recipes. Thank you. 

    Read More

  • Banana-Coconut Cake Recipe

    Banana-Coconut Cake Recipe

    recipe image

    Jonathan Hirsch|

    Banana-Coconut Cake Recipe

    This double-layer cake is shockingly delicious. The cake itself is so moist it melts in your mouth, and between the two layers of scrumptious cake lies a sweet coconut frosting and fresh banana slices. The entire masterpiece, once frosted, is topped with toasted coconut and chopped pecans. Another one of our mother-daughter creative collaborations, this banana-coconut cake is absolutely divine. — Marea Goldman, Straight From the Earth Cookbook
     

    • 1 1/4 cups sugar
    • 1/2 teaspoon salt
    • 1/2 cup coconut milk
    • 1 teaspoon baking powder
    • 1 1/4 cups mashed ripe banana (3 bananas)
    • 1 tsp pure vanilla extract
    • 1 teaspoon baking soda
    • 1/2 cup unsweetened shredded coconut
    • 2 cups whole-wheat pastry flour
    • 1/2 cups melted coconut oil
    • 1 1/2 cup earth balance or other vegan buttery spread, at room temperature
    • 3 tbsp coconut milk
    • 3/4 tsp pure vanilla extract
    • 1 cup unsweetened shredded coconut
    • 3 3/4 cup confectioners’ sugar
    • 1 cup unsweetened shredded coconut
    • 1 cup unsalted pecans, lightly toasted and chopped
    • 2 ripe bananas, sliced into 1/4- to 1/2-in /6- to 12-mm-thick pieces
    1. Preheat the oven to 350°F and grease two 9-in/23-cm springform pans with coconut oil.
    2. In a large mixing bowl, beat the sugar and oil together with an electric mixer or vigorously with a whisk until combined. Add the coconut milk and beat until smooth. Add the bananas and vanilla and mix to combine.
    3. In a medium bowl, sift together the flour, baking soda, baking powder, and salt.
    4. Add the dry ingredients to the wet ingredients. Using a spatula, mix to combine, but avoid overmixing. Mix in the coconut.
    5. Pour half of the batter into each greased pan. Bake on the middle rack of the oven for about 30 minutes, until the edges are brown and a toothpick inserted in the middle of each cake comes out clean.
    6. While the cake bakes, make the frosting: Beat the Earth Balance until fluffy. Stir in the confectioners’ sugar, coconut milk, and vanilla and beat until fluffy and combined, about 2 minutes. Stir in the coconut.
    7. Refrigerate the frosting while the cake cools.
    8. When the cakes are done, place them on racks and remove the outside edges of each pan. Let the cakes cool completely, for at least 1 hour.
    9. To make the topping: Place a medium skillet over medium-low heat. Add the coconut and stir continuously with a spatula, until the coconut is golden brown and fragrant. Turn off the heat.
    10. Once the cakes have cooled completely, remove each from its pan and transfer one to a serving plate. Spread some frosting on top of the cake. Place the banana slices evenly on top of the frosting so that the entire cake is covered. Then, gingerly place the other cake on top of the first. Using a rubber spatula, spread more frosting on the top and sides of the cake. Cover it with the toasted coconut followed by the pecans. Cut the cake into 12 slices and serve immediately. If it’s a warm day, the frosting will start to soften (so, if not serving immediately, it’s best to refrigerate). Store in an airtight container in the refrigerator for up to 5 days.

    Read More

  • Eggplant Braciola

    Eggplant Braciola

    recipe image

    1. Preheat oven to 350°F. Trim and discard stem and base ends from eggplant. Stand 1 eggplant upright on cutting board. Trim about 1/4 inch off the right and left sides; discard trimmed pieces. Cut eggplant lengthwise into 4 (1/2- to 3/4-inch-thick) planks. (Each plank should have skin on two long sides.) Repeat process with remaining eggplant. Brush eggplant planks evenly with tamari and 3 tablespoons oil.

    2. Line a rimmed baking sheet with parchment paper. On one half of baking sheet, shingle 4 eggplant planks lengthwise, overlapping by about 1 inch and alternating direction of stem ends to create a mostly square shape. Repeat with remaining eggplant planks on opposite side of baking sheet.

    3. Roast in preheated oven until eggplant is mostly tender and lightly browned, 35 to 45 minutes. Using a flexible spatula, firmly press each eggplant slab to compress layers. Let cool on baking sheet about 15 minutes. (Do not turn oven off.) Using a spatula, carefully flip each eggplant slab, repositioning slices back into place, if needed. Press again to flatten. Return to oven, and roast at 350°F until very tender but not falling apart, 25 to 35 minutes. Let cool completely on baking sheet, about 30 minutes. (Do not turn oven off.)

    4. While eggplant is roasting, heat 2 tablespoons oil in a large skillet over medium. Add onion and 1/2 teaspoon salt; cook, stirring often, until softened and translucent, 6 to 8 minutes. Stir in walnuts, garlic, rosemary, thyme, oregano, black pepper, and crushed red pepper; cook, stirring occasionally, until fragrant, about 2 minutes. Add mushrooms and remaining 1/4 teaspoon salt; cook, stirring often, until tender and lightly browned, 4 to 5 minutes. Add wine; cook, stirring occasionally and scraping bottom of skillet, until liquid is completely reduced, about 2 minutes. Add lentils and 1/4 cup marinara; cook, stirring constantly and mashing lentils using back of spoon, until mixture is well combined, about 3 minutes. Add spinach; cook, stirring constantly, until just wilted, about 1 minute. Remove from heat. Let cool completely, about 30 minutes. Season with additional salt and black pepper to taste. Set aside at room temperature.

    5. Line another rimmed baking sheet with parchment paper. Lay 4 (12-inch) pieces of kitchen twine lengthwise on pan, spacing 1 1/2 inches apart. Place 1 eggplant slab lengthwise over strings, leaving about 1 inch of strings exposed on one side. Repeat with remaining eggplant slab, overlapping first eggplant slab in center by about 1 inch, to create 1 rectangular (about 10- x 8-inch) slab of eggplant, leaving at least 1 inch of strings exposed on opposite end. Press with spatula to flatten. Spread mushroom-lentil mixture evenly over eggplant, leaving a 2-inch border on the right edge. Starting from the left edge, carefully roll the eggplant into a tight roll. Tie roll with twine to secure. Brush top of roll with remaining 1 tablespoon oil. Roast at 350°F until lightly browned and heated through, 20 to 30 minutes.

    6. Heat remaining 2 cups marinara in a small saucepan over medium, stirring often, until hot, about 3 minutes. Spread marinara on a serving platter; top with eggplant braciola. Dollop ricotta onto marinara. Garnish with basil leaves and crushed red pepper.

    Make Ahead

    Filling can be stored in an airtight container in refrigerator up to 2 days; let come to room temperature before using. Braciola can be assembled 1 day ahead; cover tightly with plastic wrap, and store in the refrigerator. Let come to room temperature before baking.

    Suggested Pairing

    Brambly, dark-berried, Cal-Ital red: Ferrari-Carano Siena

    Read More

  • Beans Bourguignon

    Beans Bourguignon

    recipe image

    You don’t have permission to access “http://www.foodnetwork.com/recipes/food-network-kitchen/beans-bourguignon-13447307” on this server.

    Reference #18.871c2117.1738523141.4c814840

    https://errors.edgesuite.net/18.871c2117.1738523141.4c814840

    Read More

  • Party Vegan’s Porcini-stuffed Seitan with Wild Mushroom Sauce Recipe

    Party Vegan’s Porcini-stuffed Seitan with Wild Mushroom Sauce Recipe

    recipe image

    Party Vegan’s Porcini-Stuffed Seitan With Wild Mushroom Sauce Recipe

    The rich flavor of porcini mushrooms, featured in both the stuffing and the sauce, is the hallmark of this elegant roast that makes a delicious centerpiece on your holiday dinner table.Note: To make your own porcini powder, place one or two dried porcini in a spice grinder and grind to a powder. Store any unused porcini powder in an airtight container, where it will keep for several months.Adapted from “Party Vegan” by Robin Robertson.

    Read More

  • Spicy Fried “Chicken” Sandwich

    Spicy Fried “Chicken” Sandwich

    recipe image

    Total Time:

    10 hrs 30 mins

    Crunchy, spicy, creamy, and tart—this “chicken” sammie is total bliss. We replicated spicy fried chicken with protein-packed tofu and added cornmeal to the batter for extra crunch.

    If you’re looking for a texture similar to chicken, don’t skip the freezing step. When tofu freezes, the texture transforms from firm and crumbly to chewy and meat-like. Whether you freeze your tofu or not, make sure to drain the tofu well between paper towels before breading it; too much water prevents the batter from turning crispy and golden.

    Advertisement – Continue Reading Below

    FOR FRIED CHICKEN SANDWICH

    • 2

      (14-ounce) blocks extra-firm tofu, drained

    • 1/4 cup

      Dijon mustard

    • 1/4 cup

      brine from bread and butter pickles, plus pickle slices, for serving

    • 1/4 cup

      hot sauce, plus more for serving

    • 2 Tbsp.

      apple cider vinegar

    • 1 cup

      all-purpose flour

    • 1/2 cup

      finely ground cornmeal

    • 1 Tbsp.

      cornstarch

    • 2 tsp.

      chili powder

    • 1 1/2 tsp.

      cayenne pepper

    • 1 tsp.

      onion powder

    • 1/2 tsp.

      baking powder

    • 1/2 tsp.

      garlic powder

    • 1/2 tsp.

      kosher salt

    • Vegetable oil, for frying

    • 4

      soft hamburger buns

    • 4

      leaves green leaf lettuce

    FOR GARLIC MAYO

    • 1

      garlic clove

    • 1/2 tsp.

      kosher salt, plus more is needed

    • 2 tsp.

      fresh lemon juice

    • 1/2 cup

      vegan mayonnaise

    • Freshly ground black pepper

    • Make sandwich

      1. Step 1Arrange the tofu blocks in a single layer on a freezer-safe plate or in a large plastic container and cover with plastic or a lid. Freeze until solid, at least 5 hours and up to a month in advance.
      2. Step 2Remove tofu from freezer and let defrost completely, about 4 hours on the counter or overnight in refrigerator. Drain off any excess water that may have accumulated.
      3. Step 3Arrange defrosted tofu in a single layer on a rimmed baking sheet lined with several sheets of paper towel. Place a few more layers of paper towels and another rimmed baking sheet on top of tofu. Weight baking sheet with a few cookbooks or cans of beans. Let drain, changing paper towels when saturated with water, at least 1 hour or up to overnight in refrigerator.
      4. Step 4When tofu is finished draining, make sandwich. In a shallow bowl, whisk together Dijon mustard, pickle brine, hot sauce, and vinegar. In another shallow bowl, whisk together flour, cornmeal, cornstarch, chili powder, cayenne pepper, onion powder, baking powder, garlic powder, and ½ teaspoon salt.
      5. Step 5Cut each piece of tofu crosswise into 2 planks; you should have 4 planks total. Working with one piece of tofu at a time, coat tofu in dry mixture then dip it in wet mixture. Return to dry mixture, then wet and one more time in the dry mixture. Place on a clean plate. Repeat with remaining tofu.
      6. Step 6Pour oil into a large cast-iron skillet until it comes ½ inch up side of skillet. Place over medium-high heat. When oil is hot and just starts to shimmer, reduce heat to medium. Fry tofu, turning once, until golden on both sides, about 5 minutes per side. Transfer to a paper towel–lined plate to drain.
    • Make garlic mayo

      1. Step 1On a cutting board, smash garlic clove with back of a knife. Sprinkle with ½ teaspoon salt. Continue mashing with the side of a knife until garlic turns into a paste. Scrape garlic paste into a small bowl and stir in lemon juice and mayonnaise. Season with more salt, if needed, and pepper.
      2. Step 2Spread garlic mayo on bottom halves of each bun. Top with lettuce,  fried tofu, and pickles. Sandwich with top bun and serve.

    Read More

  • Honey Horseradish Wings with Dijon Ranch

    Honey Horseradish Wings with Dijon Ranch

    recipe image

    You don’t have permission to access “http://www.foodnetwork.com/recipes/honey-horseradish-wings-with-dijon-ranch-11645087” on this server.

    Reference #18.871c2117.1738523142.4c815cec

    https://errors.edgesuite.net/18.871c2117.1738523142.4c815cec

    Read More