Author: PatagoniaLlami

  • Pumpkin & Black Bean Soup

    Pumpkin & Black Bean Soup

    recipe image

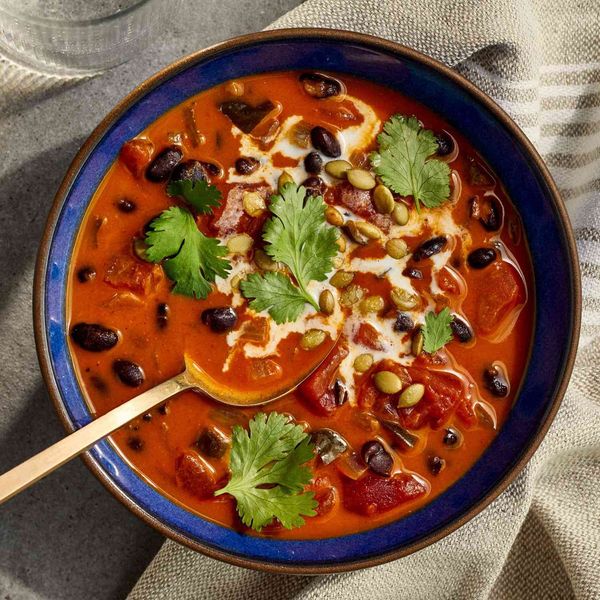
    This quick and easy vegan pumpkin black bean soup is filled with veggies. Convenient canned pumpkin, beans and coconut milk flavored with curry make it a hearty fall meal.

    Updated on April 19, 2024

    Photo: Fred Hardy


    Cook Mode
    (Keep screen awake)

    Ingredients

    • 1 tablespoon extra-virgin olive oil

    • 1 ½ cups chopped red onion

    • 1 ½ cups chopped poblano peppers

    • 2 tablespoons minced garlic

    • 2 tablespoons red curry paste

    • ½ teaspoon ground coriander

    • 3 cups reduced-sodium vegetable broth

    • 2 (15 ounce) cans unsalted black beans, rinsed

    • 1 (15 ounce) can unsalted diced tomatoes

    • 1 cup unseasoned canned pumpkin

    • ½ teaspoon salt

    • 1 (13.5 ounce) can light coconut milk (well shaken), divided

    • 2 tablespoons lime juice

    • ½ cup fresh cilantro leaves

    • 6 tablespoons roasted unsalted pepitas

    Directions

    1. Heat oil in a large pot over medium-high heat. Add onion and poblanos; cook until the poblanos start to brown and blister, about 6 minutes. Stir in garlic, curry paste and coriander; cook, stirring constantly, until fragrant, about 1 minute. Stir in broth, black beans, tomatoes, pumpkin and salt. Bring to a boil over medium-high heat.

    2. Reduce heat to medium to maintain a simmer. Simmer until slightly thickened, about 10 minutes. Reserve 6 tablespoons coconut milk for serving. Pour the remaining coconut milk into the soup. Return to a simmer; cook for 3 minutes. Stir in lime juice. Ladle the soup into 6 bowls and drizzle each with 1 tablespoon of the reserved coconut milk. Sprinkle with cilantro and pepitas.

    To make ahead

    Refrigerate in an airtight container for up to 1 week or freeze for up to 3 months.

    Originally appeared: EatingWell.com, July 2021

    Nutrition Facts (per serving)

    178 Calories
    9g Fat
    21g Carbs
    4g Protein
    Nutrition Facts
    Servings Per Recipe
    6
    Serving Size
    1 1/2 cups
    Calories
    178
    % Daily Value *
    Total Carbohydrate
    21g
    8%
    Dietary Fiber
    6g
    21%
    Total Sugars
    8g
    Protein
    4g
    8%
    Total Fat
    9g
    12%
    Saturated Fat
    4g
    20%
    Vitamin A
    5258IU
    105%
    Sodium
    426mg
    19%
    Potassium
    306mg
    7%

    Nutrition information is calculated by a registered dietitian using an ingredient database but should be considered an estimate.

    * Daily Values (DVs) are the recommended amounts of nutrients to consume each day. Percent Daily Value (%DV) found on nutrition labels tells you how much a serving of a particular food or recipe contributes to each of those total recommended amounts. Per the Food and Drug Administration (FDA), the daily value is based on a standard 2,000 calorie diet. Depending on your calorie needs or if you have a health condition, you may need more or less of particular nutrients. (For example, it’s recommended that people following a heart-healthy diet eat less sodium on a daily basis compared to those following a standard diet.)

    (-) Information is not currently available for this nutrient. If you are following a special diet for medical reasons, be sure to consult with your primary care provider or a registered dietitian to better understand your personal nutrition needs.

    Read More

  • Coconut-Mango Rice Noodle Salad

    Coconut-Mango Rice Noodle Salad

    recipe image

    Vegan

    Green beans, cashews, mint, carrot, cucumber, and lime shine through the pearly noodles in this pretty, uplifting dish. The noodles will seem undercooked at first, but they will soften as they absorb the marinade and the moisture from the other ingredients. If you cook them all the way, the finished dish will be mushy.

    • Rice noodles of various thickness can be purchased inexpensively in most Asian-themed grocery stores, some supermarkets, and online. Use medium-thin ones for this recipe.

    • You can freeze the unused coconut milk in an ice cube tray, then transfer the cubes to a heavy plastic zip-style bag for making this (or something else) in the future. Don’t forget to label the bag.

    • This tastes best within a few hours of being assembled, so plan accordingly.

    • Make sure the cucumber is sweet.

    Read More

  • Kale Slaw

    Kale Slaw

    recipe image

    Kale Slaw

    • Serves
      6
    Author Notes

    As a kid, I used to love that sweet broccoli salad studded with dried fruit and seeds my Mom would bring to potlucks, but I thought that concept could use a 2014 update. I decided to use kale and make the dressing much less sweet than I remember. The result is a lightly-sweetened, tangy dressing that stands up to hearty kale. I’m so pleased with how this turned out. It’s a sneaky way to get picky eaters to eat lots of kale. It’s also easily adaptable to your taste. Vegan? Use veganaise and agave nectar. Don’t like raisins? Try dried cranberries or dried currants. Don’t like mayo? Try greek yogurt. —Nicole Dula

    Ingredients

    • 1/2 cup

      good quality mayonnaise or veganaise


    • 2 tablespoons

      red wine vinegar


    • 1 tablespoon

      honey or agave nectar


    • 1/8 teaspoon

      fine sea salt


    • 1/4 teaspoon

      freshly ground black pepper


    • 3

      green onions, sliced very thin


    • 1 bunch

      green curly kale (6-8 stalks)


    • 1 cup

      Thompson raisins


    • 1 cup

      raw sunflower seeds

    Directions
    1. In a large bowl, add the mayonnaise (or veganaise), vinegar, honey (or agave), salt and pepper. Whisk until smooth.
    2. Wash the kale and remove the center ribs and stems from each stalk. Dry the leafy part between kitchen towels or in a salad spinner and then cut into bite-sized pieces.
    3. Add the kale, green onions, raisins and sunflower seeds to the bowl with the dressing. Toss to combine and refrigerate for at least one hour and up to overnight to let the flavors come together and allow the kale to soften.

    Read More

  • Paella Verde

    Paella Verde

    recipe image

    6¾ cups vegetable stock

    0.3 g (medium-large pinch) saffron

    ½ cup extra virgin olive oil

    2 scallions, cut into ¾ in pieces

    ½ head of broccoli, stem chopped and head broken into florets

    3 artichokes, halved

    1 zucchini, cut into ½-inch slices

    7 garlic cloves, finely chopped

    1 Tbsp. sweet smoked paprika

    1 tomato, grated

    2 cups Spanish paella rice

    100 g (3½ oz.) baby spinach, washed

    2 sprigs of flat-leaf parsley, finely chopped

    2 sprigs of thyme, leaves picked

    Salt, to taste

    Read More

  • Cauliflower in Korma Sauce

    Cauliflower in Korma Sauce

    recipe image

    Cauliflower in Korma Sauce

    Photo by PistachioDoughnut
    • Prep time
      15 minutes
    • Cook time
      45 minutes
    • Serves
      2-4
    Author Notes

    Gobi Mussallam is a very tasty dish for a crowd and also the presentation is like a show stopper for a party. Usually I prefer to make it for a crowd. But you can always make it for two people and have leftovers. Leave out the yogurt to make it vegan. Instead use more cashews nut paste. —Devangi Raval

    Ingredients

    • 1

      big head of cauliflower


    • pinch of salt


    • Pinch

      turmeric powder


    • 1 cup plain greek yogurt


    • 1/4 – 1/2 cup cashew nuts soaked in water


    • 1 tablespoon

      ginger paste


    • 1 tablespoon

      garlic paste


    • salt to taste


    • 1 tsp red chili powder or paprika


    • 2 tsp – 3 tsp tandoori spice mix


    • 2 tbsp oil


    • 1 medium diced onion


    • 1 tomato diced


    • 1/2 tsp cardamom powder


    • cilantro for garnish


    • raisins or sultanas garnish


    • pinch of sugar

    Directions
    1. Cut the stem of the cauliflower only the little bit of tough part but keep it as whole in the shape. Take a big pot of boiling water with pinch of salt and turmeric powder on medium heat and keep the whole cauliflower to blanch for about 10 minutes or until it is soft but not extremely mushy. It should retain the shape while marinading it. Remove it in colander and let it sit for sometime.
    2. To make the paste for the marinade , take some oil in pan , add ginger garlic and onions and saute them for some time until translucent. Then add in the tomatoes and let them release their juices. add salt to taste. add pinch of sugar to balance out the acidity from the tomatoes. Add in the tandoori spice mix, red chili powder. Remove water from the soaked cashews nuts and add the cashews to the tomato mix. In few seconds, turn off the stove, let it cool a little bit and blend it in a blender. Keep 1/4 gravy aside. Take it back on the pan and let it simmer for about few minutes 5 minutes.Add a little bit water if it is too thick.
    3. Take the other half of the gravy in a bowl, add in the yogurt mix and mix it well with a whisk.
    4. Pre heat oven at 350 F and place the cauliflower in a baking tray with edges ofcourse to cook for about 45-50 minutes until the marinade looks cooked and the cauli is done. Remove it and serve it as it garnished with sultanas and cilantro.
    5. Serve it as it is , you can remove it from the baking dish or serve it in the same dish. It is upto you.Use a pie cutter to cut pieces or let people serve themselves. I would also serve the rest of the 1/4 cooked gravy that we had kept on the side. It will be good to have it on the side may be in gravy boat to pour over extra when you cut the cauliflower and the middle part will not have enough marinade.

    Read More

  • Chile-Rubbed Tofu with Fried Potatoes and Tomato Sauce

    Chile-Rubbed Tofu with Fried Potatoes and Tomato Sauce

    recipe image

    To be honest, I’m still a little starstruck that my Shaking Beef graced the cover of the February 2019 issue of Food & Wine. But today, I’m here to lobby for its meatless sister — Shaking Tofu. Named for the quick back-and-forth shaking of the pan that takes place during cooking, this stir-fry is a quick-fix crowd-pleaser no matter which protein you choose. After a lightning-fast sizzle in your wok or skillet, the crispy tofu gets enrobed in a savory-sweet sesame-scented sauce, which gets tossed with a fresh salad of watercress, thinly sliced onion, and herbs. The result is bite after beautiful bite of peppery, just-wilted greens, fragrant herbs, and of course, irresistibly crispy-chewy tofu. One taste and you’ll understand why I’m such a big fan of this dish.

    Frequently asked questions

    What is tofu?

    I grew up with tofu, but for people who are new to it, the white blocks can seem alien and challenging. It’s simply a plant-based cheese, the pressed curds of coagulated soy milk — dried soybeans that have been soaked, ground with water, then filtered and cooked. A staple that’s made daily and sold like fresh bread by artisans and commercial ventures alike, tofu can be enjoyed plain (it’s a satisfying, ready-to-eat protein) or rendered into savory or sweet dishes.

    Where did tofu originate?

    Tofu originated in China and spread from there to other parts of Asia, to wherever soybeans could grow. In Vietnam — a country that’s roughly the same size as California with a population of over 95 million people — Buddhism is popular, and meat is precious, so naturally, tofu is part of everyone’s diet. At markets and neighborhood shops, tofu is commonly sold as unadorned creamy blocks as well as in fried golden pieces. Rich, chewy-crisp, and sturdy, fried tofu lends handsome, tasty pizzazz to dishes like this Shaking Tofu.

    Where do you get tofu?

    You don’t have to go to an Asian market or specialty store for fried tofu because it’s easy to make at home. Head to the supermarket, natural grocer, or specialty retailer like Trader Joe’s, and look in the produce department or near the dairy case for tofu. For frying, select extra-firm tofu sold in water-packed tubs. Super-firm “high-protein” tofu sold in vacuum packaging is way too dense for this recipe. Whenever you buy tofu, check the best-by date to determine freshness.

    Notes from the Food & Wine Test Kitchen

    Once you cut a block of tofu into pieces that you’ll cook up later, they start releasing liquid and draining. I rarely press or weight down an entire block of tofu because that takes too much time. Just pour out the water from the tub and cut up the tofu block to start your prep.

    For this recipe, lightly salting the tofu helps it brown beautifully and imparts extra umami. Insider tip: You can actually fry the tofu hours in advance and warm it up with the sauce right before bringing all the components together. — Andrea Nguyen

    Make ahead

    Fry the tofu, but do not add Bragg Liquid Aminos mixture. Set tofu aside, covered, at room temperature, up to 4 hours. When ready to serve, prepare the salad, then re-warm the tofu in a skillet over medium until gently sizzling. Add Bragg Liquid Aminos mixture as directed in Step 4, and continue as directed.


    Cook Mode
    (Keep screen awake)

    Ingredients

    Tofu

    • 16 ounces extra-firm tofu, drained and cut into 1-inch cubes (3 cups)

    • 3/8 teaspoon finely ground sea salt, divided

    • 3 tablespoons water

    • 1 1/2 tablespoons Bragg Liquid Aminos, Maggi seasoning sauce, or soy sauce

    • 1 tablespoon granulated sugar

    • 1 large garlic clove, pressed or minced (1 1/4 teaspoon) 

    • 1 teaspoon toasted sesame oil

    • 1/2 teaspoon cornstarch

    • 1/2 teaspoon black pepper

    • 1 tablespoons canola oil or other neutral oil (such as grapeseed oil)

    Salad

    • 2 tablespoons water

    • 1 1/2 tablespoons rice vinegar

    • 1 1/2 teaspoons granulated sugar or honey

    • 1/4 teaspoon finely ground sea salt

    • 1/8 teaspoon black pepper

    • 1/4 cup thinly sliced red onion or shallot, rinsed in cold water and patted dry

    • 4 cups loosely packed watercress, arugula, or baby lettuce mix (2 ounces)

    • 1/4 cup torn fresh mint, basil, or other leafy herb (optional)

    • 8 cherry tomatoes, halved (optional)

    Directions

    Prepare the tofu

    1. Gently toss together tofu and 1/4 teaspoon of the salt in a bowl. Spread tofu in an even layer on a kitchen towel or double layer of paper towels; let drain 10 to 15 minutes. Meanwhile, stir together 3 tablespoons water, Bragg Liquid Aminos, sugar, garlic, sesame oil, cornstarch, pepper, and remaining 1/8 teaspoon salt in a small bowl until sugar dissolves; set aside.

    2. Heat canola oil in a large nonstick skillet over medium-high until shimmering. Pat tofu with paper towels to remove excess moisture. Add tofu to hot skillet; cook, stirring occasionally, until browned on 2 to 3 sides, 5 to 6 minutes.

    While tofu cooks, prepare the salad

    1. Whisk together 2 tablespoons water, vinegar, sugar, salt, and pepper in a large bowl. Add onion; top with watercress, mint, and tomatoes (if using). Do not toss salad; set aside.

    2. Reduce heat under tofu in skillet to medium; pour Bragg Liquid Aminos mixture over tofu. Cook, stirring often, until sauce reduces slightly and clings to tofu, 1 to 2 minutes. Remove from heat.

    3. Toss together salad ingredients in bowl; transfer to a serving dish. Top with tofu; spoon remaining sauce in skillet over tofu.

    Originally appeared: February 2019

    Read More

  • Lentil Burgers

    Lentil Burgers

    recipe image

    1. Coarsely chop garlic; sprinkle with salt and mash to a paste with the side of the knife. Coarsely chop walnuts in a food processor. Add bread, marjoram, pepper and the garlic paste; process until coarse crumbs form. Add lentils and Worcestershire; process until the mixture just comes together in a mass. Form into four 3-inch patties (about 1/3 cup each).

    2. Heat 2 teaspoons oil in a large nonstick skillet over medium heat. Cook the patties until browned on the bottom, 2 to 4 minutes. Carefully turn over; reduce heat to medium-low. Drizzle the remaining 1 teaspoon oil around the burgers and cook until browned on the other side and heated through, 4 to 6 minutes more. Serve on buns with lettuce, tomato (or red pepper) and onion.

    Tips

    Make Ahead Tip: Prepare through Step 1, tightly wrap in plastic and refrigerate for up to 1 day or freeze for up to 3 months. If frozen, let defrost in the refrigerator before cooking.

    Tips:

    To toast nuts: Spread whole nuts on a baking sheet and bake at 350°F, stirring once, until fragrant, 7 to 9 minutes. Toast chopped, small or sliced nuts in a small dry skillet over medium-low heat, stirring constantly, until fragrant and lightly browned, 2 to 4 minutes.

    To cook lentils: Place in a saucepan, cover with at least 1 inch of water, bring to a simmer and cook until just tender, 15 to 30 minutes, depending on the type of lentil. Drain and rinse with cold water. 1 cup dry lentils = about 2 1/2 cups cooked. Or use canned lentils: 15-ounce can = 1 1/2 cups. Rinse canned lentils before cooking with them to reduce the sodium by about 35%.

    Note: Regular Worcestershire sauce contains anchovies and is not vegetarian. Look for vegetarian Worcestershire–flavored with molasses, soy sauce and vinegar–near other bottled sauces in natural foods stores or in the natural foods section of well-stocked supermarkets.

    Storage smarts: For long-term freezer storage, wrap your food in a layer of plastic wrap followed by a layer of foil. The plastic will help prevent freezer burn while the foil will help keep off-odors from seeping into the food.

    Read More

  • Buss Up Shut Paratha Roti

    Buss Up Shut Paratha Roti

    recipe image

    Step 1

    Whisk baking powder, salt, sugar, and 3 cups (375 g) flour in a medium bowl to combine. Open can of unstirred coconut milk and scoop coconut cream layer off the top into a small bowl. Mix 1 cup remaining coconut milk and 1 Tbsp. coconut cream into dry ingredients by raking with your fingers, then knead, adding more coconut milk by the teaspoonful as needed, until a soft and smooth dough forms. Cover and let sit 30 minutes.

    Step 2

    Divide dough into 6 balls (about 4 oz. each) and place on a clean surface. Cover with a damp kitchen towel. Working with 1 ball at a time, flatten into a disk on a lightly floured surface. Roll out to a 6″–8″-diameter round, dusting with more flour as needed. Using your fingers or an offset spatula, evenly spread ½ tsp. oil over surface.

    Step 3

    Using a paring knife, cut a slit from the center of the round out to the edges.

    PHOTO BY REY LOPEZ

    Step 4

    Lift a cut edge and roll dough inward and onto itself to create a tightly coiled cone (the skinny end formed from the center of round and the wider part from the edges).

    Step 5

    Pinch together outer edges at the wide end and tuck into cone, using your thumb to push them into the center so the coil is no longer visible.

    Step 6

    Gently coat cone evenly with oil and place on a large plate. Cover plate with an upside-down bowl or plastic wrap. Chill cones at least 2 hours and up to 12 hours.

    Step 7

    Working one at a time, set 1 cone, wide side down, on a lightly floured surface. Gently press down on cone to make a disk.

    Step 8

    Roll out, rotating dough often and dusting with more flour as needed, until ⅛” thick (7″–8″ wide).

    PHOTO BY REY LOPEZ

    Step 9

    Heat remaining oil in a small saucepan over medium until melted; remove from heat. Heat a medium crepe pan, tawa, cast-iron griddle, or medium skillet over medium-low. Brush pan with oil and place a roti in pan. Immediately brush surface of roti with more oil.

    Step 10

    Cook, turning every minute and brushing with more oil as it starts to look dry, until golden, puffed, and layers look like they are pulling apart, 10–12 minutes.

    PHOTO BY REY LOPEZ

    Step 11

    Immediately place a roti on one side of a clean kitchen towel and fold the other side over.

    Step 12

    Holding the two ends of the towel closed with one hand, angle on a slant, allowing bottom edge to touch the counter.

    PHOTO BY REY LOPEZ

    Step 13

    Tap wrapped roti with a metal baking spatula or a wooden spoon to break the layers apart.

    PHOTO BY REY LOPEZ

    Step 14

    Place in an airtight container lined with a kitchen towel, cover, and let steam at least 15 minutes to soften. Repeat with remaining roti, stacking to let steam as you go.

    How it all comes together

    Step 15

    Use the silky shreds of roti to scoop up all the various curries, chows and chokas that make up this roti lime feast.

    Photo by Rey Lopez

    Read More

  • Warm Tomato, White Bean & Sourdough Salad

    Warm Tomato, White Bean & Sourdough Salad

    recipe image

    Sign up for our newsletter

    Our best tips for eating thoughtfully and living joyfully, right in your inbox.

    Read More