Author: PatagoniaLlami

  • It Might as Well Be Spring Vegetable Soup

    It Might as Well Be Spring Vegetable Soup

    recipe image

    It Might as Well Be Spring Vegetable Soup

    • Serves
      8
    Author Notes

    Fennel. Asparagus. Leeks. All the herbs you can find. Great vegetable stock. A bit of heat. Vegan. Yum: spring in a bowl. —Alyce Morgan

    Ingredients

    • 2 tablespoons

      Olive oil


    • 1/8 teaspoon

      Crushed red pepper


    • 1

      Onion, chopped


    • 3

      Each: Carrots and Celery stalks, chopped


    • Kosher salt and fresh ground pepper


    • 2 tablespoons

      Lemon thyme


    • 1/2 cup

      Parsley, chopped


    • 1/3 cup

      Dill (fresh), chopped (plus 3 tablespoons for garnish)


    • 2

      Garlic cloves, minced


    • 1/4 cup

      White wine (dry)


    • 1

      Fennel bulb (large), cored and sliced


    • 2

      Leeks, thinly sliced (white and light green)


    • 1/2 pound

      Asparagus, trimmed and sliced into 1-2-inches (reserve tips)


    • 2 quarts

      Vegetable stock


    • 1 cup

      Water


    • 1/2

      Lemon, optional

    Directions
    1. In a 6-quart stockpot, heat oil over medium flame with crushed red pepper for one minute. Add onion, carrots, and celery. Season with 1/2 teaspoon salt and 1/4 teaspoon pepper; cook five minutes or until vegetables are softening. Stir in fresh herbs and garlic; cook two minutes. Pour in wine and bring to a boil for a two minutes or so until wine is reduced.
    2. Add fennel, leeks, 1″ -2″ asparagus pieces, vegetable stock, and water. Bring to a boil. Reduce heat and simmer until vegetables are tender — about 15 minutes. Meanwhile, bring 1 cup of water to boil in a small sauce pan and add asparagus tips for 2 minutes. Drain and reserve.
    3. Using an immersion blender (or in batches in the food processor or blender), blend the soup briefly and stir in asparagus tips. Taste and adjust seasonings. Ladle into warm bowls and garnish with a little freshly-chopped dill and a squeeze of lemon, if desired. Serve hot, at room temperature, or cold.

    Read More

  • Chili Chocolate Fudgesicles or Milkshakes

    Chili Chocolate Fudgesicles or Milkshakes

    recipe image

    Chili Chocolate Fudgesicles or Milkshakes

    • Serves
      4-6
    Author Notes

    Chili Chocolate Fudgesicles or Milkshakes? Who could make such a decision?!


    I highly recommend either, or both! These delicious frozen desserts are gluten-free, vegan, soy-free and easy to make. They are also fruit-sweetened! —DUZE @BakingBackwards

    Ingredients

    • 3 tbsps unsweetened cocoa powder


    • 2 dashes coarse sea salt


    • 1.5 tsp chilli powder


    • 1.5 tsp cinnamon


    • 1 small frozen banana


    • 5 small pitted sweet Sayer dates (about 35-40g) (I use Parnoosh honey dates)


    • 1.5 tbsp chia seeds


    • 2 cups water


    • 1.5 tsp pure vanilla extract


    • 1 tsp chocolate extract


    • 2.5 tsp soy free vegenaise


    • 1 small very ripe red Bartlett pear


    • 3.5 tbsp unsweetened pear sauce


    • 1 tsp baking powder


    • 1.5 tsp baking soda


    • 1 tsp maple syrup (optional)

    Directions
    1. Add all ingredients to a food processor or high speed blender. Pulse ingredients together then scrape down sides and blend again on high speed until smooth. I blended for about 5 minutes in my food processor. Taste! Adjust sweetness by adding more dates if necessary. Add extra cinnamon and chilli powder if not spiced enough. If not chocolatey enough, add extra cocoa and blend.
    2. Taste! If satisfied, serve mixture either as 2-4 milkshakes immediately, OR spoon mixture into either 4 large popsicle molds or 8 smaller popsicle molds and chill in freezer until frozen. Enjoy.

    Read More

  • Left Leaning Quinoa

    Left Leaning Quinoa

    recipe image

    Left Leaning Quinoa

    • Serves
      2-4
    Author Notes

    Back in the nineties chefs all over from Jacque Pepin to the Too Hot Tamales were singing the praises of Quinoa as the “Super Grain of the Future”. Unfortunately it has become the super grain of the recent past. Quinoa is a grain imported from Bolivia with an interesting appearance and a pleasant nutty flavor. The National Academy of Sciences has described it as one of the best sources of protein in the vegetable kingdom. I use red, mostly for its color in presentation, but flavor difference is slight.


    If you have truculent vegan offspring this is safe to serve them so that they don’t start chewing on a Zappos box.


    Why did it drop off restaurant menus? Possibly because customers were never sold on it. But I’ve been selling it to my own friends with success—one of whom makes long wilderness hikes and needs to pack light (quinoa, bouillon cubes).


    So put on your Evo Morales inauguration “freedom” cardigan sweater and prepare this as an easy side dish. It cooks up quickly in the same proportions as you would use for cooking white rice; 2 parts water to one part quinoa, but it cooks faster than rice.


    —pierino

    Ingredients

    • 2 cups

      Bolivian spring water (or from your tap)


    • 1 cup

      red quinoa (or white depending on your political spectrum)


    • 1

      green onion or ramp, thinly sliced


    • 1/2 cup

      fresh corn shaved off of the cob


    • 1

      very thinly sliced radish (ideally a French breakfast type radish)


    • Zest of one lime


    • drizzle of lime infused olive oil


    • Ground pepper and sea salt to taste

    Directions
    1. Bring the water to a boil with 1 teaspoon salt. Slowly pour in the quinoa and reduce heat to a simmer. Stir and cover the pan.
    2. Step 1 will only take about fifteen minutes. When the quinoa is about five minutes from finish lift the lid and stir in green onion, corn and nappa cabbage, then quickly replace the lid.
    3. After fifteen minutes total cooking, taste for doneness and salt. Remove from heat and stir in the lime zest and drizzle with lime oil. Top with the sliced radish and ground pepper. Serve warm
    4. Notes to cook: I have found breakfast radishes at Whole Foods and better farmers markets. But you can also easily grow your own from seed. And if you do follow that instruction, you can find uses for the top greens as well.
    5. A lemon infused oil maybe easier to find than lime. In which case substitute lemon zest especially if Meyer lemons are available.

    Standup commis flâneur, and food historian. Pierino’s background is in Italian and Spanish cooking but of late he’s focused on frozen desserts. He is now finishing his cookbook, MALAVIDA! Can it get worse? Yes, it can. Visit the Malavida Brass Knuckle cooking page at Facebook and your posts are welcome there.

    Read More

  • Blackberry Coconut Coffee Cake

    Blackberry Coconut Coffee Cake

    recipe image

    Blackberry Coconut Coffee Cake

    Photo by Tori Cooper
    • Serves
      12
    Author Notes

    A sweet and healthy coffee cake that brings together the flavors of coconut and fresh blackberries. it’s dairy free and vegan so it makes a great breakfast or snack! —Tori Cooper

    Ingredients
    • Cake:

    • 2 tablespoons flaxseed meal


    • 1 tablespoon chia seeds


    • 1 cup full-fat coconut milk


    • 2 tablespoons coconut oil, melted


    • 3/4 cup almond milk or water


    • 1 teaspoon salt


    • 1 teaspoon baking soda


    • 1 teaspoon vanilla extract


    • 1/4 cup pure maple syrup


    • 1/2 cup raw sugar (or coconut sugar)


    • 2 1/2 cups whole wheat flour


    • 2 1/2 cups fresh blackberries

    • Streusel:

    • 1/2 teaspoon cinnamon


    • 1/2 teaspoon salt


    • 1 teaspoon vanilla extract


    • 1/3 cup raw sugar (or coconut sugar)


    • 1/2 cup whole wheat flour

    Directions
    1. Preheat oven to 350 degrees F (180 C) and grease a 9×11 inch pan with a light amount of oil. In a medium mixing bowl, combine flaxmeal, chia, almond milk, and coconut milk. Add the melted coconut oil, salt, soda, cinnamon, vanilla, maple syrup, and sugar. Mix in the flour well and then gently fold in 1 1/2 cups of the blackberries. Measure out about 1/3 cup of the batter and pour the rest into the prepared pan.
    2. Pour the reserved batter back into the bowl and stir in the ingredients for the streusel. Mix until it comes together into a sort of thick dough, then alternate crumbling this mixture and sprinkling the remaining 1 cup of blackberries over the top. Bake the cake for 30 to 40 minutes until a toothpick inserted in the center comes out clean. Allow the cake to cool for at least 15 minutes before cutting.

    Read More

  • Roasted cauliflower, tomato and chickpea bowl

    Roasted cauliflower, tomato and chickpea bowl

    recipe image

    Roasted cauliflower, tomato and chickpea bowl

    Photo by Tina Jeffers
    • Serves
      2-3
    Author Notes

    Inspired by my favorite Middle Eastern dishes, this Vegan bowl is easy to prepare and you probably have most of the ingredients in your pantry! —Tina Jeffers

    Ingredients
    • For the bowl

    • 1

      small head of cauliflower


    • 1 pint

      cherry tomatoes


    • 1-15 ounces

      can of garbanzo beans, drained and rinsed


    • 1

      lemon, cut into wedges


    • 2

      cloves of garlic, finely diced


    • 2 tablespoons

      extra-virgin olive oil


    • 1/4 teaspoon

      red chili flakes


    • 1/2 teaspoon

      cumin


    • 1/2 teaspoon

      kosher salt


    • 1/4 teaspoon

      freshly ground black pepper


    • 1/4 cup

      fresh Italian parsley


    • 2 cups

      cooked couscous

    • For the tahini sauce

    • 3 tablespoons

      tahini


    • 1

      clove garlic


    • 2 tablespoons

      fresh lemon juice


    • 1 teaspoon

      apple cider vinegar


    • 1/2 teaspoon

      salt


    • 1/4 cup

      water

    Directions
    1. For the bowl
    2. Heat the oven to 450 degrees.
    3. Drain and rinse the garbanzo beans and place in a large bowl. Cut the cauliflower in half, remove the tough inner stem and break into florets. Thinly slice the florets and add to the bowl along with the tomatoes and lemon wedges. Add the olive oil, garlic, chili flakes, cumin, salt and pepper to the bowl and toss to make sure everything is coated in the oil. If you cauliflower is really large you may need to use an additional tablespoon of oil.
    4. Line a baking sheet with parchment paper and spread the vegetables over the top. Cook for 25 to 30 minutes stirring occasionally. The tomatoes should start to release their juices and the cauliflower starts to turn golden brown.
    1. For the tahini sauce
    2. Combine The Tahini, Garlic, Lemon Juice, Vinegar, And Water In A Blender And Puree Until Smooth. Taste And Add Salt And Pepper To Taste, You May Also Want To Add Additional Water If Necessary If It’s Too Thick.
    3. To serve divide the couscous between two plates and top with the cauliflower mixture. Drizzle the tahini sauce over the top of the bowl and finish with a sprinkle of parsley

    Read More

  • Best-Ever Rice Pudding

    Best-Ever Rice Pudding

    recipe image

    rice pudding dusted with cinnamon

    pinterest

    PHOTO: LUCY SCHAEFFER; FOOD STYLING: MAKINZE GORE

    preview for This Secret Ingredient Is The Key To Our Favorite Rice Pudding


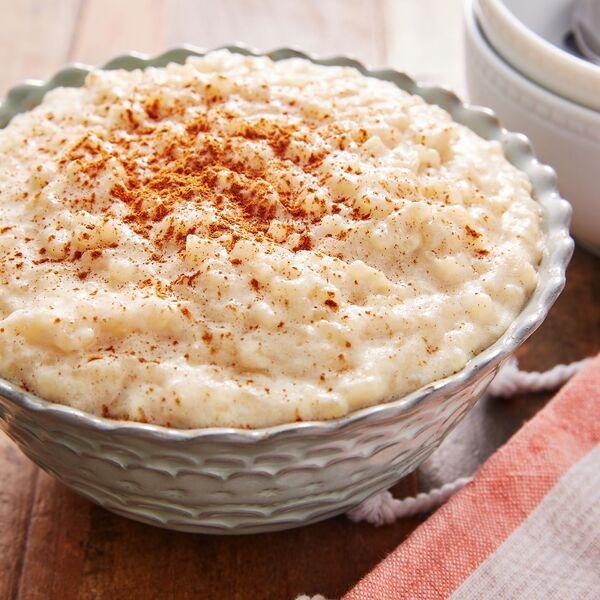
    Sure, I love fried rice (I literally wrote Delish’s recipe for it), but I gotta say, a delicious rice pudding may be a great new contender for best use of leftover rice. It’s warming, stick-to-your-ribs comfort that isn’t easily replicated in the dessert world. This recipe is very straightforward, and I’d even say it would be perfectly classic if it weren’t for one special, secret ingredient. Keep reading on to find out what makes this rice pudding so special, and how to perfect it:

    What People Are Saying:

    “Literally the best rice pudding I’ve ever eaten!” – sleepyetoile

    “Holy crap. SO GOOD. Adding ice cream is so easy and almost feels like cheating, but the results speak for themselves. No one has to know 🤫This is the way!!” – frank_cilantro

    How To Make Rice Pudding

    INGREDIENTS

    • Whole Milk: Whole milk will give the richest flavor and most decadent texture, so I highly recommend using it here instead of a lower-fat option.
    • Vanilla Ice Cream: This is my secret ingredient for the best rice pudding—vanilla ice cream. No, not to top the pudding, but in the pudding. A while back, I worked with a chef who would fold crème anglaise into his rice pudding. (Crème anglaise is just a fancy word for a rich, delicious custard.) As I was tooling with this recipe and thinking about doing the same, Taylor Ann (fellow Delish editor and mad scientist) reminded me that most ice cream is just crème anglaise that has been whipped with air and frozen. So, she brilliantly recommended I just melt some down and add it to the cooking liquid. So I did, and the results were pretty incredible. This rice pudding is slightly richer and creamier, but the added ice cream doesn’t cover up that toasty rice flavor. You can use your favorite pint of ice cream, though in testing, though I found good ol’ Häagen-Dazs to give the best results.
    • Sugar: The vanilla ice cream helps sweeten the rice pudding, but we need some granulated sugar to really turn this into a sweet dessert.
    • Cinnamon Sticks: Cinnamon sticks will add a warm, spiced flavor to our rice pudding, and another depth of flavor.
    • White Rice: You want to use previously cooked rice here, which is what makes this such a perfect dish to use up your leftover rice. Make sure you’re using cooked white rice.
    • Vanilla Extract: A little bit of vanilla extract adds another layer of sweet, floral flavor to this dessert.

    STEP-BY-STEP INSTRUCTIONS

    Grab a large, heavy pot, and cook the milk, ice cream, sugar, cinnamon, and salt over medium heat. Cook, while stirring frequently, until the ice cream has melted and the sugar has dissolved.

    rice puddingpinterest

    PHOTO: CHARLIE GILLETTE

    Once melted and incorporated, add in the rice, and bring the entire mixture to a gentle boil. Once boiling, immediately reduce the heat to medium-low to bring to a simmer. Cook the mixture on a simmer, making sure to stir occasionally—you don’t want to scorch the rice. During the last 10 minutes of cooking, add in the vanilla extract.

    rice puddingpinterest

    PHOTO: CHARLIE GILLETTE

    Then, cook until your desired texture is reached. Keep in mind that the pudding will be looser while it’s hot—once it cools, it will thicken. So, look for a texture that is slightly looser than what you want, and it will reach the desired thickness when cooled. Once it reaches the desired texture, let it cool to room temperature, then transfer to an airtight container until it reaches your desired temperature. Top with your desired toppings, and serve!

    creamy rice pudding in a blue bowl held by a hand

    PHOTO: CHARLIE GILLETTE

    bowl of creamy dessert topped with dried fruit and nuts

    PHOTO: CHARLIE GILLETTE

    The full list of ingredients and instructions can be found in the recipe below.

    Recipe Tips

    • It will thicken as it sets. Like I said above, remember that the rice pudding will thicken as it sets. So, keep that in mind when you’re determining your desired texture.
    • Let it chill. You can enjoy rice pudding at your desired temperature, but I think it tastes best after at least 1 night in the refrigerator.
    • Choose your toppings. I love eating this as is or with a dusting of cinnamon, but there are plenty of welcome additions to this rice pudding. Chopped nuts (especially pistachios) and dried fruit would also be perfect on top of this pudding.

    Storage

    This is a great make-ahead dessert, as it tastes even better after a night in the fridge. If you have any leftovers, store them in an airtight container in the fridge for around 3 days.

    Advertisement – Continue Reading Below

    • 3 cups

      whole milk

    • 1 pt.

      vanilla ice cream

    • 1/4 cup

      granulated sugar

    • 3

      to 4 (3″) cinnamon sticks

    • 1/4 tsp.

      kosher salt

    • 1 1/2 cups

      cooked white rice

    • 1 tsp.

      pure vanilla extract

    • Ground cinnamon, dried fruit, or pistachios, for topping

      1. Step 1In a large, heavy pot over medium heat, cook milk, ice cream, sugar, cinnamon, and salt, stirring frequently, until ice cream melts and sugar is dissolved, 5 to 6 minutes.
      2. Step 2Stir in rice; bring to a gentle boil. Immediately reduce heat to medium-low, bring to a simmer, and cook, stirring occasionally to avoid scorching and adding vanilla during the last 10 minutes of cooking, until desired consistency is reached, 45 to 50 minutes. Note: While the pudding is hot, this will be the loosest it will be, so look for a texture that is slightly looser than what you want, and it will reach the desired thickness when cooled.
      3. Step 3Let cool to room temperature. Transfer to an airtight container and serve at your desired temperature; it tastes best after at least 1 night in the refrigerator. Top with desired toppings before serving.

    rice pudding with cinnamon and dried fruitpinterest

    PHOTO: LUCY SCHAEFFER; FOOD STYLING: MAKINZE GORE

    Made This?

    Let us know how it went in the comments below!

    Read More

  • Thai Green Curry Zucchini Noodle Bowl

    Thai Green Curry Zucchini Noodle Bowl

    recipe image

    These easy, vegan and paleo-friendly bowls are made with pineapple, spring veggies, zucchini noodles and a creamy green coconut curry sauce. Perfect for a delicious meal!

    These easy, vegan and paleo-friendly bowls are made with pineapple, spring veggies, zucchini noodles and a creamy green coconut curry sauce. Perfect for a delicious meal!

    coconut-curry-photograph

    A bowl of straight-up spicy sweet deliciousness being delivered RIGHT to your veggie-munchin’ mouth today.

    Seriously. I could have just named this addicting bowl of crunchy-crispy-HEALTH for what it REALLY is: I just wanted to use as MANY seasonal veggies in one recipe as possible.

    And add coconut curry.

    I wonder if there is a “curry anonymous?” Maybe a twelve step program? Things to ponder.

    BUT, what is not to ponder is the fresh combo of golden-brown, SUPER fragrant garlic and ginger that combines with creamy coconut milk and S-E-V-E-N different vegetal friends, PLUS a fruity friend to keep it interesting.

    making-coconut-curry-pic

    making-coconut-curry-picture

    If nutritious-glowy-skin-food could EXPLODE off the screen, it would be happening ALL OVER you right now.

    And you’d be feeling really happy and healthy about it.

    coconut-curry-photo

    S-I-M-P-L-Y sauté all the veggies in ONE PAN (!!!) and, in equal amounts of super-easy-ness, add all the sauce ingredients right on top of them. Stir it, boil it, thicken it.

    BOOM. Dinner is on yo’ table before you even knew what was going on.

    coconut-curry-picture

    Preee much this bowl of fresh and fruity, creamy-but-spicy YUMMINESS has a 4.0 in “Stealthy Ninja Eats.” Which is not a real thing.

    But, you understand.

    Other fun facts that I need to alert your taste buds to: it makes REALLY tasty leftovers. The kind that you almost don’t make it TO the land of leftovers, because you open and close the fridge to pick at them the night before the bringing-to-work-requirement is met.

    Real talk. You’ve been there too.

    Cook once. Eat twice.

    coconut-curry-pic

    Be happy. Be healthy. GO YOU.

    Print


    5 Stars 4 Stars 3 Stars 2 Stars 1 Star

    No reviews

    • 2 Medium Zucchinis (spiralized with the 3mm blade)
    • Salt
    • 1 Tbsp Coconut oil
    • 1 tsp Garlic (minced)
    • 1/2 ts Ginger (minced)
    • 1 Cup Asparagus (cut into bite-sized pieces)
    • 1/2 Large Red Bell pepper (thinly sliced)
    • 1/2 Cup Leeks (thinly sliced)
    • 1/2 Cup Snow peas (halved)
    • 3/4 Cup Light coconut milk
    • 1/4 Cup Pineapple juice
    • 1 Tbsp Green curry paste
    • 1 Tbsp Coconut sugar
    • 1 tsp Fish sauce
    • 2 Cups Spinach (roughly chopped)
    • 1/4 Cup + 2 Tbsp Pineapple tidbits (drained)
    • 4 Radishes (thinly sliced)

    For garnish:

    • Thai Basil (thinly sliced)
    • Cilantro (roughly chopped)
    • Squeeze of fresh lime juice


    Instructions

    1. Place the spiralized zucchini into a colander set over a large bowl. Sprinkle with a pinch of salt and let them sit, stirring occasionally, so they release some of their moisture.
    2. Heat the coconut oil in a large pan set over medium heat. Add in the garlic and ginger and cook, stirring constantly, until golden brown and fragrant (about 1 minute.)
    3. Add in the asparagus, pepper, leeks and snow peas and cook until the veggies are tender and lightly brownies, about 3-5 minutes.
    4. Add in the coconut milk, pineapple juice, curry paste, coconut sugar and fish sauce and stir until the green curry is well mixed into the sauce. Turn the heat to medium/high and bring to a boil.
    5. Once boiling, reduce the heat to medium/low and simmer, stirring occasionally,until the sauce has reduced by about 1/3 and thickened slightly, about 10-13 minutes. Once reduced, stir in the chopped spinach and cook for an additional 1-2 minutes, until the spinach wilts.
    6. Squeeze out as much excess moisture from the zucchini as you can, and lightly pat it dry with a paper towel. Divide the noodles between two bowls.
    7. Divide the veggie/sauce mixture on top of the two bowls, followed by the pineapple tidbits and sliced radishes.
    8. Garnish with Thai basil, cilantro and a squeeze of fresh lime juice.
    9. DEVOUR!

    GET OUR NEW COOKBOOK FOR FREE!

    Sign up for our newsletter and get Honest Cooking’s five star rated new cookbook for FREE today.

    Previous Post

    Almond Butter and Berry Chia Pudding

    Next Post

    10 Tips that will Make Your Grilling Better This Summer

    Read More

  • White chocolate faux cheesecake

    White chocolate faux cheesecake

    recipe image

    White chocolate faux cheesecake

    Photo by Tina Jeffers
    • Serves
      8-10
    Author Notes

    Inspired by A House in the Hills vegan cheesecake, this has a great texture due to the addition of cocoa butter. Rich and decadent with a subtle white chocolate flavor that is enhanced by the addition of honey and Maldon sea salt. —Tina Jeffers

    Ingredients
    • Crust:

    • 2 cups

      almond flour


    • 2 cups

      medjool dates, pitted


    • 1/2 cup

      pistachios


    • 1/4 cup

      walnuts


    • 1/2 teaspoon

      kosher salt


    • 1/2 teaspoon

      Saigon cinnamon


    • 1/4 teaspoon

      cardamom

    • for the cheesecake layer

    • 3 cups

      raw cashews


    • 2/3 cup

      cacoa butter


    • 1

      vanilla bean


    • 3 tablespoons

      freshly squeezed lemon juice


    • 1/2 cup

      maple syrup


    • 1/2 cup

      almond milk


    • 2 tablespoons

      maple syrup


    • 1/2 teaspoon

      vanilla paste


    • 1 pint

      fresh figs


    • 1 bunch

      baby grapes with the stems attached


    • 1/2 teaspoon

      malden sea salt

    Directions
    1. Crust:
    2. Soak the cashews for the cheesecake in enough water to cover for at least 1 hour or up to overnight.
    3. For the crust, combine all the ingredients in the bowl of a food processor and pulse until crumbs form and the mixture holds together when you pinch it between your fingers.
    4. Spray a 9″ springform pan with cooking spray and then press the crumbs into the bottom of the pan smoothing the top with the back of a spoon to make an even layer.
    1. for the cheesecake layer
    2. Fill a small saucepan with an inch of water and place a heatproof glass bowl on top. Split the vanilla bean in half and add to the bowl along with the cacao butter and stir occasionally until the mixture is melted and smooth. Remove from the heat and let cool slightly while you prepare the rest of the ingredients.
    3. Drain the cashews and rinse well. In a Vitamix or other high-speed blender, combine the cashews, lemon juice, maple syrup, almond milk, and salt. Blend until the mixture is smooth and then add the cacao butter and the whole vanilla bean to the blender. Process for another 30 seconds or so or until the mixture is totally smooth. If your mixture is too thick feel free to add a little bit more almond milk if necessary. Pour the chocolate cashew mixture over the prepared crust and use a spatula to smooth the top. Cover the pan with plastic wrap and place in the refrigerator for 2 hours.
    4. To serve, release the cake from the springform pan. Combine the honey with the hot water and vanilla and stir until the mixture is smooth and pourable. Clean the figs and cut into quarters. Toss the figs and the grapes in the honey mixture and arrange to your liking on the top of the cake. Sprinkle generously with the Maldon salt (a teaspoon or so) and serve a little extra on the side if desired!

    Read More

  • Olive Oil Chocolate Chip Cookies Recipe

    Olive Oil Chocolate Chip Cookies Recipe

    recipe image

    This vegan chocolate chip cookie recipe relies on a short list of basic pantry staples (hey, chocolate chips are staples!), so be sure to reach for extra-virgin olive oil and chocolate you absolutely love.

    Updated February 12, 2025

    Why It Works

    • The rich flavor and color of extra-virgin olive oil give these cookies their distinctive character.
    • In a dough made with liquid oil, brown sugar works to keep the cookies nice and thick.
    • An oat slurry provides water, protein, and emulsification, much like a whole egg, but with a subtle flavor that blends seamlessly with the dough.
    • The varied shapes and cacao percentages in an assortment of chocolate chips provide more depth of flavor to the dough.

    These vegan chocolate chip cookies get their color and richness from extra-virgin olive oil, which lends its unique flavor to the dough and underscores the bittersweet earthiness of chocolate chips. (See the note at the bottom of this page for guidance on choosing an olive oil.) The cookies bake up crisp around the edges, with a soft and chewy center, but feel free to bake them more or less for a crisper or softer texture instead.

    Olive Oil Chocolate Chip Cookies Recipe


    Cook Mode
    (Keep screen awake)

    For the Oat Slurry:

    • 1 1/2 ounces old-fashioned rolled oats (about 1/2 cup minus 2 1/2 teaspoons; 42 g), not quick-cooking or instant

    • 3 ounces water (about 1/3 cup plus 1 tablespoon; 85 g)

    For the Dough:

    • 6 ounces light brown sugar (about 3/4 cup, gently packed; 170 g)

    • 3/4 teaspoon baking soda

    • 3/4 teaspoon (3 g) Diamond Crystal kosher salt; for table salt, use about half as much by volume or the same weight

    • 1/2 teaspoon baking powder

    • 1/8 teaspoon ground cinnamon

    • 4 3/4 ounces extra-virgin olive oil (about 2/3 cup; 135 g); see note

    • 2 ounces prepared oat slurry

    • 1/4 ounce vanilla extract (about 1 1/2 teaspoons; 7 g)

    • 6 3/4 ounces all-purpose flour (about 1 1/2 cups, spooned; 190 g)

    • 6 ounces assorted chocolate chips or chopped chocolate; see note

    1. For the Oat Slurry: In a tall, narrow container just wide enough to accommodate the head of an immersion blender, combine rolled oats and water. Using an immersion blender, purée until thick and smooth, then strain through a fine-mesh strainer, pressing on the solids with a flexible spatula until they give up all their liquid. Discard the fibrous oat solids and reserve 2 ounces of the thick and gooey purée to use as directed below. This step should not be done in advance, as the oat slurry will continue to thicken over time, eventually becoming unusable.

    2. For the Dough: Adjust oven rack to middle position and preheat oven to 350°F (180°C). In a large bowl, whisk brown sugar, baking soda, salt, baking powder, and cinnamon until very well combined and free of any major lumps, about 1 minute. Add olive oil, prepared oat slurry, and vanilla extract and whisk until smooth. Add flour and stir, using a flexible spatula, until well absorbed, then add chocolate chips and knead by hand to incorporate. The dough will seem a touch oily and strange; this is normal.

    3. Portion the Dough: Using a 2-tablespoon cookie scoop, divide dough into about 18 pieces, firmly compressing each portion into the scoop using the palm of your hand or the edge of the bowl. (If you like, the portioned dough can be refrigerated in a heavy-duty zipper-lock bag for up to 1 week, or frozen for up to 6 months. Let stand at room temperature until quite soft, about 70°F/21°C, then bake as directed.)

    4. To Bake: Arrange portioned dough on a parchment-lined aluminum baking sheet, leaving 2 inches between portions. If you like, garnish with a few extra chocolate chips on each cookie. Bake until cookies are puffed and golden from edge to center and firm around the edges but still quite steamy and soft in the middle, about 15 minutes. Cool directly on baking sheet until the crumb has set. Enjoy warm or at room temperature. Store leftovers in an airtight container up to 3 days at cool room temperature.

    Special Equipment

    Immersion blender, nonreactive fine-mesh strainer, flexible spatula, 2-tablespoon cookie scoop (optional), half-sheet pans

    Notes

    The flavor and aroma of these cookies depend entirely on the quality of the olive oil, so be sure to use a brand with a flavor you absolutely love. This recipe can be used as a showcase for any style of olive oil so long as it’s one you enjoy, but for the most “traditional” chocolate chip cookie, try an extra-virgin olive oil with a mild and buttery profile, rather than one that’s peppery or sharp. For more information, see our guide to buying olive oil.

    If olive oil isn’t your jam, regardless of how mild it may be, this recipe works equally well with hazelnut oil—which you might have left over from making our homemade Nutella.

    For more information on selecting an assortment of chips, see our chocolate chip buying guide for recommendations. Chopped chocolate bars can be used in place of commercial chips, a swap that gives the chocolate a more assertive presence in the dough; I recommend using a similar assortment of cacao percentages and styles. See our top picks for supermarket chocolate bars for more information.

    Make-Ahead and Storage

    The portioned dough can be refrigerated in a heavy-duty zipper-lock bag for up to 1 week, or frozen for up to 6 months. Let stand at room temperature until quite soft, about 70°F (21°C), then bake as directed. Leftover cookies may be stored in an airtight container for up to 3 days at cool room temperature.

    This Recipe Appears In

    • Olive Oil Chocolate Chip Cookies: Just Pantry Staples, Totally Vegan
    Nutrition Facts (per serving)
    202 Calories
    11g Fat
    25g Carbs
    2g Protein

    ×

    Nutrition Facts
    Servings: 18
    Amount per serving
    Calories 202
    % Daily Value*
    11g 14%
    Saturated Fat 3g 14%
    1mg 0%
    136mg 6%
    25g 9%
    Dietary Fiber 1g 4%
    Total Sugars 14g
    2g
    Vitamin C 0mg 0%
    Calcium 24mg 2%
    Iron 1mg 8%
    Potassium 86mg 2%
    *The % Daily Value (DV) tells you how much a nutrient in a food serving contributes to a daily diet. 2,000 calories a day is used for general nutrition advice.

    (Nutrition information is calculated using an ingredient database and should be considered an estimate.)

    Read More