Author: PatagoniaLlami

  • Versatile Lentil Stew

    Versatile Lentil Stew

    recipe image

    Versatile Lentil Stew

    Photo by Emiko
    • Serves
      4
    Author Notes

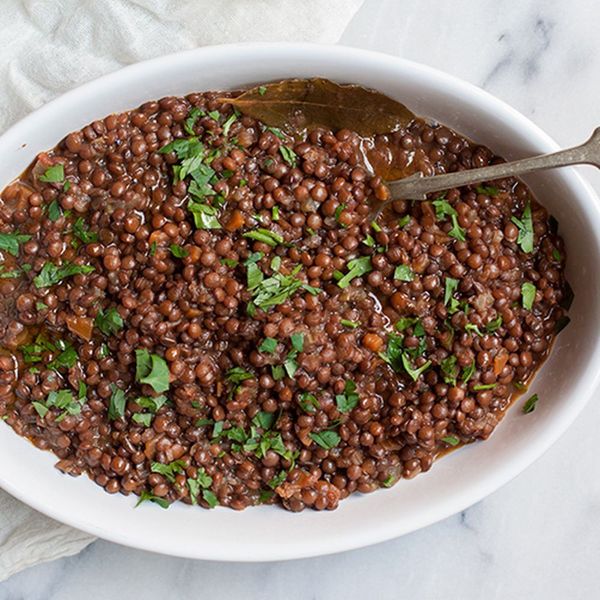
    Ever since I tried Rachel Roddy’s recipe for lentils (which is more or less this one, though she adds garlic, a good idea, and a leek and doesn’t use the bay or rosemary) from her Roman cookbook, it has become a favorite. I follow her advice by making sure I have leftovers so that I can reinvent them in various ways.

    Once you have a batch of this simple stew on hand, you can use the lentils for so many things: half-purée them and add a swoosh of olive oil for a hearty, creamy and delicious soup; stir them through freshly boiled spaghetti and you have what I like to think of as vegan spaghetti bolognese; or—my favorite solution to weeknight dinner—top them with a crisp-edged, soft-yolk fried egg.

    Brown lentils are typically used to make this stew, as brown and green lentils are firm and retain their shape when cooking. Red or yellow lentils are softer and faster-cooking, with the tendency to fall apart into a thick and wonderful mush when cooked; these are better suited for soup, sauces, or dips.

    Many will say there’s no need to soak lentils at all, but Italian recipes always call for soaking—usually from somewhere between 2 to 12 hours—and this reduces the cooking time significantly. Don’t add salt until the very end or the lentils will remain tough and hard despite hours of cooking.

    The lentils keep well in the fridge for the better part of the week, though they tend, like all legumes, to absorb their liquid (and its flavors) the longer they are in the kept. When reheating, add a splash (or more) of water to loosen and revive the mixture, depending on how you’re re-inventing them. —Emiko

    • Test Kitchen-Approved
    Ingredients

    • 1 1/4 cups

      (250 grams) dried brown lentils


    • 1

      onion, finely chopped


    • 1

      carrot, finely chopped


    • 1

      celery stalk, finely chopped


    • 3 to 4 tablespoons

      olive oil, divided


    • 1

      bay leaf or sprig of rosemary


    • 5 cups

      water


    • 1 pinch

      salt


    • handful of flat-leaf parsley, chopped

    Directions
    1. Rinse the lentils well and set them in a wide bowl. Cover with water to cover and soak for at least 12 hours or overnight (you can skip this if you are not a believer of soaking dried lentils, but do always rinse them).
    2. Place the onion, carrot, and celery in a large saucepan or soup pot with 2 tablespoons olive oil. Sauté gently on low heat until the vegetables are very soft and the onion is somewhat translucent, but not colored. Add the bay leaf and the drained lentils and 5 cups of water.
    3. Bring to a boil and then turn the heat down to a gentle simmer and cook until the lentils are tender but retain their shape (this can take as little as 15 minutes to upwards of 45 minutes, depending on the lentils and whether they were soaked). Keep checking them and add more water if necessary. Add salt to taste only once the lentils are tender, otherwise they will remain tough. Stir through chopped parsley and serve as you like (see notes for ideas).

    Read More

  • Charred Tomatillo and Scallion Salsa

    Charred Tomatillo and Scallion Salsa

    recipe image

    Charred Tomatillo and Scallion Salsa

    Photo by Julia Gartland
    • Prep time
      10 minutes
    • Cook time
      10 minutes
    • Makes
      about 1 1/2 cups [360 ml]
    Author Notes

    This recipe is featured in the story, Forget Taco Tuesday—You’ll Want Julia Turshen’s Chorizo Tacos Everyday, sponsored by Bosch.

    This salsa will cause you never to buy another jar of salsa. It’s seriously that good, and almost surprisingly so because it’s so easy to make. It’s not only vegan but also totally free of all of the things that people tend to point out (fat, sugar, dairy, gluten, and so on). I like this salsa best just after it’s made, when the lime juice and cilantro still have their freshness, but it’s also totally fine to make it up to 3 days in advance and store it in a covered container in the refrigerator. Keep in mind that cooked and cooled tomatillos tend to gel, almost like really good chicken stock, so don’t worry if the seems a little thick when you take it out of the fridge. Be sure to let it come to room temperature before serving and then maybe give it an extra squeeze of lime and a sprinkle of salt to perk it up. —Julia Turshen

    Test Kitchen Notes

    Reprinted with permission from Now & Again: Go-To Recipes, Inspired Menus + Endless Ideas for Reinventing Leftovers by Julia Turshen, copyright © 2018. Published by Chronicle Books. —The Editors

    Ingredients

    • 3/4 pound

      [340 g] tomatillos (about 8 small or 6 large), husked and rinsed, roughly chopped


    • 6

      scallions, tough roots and dark green tops trimmed off, white and light green parts roughly chopped


    • 1

      jalapeño chile, roughly chopped (discard the seeds if you like)


    • 2

      garlic cloves, peeled


    • 3 tablespoons

      fresh lime juice


    • A large handful of fresh cilantro leaves (a little bit of stem is fine!)


    • 1 teaspoon

      kosher salt

    Directions
    1. Position an oven rack about 6 in [15 cm] from the heat source and preheat your broiler. Line a large sheet pan with aluminum foil.
    2. Place the tomatillos, scallions, jalapeño, and garlic cloves on the prepared sheet pan and broil, taking the pan out to stir the vegetables now and then, until they’re charred in spots and softened a bit, about 8 minutes all together, depending on the strength of your broiler.
    3. Transfer all of the broiled vegetables to a blender or food processor, add the lime juice, cilantro, and salt and pulse until puréed but not completely smooth (texture is good!).
    4. Alternatively, put the broiled tomatillos into a medium bowl and crush them with a potato masher. Finely chop the scallions, chile, garlic, and cilantro, add to the mashed tomatillos along with the lime juice and salt, and stir well.
    5. Serve the salsa at room temperature.

    Read More

  • Israeli Couscous-Butternut Squash Salad with Fruit, Cheese + Orange Vinaigrette

    Israeli Couscous-Butternut Squash Salad with Fruit, Cheese + Orange Vinaigrette

    recipe image

    Israeli Couscous-Butternut Squash Salad with Fruit, Cheese + Orange Vinaigrette

    • Serves
      6-8
    Author Notes

    Package of Trader Joe’s Harvest Blend (Israeli Couscous, Orzo, Garbanzo Beans and Red Quinoa) kept jumping out at me each time I opened the pantry. Last week, I needed to make a winter squash recipe for our 38 Power Foods blogging group and, somehow, the two met with apples and pears on the counter. Leave out the cheese for a hearty vegan entree. Note: I do the squash in the microwave to speed cooking time: first on high (pierced at large end for steam) for a 3-5 minutes, then (let cool a bit) peeled, seeded, and chopped for a few more min. or until tender. —Alyce Morgan

    Ingredients

    • 1

      Small butternut squash- 1 lb or less, cooked and cut into 1/2 inch pieces


    • 1/2

      Package (8 ounces) Trader Joe’s “Harvest Blend” Couscous or Israeli Couscous


    • 4

      Fresh sage leaves, optional


    • 1 3/4 cups

      chicken broth


    • 1 1/2 tablespoons

      Each: Canola oil and Extra Virgin Olive Oil


    • Kosher Salt, Fresh Ground Pepper (I like white), Crushed red pepper


    • 1

      Apple, cored, 1/2 inch dice


    • 1

      Pear, cored, 1/2inch dice


    • 2

      Oranges (1 peeled and diced; 1 juiced for vinaigrette)


    • 1/4 cup

      Pecans, chopped and toasted plus a few whole pecans for garnish


    • 6

      Dried figs (or fresh, if available)


    • 2 ounces

      Each: Sharp Cheddar Cheese and Swiss Cheese (Jarlsberg, Emmental or Gruyère), 1/4″ dice


    • 1/4 cup

      Dried cranberries


    • 1 teaspoon

      Honey


    • 2 cups

      Fresh spinach leaves (to line bowl)

    Directions
    1. Cook couscous according to package directions. Use chicken broth in place of water. You can add a few leaves of fresh sage if you have them (remove before making salad). When couscous is tender, add canola and olive oils while still hot. Sprinkle with 1/4 teaspoon each kosher salt and fresh ground pepper (or to taste.) Stir in 1/4 teaspoon crushed red pepper. (Cool to room temperature while you chop fruit and cheese.)
    2. Mix all chopped fruit, squash, cheese (skip for vegan version), and pecans with cooled couscous. Add the juice of the other orange and 1 teaspoon honey. Stir well, taste and adjust seasonings and/or dressing. Serve at room temperature in a bowl lined with fresh spinach leaves and garnish with reserved whole pecans. Keeps one day well covered in the refrigerator.

    Read More

  • Spicy, Peanutty Udon with Kale

    Spicy, Peanutty Udon with Kale

    recipe image

    Spicy, Peanutty Udon with Kale

    Photo by James Ransom
    • Serves
      1, but easily doubled or tripled
    Author Notes

    An exceedingly simple but truly delicious quick meal, with possibilities for variation galore (more Sriracha! more peanut butter! different greens!). To make it vegetarian/vegan, omit the fish sauce. —Laura

    Test Kitchen Notes

    WHO: Laura is just as excited about dark, leafy greens as we are.


    WHAT: A noodle dish so simple and slurp-worthy, you’ll have to stop yourself from making it every night.


    HOW: Make a savory sauce and round it out with everyone’s favorite sandwich spread (peanut butter!). Use the sauce to sauté greens and cooked noodles, then top with scallions, chili flakes, and chopped peanuts for more crunch and spice.


    WHY WE LOVE IT: Big flavor need not require big effort. This peanut sauce turns to your pantry’s most potent players (sesame oil, soy sauce, Sriracha, fish sauce, and peanut butter) to make a powerful sauce in 30 seconds flat. Play with the ingredients to find the combination that’s right for you, then use it to make noodles and greens infinitely more exciting. —The Editors

    • Test Kitchen-Approved
    Ingredients

    • 1/2 teaspoon

      sesame oil


    • 2 teaspoons

      soy sauce or tamari


    • 1 teaspoon

      Sriracha


    • 1/8 teaspoon

      fish sauce, plus an extra dash at the end


    • 2 tablespoons

      peanut butter (any type)


    • 3 ounces

      udon or soba noodles


    • 1/2 bunch

      kale, deribbed and sliced into 1/2-inch pieces (1 packed cup)


    • Chopped scallions, for serving


    • Chili flakes, for serving


    • Chopped peanuts, for serving

    Directions
    1. Heat 1 quart of water in a saucepan to boil.
    2. In a sauté pan over low or medium-low heat, add sesame oil, soy sauce or tamari, Sriracha, and fish sauce. Stir ingredients or rotate pan to combine and let cook for about 30 seconds. Add peanut butter, stir to combine, then turn off heat.
    3. When water is boiling, blanch kale for about 15 seconds. Drain the kale and add it to the sauce in the sauté pan and stir to coat.
    4. Bring clean water to boil. When the water is boiling, add the noodles and cook until al dente. Fresh noodles will cook very quickly; dry noodles will cook in 3 to 4 minutes.
    5. Use tongs to add the noodles straight from the water to the sauté pan with the peanut sauce and the kale. The unstrained noodles will carry enough water to dilute the peanut sauce; if you decide to strain the noodles and then add them to the sauce, add 1 tablespoon water, as well. Add a dash of fish sauce to finish.
    6. Garnish with chopped scallions, chili flakes, and chopped peanuts.

    Read More

  • Tofu Pad Thai

    Tofu Pad Thai

    recipe image

    Pad Thai, also called kway teow pad Thai (meaning “Thai-style stir-fried rice noodles”), is customized in endless ways by street food vendors, restaurateurs, and home cooks all over the world. But at the heart of this beloved Thai noodle dish is a delectably sweet, salty, and sour sauce that’s seasoned with fish sauce, sugar, tamarind, and lime juice. Lara Lee’s meatless pad thai heroes hearty, savory fresh oyster and shiitake mushrooms, which suffuse the dish with earthy flavor and combine beautifully with chewy noodles, golden-fried tofu, fresh, crisp bean sprouts, lightly spicy long red chiles, and crunchy peanuts. Tamarind sits firmly at this pad thai’s center, balancing the dish and holding it all together with its delightfully sour high note. When you prepare the dish, be sure to wash and dry the skillet after browning the mushrooms to prevent the fond from burning while cooking the tofu and peanuts. To make it vegetarian, use a vegan fish sauce, such as Ocean’s Halo, and swap mushroom sauce for the oyster sauce.

    Read More

  • Jamaican Stew Peas and Spinners

    Jamaican Stew Peas and Spinners

    recipe image

    Be the first to rate & review!

    Red kidney beans, aromatics, coconut milk, a Scotch Bonnet pepper, and more come together in these Jamaican Stew Peas and Spinners, which writer Brigid Ransome Washington developed based on her mother-in-law’s recipe. While the iterations Ransome Washington enjoyed growing up in Trinidad and Tobago included meat, this version is vegan, but make no mistake, it’s still luscious, hearty, and satisfying. Don’t throw away the soaking liquid from the beans—according to Vivienne, her mother-in-law (who she calls Auntie), simmering the beans in it gives the dish a beautiful color. The resulting Stew Peas are hearty, comforting, and filled with earthy and bright flavors. READ: Jamaican Stew Peas Put a New Spin on How I See My Mother-in-Law

    Read More

  • Cheesy Chickpea Omelets

    Cheesy Chickpea Omelets

    recipe image

    Cheesy Chickpea Omelets

    Photo by Bette Blau. Prop Stylist: Brooke Deonarine. Food Stylist: Sophia Loche.
    • Prep time
      25 minutes
    • Cook time
      10 minutes
    • Serves
      4
    Author Notes

    The kitchen is low on supplies, you’re too hungry to go shopping, and ordering takeout is expensive. Make an omelet! But there aren’t any eggs—what now? Grab chickpea flour instead. Also known as garbanzo bean flour, it’s the base ingredient for Ligurian farinata (or socca) and Provençal panisse, as well as Burmese tofu and some iterations of South Asian chilla and papadum (the latter three typically call for a specific type known as besan or gram flour). Not only does chickpea flour work as a nutty (and gluten-free and protein-rich!) replacement for all-purpose flour in baking, when mixed with liquid and a bit of baking powder, it forms a smooth batter and sizzles into a distinctly omelet-like concoction—for less than a quarter the cost of a dozen eggs.

    For four omelets, you’ll need 2 cups of chickpea flour ($1.60) and 2 cups of water, which whisk up into the consistency of a loose pancake batter. To channel a bit of salty-eggy flavor and boosted color, stir in nutritional yeast and smoked paprika as well. Falling somewhere in between a dosa and American-style omelet in flavor and texture, I fill chickpea omelets with a gooey, stringy, wallet-friendly cheese, like smoked Gouda, Pepper Jack, or Muenster ($3.40). (If you want this meal to be vegan, swap in your preferred vegan cheese and use maple syrup instead of honey in the salad dressing.) I like to chase the soft, rich omelets with a crunchy-bitter salad of radicchio and fennel ($5) dressed in honey, mustard, and apple cider vinegar, but if you have another side in mind, follow your heart. Could you go the diner breakfast route and opt for hash browns? Yup. Frenchify it with a lemony-shallot dressing over tender greens? Bien sûr! What about frozen sweet potato fries and ketchup? Duh. Since the omelets run you just about $5, you have plenty of wiggle room. —Rebecca Firkser

    Test Kitchen Notes

    Nickel & Dine is a budget column by Rebecca Firkser, assigning editor at Food52 and chickpea flour enthusiast. Each month, Rebecca will share an easy, flavor-packed recipe that feeds four (or just you, four times)—all for $10 or less. —The Editors

    • Test Kitchen-Approved
    Ingredients

    • 2 cups

      (185 grams) chickpea flour


    • 3 tablespoons

      nutritional yeast


    • 1 teaspoon

      baking powder


    • 1 teaspoon

      smoked paprika


    • Kosher salt


    • 3 tablespoons

      apple cider vinegar


    • 2 tablespoons

      Dijon mustard


    • 1 tablespoon

      honey


    • Freshly ground black pepper


    • 1

      radicchio head, quartered, cored, leaves separated


    • 1

      fennel bulb, halved and thinly sliced, reserving any fronds


    • 1/4 cup

      extra-virgin olive oil, divided, plus more for serving


    • 6 ounces

      smoked Gouda, Pepper Jack, or Muenster cheese, grated (about 2 loosely packed cups)


    • Flaky sea salt, for serving

    Directions
    1. In a medium bowl, whisk together the chickpea flour, nutritional yeast, baking powder, paprika, and 1 teaspoon salt. Slowly whisk in a scant 2 cups of water. Set aside for 10 minutes or up to 1 hour to thicken.
    2. While the chickpea mixture is resting, in a large bowl, whisk together the vinegar, mustard, and honey. Season with salt and pepper to taste, then toss in the radicchio and fennel until well coated.
    3. Heat 1 tablespoon of the oil in a medium nonstick skillet over medium-high heat until rippling and nearly smoking. Swirl the oil around the pan, then immediately pour in ¾ cup of batter and again quickly swirl to coat the pan. Cook undisturbed for 1 minute, until the omelet turns matte in color and slides around the pan easily. Cover the surface of the omelet with one-quarter of the cheese (about ½ cup loosely packed). Cook for 30 seconds, until the cheese is just starting to melt, then use a spatula to fold the omelet in half. Cook 1 minute more, flipping halfway through, until the cheese is melted and the omelet is golden, then slide onto a plate. Repeat with the remaining olive oil, batter, and cheese to make 3 more omelets. (These taste great at room temperature, but if you prefer to keep the cheese melty, place the cooked omelets on a sheet pan in a 300°F oven until you’re ready to eat the whole batch.)
    4. Drizzle the salad with more olive oil, toss to combine, and divide among the plates, then sprinkle the omelets and salad with flaky salt and more black pepper.

    Read More

  • Step 1

    Stir 1 cup plain whole-milk Greek yogurt, 1 Tbsp. harissa paste, and juice of ½ lime in a small bowl until smooth; season with kosher salt. Chill harissa-lime yogurt until ready to serve.

    Step 2

    Remove ribs and stems from leaves of 8 oz. Swiss chard and slice ¼” thick. Measure out ½ cup (reserve extra stems for tossing into a soup, fried rice, or an omelet). Stack a few Swiss chard leaves on top of one another, then roll up. Thinly slice leaves crosswise to make ¼”-thick ribbons. Repeat with remaining Swiss chard leaves. Measure out 4 cups (reserve any extra leaves for a stir-fry or a soup.)

    Step 3

    Heat 2 Tbsp. extra-virgin olive oil in a medium ovenproof nonstick skillet over medium, swirling skillet to coat with oil. Add ½ small red onion, thinly sliced, and cook, stirring occasionally, until golden and beginning to soften, about 3 minutes. Add ½ cup chard stems and cook, stirring occasionally, until softened, about 3 minutes. Add 4 cups chard leaves, 1 tsp. cayenne pepper, ½ tsp. ground cumin, and ½ tsp. ground turmeric; season with salt and cook, stirring occasionally, until greens are wilted, about 2 minutes. Transfer to a large bowl and let chard mixture cool. Wipe out skillet (no need to wash).

    Step 4

    While chard mixture is cooling, heat 1 Tbsp. extra-virgin olive oil in skillet over medium until sizzling, about 2 minutes. Add 1 cup cherry tomatoes, season with salt, and increase heat to medium-high. Cook, tossing occasionally, until tomatoes burst and skins appear slightly blistered in spots, about 3 minutes. Transfer to a plate. Wipe out and reserve skillet.

    Step 5

    Add 2½ cups chickpea flour and 1½ tsp. Diamond Crystal or 1 tsp. Morton kosher salt to bowl with Swiss chard mixture. Gradually pour in 1½ cups water, whisking until a smooth, thick batter forms.

    Step 6

    Heat broiler. Heat remaining 3 Tbsp. extra-virgin olive oil in reserved skillet over medium. Pour in batter and spread into an even layer with an offset spatula or spoon. Reduce heat to low and cook pancake until edges are set, 3–4 minutes (do not stir or mix batter). Transfer skillet to broiler and broil pancake until top is set and a tester inserted into the center comes out clean, 2–3 minutes (keep a close watch on the pancake as every broiler works differently). Let pakora pancake cool in pan 3 minutes.

    Step 7

    Place a large plate on top of skillet and, using an oven mitt or towel to hold the hot skillet handle, quickly invert pancake onto plate. Top pakora pancake with burst tomatoes, a small handful of basil, dill, cilantro, and/or mint leaves, and harissa-lime yogurt.

Read More

  • Pizza with Pea-Spinach Pesto and Caramelized Onions and Fennel

    Pizza with Pea-Spinach Pesto and Caramelized Onions and Fennel

    recipe image

    Pizza with Pea-Spinach Pesto and Caramelized Onions and Fennel

    • Serves
      2
    Author Notes

    This is one of the pizzas I have developed after being really disappointed with many other vegan pizzas I have tried. I am not totally against cheese or dairy but I make a concerted effort to limit it in my diet. Having said that, I have never been impressed with faux non-dairy cheese. I made this pizza once before for my birthday dinner at my mom’s house. The pesto is such a beautiful color! The great thing about it is that the pesto and the caramelized onions and fennel can be applied to so many other recipes and food preparations. The pesto would be great as a sandwich spread (thank for the suggestion Duo Dishes!) or on pasta. The onions and fennel would also be great on a pasta dish or as a bruschetta topping. It was also a great way for me to get peas into my diet (which were not always a love of mine).

    For this recipe, I used whole wheat naan bread but in the past I have used whole wheat pizza dough that I have purchased from a local pizza parlor and/or made myself. —testkitchenette

    Ingredients

    • 1

      bunch spinach, washed and dried (I used the trusty salad spinner)


    • 1 packet

      frozen peas (cook by putting into a small pot with 1/4 c. H2O and bring to a boil for three minutes. Drain and rinse with cold H2O. I also spun them in my salad spinner to get rid of extra moisture.


    • 2-3

      good handfuls of fresh basil (basically a whole pkg.)


    • 2

      handfuls almonds (you could use pine nuts also)


    • 4-5

      garlic cloves


    • 1 tablespoon

      balsamic vinegar


    • 1 teaspoon

      salt


    • 2-3 tablespoons

      extra virgin olive oil (approximately)

    Directions
    1. Put everything in your food processor (except for oil) and process till ingredients ground up. Add the oil last until pesto is of pesto consistency. A bit of warm water will loosen it up too!
    2. Caramelized Onions and Fennel

      1 fennel bulb (fronds and green stalks removed so you just have the white part) sliced thin
      1 large red onion, peeled and sliced thin
      salt and pepper to taste

      Coat the bottom of a large pan with olive oil and put over medium heat. Add the onions and fennel and cook till transluscent. Add salt and pepper. Raise heat a bit and add a few tblsp. of H2O or white wine (so veggies don’t dry out) and caramelize (ccok till golden brown and fragrant but not burnt). This will take a little while.

    3. Constructing Pizza (Preheat oven to 350 F if using naan bread and 450 F if using raw pizza dough)

      2 whole wheat naan breads or 1 regular pizza dough

      Put your naan breads on a lightly oiled (or use a silpat or parchment paper) cookie sheet OR stretch one pizza dough out on an oiled cookie sheet

      Put the pesto and onion and fennel mixture on top of the naan bread and bake for approximately 10 minutes (maybe a bit more depending on your oven).

      If using pizza dough bake the pizza dough (with a bit of olive oil rubbed on top of it) for 10 minutes with nothing on it. Then add the pesto and onion and fennel mixture and bake for another 10 minutes. Feel free to add the cheese of your choice during the last 10 minutes of cooking.

      ENJOY!

    Read More