5tablespoons plus 1/2teaspoonfresh lime juice (from 3limes), divided
1 1/2teaspoons plus 1/8teaspoonkosher salt, divided
3tablespoonsalmond butter or cashew butter
⅓cup plus 4tablespoonswater, divided
¼teaspoongrated garlic (from 1mediumgarlic clove)
1(8-ounce) package tempeh
3tablespoonsolive oil
1small (6-ounce)red bell pepper, finely chopped (1cup)
1 ¼teaspoonsground cumin
1teaspoonchipotle chile powder
1teaspoongarlic powder
1 1/2tablespoonslower-sodium soy sauce
1 1/2teaspoonsketchup
Charred corn tortillas, sliced avocados, and lime wedges, for serving:
Directions
Add cabbage, sliced onion, 3 tablespoons lime juice, and 1 teaspoon salt to a medium bowl; gently massage together using your hands to soften cabbage slightly. Set aside.
Whisk together almond butter and 2 tablespoons water in a small bowl until smooth. Whisk in garlic, 1 1/2 tablespoons lime juice, 1/8 teaspoon salt, and 2 additional tablespoons water until creamy and smooth; set sauce aside.
Crumble tempeh into pea-sized pieces. Heat oil in a large nonstick skillet over medium-high. Add tempeh; cook, undisturbed, until bottom of tempeh is golden brown, about 5 minutes. Add bell pepper and finely chopped onion; reduce heat to medium, and cook, stirring often, until bell pepper is tender-crisp and onion is translucent, about 4 minutes. Add cumin, chile powder, and garlic powder; cook, stirring often, until spices bloom and become fragrant, about 1 minute. Add soy sauce, ketchup, and remaining 2 teaspoons lime juice, 1/2 teaspoon salt, and 1/3 cup water; cook, stirring constantly, until tempeh absorbs soy sauce mixture, about 2 minutes.
Serve tempeh on charred tortillas, top with some cabbage slaw, and drizzle with almond sauce. Top with avocado slices, and serve with lime wedges.
These are no ordinary tostones: tossed in a sweet-savory seasoning mix and dipped in a vegan lime and cilantro-laced sour cream, we can’t think of a more satisfying snack.
Got ripe plantains on hand? Try our maduros recipe!
Made this? Let us know how it went in the comment section below!
Advertisement – Continue Reading Below
1
green plantain
Avocado oil, or other neutral oil, for frying
For the brine
1cup
water
2
small garlic cloves, minced
11/2tsp.
Kosher salt
Juice from 1 small lime
For the lime sour cream
1Tbsp.
non-dairy cream cheese (such as Violife brand)
lime juice, to taste
Kosher salt, to taste
handful of cilantro leaves, chopped
Garlic chili salt
1Tbsp.
maple sugar
1Tbsp.
crushed red pepper flakes
1Tbsp.
Kosher salt
1Tbsp.
garlic flakes
Step 1Make the brine: In a large bowl, whisk all ingredients together. Set aside.
Step 2Make the lime sour cream: In a medium-size bowl, whisk the cream cheese and lime juice, to taste. Season with salt, and add the cilantro. Set aside.
Step 3Make the chili salt: using a mortar and pestle, or a spice grinder, grind sugar, pepper flakes, salt, and garlic flakes. Set aside.
Step 4Fill a large straight-sided skillet or pan with 2″ of oil, and heat oil to 300°. (You want to keep the oil between 285° and 300° for this first stage of frying.)
Step 5Slice the plantain in half crosswise, then run a sharp knife along the outsides of each half. (This is called scoring; it will help to make peeling the plantain easier.) Slice the plantain to make 2” thick circles.
Step 6Fry the plantain circles for about 3 minutes, or until golden yellow. Transfer the plantains to a baking sheet or large plate. While still warm, use a cup or tortilla press that has been lightly oiled, and flatten the plantains into a disks. Once flattened, add the plantains to the brine so that they are fully immersed, and then immediately remove them.
Step 7Raise the temperature of the oil to 350°. Add the flattened plantains to the hot oil for a second fry, and cook for about 2 to 3 minutes, or until they are golden. Transfer the plantain circles to a paper towel-lined baking sheet or large plate.
Step 8Transfer the plantain to a bowl, and season with the chili garlic salt. Serve with the lime sour cream.
I love coconut in all it’s forms including shredded, the milk, the oil, and the water. To me, it is like eating the nectar of the gods–especially with the lack of sun up here in the Pacific Northwest. I wonder if eating the coconut is somehow transferring all the sun it took to grow it, to me. Let’s hope!
And I can’t seem to get enough of it. The other day, I found myself making a big pot of brown rice with coconut milk–the full fat kind. And last week, I got a surprise box of goodies The Institute of Integrative Nutrition, with some amazing coconut macaroons in there. They were made by a graduate who has started his own business called The Laughing Giraffe Organics. And, they pretty much blew my mind. These are vegan?… and raw? I thought to myself. It was right then and there I decided I was going to trust my taste buds instead of listening to the long list of stigmas those two words tend to conjure up in my mind. Because these were incredible!
So I decided to do a little sleuthing to figure out how to make some of these on my own. I found a lot of recipes out there that use a dehydrator, and I had a feeling that is how the Laughing Giraffe does his too. But I stumbled across another recipe that looked like it was going to be the winner. And with a few tweaks it is–my coconut fix will forever be–fixed! What I love about these little no-bake cookies is that they have very few ingredients: shredded coconut, almonds, coconut oil, agave, and a little sea salt. You can keep them in your fridge in an air tight container for a long time (at least a month, maybe more) and in your freezer for even longer. People, I am telling you, if you are looking for an amazing sweet fix that won’t make your teeth fall out or you feel woozy afterward, then this is your treat. They actually give you a nice burst of energy–try eating one or two of these things before working out or as a mid-afternoon pick me up! —Eating Is Art
Ingredients
3 cups
shredded coconut
1/4 cup
coconut oil
1 teaspoon
vanilla extract
1.5 cups
raw almonds
1 cup
agave nectar
Directions
Pulse the almonds in a food processor until broken down and only some medium size pieces remain.
Transfer this mixture to a large bowl and add all remaining ingredients. Stir with a wooden spoon or strong rubber spatula. Then get in there with your hands and mash it all together.–This is actually AMAZING for your hands, they will feel super soft, like you just had a manicure, if you get them in there and mix using them. Coconut oil is wonderful for the skin too. So go for it!
Form large golf ball sized macaroons with a tablespoon and your hands, transfer macaroons to a baking sheet lined with parchment paper.
Wrap with plastic wrap and refrigerate for at least 1 hour prior to serving. You may also wrap individual macaroons in an airtight container and freeze – simply thaw out before serving.
The assortment of vegetables in this vegan one-pot dish add varying textures and flavors to make each forkful exciting. The sweet potato balances the savory spices nicely. Serve this bright and flavorful curry with rice or rice noodles.
Updated on April 19, 2024
Cook Mode (Keep screen awake)
Ingredients
2tablespoonsneutral oil, such as canola or avocado
1teaspooncumin seeds
1teaspoonmustard seeds
2cupschopped onion (about 1large)
2large clovesgarlic, minced
1tablespoonminced fresh ginger
1tablespooncurry powder
1/4-1/2teaspooncrushed red pepper
¾teaspoonsalt
1(14 ounce) cancoconut milk
1cuplow-sodium vegetable broth
2cupschopped tomatoes (about 2medium)
1mediumsweet potato, cut into 1/2-inch pieces
1 ½cupscut green beans (1-inch)
1(15 ounce) canno-salt-added chickpeas, rinsed
½cupchopped cilantro
2tablespoonslime juice
Directions
Heat oil in a large saucepan over medium heat. Add cumin seeds and mustard seeds and cook, stirring, until starting to pop, 30 seconds to 1 minute. Add onion and cook, stirring, until starting to soften, about 3 minutes. Add garlic, ginger, curry powder, crushed red pepper and salt; cook, stirring, until fragrant, about 1 minute. Add coconut milk, broth, tomatoes, sweet potato, green beans and chickpeas. Bring to a boil, reduce heat to maintain a simmer and cook, uncovered, stirring occasionally, until the vegetables are tender, about 15 minutes. Remove from heat and stir in cilantro and lime juice.
Originally appeared: EatingWell.com, April 2020
Nutrition Facts (per serving)
312
Calories
21g
Fat
30g
Carbs
7g
Protein
Nutrition Facts
Servings Per Recipe 6
Serving Size 1 1/3 cups
Calories 312
% Daily Value *
Total Carbohydrate
30g
11%
Dietary Fiber
8g
28%
Total Sugars
9g
Protein
7g
14%
Total Fat
21g
26%
Saturated Fat
13g
65%
Vitamin A
6577IU
132%
Vitamin C
24mg
27%
Folate
59mcg
15%
Sodium
436mg
19%
Calcium
86mg
7%
Iron
4mg
22%
Magnesium
74mg
18%
Potassium
652mg
14%
Nutrition information is calculated by a registered dietitian using an ingredient database but should be considered an estimate.
* Daily Values (DVs) are the recommended amounts of nutrients to consume each day. Percent Daily Value (%DV) found on nutrition labels tells you how much a serving of a particular food or recipe contributes to each of those total recommended amounts. Per the Food and Drug Administration (FDA), the daily value is based on a standard 2,000 calorie diet. Depending on your calorie needs or if you have a health condition, you may need more or less of particular nutrients. (For example, it’s recommended that people following a heart-healthy diet eat less sodium on a daily basis compared to those following a standard diet.)
(-) Information is not currently available for this nutrient. If you are following a special diet for medical reasons, be sure to consult with your primary care provider or a registered dietitian to better understand your personal nutrition needs.
When I was growing up, my Aunt Trisha would often make this sweet zucchini bread. Her secret was to add lots of chocolate chips. I’ve adapted her recipe to make it both vegan and gluten free. This bread is still as moist and delicious as my Aunt Trisha’s and now everyone can enjoy it.
This recipe comes to you straight from the little farm I head up on an island off the Sunshine Coast of BC. This season threw more tomatoes, cucumbers, and kale our way than we knew what to do with and this salad was the result. For the full story and original recipe, head over here: http://www.barnabasfarmworks.com/blog-1/2015/8/26/control-alt-delete
And here’s what we have to say about it:
Let’s be honest. We’ll take any excuse to eat sourdough. So panzanella, or bread salad, wasn’t a hard sell. But rather than the bread-heavy ratio that is typical, we opted for a more veggie-centric focus. Think of this as the Italian mashup between Greek and kale salad, but with the crouton-to-salad ratio that we all secretly desire. This is meant to highlight the veggies our garden is currently hurling our way, but if your garden (or CSA or farmer’s market) has other ideas, use what you have. The dressing is pretty punchy- just the way we like it, but feel free to taste and adjust to suit your preference. If you’re not concerned about the salad being vegan, toss a sprinkling of grated Parmesan on top to finish it. —k s
Ingredients
6
cloves of garlic
1/2 cup
olive oil
1
small loaf of bread (sourdough preferably)
generously sprinkling of salt and pepper
3 tablespoons
white wine vinegar
juice of 1 lemon
2 teaspoons
Dijon mustard
1 tablespoon
honey
1 pinch
each of salt and pepper
1 bunch
kale, stemmed and sliced into ribbons
2
field cucumbers
2 pounds
mixed cherry tomatoes, halved
1
green onion
1 handful
basil, julienned (optional)
Directions
Start by crushing and mincing your garlic cloves. Add those to a saucepan with the olive oil and bring oil to a light simmer, then turn off and cover with a lid.
While garlic is steeping, cut your loaf of bread into one-inch cubes. Pour half of the garlic oil (try to keep the minced garlic in the pot) onto the bread cubes in a large bowl. Sprinkle generously with salt and pepper and toss to coat evenly.
Spread bread cubes on a sheet pan and bake at 350 F for 10-15 minutes, stirring halfway. Cool.
While croutons are toasting and cooling, combine remaining oil and minced garlic, vinegar, lemon juice, mustard, honey, and salt and pepper in a blender until smooth. If you don’t have a blender or don’t want to dirty it, just make sure the garlic is minced fine and shake it all up in a blender bottle. Toss this dressing with shredded kale and set aside to allow kale to soften.
Slice cucumbers, tomatoes, and green onion.
Toss all components together. Enjoy immediately or let it rest to allow the croutons to soak up the dressing- it’s up to you. If you have basil on hand, chop that up and throw it in too.
A mortar and pestle draws out flavor from fresh aromatics.
Stir-frying in batches ensures that the tofu and green beans sear properly instead of steaming.
Stroll by a curry vendor in a Thai food court and you’ll likely see one curry that stands out from the rest: phat phrik khing. Unlike most other curries, which are served with plenty of liquid—be it coconut milk or broth—phat phrik khing is served dry, its intensely flavored curry paste coating each morsel of food. It can be made with any number of vegetables or meat, but I particularly love the common combination of long beans and tofu. The simplest recipes start with store-bought red curry paste. (Some contain shrimp paste, but vegan red curry paste is easy to come by.) It’s not a bad way to turn out a 10-minute meal, but, so long as you have access to fresh Southeast Asian ingredients, a few simple tools, and some elbow grease, you can make something much, much more spectacular.
Do you ever come up with a great response just a moment too late? People frequently ask me which under-appreciated kitchen tool deserves a more central place in their kitchen. I should have the answer rehearsed by now, but whenever I’m put on the spot, I wind up saying things like thermometer! or immersion blender!, or maybe a scale! Now, those are all great tools. Essential, even. But if I had to pick one tool that’s severely underrated and overlooked, it’s the humble mortar and pestle, a tool that’s been used in cultures all over the world since close to the dawn of cooking.
Why Use a Mortar and Pestle?
As we’ve seen time and again, whether you’re making pesto, guacamole, or anything in between, there’s no better tool for coaxing (okay, pounding, crushing, and grinding) the flavor out of aromatic spices and herbs.
Serious Eats / J. Kenji López-Alt
I know that most modern recipes for Thai-style curry pastes call for the use of a blender or food processor, but when a curry paste made with that method is tasted side by side against a paste made the traditional way, there’s simply no comparison. Food processors slice and chop. Mortar and pestles grind and pulverize, rupturing more cells and releasing more aromatics as they go.
Making the Curry Paste
For this curry paste, I start by pounding garlic, shallots, makrut lime leaves, lemongrass (the tender bottom core only), fiery fresh Thai bird chiles, cilantro stems (my go-to stand-in for difficult-to-find cilantro root), and galangal in the mortar and pestle. I also add a large pinch of salt, which acts as an abrasive and also helps to draw out extra flavor from the aromatics through osmosis. Though khing is the Thai word for “ginger,” this dish typically contains none.
Serious Eats / J. Kenji López-Alt
Meanwhile, I trim, seed, and soak dried chiles in boiling water to rehydrate them. Phrik haeng is the Thai term for dried chiles, and the ones used in curry paste preparations vary greatly. My favorite locally available chiles to use in this recipe are puyas, which have a flavor that lies between fiery árbol chiles and fruity guajillos. Guajillo, California, or pasilla peppers will do just fine in their place.
After they’ve rehydrated (about 10 minutes), I chop them up and add them to the mortar.
Serious Eats / J. Kenji López-Alt
The next 10 to 15 minutes of my life are devoted to three things: pounding, pounding, and pounding. It takes a little effort, but you get paid back in incredible flavor. Sing a song to yourself. Memorize funny dinosaur names, like Elvisaurus and Bambiraptor (yes, those are real). Put in headphones and catch an episode of Star Wars Minute. Whatever gets you to keep on pounding, just do it. It doesn’t need to be a completely smooth paste—Thai grandmothers may tell you that you need a paste so fine that you can rub it into the cracks in your skin,* but I typically take my curry paste to rough-purée territory and have yet to suffer any permanent disabilities.
* I think Thai grandmothers just wanted a good way to keep Thai grandchildren out of their hair for a while.
You will be tempted to transfer everything to the food processor or mini-chopper and be done with it. Honestly, it’s okay to give in to these temptations; so long as you’ve pulverized the bulk of the aromatics and it’s all nice, moist, and pasty, the mortar and pestle has done its flavor-extracting job and you can rely on the food processor to smooth things out for you. The main reason I don’t is because I find that pounding for an extra five minutes is less of a headache than pulling out the food processor and cleaning it when I’m finished.
Stir-Frying the Ingredients
Once the curry paste is made, your work is almost done. You can do your stir-frying in regular vegetable oil, coconut oil, or the fat from the top of a can of coconut milk. Typically, phat phrik khing would be made by first searing the chile paste in hot oil, which helps to develop and deepen its flavor, then adding the tofu and beans and tossing everything together. I prefer to get a little more flavor and texture in the dish by first searing the tofu until it’s crisp, removing it from the pan, blistering the green beans in more hot oil, removing them as well, then finally blooming the chile paste and tossing everything back together.
Cooking the tofu and green beans separately ensures that we’re able to maintain enough heat in our Western cooktops to fry the ingredients as we add them, instead of steaming them.
Some soy sauce adds umami depth to the mixture, while a touch of sugar helps balance out its heat. We could take it out of the pan right now and call it a day, but I like to punch things up right at the end with some fresh herbs. If you have fresh makrut lime, hair-thin slivers of the leaves are a nice addition, as is a handful of chopped fresh Thai basil.
Serious Eats / J. Kenji López-Alt
Gathering up all those aromatics may seem a little daunting at first, but once you have a good source for them, you’ll discover that a meal like this takes only about 30 minutes to make. Curry paste can also be made in large batches, placed in plastic freezer bags with the air squeezed out, and frozen flat. That way, you can break off chunks of it as you need it; freezing bags flat means rapid thawing.
I serve my phat phrik khing with some steamed jasmine rice and a fork and spoon, the way they do in Thailand, using the fork to mix the curry and rice and the spoon to deliver it to my mouth. If this isn’t enough to convince you to finally get that mortar and pestle you’ve been eyeing, I don’t know what is. Now, could somebody please remind me to write that down? I swear, if I hear myself say “thermometer” one more time, I’m going to stick my finger in an immersion blender.
March 2016
Phat Phrik Khing With Tofu and Long Beans (Thai Dry-Curry Stir-Fry) Recipe
Cook Mode (Keep screen awake)
6dried guajillo, California, or pasillachiles, stemmed and seeded (45g)
6mediumcloves garlic, roughly chopped (30g)
2mediumshallots, peeled and roughly chopped (60g)
2 to 6red Thai birdchiles (to taste), roughly chopped
3 fresh or dried makrut lime leaves (see note), hard central stem removed and discarded, leaves roughly chopped
1stalk fresh lemongrass, bottom 3 to 5 inches only (40g), tough outer leaves removed and discarded, tender core thinly sliced
1 (1-inch) knobgalangal, peeled (see note)
1/2teaspoon (2g) freshly ground white or black pepper
Kosher salt
3tablespoons (45ml) vegetable oil or coconut oil
1 (12-ounce; 340 g) blockfirm tofu, cut into 1- by 1- by 1/2-inch squares, pressed firmly between paper towels
1pound (450g) green beans or long beans, trimmed and cut into 1 1/2-inch lengths
1tablespoon (14g) sugar
1tablespoon (15ml) soy sauce
Steamed jasmine rice, for serving
Place chiles in a heatproof container and cover with boiling water. Cover and set aside for 10 minutes. Meanwhile, place garlic, shallots, Thai chiles, cilantro, lime leaves, lemongrass, galangal, ground pepper, and 1 teaspoon salt in a mortar and pestle. Pound into a rough paste. Drain chiles, add to mortar, and continue pounding until a rough paste has formed. Alternatively, chop all ingredients in a food processor (see note).
Serious Eats / J. Kenji López-Alt
Heat 1 tablespoon (15ml) oil in a wok over medium-high heat until shimmering. Add tofu, spread into a single layer, and cook, occasionally shaking pan gently, until crisp on first side, about 3 minutes. Flip tofu and continue cooking until second side is crisp. Transfer to a bowl and set aside. Add another tablespoon (15ml) oil to the wok and increase heat to high. When oil is smoking, add beans and cook, stirring and tossing occasionally, until blistered and tender, about 3 minutes. Transfer to bowl with tofu.
Serious Eats / J. Kenji López-Alt
Add remaining tablespoon (15ml) oil to wok and return to high heat until lightly smoking. Add curry paste all at once and cook, stirring continuously, until aromatic and sizzling, about 1 minute. Return tofu and beans to pan, along with sugar and soy sauce. Stir and toss to combine and coat tofu and beans in curry paste. Season to taste with more salt if desired. Serve immediately with steamed jasmine rice.
Serious Eats / J. Kenji López-Alt
Special Equipment
Mortar and pestle, wok
Notes
Makrut lime leaves can be found in Southeast Asian markets. Galangal can be found fresh or frozen in Southeast Asian markets.
A mortar and pestle will produce much better flavor than a food processor.
Read More
The Food Lab: Making Pesto or Curry Paste? The Freezer Is Your Friend
Mortar and Pestle + Food Processor = Great Curry Paste, Fast
Khua Kling Gai (Southern Thai Dry Curry With Minced Chicken)
There’s more to olives than black, green, or Martini garnish.
What’s your favorite olive? If you answered black, green, or “the one in my Martini,” then you need to do some more exploratory eating. A great place to begin is Spain, which grows nearly 300 different types of olives. Not all are imported to the U.S. or even eaten as table olives (some are just used for oil). But the wide variety means that there is an olive out there for almost everyone. To get started, Annie Sibonney of The Cooking Channel’s From Spain with Love shares four of her favorite Spanish olives along with the best ways to eat them.
Manzanilla
Medium-sized with a good flesh-to-pit ratio, manzanilla olives represent what most people think of as Spanish olives — so much so that another name for them is Spanish olive. “They’re tangy and nutty,” Sibonney says. “With a smooth texture.” She likes to marinate them in olive oil and fresh herbs and serve them as a pre-dinner snack.
Gordal
Large and robust, these are the ideal olives for stuffing. “A good stuffed olive is one of those perfect bites,” Sibonney says. Simply split the olive lengthwise, remove the pit, and stuff it. Sibonney likes hers stuffed with roasted piquillo pepper and a whole Marcona almond, then topped with crumbled blue cheese.
Hojiblanca
Sibonney describes this fairly large olive as “spicy, sharp, and crisp with a nice bite.” That’s because hojiblancas have thicker skin than other olives. “They’re beautiful in marinades or snacking on their own,” Sibonney says. “But you can also throw them into stews whole.”
Cacereña
Fruity and nutty, these olives are milder than most other Spanish olives, making them a perfect introductory type for people who are just starting to explore olives. Sibonney likes to use them in stews or make them into olivada, a Spanish olive paste that can be spread on bread, used as a crust for fish, or even dolloped on top of hard-boiled eggs.
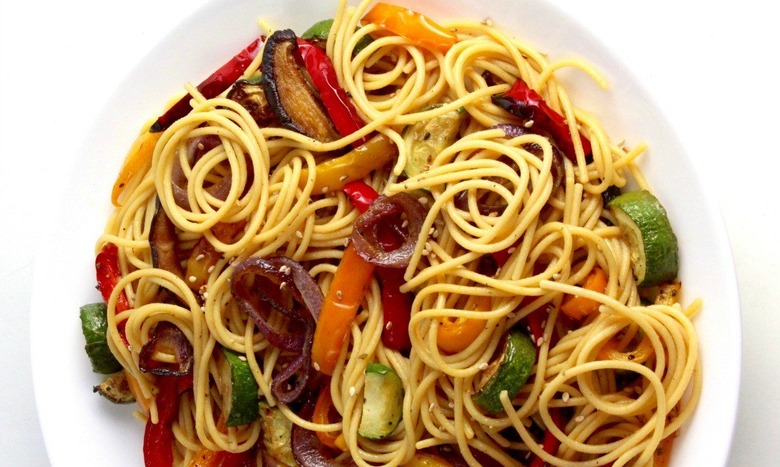
Loaded with fiber and extremely low in fat, Explore Cuisine’s Chickpea Spaghetti is a sure-fire way to bring your family around the table tonight. The chickpea spaghetti is a perfectly organic, gluten-free, vegan, and vegetarian-friendly pasta made with real, organic pea protein.
1 package chickpea spaghetti, cooked
1/4 cup each red, orange, and yellow bell pepper, sliced into batons
1/3 cup zucchini, sliced into half-moons
1/3 cup shiitake mushrooms, sliced
1/2 red onion, sliced into rings
olive oil
salt and pepper
1 tablespoon olive oil
1 tablespoon toasted sesame oil
1 tablespoon soy sauce (or gluten-free tamari)
1 tablespoon seasoned rice wine vinegar
several grinds black pepper
Toss vegetables lightly with olive oil, season with salt and pepper. Roast in a 400-degree F oven on a baking sheet in a single layer until tender and slightly caramelized.
Whisk dressing ingredients together then toss with spaghetti and vegetables. Garnish with sesame seeds (optional).


/f66b1b42-6744-47ca-804a-b15a11186777--macaroons_top.jpg)


/ded5fc1f-0819-483c-962c-9bfde0027d5b--Final_salad.jpg)