Author: PatagoniaLlami

  • Veggie Masala Burgers with Cilantro Chutney Aioli

    Veggie Masala Burgers with Cilantro Chutney Aioli

    recipe image

    Veggie Masala Burgers with Cilantro Chutney Aioli

    • Makes
      8 to 10 burgers
    Author Notes

    UPDATE: Cut the cook time in half! You can get all the ingredients to make these burgers pre-measured, pre-chopped and sent right to your doorstep! Check out: https://www.facebook.com…


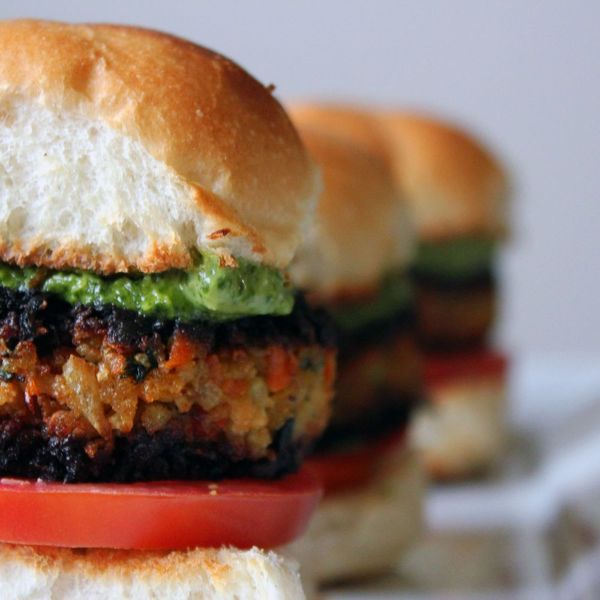
    Packed with textured veggies, lacking any sort of bean paste, and pungent with spice, I would easily pick these veggie burgers over the rest. Sure Trader Joe’s make a mean version, but it is so easy to make it from scratch why waste your time in that absurdly long line. The following recipe is loosely based on my mom’s recipe for Kofta, the Indian version of a vegetarian meatball, which uses cauliflower as the base. Shredding the cauliflower and carrots is key to the texture of the patty, so I would use the attachment on your food processor over just pulsing it. I use egg as a binder but you can replace this with either 2 tablespoons of yogurt (for vegetarians) or 2 tablespoons of canola oil (for vegans), just be careful flipping the burgers in the skillet as they will be more delicate. Garnish with tomato, your favorite cheese, spinach leaves or just the cilantro chutney aioli. So dump those freezer burn laden Boca patties and stock up on these guys before your next barbecue. —Madhuri Sharma

    Ingredients
    • Masala Burger

    • 4 cups

      shredded cauliflower (yield from one medium size head)


    • 2 cups

      shredded carrot (yield from about 4-5 medium size carrots)


    • 1 cup

      onion, finely diced


    • 2

      green chilies


    • 2 tablespoons

      ginger-garlic paste


    • 2 teaspoons

      cumin powder


    • 2 teaspoons

      coriander powder


    • 1 teaspoon

      chili powder (additional teaspoon if you like it spicy)


    • 1.5 tablespoons

      Madras curry powder


    • 3/4 cup

      chopped cilantro


    • 3/4 cup

      breadcrumbs (can be replaced with chick pea flour for gluten free version)


    • 1

      large egg


    • 1 cup

      plus 2 tbsp canola oil


    • Salt and Pepper to taste


    • 8-10

      toasted buns

    • Cilantro Chutney Aioli

    • 1

      bunch fresh cilantro


    • 3

      small green chilies


    • 1-2

      cloves of garlic


    • 1

      inch piece of fresh ginger


    • 1 tablespoon

      cumin seeds


    • 1 pinch

      asafetida


    • 1/4 cup

      canola oil


    • 1

      lime, zested and juiced


    • salt and pepper to taste


    • 3 tablespoons

      mayonnaise

    Directions
    1. Masala Burger
    2. In a large skillet over medium heat, fry the onions, green chillies, and ginger garlic paste in the 2 tbsp of oil.
    3. Add cumin, coriander and chili powders and continue to saute until spices have been absorbed by the oil.
    4. Mix in the shredded cauliflower and carrots into the mixture and allow to sweat for a few minutes before seasoning well with salt and pepper.
    5. When cauliflower begins to look slightly transparent add the curry powder and saute until fully incorporated. Cook the mixture until fork tender but not mushy. Place in a large mixing bowl to cool.
    6. Add the chopped cilantro, breadcrumbs, and egg and mix well. The mixture should not appear too wet, and you should be able to form rough balls.
    7. Divide mixture into 8 to 10 balls based on the size of the buns your using and form in patties.
    8. In a large skillet on medium-high heat pour enough oil to cover the bottom of the pan by 1/4 inch.
    9. In batches, gently place the patties around the pan giving enough room to flip over. Sear the bottom of each patty until completely brown before flipping over and repeating on the other side. The patties should be crisp, hinging on the side of burnt, on the top and bottom. Sear sides as well for extra texture if desired. Remove from pan and blot off excess oil before placing on toasted buns.
    1. Cilantro Chutney Aioli
    2. In a food processor or blender, puree the ginger, garlic, lime juice and zest, cumin seeds, and asafetida.
    3. Add the cilantro and blend on low while drizzling in the canola oil. Add water if needed to bring it to a consistency of a thin paste.
    4. Season with salt and pepper. Store in an airtight container in the fridge for future use
    5. Take 4 tablespoons of the fresh chutney and mix with 3 tablespoons of mayonnaise. Spread over the top of all the toasted buns.

    Read More

  • Instant Pot Butter Chicken by Urvashi Pitre

    Instant Pot Butter Chicken by Urvashi Pitre

    recipe image

    Instant Pot Butter Chicken

    Photo by Rocky Luten
    • Prep time
      5 minutes
    • Cook time
      25 minutes
    • Serves
      4 to 6
    Author Notes

    I set about creating this butter chicken recipe like I do everything else in my life—somewhat obsessively. Many tries later, after many less-than-perfect renditions, I knew I’d nailed it when my husband tried this particular recipe and beamed, and I put it on my blog, where it was super popular. This was the one—and it sparked a book deal. It’s also keto-friendly. This recipe, in order for optimal taste, does make too much sauce; save the rest to mix into other ingredients in your next meal (that’s why I like to call it “Now & Later” Butter Chicken). This method also allows you to cook rice in the Instant Pot at the same time.

    This recipe relies on one important ingredient—the garam masala. Invest in a bottle, which can be found in a number of grocery chains, Indian shops, and online. You can also make your own.If your butter chicken is bland and flavorless, a lack of garam masala is to blame. —Urvashi Pitre

    Test Kitchen Notes

    This Instant Pot Butter Chicken from Urvashi Pitre—a blogger and cookbook author (oh, and a Ph.D. in Experimental Psychology)—has it all: efficiency (we’re talking 30 minutes), flavor, fluffy rice, and extra-tender chicken. If you’re a vegetarian, there are tons of riffs you can try, Urvashi says. A few easy swaps for chicken: peas and paneer; hearty chickpeas; tofu; and mixed vegetables. Also, don’t forget to substitute the chicken broth for vegetable broth or water. To make it vegan, she adds, “swap butter and cream for coconut oil and coconut milk.”

    Featured in: 9 Instant Pot Indian Recipes for Rich, Comforting Flavor Fast. —The Editors

    • Test Kitchen-Approved

    Watch This Recipe

    Instant Pot Butter Chicken

    Ingredients

    • For the rice


    • 1 cup

      aged basmati rice, rinsed


    • 1 cup

      water


    • 1 tablespoon

      ghee or vegetable oil


    • 1 teaspoon

      salt


    • For the butter chicken


    • 1

      (14-ounce) can diced tomatoes


    • 1 tablespoon

      minced ginger


    • 1 tablespoon

      minced garlic


    • 1 teaspoon

      turmeric


    • 1/2-1 teaspoons

      cayenne pepper (adjust to taste)


    • 1 teaspoon

      paprika


    • 1 teaspoon

      salt


    • 2 teaspoons

      good-quality garam masala, divided


    • 1 teaspoon

      ground cumin


    • 1 pound

      boneless skinless chicken thighs, left whole


    • 4 ounces

      butter, cut into cubes (use coconut oil, if dairy free)


    • 4 ounces

      heavy cream (use full-fat coconut milk, if dairy free)


    • 1/4-1/2 cups

      chopped cilantro

    Directions
    1. Combine all the ingredients for the rice, place in a 6 or 7-inch heat-safe pan, and set aside.
    2. Place tomatoes, ginger, garlic, chicken, turmeric, cayenne, paprika, salt, 1 teaspoon of the garam masala, and cumin into the inner liner of your Instant Pot. Mix the sauce a bit, then place the chicken. You are putting in everything except the butter, cream, cilantro, and 1 remaining teaspoon of garam masala. Mix well.
    3. Place a tall steamer rack/trivet on top of the chicken mixture, and place the uncovered bowl of uncooked rice on the rack.
    4. Press the Manual or Pressure cook button, set the timer to 10 mins, and cook.
    5. Once it is done cooking, allow the pot to cool for 10 minutes, undisturbed. Then, release all remaining pressure and open the pot. Remove and set the cooked rice aside. Remove the chicken and set aside.
    6. Using an immersion blender, blend together the sauce until it is smooth. Let the sauce cool for 5 minutes. Stir in the cut-up butter, cream, cilantro, and garam masala.
    7. Remove half the sauce and freeze or refrigerate for later.
    8. Break up the chicken into bite-size pieces, add it to the sauce. Serve with rice.

    Dr. Urvashi Pitre is the President of a global marketing consulting firm, as well as the author of several best-selling cookbooks.

    Read More

  • Soba with Parsley-Pea Pesto and Kale

    Soba with Parsley-Pea Pesto and Kale

    recipe image

    Soba with Parsley-Pea Pesto and Kale

    Photo by James Ransom
    • Serves
      2
    Author Notes

    Frozen peas, in my opinion, are the highly underrated dinner savior. The pesto is a snap to throw together and is the perfect way to dress up otherwise bland pantry staples. The recipe makes more pesto than you will need for several servings of pasta, but it keeps (and freezes!) well. Make a batch and you’re only ever a few minutes away from dinner. Try leftover pesto as a sandwich/wrap/pita spread if your lunch is in need of a pick-me-up.

    Proper, well-behaved pesto should have some Parmesan or other cheese in it. But proper, well behaved pesto probably shouldn’t have peas in it. Since we’re already breaking all of the rules here, I went ahead and made this without any cheese (because I didn’t have any, if I’m being honest). If you are more prepared than I, go ahead and try the pesto with 1/2 cup of grated Parmesan or Romano thrown in at the very end. A little cheese never hurt anyone.

    Keep a bag of chopped kale in the freezer beside your peas to ensure that you can throw this meal together at a moment’s notice, but if you don’t have kale on hand try it with other greens. Spinach or swiss chard would both work well. Arugula would give it a great peppery kick. Play around with your favorite greens! —k s

    Test Kitchen Notes

    WHO: Kangarhubarb is a nurse by day, expert gardener by weekend.


    WHAT: A freezable, batchable (vegan!) pesto.


    HOW: Make a “pesto” out of defrosted frozen peas, parsley, lemon juice, almonds, and balsamic vinegar. Toss the pesto with cooked soba noodles, along with additional peas and kale.


    WHY WE LOVE IT: With all of the peas in this recipe, you may expect the result to be a little one-noted, but the opposite is true: The lemon brightens the pesto, the soba adds an earthiness, and the balsamic vinegar and kale bring a depth to the dish. *If* you have any left over, place it in an airtight container to freeze, then spoon it over your favorite pasta on a rainy day. —Elizabeth

    • Test Kitchen-Approved
    Ingredients
    • For the parsley-pea pesto:

    • 2 cups

      frozen peas, defrosted


    • 1 bunch

      fresh Italian flat-leaf parsley, roughly chopped


    • Zest and juice of one lemon


    • 1/2 cup

      slivered almonds


    • 1/2 teaspoon

      ground black pepper


    • 1/2 teaspoon

      sea salt


    • 1 splash

      balsamic vinegar


    • 1/2 cup

      olive oil, divided, or as needed

    • For the soba with kale:

    • Salt, to taste


    • 100 grams

      dried soba noodles


    • 2 cups

      frozen peas


    • 2 cups

      chopped kale (or other greens)


    • 1/2 cup

      Parsley-Pea Pesto (see recipe above)

    Directions
    1. For the parsley-pea pesto:
    2. Add all ingredients except olive oil to a food processor and pulse until roughly combined.
    3. Add 1/4 cup olive oil and continue pulsing until mixture comes together. Add more olive oil, 1 tablespoon at a time, if pesto needs to be thinned out. You want it to be loose enough that it will lightly coat your noodles.
    1. For the soba with kale:
    2. Bring a small pot of water to a boil and salt generously. Once water has come to a boil, add dried soba noodles, give a good stir, turn off the heat and cover. Set aside for 4 to 5 minutes. I like my soba al dente and find that it is very easy to overcook. This method ensures that the noodles maintain their bite.
    3. While noodles are cooking, place the frozen peas in a small bowl and add some water. Heat them in the microwave for 2 to 3 minutes on high, stirring halfway through, or until defrosted.
    4. Once noodles and peas are cooked, drain both and return to the pot. Add chopped kale and pesto. Toss to coat evenly. You’re done! Enjoy!

    Read More

  • Jenny Engel and Heather Goldberg’s Mini Pistachio Chewy Bite Rum Bundt Cakes

    Jenny Engel and Heather Goldberg’s Mini Pistachio Chewy Bite Rum Bundt Cakes

    recipe image

    Natalia Sloam

    Want a savory and boozy dessert t that won’t pack on the pounds? Try these mini Bundt cakes by Jenny Engel and Heather Goldberg, owners and chefs of a gourmet vegan food company, Spork Foods, in Los Angeles.Click here for more guilt-free party recipes. 

    • 3/4 cup un-sweetened almond milk plus 1 teaspoon apple cider vinegar
    • 1 3/4 cup organic un-bleached all purpose flour
    • 1/4 -teaspoon sea salt
    • 1/2 teaspoon ground cinnamon
    • 1/4 -teaspoon ground allspice
    • 1 1/2 teaspoon baking powder
    • 1/2 cup evaporated cane sugar
    • 1 tablespoon organic black strap molasses
    • 1 teaspoon freshly grated ginger
    • 1 teaspoon vanilla extract
    • 1/4 -cup rum
    • 1/4 -cup neutral tasting oil (safflower)
    • 1/3 cup finely ground pistachios
    • 3 pistachio chewy bites, such as setton farms pistachio chewy bites
    • 1/2 cup organic powdered sugar
    • 2 teaspoon un-sweetened almond milk
    1. Preheat oven to 350 degrees F.
    2. In a measuring cup, add almond and apple cider vinegar and set aside to curdle, about 1-2 minutes.
    3. To a large mixing bowl, add flour, cinnamon, allspice, baking powder, and sea salt and sugar and whisk until uniform. Add molasses, ginger, and vanilla extract, rum, oil and curdled almond milk mixture. Whisk until smooth and uniform.
    4. Grease mini Bundt pan with cooking spray and sprinkle ground pistachios into each section. Tap to shake and evenly disperse pistachios in each section coating lining of each mini Bundt cake.
    5. Dice pistachio bites into small pieces and place a few in each Bundt cake section. Pour about 1/3 cup batter into each Bundt cake.
    6. Place in oven.
    7. Meanwhile, whisk powdered sugar and almond milk until smooth, for icing.
    8. Bake for 23-25 minutes or until toothpick comes out clean. Cool completely and drizzle each cake with icing.

    Read More

  • Make Coffee Jelly and Eat Caffeine for Breakfast

    Make Coffee Jelly and Eat Caffeine for Breakfast

    recipe image

    Ingredients:

    • 1 liter water
    • 25 grams powdered gelatin
    • ½ cup instant coffee powder
    • 1 cup caster sugar
    • 300 milliliters thickened cream

    Read More

  • Green Tea Granola

    Green Tea Granola

    recipe image

    Ingredients:

    • 3 ¼ cups old-fashioned oats
    • 1 ½ cups chopped nuts (such as almonds, pecans, walnuts, macadamia nuts, or pistachios)
    • ½ cup pepitas (shelled pumpkin seeds)
    • 1 ½ teaspoons kosher salt
    • 2 tablespoons dark brown sugar
    • 1 teaspoon vanilla extract
    • 1 teaspoon green tea powder
    • 1 teaspoon ground cinnamon
    • 1 teaspoon ground cardamom
    • 1 teaspoon ground ginger
    • ½ cup agave syrup
    • ½ cup neutral flavored oil (such as vegetable oil or safflower oil)
    • 1 package toasted coconut chips (such as Dang or Bare)

    Read More

  • Chickpea Noodle Soup

    Chickpea Noodle Soup

    recipe image

    Chickpea Noodle Soup

    Photo by Mark Weinberg. Prop Stylist: Amanda Widis. Food Stylist: Anna Billingskog.
    • Prep time
      20 minutes
    • Cook time
      40 minutes
    • Serves
      2 to 4
    Author Notes

    In a restaurant kitchen, toward the end of service, when the bulk of the hustle and bustle has settled and the cleaning has begun, someone goes through the walk-in cooler: organizing, consolidating, putting ingredients back in their rightful home. What needs to be used up? What do we need more of?

    I almost never do this in my home fridge. The other day, as I finally took a dive into the crisper drawer, I found one stray rutabaga, two parsnips, three lemon halves, and five sprigs of thyme. I bought all of those things because I was excited to use them, but they fell away, forgotten.

    For me, the easiest way to eat more vegetables is to have an abundance on hand, but not let them languish in the fridge. If you have a few carrots and celery stalks, don’t give into the temptation to buy parsnips and rutabagas—use up what’s around first. This recipe will help.

    I call for a variety of vegetables, but don’t make a special trip to the store if you’re missing one or two. Embrace substitutions. The combination of protein-rich chickpeas and starchy noodles give this hearty vegan soup body. Using miso or liquid aminos adds salt and depth of flavor—if you don’t have either on hand, salt the soup as you normally would or add a splash of soy sauce instead. This recipe is flexible and, like most soups, benefits from a rest overnight so the flavors can meld, though I am rarely that patient. —abraberens

    Test Kitchen Notes

    Every month, in Eat Your Vegetables, chef, Ruffage cookbook author, and former farmer Abra Berens shares a seasonal recipe that puts vegetables front and center (where they should be!). Missed an installment? Head here to catch up. —The Editors

    • Test Kitchen-Approved
    Ingredients

    • Extra-virgin olive oil


    • 3 sprigs

      thyme (or 1/2 teaspoon herbs de Provence)


    • 1

      yellow onion, sliced thinly


    • 1

      leek, sliced thinly and rinsed of dirt (or skip if you don’t have one)


    • 4

      garlic cloves, minced


    • Kosher salt


    • 1 cup

      white wine


    • 2 tablespoons

      white miso (or liquid aminos)


    • 2

      carrots, peeled (or scrubbed) and diced


    • 2

      medium parsnips, peeled and diced (or swap in sweet potato)


    • 1

      medium rutabaga, peeled and diced (or swap in turnips)


    • 1

      small celeriac head, peeled and diced (or 3 stalks celery, sliced thinly)


    • 2 cups

      (or one 16-ounce can) cooked chickpeas


    • 1 1/2 teaspoons

      red pepper flakes


    • Zest and juice from 1 lemon


    • 10 sprigs

      parsley, roughly chopped


    • 4 ounces

      pappardelle or fettuccini

    Directions
    1. In a soup pot, heat a glug of olive oil over medium heat. Add the thyme (or herbs de Provence) and briefly fry, 10 to 15 seconds.
    2. Add the onion, leek, and garlic, plus a big pinch of salt, and reduce heat to medium-low. Sweat the mixture until soft, about 7 minutes.
    3. Add the white wine and reduce by half.
    4. Dissolve the miso into 8 cups of water. If it doesn’t blend completely, don’t worry, it will as the soup simmers—this just helps it along.
    5. Add the root vegetables, chickpeas, and miso water. Bring to a boil, reduce to a simmer, and cook until all the vegetables are tender, about 20 minutes.
    6. Meanwhile, in a small frying pan, lightly toast the red pepper flakes over medium-high heat until fragrant, about 30 seconds.
    7. In a separate bowl, combine 1/2 cup of olive oil, the lemon zest, lemon juice, parsley, and a pinch of salt. Add the warm red pepper to the mixture.
    8. When the vegetables are tender, taste and adjust the salt as desired. Add the pasta and simmer until tender, 6 to 8 minutes.
    9. Divide the soup into 4 bowls and top with a hefty spoonful of the parsley relish.

    Abra Berens is a chef, author, and former vegetable farmer. She started cooking at Zingerman’s Deli, trained at Ballymaloe in Cork, Ireland. Find her at Granor Farm in Three Oaks, MI. Her first two cookbooks Ruffage and Grist are out now. The third Pulp: a practical guide to cooking with fruit publishes on April 4th, 2023.

    Read More

  • Cream of Broccoli Soup With Sizzled Turmeric Croutons

    Cream of Broccoli Soup With Sizzled Turmeric Croutons

    recipe image

    Cream of Broccoli Soup With Sizzled Turmeric Croutons

    Photo by Julia Gartland
    • Prep time
      10 minutes
    • Cook time
      25 minutes
    • Serves
      4 to 6
    Author Notes

    Cream of broccoli soup is a cozy, cool-weather classic. But many versions disappoint—they’re too thick, heavy, or one-note in flavor, not to mention time consuming to make. In creating this recipe, I landed on several simple tricks for ensuring sublime creaminess (hint: there’s no cream involved!) and vibrant flavors, all in under 30 minutes.

    First, the broccoli. I’m a big believer in using frozen versus fresh in puréed soups. It’s a huge time saver—there’s no trimming, chopping, or peeling of woody broccoli stems. Plus, there’s no guessing on the number of stalks you need to buy to yield the right amount, nor any compromise on flavor and texture.

    Second, the broth. From all my testing, I found that a mixture of water and vegetable broth (enriched with a little miso) resulted in the best, most reliable base—one that’s savory yet light enough to let the star ingredient’s sweet earthiness shine through.

    And last, the “cream.” Many recipes turn to roux and heavy cream for creaminess and body—others, potato or peeled broccoli stalks. My preferred path? A can of white beans plus Greek yogurt. The white beans nicely thicken the soup (they’re hard to detect once the soup is blended), and the yogurt adds a welcome creaminess and tang that lifts and brightens the whole pot.

    A few additional notes: Feel free to garnish the soup however you like, but I’m partial to a drizzle of Greek yogurt and these golden, irresistibly crunchy croutons sizzled in turmeric and olive oil (which, as a bonus, are gorgeous against the bright green soup). To make the soup vegan, use an equal amount of plain non-dairy yogurt or sour cream in place of Greek yogurt.

    —EmilyC

    • Test Kitchen-Approved
    Ingredients
    • Cream of Broccoli Soup

    • 3 tablespoons

      extra-virgin olive oil, plus more for serving


    • 3

      celery stalks, roughly chopped


    • 6

      scallions, trimmed and roughly chopped (both tops and bottoms)


    • 1

      shallot, peeled and roughly chopped


    • 3

      garlic cloves, peeled and smashed


    • Kosher salt and freshly ground pepper


    • 1 tablespoon

      white miso


    • 1 1/2 pounds

      frozen broccoli, any variety


    • 4 1/2 cups

      vegetable broth or water (or a roughly 50/50 mix of both)


    • 1 3/4 cups

      cooked white beans (from one 15.5-ounce can), drained and rinsed


    • 3 cups

      packed baby arugula or spinach


    • 2 teaspoons

      freshly squeezed lemon juice, plus more to taste


    • 3/4 cup

      plain Greek yogurt, plus more for serving

    • Sizzled Turmeric Croutons

    • 2 tablespoons

      extra-virgin olive oil


    • 1 1/2 teaspoons

      ground turmeric


    • 3

      large slices crusty bread (6 ounces), torn (crust and all) into bite-sized pieces (yielding about 3 cups in total)

    Directions
    1. Heat 3 tablespoons oil in a large pot or Dutch oven over medium heat. Add celery, scallions, shallot, and garlic, then season with a few big pinches of salt and pepper. Sauté for about 6 minutes, until softened, lowering heat, if needed, to prevent coloring.
    2. Add miso to the pot, smearing it with the back of a spoon and toasting it in the oil for 15 to 30 seconds. Add broccoli, stock and/or water, and white beans, plus a few more big pinches of salt and pepper. Bring to a simmer, then cook for about 5 to 7 minutes, or until the broccoli is completely tender.
    3. Meanwhile, to make the croutons: Heat 2 tablespoons oil in a large skillet over medium heat. Add the turmeric (it will gently sizzle), then mix in the bread. Sauté for 3 to 5 minutes, stirring several times, or until the croutons are nicely crisp and golden on all sides. Remove from heat.
    4. When the broccoli is tender, add the lemon juice and arugula to the soup, stirring until wilted, then remove from heat. Let cool slightly.
    5. Blend the soup in batches until smooth, using an immersion or stand blender, adding a little more water or stock, if needed, to thin the soup.
    6. Return soup to pot (if you used a stand blender) and bring the pureed soup to a bare simmer over medium-low heat, then add the yogurt, stirring until fully incorporated. Remove from heat and season to taste.
    7. To serve, divide soup into bowls. Drizzle with a little Greek yogurt (thinned with a little olive oil or milk) and top with croutons. Serve warm.

    I’m a home cook. I love salads. Two things you’ll always find in my refrigerator are lemons and butter, and in my pantry good quality chocolate and the makings for chocolate chip cookies.

    Read More

  • Zucchini Lasagna

    Zucchini Lasagna

    recipe image

    Zucchini Lasagna

    Photo by Julia Gartland. Prop Stylist: Amanda Widis. Food Stylist: Anna Billingskog.
    • Prep time
      30 minutes
    • Cook time
      1 hour 20 minutes
    • Serves
      8
    Author Notes

    Sliced zucchini, gooey mozzarella, chunky tomato sauce, creamy ricotta, repeat. If you’re reading this and paused when you saw zucchini, believe me, I understand. I used to be squeamish about embracing vegetables, and always felt like doing so meant missing out on satiety. That is, until I started developing dishes like this zucchini lasagna. It’s full of flavor, loaded with texture, and so satisfying that I never feel like I’m sacrificing a thing. When I sunk my teeth into this for the first time, I asked myself, “Veggie who, veggie what?” And I’m that one that made it.

    Lately, my husband and I have been doing vegan or vegetarian weekdays. One glaring observation during this quest? Vegetables retain a lot of damn water. And there is nothing I despise more than soggy food. When working with vegetable substitutes, there are a few universal rules to retain the vegetable’s integrity while reducing excess moisture: In this lasagna, thinly sliced zucchini replaces pasta. So I take a couple of key steps to make sure this zucchini stays on point:

    First, I pull out the tools. My favorite, in this case, is the mandoline. Please don’t get me wrong, you can cut your zucchini by hand—but a mandoline ensures all of your zucchini strips are cut evenly, so they cook evenly. I set my mandoline for 1/8-inch cut: pretty thin but thick enough to stand against the heat. Next, I reduce the excess liquid. Salt draws out moisture, then a quick roast expedites the process and tenderizes the zucchini. Once I pull the zucchini out of the oven, I transfer the slices to paper towels to dry out. This is essential in making sure that you don’t end up with a pool of liquid in your lasagna pan.

    After you take those steps, all you have to do is layer your ingredients and bake. But if you’re feeling spiffy like me, you’ll sprinkle a garlicky crumble over the top for added texture and flavor. Layer upon layer, this zucchini lasagna is hearty enough to satisfy your soul. —Meiko And The Dish

    • Test Kitchen-Approved
    Ingredients

    • Seasoning blend


    • 2 teaspoons

      onion powder


    • 2 teaspoons

      garlic powder


    • 2 teaspoons

      Italian seasoning


    • 1 1/2 teaspoons

      kosher salt


    • 1 teaspoon

      freshly ground black pepper


    • 1/2 teaspoon

      red pepper flakes (optional)


    • Lasagna


    • Cooking spray


    • 4

      medium zucchini, sliced lengthwise into 1/8-inch thick pieces


    • 1 tablespoon

      extra-virgin olive oil


    • 1

      medium yellow onion, diced


    • 1 pound

      ground beef or ground meat alternative (such as Impossible ground beef)


    • 1

      (24-ounce) can tomato sauce


    • 5

      garlic cloves, minced


    • 1 tablespoon

      tomato paste


    • 1/2 teaspoon

      hot sauce


    • 1 tablespoon

      balsamic vinegar


    • 1 pound

      ricotta cheese


    • 1

      large egg


    • 1/3 cup

      finely grated Parmesan


    • 3 cups

      low-moisture mozzarella, shredded


    • Garlicky crumble


    • 4 garlic cloves, minced


    • 1/3 cup

      bread crumbs (I used a blend of Italian-style and panko)


    • 3 tablespoons

      finely grated Parmesan


    • 1 teaspoon

      extra-virgin olive oil

    Directions
    1. Make the seasoning blend: Add all seasonings to a bowl and stir until combined.
    2. Prepare the zucchini: Heat the oven to 450°F and coat 2 large sheet pans with cooking spray. Arrange sliced zucchini in a single layer on a baking sheet without overlapping. Use 2 teaspoons of seasoning blend to sprinkle on top of zucchini on both sides. Transfer to the oven and roast for 8 minutes. Remove the zucchini slices from the baking sheet and place on a paper towel to absorb any excess moisture. Reduce the oven heat to 350°F.
    3. Make the meat sauce: Heat the olive oil in a large skillet over medium heat. Add the onion and cook for about 3 minutes, until soft. Add the ground meat, plus 1 tablespoon of the seasoning blend, and cook until browned, approximately 6 minutes. Use a wooden spoon to break up the meat while it cooks.
    4. Stir in the tomato sauce, garlic, tomato paste, hot sauce, and balsamic vinegar, plus an additional 2 teaspoons of the seasoning blend. Let simmer over medium heat for 15 minutes.
    5. Assemble the lasagna: Combine the ricotta, egg, Parmesan, and 1 teaspoon of the seasoning blend in a small bowl.
    6. Lightly oil a 9×13-inch baking pan. Add 3 to 4 spoonfuls of the meat sauce across the bottom of the pan, followed by 1/4 of the zucchini slices in a single layer. Sprinkle over 1/4 of the shredded mozzarella, followed by a layer of meat sauce (approximately 1 heaping cup). Spread 1/3 of the ricotta mixture in dollops on top. Repeat this two more times by layering the zucchini slices, mozzarella, meat sauce, and ricotta mixture. Be sure to gently press down with each layer of zucchini. Finally, top with the last layer of zucchini slices and then the last of the shredded mozzarella cheese.
    7. Make the garlic crumble: Add the garlic, bread crumbs, Parmesan, remaining seasoning blend, and the oil to a bowl and toss until combined. Sprinkle the garlic crumble across the top of the lasagna.
    8. Transfer to the oven and bake for about 50 minutes. The top should be golden brown and bubbly on the edges. Let the lasagna sit at room temp for 15 to 20 minutes before serving.

    Meiko is corporate America retiree turned full-time foodie and host. Besides her obvious love of cooking she obsessed with designing foodie apparel, celebrity gossip sites and hosting elaborate dining experiences. She shares her recipes, kitchen hacks and entertaining tips on the blog meikoandthedish.com. Check it out!

    Read More

  • Sweet Potato Pie

    Sweet Potato Pie

    recipe image

    Total Time:

    2 hrs 45 mins

    preview for Move Over, Pumpkin—Sweet Potato Pie Is Our New Favorite Thanksgiving Dessert


    Sweet potato pie might be the Cinderella of Thanksgiving desserts—under-appreciated and overlooked—but with this forever favorite recipe, I’m bringing her into the spotlight and making her shine. Mounds of roasted sweet potato combine with dark brown sugar, vanilla, and spices inside a golden flaky crust for a pie that rivals all other contenders. Here are some tips and tricks on how to make my best-ever sweet potato pie:

    How To Make Sweet Potato Pie

    INGREDIENTS

    • Sweet Potatoes: About 3 medium sweet potatoes will give you the perfect amount for this pie, but sweet potatoes vary by size, so make sure to measure them. Roasting the sweet potatoes concentrates and caramelizes their natural sugars, transforming them into a rich foundation for the pie. Yes, the roasting takes a while, but it’s the only way to get that deep complex flavor out of the sweet potato—and without that, the pie is just one-dimensional.
    • Pie Dough: While you can use store-bought, I highly recommend making our best-ever pie dough for this pie for the ultimate golden, flaky crust.
    • Eggs: Eggs are classically used in baking as a binder and to give a slight lift in baked goods. This helps to keep the structure of the pie light and airy.
    • Heavy Cream: Just like in our classic pumpkin pie, heavy cream is used here to add moisture and fat to the sweet potato filling.
    • Dark Brown Sugar: Dark brown sugar, with its extra bump of molasses, further accents the sweet potato’s richness.
    • Vanilla Extract, Cinnamon & Nutmeg: A generous hit of vanilla, cinnamon, and nutmeg become the finishing touch to round it all out.

    STEP-BY-STEP INSTRUCTIONS

    First, we’ve got to prep our sweet potatoes. Preheat the oven to 425°, then line a baking sheet with foil. Grab your potatoes, and pierce them with a fork on all sides and arrange on a baking sheet. Then roast until completely tender, and be patient—let them sit until they are cool enough to handle.

    sweet potato piepinterest

    PHOTO: COREY FLORIN

    While they’re cooling, we’ll prep our pie crust. On a lightly floured surface, roll pie dough into a 1/4″-circle. Then, lift and very carefully transfer to a glass or metal pie pan. Lift up the edges to allow the dough to slump down into the dish. Let the pie crust do its thing—don’t be tempted to stretch it. Grab a sharp knife or kitchen shears, then trim the edges of the dough, leaving about a 1/4” overhang. Then fold the excess dough underneath the dough on the top rim of the pie pan. Then using clean fingers, crimp the dough to seal it. Put it in the refrigerator until cold, around 30 minutes.

    sweet potato piepinterest

    PHOTO: COREY FLORIN

    Place a rack in the center of the oven, then preheat it to 375°. Cut out a large square piece of foil or parchment paper, and scrunch to wrinkle it. Grab your cold pie crust, then line it with the scrunched foil and fill to the brim with something to weigh it down. You can use pie weights, uncooked rice, or dried beans—the choice is yours. Put it in the oven, then bake the crust until the top and sides are dry and set. Then, you can remove the foil and pie weights, and continue to bake until the bottom is dry and set—this should only take around 5 minutes more. Remove and let it cool, then reduce the oven temperature to 350°.

    sweet potato piepinterest

    PHOTO: COREY FLORIN

    Grab your cooled potatoes, and peel and trim off any overly caramelized patches. Measure 2 cups of potatoes, and transfer to a food processor. Pulse in the food processor until the mixture is well blended, making sure to scrape down the sides as needed. Add the eggs, cream, brown sugar, butter, vanilla, cinnamon, nutmeg, and salt, then continue to pulse. Scrape down the sides every 30 seconds until smooth, which should be around 90 seconds total. Then, pour the filling into the crust.

    sweet potato pie

    PHOTO: COREY FLORIN

    sweet potato pie

    PHOTO: COREY FLORIN

    Bake the pie until the filling is set around the outside and just slightly jiggly in the middle. The filling will be puffy around the sides and will still look damp in the center—that’s okay, that’s what we’re looking for. Let it cool first, then slice and serve. Top with whipped cream if no pie is complete without it for you.

    sweet potato piepinterest

    PHOTO: COREY FLORIN

    Full list of ingredients & instructions can be found in the recipe below.

    Recipe Tips

    • How to blind-bake. When a pie has a wet filling like this, blind-baking is the key to achieving that crisp, golden brown bottom crust (and avoiding a soggy bottom!). Chill the formed pie shell at least 30 minutes before baking, then line it with foil and fill it to the brim with pie weights. While some people like to prick the bottom and sides of their pie crust to prevent it from puffing up and out of shape, we found this to be unnecessary, provided the liner is filled to the top with the pie weights. After the pie shell has baked for 20 minutes, it should be completely set around the edges, and at this point, you can remove the liner and the pie weights and return the pie to the oven for 5 more minutes just to dry out the bottom. Let it cool before loading it with the pie filling and baking it off.
    • How to know when it’s ready to go. No one wants to serve a pie with a giant crack in the center, so for the best results, pull this pie out of the oven when the filling is still slightly jiggling in the center. It will look damp in the center and puffy all around the sides, and that’s okay: As the pie cools, the middle will set up and the top will settle into a gorgeously smooth, glossy surface.

    Storage

    While it’s unlikely that you’ll have leftovers (even on Thanksgiving!), this pie will keep for up to 3 days in the refrigerator. Cover tightly with plastic wrap or store in an airtight container.

    Advertisement – Continue Reading Below

    • 1 1/2 lb.

      sweet potatoes (about 3 medium) 

    • All-purpose flour, for rolling

    • 1

      batch basic pie dough, chilled

    • 3

      large eggs

    • 3/4 cup

      heavy cream

    • 2/3 cup

      (135 g.) dark brown sugar

    • 4 Tbsp.

      (1/2 stick) unsalted butter, softened

    • 2 tsp.

      pure vanilla extract

    • 1 1/2 tsp.

      ground cinnamon

    • 1 tsp.

      ground nutmeg

    • 1/2 tsp.

      kosher salt

      1. Step 1Preheat oven to 425° and line a baking sheet with foil. Pierce potatoes on all sides with a fork and arrange on prepared sheet. Roast until completely tender, 45 to 50 minutes. Let sit until cool enough to handle.
      2. Step 2Meanwhile, on a lightly floured surface, roll pie dough to a 1/4″-thick round. Lift and carefully transfer to a glass or metal 9″ pie pan. Lift up edges and allow dough to slump down into dish (do not stretch).
      3. Step 3Using a sharp knife or kitchen shears, trim edges of dough, leaving about a 1/4″ overhang. Fold excess dough underneath dough on top rim of pie pan. Using clean fingers, crimp to seal. Refrigerate until cold, about 30 minutes.
      4. Step 4Place a rack in center of oven; preheat to 375°. Cut a large square piece of foil or parchment and scrunch to wrinkle. Line dough with scrunched foil, then fill to the brim with pie weights, uncooked rice, or dried beans.
      5. Step 5Bake crust until top and sides are dry and set, 18-20 minutes. Remove foil with pie weights. Continue to bake until bottom is dry and set, about 5 minutes more. Let cool. Reduce oven temperature to 350°.
      6. Step 6Peel potatoes and trim off any overly caramelized patches. Measure 2 cups (about 450 grams) potato and transfer to a food processor. Pulse, scraping down sides as needed, until well blended. Add eggs, cream, brown sugar, butter, vanilla, cinnamon, nutmeg, and salt. Continue to pulse, scraping down sides every 30 seconds, until smooth, about 90 seconds total.
      7. Step 7Pour filling into crust. Bake pie until filling is puffed and set around the outside and just slightly jiggly in the middle, 40 to 50 minutes. Let cool before slicing and serving.

    sweet potato pie slice on a plate dolloped with whipped creampinterest

    PHOTO: ANDREW BUI; FOOD STYLING: MAKINZE GORE

    Sweet Potato Pie Variations

    sweet potato marshmallow bars

    Sweet Potato Marshmallow Bars
    Ethan Calabrese

    vegan sweet potato pie

    Vegan Sweet Potato Pie
    kat wirsing

    sweet potato pie cocktail

    Sweet Potato Pie Cocktail
    Laura Rege

    Made This?

    Let us know how it went in the comments below!

    Read More