Author: PatagoniaLlami

  • Vegan Caramel Monkey Bread

    Vegan Caramel Monkey Bread

    recipe image

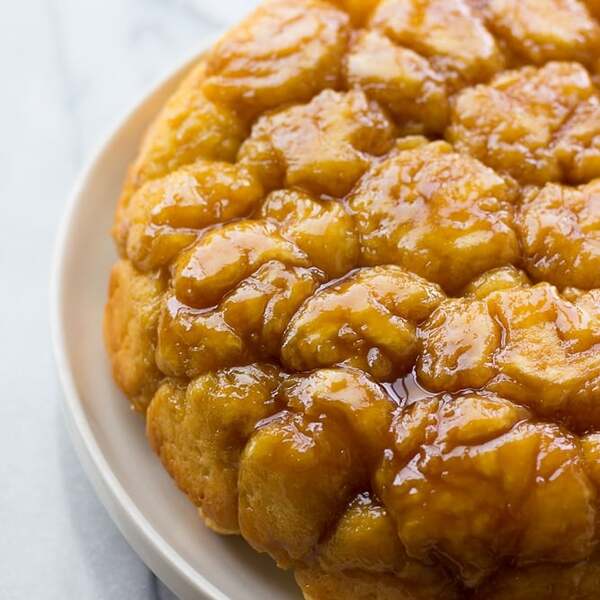
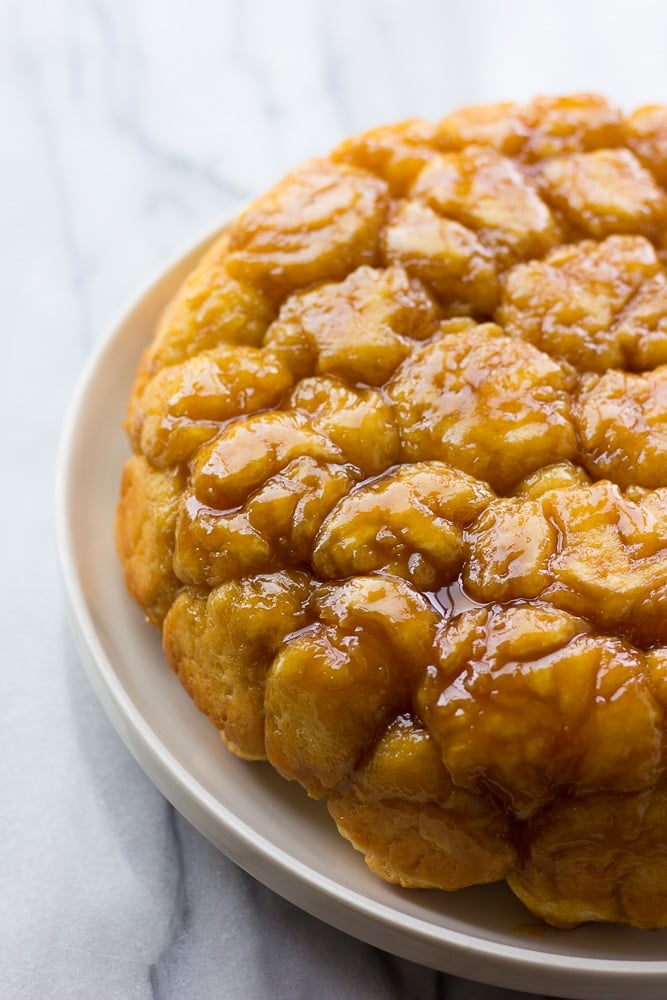
    Vegan Caramel Monkey Bread! Gooey, sweet, fluffy homemade pull apart bread with vegan caramel sauce. Let the dough rise overnight, then put it together quickly in the morning for a decadent breakfast. 

    caramel monkey bread on a plate

    Have you ever had Monkey Bread before? I’m not sure where it came from, but it’s also called “pull apart bread”, and it’s basically the most delicious thing ever. It’s like a giant cinnamon roll, except here, we are using vegan caramel!

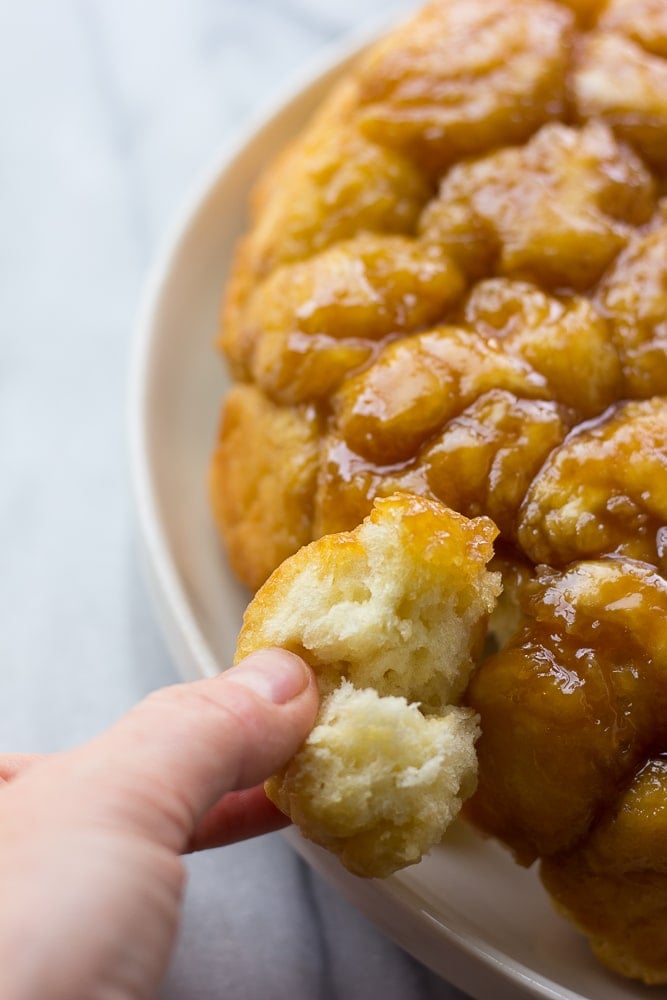
    I can totally see why it’s called Monkey Bread. When I made it the other week for my kids, the 3 of them (plus a few friends) where picking at it like little monkeys and eating it. So fun, and I definitely got the best mom ever award that day! They’ve been begging me to make it ever since.

    How do you make Vegan Caramel Monkey Bread?

    First, you make the sticky, sweet dough and let it rise. You can either let it rise in the fridge overnight, or for about 2 hours at room temperature.

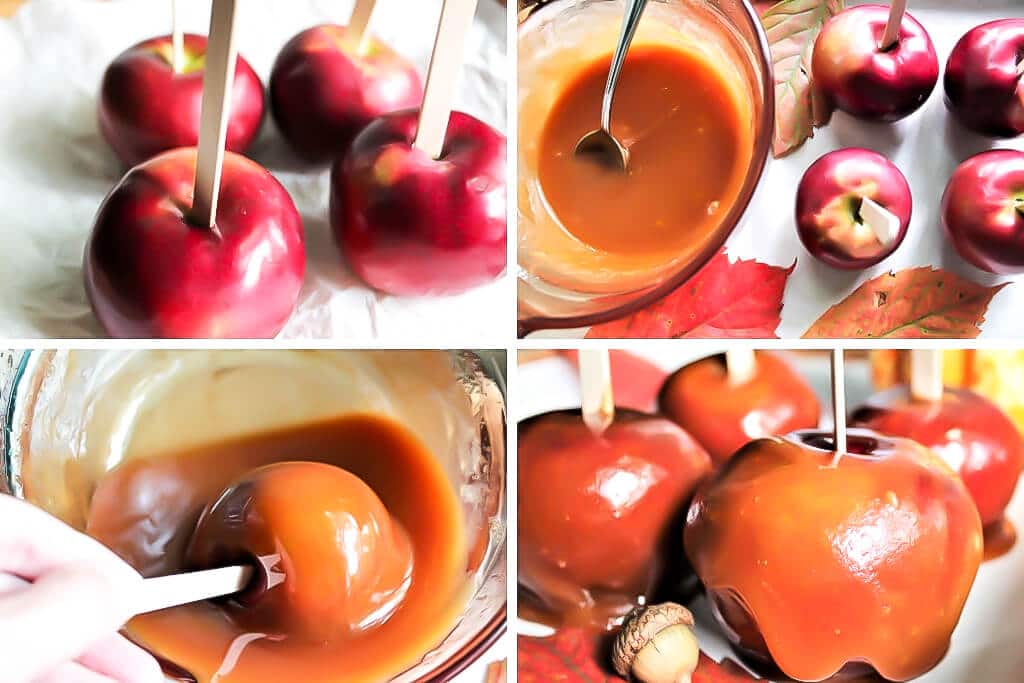
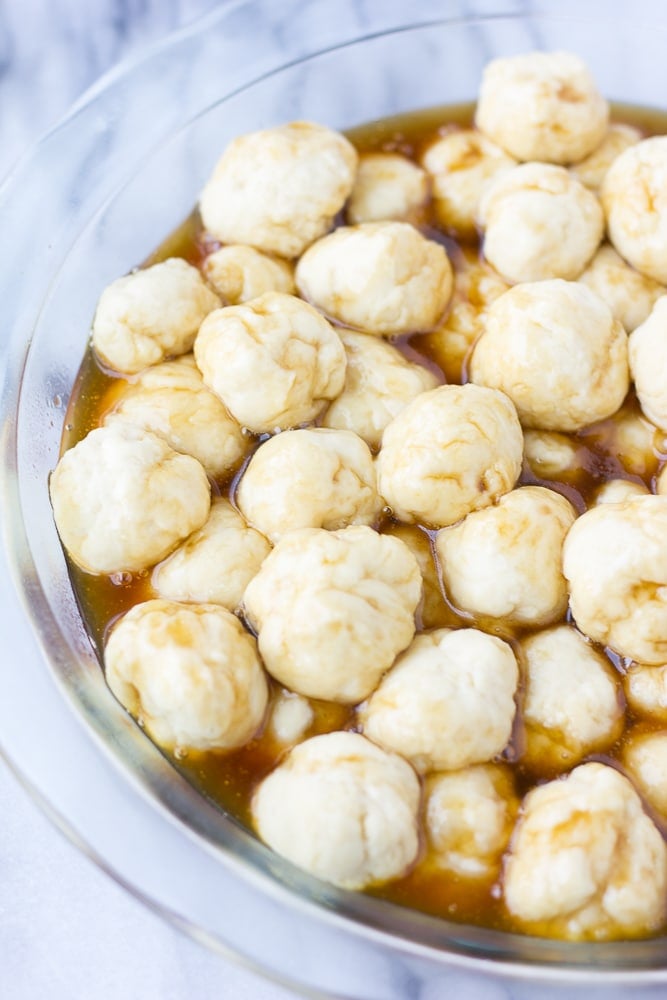
    Make your caramel sauce on the stove in 5 minutes, and then roll the dough into little balls. Layer it in a pan (I used a pie pan, but if you have a bundt pan, use that!).

    balls of dough for caramel monkey bread

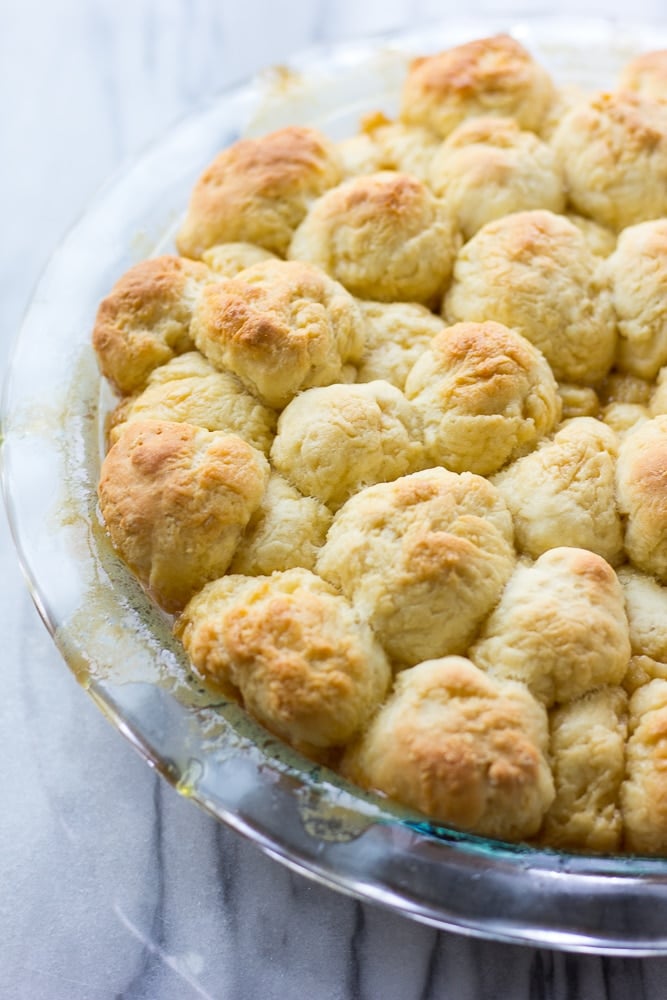
    Bake for 25-30 minutes, the balls should be a little golden brown on top. This is what it will look like out of the oven and before you invert it:

    cooked balls for caramel monkey bread in a pie pan

    Now flip it over and invert it onto a serving plate large enough to hold it. This is what it will look like once you flip it over: Delicious, ooey, gooey caramel monkey bread!

    flipped over caramel monkey bread

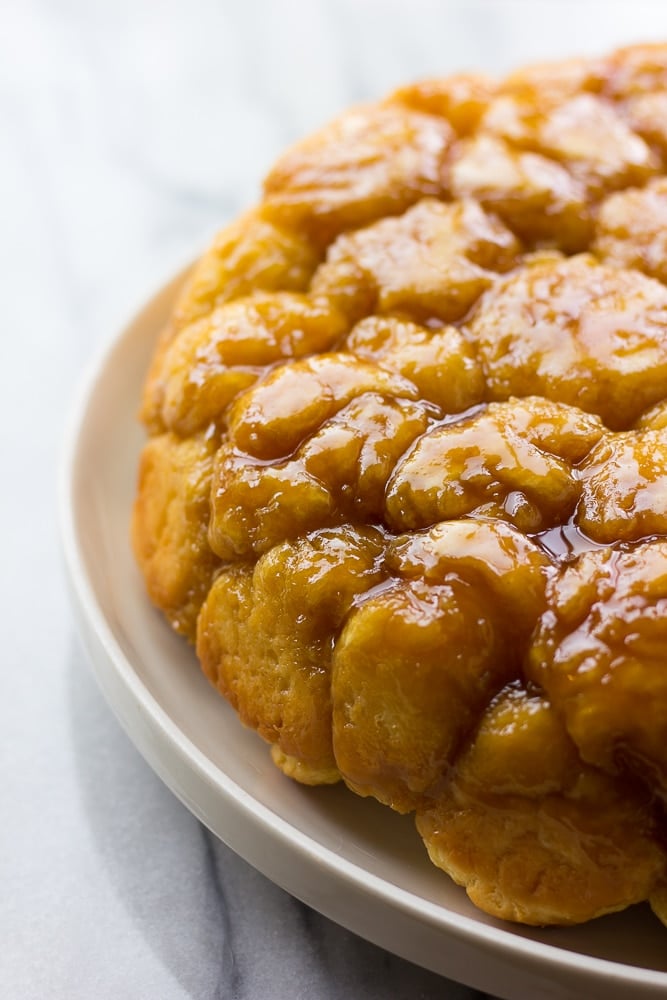
    You can either let everyone pick at it like I did, or cut off larger pieces and serve with more caramel sauce.

    taking a piece off of caramel monkey bread with fingers

    Recipe adapted from Sally’s Baking Addiction.

    For the dough:

    • 1/4 cup warm water
    • 2 1/4 teaspoons dry active yeast (1 packet)
    • 1/4 cup granulated sugar
    • 1 cup soy milk
    • 2 tablespoons vegan butter, melted (I use earth balance)
    • 3 1/2 cups all purpose flour
    • 1 1/2 teaspoons salt

    For the Vegan Caramel:

    • 1/2 cup vegan butter
    • 1/2 cup full fat coconut milk (the thick white part)
    • 1 1/2 cups brown sugar
    • pinch of salt, optional
    • Make the dough: In a mixing bowl, add the warm water and yeast. Let sit for 5 minutes, it should get a bit foamy on top. Now add the rest of the dough ingredients, and mix. Knead a little with your hands to combine. It should be sticky. Cover with a towel and set aside to rise for about 2 hours, then stick it in the fridge to cool.

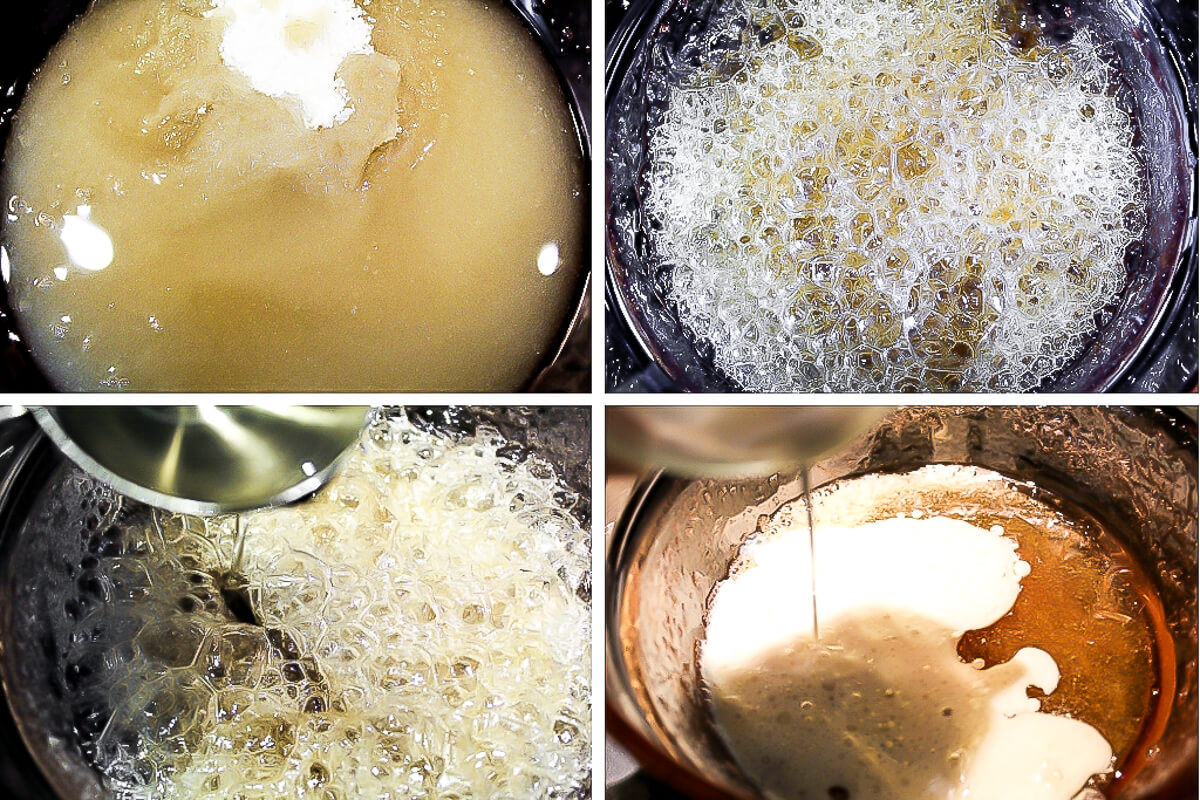
    • Make the caramel: Melt the vegan butter in a small pan over medium heat. Now add the coconut milk and brown sugar, and stir. Bring to a boil and stir constantly for 5 minutes. Remove from heat. Add a sprinkle of salt, if desired.

    • Preheat the oven to  350 degrees F and lightly grease a bundt or pie pan.

    • Assemble: Punch the cold dough gently to release the air bubbles. Pull apart and shape into 1 1/2 inch balls. In prepared pan, layer 1/4 cup caramel, dough balls, 1/4 cup caramel, dough balls and pour 1/4 more cup caramel on top. Reserve the remaining caramel.

    • Bake for 25-30 minutes, or until the top pieces are starting to get golden. Cool for 5-10 minutes, and then invert carefully onto a serving plate. Drizzle extra caramel on top, if desired, and serve. Enjoy!

    1. Monkey bread will taste best the same day it’s made.
    2. You can prep this the night before by allowing the dough to rise in the fridge overnight. 

    Serving: 1serving | Calories: 428kcal | Carbohydrates: 73g | Protein: 7g | Fat: 13g | Saturated Fat: 5g | Sodium: 465mg | Potassium: 175mg | Fiber: 2g | Sugar: 38g | Vitamin A: 631IU | Vitamin C: 2mg | Calcium: 69mg | Iron: 3mg

    Course: Dessert

    Cuisine: American

    you may also like:

    Read More

  • Vegan Chocolate Chip Cookies

    Vegan Chocolate Chip Cookies

    recipe image

    “This recipe is from a great book called Vegan Planet by Robin Robertson. I like the texture of the cookies much better that that of the standard egg and butter variety.”

    Ready In:
    28mins

    Ingredients:
    10

    • 2

      cups flour
    • 12

      teaspoon baking soda
    • 12

      teaspoon salt
    • 1

      cup light brown sugar (firmly packed)
    • 14

      cup pure maple syrup
    • 12

      cup corn oil or 1/2 cup vegan butter
    • 3

      teaspoons egg substitute
    • 4

      tablespoons warm water
    • 1

      teaspoon vanilla extract
    • 8

      ounces semisweet vegan chocolate chips

    directions

    • Preheat oven to 350. Prepare baking sheets.
    • Combine flour, baking soda and salt in a bowl and set aside.
    • Combine the egg replacer with the warm water and add to brown sugar, maple syrup corn oil and vanilla and mix until blended.
    • Add dry ingredients and mix until combined. Add chocolate chips and mix.
    • Drop with a spoon onto baking sheets 2 inches apart.
    • Bake for 15 to 18 minutes.

    Questions & Replies


    Got a question?


    Share it with the community!

    Want a Second Helping?

    Sign up for our newsletter to get recipes, easy dinner ideas, tasty treats and more delivered straight to your inbox.

    To withdraw your consent or to learn more about your rights, see the Privacy Policy.

    RECIPE SUBMITTED BY

    I’ve recently been trying to veganize my eating habits. There is a great book called “The Encyclopedia of Healing Foods” that I’ve found really interesting and especially helpful for using familiar and unfamiliar vegetables, fruits and other types of food. The authors are Michael Murray, Joseph Pissorno and Lara Pizzorno.

    View Full Profile

    Read More

  • Vegan Cherry Cheese Danish

    Vegan Cherry Cheese Danish

    recipe image

    I won’t tell anyone how easy it was to make this sweet, creamy, vegan cheese danish if you don’t! Make them straight up or add cherries for cute little cherry danishes!

    Prep Time9 minutes

    Cook Time11 minutes

    Total Time25 minutes

    vegan cheese danish with cherries on a serving tray
    Table of Contents
    • ✓ Ingredients and substitutions
    • 🔪 How to make vegan cheese danish
    • 💡 Helpful tips
    • 🫙 Storage directions
    • 🍴 More breakfast pastries
    • 📖 Recipe

    When I was a kid, danishes were a special treat that we loved having on hand! We’d buy them frozen, but pre-made vegan cheese danish is hard to find. Luckily, it’s very easy to make them from scratch with just a handful of ingredients!

    hand holding a vegan cheese danish

    The secret to this easy vegan danish recipe is a tube of crescent rolls. Most store-bought crescent roll dough is accidentally vegan, so it’s a great option when you want a flaky dough but don’t want to spend hours mixing, rolling, and laminating dough from scratch.

    You can make plain vegan cheese danish or you can make a cherry cheese danish by adding half a cherry to the center.

    vegan cheese danish ingredients on a wooden cutting board

    ✓ Ingredients and substitutions

    1. vegan cream cheese – For the filling.
    2. powdered sugar – To thicken the filling.
    3. roll of crescent rolls – Many store-bought crescent rolls are accidentally vegan! Just check the label for dairy and eggs.
    4. fresh cherries – These are optional, but for cherry cheese danish, you’ll need a few cherries pitted and sliced in half.

    🔪 How to make vegan cheese danish

    cream cheese mixture after whisking together

    Preheat the oven to 375℉. In a small bowl, whisk together the cream cheese and powdered sugar.

    crescent roll dough on the cutting board after slicing into rounds

    Open your crescent rolls, but don’t unroll them. Slice them into 8 equal-sized rounds instead.

    fork marks on the crescent roll dough

    Transfer the rounds to a baking sheet lined with parchment paper, and use the palm of your hand to flatten the rounds, then use a fork to create a shallow well in the middle of each crescent roll round. Press with the fork in the center in one direction, then turn it to press in the other, so you create a pattern like this: #.

    cream cheese mixture spread onto the crescent roll rounds

    Divide the cream cheese mixture between the crescent roll rounds, scooping about 1 to 2 teaspoons onto each round. Use a spatula or spoon to spread the cream cheese. You don’t want it to bulge over the top of the cups you made.

    adding cherries to the vegan cheese danish on the baking sheet

    Place one cherry half (if using) face-down in the middle of each danish. Press gently, but you don’t want to cram it into the cream cheese.

    vegan cheese danish on a serving tray before icing

    Bake 11 to 14 minutes, until the pastry is golden brown. Cool for 5 to 10 minutes before serving.

    vegan cheese danish glaze after mixing

    💡 Helpful tips

    • Pressing that well into the center of the dough is crucial. You don’t want the middle to puff up during baking.
    • Do not overfill the danishes! The cream cheese will ooze over and make a big mess.
    • If you want, you can make an optional glaze to drizzle on top! Just mix ¼ cup powdered sugar with 2 teaspoons of non-dairy milk. Drizzle onto the finished danishes.

    🫙 Storage directions

    Vegan cheese danish are best eaten the day that you make them, but they will keep in a closed container in the refrigerator for two to three days. Warm them up in the toaster oven before serving.

    close-up of vegan cheese danish on a serving tray

    🍴 More breakfast pastries

    📖 Recipe

    hand holding a vegan cheese danish

    Vegan Cheese Danish

    by Becky Striepe

    I won’t tell anyone how easy it was to make this sweet, creamy, vegan cheese danish if you don’t! Make them straight up or add cherries for cute little cherry danishes!

    Prep Time 9 minutes

    Cook Time 11 minutes

    Cooling Time 5 minutes

    Total Time 25 minutes

    Ingredients  

    • ¼ cup vegan cream cheese
    • 2 tablespoons powdered sugar
    • 1 package crescent roll dough
    • 4 fresh cherries pitted and halved, optional

    Get Recipe Ingredients

    Instructions 

    • Preheat the oven to 375℉. In a small bowl, whisk together the cream cheese and powdered sugar.

    • Open your crescent rolls, but don’t unroll them. Slice them into 8 equal-sized rounds instead. Transfer the rounds to a baking sheet lined with parchment paper, and use the palm of your hand to flatten the rounds, then use a fork to create a shallow well in the middle of each crescent roll round. Press with the fork in the center in one direction, then turn it to press in the other, so you create a pattern like this: #.

    • Divide the cream cheese mixture between the crescent roll rounds, scooping about 1 to 2 teaspoons onto each round. Use a spatula or spoon to spread the cream cheese. You don’t want it to bulge over the top of the cups you made.

    • Place one cherry half (if using) face-down in the middle of each danish. Press gently, but you don’t want to cram it into the cream cheese.

    • Bake 11 to 14 minutes, until the pastry is golden brown. Baking time will depend on your oven. Cool for 5 to 10 minutes before serving.

    📝 Notes

    These are best eaten the day that you make them but they will keep in a closed container in the refrigerator for 2 to 3 days. Warm them up in the toaster oven before serving.

    If you want, you can make an optional glaze to drizzle on top! Just mix ¼ cup powdered sugar with 2 teaspoons of non-dairy milk. Drizzle onto the finished danishes.

    Nutrition

    Calories: 130kcal (7%)Carbohydrates: 15g (5%)Protein: 1g (2%)Fat: 8g (12%)Saturated Fat: 3g (15%)Polyunsaturated Fat: 2gMonounsaturated Fat: 1gSodium: 249mg (10%)Potassium: 9mgFiber: 1g (4%)Sugar: 6g (7%)Vitamin A: 3IUVitamin C: 0.3mgCalcium: 5mg (1%)Iron: 0.5mg (3%)

    Keywords vegan cheese danish

    💌 Hungry for more?Sign up for my newsletter! ✨Get top tips for going (and staying!) vegan and never miss a recipe.

    More Sweet Vegan Breakfasts

    Reader Interactions

    Read More

  • Chocolate Chip Spelt Cookies (Vegan)

    Chocolate Chip Spelt Cookies (Vegan)

    recipe image

    Photobucket - Video and Image HostingPhotobucket - Video and Image Hosting
    Photobucket - Video and Image Hosting


    Oh bother!Take this quiz!

    Hit Counters

    Budget Car Rentals”>

    30 THINGS ABOUT ME:

    1. I taught myself how to cook out of self-defense.
    (Mom hated cooking, and her “specialty” was “Liver and Onions”)
    2. I love to cook.
    3. I think eating’s pretty fun, too.
    4. I enjoy many different cuisines.
    5. Organ meat isn’t one of them.
    7. I was born in New Jersey.
    8. I’m Italian.
    9. The only Italian words I know are bad ones.
    10. I’m married to a wonderful man who loves trying new recipes.
    12. I have 5 beautiful children…and the pictures to prove it. 😉
    13. I hate doing laundry.
    14. I do it anyway because I hate dirty clothes even more.
    15. I used to work in Marketing.
    16. My favorite color is purple.
    17. I like the black jelly beans best.
    18. I have a weakness for dark chocolate.
    19. I love penguins.
    20. My favorite pets are cats.
    21. We have a pet turtle.
    22. I can drive a stick (manual transmission).
    23. I can juggle (nothing sharp or on fire).
    24. I love gardening.
    25. I hate garden-eating bugs.
    26. My hobby is black and white photography.
    27. I enjoy public speaking.
    28. I like creating fun, innovative cakes.
    29. I once made a soundboard cake for a DJ’s wedding. It even lit up.
    30. I live in Texas, but I don’t say, “y’all.”
    31. I’ve always wanted to visit New Zealand.
    32. I read a lot.
    33. I use vegan-certified skin care products.
    34. I’m not religious, but I have a personal relationship with Jesus.
    35. Okay, so I have more than thirty things…never was much good with numbers!

    Photobucket - Video and Image HostingPhotobucket - Video and Image Hosting
    Photobucket - Video and Image Hosting


    Oh bother!Take this quiz!

    Hit Counters

    Budget Car Rentals

    Read More

  • Vegan Fried Mac and Cheese

    Vegan Fried Mac and Cheese

    recipe image
    Vegan Fried Mac and Cheese balls are the perfect fall comfort food. Made with less than 10 ingredients, this dish is great for quick snacks everyone will enjoy!

    Ingredients:

    • 6 small servings vegan jalapeno mac and cheese
    • 1.5 cups panko bread crumbs
    • 2 cups unsweetened flax milk, divided
    • 1.5 cups flour
    • 5-6 oz vegan cheddar cheese shreds, such as Daiya
    • 1 tsp Slap Ya Mama Seasoning (Extra Hot)
    • Pink Himalayan Sea Salt to taste
    • Oil for frying

    Instructions:

    1. In a small saucepan on low heat, mix cheese, flax milk and Slap Ya Mama seasoning
    2. Whisk constantly to remove all clumps
    3. Keep warm until serving
    4. Make the jalapeno mac and cheese according to directions. Be sure to omit bread crumbs and chik'n from the recipe
    5. Place mac and cheese in refrigerator for at least 6 hours
    6. Once solidified, use an ice scream scoop and roll mac and cheese into 6 uniformed balls
    7. Cover and place in the freezer for 4-6 hours
    8. In a large pot on medium heat, add enough oil to cover the balls at least half way
    9. In three separate bowls, add flour, one and a half cups flax milk, and panko bread crumbs
    10. Season panko bread crumbs with about a teaspoon of salt
    11. Place frozen mac and cheese balls in the milk until fully submerged, then the flour, then milk again, then bread crumb mixture. Make sure to coat every piece evenly and fully
    12. Once oil has reached between 360-375 degrees fahrenheit, place breaded mac and cheese into the oil and fry until golden brown and crispy, about 4-5 minutes per side
    13. Remove from oil and place on a paper towel lined plate
    14. Drizzle with cheese sauce and enjoy!

    Read More

  • VEGAN CARAMEL APPLES

    VEGAN CARAMEL APPLES

    recipe image

    Vegan caramel apples without dairy or coconut milk!  Some caramel sauce will just side off your apple or others will be so tough that it hurts your teeth.  This vegan caramel recipe is thick and sticky enough to coat your apples yet still soft and chewy.  Best of all, since it’s not made with coconut milk like many vegan caramels, it has the classic taste that you expect from a traditional caramel apple.

    An apple dipped in vegan caramel to make vegan caramel apples.

    Want to save this recipe?

    Enter your email below and get it sent straight to your inbox. Plus, get more amazing vegan recipes that will satisfy your cravings!

    Caramel is something I thought I might never be able to eat again after going vegan.  I wasn’t sure how to make caramel or if it was even possible without dairy, but I was determined to try!

    After years of living without caramel, I came across a vegan caramel recipe in a magazine. It called for coconut milk instead of dairy. I was so excited that I made it that same day. I thought it was delicious, but it definitely had a coconut flavor and not the normal caramel flavor that I remembered. My son who hates coconut wouldn’t touch it. It seemed like there had to be another way to get the right consistency and flavor.

    🥛 What to use instead of dairy?

    After much trial and error, I discovered that refined coconut oil and soy milk work great as a replacement for dairy or coconut milk. If you use refined coconut oil, it doesn’t have the flavor of coconut, and the soy milk gives it the right consistency.  I use this basic caramel recipe for my vegan salted caramel sauce too.

    🧾 Ingredients and substitutions

    • Sugar – any vegan granulated sugar will work.  You will be able to see the color change easier in the lighter color sugars.
    • Water – to give your sugar some moisture so you can cook it and caramelize it.
    • Oil – for a rich and creamy texture.  Any neutral-flavored oil will work.  I prefer refined coconut oil for the richest and most neutral taste.
    • Plant Milk – any will work, but I like soy milk since it has a rich and creamy dairy-like taste.
    • Cream of Tartar – or lemon juice.  For acidity to help your sugar stay smooth and not crystallize. 
    • Apples – to coat in the caramel.

    🔪 Helpful tools

    • A heavy-bottomed pot to make sure that the sugar cooks evenly.

    🥄 How to make vegan caramel apples

    Step 1 – Start with a clean medium-sized saucepan and add the sugar, water, and cream of tartar.

    Step 2 – Heat on medium bringing the sugar water will start to boil. (Don’t stir. Just pick up the saucepan and swish around the sugar if needed).

    Step 3 – Watch the sugar mixture closely! After it boils for about 6-8 minutes, it will start to get slightly darker and smell like caramel.

    Step 4 – Boil for about 10-20 more seconds to let it turn a medium brown color (this color change will be slight when using vegan unbleached sugar).

    Step 5 – Remove from heat and immediately add coconut oil and stir with a metal whisk for a few seconds.

    Step 6 – Add the soy milk and continue to stir until smooth and everything is well mixed. (It will bubble up and may spatter, so be careful)!

    A series of 4 pictures showing the steps of boiling sugar and adding coconut oil and soy milk to make vegan caramel for vegan caramel apples.

    Step 7 – Allow cooling to room temperature.

    Step 8 – While it’s cooling, prepare your apples by washing and drying them.  Then remove the stems and insert a stick into the top.

    Step 9 – Line a tray with parchment paper to set the apples on after they have been dipped.

    Step 10 – Reheat the caramel sauce until it is the right consistency for dipping apples. (If your caramel is thin, let it boil again for about 30 seconds.  If it is too thick add a teaspoon or two of soy milk and reheat and stir until it’s a sticky sauce.

    Step 11 – Dip the apples in the caramel.  Let the excess drip off and place it on the parchment-lined tray.

    A collage of 4 pictures showing the process steps for dipping apples into caramel to make vegan caramel apples.

    Step 12 – Allow cooling in the refrigerator for about 30 minutes.  They will come off the paper easily once they have cooled completely.

    📝 Recipe Notes

    • I have found that if you let the caramel sauce cool slightly and then heat it on low again and let it bubble for about 30 seconds, it makes it stickier and just the right consistency for making caramel apples.
    • Caramel is tricky! Nearly every recipe on my blog is easy and can be done by someone relatively inexperienced in the kitchen, however, caramel is more of an exact science. If you want easier ways to make a caramel-style dip for apples, use my peanut butter caramel recipe or my vegan butterscotch recipe.
    • You must watch it carefully. It goes from sugar to caramel to a burnt mess in a matter of about 30 seconds.  Just know that you may have to throw out your first attempt, but once you get it right, it becomes easy.

    👩🏻‍🍳 Pro Tips

    • Every time I made vegan caramel it would come out differently and many times it would seem perfect while still warm, but then get gritty and start to crystallize when it cooled. So, I learned to add a pinch of cream of tartar to keep the sugar smooth.
    • I also learned the hard way to have the coconut oil and soy milk measured and wait to pour them into the sugar mixture the second it caramelizes.  Adding oil and milk reduces the temperature and keeps it from burning.  In the few seconds that it would take you to find and measure the oil and soy milk, your sugar will burn!
    • When using vegan sugar, it is already slightly brown, so you will not see a big color change.  Go by smell more than color. ( It will start to smell like caramel or even slightly burnt sugar).
    • Add the oil first, give it a little stir with a whisk, and then add the milk.  This will cool it down a little and it won’t spatter as much once you add the soy milk.  When you do add the milk, it will still bubble up and may spatter a little, so use a long-handled whisk to stir and stand back.  (Make sure children are back and out of your way)!
    • If your sauce is too runny you can heat it again on low for about 30-60 seconds to evaporate some liquid out of it and firm it up. (But don’t let it burn)!

    🥡 Storage

    Keep the caramel apples in the fridge for up to 3 days. You can store them on the countertop in a cool dry place for about 24 hours, but the caramel may start to run off of them if they get too hot.

    Allow to warm to room temperature before serving or the caramel will be very hard.

    A close up of 4 vegan caramel apples.

    🌟 More fall recipes

    • Gluten-Free Vegan Chocolate Cupcakes with Vegan Salted Caramel Frosting.
    • Pumpkin Bean Soup
    • Vegan Pumpkin Bread with homemade Vegan Cream Cheese Frosting
    • Red Lentil Soup with Pumpkin and Kale
    • Vegan Apple Crisp
    • Vegan Apple Cake

    📌 Be sure to follow me on Pinterest for new vegan recipes!

    📋 Vegan caramel apples recipe

    For vegan caramel apples with sticks in the top of each one.

    Vegan Caramel Apples

    Yield: 4 large apples

    Prep: 10 minutes

    Cook: 10 minutes

    Total: 20 minutes

    Vegan caramel apple recipe that tastes like the real deal!

    For the Caramel Apples:

    • 4 apples
    • 4 popsicle sticks

    To make the caramel:

    • Start with a clean medium-sized saucepan and add the sugar, water, cream of tartar.

    • Turn the heat on to medium. The sugar water will start to boil. Don’t stir, just pick up the saucepan and swish around the sugar if needed.

    • Watch the sugar mixture closely! After it boils for about 6-8 minutes, it will start to get slightly darker and smell like caramel.  At this point let it boil for about 10-20 more seconds to let it turn a medium brown color (this color change will be slight when using vegan unbleached sugar).

    • Remove from heat and immediately add coconut oil and stir with a long-handled metal whisk for a few seconds.

    • Add the soy milk (It will bubble up and may spatter, so be careful)!  Continue to stir until smooth and everything is well mixed. Then allow the mixture to cool to room temperature.

    • Reheat the caramel sauce until it begins to bubble and allow it to bubble on low heat for 45 seconds.

    • Allow it to cool for about 10 minutes until it starts to slightly firm up and get sticky.

    Coat the apples in the caramel sauce

    • While your caramel is cooling, take out the apple stem, then wash and dry the apples well. Place a popsicle stick in the top of each apple.

    • Cover a tray or cookie sheet with parchment paper to put the apples on after they are dipped in caramel.

    • Once your caramel has a thick, sticky consistency, roll the apples in the caramel, coating the whole apple. (You can use a spoon to help you coat the apple completely).

    • Allow to drip for a few seconds and then place it on the parchment paper.

    • Put the tray of apples in the fridge to cool completely. (They will easily come off of the parchment paper once cool).

    • Watch the caramel closely as it’s cooking, don’t walk away from it!
    • You will know your caramel is done cooking when it smells like caramel.  The smell is as important as the color change in determining when to remove it from the stove.
    • Make sure to remove it from the burner completely before adding the oil and soy milk.  Don’t just turn off the heat.
    • If your caramel starts to get too thick add a few drops of water or soy milk and reheat it until you get a smooth consistency.

    Serving: 1apple, Calories: 410kcal, Carbohydrates: 75g, Fat: 14g, Saturated Fat: 11g, Sodium: 7mg, Potassium: 225mg, Fiber: 4g, Sugar: 69g, Vitamin A: 140IU, Vitamin C: 9.2mg, Calcium: 26mg, Iron: 0.3mg

    Read More

  • Stracciatella Cream Pie (vegan, gf, no bak

    Stracciatella Cream Pie (vegan, gf, no bak

    recipe image

    This Stracciatella Cream Pie is addictive – vegan, gluten free, and a no bake pie. Can you believe it is made from only 6 ingredients?

    Closeup on Stracciatella Cream Pie

    My favorite ice cream flavor in my childhood was stracciatella. In summer, I could eat that almost every day from the local Italian ice cafe around the corner.

    What was (or is) your favorite flavor?

    Me and Stracciatella were best friends ever. I was totally blown away with the combination from classic cream ice cream, thick and delicious chocolate chunks. That is, of course, until I became vegan.

    Lifting of a slice of the Stracciatella

    You get the picture. Traditionally stracciatella is made from heavy cream, lots of sugar. And if you don’t get it from the local ice cafe that make its own but buy from a store: say hello to preservatives and other stuff that I can’t define.

    Yup ,obviously not vegan and for sure not that healthy and nourishing.

    But recently I came up to this point that I don’t want any longer to give up my precious favorite childhood flavor, so for now I have to help myself and make my dessert dreams happen again.

    A slice of the Stracciatella Cream Pie.

    Friends, I hope you will all love this vegan Stracciatella Cream Pie. It’s a healthy, easy, no bake, creamy, chocolatey, elegant, outstanding, satisfying dessert dream – so delicious.

    Let’s start making this new showstar of course I will show you how! We will play with the food processor or a blender a couple of times – it’s a no bake vegan cream pie after all.

    Start with making the dough. Combine cashews and dates together at full speed. Have a bit of patience please. I know it’s hard to wait but depending on the power of the blender, it takes a little while until you have a sticky but still rough dough.

    Three slices of the Stracciatella Cream Pie on a serving plate.

    Prepare a springform with parchment paper (or grease with a tiny bit of oil) and press the dough onto the bottom.

    Now it’s time for part two of the blender game. Combine silken tofu, your choice of sweetener, cashews. Blend until really smooth. Mix this in a bowl with vegan creme cheese and chocolate chunks with a beater and whisk until creamy and fluffy.

    Finally put the filling on top of the dough. Garnish with chocolate, done. Chill until serving, enjoy!

    Top view on slices of the Stracciatella Cream Pie.

    This Stracciatella Cream Pie requires just 6 ingredients and as you saw it comes together in just 3 easy steps – vegan, gluten free and oil free.

    Friends, I have a thing for Desserts – now feel free to discover all things for your sweet cravings among these my Vegan Snickers Bars. You will also find delicious cheesecakes, brownies, cakes, cookies and much more, friends so feel free and enjoy.

    Make this incredibly delicious showstopper of a vegan Stracciatella Cream Pie and bring back your childhood memories

    Closeup of a slice of Stracciatella Cream Pie.

    Get a boost from the Stracciatella Cream Pie

    Many vegan no bake pies or cakes use coconut cream because of it firms up very nicely when cooled. However, sometimes the coconut flavor can be a little bit overwhelming.

    Therefore, I went for a base made from silken tofu in this recipe.

    I don’t know if you have any experience with silken tofu? I have used it several times in a variety of recipes. It has a somewhat pudding like texture, which makes it perfect for dressings, purees, soups – and obviously when properly sweetened – in cakes.

    The Kitchn has a really enlightening interview with an expert about silken tofu – I can strongly recommend to read “All About Silken Tofu“.

    Collage of two pictures of the Stracciatella Cream Pie with recipe title text.

    If you wanna bring back your child memories back to life or just enjoy a new delicious, exciting, luscious cream pie, try it and show me your results! Tag me on Instagram and Facebook as always so I can see all your creations. Cheers, friends!

    Ingredients

    For the crust:

    • 2 cups cashews
    • 12 medjool dates

    For the filling:

    • 1 1/2 cups cashews
    • 8 oz vegan creme cheese
    • 1/3 cup maple syrup or dark agave
    • 15 oz silken tofu
    • 3 oz vegan dark chocolate cut into chunks + more for garnish

    Instructions

    1. Start with making the dough. Combine cashews and dates in a blender and process at full speed. It may take a little while until you have a sticky, but still rough, dough.
    2. Prepare a springform with parchment paper (or grease with a tiny bit of oil) and press the dough onto the bottom.
    3. Combine silken tofu, your choice of sweetener, cashews in a blender. Blend until really smooth. Mix this in a bowl with vegan creme cheese and chocolate chunks with a beater and whisk until creamy and fluffy. Finally put the filling on top of the dough. Garnish with chocolate. Chill until serving.
    Nutrition Information:

    Yield: 12

    Serving Size: 1 slice


    Amount Per Serving:

    Calories: 399Total Fat: 25gSaturated Fat: 14gTrans Fat: 0gUnsaturated Fat: 10gCholesterol: 0mgSodium: 300mgCarbohydrates: 43gFiber: 1gSugar: 31gProtein: 5g

    Read More

  • Vegan Stuffed Mushrooms

    Vegan Stuffed Mushrooms

    recipe image

    I’ve been on a mushroom kick lately for some reason. They’re just so dang good. There aren’t a lot of mushroom variety choices at my supermarket though – if I don’t want button, it’s pretty much shiitake (if they’re in stock).

    But hey, who’s complaining? Mushrooms are good tons of ways, and stuffed is of course one of the classics. I haven’t had these in ages, so it’s time to create a recipe for vegan stuffed mushrooms!

    mushrooms stuffed with white beans and breadcrumbs

    These mushrooms are stuffed with bread crumbs. They’re garlicky and herby, with lots of lovely umami from the mushrooms and soy sauce. On a side note, you can’t go wrong with a mushroom soy sauce garlic combination – it’s a classic flavor combo that’s SO. DANG. GOOD.

    Adding beans to the filling binds everything together just like an egg would, and adds a nice boost of low-fat protein.

    This is a super easy appetizer for a party or just yourself. Or throw these in the oven while you’re cooking a nice soup. I’m picturing these served with a tomato soup for dinner – amazing. They’re super with Miso soup too (yup, that was my lunch for leftover day)!

    How do YOU feel about mushrooms? Love ‘em? Hate ‘em? What’s your favorite way to eat them? Please share in the comments, I’d love to talk shrooms!

    Servings: 4

    Time: 1 hour

    Ingredients

    • 1 lb. package of button mushrooms
    • 4 slices of whole wheat sandwich bread
    • 1 15 oz. can of cannellini beans, drained and rinsed (or 1.5 cups cooked)
    • 1 clove garlic, minced
    • ¼ cup roughly chopped parsley
    • 2 tablespoons vegan mayonnaise
    • 1 tablespoon nutritional yeast
    • 1 tablespoon soy sauce

    Instructions

    • Preheat the oven to 400 degrees Fahrenheit.
    • Remove the stems from the mushrooms. (I find it’s easiest to pull them out gently.) Set the caps aside.
    • Roughly chop the stems. Add to a large bowl.
    • Crumble the bread with your hands, or process into rough crumbs with a food processor. Add to the bowl.
    • Mash the beans with a fork and add to the bowl with the garlic, parsley, mayo, nutritional yeast, and soy sauce.
    • Stir until all the ingredients are well blended. Season with salt and pepper to taste.
    • Put the mushroom caps on a lightly oiled sheet pan, round side down, and top each with the filling from the bowl, filling in the holes where the stems used to be and mounding the stuffing up.
    • Cook the mushrooms for 15 minutes, until the filling has browned and the mushrooms are cooked through.
    • Serve, topping with more chopped parsley if you like.

    Serving

    These are a great appetizer. Serve them before pasta, or alongside soup for a lovely light dinner (try tomato, or miso).

    Storing

    These will keep up to three days in the fridge – I wouldn’t freeze them.

    plant based stuffed mushrooms

    Read More

  • Easy Vegan Silk Chocolate Mousse

    Easy Vegan Silk Chocolate Mousse

    recipe image

    by Kathy Patalsky · updated: · published: · About 3 minutes to read this article. Leave a Comment


    Have you ever made homemade jam? Take it from this jam newbie – it’s terribly easy and the results will impress you – and your family. Better than the bottled suff you buy in stores. Way better.

    I played around in my kitchen last weekend and whipped up my very first batch of jam. And a slew of delicious jam-infused creations followed. Like jam-swirled bagel spread and berry-accented chocolate mousse. I was amazed at how easy the process was and how delicious the results are. I don’t think I ever want to buy bottled jam again!..

    Also in this post.. Silk Chocolate Mousse. Two Ingredients. This silk chocolate mousse is awesome. It’s a simple recipe. Together: Jam and Mousse, soy whip on top. Recipes ahead!..


    I started off with a Double Berry Jam (shown dolloped on top of the mousse in the image) – it features sweet tart raspberries and juicy strawberries. Then yesterday I made a Strawberry Citrus Jam. This stuff is so yummy that all I need to enjoy it is a spoon! Or slather some on a warm slice of toast and instant jam heaven.

    ..Now I need to find some jam jars. I am dying to turn my kitchen into a mini jam factory. Bottle my whimsical creations and head out to a Farmer’s Market to sell them. None of this “Strawberry Jam” simplicity. Lets try Blackberry Ginger Jam, or Blueberry Cayenne, Cinnamon Maple Marmelade, Peach Papaya, Spicy Grape. I’m inspired. Anyone else a jam-making fanatic? Jam Junkie? And tips to share?

    Berries and Cream. Yesterday for breakfast I whipped up some Berry Cream Cheese using my homemade Double Berry Jam. Wow was this stuff awesome! Sometimes I complain that tofu cream cheese is a bit lacking in flavor and texture. Well whip in a few spoonfuls of homemade jam and problem solved. Get my Sweet Pink Bagel recipe here. Isn’t it pink-tastic?..

    Recipes: Two Jams and a Mousse (below)

    Double Berry Jam


    3 cups ripe raspberries


    1 cup ripe strawberries – destemmed


    ½ cup maple syrup


    ¼ cup lemon juice


    2-3 teaspoon corn starch

    Citrus Strawberry Jam


    4 cups strawberries, washed/de-stemmed


    ½ cup sugar (opt’l)


    4 satsuma mandarins, juiced (some pulp is good)


    ½ teaspoon citrus zest


    pinch of salt


    2-3 teaspoon corn starch

    Jam Directions:


    1. For both jams – dissolve the corn starch in the cold citrus liquid. Then combine all ingredients in a large pot on stove. Bring to a boil.

    2. Reduce heat and allow to simmer for 30-60 minutes.

    3. Pour into jar(s) and store in the fridge.

    Easy Vegan Silk Chocolate Mousse


    16 ounces silken tofu


    1 cup vegan chocolate chips + 1 teaspoon veg oil


    additional sweetener to taste (optional)


    pinch of salt (optional)


    *I added in about ⅓ cup maple syrup to increase sweetness – additional sweetness is optional though

    Directions:

    1. In a double broiler, add chocolate chips and oil. Heat until melted. Remove from heat.

    2. Add your tofu, optional sweetener, and melted chocolate to a blender. Blend until smooth and silky.

    3. Pour into serving dishes and chill in the fridge for a few hours – until firmed up a bit.

    Mousse Tips: You can use arrowroot and or agar agar to make your mousse even more firm – but I personally like the silky texture. You can also add more chocolate chips for a deeper chocolate flavor and richer texture as well.

    Read More

  • Vegan Pancakes

    Vegan Pancakes

    recipe image

    By bearplate 4 Comments

    What are your favorite things to do on the weekend?

    I love sleeping in, lounging around with my dog Lola, and making some something tasty for breakfast!

    A stack of vegan pancakes with syrup being poured on them.

    When it comes weekend breakfasts pancakes (vegan of course) are one of my top choices.

    They are:

    • Easy to make
    • Quick
    • Delicious
    • One of the most comforting comfort foods

    There’s really nothing better then to sit down to a hot cup of coffee and a stack of fluffy pancakes on a cold morning.

    They are also a great choice when you have people staying with you. I don’t think I’ve ever met someone who doesn’t like pancakes. Plus, it’s easy to make a big batch of them if you need to feed a lot of people.

    It’s fun to try different topping like fruit or flavored syrups, but you can never go wrong with some classic maple syrup.

    Looking for more vegan breakfast recipes? Check out Vegan Blueberry Coffee Cake, Good Morning Granola, and Instant Chai Tea Mix.

    Print

    Vegan Pancakes

    5 Stars 4 Stars 3 Stars 2 Stars 1 Star
    No reviews


    • Author:
      bearplate


    • Yield:
      8 1x


    • Category:
      Breakfast


    • Cuisine:
      Vegan


    Description

    Easy and tasty vegan pancakes.


    Instructions

    In a small bowl mix the almond milk, flax seeds, vegan butter, vinegar, and vanilla together.

    In a large bowl mix the flour, baking powder, and salt together. Add the almond milk mixture and stir until combined, it’s okay if there are still small lumps. 

    In a lightly oiled pan over medium heat, add 1/4 cup of the batter and cook until browned.  Flip add cook until browned on the other side. 


    Nutrition

    • Serving Size: 1 Pancake
    • Calories: 136
    • Fat: 5.2
    • Carbohydrates: 19
    • Protein: 3

    Reader Interactions

    Read More