Blog

  • Vegan Chocolate Chip Cookies

    Vegan Chocolate Chip Cookies

    recipe image

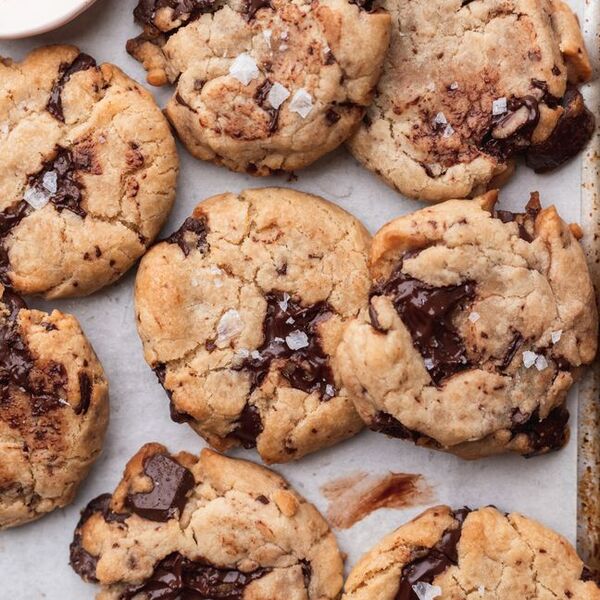
    When I try to pick a favorite dessert, my mind flits between cakes, pies, ice cream, and pastries before invariably landing on chocolate chip cookies. A really good one is hard to beat, hitting all of the right textures (crisp on the outside and soft in the middle) and flavor notes (buttery, brown sugary, chocolatey) in a convenient, hand-held form.

    While it once seemed impossible to make great cookies without dairy (butter!) and eggs, expert vegan bakers have made it possible with the smart use of oils, non-dairy milks, and vegan products like chocolate and even sugar.

    Vegan chocolate chip cookies are so satisfying that, dare I say it, I prefer them to my non-vegan cookie recipe. They win on both texture and flavor and happen to be quicker and easier to make. There’s no long chill time and no need to cream butter and sugar. You don’t even need a mixer.

    Crisp on the outside and chewy on the inside with a balance of caramelized sweetness, rich chocolate, and a touch of salt, now that’s what I call a great chocolate chip cookie.

    What Sets These Vegan Cookies Apart From Others?

    My recipe calls for melted and cooled refined coconut oil, which provides richness. I use refined coconut oil since it doesn’t have a strong coconut flavor and is excellent for baking. If you don’t mind the tropical coconut flavor, you can use virgin or unrefined coconut oil.

    You’ll whisk the coconut oil with vegan brown and white sugars, a little non-dairy milk, and vanilla until creamy. This can be done by hand, without an electric mixer.

    This dough holds together well without eggs and baking powder gives it lift. Add the flour, then the chopped dark chocolate, which creates tasty specks and gorgeous pools of molten chocolate. A sprinkle of flaky sea salt brings out all the flavors.

    There’s no need to chill the dough before scooping it into cookies. In fact, I don’t recommend it, since it solidifies the coconut oil, making the dough too hard to scoop. Instead, scoop the cookies and freeze them for just 10 minutes right before baking. This will keep them from spreading too much as they bake, resulting in soft, chewy centers.

    Simply Recipes / Cambrea Gordon


    How to Make The Best Vegan Chocolate Chip Cookies

    This recipe is straightforward, with just a handful of ingredients and 10 minutes of active prep time. Here are a few tips for the best results:

    • If possible, weigh your ingredients using a kitchen scale. It’ll ensure the dough is the right texture. You can also weigh the balls of dough, which helps them bake evenly.
    • Chopped chocolate works nicely for this recipe since it provides a little chocolate flavor in every bite along with wonderful pools of molten chocolate. It also helps the dough bind together better than chocolate chips. Plus, it’s easier to find vegan chocolate in bar form. Look for dark chocolate (about 72% cacao) with no added dairy milk.

    • If you don’t have freezer space, you can skip the 10-minute chilling before baking the cookies. They will be a little flatter, but still delicious. Keep an eye on them since they will only take about 9 minutes to bake.
    • If baking more than one baking sheet at a time, rotate the sheets halfway through.
    • Don’t overbake these cookies. They won’t brown as much as butter-based cookies; rather, they’ll lightly brown around the edges and the bottom. Since there are no eggs, it’s better to slightly underbake them (unless you like your cookies on the crunchy side). Check them at the 9-minute mark.

    Swaps That Work

    If you have a coconut allergy or also eat gluten-free, you can adjust this recipe.

    • To make the cookies without the coconut oil, swap it for melted, cooled vegan butter. Note that the composition of vegan butters varies, so your results may vary. Consider waiting to add the non-dairy milk until after the dry ingredients are added. You may need less of it than the recipe calls for to make an easy-to-roll but stiff dough.
    • For gluten-free cookies, try a cup-for-cup all-purpose gluten-free flour blend like Bob’s Red Mill. It should have xanthan gum in it. You may need to add more non-dairy milk since gluten-free flours can be on the dry side.

    Simply Recipes / Cambrea Gordon


    Recipe Variations

    If you’d like to switch up the flavors a bit or add some crunch, try these:

    • Chocolate: Swap all or part of the chocolate for vegan semi-sweet, extra-dark, or milk chocolate. A mixture would offer a nice blend of flavors.
    • Nuts: Add 1/2 cup of chopped toasted nuts like pecans or walnuts.
    • Raspberry: Add up to 1/3 cup of lightly crushed freeze-dried raspberries.
    • Potato chip: Add up to 1/2 cup crushed potato chips and omit the salt on top.
    • Peppermint: Mix in 1/3 cup crushed peppermint candies and swap half of the vanilla extract with 1/4 teaspoon peppermint extract.

    Freezing the Dough to Bake Later

    You can freeze the dough for baking later. Shape the cookies and sprinkle them with salt, pressing the salt into the top a bit to adhere. Freeze them for an hour until firm and transfer them into a zip-top freezer bag. They can be stored in the freezer for up to a month.

    To bake from frozen, let them sit on a parchment paper-lined baking sheet while the oven preheats. They don’t have to fully thaw. Add about a minute to the bake time.

    Simply Recipes / Cambrea Gordon


    More Vegan Desserts

    • Vegan Brownies
    • Vegan Cheesecake
    • The Best Chocolate Cupcakes
    • Vegan Gingerbread Cookies
    • Vegan Banana Bread

    Not all sugars are vegan. Look for labels that say vegan or organic.

    Don’t chill the dough before you’ve formed the cookies. It’ll become hard as a rock and difficult to roll into balls.


    Cook Mode
    (Keep screen awake)

    • 2/3 cup refined coconut oil

    • 6 ounces (170g) vegan dark chocolate bar

    • 2 cups (250g) all-purpose flour

    • 1 1/2 teaspoons baking powder

    • 1/2 teaspoon salt

    • 2/3 cup (140g) light brown sugar, tightly packed

    • 1/3 cup (75g) sugar

    • 1/4 cup non-dairy milk, like almond, oat, or soy

    • 1 teaspoon vanilla extract

    • 1 teaspoon flaky sea salt, for sprinkling

    1. Preheat the oven:

      Set an oven rack in the center of the oven and preheat it to 375°F. Line 2 large baking sheets with parchment paper.

    2. Melt the coconut oil:

      In a small skillet or saucepan over low heat, add the coconut oil. As soon as the oil fully melts, turn the heat off, remove the skillet from the heat, and let cool a bit while you prepare the other ingredients.

      Alternatively, add the coconut oil into a medium heatproof bowl and microwave on 50 percent power in 30-second intervals, just until melted.

    3. Chop the chocolate:

      Place the chocolate on a cutting board and use a large knife to roughly chop it. The biggest pieces should be about 1/2-inch chunks, but you should mostly have smaller pieces and shards. You can leave it on the cutting board until you’re ready to add it to the dough.

      Simply Recipes / Cambrea Gordon


    4. Mix the dry ingredients:

      In a medium bowl, add the flour, baking powder, and salt. Whisk together to combine.

      Simply Recipes / Cambrea Gordon


    5. Mix the wet ingredients:

      In a large bowl, combine the melted and cooled coconut oil, brown sugar, sugar, non-dairy milk, and vanilla extract. Whisk until fully combined and creamy, about 2 minutes.

      Simply Recipes / Cambrea Gordon


    6. Make the cookie dough:

      Add the flour mixture into the wet ingredients. Use a wooden spoon or rubber spatula to mix just until a dough forms and no streaks of flour remain. Don’t overmix the dough. Add the chopped chocolate and mix to combine.

      Simply Recipes / Cambrea Gordon


    7. Form the cookies:

      Use a #30 cookie scoop or a spoon to divide the dough into 2-tablespoon (43g) portions. Roll each between your palms to form it into a ball.

      Place it on a prepared baking sheet, about 2 inches apart. Use your hand to gently flatten the dough just slightly and sprinkle the tops with a little flaky sea salt.

      Place the baking sheet in the freezer for 10 minutes. Meanwhile, form more cookies and add them to the second baking sheet.

      Simply Recipes / Cambrea Gordon


    8. Bake the cookies:

      Take the first baking sheet out of the freezer and place it in the oven. Place the second baking sheet in the freezer while the first batch bakes.

      Bake until the cookies have doubled in width and are lightly brown around the edges, 9 to 11 minutes. Don’t overbake these cookies. Let them cool on the baking sheet for 3 minutes before transferring them to a cooling rack to finish cooling.

      Move the second batch from the freezer to the oven and bake. Repeat with any remaining cookie dough, if needed.

      Simply Recipes / Cambrea Gordon


    9. Store:

      Store the cooled cookies in an airtight container at room temperature. They’ll keep well for about 4 days. You can freeze them, although the texture won’t be as good after they thaw.

      Did you love these cookies? Leave a comment and give us some stars below!

    Nutrition Facts (per serving)
    196 Calories
    10g Fat
    25g Carbs
    2g Protein

    ×

    Nutrition Facts
    Servings: 20
    Amount per serving
    Calories 196
    % Daily Value*
    10g 13%
    Saturated Fat 8g 38%
    1mg 0%
    199mg 9%
    25g 9%
    Dietary Fiber 1g 3%
    Total Sugars 14g
    2g
    Vitamin C 0mg 0%
    Calcium 32mg 2%
    Iron 1mg 8%
    Potassium 70mg 1%
    *The % Daily Value (DV) tells you how much a nutrient in a food serving contributes to a daily diet. 2,000 calories a day is used for general nutrition advice.

    Nutrition information is calculated using an ingredient database and should be considered an estimate. In cases where multiple ingredient alternatives are given, the first listed is calculated for nutrition. Garnishes and optional ingredients are not included.

    Read More

  • Vegan Caesar Salad Dressing

    Vegan Caesar Salad Dressing

    recipe image
    Ingredients:

    • 1/2 cup raw cashews
    • 1/4 cup 3 minute Vegan Parmesan cheeze
    • 6 tbsp fresh lemon juice, or to taste
    • 2 tbsp sunflower oil (or EVOO)
    • 1 garlic scape (or 1 clove garlic)
    • 1/2 tsp sea salt, or to taste
    • Freshly ground black pepper, to taste
    • 1/2 cup water

    Read More

  • The best gluten-free vegan pesto pasta

    The best gluten-free vegan pesto pasta

    recipe image

    The best gluten-free vegan pesto pasta

    Photo by Alannah | Kale Mary
    • Serves
      4-6
    Ingredients

    • 1 cup

      fresh basil


    • 1 cup

      nutritional yeast


    • 1 cup

      baby spinach


    • 1 cup

      pine nuts


    • 1/2 cup

      raw cashews


    • 1 tablespoon

      garlic granules


    • 1 1/2 cups

      EVOO


    • 1 pinch

      salt


    • 500 grams

      gluten-free vegan pasta


    • 12

      cherry tomatoes, halved

    Directions
    1. Cook pasta as per packet directions. Gluten-free pasta usually cooks in around eight minutes (for al dente).
    2. Add basil, nutritional yeast, spinach, pine nuts, cashews, garlic granules, olive oil and salt to a food processor and blend until combined. Adjust seasonings to taste then mix the pesto through the cooked pasta, spoonfuls at a time.
    3. Once you have reached your desired pesto to pasta ratio, add the cherry tomatoes then serve.
    4. Any leftover pesto can be stored in the fridge, but let it sit at room temperature before eating as the oil may solidify from being refrigerated.

    Read More

  • Vegan Mediterranean Stuffed Zucchini Boats

    Vegan Mediterranean Stuffed Zucchini Boats

    recipe image

    Vegan Mediterranean Stuffed Zucchini Boats

    Photo by Carissa Erzen
    • Prep time
      25 minutes
    • Cook time
      35 minutes
    • Serves
      4
    Author Notes

    I love love love stuffed veggies. Stuffed bell peppers, stuffed pumpkin, stuffed zucchini, stuffed pizza crust… 😉 Zucchini boats are essentially stuffed zucchini halves, and there are more customization possibilities than settings in an Android phone. They keep well in the fridge and can be reheated for meals throughout the week, making it perfect for healthy and delicious meal prep.

    I have made these vegan Mediterranean stuffed zucchini boats multiple times, and they are so simple and sooooo good! Drawing on enticing flavors from the Mediterranean, make these and transport yourself to a lovely sunny beach with a salty sea breeze in Corfu… —Carissa Erzen

    Ingredients

    • 30 ounces

      (2 cans) chickpeas, rinsed and drained


    • 1

      clove garlic


    • 1 teaspoon

      ground cumin


    • ¼ teaspoons

      paprika


    • 1 teaspoon

      dried oregano


    • ¾ teaspoons

      fine sea salt, divided


    • 1 teaspoon

      dried thyme


    • ½ teaspoons

      garlic powder


    • ½ teaspoons

      dried minced onion


    • 4

      zucchini, ends trimmed and sliced into halves


    • ¼ cups

      sliced black or kalamata olives


    • 10

      cherry tomatoes, sliced in half lengthwise


    • 1 cup

      shredded vegan cheese or feta

    Directions
    1. CHICKPEA HUMMUS
      – In a blender or food processor, blend one can of chickpeas with the garlic clove, cumin, paprika, lemon juice, 2 Tbsp of olive oil, water and ¼ tsp of sea salt.
      – Mix everything until it’s creamy – you may need to scrape down the sides a few times or add another tablespoon of water to create a creamy consistency.
      – Set the hummus aside.
    2. CHICKPEA CROUTONS
      – Preheat the oven to 400°F.
      – Place the second can of chickpeas on a clean kitchen towel to dry for a few minutes. Gently rub them with the towel and remove any skins that come off the chickpeas – it’s okay if most are still on the chickpeas.
      – In a bowl, toss the chickpeas with 1 Tbsp extra virgin olive oil and the remaining ½ tsp sea salt. (Save the bowl for later, don’t wash it yet.)
      – Lay out all the chickpeas on a baking sheet so they don’t overlap.
      – Bake for ~ 20 minutes, shaking the pan halfway through baking to make sure they get an even roasting. Once done, the chickpeas will be crispy on the outside and chewy in the center.
      – In the same bowl lined with olive oil used to toss the chickpeas before baking, pour in the hot chickpeas.
      – Toss with the dried oregano, thyme, garlic powder and dried onion. Set aside to cool a bit.
    3. ZUCCHINI BOATS
      – Turn the oven down to 350°F.
      – Lay the zucchini with the skin side down on a cutting board and use a spoon to scrape out the seeded center from each zucchini half. Don’t scrape all the way through – keep at least ½ inch of zucchini on the bottom. It should look like a canoe.
      – Spread some of the hummus on each zucchini half.
      – Top each zucchini boat with sliced olives, cherry tomato halves, shredded vegan cheese or feta cheese.
      – Bake until the cheese is melted and the zucchini is tender, about 15 minutes.
      – Finally, top each zucchini boat with your chickpea croutons for some extra crunch and flavor.

    Read More

  • Vegan Spinach Artichoke Dip

    Vegan Spinach Artichoke Dip

    recipe image

    vegan spinach artichoke dip

    pinterest

    PHOTO: LUCY SCHAEFFER; FOOD STYLING: MAKINZE GORE

    Yields:

    8 – 10 serving(s)

    A creamy, cheesy spinach artichoke dip that’s completely vegan? Not possible! Oh, but it is. Vegan alternatives to cheeses and mayonnaise are thankfully much more common in most grocery stores, making one of our favorite dips and appetizers more enjoyable for everyone. The dip looks and tastes(!) just like it’s dairy-filled namesake. It’s best warm out of the oven with toasted bread and crackers.

    Have you tried this yet? Let us know how it went in the comments below!

    Advertisement – Continue Reading Below

    • 8 oz.

      vegan cream cheese

    • 1/2 c.

      vegan mayonnaise

    • 1

      (14-oz.) can artichoke hearts, drained, chopped

    • 10 oz.

      frozen spinach, thawed, liquid squeezed out

    • 1/2 c.

      shredded vegan Parmesan

    • 2

      cloves garlic, finely chopped

    • 1 Tbsp.

      nutritional yeast

    • 1 1/2 c.

      shredded vegan mozzarella, divided

    • Kosher salt

    • Freshly ground black pepper

    • Crushed red pepper flakes

    • Cubed bread or crackers, for serving

      1. Step 1Preheat oven to 375°. In a large bowl, combine cream cheese and mayonnaise. Add artichokes, spinach, Parmesan, garlic, nutritional yeast, and 1 cup mozzarella; season with salt, black pepper, and red pepper flakes. 
      2. Step 2Transfer to a small baking dish and spread in an even layer. Top with remaining 1/2 cup mozzarella. 
      3. Step 3Bake dip until cheese is melty and filling is bubbling, about 30 minutes. 
      4. Step 4Serve warm with bread or crackers alongside.

    preview for EVERYONE Will Be Sneaking Slices Of This Vegan Pumpkin Pie

    vegan spinach artichoke dippinterest

    PHOTO: LUCY SCHAEFFER; FOOD STYLING: MAKINZE GORE

    Read More

  • Vegan Creamy Coleslaw

    Vegan Creamy Coleslaw

    recipe image

    Be the first to rate & review!

    Classic coleslaw goes vegan in this easy barbecue side dish recipe. Eggless or vegan mayonnaise’s mild flavor is indistinguishable from regular mayo in this coleslaw flavored with Dijon and cider vinegar. Look for it in the condiment section of large grocery stores or natural-foods stores.

    Updated on April 19, 2024


    Cook Mode
    (Keep screen awake)

    Ingredients

    • 6 tablespoons vegan or eggless mayonnaise

    • 1 tablespoon Dijon mustard

    • 1 tablespoon cider vinegar

    • 1 teaspoon sugar

    • ½ teaspoon caraway seeds or celery seed

    • Pinch of salt

    • Pinch of ground pepper

    • 2 cups thinly sliced red cabbage (about 1/4 of a medium head)

    • 2 cups thinly sliced green cabbage (about 1/4 of a medium head)

    • 1 cup shredded carrots (about 2 medium)

    Directions

    1. Combine mayonnaise, mustard, vinegar and sugar in a large bowl. Add caraway seeds (or celery seed), salt and pepper. Add red cabbage, green cabbage and carrots; toss well.

    Tips

    To make ahead: Refrigerate for up to 1 day.

    Originally appeared: EatingWell.com, May 2018

    Nutrition Facts (per serving)

    115 Calories
    10g Fat
    6g Carbs
    1g Protein
    Nutrition Facts
    Servings Per Recipe
    6
    Serving Size
    3/4 cup
    Calories
    115
    % Daily Value *
    Total Carbohydrate
    6g
    2%
    Dietary Fiber
    2g
    6%
    Total Sugars
    3g
    Added Sugars
    1g
    2%
    Protein
    1g
    2%
    Total Fat
    10g
    13%
    Saturated Fat
    1g
    5%
    Vitamin A
    3347IU
    67%
    Vitamin C
    23mg
    26%
    Folate
    18mcg
    4%
    Sodium
    160mg
    7%
    Calcium
    27mg
    2%
    Iron
    0mg
    2%
    Magnesium
    9mg
    2%
    Potassium
    160mg
    3%

    Nutrition information is calculated by a registered dietitian using an ingredient database but should be considered an estimate.

    * Daily Values (DVs) are the recommended amounts of nutrients to consume each day. Percent Daily Value (%DV) found on nutrition labels tells you how much a serving of a particular food or recipe contributes to each of those total recommended amounts. Per the Food and Drug Administration (FDA), the daily value is based on a standard 2,000 calorie diet. Depending on your calorie needs or if you have a health condition, you may need more or less of particular nutrients. (For example, it’s recommended that people following a heart-healthy diet eat less sodium on a daily basis compared to those following a standard diet.)

    (-) Information is not currently available for this nutrient. If you are following a special diet for medical reasons, be sure to consult with your primary care provider or a registered dietitian to better understand your personal nutrition needs.

    Read More

  • Amatriciana-Inspired Vegan Bucatini with Chanterelles Mushrooms

    Amatriciana-Inspired Vegan Bucatini with Chanterelles Mushrooms

    recipe image

    Amatriciana-Inspired Vegan Bucatini with Chanterelles Mushrooms

    • Serves
      2 as main dish, 3-4 as first course
    Author Notes

    Bucatini is one of my favorite pasta shapes. I rarely cook it though, even before I became a vegan. It’s too chewy for my wife. Now that I am a vegan, I don’t eat it often either. The penultimate role for bucatini in life is in “Bucatini All’Amatriciana“. And since I have cut back significantly on my consumption of Guanciale and Pecorino, there are few occasions to enjoy this pasta’s marvelous, mouth-filling qualities. I invented this recipe to take advantage of some excellent chanterelles in the market, and to fulfill my bucatini need. —dgourmet

    Ingredients

    • 2-3 ounces

      fresh chanterelles mushrooms


    • 2 tablespoons

      olive oil


    • 1 cup

      vegetable broth (preferably roasted, homemade)


    • 1 handful

      chopped fresh herbs (choose among thyme, oregano, rosemary, parsley)


    • 1/3 pound

      bucatini


    • 1-2 pieces

      small hot peppers, diced (optional)


    • Pinch

      salt & pepper to taste


    • 1 tablespoon

      Kosher salt


    • 1/2 cup

      white wine


    • 1 tablespoon

      grated parmesan or pecorino, vegan or dairy (optional)

    Directions
    1. Bring a large pot of water to a rolling boil. Add a tablespoon of Kosher salt to the boiling water.
    2. Add bucatini to the water, stirring occasionally. Cook the pasta until al dente, estimated time 12-15 minutes or more. Pick out a piece and taste to judge doneness.
    3. While pasta is cooking, prepare the mushrooms. First, trim off any bad spots on the mushrooms, then cut large pieces into bite-sized slices, leaving small pieces whole.
    4. In a large pan saute the mushrooms in olive oil (or butter), until just barely tender. Add the vegetable stock, and cook on medium heat until the liquid is gone. Add a little more liquid and continue to cook if the mushrooms are still tough.
    5. When the liquid is gone, add about 1/2 cup of white wine, and boil that off. Add salt and pepper to taste, plus any chopped herbs you fancy. Add chopped hot pepper if using.
    6. When pasta is done, reserve a cup of the hot pasta water, and drain the bucatini.
    7. Reheat the mushrooms, add the pasta water, and the pasta. Heat until all is well-coated and the texture of the pasta is tender enough, but not flabby.
    8. Top with cheese or vegan equivalent (optional).
    9. Serve with a Southern Italian red wine — Aglianico, Primitivo, or similar.

    Read More

  • Vegan Spaghetti

    Vegan Spaghetti

    recipe image

    Be the first to rate & review!

    This vegan spaghetti packs plenty of fresh herbs and veggies into your dinner. Whole-wheat spaghetti, combined with zucchini noodles, is coated in a tomato-based sauce that clings to the pasta, thanks to the thickening power of vegan butter.

    Updated on September 20, 2023

    Photo:

    Photographer: Victor Protasio, Food Stylist: Karen Rankin


    Cook Mode
    (Keep screen awake)

    Ingredients

    • 8 ounces whole-wheat spaghetti

    • 3 tablespoons extra-virgin olive oil, divided

    • 2 tablespoons thinly sliced garlic

    • teaspoon crushed red pepper

    • 2 (14.5 ounce) cans diced tomatoes, undrained

    • ½ cup chopped fresh basil, plus more for garnish

    • ½ cup chopped fresh flat-leaf parsley, plus more for garnish

    • ¾ teaspoon salt

    • ¼ teaspoon ground pepper

    • 3 cups sliced fresh cremini mushrooms

    • 1 (10-ounce) package fresh zucchini noodles (see Tip)

    • 1 (5 ounce) package fresh baby spinach

    • 2 tablespoons unsalted vegan butter (such as Miyoko’s)

    Directions

    1. Bring a large Dutch oven filled with water to a boil over high heat. Add pasta and cook according to package directions; drain.

    2. Heat 1 tablespoon oil in the Dutch oven over medium-low heat. Add garlic and crushed red pepper; cook, stirring constantly, until softened and fragrant but not browned, 30 seconds to 1 minute. Add tomatoes; mash to a coarse consistency using a potato masher. Bring the mixture to a simmer over medium heat. Simmer, uncovered, stirring and mashing occasionally, until the liquid has reduced and the sauce is slightly thickened, about 20 minutes. Stir in basil, parsley, salt and pepper. Remove from heat.

      Photographer: Victor Protasio, Food Stylist: Karen Rankin


    3. Heat the remaining 2 tablespoons oil in a large skillet over medium-high heat. Add mushrooms; cook, stirring occasionally, until the mushrooms are golden brown and all the liquid has evaporated, 8 to 10 minutes. Add zucchini noodles; cook, stirring gently and occasionally, until just tender, 2 to 3 minutes. Add spinach; cook, stirring occasionally, until just wilted, about 1 minute.

      Photographer: Victor Protasio, Food Stylist: Karen Rankin


    4. Add the pasta, the mushroom mixture and butter to the tomato sauce, stirring gently until the butter melts and the sauce coats the pasta and vegetables. Divide among 4 plates or shallow bowls. Garnish with additional basil and parsley, if desired.

      Photographer: Victor Protasio, Food Stylist: Karen Rankin


    To make ahead

    Prepare through Step 2; refrigerate pasta and tomato sauce in separate airtight containers for up to 3 days. Warm the sauce over medium-low heat before proceeding with Steps 3 and 4.

    Tip

    Look for a package of fresh zucchini noodles or spirals in the produce department, or make your own zucchini noodles.

    Originally appeared: EatingWell.com, September 2022

    Nutrition Facts (per serving)

    427 Calories
    17g Fat
    58g Carbs
    13g Protein
    Nutrition Facts
    Servings Per Recipe
    4
    Serving Size
    1 3/4 cups
    Calories
    427
    % Daily Value *
    Total Carbohydrate
    58g
    21%
    Dietary Fiber
    9g
    32%
    Total Sugars
    10g
    Protein
    13g
    26%
    Total Fat
    17g
    22%
    Saturated Fat
    6g
    30%
    Vitamin A
    3992IU
    80%
    Vitamin C
    54mg
    60%
    Vitamin D
    2IU
    1%
    Vitamin E
    2mg
    13%
    Folate
    71mcg
    18%
    Vitamin K
    316mcg
    263%
    Sodium
    953mg
    41%
    Calcium
    128mg
    10%
    Iron
    5mg
    28%
    Magnesium
    111mg
    26%
    Potassium
    790mg
    17%
    Zinc
    3mg
    27%

    Nutrition information is calculated by a registered dietitian using an ingredient database but should be considered an estimate.

    * Daily Values (DVs) are the recommended amounts of nutrients to consume each day. Percent Daily Value (%DV) found on nutrition labels tells you how much a serving of a particular food or recipe contributes to each of those total recommended amounts. Per the Food and Drug Administration (FDA), the daily value is based on a standard 2,000 calorie diet. Depending on your calorie needs or if you have a health condition, you may need more or less of particular nutrients. (For example, it’s recommended that people following a heart-healthy diet eat less sodium on a daily basis compared to those following a standard diet.)

    (-) Information is not currently available for this nutrient. If you are following a special diet for medical reasons, be sure to consult with your primary care provider or a registered dietitian to better understand your personal nutrition needs.

    Read More

  • Vegan Sugar Cookies

    Vegan Sugar Cookies

    recipe image

    vegan sugar cookies iced and topped with sprinkles

    pinterest

    PHOTO: LUCY SCHAEFFER PHOTOGRAPHY; FOOD STYLING: ERIKA JOYCE

    If Santa were vegan, he’d want you to leave these cookies out for him. Soft, buttery, with crispy edges, these are the classic, quintessential sugar cookie, veganized and ready to bring to any of your holiday gatherings. Whether frosted, sprinkled, or eaten plain right out of the oven, we can’t get enough of them.

    These cookies are pretty straightforward, but if you’re not used to baking without eggs and butter, you might have some questions. We’ve got the answers!

    What vegan butter should I use?

    I tested with both Miyoko’s Vegan Butter and Earth Balance Vegan Buttery Sticks. Both work, but try to get Earth Balance if you can. It’s easier to bake with and the cookies had a slightly better texture. Whatever butter you use, don’t skip the almond extract. It gives these cookies a little something special that’s perfect for the holidays.

    How do I roll out the dough?

    Make sure your dough is properly chilled before rolling. If the dough isn’t chilled, the cookies will be too hard to roll out and will spread while baking and not hold their shapes. A little trick I like to use is to roll the dough between two sheets of parchment before putting in the refrigerator to chill. When rolling out, try not to go too thin! Between 1/4″ and 1/8″ thickness is perfect. If you go too thin, you’ll end up with crunchier cookies that might get too toasty with our cooking times. 

    And now the best part: the decorating!

    Using corn syrup in the icing makes it shiny and pretty. If you aren’t comfortable using it, you can omit it. Just be sure to add a bit more milk or even water to get the right consistency. Want decorating ideas? Check out our leg lamp cookies, our swirl Christmas tree cookies, or our Santa cookies.

    What about food coloring and sprinkles?

    Not all food colorings and sprinkles are vegan, though there are many available now. Be sure to read the ingredients before buying. If you don’t want to use food coloring, just go with a classic white frosting. If you can’t find vegan sprinkles, use organic coarse sugar, coconut flakes, cocoa nibs, or seeds (such as chia, hemp, or flax) instead.

    Made these? Let us know how it went in the comments below!

    Advertisement – Continue Reading Below

    Cookies

    • 2 1/2

      (320 g.) all-purpose flour, plus more for surface

    • 1 Tbsp.

      cornstarch

    • 1 tsp.

      baking powder

    • 3/4 tsp.

      kosher salt

    • 1 c.

      (2 sticks) vegan butter, slightly softened

    • 1 c.

      (200 g.) vegan granulated sugar

    • 2 Tbsp.

      non-dairy milk

    • 1 tsp.

      pure vanilla extract

    • 1 tsp.

      almond extract

    Icing

    • 3 c.

      (or more) vegan powdered sugar

    • 3 Tbsp.

      (or more) non-dairy milk

    • 1 Tbsp.

      light corn syrup (optional)

    • 1/2 tsp.

      pure vanilla extract

    • Cookies

      1. Step 1In a large bowl, whisk flour, cornstarch, baking powder, and salt. 
      2. Step 2In the large bowl of a stand mixer fitted with the paddle attachment (or in another large bowl, using an electric mixer), beat granulated sugar and butter on medium speed until pale and fluffy, 2 to 4 minutes. Add milk, vanilla, and almond extract and beat until combined. With mixer on low speed, gradually add dry ingredients and beat, using your hands if needed to push together, until just combined; do not overmix.
      3. Step 3Divide dough in half and form into 2 discs. Wrap each in plastic wrap and chill until firm, 2 to 3 hours. (Alternatively, divide dough in half and roll each half between 2 pieces of parchment to 1/4″ thick. Chill until firm.)
      4. Step 4Preheat oven to 350°. Line 2 large baking sheets with parchment. On a lightly floured surface, roll one disc to 1/4″ thick. (Alternatively, peel off top sheet of parchment from dough.) Cut out desired shapes with a cookie cutter and arrange on prepared sheets.
      5. Step 5Bake cookies until slightly puffed and set, 8 to 10 minutes, depending on size of cookie. Let cool on baking sheets 5 minutes, then transfer to a wire rack and cool completely.
    • Icing

      1. Step 1In a medium bowl, whisk powdered sugar, milk, corn syrup, if using, and vanilla until smooth, glossy, and not runny. If icing seems too thick, add a little more milk; if it seems too runny, add more powdered sugar.
      2. Step 2Frost and decorate cookies as desired.

    vegan sugar cookies iced and topped with sprinklespinterest

    PHOTO: LUCY SCHAEFFER PHOTOGRAPHY; FOOD STYLING: ERIKA JOYCE

    Read More

  • step 1

    Put the cashews in a large heatproof bowl and cover with boiling water from the kettle. Leave to soften for 1 hr.

  • step 2

    Heat the oven to 200C/180C fan/gas 6. Line the base of a 20cm (4cm deep) round cake tin with baking parchment. To make the base, put the oats, sugar and a pinch of salt in a food processor and blitz to a fine powder. Pulse in the coconut oil until combined, then gradually pulse in 3-4 tbsp water until it comes together into a dough – it should be crumbly, not sticky.

  • step 3

    Press the dough into the base and up the side of the tin using the back of a spoon. Bake for 20-25 mins until golden. Leave to cool.

  • step 4

    Reduce the oven to 180C/160C fan/gas 4. Drain the cashews, then transfer to a blender along with the coconut cream, soft cheese, cornflour, vanilla, maple syrup, coconut oil, lemon juice and a pinch of salt. Blitz on high speed until the mixture is creamy and smooth.

  • step 5

    Pour the cashew and soft cheese mixture over the base and bake for 1 hr-1 hr 15 mins until the edge is just coloured and the centre has mostly set with just a slight wobble. Leave to cool completely (it will sink slightly as it cools), then chill for at least 3 hrs, or overnight.

  • step 6

    Put the raspberries and sugar in a heatproof bowl and microwave for 1 min 30 seconds on high. Stir and leave to cool completely, then pour this over the cheesecake. Scatter over the pistachios and candied clementine peel. Will keep chilled for up to three days.

Read More