Vanilla bean sugar cookie dough and chocolate sugar cookie dough marbled together and cut into hearts —Brittany
Ingredients
Vanilla Bean Sugar Cookie
1/2 cup
vegan butter
1/2 cup
granulated sugar
1/2 tablespoon
cornstarch
1 tablespoon
water
1/2 piece
vanilla bean
1 teaspoon
baking powder
1 1/2 cups
all-purpose flour
Chocolate Sugar Cookie
1/4 cup
vegan butter
1/4 cup
brown sugar
1 1/2 tablespoons
orange juice
1/2 teaspoon
baking powder
1 pinch
salt
1/2 cup
all-purpose flour
3 tablespoons
all-purpose flour
2 tablespoons
cocoa powder
Directions
For the vanilla bean cookie dough – Cream together the butter, sugar, and vanilla bean until light and fluffy (about 5-7 minutes).
Combine cornstarch and water and add to the butter mixture. Mix well.
Sift together the flour and baking powder, then add to the butter mixture. Mix until the dough comes together in big chunks, then wrap in plastic and chill for 30 minutes.
For the chocolate cookie dough – Cream together the butter and sugar until light and fluffy (about 5-7 minutes).
Sift together the flour, cocoa powder, baking powder, and salt and add to the butter mixture. Mix well, then add the orange juice and mix until creamy (about 1 minute). Wrap in plastic and chill for 30 minutes.
Preheat the oven to 350ºF.
Unwrap both cookie doughs. Break the cookie doughs into chunks, then reassemble the doughs together alternating chocolate and vanilla.
On a lightly floured surface, roll the cookie dough out to about 1/2″ thick, then use a heart-shaped cookie cutter to cut out the cookies. Continue patting the dough back together, rolling out, and cutting out cookies until all the dough is used up. Arrange on a parchment-lined baking sheet and place in the freezer for 10 minutes.
Bake 13-15 minutes until the cookies are set and lightly browned along the edges.
It’s citrus season and my family’s various small trees are filled with lots of ripe fruit. I’m also challenging myself to create some of my favorite cookies vegan & celiac friendly and why not start with my favorite —shortbread. These cookies are small, crispy & light, yet they pack a big punch of fresh lemony flavor from plenty of meyer lemon zest and smothered in a tart glaze jeweled with poppyseeds. —jonajim
Ingredients
shortbread
1 2/3 cups
gluten-free flour blend (267g)
1/3 cup
almond flour (40g)
1/3 cup
cornstarch (45g)
1/2 teaspoon
sea salt
1 cup
vegan butter, softened (225g)
1/2 cup
cane sugar (100g)
2
meyer lemons (or lemon + orange)
1/2 teaspoon
vanilla extract (2.5mL)
1/2 teaspoon
pure lemon extract, optional (2.5mL)
glaze
3/4 cup
powdered sugar (75g)
1 1/2 tablespoons
meyer lemon juice (22mL)
1 tablespoon
poppyseeds
1 tablespoon
vegan butter, melted (14g)
Directions
Add flour, cornstarch, almond flour and salt to a medium bowl, and whisk to combine. Set aside.
Combine butter and granulated sugar in the bowl of a stand mixer fitted with the paddle attachment. Zest 1 1/2 lemons into the bowl, reserving the remaining 1/2 of un-zested lemon for the glaze. Cream the butter, sugar and zest on medium-high speed until light and fluffy, 2 to 3 minutes. Add vanilla and lemon extracts and beat on medium speed until well combined, scraping the bowl as needed.
Add the flour mixture to the creamed butter and beat on low speed until combined. Scrape the bowl and fold a few times to make sure everything is well combined. Wrap dough in plastic wrap, flatten into a disk, and chill until firm, at least 1 hour, and up to 3 days.
Place oven racks in lower-middle & upper-middle of oven, then preheat to 350 degrees. On a flour-dusted parchment paper (especially helpful for dough in warmer environments), roll shortbread 1/4” thin. Don’t worry about using a lot of flour, you can dust off excess later after they’re chilled. Cut out cookies with a 2” round cutter and knead together the scraps to make a few more. Chill the cookies on a baking sheet in the freezer until very firm, at least 10 minutes. Dust off the excess flour if needed.
Bake until cookies just start to turn light-golden on the edges and golden underneath (about 18 to 22 min.) switching the baking sheets from front to back and top to bottom halfway through baking time. Make the glaze while the cookies bake, zesting 1/2 of reserved lemon into a small bowl and combining remaining ingredients with a whisk until smooth.
Let the cookies cool for a few minutes on the baking sheets, and transfer to a wire rack set over a parchment or silicone mat on a baking sheet. Pick up a cookie and using the back of a small spoon, spread a generous teaspoon of glaze on a cookie, letting any excess drip onto the next cookie. Repeat until all the cookies are glazed. Cool completely and let the glaze set. Cookies will keep in an airtight container at room temperature for up to 1 week. Enjoy!
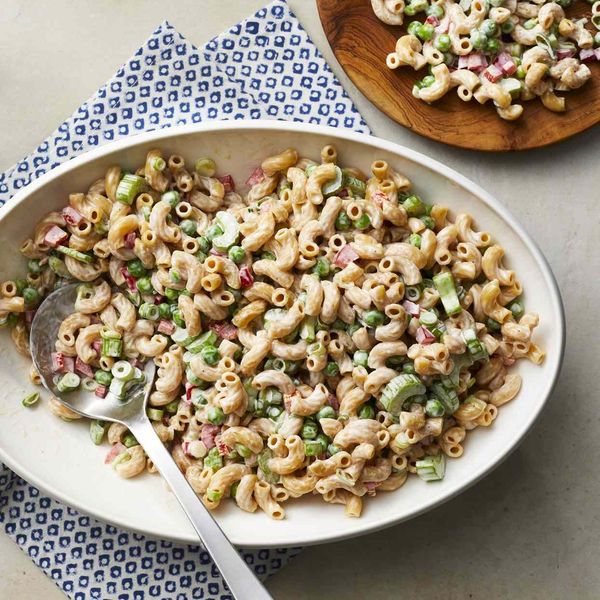
You don’t have to be vegan to enjoy this vegan macaroni salad! The colorful array of veggies give it texture and flavor and help make it lighter than traditional pasta salads. It’s perfect to bring along to your next picnic or potluck.
Cook pasta according to package directions. Drain; rinse with cold water and drain well. Transfer to a large bowl. Add peas, celery, bell pepper and scallions; toss gently to combine.
Combine mayonnaise, lemon zest, lemon juice, salt and pepper in a small bowl. Add the dressing to the pasta mixture; gently stir until thoroughly combined. Serve immediately or cover and refrigerate until ready to serve.
Tips
To make ahead: Refrigerate in an airtight container for up to 3 days.
Originally appeared: EatingWell.com, February 2020
Nutrition Facts (per serving)
185
Calories
10g
Fat
20g
Carbs
5g
Protein
Nutrition Facts
Servings Per Recipe 8
Serving Size 1/2 cup
Calories 185
% Daily Value *
Total Carbohydrate
20g
7%
Dietary Fiber
3g
12%
Total Sugars
2g
Protein
5g
9%
Total Fat
10g
13%
Saturated Fat
1g
6%
Vitamin A
908IU
18%
Vitamin C
19mg
22%
Folate
37mcg
9%
Sodium
338mg
15%
Calcium
23mg
2%
Iron
1mg
7%
Magnesium
38mg
9%
Potassium
150mg
3%
Nutrition information is calculated by a registered dietitian using an ingredient database but should be considered an estimate.
* Daily Values (DVs) are the recommended amounts of nutrients to consume each day. Percent Daily Value (%DV) found on nutrition labels tells you how much a serving of a particular food or recipe contributes to each of those total recommended amounts. Per the Food and Drug Administration (FDA), the daily value is based on a standard 2,000 calorie diet. Depending on your calorie needs or if you have a health condition, you may need more or less of particular nutrients. (For example, it’s recommended that people following a heart-healthy diet eat less sodium on a daily basis compared to those following a standard diet.)
(-) Information is not currently available for this nutrient. If you are following a special diet for medical reasons, be sure to consult with your primary care provider or a registered dietitian to better understand your personal nutrition needs.
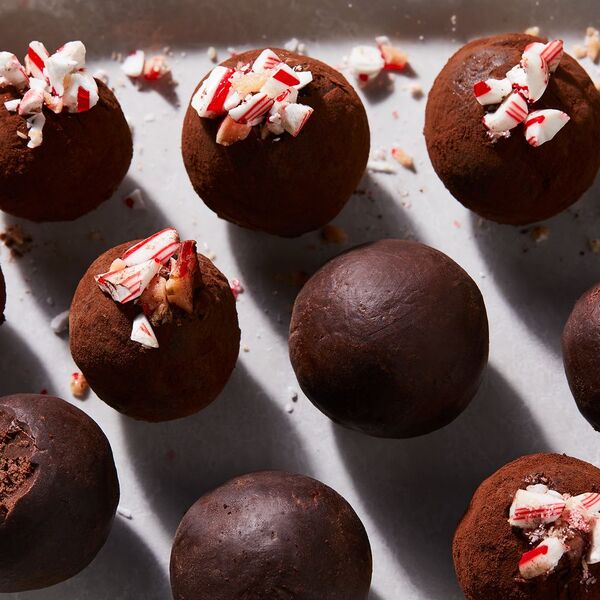
These truffles—a holiday favorite of mine, especially for gifting—are a riff on the Minimalist Baker’s brilliant, “2-Ingredient Dark Chocolate Truffles.” They come together in three ingredients (we don’t count salt, assuming you already have it), and are deeply chocolatey, with a lively pop of peppermint. If you want, you can toss them in cocoa powder, and sprinkle with crushed peppermint candy. Oh, and did I mention that they’re vegan? —Ella Quittner
Test Kitchen-Approved
Ingredients
7 tablespoons
plus 1 teaspoon full-fat coconut milk, stirred well
9 ounces
vegan dark chocolate, very, very finely chopped
1/2 teaspoon
peppermint extract
1
pinch kosher salt
1/3 cup
Dutch-processed cocoa powder, for garnish (optional)
1/3 cup
crushed peppermint candies, for garnish (optional)
Directions
In a medium saucepan, heat the coconut milk over a medium-low flame until it’s just beginning to simmer around the edges. Turn off the heat, and add the finely chopped chocolate. Stir to combine. There should be enough residual heat to fully melt the chocolate as you stir, but if you need to, turn the flame back on very low for just a minute or so to get everything smooth, creamy, and fully combined—but it shouldn’t become hot to the touch.
Once the chocolate is melted and the mixture is smooth and glossy, transfer to a medium bowl, and add the peppermint extract and a pinch of salt. Stir to combine, then set uncovered in the fridge for 2 to 3 hours, until just fully solidified, but still pliable. (There should be no puddle of melted chocolate in the center, as Minimalist Baker notes.)
Grab a tablespoon (or a tablespoon-sized scoop). Scoop out a heaping tablespoon of the chocolate, and use your hands to gently roll it into a round ball. Set aside on a parchment-lined dish. Repeat until you’ve scooped and shaped all of the balls. You should get about 16 truffles.
If you’d like to decorate them, set the cocoa powder on a large plate, and roll the truffles around in it until they’re coated. Press a small pinch of the crushed peppermint candy into the top of each one.
Enjoy truffles immediately, or store covered in the fridge for up to 1 week. To serve, let them come to room temperature for maximum smooth creaminess.
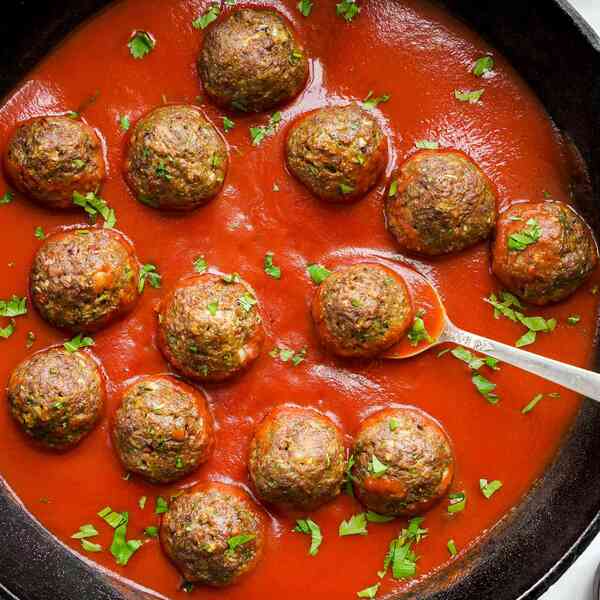
These vegan meatballs are crispy on the outside and tender on the inside. They pack in lots of classic Italian flavor and take just 10 minutes to bake. Serve as an appetizer, over pasta, and more.
Published February 18, 2023
Simply Recipes / Tara Omidvar
We grew up on meatballs. It’s one of many classic Italian meals we vividly remember making throughout our childhood. It’s no surprise that meatballs are heavily intertwined with our most wholesome memories: cooking with our mom, hosting pasta parties for our high school soccer team, and enjoying the coveted meatballs in our grandma’s “Christmas soup” every year for the holidays.
It’s safe to say that 20 percent of our childhood was spent standing over the kitchen table rolling meatballs into perfect balls. They are near and dear to our hearts. To this day—with all the recipes we make and develop—our dad’s favorite meal is still spaghetti and meatballs.
These vegan meatballs are juicy, tender, cheesy, garlicky, and packed with flavor. The smell of them baking in the oven carries the promise of a comforting Italian meal on its way. There’s truly nothing better. So put on Frank Sinatra and start rolling! You’re guaranteed to have a good time and an enjoyable meal.
What Makes These Meatballs Vegan?
There are 3 main things that make these meatballs vegan. Impossible Foods plant-based meat instead of ground beef, a flaxseed “egg” as a binding agent, and nutritional yeast and vegan Parmesan instead of dairy cheese.
Simply Recipes / Tara Omidvar
Tips for Making The Best Vegan Meatballs
Use your hands to combine all the ingredients. This prevents overmixing and creates a juicy, more tender meatball.
When rolling out the meatballs, wet your hands so the mixture doesn’t stick to you. Keep a glass of water nearby to dip your fingers in as needed.
Chop your garlic and onion very finely so they are easy to incorporate into the meatball mixture.
Ways To Serve Vegan Meatballs
Spaghetti & Meatballs: You know the drill. After baking, drop the meatballs into simmering tomato sauce and serve atop spaghetti.
Italian Wedding Soup: Swap these vegan meatballs for the traditional beef and pork meatballs in this recipe, cooking them in the broth as instructed.
Cheesy Meatball Appetizer: Place cooked meatballs in a baking dish lined with tomato sauce. Top with mozzarella cheese (vegan if desired) and broil until it melts. Serve with toothpicks for bite-sized apps.
Meatball Sub: Meatballs, sauce, and shredded cheese on a garlic and olive oil brushed roll is the ultimate Italian comfort food.
Greek Meatballs: Give these meatballs a Mediterranean flavor by substituting fresh dill for the parsley.
Simply Recipes / Tara Omidvar
Vegan Comfort Food Classics
Vegan Biscuits
Vegan Chocolate Chip Cookies
Vegan Mashed Potatoes
Vegan Sloppy Joes
Vegan Patty Melt
You can substitute Beyond Meat for Impossible. Just note that the package might be a different weight.
If you don’t have vegan Parmesan, you can use extra nutritional yeast in its place.
If you don’t have ground flax seed, soak your breadcrumbs in plant milk to replicate the binding agent. Use 1 tablespoon of unsweetened plant milk for 2 tablespoons of breadcrumbs. The texture of the meatballs will be softer.
Cook Mode (Keep screen awake)
1tablespoonground flax meal
2tablespoonswater
2cloves garlic, finely minced or grated
1/4cup finely diced white onion
2 tablespoons finely chopped fresh parsley, or 2teaspoonsdried parsley
2tablespoonsbreadcrumbs, plain or Italian
2tablespoonsnutritional yeast
1tablespoon freshly grated vegan Parmesan
1teaspoondried oregano
1/2teaspoonfennel seeds, optional
1/2teaspoononion powder
1/2teaspoon freshly ground black pepper
1/4teaspoonsalt
1/4teaspoonchili flakes
1 (12–ounce) package Impossible Foods ground beef
Make the flax egg:
Whisk together the ground flax meal and water in a small bowl. Set aside for 10 minutes.
Simply Recipes / Tara Omidvar
Make the meatball mixture:
Meanwhile, add the garlic, onion, parsley, breadcrumbs, nutritional yeast, vegan Parmesan, oregano, fennel seeds (if using), onion powder, black pepper, salt, and chili flakes to a medium-sized mixing bowl. Whisk to combine.
Add the flax egg and Impossible meat. Use clean hands to mix just until combined.
Simply Recipes / Tara Omidvar
Simply Recipes / Tara Omidvar
Simply Recipes / Tara Omidvar
Form the meatballs:
Line a baking sheet with parchment paper. Set aside a small bowl or glass of water.
Using a cookie scoop or rounded tablespoon to measure, gently roll 1-inch balls and place them on the baking sheet. Dip your fingers in the water to make it easier to form your meatballs. You should have 12 to 16 meatballs.
Simply Recipes / Tara Omidvar
Simply Recipes / Tara Omidvar
Refrigerate and preheat the oven:
Refrigerate the meatballs for 30 minutes. This helps them keep their shape and provides a juicier, more tender texture.
Preheat the oven to 425°F.
Bake:
Bake the meatballs until browned, 10 to 14 minutes. To check for doneness, cut one in half. It should be largely cooked through, although a very small amount of pinkness at the center is okay. Enjoy immediately.
Tip
If you are serving the meatballs with a sauce, at this point you can drop the meatballs into the sauce and simmer them for a few minutes.
Store leftover meatballs in the refrigerator for up to 4 days or in the freezer for 2 months. To reheat, drop them into simmering sauce or broth and cook until warmed through.
Love the recipe? Leave us stars below!
Simply Recipes / Tara Omidvar
Simply Recipes / Tara Omidvar
Nutrition Facts (per serving)
273
Calories
16g
Fat
7g
Carbs
26g
Protein
×
Nutrition Facts
Servings: 3
to 4
Amount per serving
Calories
273
% Daily Value*
16g
20%
Saturated Fat 6g
31%
75mg
25%
228mg
10%
7g
3%
Dietary Fiber 2g
8%
Total Sugars 1g
26g
Vitamin C 2mg
9%
Calcium 53mg
4%
Iron 3mg
14%
Potassium 340mg
7%
*The % Daily Value (DV) tells you how much a nutrient in a food serving contributes to a daily diet. 2,000 calories a day is used for general nutrition advice.
Nutrition information is calculated using an ingredient database and should be considered an estimate. In cases where multiple ingredient alternatives are given, the first listed is calculated for nutrition. Garnishes and optional ingredients are not included.
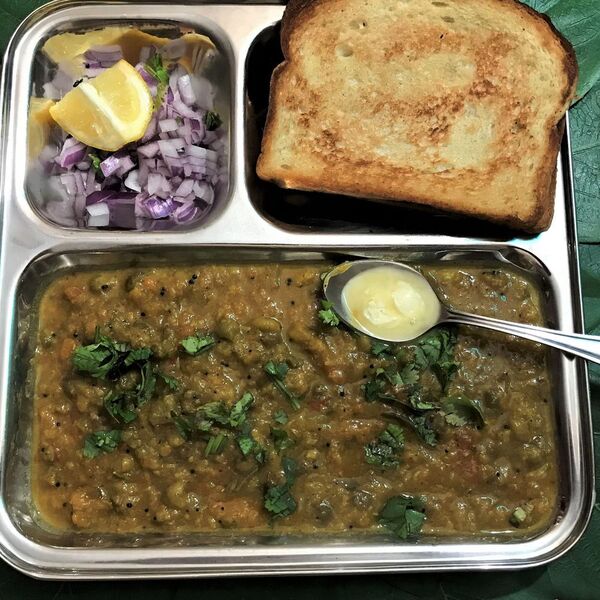
One dish branded and loaded with the taste of butter. Sold under the name of “Amul Butter”. My mothers recipe, the best pav-bhaji I ever had and loved , changed to satify my son’s allergies. —Nimisha Chawak
Ingredients
1 cup
cut caulifower
1 cup
cut capsicum
1 cup
cut french beans
1 cup
cut potato
1/2 cup
Green peas
2
Onions Finely chopped
3
Tomatoes Finely chopped
1 tablespoon
ginger garlic paste
1 teaspoon
turmeric powder
1 teaspoon
red chilli powder
2 teaspoons
Pav bhaji masala
1 tablespoon
Vegetable Oil
1/4 teaspoon
Asafoetida powder
salt to taste
Vegan Butter – I use EarthBalance , you can use one that suites you.
Directions
In a pan or insta pot saute mode add oil and het it up. Add Asafoetida .
Add cut onions and saute till the onions are translucent.
Add ginger-garlic paste and saute for a minute or 2.
Add cut tomatoes. Add a pinch of salt and saute till tomatoes are nice and mushy.
Add turmeric powder , red chilli powder , pav bhaji masala and adjust salt to taste. Mix well. Saute for another couple of minutes.
Insta Pot Method –
Add all the cut vegetables . Mix well.
Add 2 cups water and mix well.
Close the lid . Vent closing. Pressure cook for 20 minutes.
Let the steam release naturally.
Mix well. Put the saute mode on . Mash the vegetables using a potato masher. Saute for a couple of minute.
Garnish with cut cilantro and vegan butter of your choice.
Kadai Method.
Boil all the vegetables in a pressure cooker for 3 whistles. Once cooled doen , mash using a potato masher.
Add the mashed vegetables to the masal made above. Mix well.
Add water to adjust consistency.
Close the lid and cook for 10 minutes.
Garnish with cut cilantro and vegan butter of your choice.
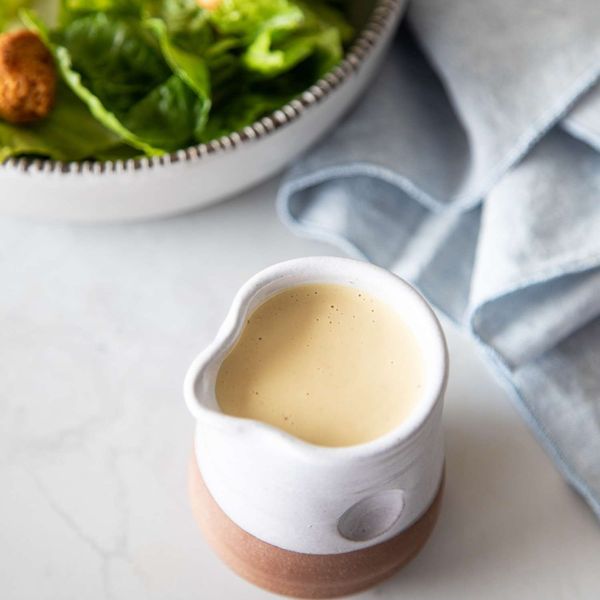
No salad is quite as satisfying as a Caesar salad, with its creamy texture and umami-packed, punchy flavor. But if you’re vegan or on a restricted diet, Caesar is probably the last salad dressing you reach for. Traditional recipes call for egg, anchovies, Parmesan cheese, and often Worcestershire sauce, none of which fit a vegan diet.
This dressing makes some clever swaps so you can enjoy the flavors of Caesar dressing without eggs, dairy, or fish. It’s satisfyingly creamy, cheesy, garlicky, and tart. Regardless of whether you follow a vegan diet or not, you’ll enjoy it immensely.
Plus, it’s easy to make. All you’ll need are a few ingredients and a blender. You can adjust the thickness to suit your tastes and purposes—a bit thinner for tossing with greens, thicker for using as a dip or for slathering on sandwiches or wraps.
It’s quick, too. Peel some garlic, juice a lemon, blend it up with the remaining ingredients, and you’re done!
Lori Rice / Simply Recipes
What Makes This Dressing Vegan?
There’s no need to soak cashews or seek out hard-to-find ingredients to make this vegan dressing. It emulates the classic with basic ingredients that you’ll likely find in your local supermarket.
In traditional Caesar dressing, an egg-based emulsion creates the creaminess, much like in homemade mayonnaise. Here, the eggs are replaced with tahini, a naturally thick and creamy sesame seed paste. It adds a slightly nutty flavor to the dressing without overpowering it.
Nutritional yeast steps in effortlessly for Parmesan cheese, and soy sauce steps in for Worcestershire sauce, which contains anchovies. Or, if you can find it, use vegan Worcestershire.
A Little About Tahini
You’ll find tahini in most grocery stores, with a wider selection of brands at Middle Eastern markets. You can also order it online. When you look at the label, the sole ingredient should be sesame seeds.
Much like natural peanut butter, tahini tends to separate as it sits. Give a new jar a good stir, really incorporating the oil into the paste, and give it a quick stir before every use.
Also like peanut butter, when a liquid is added to tahini, it becomes thicker rather than thinner. This is because tahini is made up largely of carbohydrates, and when a little liquid is added, the molecules are drawn to it, making clumps. Enough liquid needs to be added to pass a threshold, causing the tahini to loosen up and thin out.
Keep adding warm water to the dressing a little at a time until you get the consistency you’re looking for. You’ll likely need to add a splash of warm water to leftover dressing, as it can thicken in the fridge. Luckily, it’s a very stable dressing that’ll stay creamy—you can add water at any point without breaking the emulsion.
Lori Rice / Simply Recipes
The Secret Ingredient: Nutritional Yeast
Nutritional yeast is a go-to ingredient in many vegan households. Even though I don’t eat vegan for every meal, I love the stuff and always have some stashed in my pantry. While it may look like fish food, the flakes are incredibly nutritious and they smell and taste very similar to Parmesan cheese.
In this recipe, nutritional yeast adds umami and cheesiness that is key to Caesar dressing. If you’re making a Caesar salad, I recommend sprinkling some on top before serving, too.
You can find nutritional yeast in a few different sections of the grocery store, either near the breadcrumbs and spices, in the health food section, or in a bulk bin.
Equally Delicious Variations
This dressing is easy to tweak to suit your tastes by adding more or less lemon or vinegar, more or less garlic, plus anything else you want to experiment with. Here are a few variations that are also incredibly delicious.
Roasted garlic: Swap the cloves of garlic for an entire head of roasted garlic. Squeeze out the roasted garlic into the blender. This is my favorite variation—it gives the dressing a slightly more mellow, rich garlic flavor.
Spicy: Add up to 1/2 teaspoon of red pepper flakes, a teaspoon of Calabrian chili paste, or several dashes of hot sauce to give the dressing a kick.
Capers: Add a spoonful of capers. It won’t be quite as creamy, but it’ll have a nice briny flavor.
Lori Rice / Simply Recipes
Ideas for Using Vegan Caesar Dressing
The obvious use for Caesar dressing is on a salad, but it certainly doesn’t end there. Use it as a dip for crudité or slather it on sandwiches and wraps. Replace the dressing or spread in these recipes with vegan Caesar dressing:
Caesar Salad
Kale Caesar Salad with Creamy Parmesan Dressing
Grape and Walnut Side Salad with Blue Cheese Dressing
Avocado Lettuce Tomato Sandwich (ALT)
Portobello Mushroom Burger
If the dressing is too thick for tossing a salad, adjust the consistency by adding a splash of water (about 1 tablespoon) and give it a really good stir to incorporate.
Cook Mode (Keep screen awake)
4 cloves garlic
1/2 cup tahini, stirred well
1/4 cup fresh lemon juice
3 tablespoons nutritional yeast
2 tablespoons red wine vinegar or caper brine
1 tablespoon extra virgin olive oil
2 teaspoons Dijon mustard
2 teaspoons soy sauce or vegan Worcestershire sauce
1 teaspoon agave or maple syrup
1/2 teaspoon kosher salt, plus more to taste
1/4 teaspoon freshly ground black pepper, plus more to taste
1/4 cup warm water, divided, plus more as needed
Combine the ingredients:
In a blender, add the garlic, tahini, lemon juice, nutritional yeast, vinegar or brine, olive oil, mustard, soy sauce or Worcestershire, agave or maple syrup, salt, black pepper, and 2 tablespoons warm water.
Lori Rice / Simply Recipes
Blend:
Secure the lid on and blend on medium-high speed until very smooth, about 2 minutes. Drizzle in the remaining 2 tablespoons warm water while blending, adding up to 2 additional tablespoons as needed to reach the desired consistency.
For dressing a salad, it should be thin enough that it easily drips off a spoon. For a dip or spread, it should be thick like sour cream.
Lori Rice / Simply Recipes
Lori Rice / Simply Recipes
Taste and serve:
Taste the dressing and add more salt and black pepper as needed.
Serve immediately or store in the fridge for up to 5 days. Before serving, give it a stir. If it is too thick upon chilling, stir in warm water, 1/2 teaspoon at a time, until the dressing loosens.
I do not recommend freezing this dressing—it tends to separate when defrosted.
Did you love this recipe? Give us some stars below!
Need a make-ahead dessert for your plant-based dinner party? This four-ingredient vegan chocolate mousse is just the thing. While most chocolate mousse recipes contain eggs and dairy, this vegan version relies on the magical powers of aquafaba, the viscous liquid from cooked chickpeas, to perform similar feats of levitation. Like egg whites, aquafaba whips up to a tall, fluffy white foam, making it the ideal base for this egg-free, dairy-free chocolate dessert. The resulting mousse has a lighter texture than chocolate pudding or ganache and the deep chocolate flavor of brownies. (As for those leftover chickpeas, put them to work in any of these recipes.)
Don’t swap the sweetener here: The scant quantity of sugar adds body to the aquafaba meringue. Also, be aware that not all dark chocolate is vegan—some brands contain milk powder or sugar refined with animal by-products. Seek out a certified vegan brand, like Hu, and opt for bars over chocolate chips, which often have stabilizers that could affect the texture of the finished mousse.
Topped with a crackly, sweet sesame brittle, this dessert is an impressive, yet easy recipe fit for any celebration. No time to make the brittle? Garnish with chocolate shavings, fresh raspberries, and coconut whipped cream.
All products featured on Epicurious are independently selected by our editors. However, when you buy something through our retail links, we may earn an affiliate commission.
Preparation
Step 1
Beat 1 cup strained aquafaba (from two 15-oz. cans chickpeas) and 1 tsp. fresh lemon juice in the bowl of a stand mixer fitted with the whisk attachment on medium-high speed until mixture begins to turn white and foamy, about 30 seconds. Add 1 Tbsp. sugar, increase speed to high, and beat until very stiff peaks form and mixture is quadrupled in volume (it should nearly reach top of bowl; don’t worry about overmixing), 8–10 minutes.
Step 2
Meanwhile, heat 10 oz. bittersweet vegan chocolate (60%–75% cacao), chopped, in a large heatproof bowl set over a large saucepan of barely simmering water (do not let bowl touch water), stirring occasionally with a heatproof rubber spatula, until mostly melted. Remove bowl from saucepan and stir until chocolate is completely melted and smooth and has cooled slightly, about 2 minutes.
Step 3
Working with 1 cup at a time, gently fold aquafaba meringue into melted chocolate until no streaks remain. (If mixture appears stiff after second or third addition, stir vigorously to loosen before continuing.) Divide mousse among four to six 8-oz. glasses. Cover and chill at least 3 hours and up to 12 hours.
Step 4
Meanwhile, toast ½ cup sesame seeds in a dry medium nonstick skillet over medium heat, stirring occasionally, until golden brown, about 5 minutes. Transfer to a small bowl and let cool. Wipe out skillet.
Step 5
Cook remaining ⅓ cup sugar in same skillet, stirring occasionally with a clean heatproof rubber spatula, until melted and deep amber in color, about 4 minutes. Immediately remove from heat and stir in sesame seeds and ½ tsp. Diamond Crystal or ¼ tsp. Morton kosher salt.
Step 6
Working quickly, scrape caramel mixture onto a parchment-lined baking sheet and spread out into a thin layer about ⅛” thick. Let cool, then break into large shards.
Step 7
When ready to serve, top mousse with brittle; sprinkle with flaky sea salt.
Do ahead: Brittle can be made 3 days ahead. Transfer to an airtight container and store at room temperature.
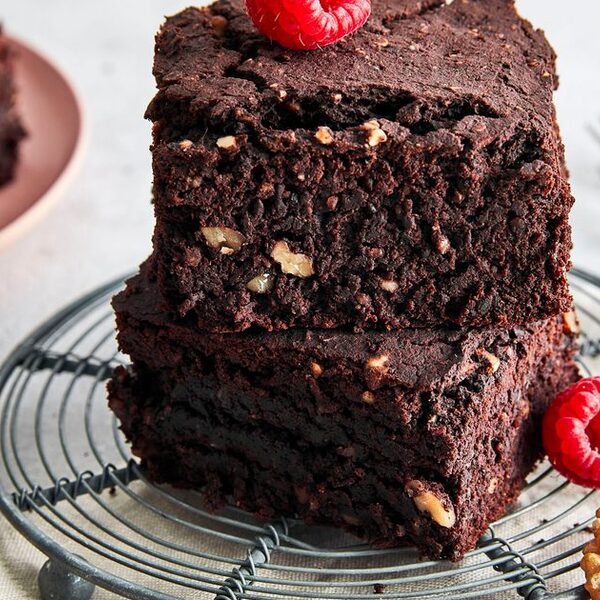
Drain the dates, reserving 1 tbsp of the liquid. Tip the oats into a food processor and blitz until finely chopped. Add the coconut oil, black beans, banana, cocoa powder, maple syrup, vanilla, bicarbonate of soda, baking powder, salt, and the drained dates. Pour in 1 tbsp of the date liquid. Blitz until smooth then stir in the walnuts and chocolate chips. Spoon into the tin and smooth out. Bake for 30-35 mins until set and leave to cool completely in the tin. Once cooled, leave overnight in the fridge to set (this makes them extra fudgy and easier to slice). Sift over some icing sugar to serve. Will keep chilled in an airtight container for up to three days.
We tell stories with our food. Some of those stories are simple, straightforward: I want to eat cake. And others might be a little more layered. Growing up, we rarely got to eat American food. But every birthday, my mom would head into the city and pick up a cake from a famous bakery, Lutz. I knew from the way my mom emphasized the word “Lutz” that there was something special, something rich about a “Lutz cake.” Untying the string around the glossy white box to unveil the dreamy strawberries and cream confection inside was a present all in itself. Once, my mom took me with her to the bakery, with its golden chandeliers. I pressed my nose right up against the glass display, dazzled by strawberries the size of my face. And it was then, as a little girl, that I realized that it wasn’t just about the cake. It was about a whole other world out there, with tinkling glass and amber lights, four pronged forks and English words rolling off tongues like silky fondant. That’s what my mother tried to bring home to me, every birthday, in a white paperboard box, tied up with a piece of string.
This is a vegan version of the storied strawberries and cream cake I used to eat on every birthday. —The Korean Vegan
Ingredients
Vanilla Cake
2 cups
plant milk
1 tablespoon
white wine vinegar
2 2/3 cups
flour
4 teaspoons
baking powder
1/2 teaspoon
baking soda
1/2 teaspoon
salt
1/3 cup
vegan butter
3/4 cup
sugar
2 tablespoons
vegan sour cream
1 tablespoon
vanilla extract
Whipped Cream Frosting
1 3/4 cups
aquafaba (chickpea brine)
1 cup
granulated sugar
1 1/2 teaspoons
agar agar
1 1/2 teaspoons
cream of tartar
1 cup
powdered sugar
1 tablespoon
vanilla extract
1 cup
strawberries, quartered
Directions
Vanilla Cake
For the cake: Preheat your oven to 350° F. Line two 7-inch round cake pans with parchment paper and spray them generously with cooking spray.
Add the white wine vinegar to the plant milk and set aside.
In a large bowl, add together the flour, baking powder, baking soda, and salt. Stir with a whisk to avoid any clumps.
Add the butter and sugar to the bowl of your stand mixer (you can also use a hand mixer). Using the whisk attachment, mix on high until the butter and sugar are completely incorporated (about 2 minutes).
Add the sour cream, the milk + vinegar mixture, and the vanilla extract to the butter and sugar. Mix on medium until combined (about 30 seconds).
Add the flour mixture to the wet ingredients in 3 batches, stirring on medium each time, until just incorporated (there will still be flour on the sides of the bowl).
Using a spatula, incorporate any residual flour into the batter.
Evenly divide the batter into your cake pans (I used a scale) and bake in a preheated oven for about 24 to 26 minutes, until an inserted toothpick comes out clean.
Whipped Cream Frosting
For the whipped cream frosting: Add the aquafaba, granulated sugar, and the agar agar to a small pot and bring it to a gentle boil for approximately 2 minutes, stirring constantly.
Remove the mixture from heat to allow it to cool to about lukewarm temperature (cool enough where you can touch it).
Add the mixture to your stand mixer and using the whisk attachment, mix on high until you achieve stiff peaks (about 7 to 8 minutes).
Add the cream of tartar, the powdered sugar, and vanilla extract. Mix on high until your frosting is stiff and glossy (about 3 to 5 minutes).
Frost the bottom layer and add half your quartered strawberries, pressing them into the frosting. Add more whipped cream frosting over the top of the strawberries, before placing the second layer.
Frost the second layer and top with remaining strawberries.


/e889d870-f3f3-4ea0-91f2-09798534a3b4--Screen_Shot_2018-02-23_at_3.07.26_PM.png)


/f114997f-f72e-427b-a56a-74b395bf66a9--C39F3708-A16F-4429-B7C8-ABF0B04CD842.jpeg)


/4f556a24-caab-40eb-bc42-a216bc77e13b--2018-1207_vegan-chocolate-peppermint-truffles_3x2_ty-mecham_001.jpeg)


/e05280f8-0293-477b-bd8e-76bf3d36b699--pav_bhaji.jpg)


/5358c983-fd50-45f8-bbf5-99b38f17d2b2--3O6A1409.jpg)